
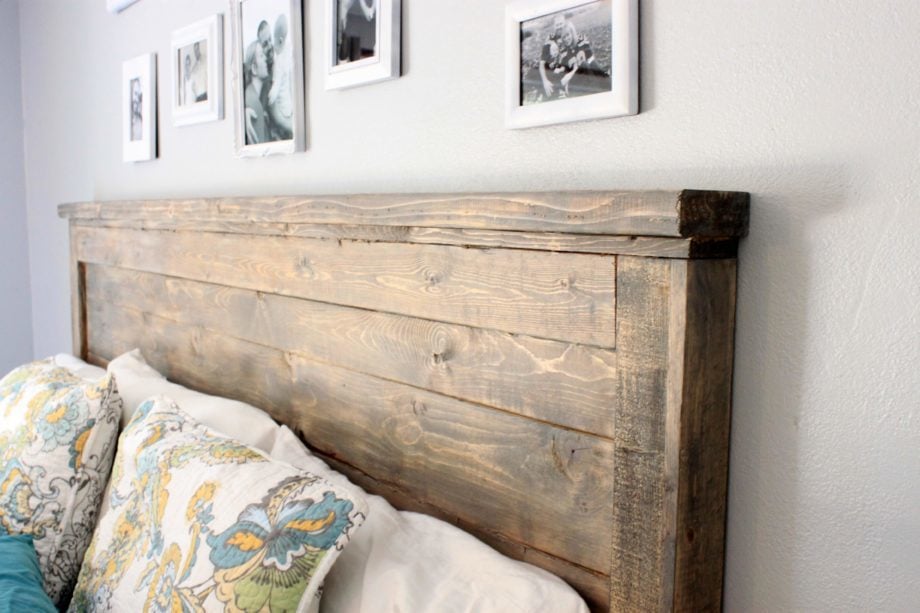

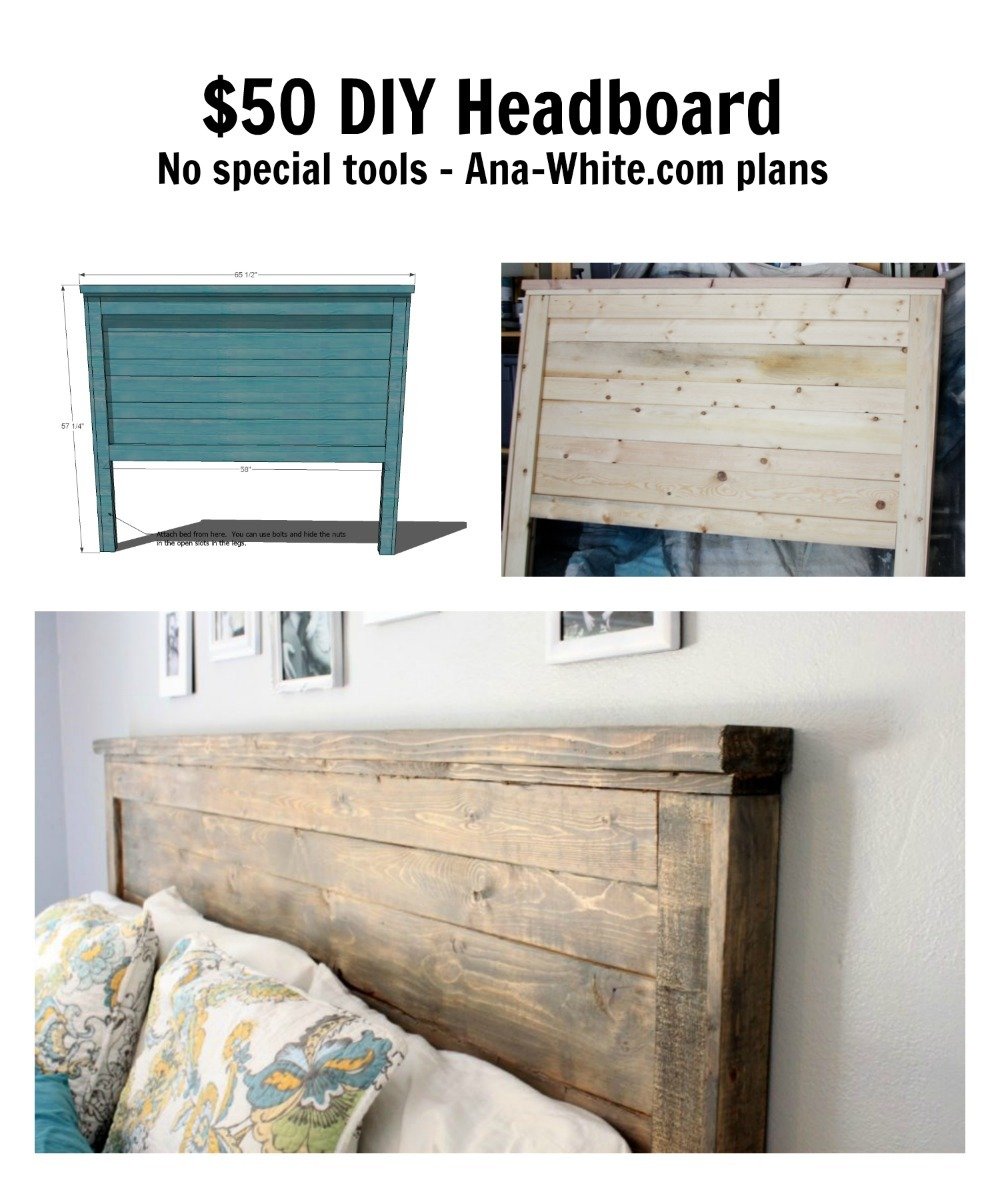
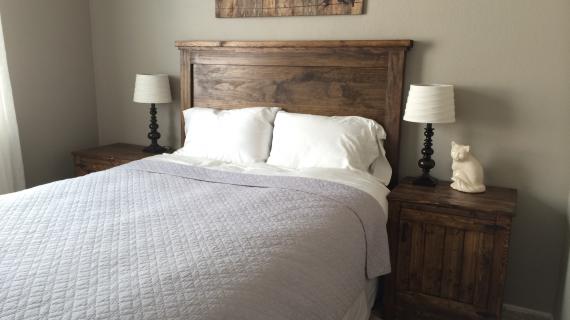
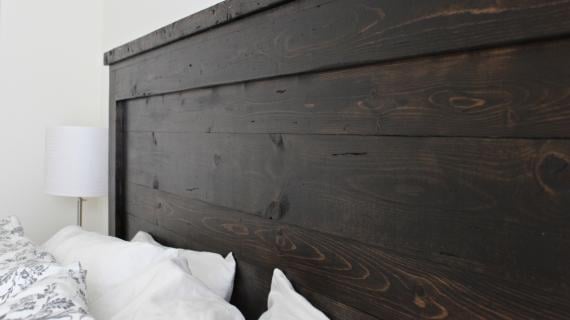
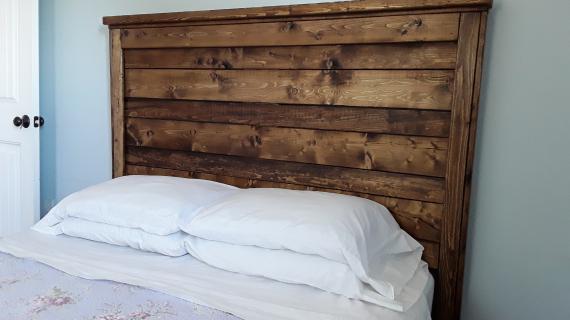
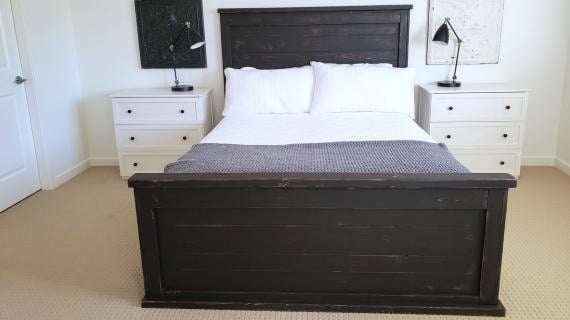
Easy DIY planked wood headboard build - no special tools required! This beautiful headboard gives that wood texture to your bedroom - without costing a fortune or being a huge project. You can use inexpensive pine boards or furring strips. Free step by step plans by ANA-WHITE.com
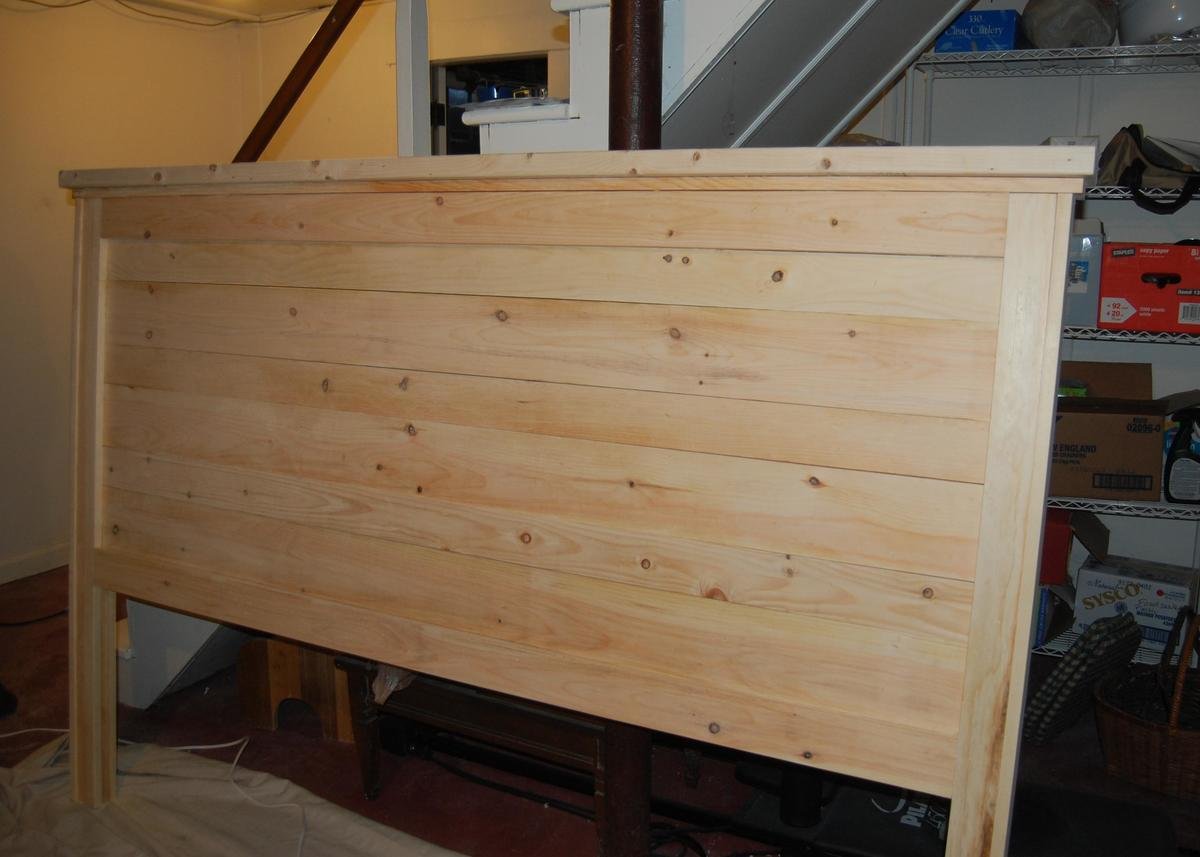
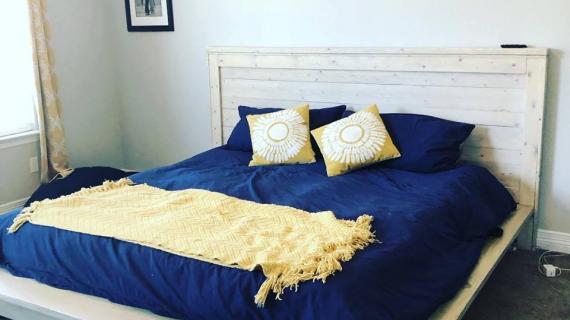
Photos submitted by Cynthia and Nicole.
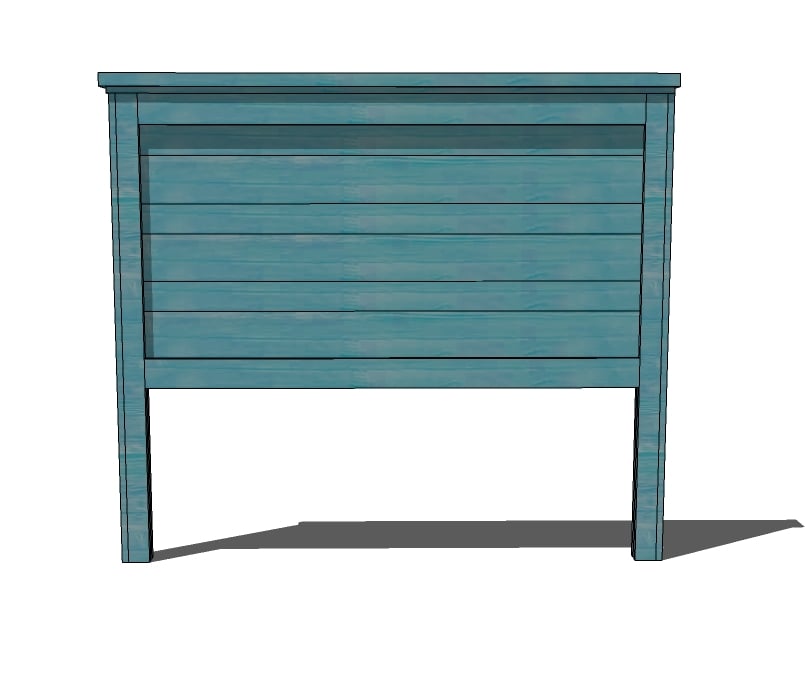
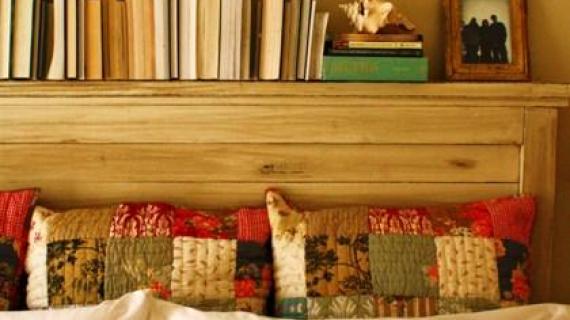
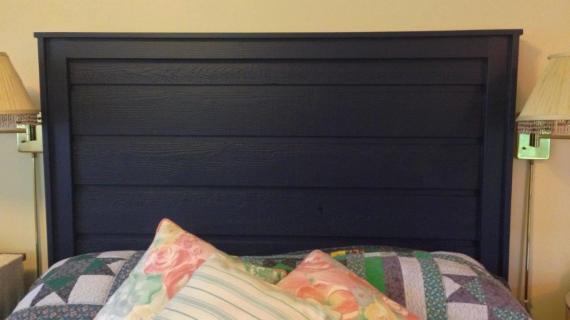
Simplicity and the beauty of soild wood come together in this headboard to transform a room. This project can be completed in just a few hours. Available in all standard bed sizes.
Easy to build, all you need is a saw and nails - you can even use a hammer and nails!
Most builders are spending about $50 making this beauty. Be sure to check out brag posts.
Free plans follow!
Pin For Later!

Preparation
Twin Lumber Shopping List
- 2 – 1×2 – 8′ Length
- 7 – 1×3 – 8′ Length
- 3 – 1×4 – 10′ Length
- 1 – 1×6 – 10′ Length
- 1 – 2×4 – 8′ or Stud Length
Full Shopping List
- 2 – 1×2 – 8′ Length
- 7 – 1×3 – 8′ Length
- 4 - 1×4 – 10′ Length
- 1 – 1×4 – 6′ Length
- 3 – 1×6 – 5′ Length
- 1 – 2×4 – 8′ or Stud Length
Queen Lumber Shopping List
- 2 – 1×2 – 8′ Length
- 7 – 1×3 – 8′ Length
- 4 - 1×4 – 10′ Length
- 1 – 1×4 – 6′ Length
- 3 – 1×6 – 5′ Length
- 1 – 2×4 – 8′ or Stud Length
Standard King Shopping List
- 2 – 1×2 – 8′ Length
- 7 – 1×3 – 8′ Length
- 9 - 1×4 – 8′ Length
- 3 - 1×6 – 8′ Length
- 1 – 2×4 – 8′ or Stud Length
California King Lumber for California King
- 2 – 1×2 – 8′ Length
- 7 – 1×3 – 8′ Length
- 5 - 1×4 – 12′ Length
- 4 - 1×6 – 6′ Length
- 1 – 2×4 – 8′ or Stud Length
Cut List for Twin
- 6 - 1×3 @ 55″ (Fronts and backs of Legs)
- 2 – 1×2 @ 55″ (Inside of Legs)
- 5 – 1×4 @ 39″ (Panel Pieces)
- 3 – 1×6 @ 39″ (Panel Pieces)
- 4 – 1×4 @ 37″ (Panel Trim, Front and Back)
- 1 – 1×3 @ 43 1/2″ (Top Trim)
- 1 – 2×4 @ 44 1/2″ (Top of Headboard)
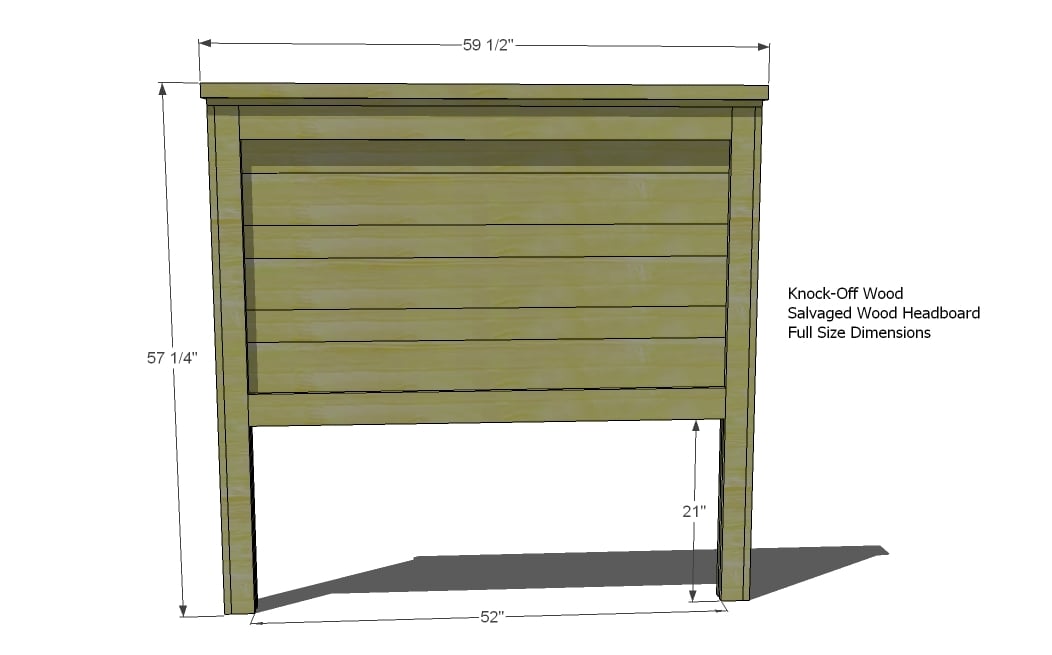
Cut List for Full
- 6 - 1×3 @ 55″ (Fronts and backs of Legs)
- 2 – 1×2 @ 55″ (Inside of Legs)
- 5 – 1×4 @ 54″ (Panel Pieces)
- 3 – 1×6 @ 54″ (Panel Pieces)
- 4 – 1×4 @ 52″ (Panel Trim, Front and Back)
- 1 – 1×3 @ 58 1/2″ (Top Trim)
- 1 – 2×4 @ 59 1/2″ (Top of Headboard)
Cut List for Queen
- 6 - 1×3 @ 55″ (Fronts and backs of Legs)
- 2 – 1×2 @ 55″ (Inside of Legs)
- 5 – 1×4 @ 60″ (Panel Pieces)
- 3 – 1×6 @ 60″ (Panel Pieces)
- 4 – 1×4 @ 58″ (Panel Trim, Front and Back)
- 1 – 1×3 @ 64 1/2″ (Top Trim)
- 1 – 2×4 @ 65 1/2″ (Top of Headboard)
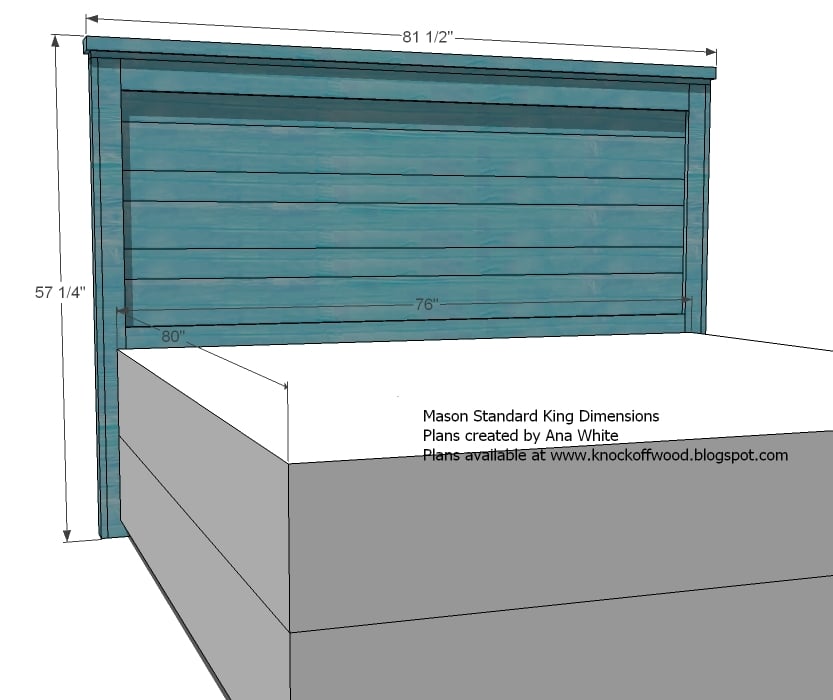
Cut List for Standard King
- 6 – 1×3 @ 55″ (Fronts and backs of Legs)
- 2 – 1×2 @ 55″ (Inside of Legs)
- 5 – 1×4 @ 76″ (Panel Pieces)
- 3 – 1×6 @ 76″ (Panel Pieces)
- 4 – 1×4 @ 74″ (Panel Trim, Front and Back)
- 1 – 1×3 @ 80 1/2″ (Top Trim) (measure before cutting)
- 1 – 2×4 @ 81 1/2″ (Top of Headboard) (measure before cutting)
Cut List for California King
- 6 – 1×3 @ 55″ (Fronts and backs of Legs)
- 2 – 1×2 @ 55″ (Inside of Legs)
- 5 – 1×4 @ 72″ (Panel Pieces)
- 3 – 1×6 @ 72″ (Panel Pieces)
- 4 – 1×4 @ 70″ (Panel Trim, Front and Back)
- 1 – 1×3 @ 76 1/2″ (Top Trim) (measure to fit)
- 1 – 2×4 @ 77 1/2″ (Top of Headboard) (measure to fit)


Work on a clean level surface. Use necessary safety precautions. Measure and cut your boards to fit your piece – measurements given are for a perfect build, and you may find your headboard off a tiny bit. So on the trim and top pieces, measure to fit, using the given cut list as a approximate measurement. Use glue and check for square after each step.
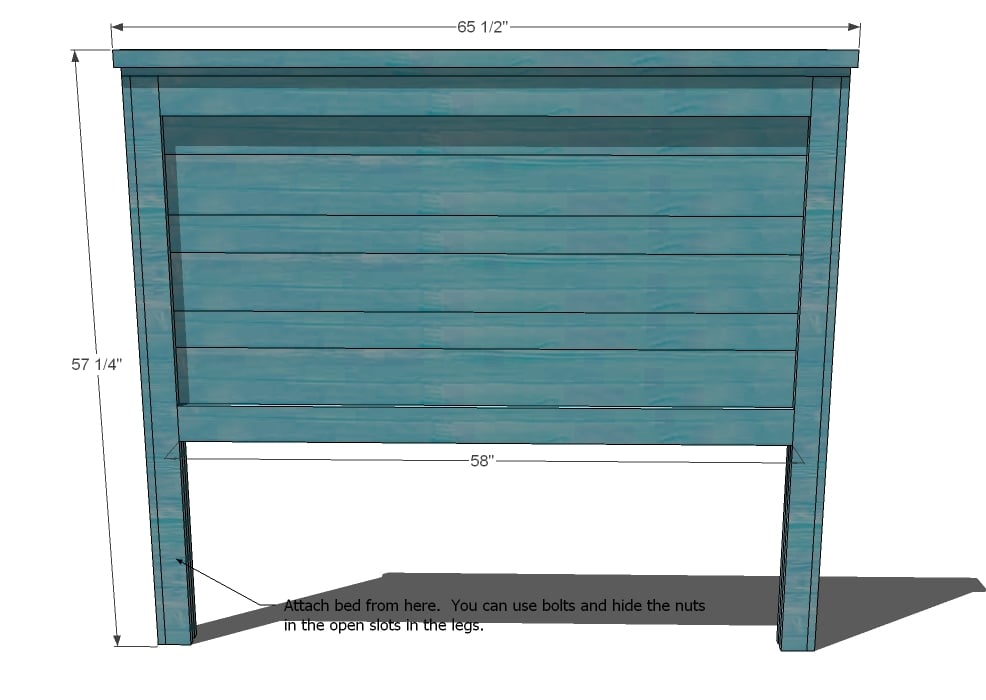
Standard King Dimensions
Dimensions for Full
Instructions
Step 1
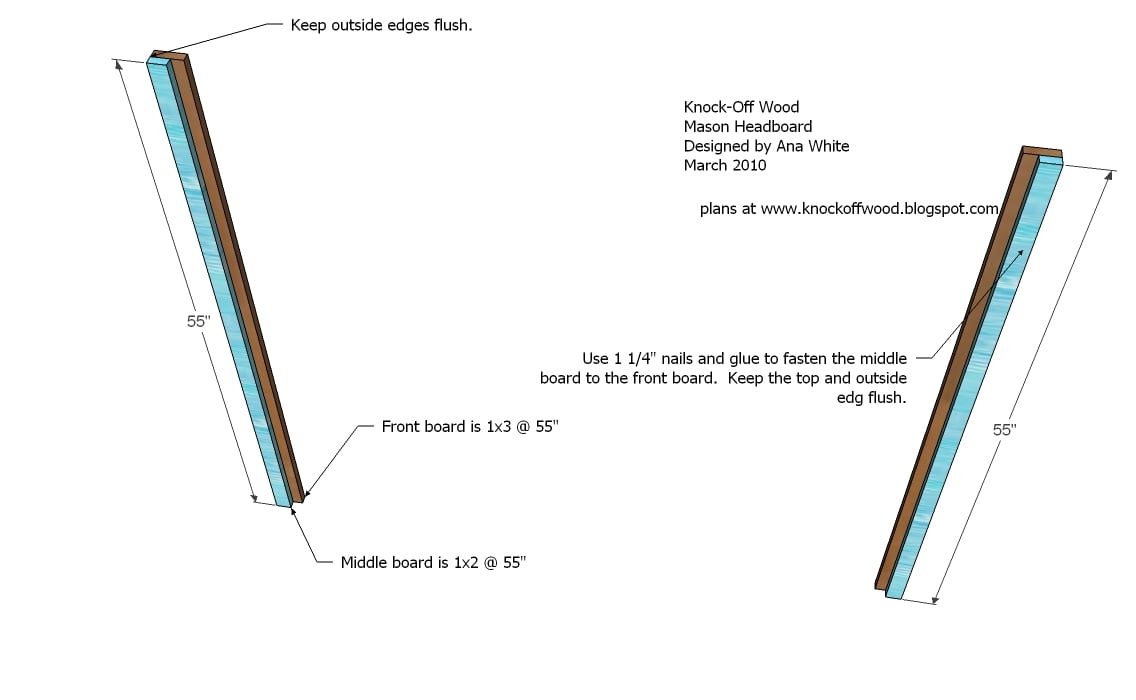
Legs. Begin building the legs by fastening the 1×2 middle piece to the 1×3 front leg piece, as shown above. To hide your nail holes, fasten for the 1×2 board into the back side of the 1×3 board. Keep outside edges flush.
Step 2
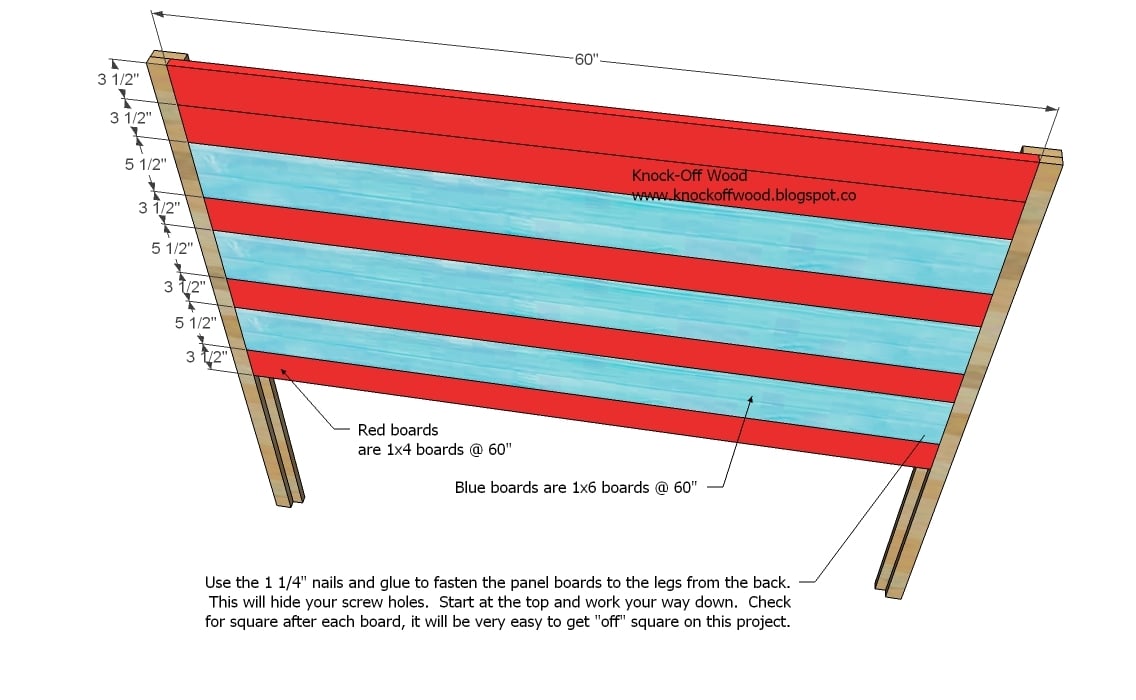
Panel Pieces. Starting on the top, fasten the panel pieces as shown above. The red pieces are 1×4 boards, the blue are 1×6 boards. Use 1 1/4″ nails and glue. Check for square. Hide your nail holes as you did in step 1.
Step 3
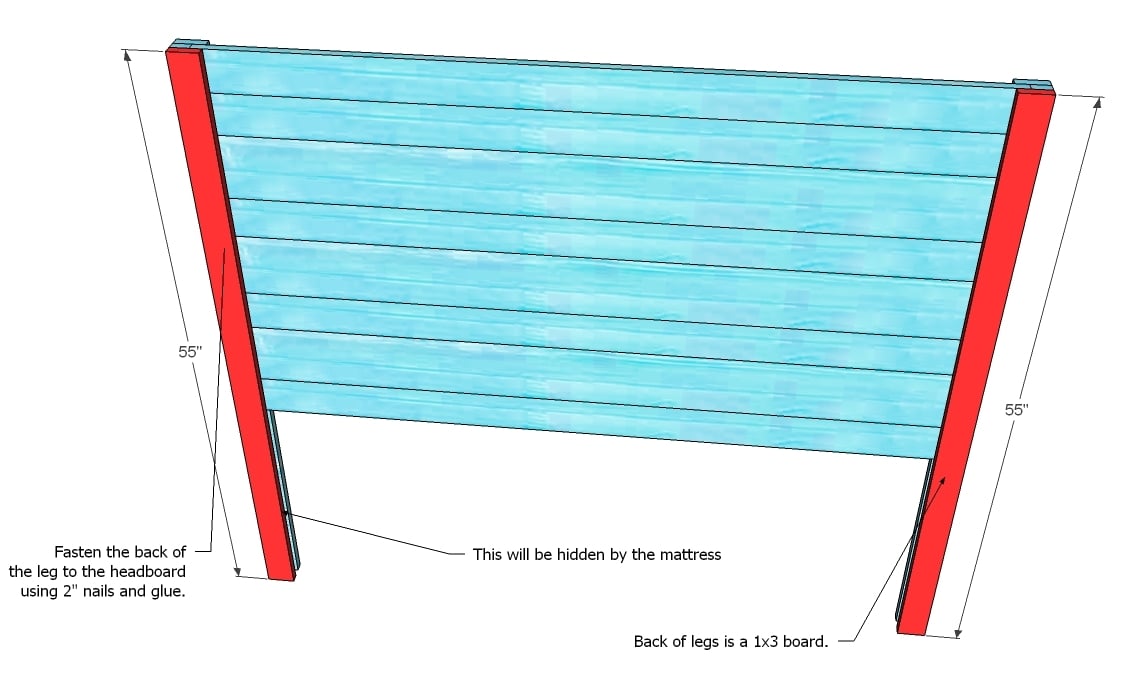
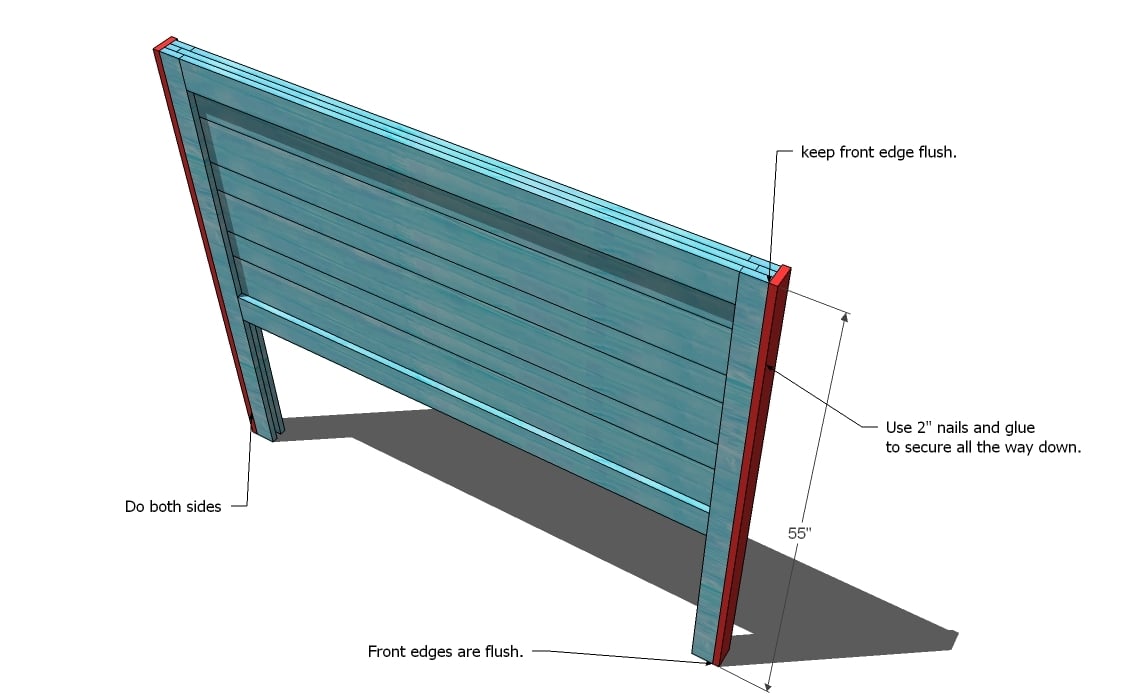
Back of Legs. Use 2″ nails and glue to fasten the back of the legs in place. Fasten to the panel pieces and the middle leg piece. Keep outside edges flush.
Step 4
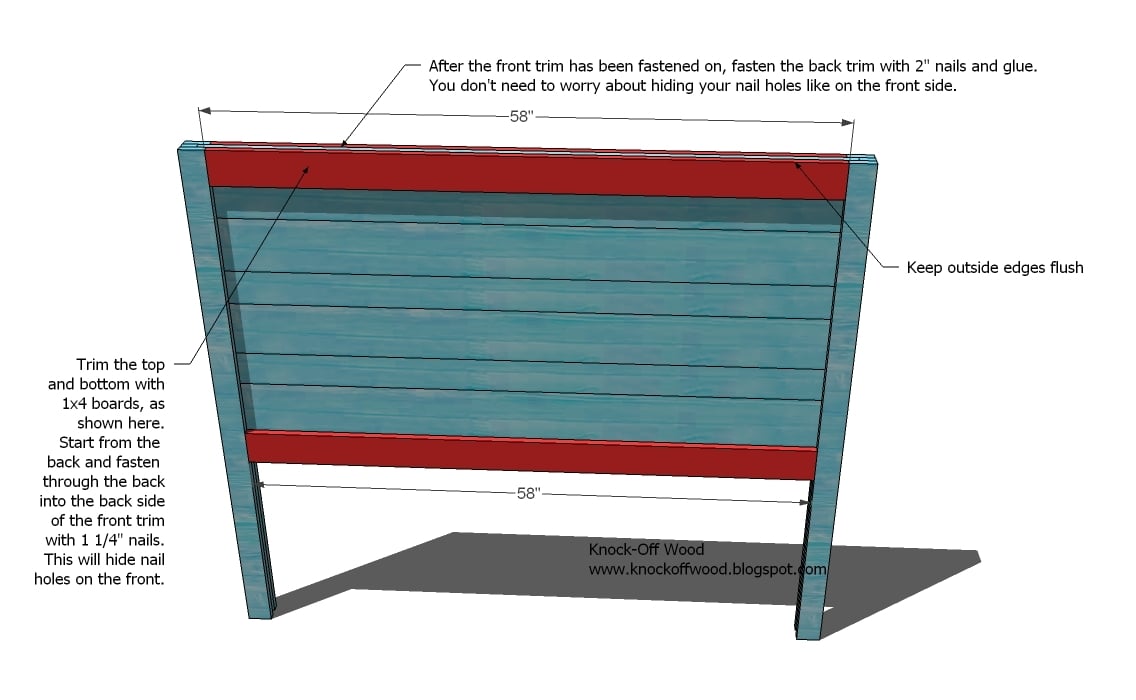
Trim Pieces. Start by fastening the front trim pieces by using 1 1/4″ nails and nailing through the back into the back edge of the front trim. This will hide your nail holes. Then fasten the back trim in place using 2″ nails and glue.
Step 5
Step 6
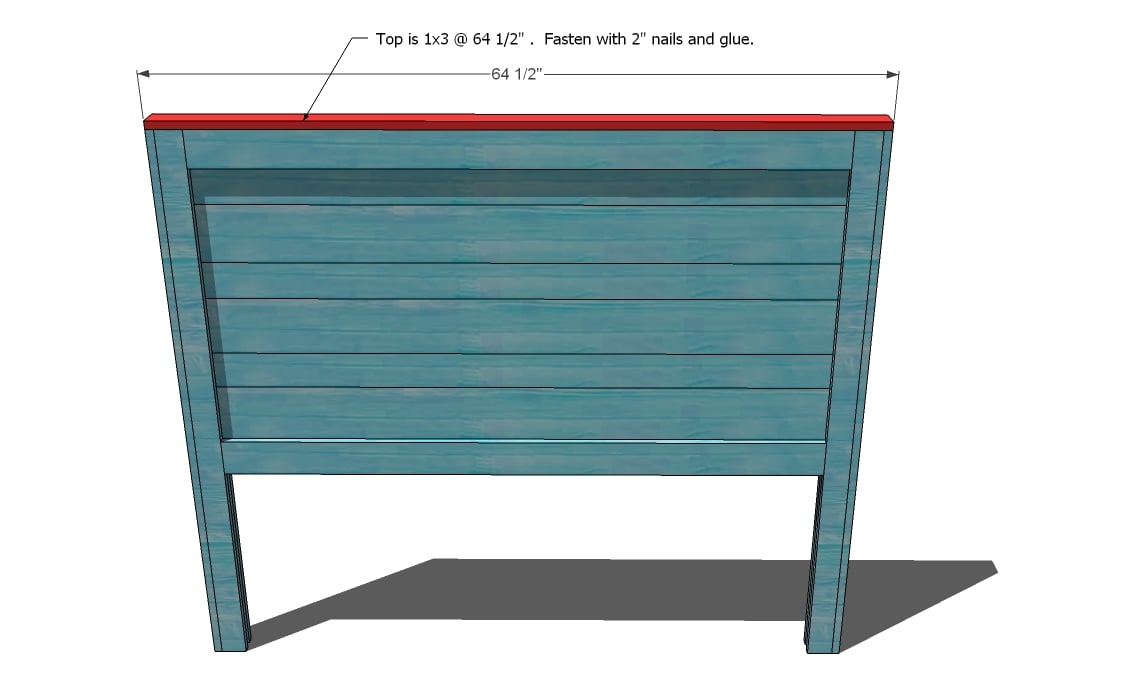
Top Trim. As shown above, measure and cut your top trim piece. The distance will be the overall width of the headboard at this step. Keeping the top trim flush with the outer leg and the front of the headboard, use 2″ nails and glue to fasten in place.
Step 7
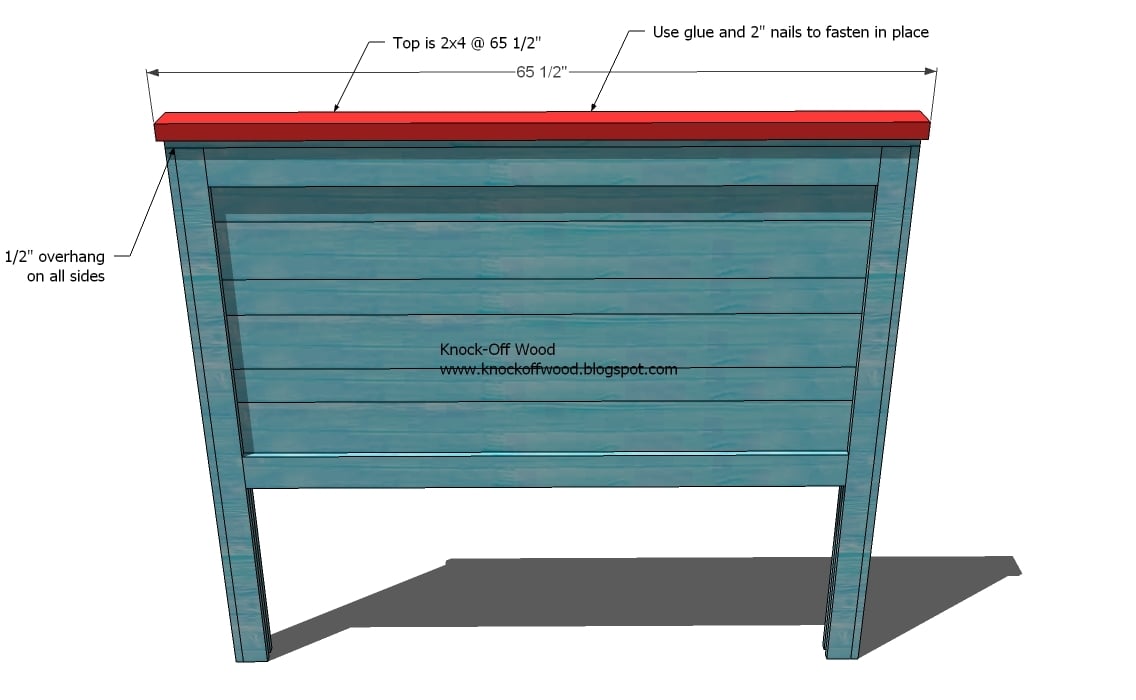
Top of Headboard. Cut the top of the headboard piece 1″ longer than the trim piece from step 6. Mark 1/2″ in from all sides. Center on top of the headboard and fasten in place with glue and 2″ nails.
Step 8
Finishing. Fill any visible nail holes with wood filler and sand and finish as desired. A bed frame can be attached by drilling holes in the fronts of the legs, and using bolts and nuts inserted in the slots open in the insides of the legs.


Comments
Brandon (not verified)
Sat, 03/06/2010 - 08:50
I think I might have some
I think I might have some ideas on how to achieve that finish. Distressing the wood is great, and glaze is a MUST but you might want to look into a product called texture putty. It's a lacquer based product that you can apply any number of ways, but you can get that 150 year old weathered look in about 25 minutes. Just apply it over your stained wood, and manipulate it how you need before it dries. Then apply glaze and a clear coat for the sheen you want, and viola! You have a finished piece just like what they have here.
Garden Grove W… (not verified)
Thu, 07/19/2012 - 09:18
Reply to comment | Ana White
Love the blog. I've bookmarked your website in my bookmarks to read tomorrow.
Kaely (not verified)
Sat, 03/06/2010 - 08:59
Oh, I think this maybe my
Oh, I think this maybe my first project. I need to practice with our nail gun (my husband says it jams up with shorter nails, so I'm gonna test it out). We are in desperate need of a headboard.
Could you post a cut list to make this as a King? :)
Melissa (not verified)
Sat, 03/06/2010 - 09:02
Wow this is a great project!
Wow this is a great project! I just found your site a few days ago, and you are amazing! I have been wanting a headboard for my bed for a while, and this is perfect. Any chance you will be posting plans for a king-size bed?
Anonymous (not verified)
Sat, 03/06/2010 - 09:40
I would also love plans for a
I would also love plans for a king.
sjvirchow
Fri, 05/09/2014 - 08:02
King Plans
Did you ever get plans for this headboard in a king size? I would like to build this but haven't heard back. Thanks so much!
In reply to King Plans by sjvirchow
emilytaylor225
Fri, 03/20/2015 - 04:35
Really you just need to find
Really you just need to find another king bed plan on here and see the inside width. Adjust the plan here to accommodate the king. I am an amature but I have already built a Queen headboard from the farmhouse bed plan on this site. It turned out beautifully and it was easy enough. With a straight forward plan like this I can only imagine stretching it to fit a king bed should be easy. Good luck!!!
Gen (not verified)
Sat, 03/06/2010 - 10:49
King Me Please!
King Me Please!
Gen (not verified)
Sat, 03/06/2010 - 10:52
anyone else eyeing the
anyone else eyeing the nightstand???
Gina (not verified)
Sat, 03/06/2010 - 10:59
I need plans for a King sized
I need plans for a King sized too please! :)
The P*dunc's (not verified)
Sat, 03/06/2010 - 11:31
this is THE one! love
this is THE one! love it!
king, please? pretty please???
Random Research Girl (not verified)
Sat, 03/06/2010 - 12:28
looks very impressive!
looks very impressive!
K (not verified)
Sat, 03/06/2010 - 12:42
I would love the cut list for
I would love the cut list for a king also. This WILL be my first project from your site!
Lindsay (not verified)
Sat, 03/06/2010 - 13:25
I love this one! I'm not
I love this one! I'm not quite sure my husband and I are ready for the Farmhouse bed (I love it, but we've never built a THING in our lives!), I think this would be a great first project. I'd love the plans for a king please!
Kelly (not verified)
Sat, 03/06/2010 - 13:25
Hi! This is my first comment
Hi! This is my first comment on your blog, but I have been lurking for at least a month! This will (hopefully) be my first project from here. I just broke down and bought a pneumatic nailer to finish some trim in our bathroom and I am ready to ROCK the Mason headboard. Could you please, please make the adjustments for a king size? (My husband will thank you - he's 6'5" and can't stand footboards!!!
Amy Christian (not verified)
Sat, 03/06/2010 - 14:45
I would love the King Plans
I would love the King Plans also...we have been needing a headboard badly!!!!
lindar
Sun, 07/24/2011 - 13:38
Rustic Headboard
I just found you blog and I am a huge fan! I have been without a headboard for years and would love to give this a shot. I too would love to have the King Plans if possible.
Thank you for sharing all your wonderful ideas.
Laurie Mom of 3 (not verified)
Sat, 03/06/2010 - 15:23
Love this! How about a cut
Love this! How about a cut list for Twin size.
Tara (not verified)
Sat, 03/06/2010 - 15:23
Love the plans and would love
Love the plans and would love to have a king size plans!
Thank you for all the plans and the time you spend! They are great!
Beth in NY (not verified)
Sat, 03/06/2010 - 15:43
My brother in law has a barn
My brother in law has a barn on his property that is falling down- he told me to 'have at' the boards, and I think they'll be perfect for this project! (In a King size, if you could!) Thanks!
Curried Cupcakes (not verified)
Sat, 03/06/2010 - 16:34
This is wonderful! Will you
This is wonderful! Will you please post for a king size please?
Missy (not verified)
Sun, 03/07/2010 - 03:52
This will be my first project
This will be my first project too! I'm going to make a turquoise one, but I need king plans. I promise I'll put up pictures.
KING ME PLEASE!
[email protected]
Blogging with … (not verified)
Sun, 03/07/2010 - 04:05
My hubby and I want to build
My hubby and I want to build this ASAP - love it! Need a king size please - so excited!
Dianne (not verified)
Sun, 03/07/2010 - 04:51
OK...I"m in too! King size!
OK...I"m in too! King size!
Anonymous (not verified)
Sun, 03/07/2010 - 05:31
we know your super busy but
we know your super busy but would love the king size directions we just bought a new bed cal king and have been eyeing some of your bed frame plans cant decide what to make but we definately need the king size directions!!!!
Anonymous (not verified)
Sun, 03/07/2010 - 07:08
I love your site. I'm going
I love your site. I'm going to do a full. For King Size, all you need to do is extend the length of the panel boards.
TracyD (not verified)
Sun, 03/07/2010 - 08:35
Oh PLEASE modify for a Full
Oh PLEASE modify for a Full size bed!! Thank you for all the wonderfull plans!!
Tara (not verified)
Sun, 03/07/2010 - 15:11
I'd love it in a full size as
I'd love it in a full size as well... PERFECT for my new guest room!
Brenda (not verified)
Sun, 03/07/2010 - 18:17
Thanks so much for the king
Thanks so much for the king size plans. I'm hoping to talk my husband into making this. I'll post pictures if we do. :)
Serena (not verified)
Sun, 03/07/2010 - 21:47
I love this! I think I am
I love this! I think I am going to build it for our guest bedroom. Thank you so much for the plans!
Sarah Goblot (not verified)
Mon, 03/08/2010 - 04:00
How would you modify this so
How would you modify this so you can use fabric on the inside?
Cassidy (not verified)
Tue, 04/13/2010 - 09:24
I've got this all put
I've got this all put together and it looks NOTHING like the gorgeous finished product! It seriously must ALL be in the finishing. {pushing up sleeves and diving in!}
Rebecca (not verified)
Tue, 04/20/2010 - 15:31
I love this headboard! I am a
I love this headboard! I am a little confused(it doesn't take much :)). With this:
6 - 1x3 @ 55" (Fronts and backs of Legs
I only count needing 4 what are the other 2 for or am I just missing something?
Ana White (not verified)
Tue, 04/20/2010 - 15:40
Rebecca, thanks. The third
Rebecca, thanks. The third leg piece goes on the sides. Ana
sleeplessmom (not verified)
Fri, 04/30/2010 - 02:38
Lol Thanks Ana! That is a
Lol Thanks Ana! That is a total DUH! moment for me!
Christine (not verified)
Mon, 05/03/2010 - 14:10
Great plans Ana! I have never
Great plans Ana! I have never built anything before, but this was definitely doable for me by myself. My husband taught me how to use the circular saw and then took a nap. By the time he woke up, I was nailing in the last board! Can't wait to finish it.
Natty (not verified)
Tue, 06/15/2010 - 07:03
I am building this now and
I am building this now and the only power tool I am using is a sander! I decided that I don't have to wait until I can afford a mitre saw and pneumatic nailer to get building :)
Will email pics once I'm finished!
Da (not verified)
Sun, 06/27/2010 - 05:49
How would you make this into
How would you make this into a bed with side rails and a footboard? I was also looking at how you attached the bedrails on other beds and will a couple of screws hold up well for some... bedroom activity?
Nick Talkers (not verified)
Sun, 07/18/2010 - 16:17
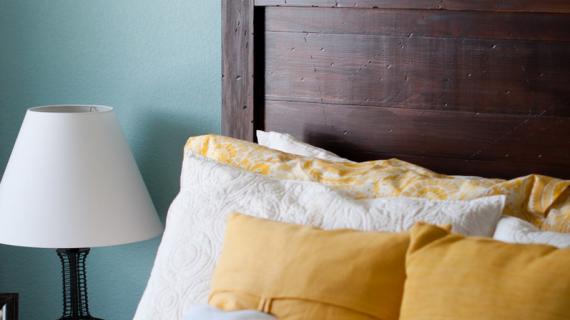
To get the pottery barn look,
To get the pottery barn look, I used a mahogany gel stain. This was easy because you can apply it as light/dark as you want and wipe off. If you go darker in the cracks, creases, etc, it makes it very easy to achieve the same look. A few coats of a semi-gloss polycrylic and it looks great!
Lulu (not verified)
Sat, 08/07/2010 - 10:48
I found your site through a
I found your site through a post on Wedding Bee (http://www.weddingbee.com/2010/08/06/remodel-before-and-after/) where they showed a table and bed they made. This site is amazing, can't wait to try some of these projects!
Crystal (not verified)
Fri, 09/03/2010 - 03:53
The link for the King bed is
The link for the King bed is no longer available. My Girlfriend and I want to build it together. (one for each of us) Is there another place to find the shopping list and cut list?
I just finished the console table. Thank You!!!
Ana White (not verified)
Fri, 09/03/2010 - 08:58
Crystal, here is the link
Crystal, here is the link http://ana-white.com/2010/03/plans-reclaimed-wood-look-headboard-king-s… Sorry about the dead end page :( The move has been quite painful.
livaward (not verified)
Thu, 09/09/2010 - 12:17
I just finished making this
I just finished making this headboard and I am in love! I posted on your facebook also with a picture.....just wanted to say I made a rookie mistake and cut all my boards first so my panel pieces came a bit short and there is a gap.....so I'll remember that for my next project!
thepennyparlor (not verified)
Tue, 09/21/2010 - 15:43
Hi Ana! Love your plans! I'm
Hi Ana! Love your plans! I'm so glad I found your site. I just finished this headboard. Please let me know what you think!?
THanks! - Amanda
http://www.thepennyparlor.com/2010/09/diy-pottery-barn-mason-headboard…
Karrie Johnson (not verified)
Wed, 09/29/2010 - 05:26
Ana- I love your site! Can
Ana-
I love your site! Can you please advise what measurements would be needed to make this headboard in a twin size? My 3 year old daughter is ready for a big girl bed and I would love to make it for her, I didn't see any information for this in twin, only queen and king size. Thank you so much, your site is so inspiring!
-Karrie
Ana White (not verified)
Wed, 09/29/2010 - 06:40
Hi Katie, try this
Hi Katie, try this http://ana-white.com/2010/03/plans-reclaimed-wood-headboard-full-and.ht…
Ian (not verified)
Fri, 10/08/2010 - 06:08
This is awsome! I found out
This is awsome!
I found out about your site yesterday and buit this headboard after work. I finished assembling it arond 10h30pm and all thats left is the sanding and staining.
I used the ruff lumber since is was WAY cheaper and look alot more like reclaimed wood. It did take me a long time to choose the wood since most of the ruff lumber is crooked or too ruff. The outcome looks nice. I will post picture later.
Are most using ruff lumber or planks?
Lori @ Buildin… (not verified)
Wed, 11/03/2010 - 10:57
Hello! I'm having so much
Hello! I'm having so much fun with your site! I'm wondering if you have plans for a twin available? I'd love for my husband to make 2 of these for our daughters since they'll be sharing a room soon. Thanks for your generous spirit!
Megan (not verified)
Thu, 11/04/2010 - 08:01
I love it and and am so
I love it and and am so inspired for my first project. Any thoughts on how to add a footboard?
Matt (not verified)
Sun, 11/07/2010 - 04:00
Just an FYI to everyone here
Just an FYI to everyone here - these measurements are off... which is kind of a big deal when you're using reclaimed wood and you can't just get more.
Anyway, it's got the two top pieces measured at 64.5 inches and 65.5 inches. However, the panel pieces are 60" plus 2" on either side, plus an additional 3/4" if not an inch with the leg "caps". That brings the total width to 65.5" if not 66"... longer than the two top pieces are.
I don't know how to contact the author - but she really needs to know. I'm going to have to do some ripping now (since my leg pieces on the inside are a different type of wood) in order to cover it. Only had one 2x4 in the same wood... so I'm going to have to make it work somehow. Anyway, good luck! Other than that, it looks really good.