


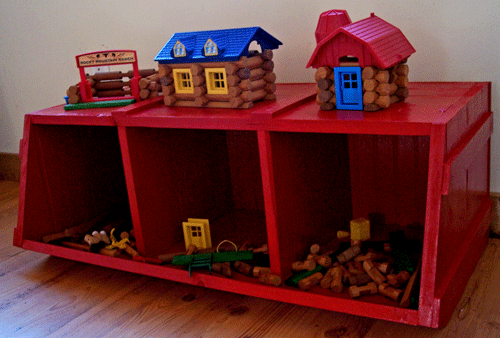
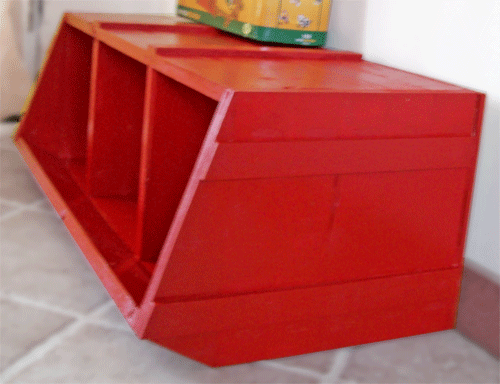
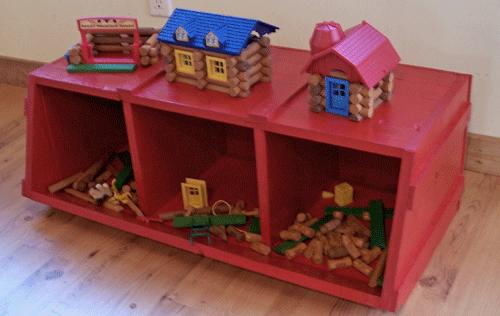
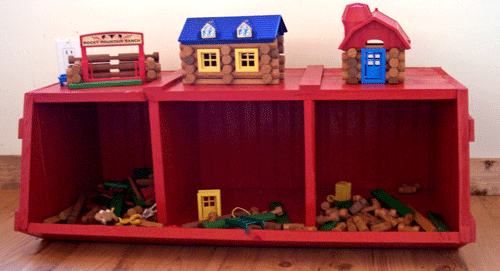
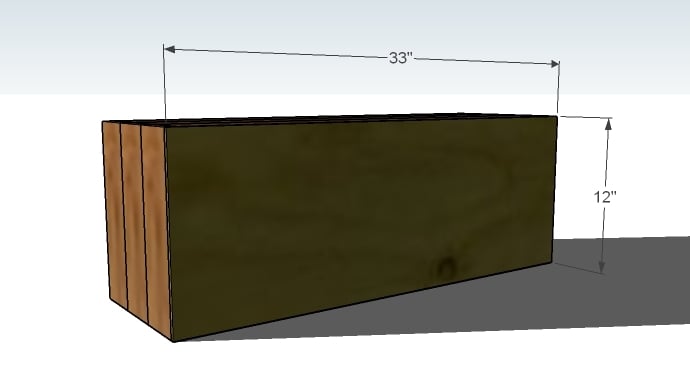
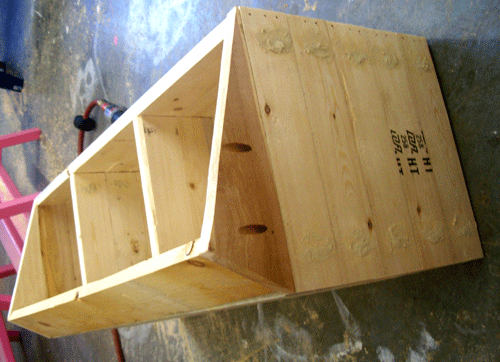
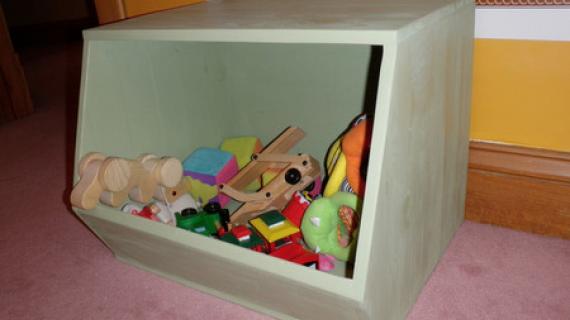
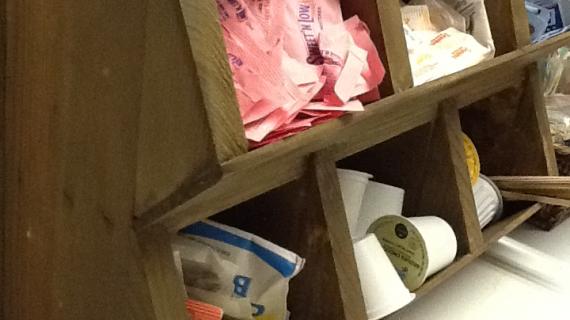
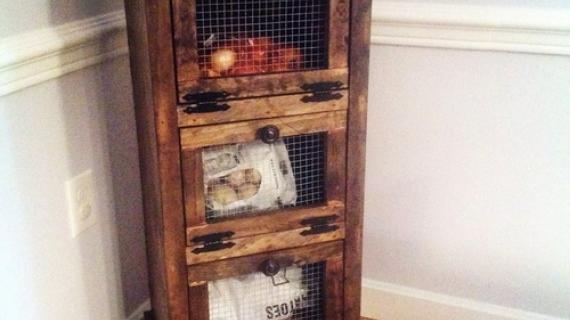
Simple vegetable bins that can store all your child's needs. A lip on the front keeps items in the bins.

One of the very first plan requests I had as the author of Knock-Off Wood was for simple toy bins, like these from Pottery Barn Kids. And while simple in appearance and in nature, I could not figure out how to design a Knock-Off Wood plan that met my criteria for posting a plan. And I just could not subject you to cutting out little pentagon shaped pieces from plywood (four of them per toy bin) and then finishing edges with edge banding. Time and tediousness removed, cutting pieces from plywood was wasteful. By cutting out the pentagon shapes, a great amount of wood would become unusable scraps. And I just couldn't do that to you.

But how to add that front lip to the piece, without wasting material? I thought about this all winter. Of course, if you had a fancy tool, it would be super simple. But I don't expect you to have fancy tools.
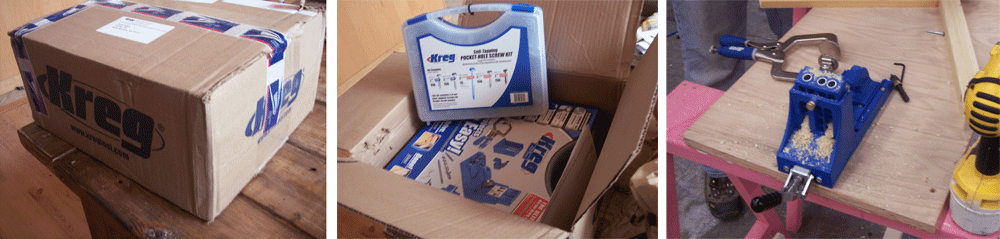
And when I got my Kreg Jig (special thanks to one of our readers for taking her time to write The Kreg Tool Company about Knock-Off Wood), I knew that with the Kreg Jig, I could easily add the lip to the toy bin.

But one problem. At $99, the Kreg Jig that I received was a little expensive. And although I highly recommend buying the Kreg Jig if you are doing lots of woodworking, for those of us just needing the Kreg Jig here and there, the Kreg Jig JR was much more economical.

For just over $44, which isn't much if you've bought (and broke) countersink bits trying to drill at an angle), just by building this one project once, you would make back your investment. The first thing I noticed was how nicely the entire jig fit into the included case. Because when you've got kid's helping and husbands borrowing your tools, it's nice to keep all the parts together.
It works with a standard clamp and you simply clamp the jig to your wood and drill a pocket hole. The bit that is included is the same as the full size Kreg Jig and it's sharp - I even caught my husband using it when he was siding our house!
As I've said before, the Kreg Jig solves a couple of problems your standard power tools don't
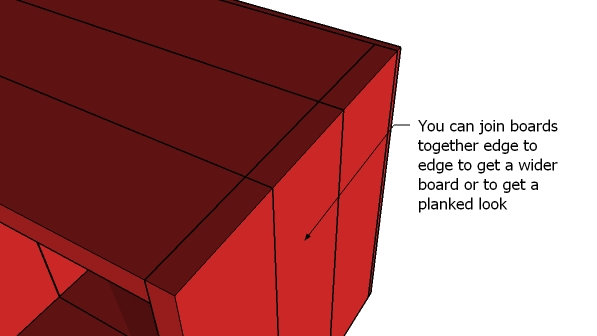
Think building tabletops or just getting your boards to be a little wider, the Kreg Jig can join boards up to 1x6 widths edge to edge. Just make sure you alternate the grain of the wood as you join your boards to keep the panel from warping to one side.
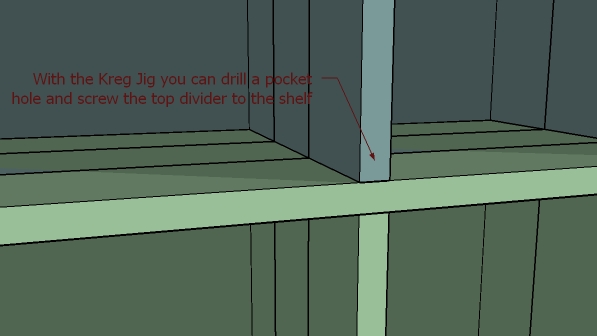
Been there, building cubbies and suddenly realize you can't screw the divider down on one edge? With the Kreg Jig or Kreg Jig JR, you can simply drill a pocket hole and fasten the divider in place.
And some other common problems that I would use the Kreg Jig for:
- Attaching Tabletops from Underneath
- Building Picture Frames (joining the corners)
- Build Cabinet Doors with Rails and Stiles (joining the corners)
I'm not ready to give up my nailer, but I am ready to add a Kreg Jig to my projects. I see the Kreg Jig as not a replacement for screws and nails, but a compliment, an addition to your tool arsenal. And because I see us using the Kreg Jig as a compliment, I believe that the Kreg Jig JR will fit your needs perfectly. If however you see yourself creating lots of pocket holes, I would highly recommend spending the extra fifty bucks for the Kreg Jig.
This video show the full size Kreg Jig, but the Kreg Jig JR uses the same technology, it just takes a little more time to set up the jig and drill your pocket holes. You can get the same results with the Kreg Jig JR, but it's going to take more time. The full size Kreg Jig will let you drill pocket hole after pocket hole, I was able to drill pocket holes as fast as two per minute. But with the Kreg Jig JR, it takes me closer to 2 minutes to clamp the jig, drill, and unclamp the Kreg Jig JR per pocket hole.

I built it before breakfast, made a noon hair appointment (sorry about the sawdust in my hair)
and in between painting the front of our house, I put two coats of High Gloss Red Valspar paint on.
Preparation
5 – 1×4, 8′ length
1 1/4″ Self Tapping Pocket Hole Screws
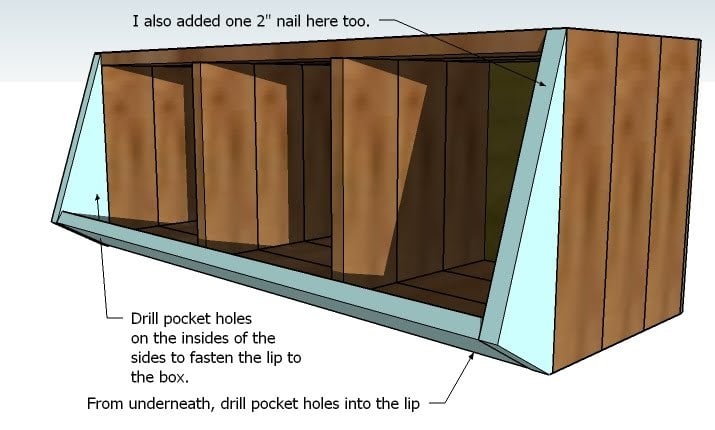
2” nails
1 1/4″ nails
Wood Glue
Wood Filler
Sandpaper
Paint
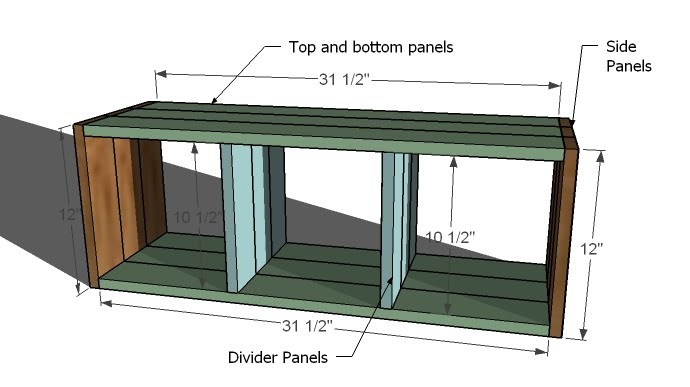
6 – 1×4 @ 31 1/2″ (Top and Bottom Panel Boards)
6 – 1×4 @ 12″ (Side Panel Boards)
6 – 1×4 @ 10 1/2″ (Divider Panel Boards)
2 – 1×4 @ 12″ (Lip Sides)
1 – 1×4 @ 31 1/2″ (Lip)


Remember you can click on any image for a larger view. Always read comments before begining a project and use the plans from the blog to get the most current plans. Work on a clean level surface and use straight boards. Use glue. Predrill any screw holes. Take a square after each step. Be safe, have fun.
Instructions
Step 1
Step 1: Build the Box
To get the planked look, first join the 1×4 boards to create the panels shown above. You will have two sides, two dividers, and a top and bottom panel. As you join your boards, pay attention to the grain of the board (look at the end of the board) and join the boards together with your Kreg Jig™ is such a manner that the grains are alternating spiraling up and spiraling down. This will keep your panels from warping to one side or the other. You can skip this step by simply building the box out of 1×12 boards instead of 1×4 boards as done here.
Step 2

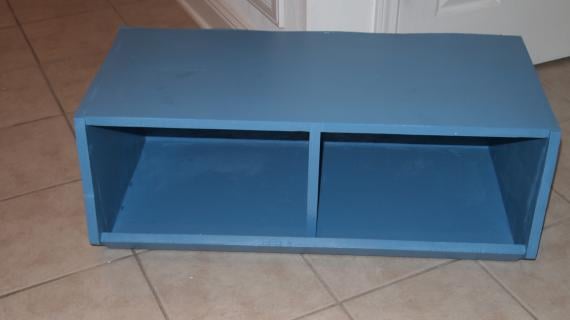
And while you can definitely use the Kreg Jig™ to build the box, it’s not necessary because the bottom sits on the ground and the top sits on the sides – there is minimal weight or strain on the nailed joints. So I nailed the box together using glue and 2″ nails, leaving 10″ between the sides and the dividers.
Step 3
Step 3: Back
Take a square of your project then attach the back with 1 1/4″ nails and glue. Don’t forget to nail to the dividers too!
Step 4
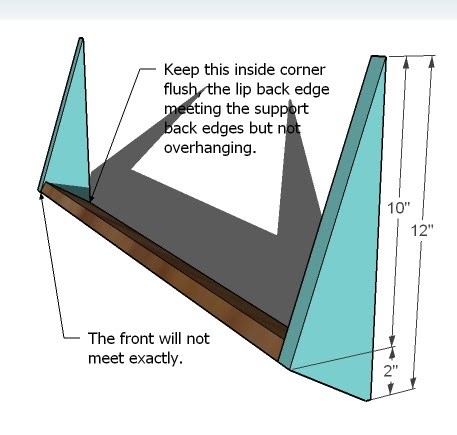
Step 4: Front Lip
Begin by cutting the sides of the front lip from 1×4 boards. Simply cut two 1x4s @ 12″, then mark 10″ and 2″, as shown above, draw a diagonal, clamp the boards to you work surface, and cut into the shape above. The lip is a 1×4 @ 31 1/2″. Use glue.
Step 5
Step 6
One other note, I did notice that this lip was not as pronounced as you may want it to be for holding items like legos or even lincoln logs (smaller items). It is perfect for larger items, like balls, large blocks, dolls, and even stuffed animals. You can easily adjust for a steeper lip by using a 1×6 instead of a 1×4 for the lip and tracing the 1×6 edge on to the lip sides and cutting your lip sides to fit the 1×6.
Step 7
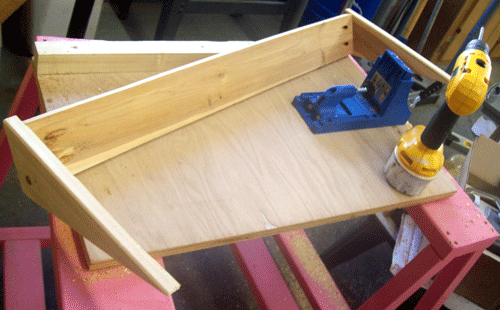
Attaching the Lip
Attach the lip as shown above in the diagram. From underneath, drill a few pocket holes and attach the bottom edge of the li
If you are stacking, I recommend attaching the bins to each other (drilling pocket holes in the underside of the bottom bin and screwing into the bottom of the top bin would be very effective) and also attaching to the wall.

Comments
Angie - treasu… (not verified)
Mon, 05/10/2010 - 22:10
I want a Kreg Jig! The bin
I want a Kreg Jig! The bin looks great and you did it so fast! Thank you for another set of awesome free plans! I'm totally addicted to your blog!
skip hire adelaide (not verified)
Tue, 01/15/2013 - 11:45
Vegetable Bins | Ana White
Thnx for providing this resource on the internet.
James (not verified)
Tue, 05/11/2010 - 01:02
Hi Ana! After you last
Hi Ana! After you last mentioned the Kreg jig, I bought a Jr. myself and I've already used it to build some 2' square lavender planters, a small bookcase to store tools and screws, and just yesterday I finished up my gigantic new workbench - must get on the bragging board and show them off.
One tip that I recently discovered is that it's a lot better to use a mains drill when drilling pocket holes into softwood. The extra torque and speed makes for a much less messy edge and a cleaner hole in general. It also means you can keep your cordless drill on hand with the square tipped bit in it, which is more flexible than swapping the bits all the time.
The more I use my jig the more I wish I'd spent a bit more and gone for a K4 or a K3 Master System for speed, but as my planters, bookcase and workbench prove, you can definitely use a Jr. to build anything you can build with its big brothers!
Catherine Hans… (not verified)
Tue, 05/11/2010 - 01:47
Get me a Kreg Jig! What
Get me a Kreg Jig! What other tools would you like? I am sure we could all spread the word - lol. I CANNOT wait to move (just three weeks now) so I can get my hands on some building fun!
Come on James! We will be watching the bragging board for you!
Jennifer (not verified)
Tue, 05/11/2010 - 02:35
I splurged on the master K4
I splurged on the master K4 and I highly recommend it! I also have my corded Dewalt drill set up for drilling the pocket holes and then my cordless set up on torque 14 for screwing in the screws. If you have it full power, the screws are so strong they will pull right through. I've found that level 14 has enough power to get the job done nice and tight without pulling through.
Ana, I've been waiting on this plan for so long and once again, you are amazing! Thank you so much for all your hard work!!
Stephanie (not verified)
Tue, 05/11/2010 - 03:25
I just bought a Kreg Jr jig
I just bought a Kreg Jr jig on the recommendation of the guy whose miter saw we bought. Now I'm really motivated to go build something! I found it at my local Blue.
Monica (not verified)
Tue, 05/11/2010 - 05:48
I am ready to start
I am ready to start woodworking thanks to your awesome site. For Mother's Day I asked my husband for tools instead of a purse or flowers. I have no tools except for a drill. What else should I have in my tool box to be able to make these wonderful creations you've posted? I want a nailer but have no clue about them. What kind do you have?
Emily (not verified)
Tue, 05/11/2010 - 06:54
Looks neat, but you have to
Looks neat, but you have to buy special screws for it? Do those get a little expensive?
Amanda (not verified)
Tue, 05/11/2010 - 07:25
I am so happy you have posted
I am so happy you have posted this. I was hoping someone would. I'm not good at making plans but I can sure follow them. Besides it's so much more fun to make your own than just spend $100+ dollars online. Thank you so much. Can't wait to bug my husband with another "group project"
orange sugar (not verified)
Tue, 05/11/2010 - 07:27
Hi Ana. My very lofty goals
Hi Ana. My very lofty goals are to build two daybeds, mudroom storage, the recycling center, an in the wall cabinet for my bathroom, possibly a kitchen table, chairs, and drawers for some built-in dressers that have seen better days. My boyfriend has all the major tools. Would I find a kreg jig useful for all these projects?
J. PENROD (not verified)
Tue, 05/11/2010 - 08:04
orange sugar--I would get a
orange sugar--
I would get a kreg jig. You can use it in many applications,on all types of wood- pine, hardwoods, plywoods etc. Pocket holes are a strong joint and you don't have to clamp it and wait to have the glue dry. You can go right on to the plans next step.
I recommend buying the screws in bulk or the bigger boxes, instead of the small packages. You can use the self tapping screws in any other place you would use regular screws. Go for the master K4 kit. Because it also acts like a Jr. It is the most versatile of the kits.
I use my kreg jig more than any other tool in my workshop.
Kelly (not verified)
Tue, 05/11/2010 - 09:01
The Kreg Jig Jr. was my
The Kreg Jig Jr. was my Mother's Day gift from my hubby and kids. They waited for me to open it like it was a new car... and I was just as excited. I asked for one! Lovin' this new design! I'm thinkin' toy bins for the kids and veggie bins in the kitchen. I have a perfect little nook for them!
James (not verified)
Tue, 05/11/2010 - 09:43
You're supposed to use the
You're supposed to use the Kreg screws, but I've been getting decent results using ordinary self-tapping countersunk wood screws (you definitely do want to make sure they're self-tapping though). The only consideration is that they have a smaller contact patch so they're easier to overdrive in softwoods.
Alternatively you could use a screw with a raised head and a small washer as a collar, but screws plus washers would probably cost as much as the Kreg screws in the end.
orange sugar (not verified)
Tue, 05/11/2010 - 15:12
I didn't know you needed to
I didn't know you needed to buy their screws. That's kind of a pain. How do they compare in price to regular screws?
Do you have a source for where you can buy them in bulk?
EMarie (not verified)
Sat, 08/14/2010 - 17:25
I did it!!! I just finished
I did it!!! I just finished building this and just need to paint it! I'm a stay at home mom of a one and three year old. If I can do it, you probably can too! Thanks for the plans!
Sha~ (not verified)
Fri, 09/17/2010 - 01:22
I picked up my Kreg Jr at
I picked up my Kreg Jr at Blue for about 39. I LOVE it!
Countersunk Se… (not verified)
Sat, 09/25/2010 - 23:52
[...] How to Build Vegetable
[...] How to Build Vegetable Bin Storage Boxes — Ana White Been there, building cubbies and suddenly realize you can't screw the divider down on one edge? With the Kreg Jig or Kreg Jig JR, you can simply drill a pocket hole and fasten the divider in place. And some other common problems that I You're supposed to use the Kreg screws, but I've been getting decent results using ordinary self-tapping countersunk wood screws (you definitely do want to make sure they're self-tapping though). The only consideration is that they . [...]
marie (not verified)
Wed, 11/17/2010 - 00:21
this is such a great idea. i
this is such a great idea. i think i'll be making this soon for toy storage for my 4yr old!
Bark219 (not verified)
Thu, 04/05/2012 - 07:05
Toy bin
Can't wait to make this! I can see it working as a place to organize Lego's!
I use my Kreg jig for almost every project I make. I went through the small packets of screws that come with it in no time, so I got more at Amazon.com.
It's really cool to see how many women woodworkers there are out there. The woman whose family got her a jig for Mother's Day cracked me up, b/c she sounds just like me! Forget the purse! Give me some tools!
MCGBishop
Thu, 06/12/2014 - 14:14
No Kreg Jig
So is there a way to make this without the purchase of this new tool? Any tips?