
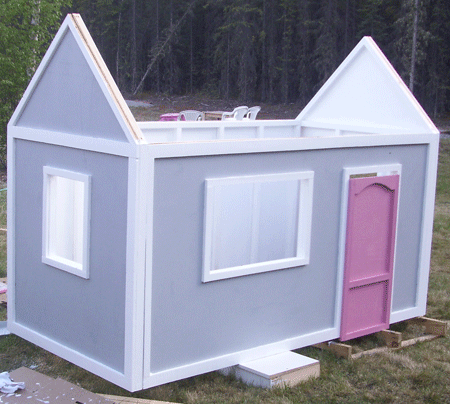

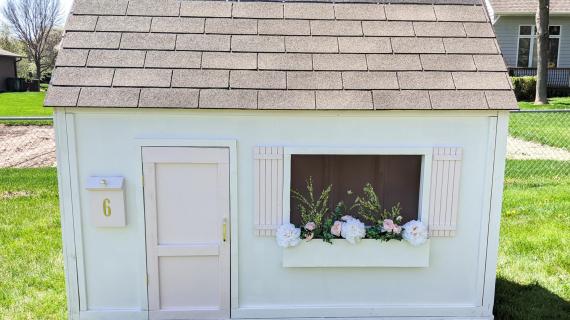
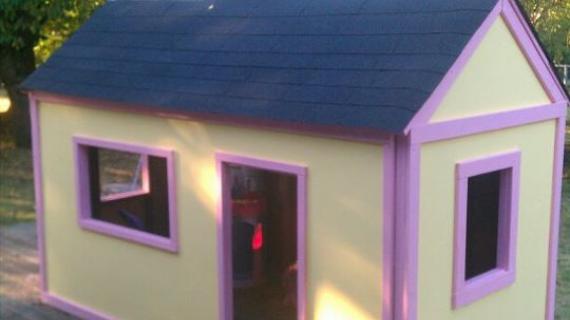
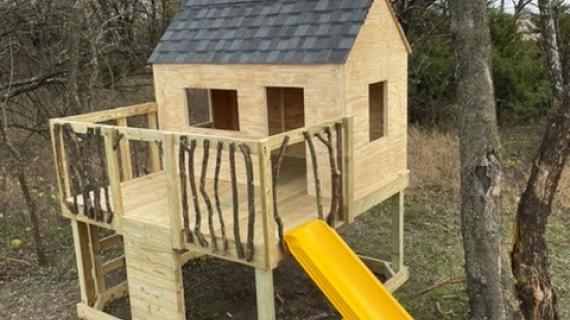
You can build your own playhouse and we are here to help! Just build the four walls in panels. The Gable End Walls feature a window and full trim work.
This playhouse plan is part of a series of plans:
- Playhouse Deck
- Playhouse Back Wall
- Playhouse Gable End Walls
- Playhouse Front Wall
- Playhouse Roof
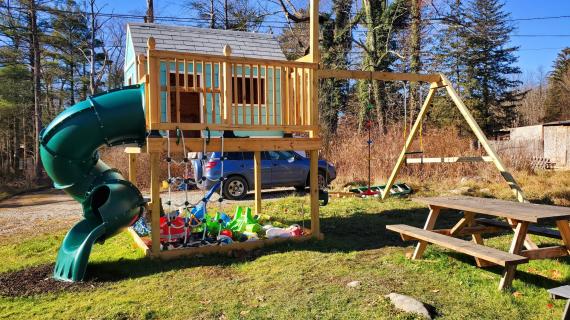
- Playhouse Swingset
In this plan, we show you how we built the gable end walls for the playhouse.
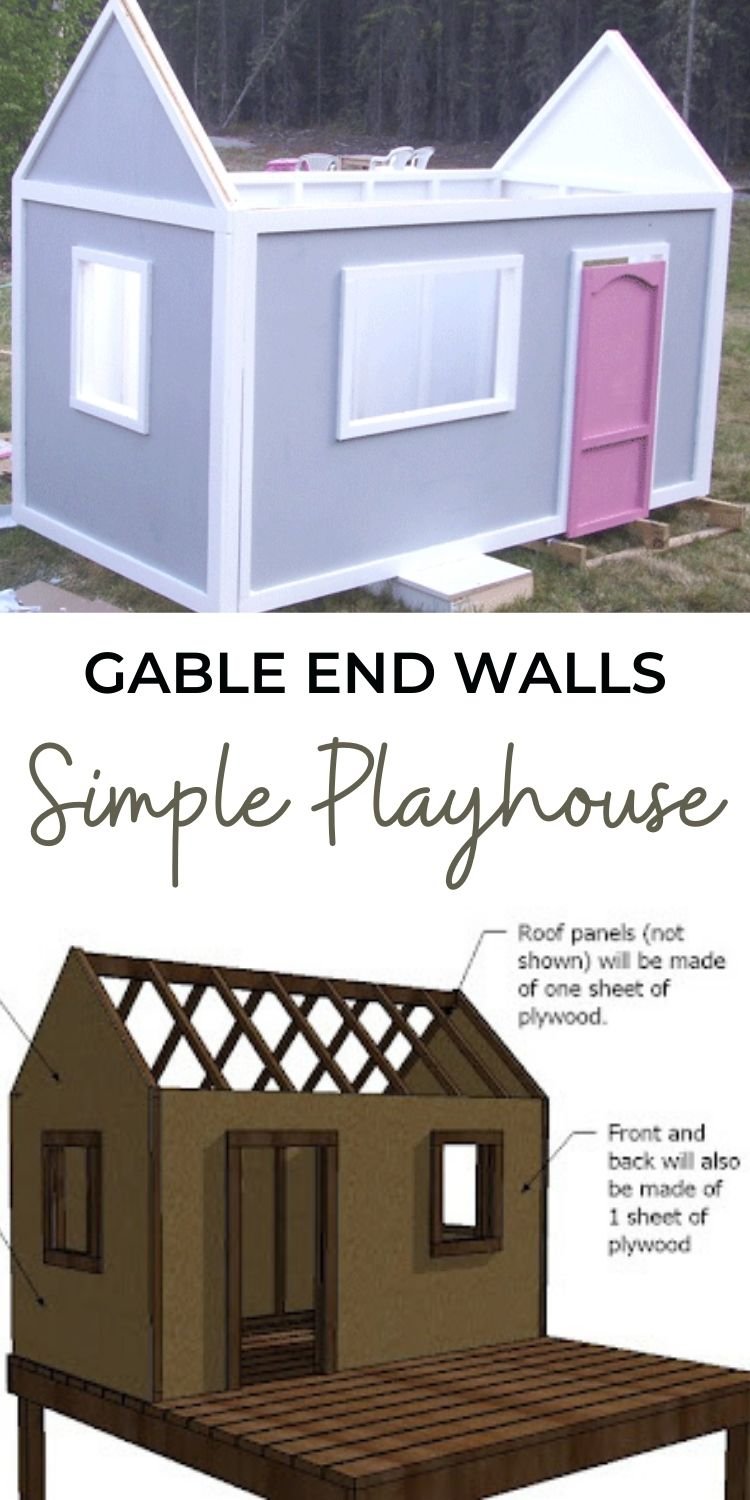
Pin For Later!
Preparation
Shopping List for TWO End Gable Panels
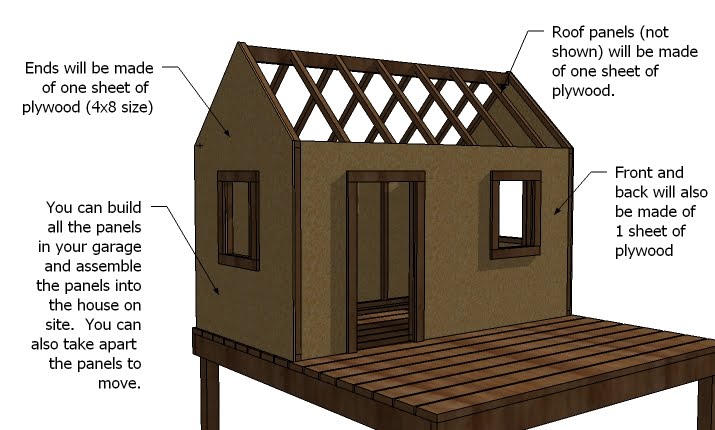
- 2 – Sheets of Plywood Sheathing (I’m using 1/4″ Lauan because it’s water resistant and finished on two sides
- 1 1/2″ nails or Screws (for fastening the sheathing to the studs)
- 2 1/2″ Self Tapping Exterior Screws (for fastening the studs together)
- Wood Glue
- 8 – 2×2 Boards, 8′ Length
- 2 – 1×3 Boards, 8′ Length
Cut List for TWO Gable End Walls
- 8 – 2×2 @ 45″ (Wall Studs)
- 4 – 2×2 @ 14″ (Window Framing)
- 4 – 2×2 @ 48″ (Top and Bottom Plate, cut (1) 48″ and (1) 45″ board from an 8′ 2×2)
- 4 – 2×2 @ 34″ (Both ends mitered down 45 degrees, ends will run perpendicular to each other)
- 2 – Sheets of Sheathing Overall 48″ wide x 72″ tall, top angled down to match rafters
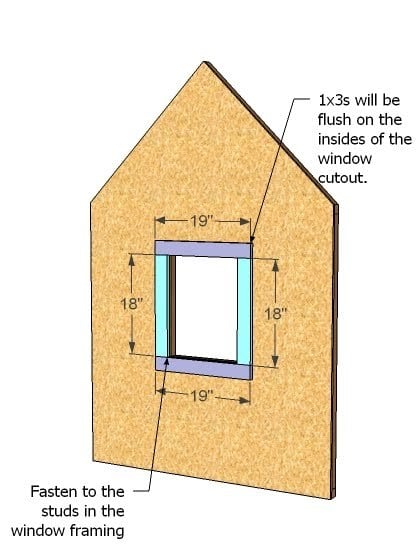
- 4 – 1×3 @ 19″ (Window Trim)
- 4 – 1×3 @ 18″ (Window Trim)


Instructions
Step 1
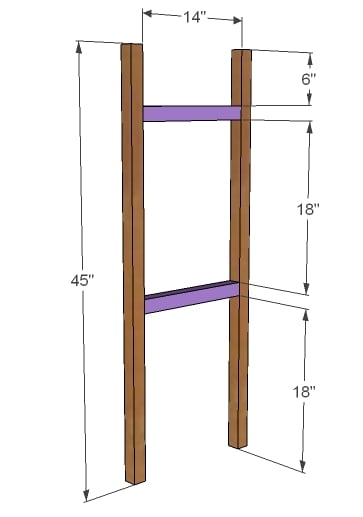
Window Framing
So this is not how you would frame a window in a real house, but because our walls are only 4′ tall and we’re just building a little playhouse, this will be plenty strong. And despite the way the frame looks, the load bearing walls are actually the side walls. Use the 2 1/2″ screws and glue to fasten the studs to the window frame.
Step 2
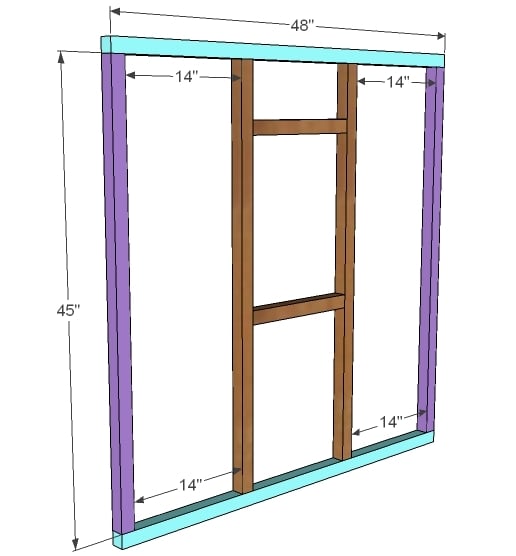
Wall Framing
Now add the top and bottom plates to the window studs, and also screw the end studs to the top and bottom plates. Use 2 1/2″ screws and glue.
Step 3
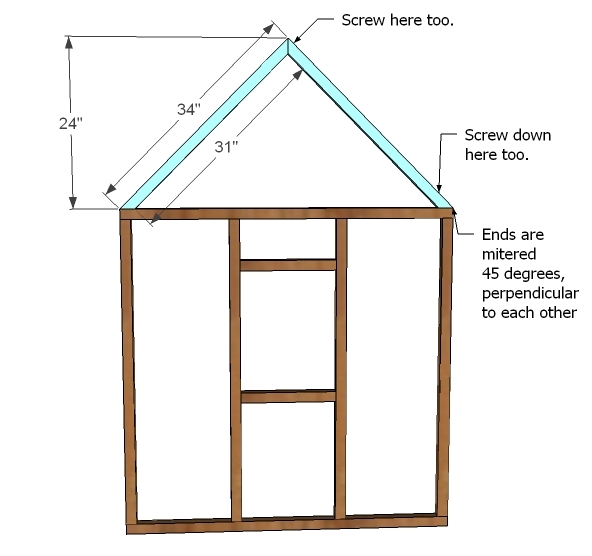
Rafters
Cut your rafters by mitering the ends at 45 degrees. Then use 2 1/2″ glue and nails to fasten the rafters together and to the wall as shown above.
Step 4
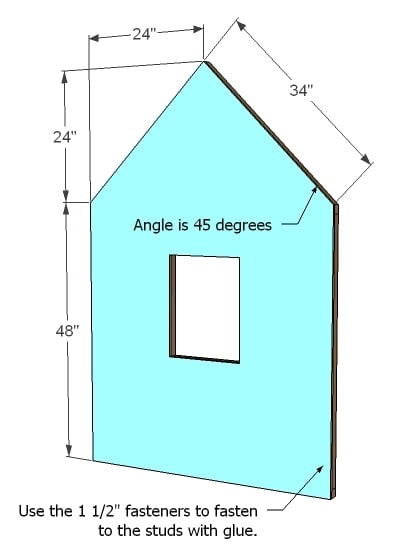
Sheathing
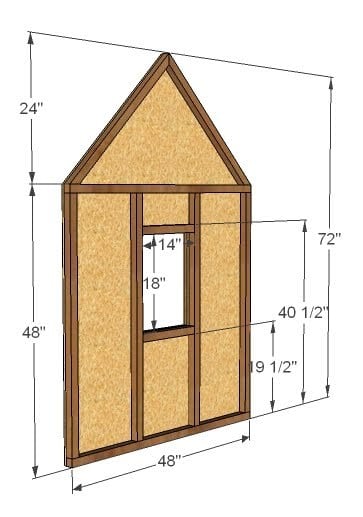
Cut out the sheathing as shown above. Refer to the dimensional diagram for window cutout dimensions. Fasten the sheathing to the studs using 1 1/2″ fasteners and glue.
Step 5
Step 6
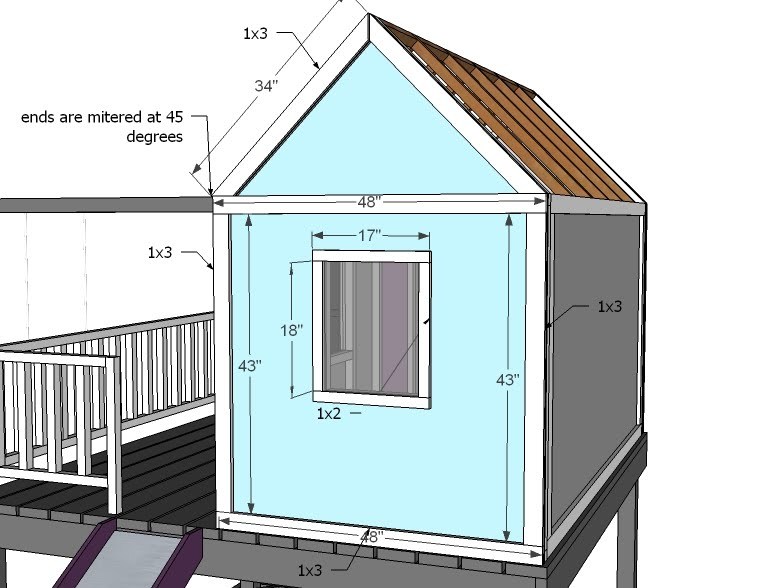
I ended up using 1x2s for the window trim because I felt like when the window itself is put in, the frame will be quite thick. Use the measurements above to guild you when trimming out the gable ends for the playhouse.
4 – 1×2 @ 17″
4 – 1×2@ 18″
4 – 1×3 @ 48″
4 – 1×3 @ 43″
4 – 1×3 @ 34″ (Both ends mitered down 45 degrees)
You will need to in addition to the above cut list purchase (to trim out 2 gable end walls)
2 – 1x2s
6 – 1x3s

Comments
Kirsten (not verified)
Thu, 05/13/2010 - 03:54
Yay! As always, so excited
Yay! As always, so excited and THANK YOU so much for doing this!!
I have a plywood question for you--I have a couple sheets already that are NOT water resistant. Since I live in the PNW, that's not gonna work out:). Do you know what I could put on the sheets (the whole thing, actually!) that would allow me to use what I have?
Love the pic of all of you working on your house!!
Beth (not verified)
Thu, 05/13/2010 - 05:44
If i want to make this bigger
If i want to make this bigger can I just change the measurements and will it still have enough support? I have been planning on making one more like 8X10. Thanks!
Ellefrost8
Thu, 01/15/2015 - 14:39
8x10 playhouse
Did you ever build bigger? I want to do the same thing. Thoughts?
Momma Rhyne (not verified)
Thu, 05/13/2010 - 05:50
About the plywood... most
About the plywood... most isn't water resistant, untreated and laying flat. But once the ends are covered and it is standing upright, as long as it's not in contact with the ground, a good paint job and you should be good.
Don't use pressure treated unless it is in contact with the ground. P.t wood is continually giving off fumes and very hazardous to children, especially if ingested.
Bethany (not verified)
Thu, 05/13/2010 - 06:06
No road access? Do you have
No road access? Do you have to take a boat to get to the road to drive to the orange/blue??!! You must be the most organized person - I can see myself forgetting something and then what! You are amazing!
Ana White (not verified)
Thu, 05/13/2010 - 08:46
Don't limit yourself to just
Don't limit yourself to just plywood. You can get a cabin look by using boards or even use siding. I have some leftover siding from the house that I might just burn up on the playhouse.
Bebedores do Gondufo (not verified)
Thu, 05/13/2010 - 11:48
Very good.
Very good.
Nicki C K (not verified)
Thu, 05/13/2010 - 16:29
WHOA, this is AMAZING! Love
WHOA, this is AMAZING! Love Love Love it!
SusanK (not verified)
Fri, 05/14/2010 - 09:48
This is amazing! How much do
This is amazing! How much do you expect the entire playhouse/slide/swing set to cost to build?
Stephanie (not verified)
Fri, 05/14/2010 - 10:04
My husband and I looked at
My husband and I looked at the picture of the stairs to your adult playhouse and we agreed that it's just the sort of thing we need on our property (we're on a hill, too). So, would you be willing to share what went into your stairs?
Vanilla Comfort (not verified)
Sun, 05/16/2010 - 08:38
I want to build this so bad!
I want to build this so bad! But I'm not sure my two year old is ready for the raised playhouse yet. So I might just build the sand box part this summer and the pannels throughout the year (I have a long list of projects and am a full time nursing student). Plus my major concern is: once I build this, I will have the ENTIRE NEIGHBORHOOD of children in my backyard constantly. I already do and all we have is a plastic 4-wall play structure, the baby kind! I'm not kidding, these poor kids have NOTHING in their own backyards. I wish I could build something for all of them, but NOT in my own yard. I don't want to be responsible when they get hurt and you know they will. I get so nervous when they are out back alone....ug.
Anyways, I'm confused! How old is Grace? Isn't she only 3? So if the deck has been there 7 years, is that her in that first picture? And your hubs is so cute! You have an awesome family.
Ana White (not verified)
Sun, 05/16/2010 - 19:07
Thank you! Grace is 3 1/2
Thank you! Grace is 3 1/2 but the deck that has been there for seven years is the cabin foundation. The small deck we built last summer for our stairs. Next time, we'll build the stairs before the cabin LOL!
Betsy ~ GAhandygirl (not verified)
Sat, 05/22/2010 - 14:30
I'm thinking about NOT
I'm thinking about NOT raising the playhouse and putting the sandbox underneath. that way we could ADD a porch maybe? to make it not so rustic and more girly girl southern. Awesome job.
b. (not verified)
Mon, 07/26/2010 - 12:12
me and my boys (ages 5.5, 4,
me and my boys (ages 5.5, 4, & 1.5) are so excited to get started on this awesome plan! the only trouble i'm having is with the windows. where do you find actual windows to fit the plans dimensions? wondering if i missed something :)
thanks!
robin (not verified)
Mon, 10/18/2010 - 10:42
How much would you say the
How much would you say the whole playhouse cost to build?
critterfam
Thu, 03/31/2011 - 21:55
(No subject)
Guest (not verified)
Tue, 06/07/2011 - 20:22
How much does something like
How much does something like that cost to build?
james c thomas (not verified)
Fri, 06/24/2011 - 02:18
how much would it cost 2 bild
how much would it cost 2 bild the play house i have the slide & swings
sanmaurais
Sat, 04/13/2013 - 17:08
PDF
Hi
I love this playhouse and I will be making for my little girls but for some reason I can't download the PDF version so I can print it out
sanmaurais
Sat, 04/13/2013 - 17:08
PDF
Hi
I love this playhouse and I will be making for my little girls but for some reason I can't download the PDF version so I can print it out
Joshual1177
Mon, 06/03/2013 - 06:07
Modifying to have storage underneath
I have an 8x10 concrete pad and I would like to modify these plans to have a framed and enclosed storage shed underneath this playhouse. I'm wondering how high up I could build this. I was thinking about maybe 4.5 to 5 feet up would be okay. I would frame out and sheath my walls for the shed underneath and anchor them to the concrete pad. Then I could frame the floor but I would probably need a beam to support the load, right? I would run my floor joists across the 8' span then run my decking, (2x4's or 2x6's), perpendicular to the joists.
I guess my two main concerns are:
1. How high up can I have my platform for my playhouse?
2. Do I need a beam to support the joists?
I would really like to utilize my concrete pad for both a small storage space underneath and a playhouse on top.
Joshual1177
Mon, 06/03/2013 - 06:13
.
.
drdanelliott@g…
Wed, 05/20/2015 - 10:08
Double the height
I am building a Tree House platform. I'd like to use the plan you have for this playhouse but need to double the heights (for big people too). If I just double the height of the portion below the peak roof and the depth, will the rest of the plan work?
[email protected]