

Pattern to make a cushion for the Simple Modern Outdoor Collection Sectional.
 By no means to I claim to excel at sewing, and am first and foremost a fan of a nailer, kreg jig and a miter saw. But sometimes a girls just gotta sit down and sew something . . . because she loves a certain fabric or she wants to save a little money on cushions for her huge outdoor sectional she just built.
- I only cut straight lines
- I only sew straight lines
- I only cut with a quilter's cutting wheel and cutting board
- I pin before I sew
- I keep the seam ripper handy
- I do not hand sew
- And I only use fabric I love
- Oh, and I don't sew stripes for anything but curtains
Here's how I would sew one box cushion, the foam measuring 24" x 24", designed for the Simple Outdoor Collection Sectional.
- 1 Yard of 54" Wide Decorator Weight Fabric (you can spray the fabric to make it waterproof and mildew resistant later if it's not outdoor fabric) Fabric shown is Waverly Sun and Shade Lennox
- 3 Yards Piping
- Thread
- 24" x 24" x 3" thick foam piece
- Zipper Foot

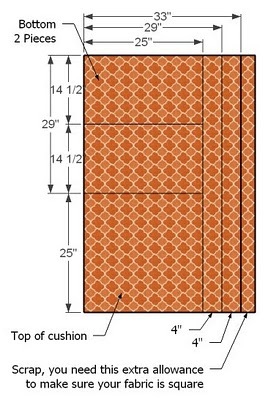
Begin by squaring your edge of fabric (because the yardage you bought is probably not 100% square. You just need to do this on one cut edge). Then cut your fabric as shown above.
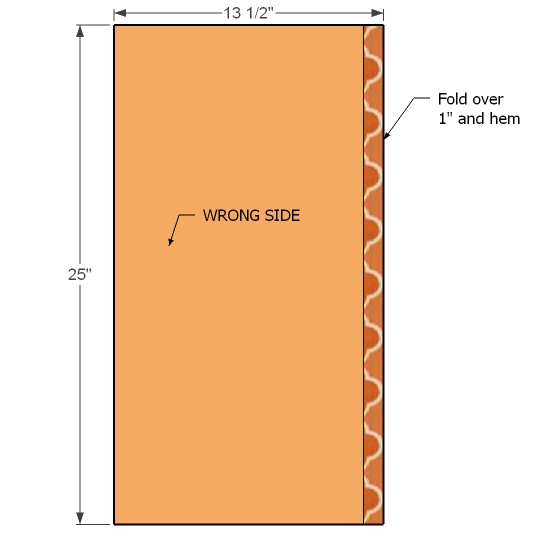
Take the two pieces that are 14 1/2" x 25" and hem one edge as shown above. Press.
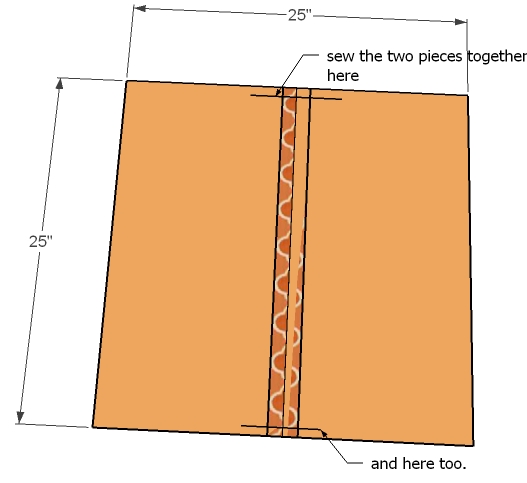
Sew the two back pieces together, as shown above, so that the total back piece is 25" x 25". Your seam allowance is 1/2". I recommend either sewing some buttons to keep the back closed or pressing some iron on Velcro in place. The opening is so that you can take your cover off the cushion (and also because I don't hand sew or blind stitch my pillows closed).
With your zipper foot on, sew your piping to the tops and bottoms of the cushion covers. Remember that the maximum seam allowance is 1/2". I love piping, especially when contrasted sharply like in these pillows, but it's mostly decorative (and makes your cushion look more like a cushion and less like a pillow).
This is probably not the right word, but I don't claim to be a seamstress, and it's what I would call it if it was wood. So take your 4" wide strips and sew the ends together to get 1 4" wide strip about 108" long. Then sew your banding to the tops and then the bottoms just like you did the piping. Finally, sew the two ends of banding together, and trim the ends.
I strongly suggest you review a few of these sites before sewing this cushion. There are much brighter people out there than me.
Sew 4 Home Box Cushion (You must check out the entire site, it's amazing)
Threads Magazine Sew the New Box Pillow
A Throw Pillow with Zipper from Design Sponge (with the ladies running around, I dare not try to take the time to put zippers on anything)
Sewing.org's Teen Cushion Couch (makes me want to hack you know what couch)
Alternative Windows Box Cushion
Mildly Crafty's Pillows
And also, if you sew and you are smarter than me, feel free to ad advice in comments. You're wisdom is much appreciated!


Comments
Jeannine (not verified)
Mon, 05/17/2010 - 02:20
I left this same comment on
I left this same comment on the post of the actual furniture. I didn't see this post when I left it there. So ignore the duplication, just wanted to make sure it was in the right place.
A couple comments on the cushions. There are different types of foam - make sure if your sectional is going to be outside (not inside a screen porch) that you buy OUTDOOR foam. It cost more, but it will dry quicker and will not mold or rot after repeated times getting wet and air drying. Same with the fabrics. If it will be outside, invest in outdoor fabric. Regular "indoor" fabric will mold rather quickly and will fade and wear out from sun, wet, dry, weather.
The cheapest place to buy foam is from ebay. Do a search for it and you will find many places that sell it. I bought 2 types of foam (harder foam and memory foam) off ebay and made my own tempurapedic mattress last year. The whole thing cost me about $200 as opposed to a $1200 tempurpedic mattress.
Also, if you make cushions, make sure you add zippers. They do take an extra step, and there is the cost of the zipper, but when your cushions get dirty and you want to wash them you will be happy! Otherwise you will have to take them apart to get them off and then when you wash them that edge you had to take apart will probably fray and you will have a hard time putting them back together (I am telling you this from experience!!!).
Love the plan though and can't wait to see a finished project.
In reply to I left this same comment on by Jeannine (not verified)
biz_kid1
Fri, 04/01/2011 - 06:14
You can make your own mattress?!?!?!?
Side note: can I get instructions for how to accomplish the mattress, please? My jaw just dropped to the floor - that's genius! =)
In reply to I left this same comment on by Jeannine (not verified)
aria_dia
Thu, 06/02/2011 - 20:23
Mattress plans?
I agree with biz_kid1
Can you post how to make your own mattress? My husband and I have been wanting to buy a new mattress but the idea of $1200 is just mind boggling to me, how can they justify upping prices that much?!
Melissa (not verified)
Mon, 05/17/2010 - 04:15
I love this plan! When
I love this plan! When looking at the sectional without the cushion on it I realized that the back is completely open. What are the chances that the cushion will fold and fall through?
Robyn Fish (not verified)
Mon, 05/17/2010 - 05:06
TIP: You can use vinyl
TIP: You can use vinyl tablecloths to cover the cushions to keep them waterproof!
Danielle (not verified)
Mon, 05/17/2010 - 10:37
I'm in agreement about
I'm in agreement about waterproof cushions. In my experience, the water-proofing sprays help the fabric shed the water a bit better, but don't actually prevent penetration in a big downpour...and regular foam is basically a sponge. Even two days after a rain, the cushion may still be full of rain, and an unsuspecting person could sit down squeezing that sponge of water all over them.
The outdoor foam is EXPENSIVE, and I've been thinking about this. I was also thinking about a vinyl covering, but cushions need to "breathe"...the air will squeeze out and find its way out of the cushion, but then have a hard time fluffing back up. (I ran into this recently when I cut up pieces of foam to refill a vinyl beanbag, hoping it would feel more like a LoveSac, but it just goes flat, and I have to unzip it to get the foam to fluff back up.)
So I'm thinking something along the lines of using a cheap foam, and covering it with a heavy-duty vinyl (like a table cloth), on the top sides, and half or so of the bottom.. (On a 24 inch cushion, I could see covering it about 4 inches all along the bottom.) Then covering the cushion in an outdoor fabric like Sunbrella, although I think one of the coatings on another fabric could be okay. Then, the cushion would be waterproof, as long as it isn't used upside down....plus, it could still "breathe", the air would squeeze out the bottom and be able to come back into it when the person using it got up...but water wouldn't be able to flow straight into the cushion, absorbing into a heavy mass like a regular upholstery cushion would.
I'm planning to experiment with this in the next couple of days, so if anyone is interested in how it turns out, I'll be glad to let you know if I think it's going to work.
Also, www.overstock.com has pretty good prices on pre-made outdoor cushions, although I haven't looked specifically for these sizes...but if there was a way to get the cheap cushions to work out, it would be SO MUCH CHEAPER.....more inconvenient in that it wouldn't be "reversible", but an inconvenience that seems worth saving hundreds over buying outdoor foam for a sectional that large.
L Sierra (not verified)
Wed, 07/18/2012 - 02:39
Cushions with Vinyl Tablecloth
How did your cushions turn out? Just curious because I wanted to try your method. Thank you!
Loni (not verified)
Mon, 05/24/2010 - 05:33
Hi, I just wanted to share
Hi, I just wanted to share what another woman shared with me. She gave me this link to another way of sewing the box cushion that seems pretty easy for someone like me who's never sewn before. (I need lots of pictures, lol)
http://www.threadsmagazine.com/item/4322/sew-the-new-box-pillow
Evelyn (not verified)
Mon, 01/10/2011 - 20:43
Thank You Ana, It doesn't
Thank You Ana,
It doesn't matter which of your sites I view - they are all fabulous.
You do the things I'd like to do. . . and now that I have a Slide Arm Mitre Saw, I will do more of these projects. I got one as a gift over the holidays.
I have a particular interest in a childs table and chairs with Drawers (especially a table drawer)
I was also thinking of a drawer for under neath the seat of the chair (it would have to pull out to the side of course).
I bought a small child's table at a second hand store - it was in excellent condition, so I bought it for $4.00. But I had in mind that it needed a drawer for papers, coloring books and crayons and such, so I made one.
I do not own a router (yet) so I made the best I could without that. The table has a drawer (not exactly the way I wanted it but it works> I also made 2 chairs using 2x2's for most of the frame (chair legs included) and I painted it Pink - That's my granddaughter's favorite color. She loves it_ I just would have liked to have done a more perfect job... I made this set before I had my new saw, and my husband used a hand saw to cut the parts - those saws seldom cut a straight edge.
If you can conjure up a pattern like that and share it with us - that would be execllent. You're a girl after my own heart Ana.
Thank you.
Guest (not verified)
Tue, 03/22/2011 - 21:36
Another Waterproofing Option
I just thought of this idea, similiar in theory to using vinyl tablecloths with non-waterproof cushions to save $. What about using waterproof bed covers? I have some left from my kids (don't we all? Oh wait, maybe i'm the only one that has kept them? LOL I've seen them at thrift stores too...). I like the idea of the elastic around the edges for ease. I will probably even use two, one from the bottom up, topped with one top down to ensure water doesn't get in thru the bottom of the cushion.
I haven't priced new ones from the store, so i'm sorry i don't know if this is a good alternative to wrapping with tablecloths. Anyone elsse have thoughts? I will update if needed.
As always, THANK YOU ANA!
Mark (not verified)
Tue, 03/22/2011 - 22:36
Most of the stores in the
Most of the stores in the springtime sell chair and table covers. If you cover your outdoor furniture when not in use, it will be cleaner - no dust that turns to mud from dew. Additionally, you will also protect your finish and fabric from the UV rays of the sun. Build a storage box to toss the covers in when the furniture is in use! Or build a waterproof storage box to toss the cushions in....
Char Haas (not verified)
Fri, 04/01/2011 - 06:42
Just a word about piping...
While piping is pretty- it is NOT just decorative. It functions to protect the edges of your cushions from wear. When your piping is worn and beginning to fray, you can trim it carefully off, or even deconstruct your cushions, and replace just the piping. That's why I use plain, inexpensive, contrasting piping. iI saves my more expensive cushion fabric, and my cushions last longer!
lunati515
Tue, 09/25/2012 - 06:39
velcro
I'm new to sewing & I got some fabric to change my window seat cushions..... can you use velcro for closure instead of a zipper
In reply to velcro by lunati515
romanweel
Fri, 02/01/2013 - 10:07
Velcro
For indoor projects, velcro does just fine (NOT the sticky-back kind on fabric, I promise it's not worth it! Use the kind you have to sew on, and do it either on a machine or by hand with a good thimble). For outdoor, I don't think I'd use velcro simply because the female side wears out so quickly in the elements. Ties (super easy) or sew-on snaps (also easy) or tabs with buttons (not that easy) would hold up better and look nicer, I think. Or you could do like some pillow cases I've seen where the bottom panel wraps up and around the top, and the top cover simply ends over the side...no closures necessary at all. Just my 2 cents.
biz_kid1
Tue, 09/25/2012 - 06:48
Sewing cushion closures...
You can use velcro if you'd like. You can use snaps or buttons or zippers or hook & eye or ribbon/ties/lacing...anything you want! You just need to consider your skills & abilities and the use of the fabric/cushions!!!
WorkShopWendy
Fri, 06/21/2013 - 05:19
New Product @ HomeDepot !!
I was reading the plans and comments on how to make these cushions and treating them to make them weather resistant. I work at The Home Depot and we just got a new product called "Never Wet" and can be used on lots of different materials, including fabric. It's a two step kit and it sells for around $20. It's areosol and seems easy to use. We just got it in our store and I have'nt had a chance to try it out but I will this weekend and post my findings, unless someone has already tried it and can comment on it.