
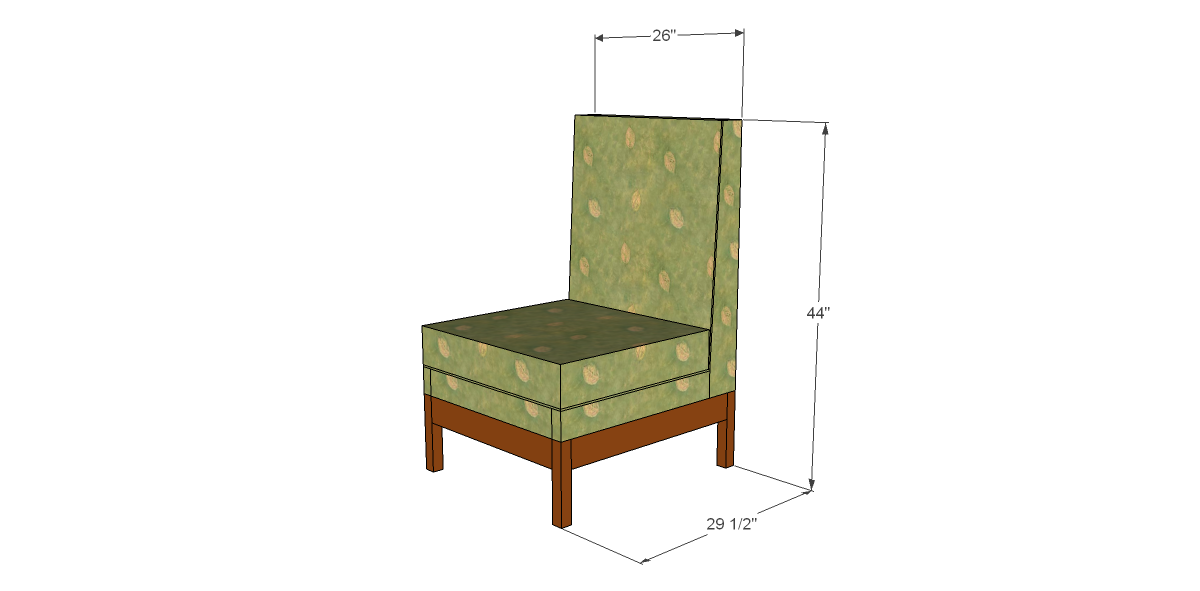

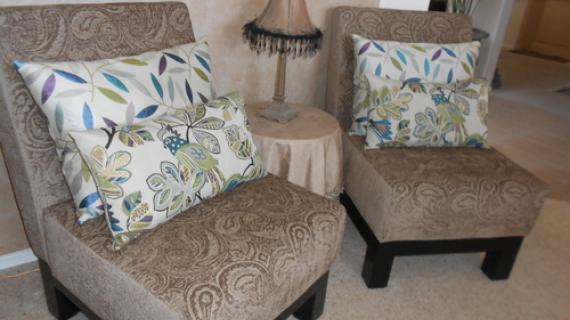
A few years ago, Ana posted a drawing of a slipper chair on the Knock-Off Wood Facebook page. She hadn't had time to create the plans... I wanted to build the chair so I hacked Ana's drawing and created plans for it!

Preparation
1 – 2x2 at 6’
3 – 2x4 at 8’
1 – 2x6 at 8’
Half sheet of ¼” lauan or hardboard
2-1/2” pocket hole screws
1-1/4” brad nails
4 – 4” carriage bolts with nuts
8 – fender washers
1” upholstery foam
5” upholstery foam
Upholstery batting
Fabric
Upholstery tacks
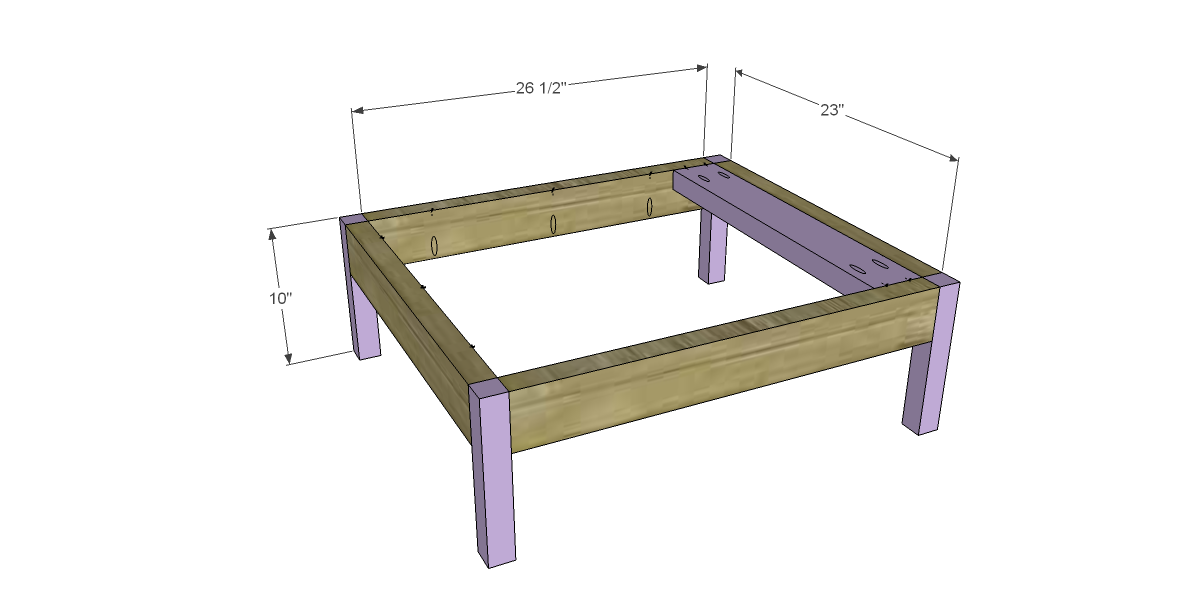
4 – 2x2 at 10” – Legs
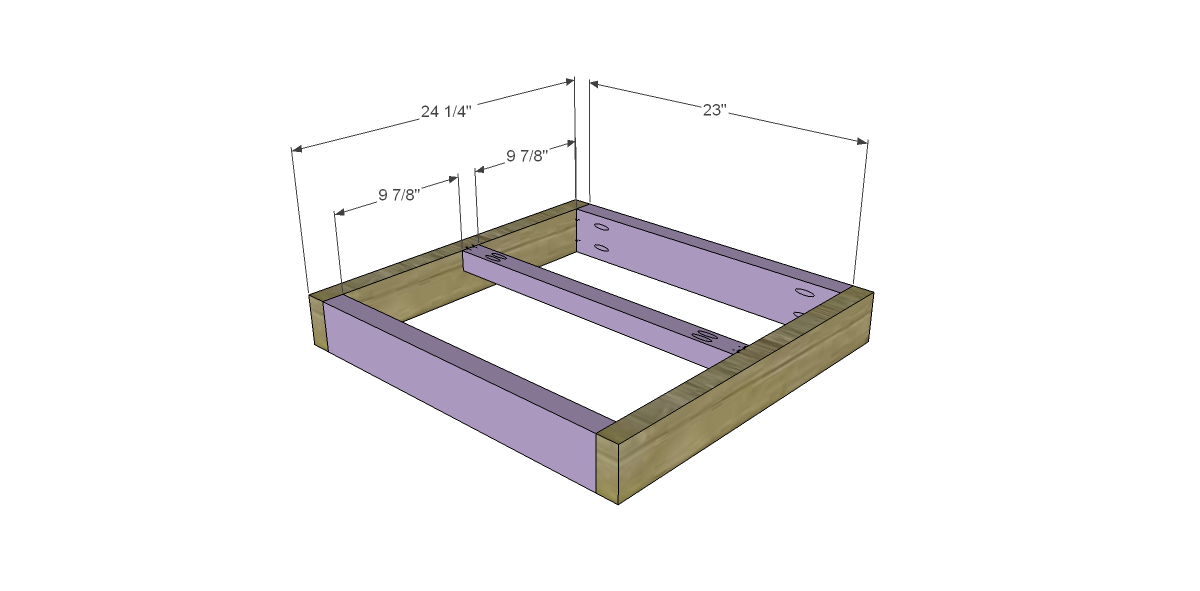
5 – 2x4 at 23” – Leg Frame, Support, & Seat Box
2 – 2x4 at 26-1/2” – Leg Frame
2 – 2x4 at 24-1/4” – Seat Box
1 – 2x2 at 23” – Seat Support
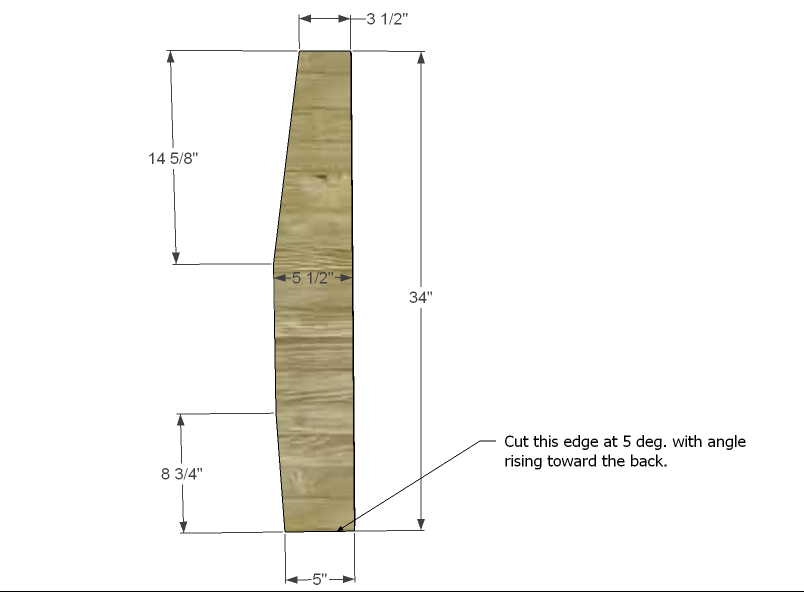
2 – 2x6 at 34” – Back Frame Sides
3 – 2x4 at 23” – Back Frame
1 – 2x6 at 23” (ripped to 5” wide) – Back Frame Bottom
1 – ¼” lauan or hardboard at 26” x 30-1/2” – Back
1 – ¼” lauan or hardboard at 23-3/4” x 26” – Seat


Please read through the entire plan and all comments before beginning this project. It is also advisable to review the Getting Started Section. Take all necessary precautions to build safely and smartly. Work on a clean level surface, free of imperfections or debris. Always use straight boards. Check for square after each step. Always predrill holes before attaching with screws. Use glue with finish nails for a stronger hold. Wipe excess glue off bare wood for stained projects, as dried glue will not take stain. Be safe, have fun, and ask for help if you need it. Good luck!
Instructions
Step 1
Cut the pieces for the frame. Drill pocket holes in each end of the 2x4 pieces, as well as one long edge of the sides and the front (to attach the top). Assemble using glue and 2-1/2" pocket hole screws. Paint or stain as desired and set aside.
Step 2
Cut the pieces for the seat box. Drill pocket holes in each end of the shorter pieces, as well as the 2x2 support. Assemble the frame as shown using glue and 2-1/2" pocket hole screws.
Step 3

Cut the piece for the seat and attach to the frame using glue and 1-1/4" brad nails.
Step 4
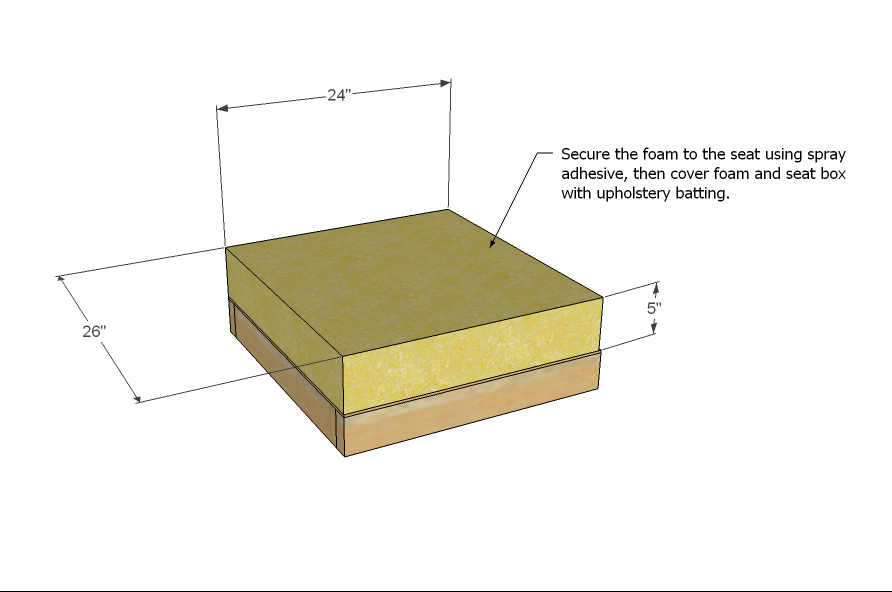
Cut the 5" foam and position on the seat with spray adhesive. Cover the foam and seat box with upholstery batting, then fabric. Secure to the underside of the box using staples.
Step 5
Step 6
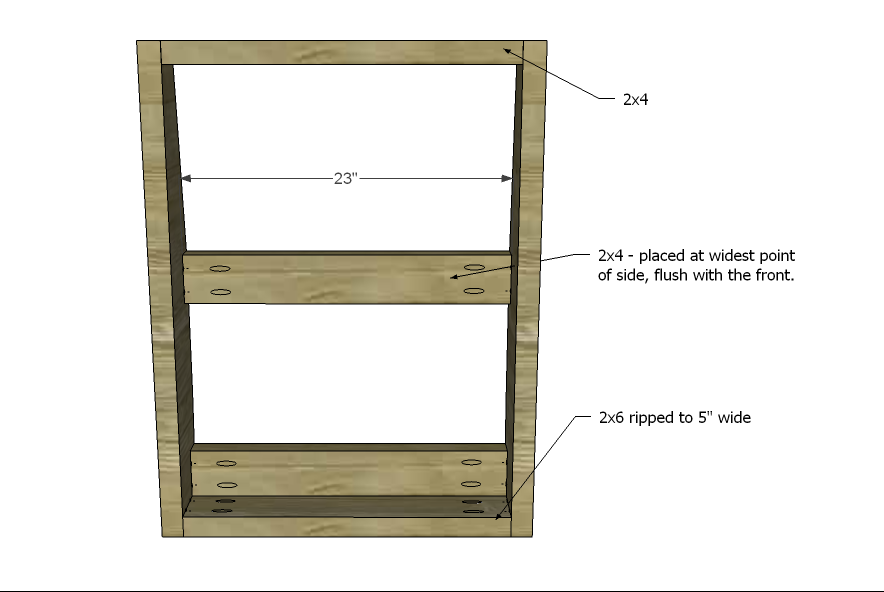
Cut the remaining pieces for the back frame and drill pocket holes in each end. Position as shown and secure using glue and 2-1/2" pocket hole screws.
Step 7

Cut the piece for the back rest. It will bend slightly over the curve. Secure using glue and 1-1/4" brad nails. Position the 1" foam using spray adhesive. Cover the back rest, sides, and top of the back frame with upholstery batting and fabric. Staple to the inside of the frame.
Step 8
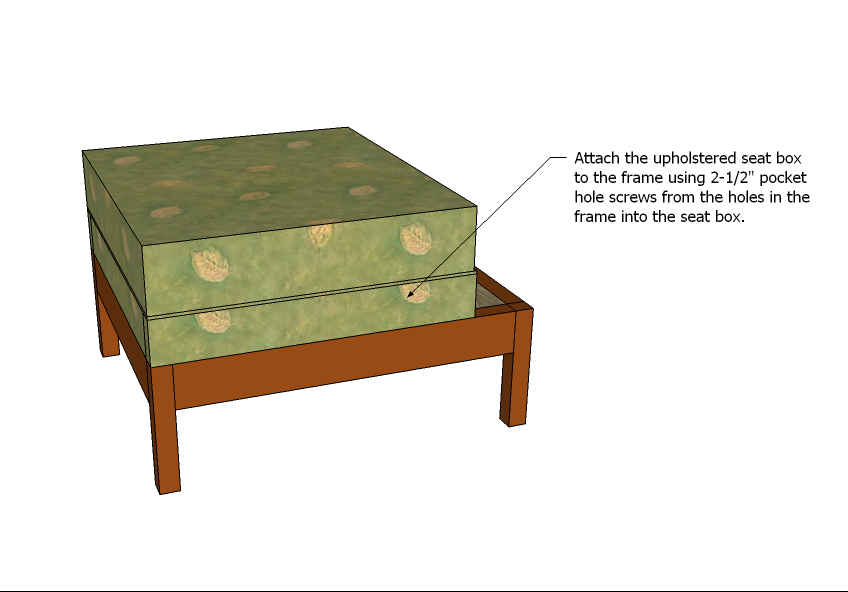
Position the seat box on the frame and secure using 2-1/2" pocket hole screws drilled through the upper edges of the frame.
Step 9
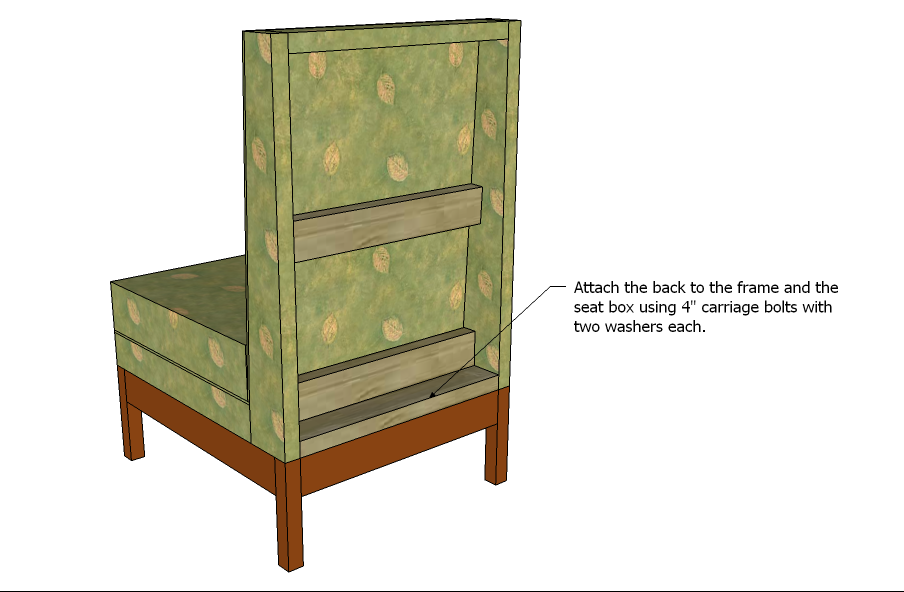
Position the back frame and clamp in place. Drill two holes (for the carrieage bolts) through the lower stretcher on the back frame into the seat box, as well as through the bottom piece of the back frame into the chair frame. Insert the bolts using a washer on each side of the pieces and tighten with a socket wrench. Cut a piece of the fabric to cover the exposed area of the back and secure in place using upholstery tacks.
It is always recommended to apply a test coat on a hidden area or scrap piece to ensure color evenness and adhesion. Use primer or wood conditioner as needed.

Comments
katherinecm
Fri, 01/11/2013 - 18:03
Is it comfortable?
I'm wondering if the board under the foam (instead of springs) makes this too hard.
Ana White
Fri, 01/11/2013 - 18:31
Thank you so much for hacking
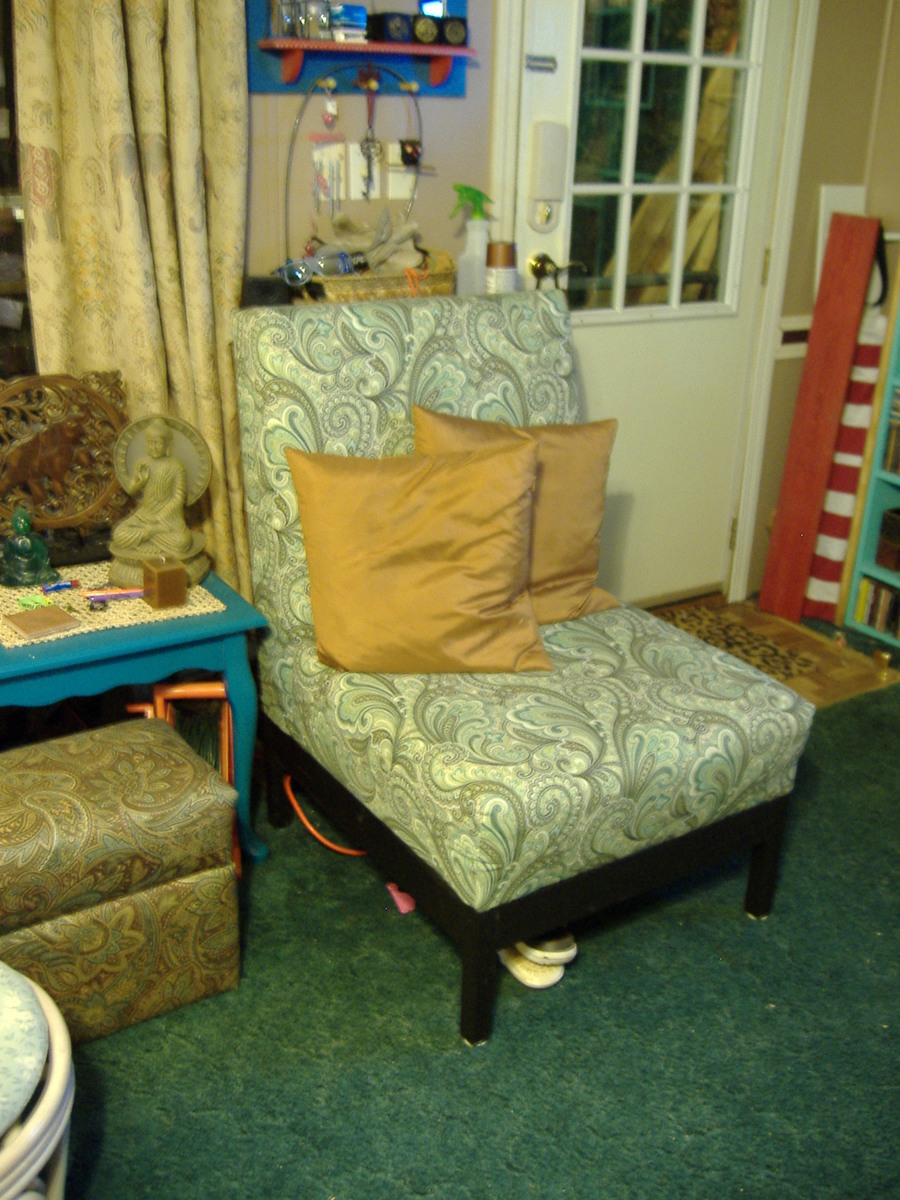
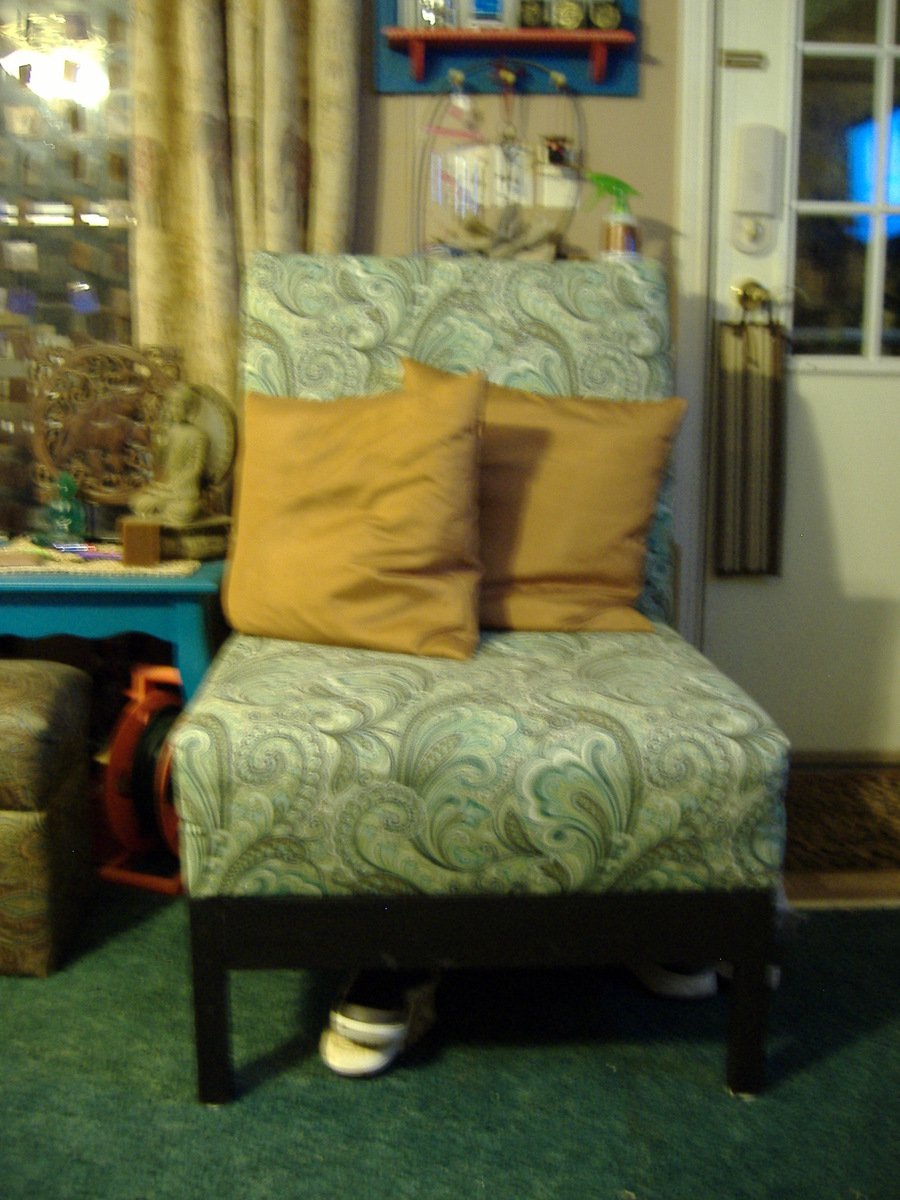
Thank you so much for hacking and posting! These projects (upholstery) take much longer to make (thank you!) and I'm so glad you just went for it! The chairs are beautiful, love your fabric, and they look really nice and comfy! Ana
In reply to Thank you so much for hacking by Ana White
designsbystudioc
Sat, 01/12/2013 - 10:44
Thank you!
Thanks so much! I know it takes a lot of work to create plans and I was just impatient! I'm sorry it took so long to finally share them!
designsbystudioc
Sat, 01/12/2013 - 10:43
Comfort..
It is absolutely comfortable... especially if high-density foam is used! The seat is wide enough for me to sit on it cross-legged and I really like it!
redhead_61
Mon, 01/14/2013 - 15:47
stability
This is awesome. I have been really annoyed lately with the recliner my husband loves that takes up WAY too much space in my tiny living room. I have been wanting to build a chair for a while now.
How do you feel about the stability of the back on this? Do you feel any give when sitting in it. I have kids and would hate to do the work for it not to hold up! I so want to build this!
In reply to stability by redhead_61
designsbystudioc
Tue, 01/15/2013 - 19:52
Stability
It seems perfectly stable to me! I used carriage bolts in two places just for that reason - so it won't wobble! I have kids also (teenagers) and they use it more than I get to! Hope this helps!
CChe2001
Tue, 01/29/2013 - 06:43
Tool assistance
Hi! I'm a college kid moving into a new unfurnished apartment, and could use an alternative to expensive furniture so this site is great. I have a tiny vehicle so garage sale is even difficult for me. I love this chair, but have absolutely no tools. I have allocated $150 for just tools, what are the essentials/must-need-tools that I need to have in order to start building? I would really appreciate a list, if possible, and I might be able to purchase tools second-handed. Please and thank you!
In reply to Tool assistance by CChe2001
redhead_61
Tue, 01/29/2013 - 11:06
Go up to the top of the
Go up to the top of the webpage and on the left hand side, the second little design bullet says GETTING STARTED. Ana talks about tools and advice. I would definitely look at second hand tools. People get rid of perfectly nice shop set ups all the time. Most people on here use a Kreg jig which is an amazing tool. Also remember that if you are near a Home Depot or Lowes they will can cut a lot for you. Good luck.
CChe2001
Tue, 01/29/2013 - 14:10
Thank you! I completely
Thank you! I completely forgot about Home Depot and Lowe's. I appreciate the suggestions, the last time I did anything with saw was making a birdhouse ten years ago in middle school so I'm a little bit nervous about getting started. But furniture is really expensive and the nearby Ikea is about 5 hour drive from me. Thanks again!
In reply to Tool assistance by CChe2001
designsbystudioc
Tue, 01/29/2013 - 11:08
Tools on a budget...
Hello! If you're just starting out, a drill can be purchased very inexpensively. I bought a Black & Decker at Walmart (for about $50) and was really pleased with it. Another great tool would be the Kreg Jig Mini (I think they are about $25-30). You will love it! I also have a circular saw that I also bought at Walmart for $30... I've had it for about six years and used the heck out of it! I did ditch the blade first thing and bought a better one. Then, a jigsaw can also be purchased inexpensively. The one I have is also a B & D, and I've used the heck out of it also. Check Amazon, Craig's List, eBay, and Walmart. You may still have money left over! Hope this helps and good luck... You'll be addicted in no time!
CChe2001
Tue, 01/29/2013 - 14:12
Thanks for the starter list!
Thanks for the starter list! I will check out these places and craig's list as well. Should I get a sander as well while I'm looking for the saws and drill?
In reply to Thanks for the starter list! by CChe2001
designsbystudioc
Tue, 01/29/2013 - 19:23
Starter List...
Duh, sorry! Yes, of course! A sander is most important and is inexpensive, also!
Bbethb79
Fri, 02/08/2013 - 18:01
Love this chair!
Hello! I'm new to this site and loving everything I see. I am also fairly new to building, although I am my father's daughter and have his love for woodworking running through my veins!! I am currently trying to redo my home and have set a personal goal to do as much work as I can myself and other than the cost of a good quality sofa, do as cheaply as I can do. Aprox how much did this chair cost you to make? Also, how many yards of fabric did you use? I understand that fabric can get expensive as I have reupholstered one chair already. I would love to actually build this chair versus buying and reupholstering the next.
Thanks in advance for your help!
Beth
In reply to Love this chair! by Bbethb79
designsbystudioc
Tue, 02/12/2013 - 14:01
Cost
Hello! I think I spent less than $50 to build the chair. I used a little less than 3 yards of fabric and I usually buy mine through fabricguru.com. Their fabric is awesome and extremely inexpensive. Hope this helps! Happy Building!
crystals
Thu, 12/19/2013 - 07:55
tools question
Is it essential to use a compound miter saw here? Could I measure the angles by hand and cut them? I'm totally new to building, but it seems as though the angles here are simple, unless I'm not understanding the directions properly. Thanks!
In reply to tools question by crystals
designsbystudioc
Thu, 12/19/2013 - 15:22
Cutting by hand
You can absolutely cut by hand. A miter saw just makes it easier. I don't have a good relationship with the handsaw!
AdkinsMom
Mon, 02/16/2015 - 11:06
Looking for sizes
What size carriage bolts and fender washers are needed for this project? I went to Home Depot with the info provided in the description but there are several sizes available.