


How to build your own kitchen cabinet base plans from ana-white.com
Hello DIY Friends!
Today we have such a very special post for you.
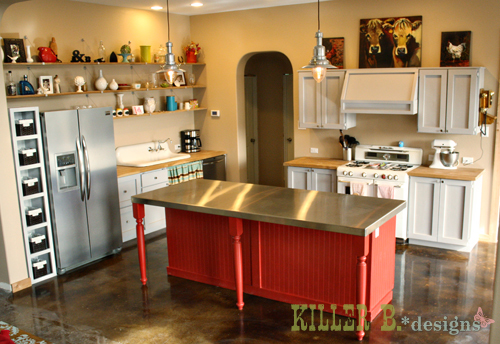
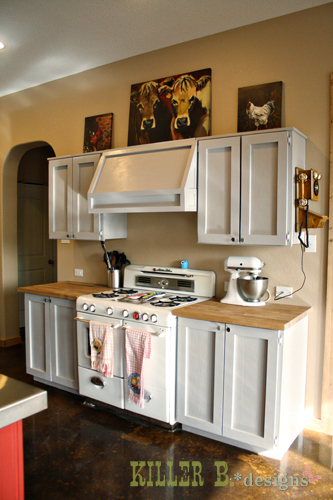
My dear friend Brooke from Killer b. Designs is building a new house, and they are DIYing much of it themselves. Brooke is already an amazing builder, and when it came time to tackle the kitchen, she decided to DIY the kitchen cabinets!

Yep, It's all DIY!

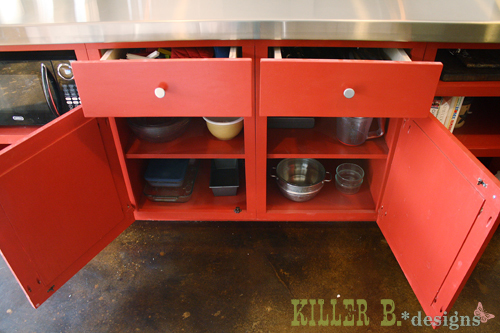
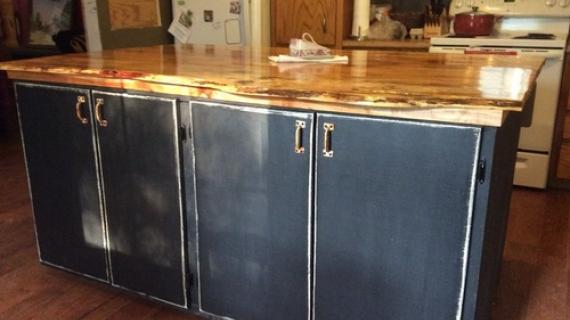
Right down to the bright red island custom fit for a microwave!

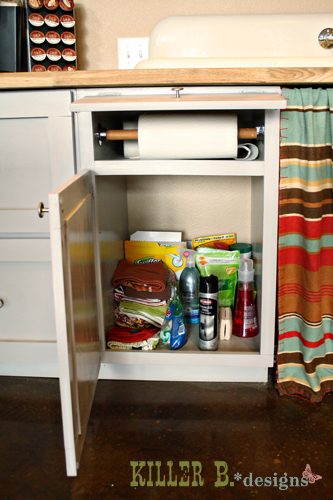
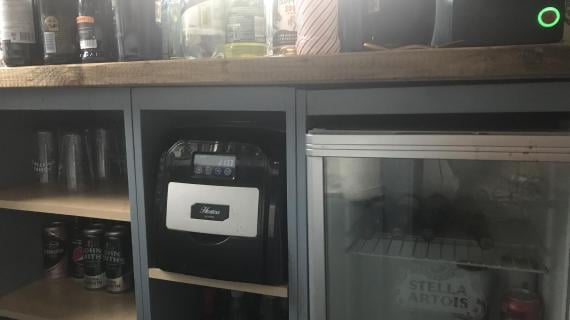
And the paper towel holder built right into the kitchen design!
Amazed already?
There are tons tons tons more pictures and details on Brooke's kitchen, but it would be unfair to you to not go visit Brooke and read from her all about her DIY kitchen.
From Brooke:
Handbuilt Vintage Country Kitchen
Customizing 21" Drawer and Paper Towel Cabinets
Must reads if you are even considering redoing your kitchen or any cabinetry in your home!
Why not save hundreds (if not thousands) of dollars, build your cabinets with PureBond Formaldehyde-free 3/4" thick plywood, and get EXACTLY what you want?
Thank you so much Brooke for sharing your DIY kitchen with us today!
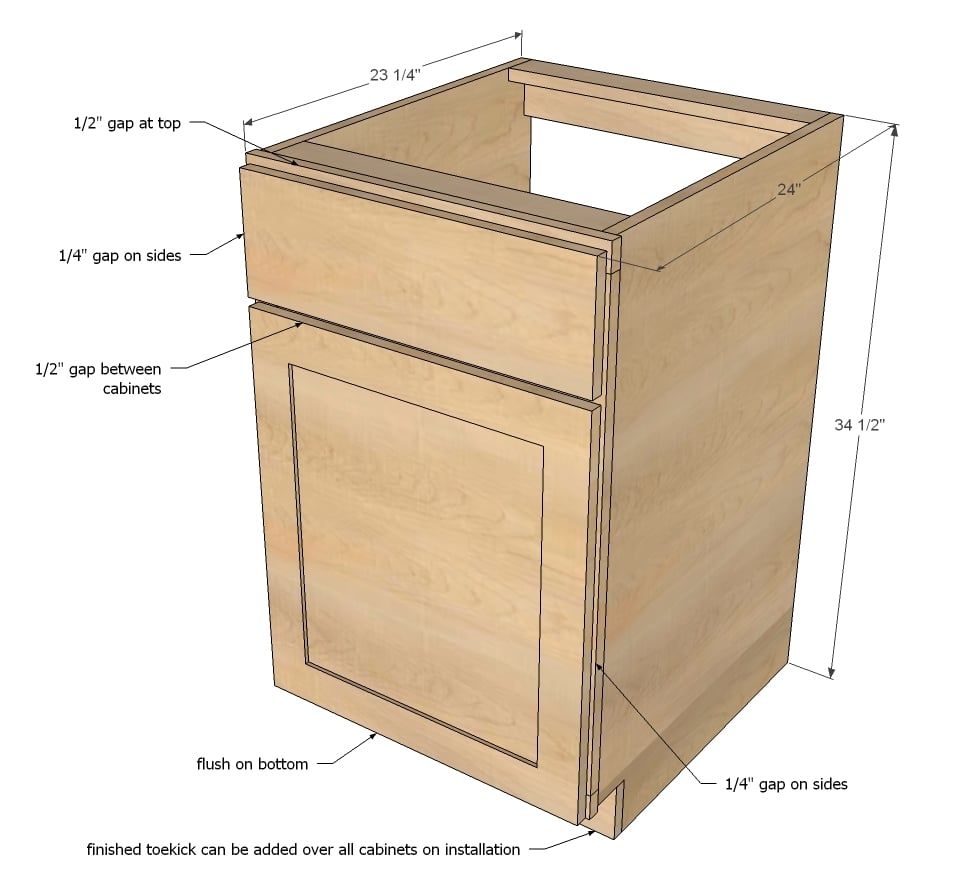
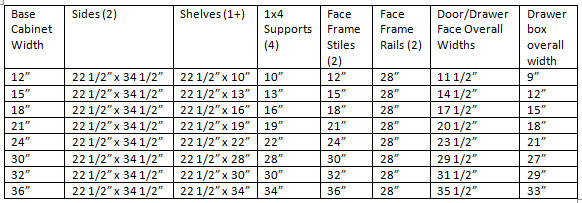
And OF COURSE we've got you covered with the plans as well if you want to build your own kitchen cabinets. In today's plan, I'll show you how to make a base cabinet carcass. You can customize the width to any width you like, but I recommend staying under 36" to avoid having saggy shelves or having to reinforce the countertop for support. We'll get into specific drawer posts and door options later on. Read on!
NOTE: I do work with (and love) the folks at PureBond Plywood, but this here post is not sponsored by them.
Preparation
3/4" cabinet plywood (PureBond shown) ripped into 22 1/2" widths
1x4 boards (can be pine) for bottom supports and top supports
1x2 boards for face frames in wood species matching cabinet plywood
1/4" plywood for backs if desired and also can be used to finish off exposed kitchen cabinet ends and ripped into strips to finish off toekick after cabinet installation
1 1/4" pocket hole screws


Please read through the entire plan and all comments before beginning this project. It is also advisable to review the Getting Started Section. Take all necessary precautions to build safely and smartly. Work on a clean level surface, free of imperfections or debris. Always use straight boards. Check for square after each step. Always predrill holes before attaching with screws. Use glue with finish nails for a stronger hold. Wipe excess glue off bare wood for stained projects, as dried glue will not take stain. Be safe, have fun, and ask for help if you need it. Good luck!
Instructions
Step 1
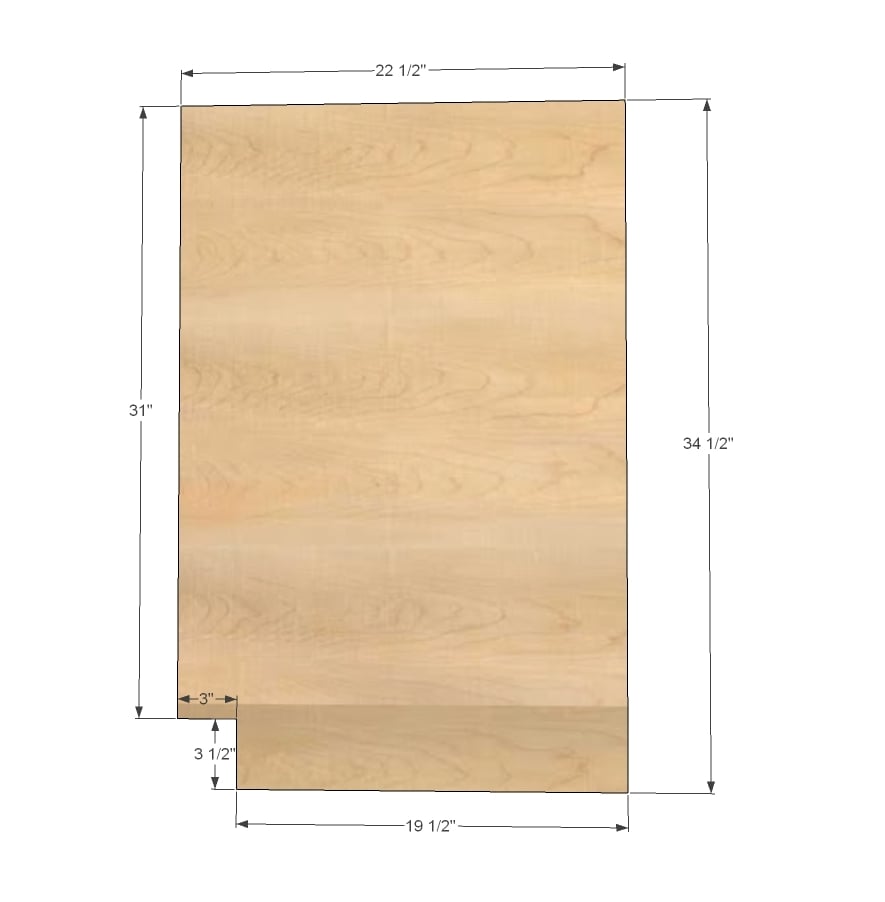
Rip plywood into 22 1/2” wide strips. Save the leftover scrap piece, you can use it as a support board in step 3, or use it to make corner bracing.
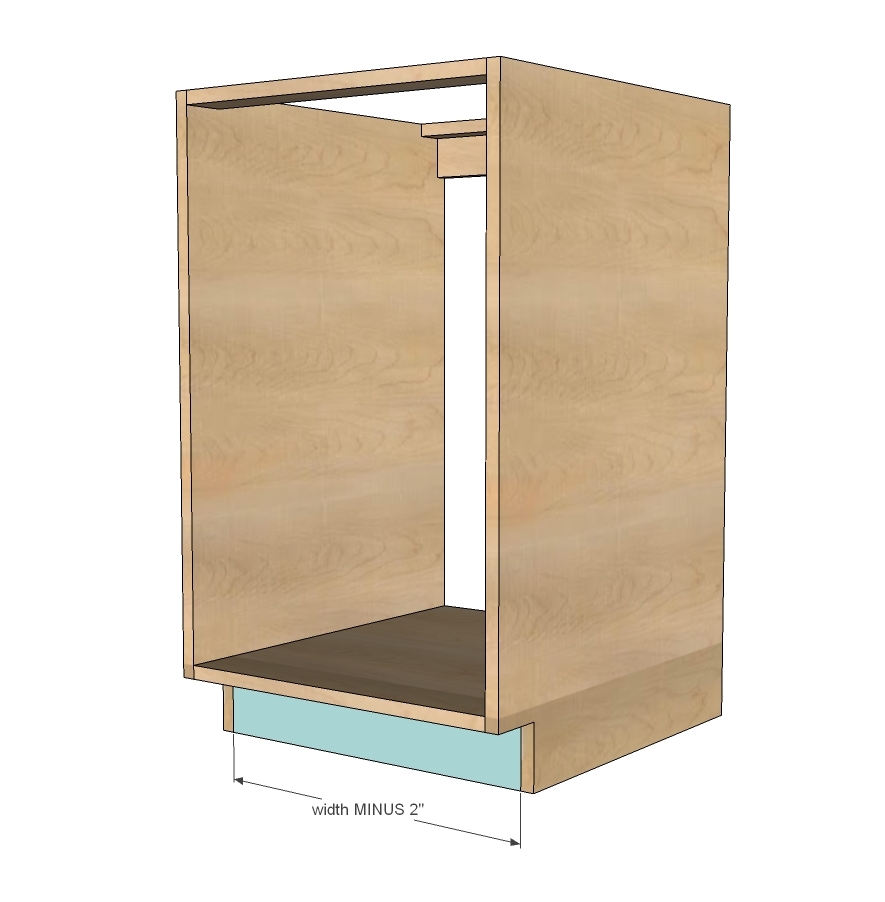
For each base cabinet, you will need two sides. Cross cut the 22 1/2” strips down to 34 1/2”. Notch out toekick with jigsaw.
NOTE: If you wish to attach face frames with pocket holes, drill 3/4” pocket holes on inside front edges of the sides.
Step 2
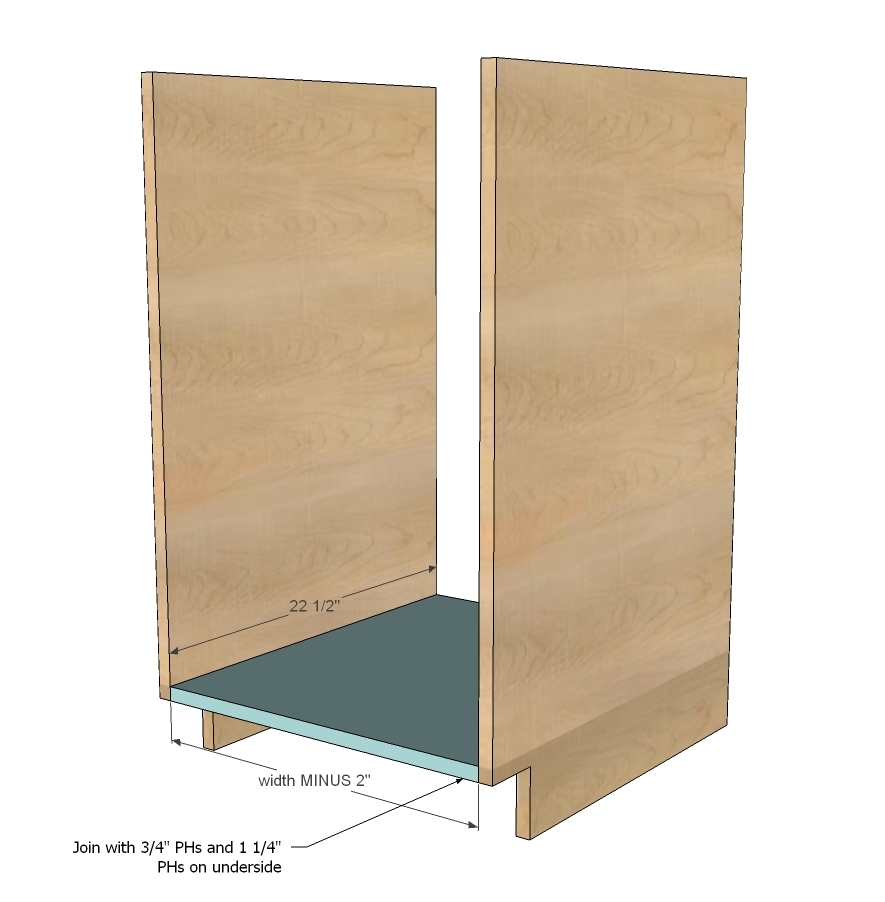
Cut shelves from 22 1/2” wide strips. You will need at minimum a bottom shelf. You can cut additional shelves as well. For all fixed shelves, drill 3/4” pocket holes on 22 1/2” long sides and attach to sides with 1 1/4” pocket hole screws. Note that your carcass is 1/2” less in overall width than your desired finished cabinet dimensions.
NOTE: for face frames attached with pocket holes, also drill 3/4” PHs facing forward for attaching face frames in later steps on underside of bottom shelf.
Step 3
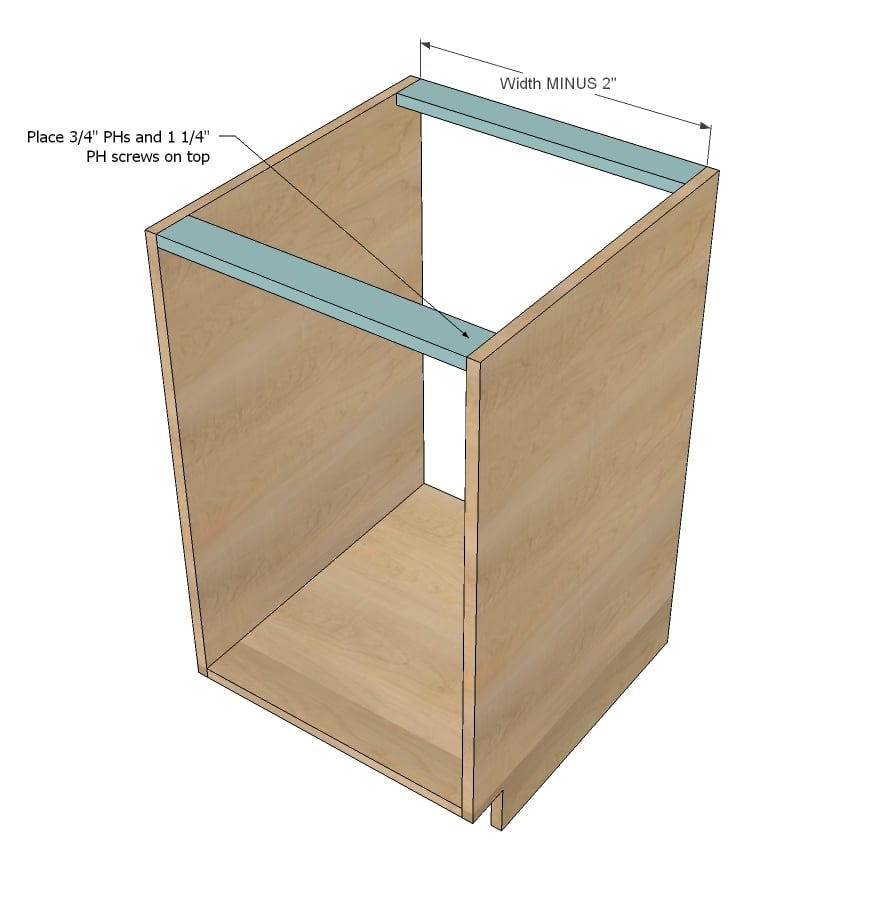
You can use the scrap plywood strips here. This just helps you square up your cabinet and gives you something to attach countertop plywood to. Place 3/4” pocket holes and 1 1/4” pocket hole screws to top - they will get covered in later steps.
NOTE: For attaching face frame with pocket holes, also drill 3/4” pocket holes facing forward on top of front support.
Step 4
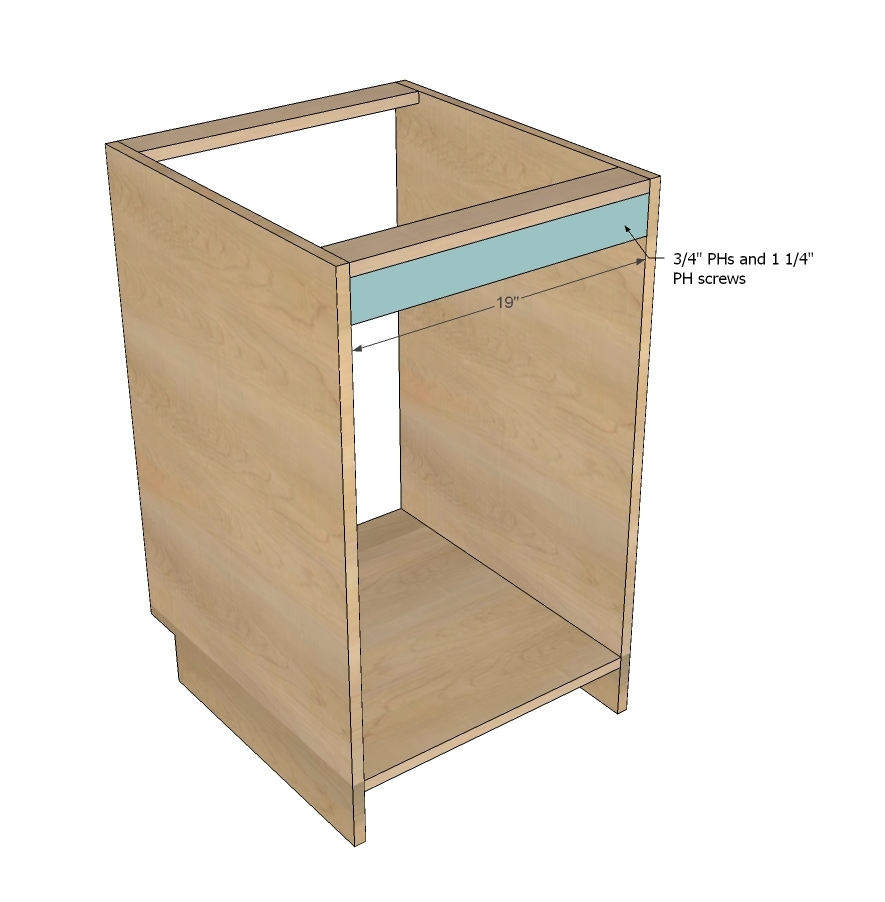
You can again use scrap plywood here. Also attach to top support. You will use this board to attach base cabinet to wall, and it also helps square up the back of the cabinet.
A back can be attached, but it may be easier to wait to attach the backs until after you install drawers or shelves.
Step 5
Step 6
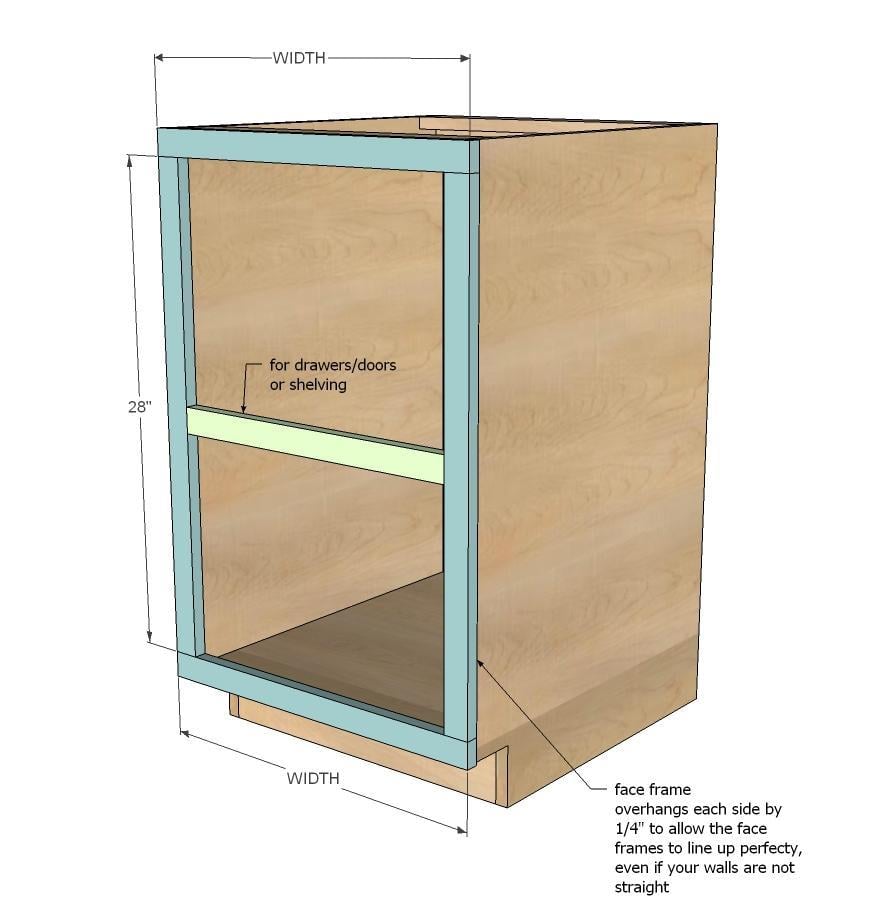
Build face frames first with pocket holes and glue. If you have trouble with wood splitting, try setting pocket holes for 1/2” stock and using 1” pocket hole screws.
Note that your face frames are 1/2” wider than the carcass, or the desired with of your cabinet. This gives you some wiggle room when you install the cabinets to get your face frames to line up perfectly level. For end cabinets, you can also finish off ends with 1/4” plywood if desired (ie if you were using Melamine for carcasses and Maple for face frames and doors, you would finish off ends and toe kick with maple hardwood plywood to hide all Melamine)
I love how Brooke finished off her kitchen island ends with beadboard.
Step 7

To give you an idea of the placement of face frame boards for drawers/doors here is the diagram I sent Brooke.
Step 8
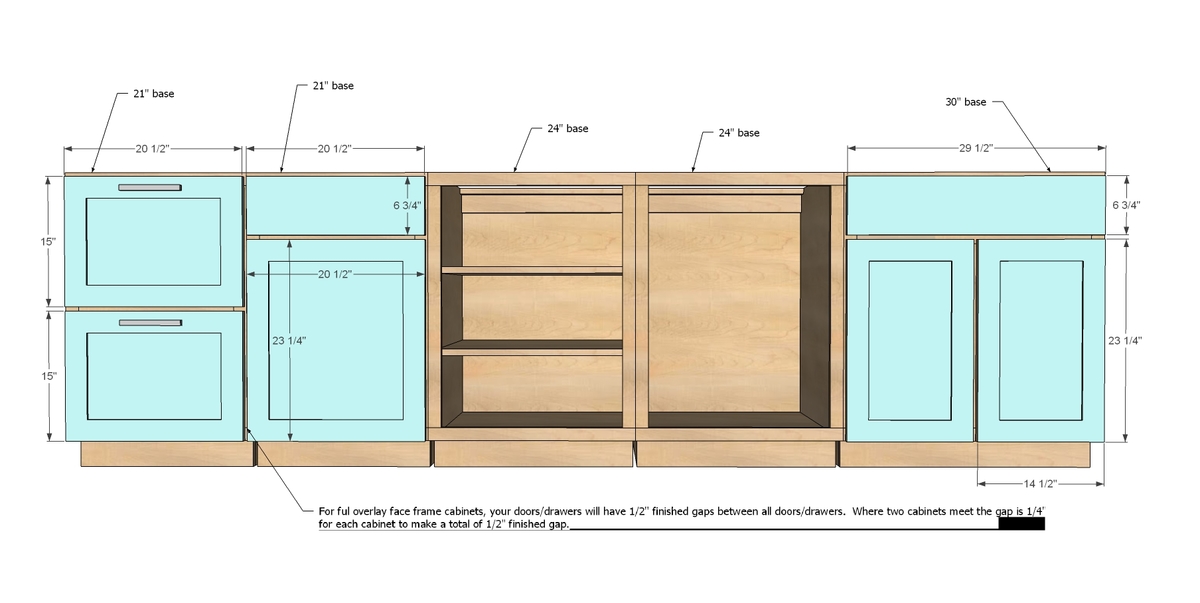
And then here is the diagram I sent Brooke for the door sizes. You'll want a finished reveal gap of 1/2" between everything for full overaly doors/drawers, so between cabinets, that's 1/4" per cabinet, but between doors/drawers on the same cabinet it's 1/2" gap.
I'll get into this more when we do plans for drawers and doors and accessories and of course wall cabinets.
It is always recommended to apply a test coat on a hidden area or scrap piece to ensure color evenness and adhesion. Use primer or wood conditioner as needed.

Comments
Lady Goats
Wed, 01/23/2013 - 14:52
WOW!
Great job, Brooke!!!!!!!!! LOVIN' your kitchen!
Cindycir
Thu, 01/24/2013 - 18:15
Frameless cabinets?
Love this! So let's say we wanted to build frameless cabinets? Could this work with some modifications?
Quintin79
Tue, 02/12/2013 - 09:02
Frameless
Yes you can, edge finishing depends on building material. Solid wood nothing extra required. Plywood/melamine will need edgebanding applied, which is extremely simple. Buy a cheap clothes iron or use an old one (don't reuse to iron clothes after) it can get messy on iron. Iron on matching edgebanding available at the big boxstores. Note it is easier if you buy it a little wider than you need because you will need to trim either way. The trimming may be done multiple ways, the least precise way is using an exacto knife/utility knife (works well for melamine i wouldn't try it with plywood though. I saw a little handheld trimmer in both double edge and single edge for at most 10$ and thats Canadian price. I would suggest this method. Then if you own a router you can use a flush trim bit. Good luck on your project.
patrickhosey
Sat, 02/02/2013 - 19:22
WOW
What's up with this post only having 2 comments? This is awesome. Great job
orangesugar
Mon, 02/11/2013 - 09:46
Build base separately?
So there are two base cabinet plans on this site, this one and this one (http://ana-white.com/2012/01/momplex/kitchen-base-cabinets-101). The older plan has you build the cabinet base separately. Is one way better than the other?
In reply to Build base separately? by orangesugar
tracysmith
Tue, 02/12/2013 - 08:30
This is my opinion solely,
This is my opinion solely, but, the most recent version of base cabs are what is considered industry standard. I say that because when we were building our house, I looked at tons of cabinets and they are not built with 2 x 4 bases, they are built just like the most recent plans. However, if you are going to add a lot of weight to the top of the cab, it might be wise to beef up the base. Most cabinets are just fine with out the 2 x 4 base and they can hold up granite counter tops.
tracysmith
Sat, 02/23/2013 - 23:03
Also, a person building these
Also, a person building these base cabinets should know that the terminology for the rails and stiles is correct, but their locations aren't. I'm building three base cabinets for my laundry room currently and when building the face frames for the cabinets, I noticed that what is labeled rails should be the stiles and the stiles should be the rails and the measurements for those should be adjusted. Stiles should be 31" for all and the rails should fit inside the stiles.
To see what I mean, check this out: http://en.wikipedia.org/wiki/Frame_and_panel
diyninja
Sun, 11/16/2014 - 20:33
These plans are a good starting point but not really correct
I agree. I love this site, but some of their plans, while they mean well, can lead you down the wrong path. These cabinets are a good example. The terms are mixed up, not a big deal. But so are the dimensions, which can be a big deal. You ALWAYS want the vertical (stiles) to go the *entire height* of the base cabinet! You'd never want the horizontal (rails) to go the entire width. Why? Well think about how they are going to mate up to each other for a moment. You want only one joining point between your cabinets, a vertical line between only two pieces of wood (the stiles). If you do as these plans suggest, you'll end up with 4 pieces of wood meeting in the same spot, which will almost certainly not align properly when installed. This will make your cabinets look crooked. Again, not trying to be harsh, just constructively critical. It was these plans that got me to great start. However I quickly noticed the issue when I did exactly as these plans suggested. I wasted some wood as a result! I had to go remake all my stiles 31" and then chop down the two longer rails of each base to match the center rail width. Now all is well.
I love how you guys make your plans in sketchup to illustrate. Would you consider fixing this "design flaw" and updating this post? This is a very helpful post otherwise.
MikeE
Thu, 04/11/2013 - 21:56
RE:Face Frame Base Kitchen Cabinet Carcass
In the current times, people like to merge the kitchen worktops with small pantry, which helps saving the space. You can use unique kitchen remodeling ideas to increase the usability of the available space in a sensible manner.
Oxwilder
Thu, 06/13/2013 - 09:56
Diagram mix-up
Love these plans, very simple and attractive results. The cut list diagram has a couple labels mixed up. Stiles go up and down (so they should measure 28" for any width cabinet), and rails go across, as in a rail fence (so they should be full cabinet-width). I suppose it's also worth noting that a 28" height assumes the face frames are made out of 1x2 stock measuring 3/4" by 1 1/2".
Keep up the great work!
EDIT: Just realized another commenter already caught that. Never mind.
watrfall86
Tue, 12/23/2014 - 16:27
Stainless Steel Top
I LOVE that. We're looking at buying for the first time, and I'm trying to brainstorm ways to expand both counter and cabinet space without redoing a whole kitchen, so doing a stainless steel top intrigues me.
Tyler88
Tue, 07/07/2015 - 22:40
great article!
Great transformations! I would love to do this DIY. if you could share a video on this, it could have been better. We home renovated a few months back and got are custom shelves and closets from Space age ( gtaclosets.com ) of Toronto. Had I read this blog before that Ana , I would have given a try myself! Thanks for sharing this lovely blog!