$10 Cedar Cubby Shelf

Difficulty
Beginner Projects
| Print this plan

How to build a cubby wall shelf from cedar fence pickets! Free plans from Ana-White.com

Well, I must say, I think I've been spotted in Carhartts and work boots one too many times ... because a big box came in the mail the other day and had me squealing with delight.  

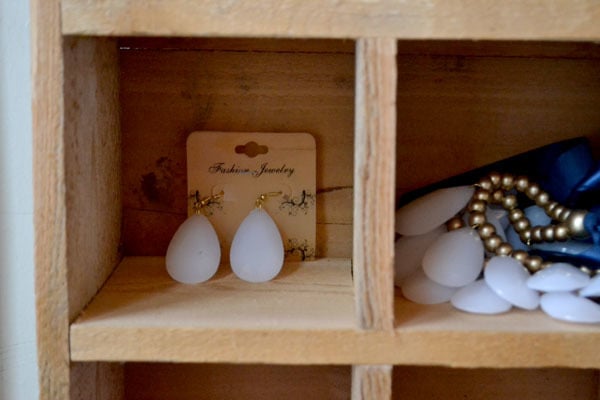
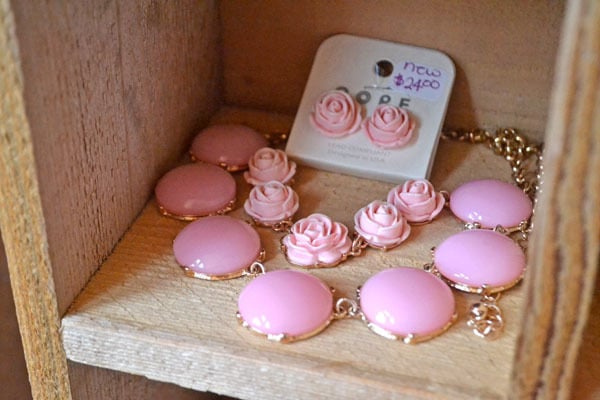
My cousin Angela owns Bedazzled Boutique, a trendy online jewelry and fashion store where you can buy a bubble necklace for not $150 (I love JCrew too, but come on, who can afford that?) 

Try $25!!!!

And she's got very reasonable prices on a whole lot more than the bubble necklace!  I loved so much of her jewelry, I ended up ordering more than I could store!

So what's any gal to do?

Why, get her saw out and start cutting fence pickets, of course!

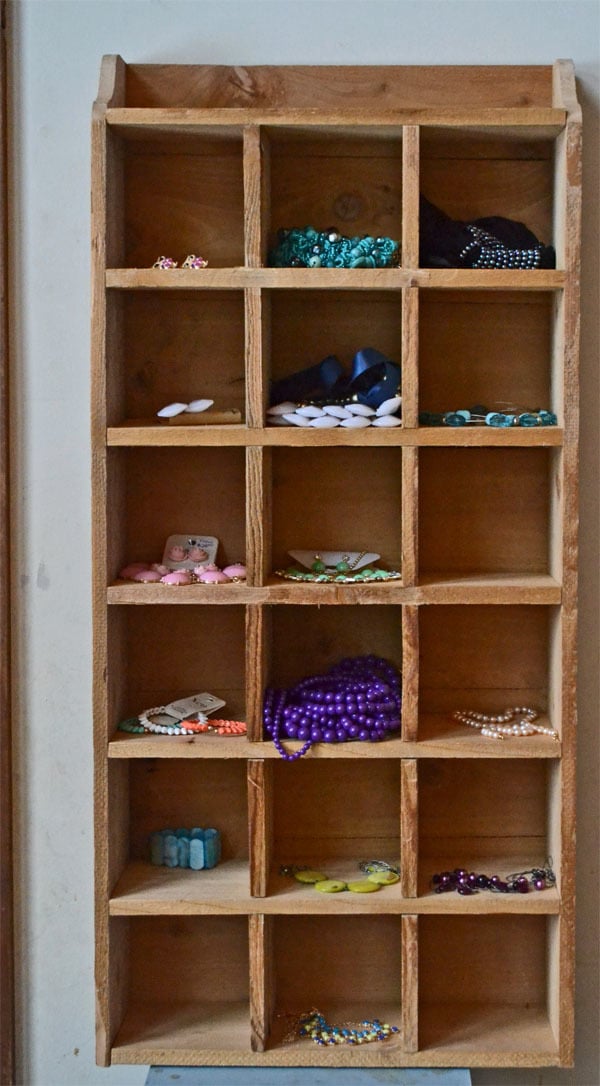
A couple of hours, a big pile of sawdust later, and I turned 6 Fence Pickets (that I purchased for $1.65 each) into this!!!!  Not bad for less than $10 in lumber!

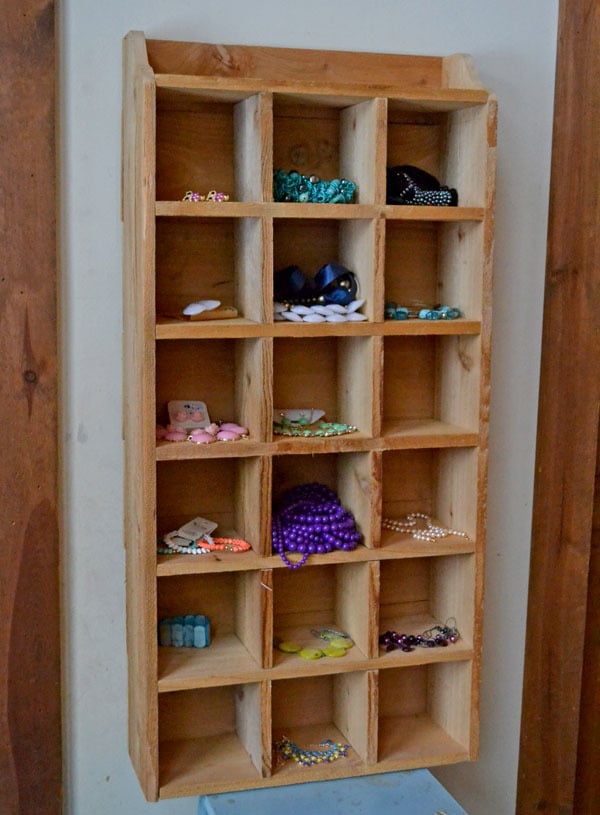
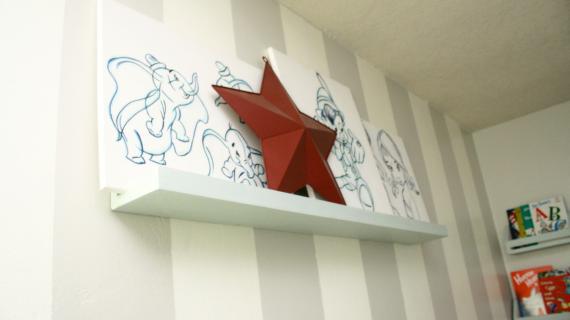
The plan is to hang the cubby wall shelf system up in my bathroom, but due to lighting issues in Alaska right now, I photographed the project on an empty wall space.  The fence pickets were far from perfect - going on two years laying in a pile in my lean-to, but I loved the character they brought to this piece, imperfections especially!  And I don't know if I'll add stain or paint.

I just kinda love the raw wood.  It is beautiful.  

But then again, what doesn't look good with these pretty accessories?

Okay, that might be a stretch!  Fence pickets are much prettier than Carhartts!

For this project, I choose to notch full length shelves instead of attaching little shelves or dividers.  I really thought this part was going to be tough, but it ended up being super easy - maybe even easier than cutting a bunch of tiny little 5" long shelves and certainly easier than trying to attach all those little shelves.  And the finished look is much better because everything lines up perfectly and there's no nail or screw holes to hide!

What I did first was mark the notches out on the boards.  I made the notches a tiny bit past the half way point of the board just to give me a wiggle room.

Then I clamped multiple boards down, with cut overhanging my work table.  Here I've got two boards clamped, and actually got away with cutting three as well.

Then I cut on the line with my jigsaw.  I cut on the line just to give me some wiggle room when fitting the shelves together, but for more precision, you can cut inside the line, and then sand notches to get to work together seamlessly.  

Notice that I only cut the side lines.

To finish the cut, I simply used a 1/2" wide chisel and gave it a quick tap and the pieces fell right out.  You could also use a flat screwdriver.  Remember, this part is hidden inside the project.

Once you have the pieces all cut out, well, it's time to start assembly!  Follow the plans below and you'll be on your way to the cutest little cubby shelf ever ... for about $10 in .... yep, fence pickets!

Happy Building!

Ana

PS - Hope you take a second to meet my cousin Angela and check out her beautiful boutique! 

Dimensions
Dimensions shown above.

Preparation

Shopping List

5 fence pickets - I used dog eared cedar ones (recommed getting 6 in case one splits or you have to cut around knots)
1 1/4" finish nails
wood glue

Cut List

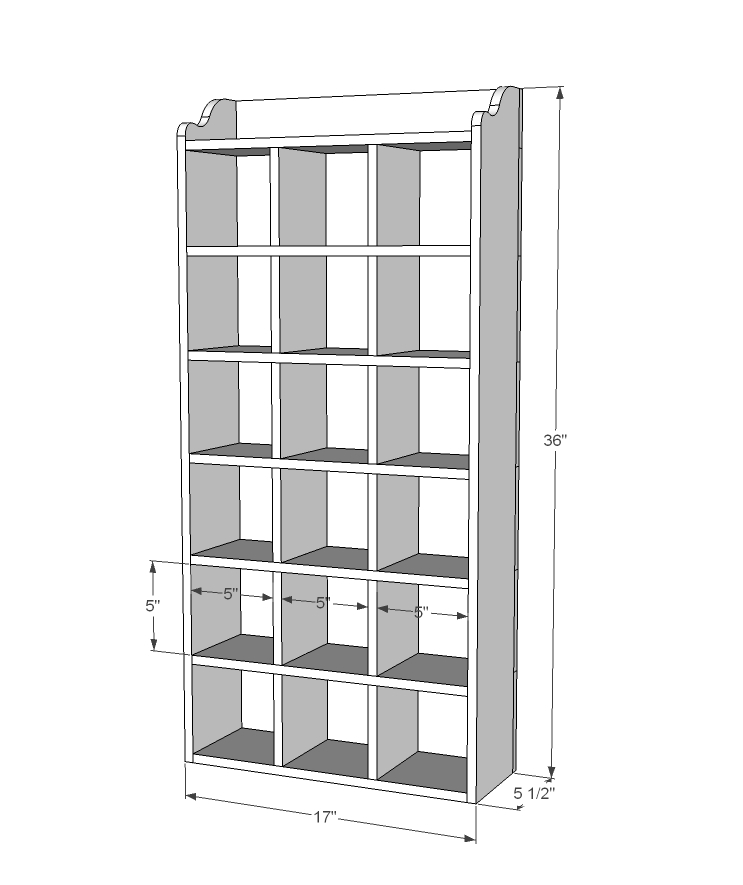
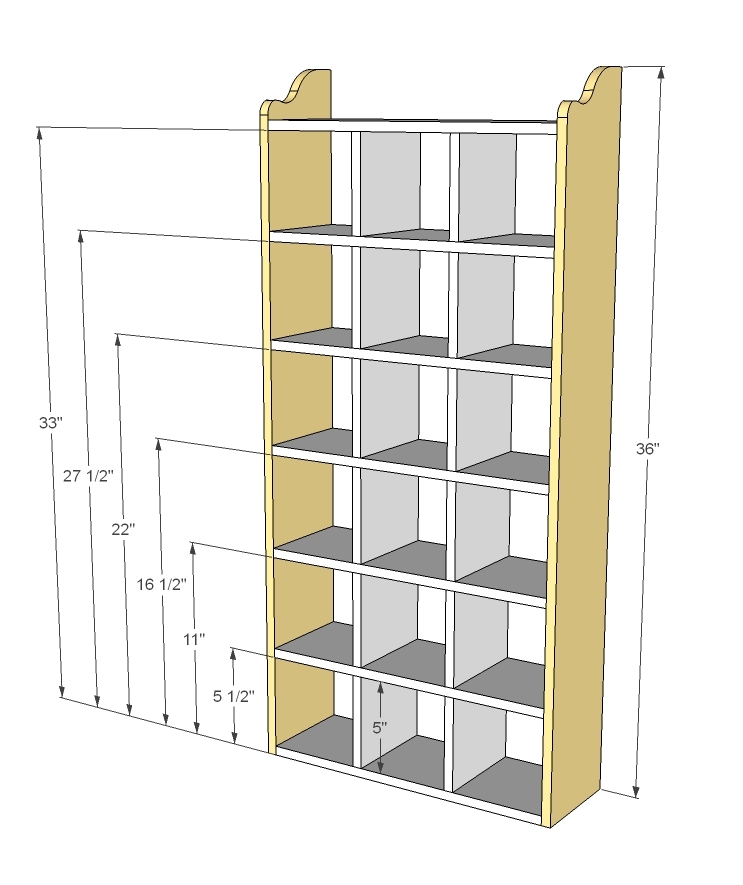
2 - 1/2" x 5 1/2" fence pickets @ 32 1/2" long (vertical dividers)
7 - 1/2" x 5 1/2" fence pickets @ 16" long (horizontal shelves)
2 - 1/2" x 5 1/2" fence pickets @ 36" long (sides)
7 - 1/2" x 5 1/2" fence pickets @ 17" long (back - optional or you could use plywood)

Tools
Tape Measure
Speed Square
Pencil
Hammer
Safety Glasses
Hearing Protection
Circular Saw
Jigsaw
Brad Nailer
General Instructions

Please read through the entire plan and all comments before beginning this project. It is also advisable to review the Getting Started Section. Take all necessary precautions to build safely and smartly. Work on a clean level surface, free of imperfections or debris. Always use straight boards. Check for square after each step. Always predrill holes before attaching with screws. Use glue with finish nails for a stronger hold. Wipe excess glue off bare wood for stained projects, as dried glue will not take stain. Be safe, have fun, and ask for help if you need it. Good luck!

Instructions

Step 1

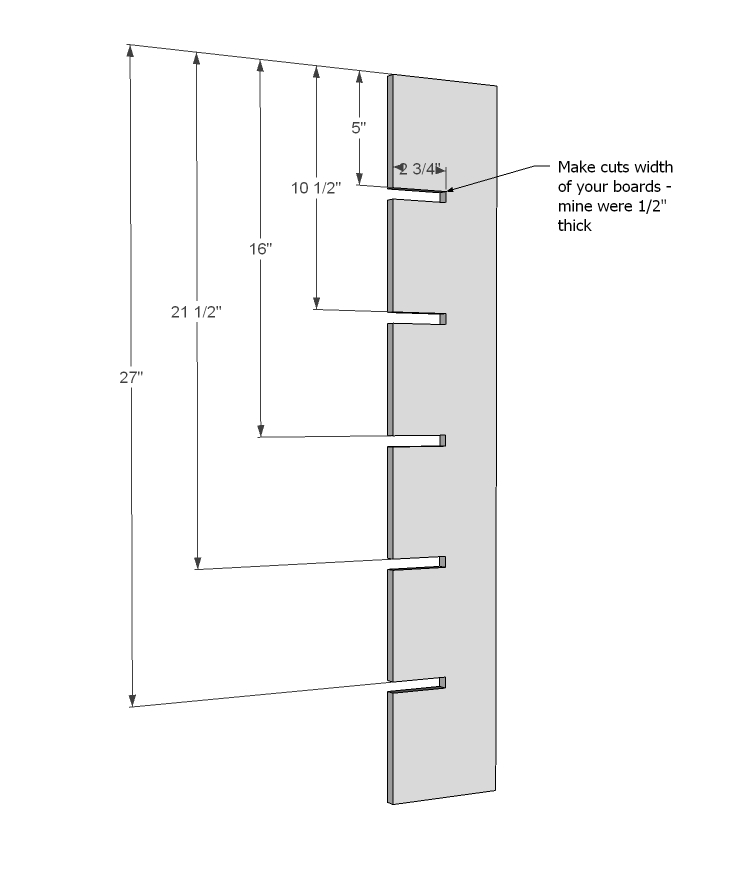
First cut the vertical dividers. Mark the side you start measuring from - this will be the bottom. Clearly mark this - it is important because if your boards aren't exactly 1/2" thick (mine were almost 1/16 wider in width) you'll be off that much.

Step 2

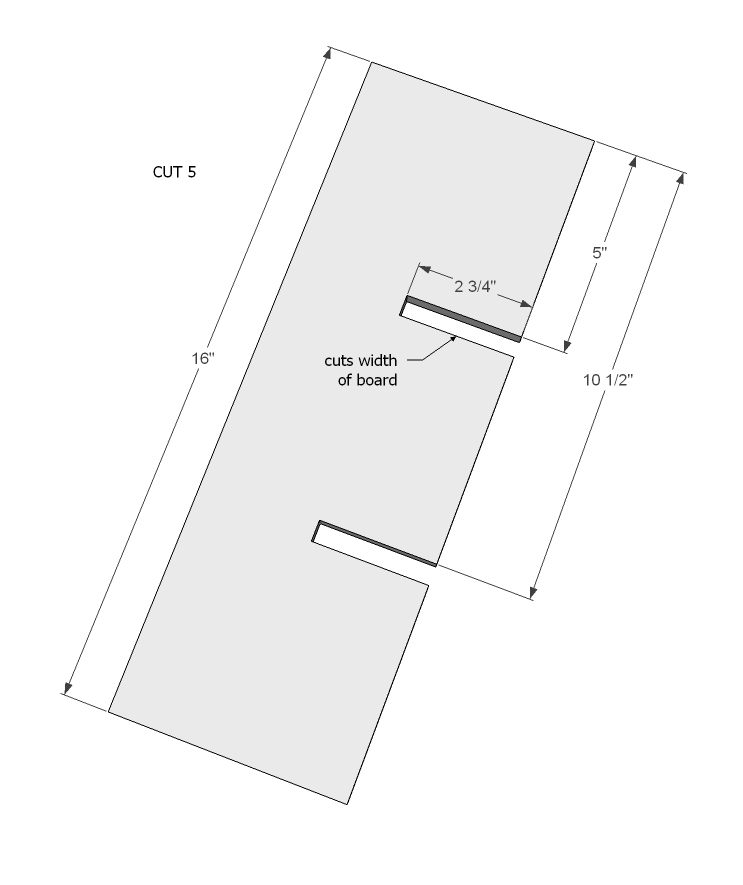
Then cut five of the seven boards in notches. Again, mark the side you measure the notch outs to keep everything square and even.

Step 3

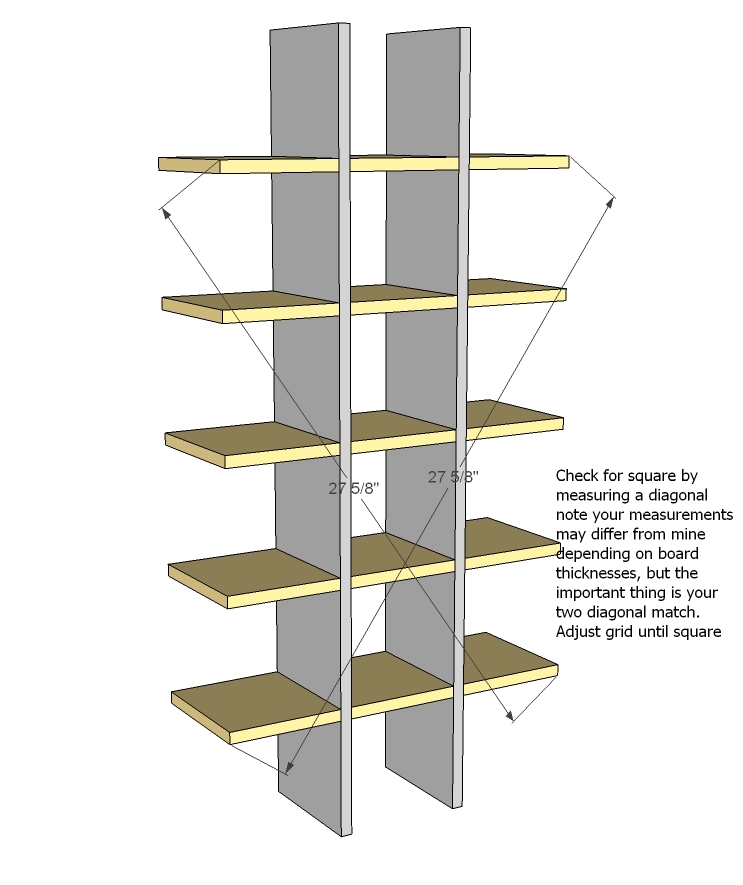
With your vertical divider boards with the marked end down, add the shelves, marked ends all to either the right or left for consistency. You may need to use a mallet to get the notches to go in, or sand some tight spots.

Step 4

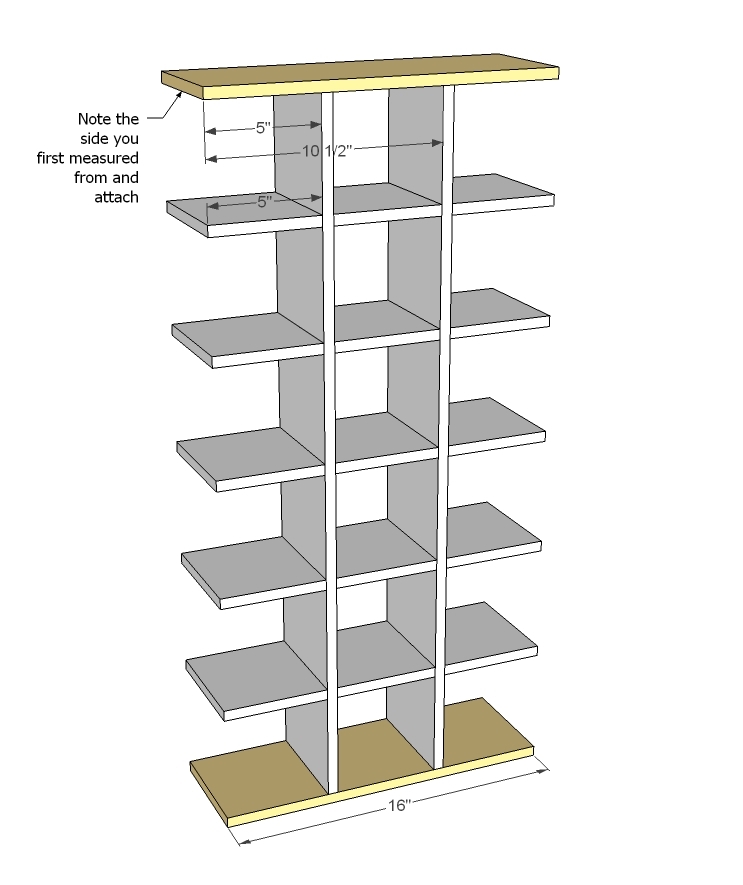
Next, mark the top and bottom shelf 5" and 10 1/2" in to match the notch outs you did in step 2. Match up with the side you measured from matching the marked ends of the notched shelves.

I nailed on with 1 1/4" finish nails and glue.

Step 5

Step 6

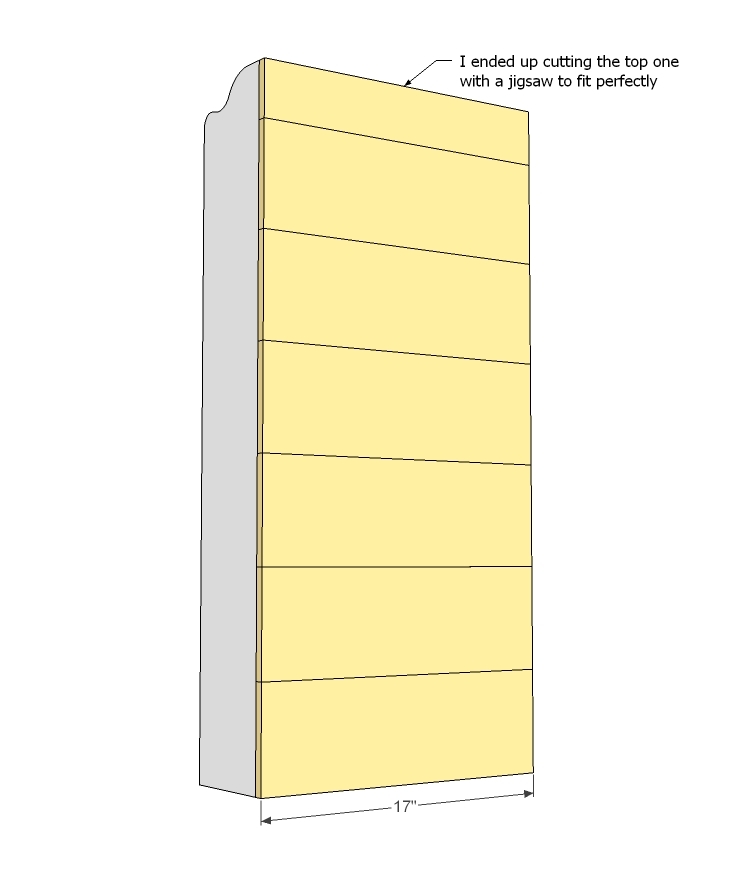
Originally I was going to slap 1/4" plywood to the back, but thought that the cedar would be prettier and cheaper. So I just cut boards and added to the back. For the top, I simply cut it down to size with the jigsaw.

Finishing Instructions
Preparation Instructions
Fill all holes with wood filler and let dry. Apply additional coats of wood filler as needed. When wood filler is completely dry, sand the project in the direction of the wood grain with 120 grit sandpaper. Vacuum sanded project to remove sanding residue. Remove all sanding residue on work surfaces as well. Wipe project clean with damp cloth.

It is always recommended to apply a test coat on a hidden area or scrap piece to ensure color evenness and adhesion. Use primer or wood conditioner as needed.

Comments

bhoppy

Mon, 02/11/2013 - 13:12

I love this! I don't have that much jewelry but my daughter has a rock collection that would look awfully cute in those cubbies:-) The strangest thing is that they don't carry cedar fence boards at the local blue store here...

jaimecostiglio

Mon, 02/11/2013 - 14:50

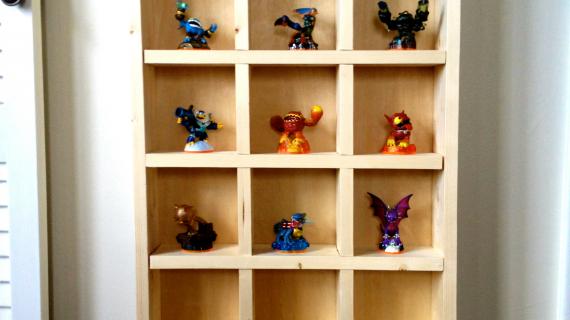
Ana the cubby shelf is so yummy (as well as the jewelry and you too even in the Carhartts!). I know a young boy with lots of Skylander figures who need a home and this plan is perfect. I'm on it this weekend.

dmcarwin

Mon, 02/11/2013 - 17:54

Great tutorial Ana, and plan! I agree with Jaime, our Skylanders would love a great looking home like this! And I am heading over to check out the beautiful jewelry!

spiceylg

Tue, 02/12/2013 - 05:33

Very nice, I can see this having so many uses. BTW - I placed an order from your cousin. Adorable stuff! ;)

Frequently Asked Questions

Wood Questions

What kind of wood should I use?
Most of our plans use standard construction lumber like pine or fir. It's affordable, easy to work with, and easy to find. It's also rapidly renewing and biodegradable, so a great eco friendly choice!

Can I use hardwoods instead?
Yes—just keep in mind they're heavier, cost more, and can be tougher on tools and harder to join together and finish. I recommend not tackling a hardwood project until after you have built several softwood projects.

What if my boards are warped?
Choose the straightest boards at the store. You can often work around slight warps by cutting them into shorter pieces.

What wood should I use for outdoor furniture?
Use red-toned or pressure-treated 2x lumber for framing, and cedar or cedar fence pickets for the decking. Outdoor furniture should be built like a deck—your local home center can help recommend the right wood for your climate.

Will my wood move or warp after I build?
Potentially, especially in humid climates. Let your wood acclimate indoors before building. Once acclimated and kept in a stable environment, movement should be minimal. Remember, most houses are built using framing lumber - it's all about keeping moisture down indoors.

Cutting Questions

Do I need a miter saw?
A miter saw is great, creating fast, safe, and precise cuts, even for beginners. But most plans can be built with a circular saw and a straight edge. If using a circular saw to cut, take time to practice, and get good at making cuts, before cutting your project boards.

How do I get clean cuts with a circular saw?
Clamp your board, measure twice, cut slow, and use a sharp blade. This takes practice, so spend some time making cuts. I go through becoming proficient at freehand cutting in my course, it is worth taking if you want to master this skill.

Will the store cut my wood?
Yes—most stores will do rough cuts to help you transport your materials home. But from store to store, the quality of cuts could greatly vary.

Joinery Questions

What screws should I use?
We recommend star-head self tapping screws for framing, most common sizes are 2-1/2", 1-3/4". Pre-drill if close to the edge or you find your wood is splitting.

Do I have to use pocket holes?
Pocket holes are the cheapest, easiest and fastest way to do some joints - like edge to edge or a hidden fastener joint. There are other methods, but these can be time consuming and expensive. We recommend using pocket holes as indicated in plans for best results.

How do I keep things square?
Use a speed square and measure diagonals after each step. Always clamp joints before screwing to keep them tight and flush.

Finishing Questions

Stain or paint before or after building?
A quick sand before and a full finish after gives the best results. Pre-finish if you're doing two-tone or detailed finishes.

What type of finish?
Use oil-based or water-based stain. For paint, cabinet-grade latex or enamel works great. High use surfaces on indoor projects should get a coat of polyurethane, I recommend a Helsman or Spar or other flexible poly that won't crack or peel with wood movement. For exterior projects, use a finish suitable for exterior fences.

How to get a smooth finish?
Start with a well sanded project. Sand between coats (220 grit), wipe clean, and apply light coats with a foam brush or roller.

Plan Questions

Can I change the size?
Many people do, and that's the great thing about building your own furniture! But do keep in mind going bigger might mean more supports are required, and often plans are optimized for minimal material waste.

Are these beginner-friendly?
Yes—plans are written with simple tools and clear steps in mind, with every effort to make plans as simple as possible.

Can I sell what I build?
Absolutely! Just don’t resell or repost the plans themselves.

General Questions

What tools do I really need?
A drill, circular saw, tape measure, square, and a few clamps will get you through most projects.

Do I need a workshop?
Nope! A driveway or small patio is plenty to get started, just make sure you have a level place to work. If you find you are building several projects a year, creating a small workbench is a great way to store tools and have a dedicated workspace.

What if I mess up?
Wood filler, sanding, or flipping boards goes a long way. Mistakes are part of the process!

What can I do to make my projects look more professional?
Start with straight boards, make accurate cuts, clamp all joints, and line up everything neatly. Sand thoroughly, use a neutral finish, and apply it in light coats for a clean look.

I've never built anything before. Where should I start?
Start with a few smaller softwood projects to get hands-on experience. Or if you're tackling a big project, buy a little extra lumber and practice your cuts and joints first. If possible, work with someone who has a bit of experience.

Care & Maintenance

How long will my furniture last?
With good joinery and regular care, your DIY furniture can last for decades. I have pieces in my own home that are over 20 years old and still going strong! One of the best parts about DIY furniture is that it’s easy to repaint, refinish, or repair—so your projects can grow and adapt with you.

How should I care for outdoor furniture?
Lightly pressure wash or hose it down once or twice a year. Tighten screws and reapply finish as needed to protect it—just like a deck or fence. A little upkeep goes a long way in extending the life of your furniture.

How about indoor furniture?
Regularly dust or wipe with a damp cloth. If it starts to look worn, a light sanding and touch-up paint or stain can refresh it in no time. DIY pieces are meant to be durable and fixable—so don’t be afraid to give them some love now and then.

Want to Build with Confidence?

Check out my ebook: 12 Skills to Build Your Own Furniture
It walks you through the core skills every builder needs—measuring, cutting, joinery, and finishing—so you can build beautiful furniture that lasts.

Still Have Questions?

Email us anytime at [email protected] and we’ll be happy to help!