

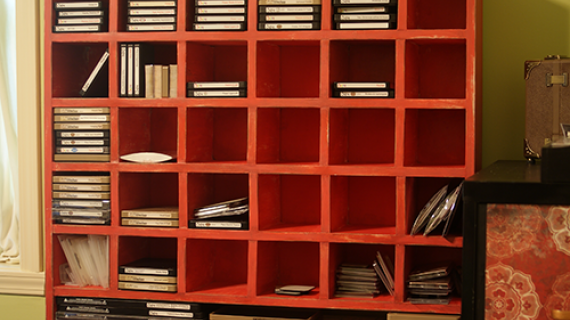
Twenty five little cubbies on the wall that you can store just about anything in! Advent calender to spices, collections to candles, there's room to display and store your favorite little things here!
 Well, the HUBS is back home, and that should mean more time for me to blog and build because I have some relief from childcare . . . but instead . . . I'm sure you know what I'm talking about. He wants me not to work so hard, to go fishing, to have fun. And I try to explain to him that fun for me is being productive. A day at the spa for me is like Grace sitting in a timeout chair. So anyway, plans are going to be short and sweet, because the roses are in bloom and the RAM says I need to stop and smell them . . . well, not in those words, it's more like the fish are biting and I need to stop and catch some fish. But I only like fishing when it's to fill the freezer, not just to see if I can catch one, and then throw it back.

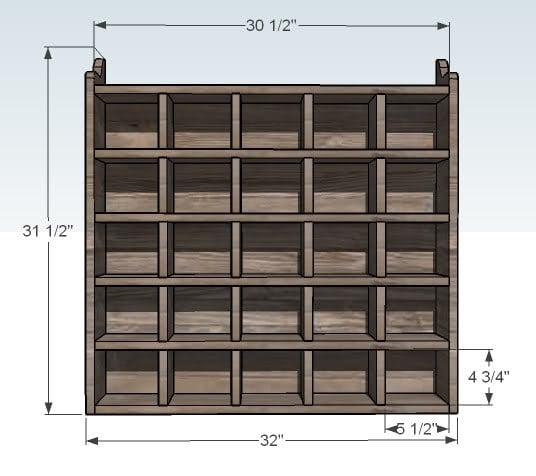
I've been meaning to blog this plan for some time, because many of you have wrote me saying you love this Cubby Organizer from Pottery Barn, and I'm sure many of you have accumulated quite a scrap pile. I choose to build this plan out of 1x6s for a 5 1/2" deep cubby, but you could of course make yours 3 1/4" deep if you are knee deep in 1x4 scraps (which many of you probably are after building the outdoor furniture).

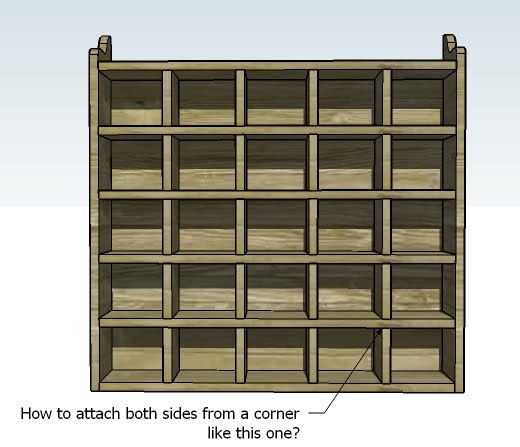
The trick with cubbies is it's easy to work yourself into a corner and have nowhere to nail or screw from. Here's what's important to take not of: the bottom is the only part that needs to be securely fastened in place. The top can be just glued in place. Think of it this way, if you have a object forcing the cubby divider out of position, the force is probably on the bottom of the divider, and not the top. And you would be surprised at how many things you buy are actually glued together. So get some good glue, and let's get started!

I really liked and was inspired by the Pottery Barn Cubby Organizer, but I made this design slightly larger because, if you can, you should always make good use of your boards and minimize your scraps. So the dimensions are slightly larger. And also, you can use 1x4s instead of 1x6s to build this. And this is what Lindsay already built! What a great place to store fabric :)
Pin for Later!
Preparation
4 – 1×6 Boards, 8′ Long 1 – 1/4″ Plywood at least 28 1/4″ x 32″ 2″ Screws or nails 1 1/4″ Nails Wood Glue Finishing Supplies (Paint, Wood Filler, etc) Picture Hanging Kit (Optional)
6 – 1×6 @ 30 1/2″ (Shelves) 20 – 1×6 @ 4 3/4″ (Cubby Dividers) 2 – 1×6 @ 31 1/2″ (Sides) 1/4″ Scrap plywood @ 28 1/4″ x 32″ (Back)


On this project, being square and good glue are super important. It’s a good idea to mark all of your joints first, trust me, it’ll save you lots of time. And find a clean level spot to work off of. Check for square. Clamp your glue joints.
Instructions
Step 1
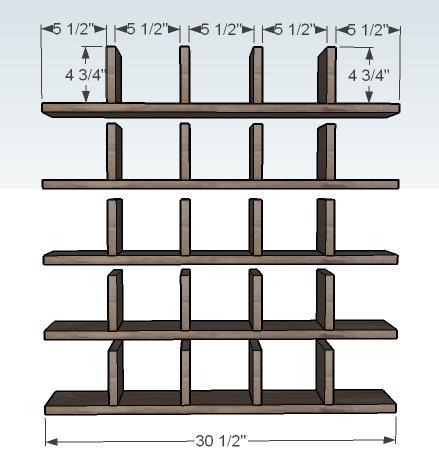
Nail or screw your cubby dividers to the shelves as shown above, creating five different shelves with four cubby dividers attached. Use glue and 2″ fasteners.
Step 2
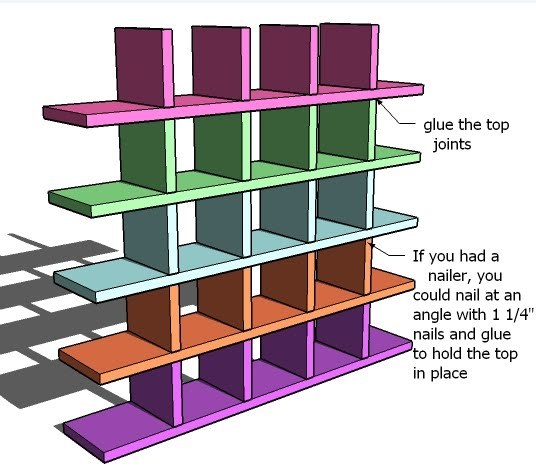
TOP OF CUBBIES
Attach the cubbies with glue and clamp and let dry. If you have a nailer, you could nail at an angle as shown above. Also, if you have a Kreg Jig™, you could drill pocket holes on the faces of the cubby dividers to attach. Your cubbies should be laying flat on the FRONT FACE of the cubbies. Make sure everything is square before you let the cubbies dry. If you need to, you can glue two shelves together, clamp, let dry, and then add another shelf, glue, clamp, let dry and so on (because like me, you probably don’t have an endless supply of clamps).
Step 3
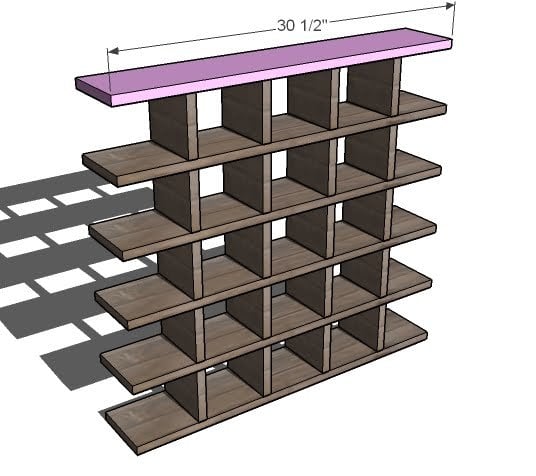
TOP
Attach the top to the shelf as shown above, using screws or nails and glue.
Step 4
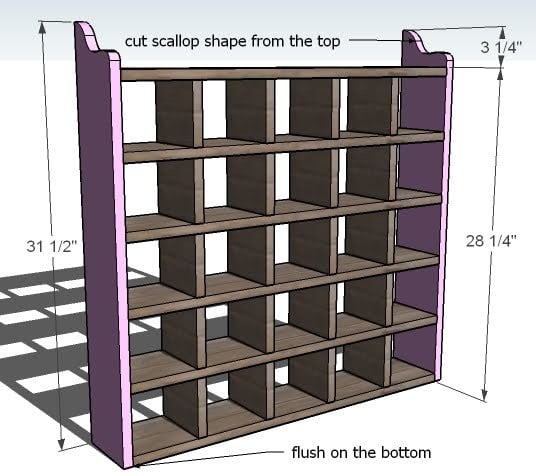
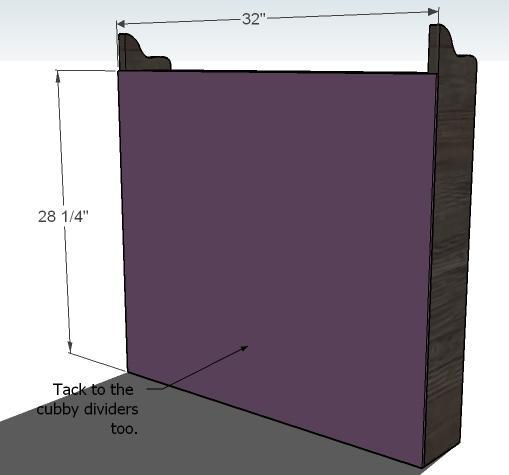
SIDES
The sides will help tie everything together. You fasten the sides to the shelves to keep the shelves in place as the cubby dividers dry. Make sure you attach the sides so that the face is resting down (you can either cut out later with a jigsaw the scalloped pattern or do it before you assemble the sides).
Step 5
Fill any nail holes with wood filler. Sand and finish as desired. Either attach by screwing through the back into a stud in the wall or purchase a picture hanging kit and use it to hang your shelves. I’m officially saving any boards that are longer than 4″ (an shorter and I get a little nervous at the saw).

Comments
Heather (not verified)
Wed, 06/02/2010 - 02:52
I love this!! love it, love
I love this!! love it, love it, love it. You are a genius Ana, although hopefully you already know that. Now, go catch some fish. I love me some fresh Alaskan salmon, assuming that's what you're fishing for? or trout...yummy! Wish I was there, instead of here in Michigan. oh well... Have a wonderful day!!
3Janes (not verified)
Wed, 06/02/2010 - 03:34
THANK YOU!!! This is perfect
THANK YOU!!! This is perfect for my sewing room and those infernal little pet shop toys that keep multiplying in our house!! You're a life savior Ana!
The Hillbilly … (not verified)
Wed, 06/02/2010 - 03:49
Hi, I am a new follower.
Hi, I am a new follower. Thanks for the work you do of posting all your plans online. I look forward to making some projects with my husband.
One comment on today's post...WHY DO these men not see that working on our little craftiness is very therapeutic...especially when it's an hour to ourselves without a kid hanging off of you? LOL...I like to fish too, but boy that has been a long time. Enjoy!
Tanjia (not verified)
Wed, 06/02/2010 - 04:38
this plan is fantastic! I
this plan is fantastic! I hope I can build it soon!
Rebecca Edward… (not verified)
Wed, 06/02/2010 - 04:39
Ana, thanks for posting this!
Ana, thanks for posting this! I had been eyeballing that piece but it was so low on the list of things to build, but now that you have posted the plans, I am going to go through my scraps...Yay!
Stacy (not verified)
Wed, 06/02/2010 - 04:42
I'm really excited about this
I'm really excited about this plan. One question though? Why does the cut list 25 pieces for the dividers? It seems like in all the sketchups, there are only 20 used? What am I missing??
Jen Woodhouse (not verified)
Wed, 06/02/2010 - 05:01
Hi Ana!I think you forgot me!
Hi Ana!
I think you forgot me! I was a May sponsor too!
:)
xo
jwoo
Leah (not verified)
Wed, 06/02/2010 - 05:15
Ana, I'd hate to have someone
Ana, I'd hate to have someone worry about these plans after reading in step 5, "you should have trouble with the piece not being strucutally sound."
Tuli (not verified)
Wed, 06/02/2010 - 07:04
To ensure the dividers line
To ensure the dividers line up properly, you could also use a dowel kit as described, with pictures here: http://chezlarsson.com/myblog/2008/06/shoe-cubby-how.html
Home Depot had two different kits when I checked. :)
senovia (not verified)
Wed, 06/02/2010 - 07:11
I love this because you could
I love this because you could easily make the spaces taller and make an awesome spice jar rack!!
Ana White (not verified)
Wed, 06/02/2010 - 07:51
Leah, ack! Typo! Fixed it.
Leah, ack! Typo! Fixed it. What I'm trying to say is that the cubby dividers are going to be fastened securely with nails or screws on the bottoms and the backs, and glue is actually a very very strong joint (just try to undo a good glue joint, I've found the wood will split out before the glue will give). And the glued joint is at the top, where it's least likely you are going to have any stress. You can of course use dowels (or pocket holes or nails from a crown nailer) but it's fine without for this application.
Ana White (not verified)
Wed, 06/02/2010 - 07:55
You guys are so smart. Fixed
You guys are so smart. Fixed the cut list!
Jen, thanks so much for sponsoring a post, but today I just wanted to mention the people that sponsored the site for the entire month with a sponsor button. But I'm very appreciative of everyone who sponsors posts too! Thank you.
Ahren (not verified)
Wed, 06/02/2010 - 12:14
Workbench PlanWorkbench
Workbench Plan
Workbench Plan
Thanks! :)
Tuli (not verified)
Wed, 06/02/2010 - 12:31
@Ahren - Super simple, CHEAP
@Ahren - Super simple, CHEAP workbench. http://www.hammerzone.com/archives/workshop/bench/below20xl.html
Julia @ Hooked… (not verified)
Wed, 06/02/2010 - 18:23
Thanks for the shout-out,
Thanks for the shout-out, Ana! :)
Lura (not verified)
Thu, 06/03/2010 - 12:20
Just a quick comment on your
Just a quick comment on your use of glue: Wood glue is AWESOME. I'm a theatrical carpenter, so I'm used to building things that are used hard, but for a short amount of time. Most furniture for homes are not used as hard, but we want them to last. No matter though, if you are building something you want to keep together, like these cubbies, glue is really what holds them together. The fasteners (nails, screws, etc) are only there to hold the stuff in place till the glue dries. If you build something you want to be able to dismantle, DON'T use glue--you'll end up destroying what ever it is when you try to take it apart.
Randi (not verified)
Sun, 06/06/2010 - 12:21
This is great!! I have been
This is great!! I have been looking for a solution for my little girls' shoes. They love to play with them and when it's time to go somewhere, I can't find ever find the matching shoe. With this, I can hang it where they can't reach and have them all organized!! Thanks so much!
Megan (not verified)
Tue, 11/02/2010 - 02:41
Sometimes I wish I could be
Sometimes I wish I could be more productive! Don't you hate when you have to get something done but you're missing ONE piece to the puzzle? A tool, an ingredient, et cetera. Drives me crazy, because the pile of whatever you need to get done just sits on the counter or dining room table for what seems like for ever!
BTW, I <3 this wall cubby shelf! They have one similar to it at Ikea that I've been eying for years, but never could justify buying something that looked so simple to build!
Christy Ireland (not verified)
Tue, 02/08/2011 - 16:58
Hi, I was wondering if there
Hi, I was wondering if there is an estimated price on this plan?
In reply to Hi, I was wondering if there by Christy Ireland (not verified)
MrsD2008
Sun, 04/24/2011 - 19:45
If you look at the bottom
If you look at the bottom where the tags are (where you click add to to-do list) there is a tag for $20-$50.
davidyounger6 (not verified)
Sun, 05/08/2011 - 18:42
Change of dimensions? Support?
So, my wife and I were thinking of building this in a pantry area (8ft ceiling and wide enough for 5 ft shelves). The dimensions here 4.75 inches tall and 5.5 inches wide isn't terribly conducive to holding boxes of cereal, small kitchen appliances, etc. Could one easily change the dimensions to say 12in(h) x 12in(w) x12in(d) and keep the stability and support of it? Or would I need to change the wood to 2 x whatever to make it more stable? I'm thinking i would need at least one row to be 18in tall as well (to fit the kitchenaid in it as we don't have the counter space or need to keep the mixer out 24/7). Thoughts?
Tsu Dho Nimh
Mon, 05/09/2011 - 05:25
David - The support comes
David - The support comes from the vertical dividers holding up the horizontal shelves, and the plywood back keeps it from "racking" (doing this: /_/ ) 1x12s, vertically, can hold a lot of weight. Horizontally, keep the unsupported span under a couple of feet and you can hold almost anything.
Changing the dimensions to hold cereal boxes and mixers sounds like a great idea. Measure them to see what size you need, then cut a row of dividers to the height you need.
If it's a pantry, make sure the thing is screwed into the studs in case of earthquake or climbing toddler. You don't want a can-alanche
davidyounger6 (not verified)
Tue, 05/10/2011 - 06:17
Thanks for the clarification.
Thanks for the clarification. My wife and I are still mulling it over. Gotta finish drywalling the basement first (a few more weeks yet), then we'll consider the pantry in more depth.
Sarah Markey (not verified)
Thu, 07/28/2011 - 08:51
25 cubbies
Wow, what a great find! I'm a quilter and have a million fat quarters and a giant stash of fabric. I've been longing for the Pottery Barn cubbies but their prices are simply out of reach for me. With your plans, I can fill the wall in my workroom with cubbies, cubbies, cubbies!
Also, your instructions are terrific. I was a technical writer for 25 years and understand the difficulty of writing clear, concise directions for a complex task.
Thanks so much. Looking forward to more.
Ali M (not verified)
Sat, 07/07/2012 - 17:12
Talk about timely!
I almost ordered that cubby this week, but the price is so big, I decided to google making cubby organizers, I'm SO glad I found your tutorial!
Poppers Momma (not verified)
Sat, 10/20/2012 - 09:08
Awesome
Thank you so much for leaving this page up! I've been scratching my head and trolling the internet for a way to make similar shelves for my baby girl. I wasn't sure of the best way to attach the inner shelves but now I have the answer!
adropofpaint
Thu, 03/30/2017 - 15:00
25 cubbies
Hi Ana, I'm building a Cubby shoe storage that will look similar to this but obviously bigger. For the dividers, the bottoms can be nailed & glued to the shelf and for the top of the dividers you mentioned "you could drill pocket holes on the faces of the cubby dividers to attach. " How would I put my pocket screws in if the other dividers are in...seems like I wouldnt have space for the drill to get the screws from the top of the divider into the top of the shelf... Thanks
In reply to 25 cubbies by adropofpaint
Ana White
Fri, 03/31/2017 - 13:00
take a look at this planhttp:
take a look at this plan
http://www.ana-white.com/2011/12/plans/5x5-storage-cubbies