Potting Bench by Between Naps on the Porch

Difficulty
Beginner Projects
| Print this plan

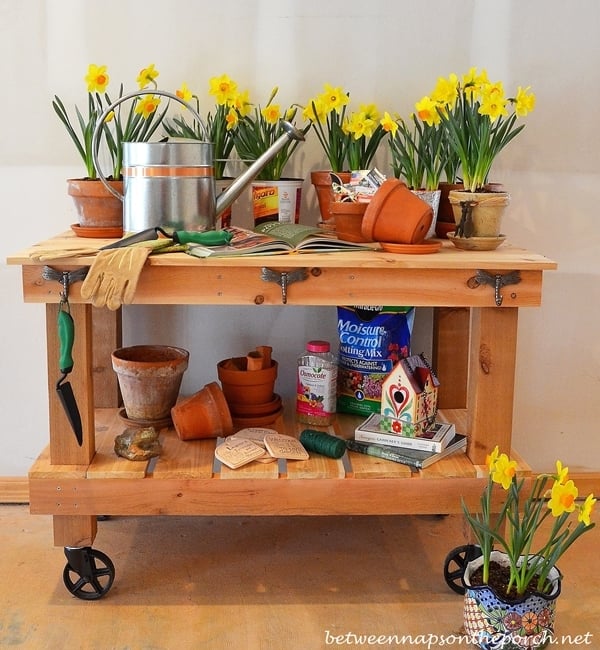
easy potting bench plans by Ana-White.com

Hi everyone!  Hope you had a great weekend!  

Is spring arriving for you?  Up here in Alaska, we've been blessed with the warmest winter I can remember, and we are so thankful for the increasing daylight.  My mom has already started her seeds!

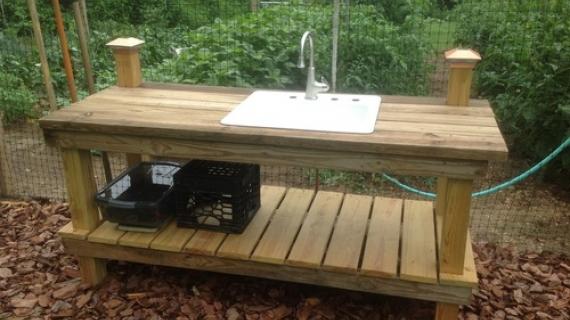
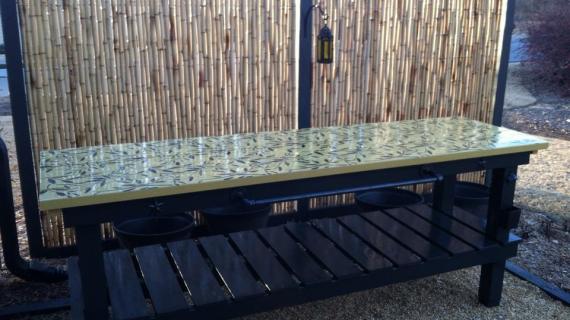
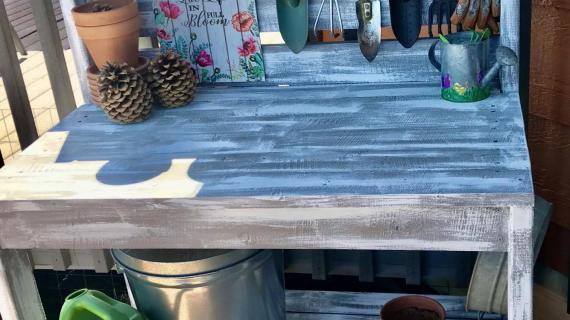
I am overly honored today to be able to introduce a new plan, just in time for spring, built by my friend Susan from Between Naps on the Porch.

Can you believe this potting table was Susan's first ever project?  That before building this potting table, she'd never built anything in her life?  And that she did the designing too?

I tell you, it is a great honor to be able to share the plans with you!

You'll find plan diagrams below, but please take a second to stop over and read Susan's building post!

Thank you Susan!

Enjoy the plans following!

XO Ana + Fam

Dimensions
Dimensions shown above

Preparation

Shopping List

1 - 4x4 @ 12 feet long
4 - 2x4 @ 8 feet long
6 - 1x6 cedar boards 10 feet long or 9 cedar fence pickets 6 feet long
4 - caster wheels (if desired)
3" or longer self tapping exterior deck screws
2" self tapping exterior deck screws (for attaching top)
exterior wood glue

Cut List

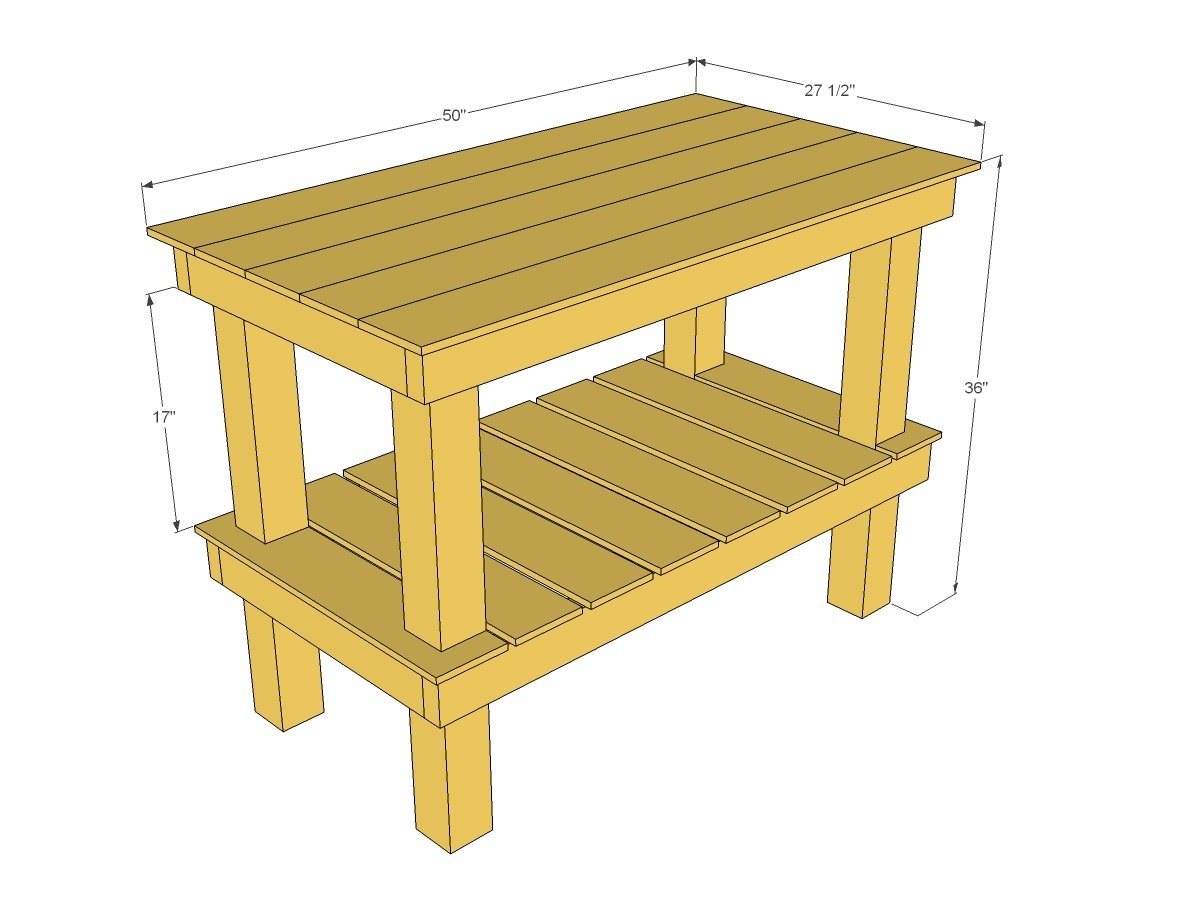
4 - 4x4 @ 35-1/2" - cut shorter per wheel height if using (legs)
8 - 2x4 @ 22" (sides and top supports)
4 - 2x4 @ 48" (front and back)
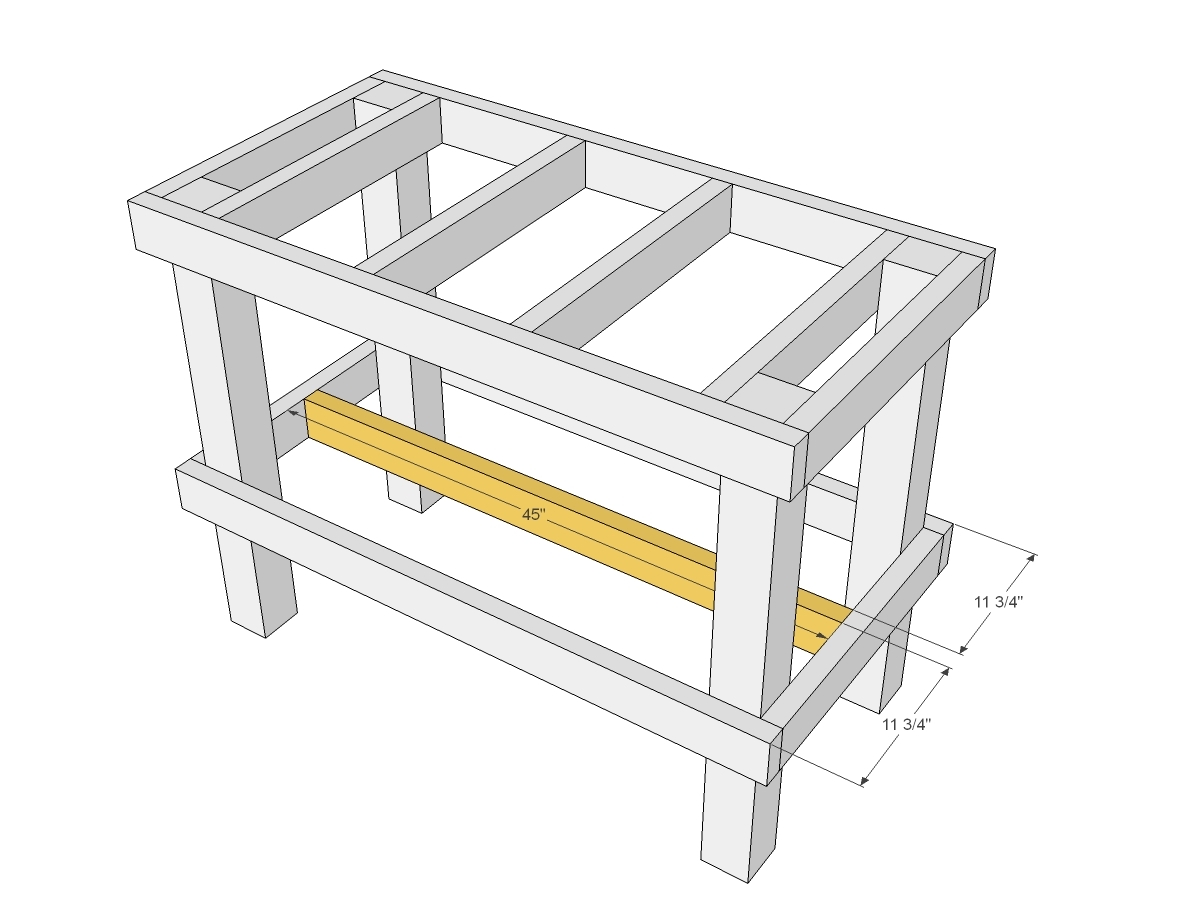
1 - 2x4 @ 45" (bottom support)
8 - 1x6 cedar boards or fence pickets @ 26" (bottom shelf)
5 - 1x6 cedar boards or fence pickets @ 50" (top shelf)

Tools
Tape Measure
Speed Square
Pencil
Safety Glasses
Hearing Protection
Drill
Circular Saw
Jigsaw
Power Sander
Drill Bit Set
General Instructions

Please read through the entire plan and all comments before beginning this project. It is also advisable to review the Getting Started Section. Take all necessary precautions to build safely and smartly. Work on a clean level surface, free of imperfections or debris. Always use straight boards. Check for square after each step. Always predrill holes before attaching with screws. Use glue with finish nails for a stronger hold. Wipe excess glue off bare wood for stained projects, as dried glue will not take stain. Be safe, have fun, and ask for help if you need it. Good luck!

Instructions

Step 1

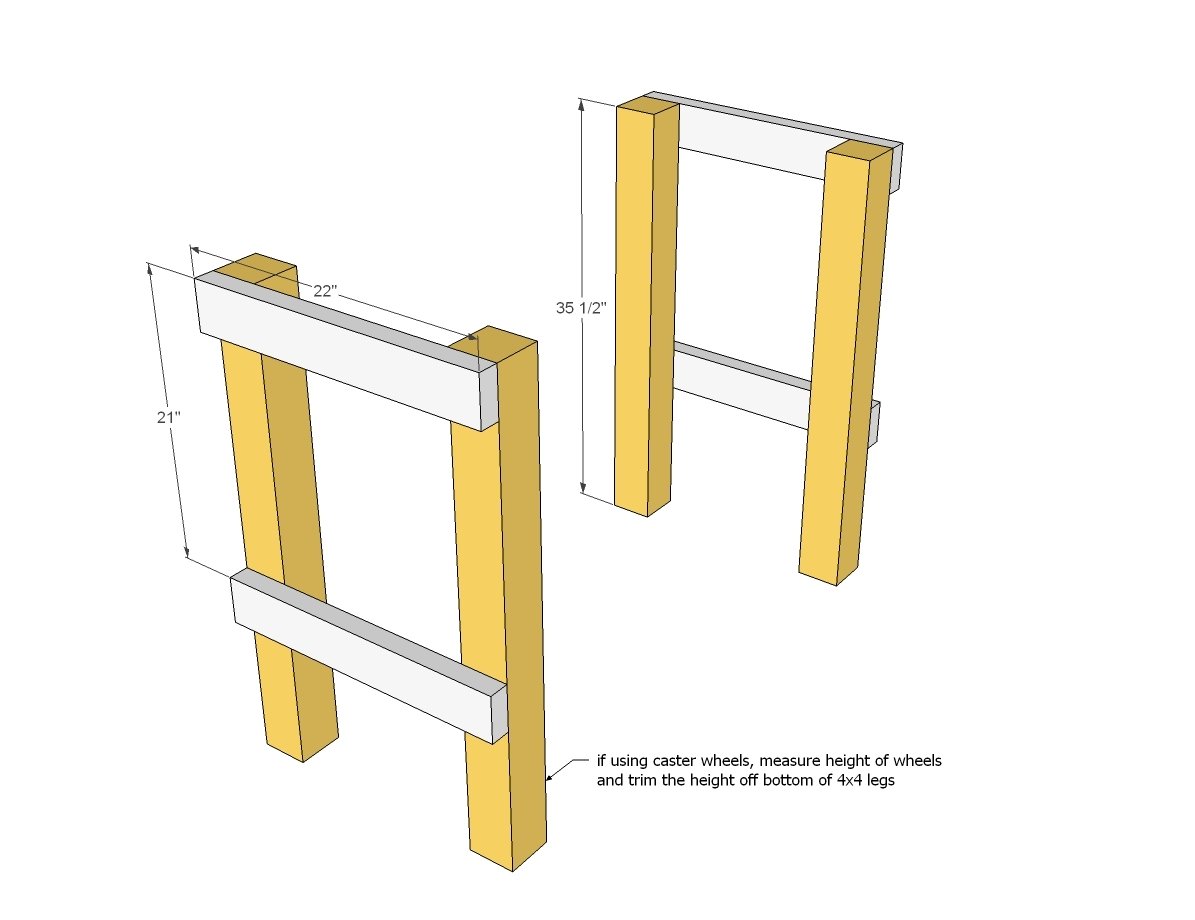
Test a few of your screws to make sure you don't need to predrill all the holes. I find self tapping screws pretty forgiving (though more expensive). Layout the 4x4 legs and attach the 2x4s to the top and at the bottom shelf location. 

 To keep things pretty - I love how Susan made a screw pattern here.

Step 2

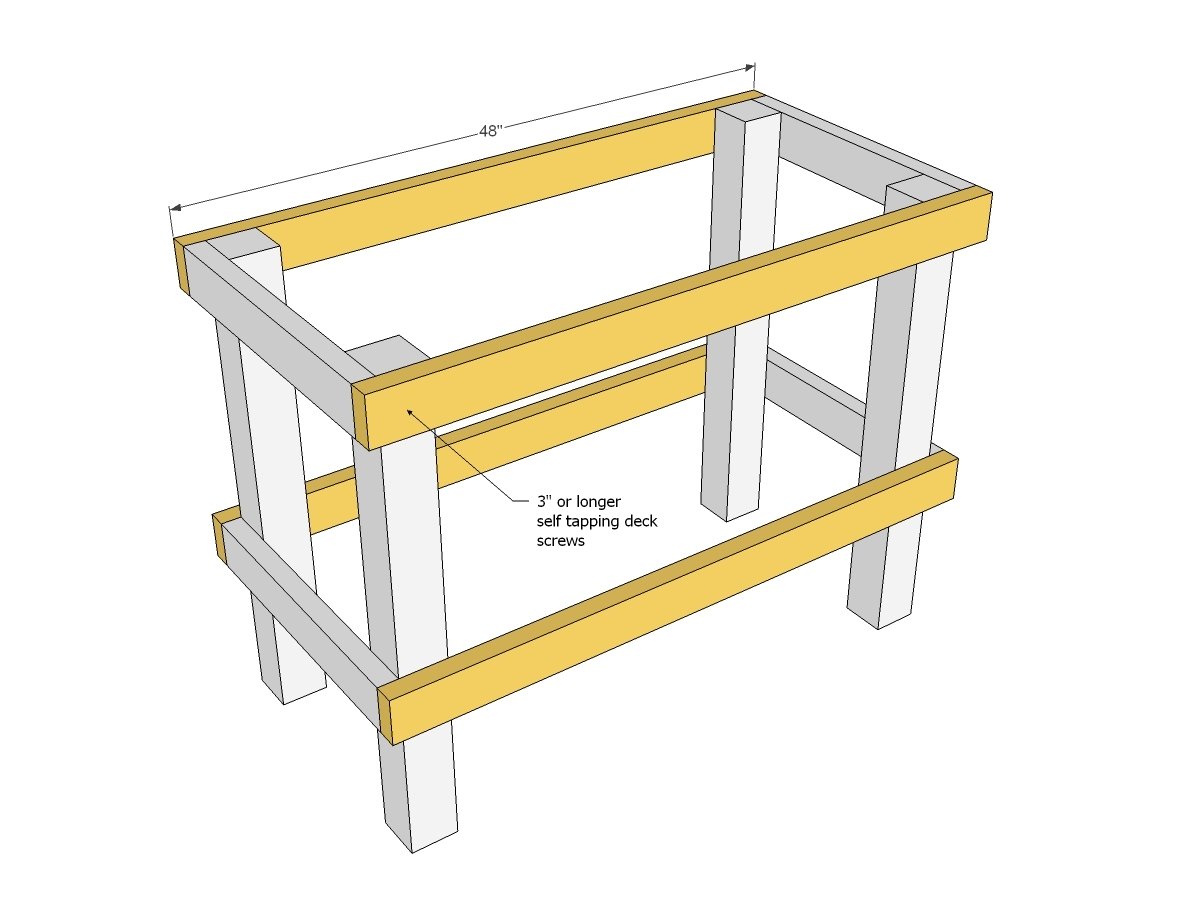
Now things will start to take shape! Attach 2x4s to both the 4x4s and the side 2x4s for extra support.

Step 3

You'll need something to attach the top boards too - so attach more 2x4s inside the top.

Step 4

The same needs to be done for the bottom shelf - but we'll go the other way since the bottom shelf boards are run the other way.

Step 5

Step 6

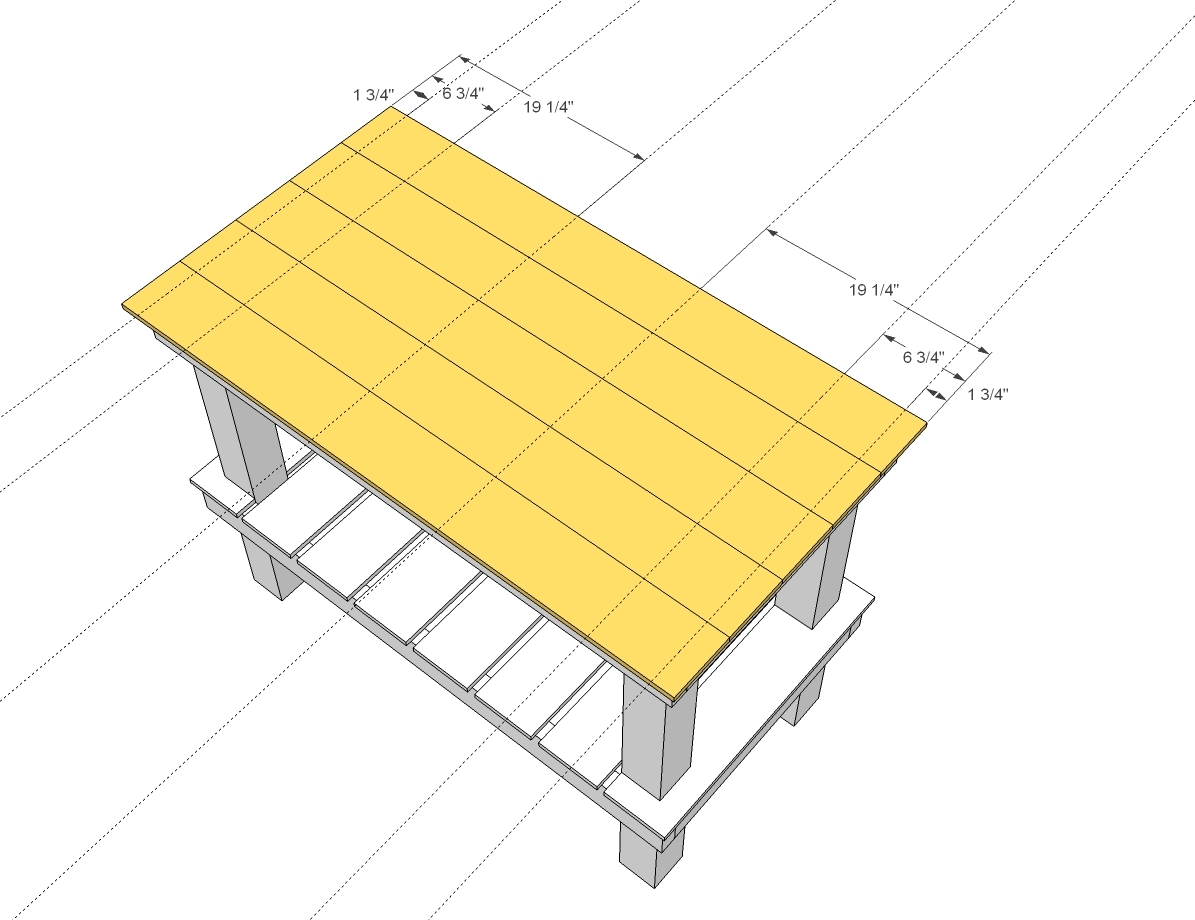
Attach top shelf boards with the shorter screws to the supports - if the supports were placed to plans, the dotted lines show the location of the center of the studs.

Step 7

Attach wheels to bottom of legs if using. 

For more details - please visit Susan at Between Naps on the Porch.

Thank you Susan!

Finishing Instructions
Preparation Instructions
Fill all holes with wood filler and let dry. Apply additional coats of wood filler as needed. When wood filler is completely dry, sand the project in the direction of the wood grain with 120 grit sandpaper. Vacuum sanded project to remove sanding residue. Remove all sanding residue on work surfaces as well. Wipe project clean with damp cloth.

It is always recommended to apply a test coat on a hidden area or scrap piece to ensure color evenness and adhesion. Use primer or wood conditioner as needed.
Project Type
Room

Comments

aclifford

Tue, 03/11/2014 - 05:25

This is so cool! Really easy to follow tutorial. You should wear protective masks and gloves.

DIYmommyAK

Tue, 03/18/2014 - 10:05

I love this! I am determined to have a garden this year, so I'm thinking I NEED it :-)

Do you think I could use pocket holes to attach the 2x4s? I bought a massive box (2000!) of outdoor 2.5" Kreg screws, so this seems like a good use for them.

MikeS

Sun, 05/11/2014 - 07:34

I built this in about 3 hours including sanding yesterday. What a sturdy bench, I think I may build another one a little bigger for a workbench using maple as a top. Two things i found: From the buy list, I was (1) 2x4 short, as well as (1) 1x6 too many. Also, be very careful about screw placement on the (2) cut out boards on the lower shelf. It's very easy to split the wood even when pre-drilling. One last thing, remember to always put the Top boards "crown down" to keep from warping and pulling up in the future.

Frequently Asked Questions

Wood Questions

What kind of wood should I use?
Most of our plans use standard construction lumber like pine or fir. It's affordable, easy to work with, and easy to find. It's also rapidly renewing and biodegradable, so a great eco friendly choice!

Can I use hardwoods instead?
Yes—just keep in mind they're heavier, cost more, and can be tougher on tools and harder to join together and finish. I recommend not tackling a hardwood project until after you have built several softwood projects.

What if my boards are warped?
Choose the straightest boards at the store. You can often work around slight warps by cutting them into shorter pieces.

What wood should I use for outdoor furniture?
Use red-toned or pressure-treated 2x lumber for framing, and cedar or cedar fence pickets for the decking. Outdoor furniture should be built like a deck—your local home center can help recommend the right wood for your climate.

Will my wood move or warp after I build?
Potentially, especially in humid climates. Let your wood acclimate indoors before building. Once acclimated and kept in a stable environment, movement should be minimal. Remember, most houses are built using framing lumber - it's all about keeping moisture down indoors.

Cutting Questions

Do I need a miter saw?
A miter saw is great, creating fast, safe, and precise cuts, even for beginners. But most plans can be built with a circular saw and a straight edge. If using a circular saw to cut, take time to practice, and get good at making cuts, before cutting your project boards.

How do I get clean cuts with a circular saw?
Clamp your board, measure twice, cut slow, and use a sharp blade. This takes practice, so spend some time making cuts. I go through becoming proficient at freehand cutting in my course, it is worth taking if you want to master this skill.

Will the store cut my wood?
Yes—most stores will do rough cuts to help you transport your materials home. But from store to store, the quality of cuts could greatly vary.

Joinery Questions

What screws should I use?
We recommend star-head self tapping screws for framing, most common sizes are 2-1/2", 1-3/4". Pre-drill if close to the edge or you find your wood is splitting.

Do I have to use pocket holes?
Pocket holes are the cheapest, easiest and fastest way to do some joints - like edge to edge or a hidden fastener joint. There are other methods, but these can be time consuming and expensive. We recommend using pocket holes as indicated in plans for best results.

How do I keep things square?
Use a speed square and measure diagonals after each step. Always clamp joints before screwing to keep them tight and flush.

Finishing Questions

Stain or paint before or after building?
A quick sand before and a full finish after gives the best results. Pre-finish if you're doing two-tone or detailed finishes.

What type of finish?
Use oil-based or water-based stain. For paint, cabinet-grade latex or enamel works great. High use surfaces on indoor projects should get a coat of polyurethane, I recommend a Helsman or Spar or other flexible poly that won't crack or peel with wood movement. For exterior projects, use a finish suitable for exterior fences.

How to get a smooth finish?
Start with a well sanded project. Sand between coats (220 grit), wipe clean, and apply light coats with a foam brush or roller.

Plan Questions

Can I change the size?
Many people do, and that's the great thing about building your own furniture! But do keep in mind going bigger might mean more supports are required, and often plans are optimized for minimal material waste.

Are these beginner-friendly?
Yes—plans are written with simple tools and clear steps in mind, with every effort to make plans as simple as possible.

Can I sell what I build?
Absolutely! Just don’t resell or repost the plans themselves.

General Questions

What tools do I really need?
A drill, circular saw, tape measure, square, and a few clamps will get you through most projects.

Do I need a workshop?
Nope! A driveway or small patio is plenty to get started, just make sure you have a level place to work. If you find you are building several projects a year, creating a small workbench is a great way to store tools and have a dedicated workspace.

What if I mess up?
Wood filler, sanding, or flipping boards goes a long way. Mistakes are part of the process!

What can I do to make my projects look more professional?
Start with straight boards, make accurate cuts, clamp all joints, and line up everything neatly. Sand thoroughly, use a neutral finish, and apply it in light coats for a clean look.

I've never built anything before. Where should I start?
Start with a few smaller softwood projects to get hands-on experience. Or if you're tackling a big project, buy a little extra lumber and practice your cuts and joints first. If possible, work with someone who has a bit of experience.

Care & Maintenance

How long will my furniture last?
With good joinery and regular care, your DIY furniture can last for decades. I have pieces in my own home that are over 20 years old and still going strong! One of the best parts about DIY furniture is that it’s easy to repaint, refinish, or repair—so your projects can grow and adapt with you.

How should I care for outdoor furniture?
Lightly pressure wash or hose it down once or twice a year. Tighten screws and reapply finish as needed to protect it—just like a deck or fence. A little upkeep goes a long way in extending the life of your furniture.

How about indoor furniture?
Regularly dust or wipe with a damp cloth. If it starts to look worn, a light sanding and touch-up paint or stain can refresh it in no time. DIY pieces are meant to be durable and fixable—so don’t be afraid to give them some love now and then.

Want to Build with Confidence?

Check out my ebook: 12 Skills to Build Your Own Furniture
It walks you through the core skills every builder needs—measuring, cutting, joinery, and finishing—so you can build beautiful furniture that lasts.

Still Have Questions?

Email us anytime at [email protected] and we’ll be happy to help!