

Claim two extra square feet in your closet with this amazing easy plan!

It's taken me weeks to get the courage to share the closet of a three year old with the world, but it's taken me months to take what was just a clever idea and turn it into . . .
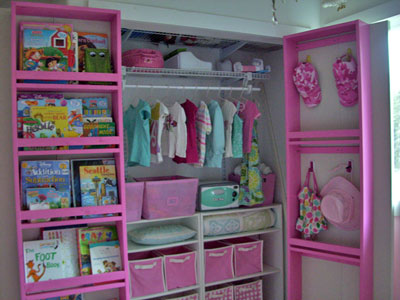

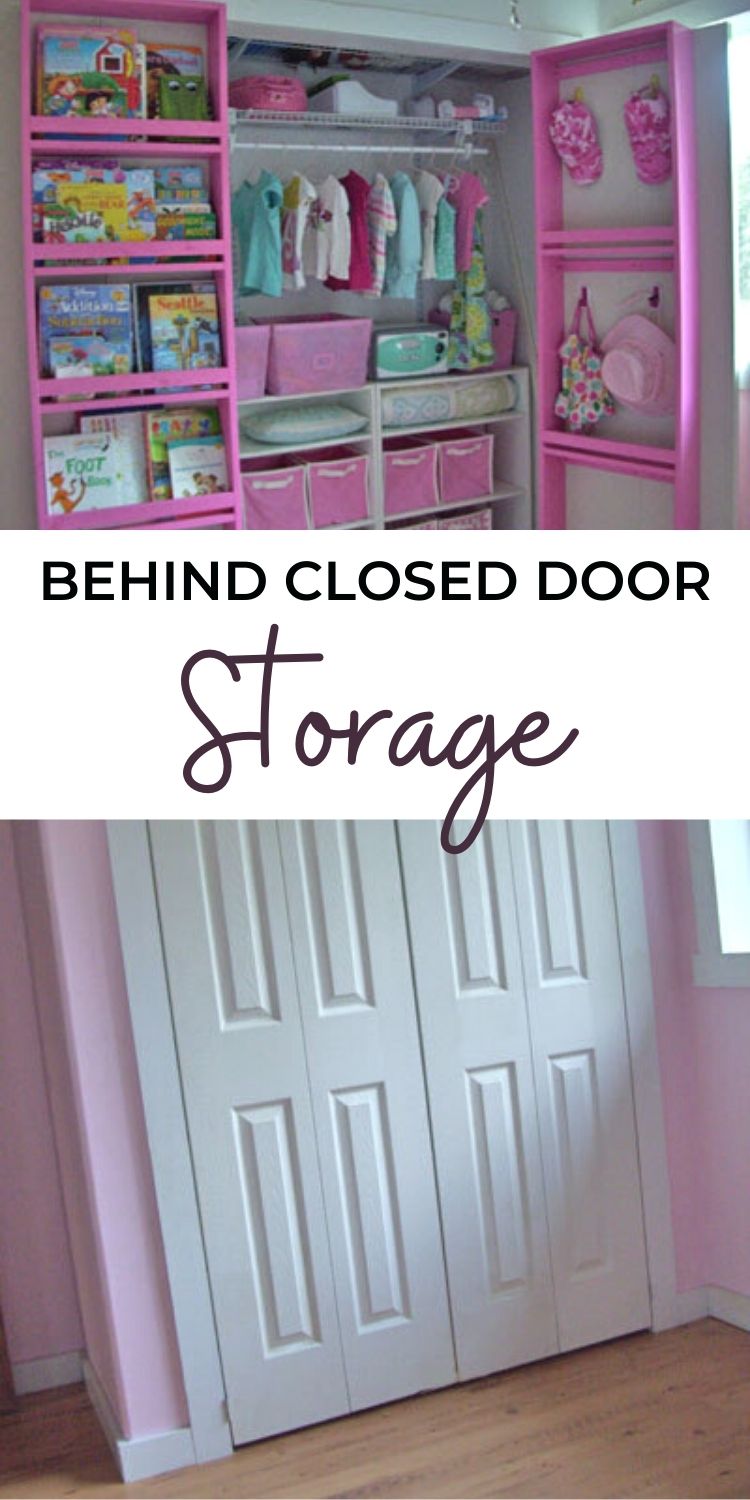
Here's the bottom. You can see how I simply built bookshelves, attached them to the inside of existing closet doors, put the doors on hinges, and added a couple extra square feet of storage to a tiny closet. Oh, those hooks are Command hooks from 3M - So easy to use, I love them!

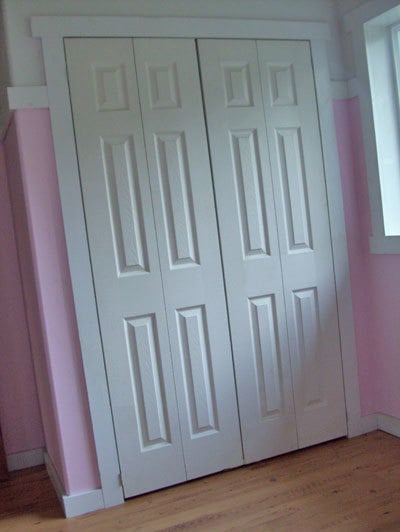
When open, the doors opens completely flush, giving you the most room to access the inside of the closet (as long as there is not a wall or something in the way). No those are not my bookcases (the saggy white ones), they are the last of the flat pack particle board furniture that I have in my home. When closed, the bookshelves sit in the door frame, taking up what used to be completely wasted space. And in a house the size of mine, with exactly three closets, every square inch of a closet is prime real estate.
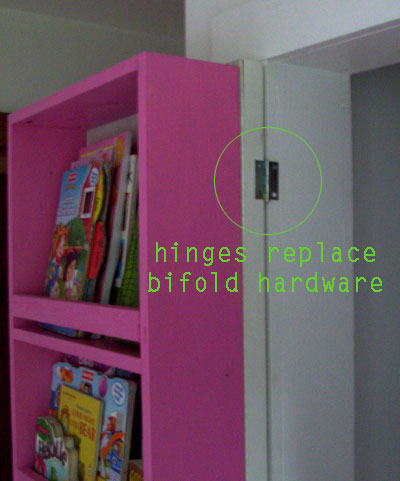
These are super easy to install. Simply remove the bifold door hardware and attach the bifold doors with standard hinges as shown in the photo
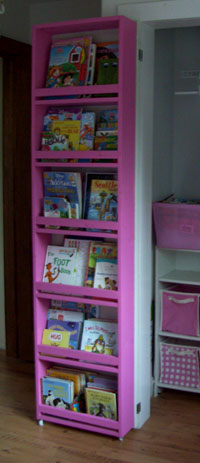
The weight of the doors rests on wheels, so you can load the doors up. In one closet door, I was able to store ALL of Grace's books.
Think of the possibilities - pantry items, toiletries, towels, accessories, and did anyone mention shoes?
And best of all? I can close the doors live my dream of a simple, bare home, free of clutter. No one (besides you, my friends) would ever know what's behind my closet doors. All for around twenty bucks a door!
So wanna make your own? Here's how I did. You will need to alter your shelves to your own closet specifications. So get your measuring tape out!
Pin For Later!
Preparation
1x6 Boards Heavy duty hinges four caster wheels 1x2 Boards Anchoring bolts for hollow core doors Screws
Cut your boards to fit your closet and closet doors.


The success of this project greatly depends on building square, and installing level and square with a square closet opening.
Instructions
Step 1
First, measure your closet doors. If they are a standard 24″ wide, you will need to subtract 5 1/2″ to get a total door shelf of 18 1/2″ wide. That means all of the shelves will need to be cut at 17″ wide.
Measure the overall height of the doors and subtract two inches. Cut two 1x6s to this length. You will also need to cut as many shelves as desired to the shelf width (in my example, 17″ wide). Also cut 1×2 shelf trim to the shelf width, one more than the number you cut for shelves.
Step 2

Basically, you just build a shelf, as shown above, out of 1x6s. You have to make the shelf 5 1/2″ narrower than the closet door so that it has room to swing when opening and closing.
Step 3
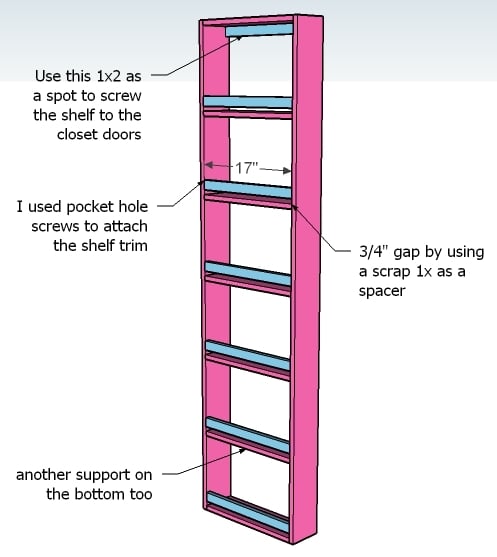
Then you attach the 1x2s as shelf trim and supports. I used my Kreg Jig™ to build Grace’s closet doors, but you could also simply use 2″ wood screws countersunk. Don’t forget the glue.
Step 4
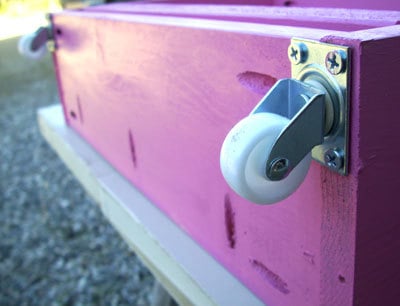
Then you attach the caster wheels to the bottom. You only need two caster wheels per door. I use 1 1/4″ caster wheels. Those are the pocket holes I used to build the shelf with.

Comments
Sharon (not verified)
Sun, 10/10/2010 - 13:29
Question- What kind of
Question- What kind of wheels would you use on this project if you had carpet floors?
DIY Simple Clo… (not verified)
Tue, 10/12/2010 - 17:15
[...] plan is really straight
[...] plan is really straight forward and boring, not like Grace’s closet (click for [...]
Farm Marm (not verified)
Sat, 11/20/2010 - 13:09
You have psychic powers! I
You have psychic powers! I had this exact idea in my head for month! I have a VERY small pantry and there isn't a door on it.. I've had many ideas for what kind of door to use. Needing space for the spice rack (I have about 100 jars of spices and mixes) I thought- what about the back of the door? For the front I want to use metal sheeting trimmed out ;) I have some Watkins brand spices that I want to put magnets on the back of and attatch to the door front (I have one of those "stainless" refrigerators)...besides the abc mags for the lil ones..Thanks Ana for the great site! I have become a stalker! ha ha! I have at least 40 projects saved for building! lol
The $20 (Or No… (not verified)
Mon, 11/29/2010 - 03:42
[...] Posted on November 17,
[...] Posted on November 17, 2010 by pinktoesandpowertools| Leave a comment Ana’s plans for the storage closet doors involve bi-fold doors in a room with hardwood floors. If you have this type of door, you should [...]
The $20 (Or No… (not verified)
Mon, 11/29/2010 - 03:44
[...] Leave a comment Ok,
[...] Leave a comment Ok, so it was my first attempt at building. Ana provided me with a great plan and idea for my own house, but let’s face it people, she can’t hold my hand while I [...]
Laura (not verified)
Sun, 12/26/2010 - 16:02
Perhaps consider switching
Perhaps consider switching your sliding doors for two hinged doors (non-bi-fold) ...
Use really good/heavy-weight hinges, to help accommodate the weight you put in these shelves (& try not to get carried away with loading them with super heavy items) ...
That way, you SHOULD be able to get away withOUT having to add wheels on the bottom on the shelves ...
and you won't have to give up on this storage idea because of that 2" rise in your closet floor.
Just something to ponder. =)
Laura (not verified)
Sun, 12/26/2010 - 16:05
oops! Ana mentions this idea
oops! Ana mentions this idea below ... =}
I agree with her, though ... this should work just fine =)
Twin over Full… (not verified)
Sun, 01/02/2011 - 20:07
[...] probably my marriage
[...] probably my marriage too), a storage sofa that also sleeps one, a coffee table that hides legos, closet doors that add 25% more storage to your closets, lockers for your closetless entryways, or storage beds to increase storage dramatically in [...]
sue underwood (not verified)
Fri, 01/07/2011 - 18:20
would this work with a single
would this work with a single bifold door that is unable to open past 90 degrees? is there any way i could accommodate that? thanks so much!
Amanda (not verified)
Thu, 01/13/2011 - 10:28
I can't believe how much I
I can't believe how much I LOVE this...I think I'm actually getting an adrenaline high just thinking of what I can do in our house for storage! It's even making me want to delay putting our house on the market!! :) This is TOTALLY going in my daughter's room, and the shelves are also going in our master bedroom (along with the closet organizer plans!)!
Nina T. (not verified)
Sat, 02/05/2011 - 13:55
I absolutely LOVE this
I absolutely LOVE this idea.....and for my own closet, not my kids!!! What an awesome idea!!!! I feel a honey-do list coming ! :P
Angie (not verified)
Sat, 02/05/2011 - 22:43
While looking for a way to
While looking for a way to actually use the huge space above my closet rod I came across your website....this is an absolutely brilliant idea...I think I will try this in my grand kids playroom!!
Alyssa (not verified)
Sun, 02/06/2011 - 05:47
This is a wonderful idea, and
This is a wonderful idea, and just what I've been looking for! Thank you so much for sharing! Now, I've never done a woodworking project. Would I have to drill my own pocket holes, or just use those types of screws? Do I have to cut my own wood - or will a Home Improvement store do that for me? The most I have in the tools department is a small electric screwdriver and a cheap-y "all you need" tool kit.
Sorry Mom « Th… (not verified)
Sun, 03/06/2011 - 10:59
[...] The first picture of
[...] The first picture of the shelf may not have looked like much, but here it is installed in the bathroomYep, look at me go! I made that, but I couldn’t have done it without Ana’s genius. It took longer for the paint to dry that it did for me to build it. We can store a lot of stuff in that shelf. We’re a frugal family, we stock up when we find good deals and the challenge is finding a place for it all. I mean where are you going to store 15 body poufs that you pick up on clearance for 90% off? Well, you can store them on the top two shelves of this. If you wanna build your own, check out Ana’s site and find the plans here. [...]
Mitchkulet (not verified)
Thu, 06/30/2011 - 05:32
Useful ideas! Anyone can try this to have a clutter free space a
Useful ideas! Anyone can try this to have a clutter free space at home.
Locksmith Jack… (not verified)
Fri, 07/29/2011 - 03:42
Ana, I can imagine your
Ana, I can imagine your doubts of sharing these pictures of your kid’s closet, but let me tell you, this is the best idea ever! Congratulations for you, it was a beautiful work. I will take some of these ideas for mi child’s room. Thank you!
Guest (not verified)
Wed, 09/07/2011 - 18:52
White Shelves
Hi! I love your closet! Where did you get your white shelves that are inside the closet? Did you make those as well? Thanks!
Ash_mommy_of_2
Sat, 10/15/2011 - 12:25
WOW!!
This is AWESOME!! Every closet door in my house needs this treatment!! :)
AmandaV (not verified)
Wed, 12/28/2011 - 17:48
what about...
I have 2 girls sharing a small-ish room, and I have the shoe organizer over each door. Do you think there is more or better usable space using these organizers, or the shoe holder?
also their closet has space/ or a "cubby" area on each side. it really seems like wasted space, since it isn't the easiest to get to. anyone have any ideas for this area?
(on the right and left of the doors, this area is closet space, and you have to lean in and under the clothes to get to the space, HELP.. please of course )
http://i7.photobucket.com/albums/y251/flame_chick/DSCN9332.jpg
http://i7.photobucket.com/albums/y251/flame_chick/DSCN9337.jpg
tannisg
Tue, 01/10/2012 - 07:58
trying to work a similar idea with no room for swing out doors
I love these shelves, and I love that it uses that wasted space!
I am going to build a new closet organizer for my big girls room (9 and 12) They say not to make the shelves deeper than 12 inches so things dont get lost back there (like they do now at the bottom of drawers and "I don't have anything to wear!!") but that leaves a lot of real estate!
The problem is that there isn't room for the doors to swing out, they're pretty crammed in that room already.
I took off the sliding doors and replaced with a curtain so both sides can be accessed at once.
I am trying to wrap my brain around a rotating shelf similar to this one:
http://www.rockler.com/product.cfm?page=21748&filter=pantry
but I don't know where/how to attach it (floor to ceiling pole?) or what kind of hardware to use. The shelves themselves I think I would like to make just like these - 1 by 6 box with shelves and open on both sides with 1 by 2 rails to keep stuff in (I'm thinking lotion bottles, small bins of pencils, hair stuff, etc)
Any thoughts on the hardware? I also posted in the project suggestions but I thought I'd try both - thanks!
Bubba's mom (not verified)
Fri, 03/09/2012 - 20:51
I love this idea! Looking at
I love this idea! Looking at my closet doors (which are set up just like the picture), I feel like it would hit the side molding when trying to open it if I converted to non-bi-fold. Anyone have any issues with that?
dragons49
Wed, 06/04/2014 - 22:50
PDF version is not coming up
PDF version is not coming up for this project