
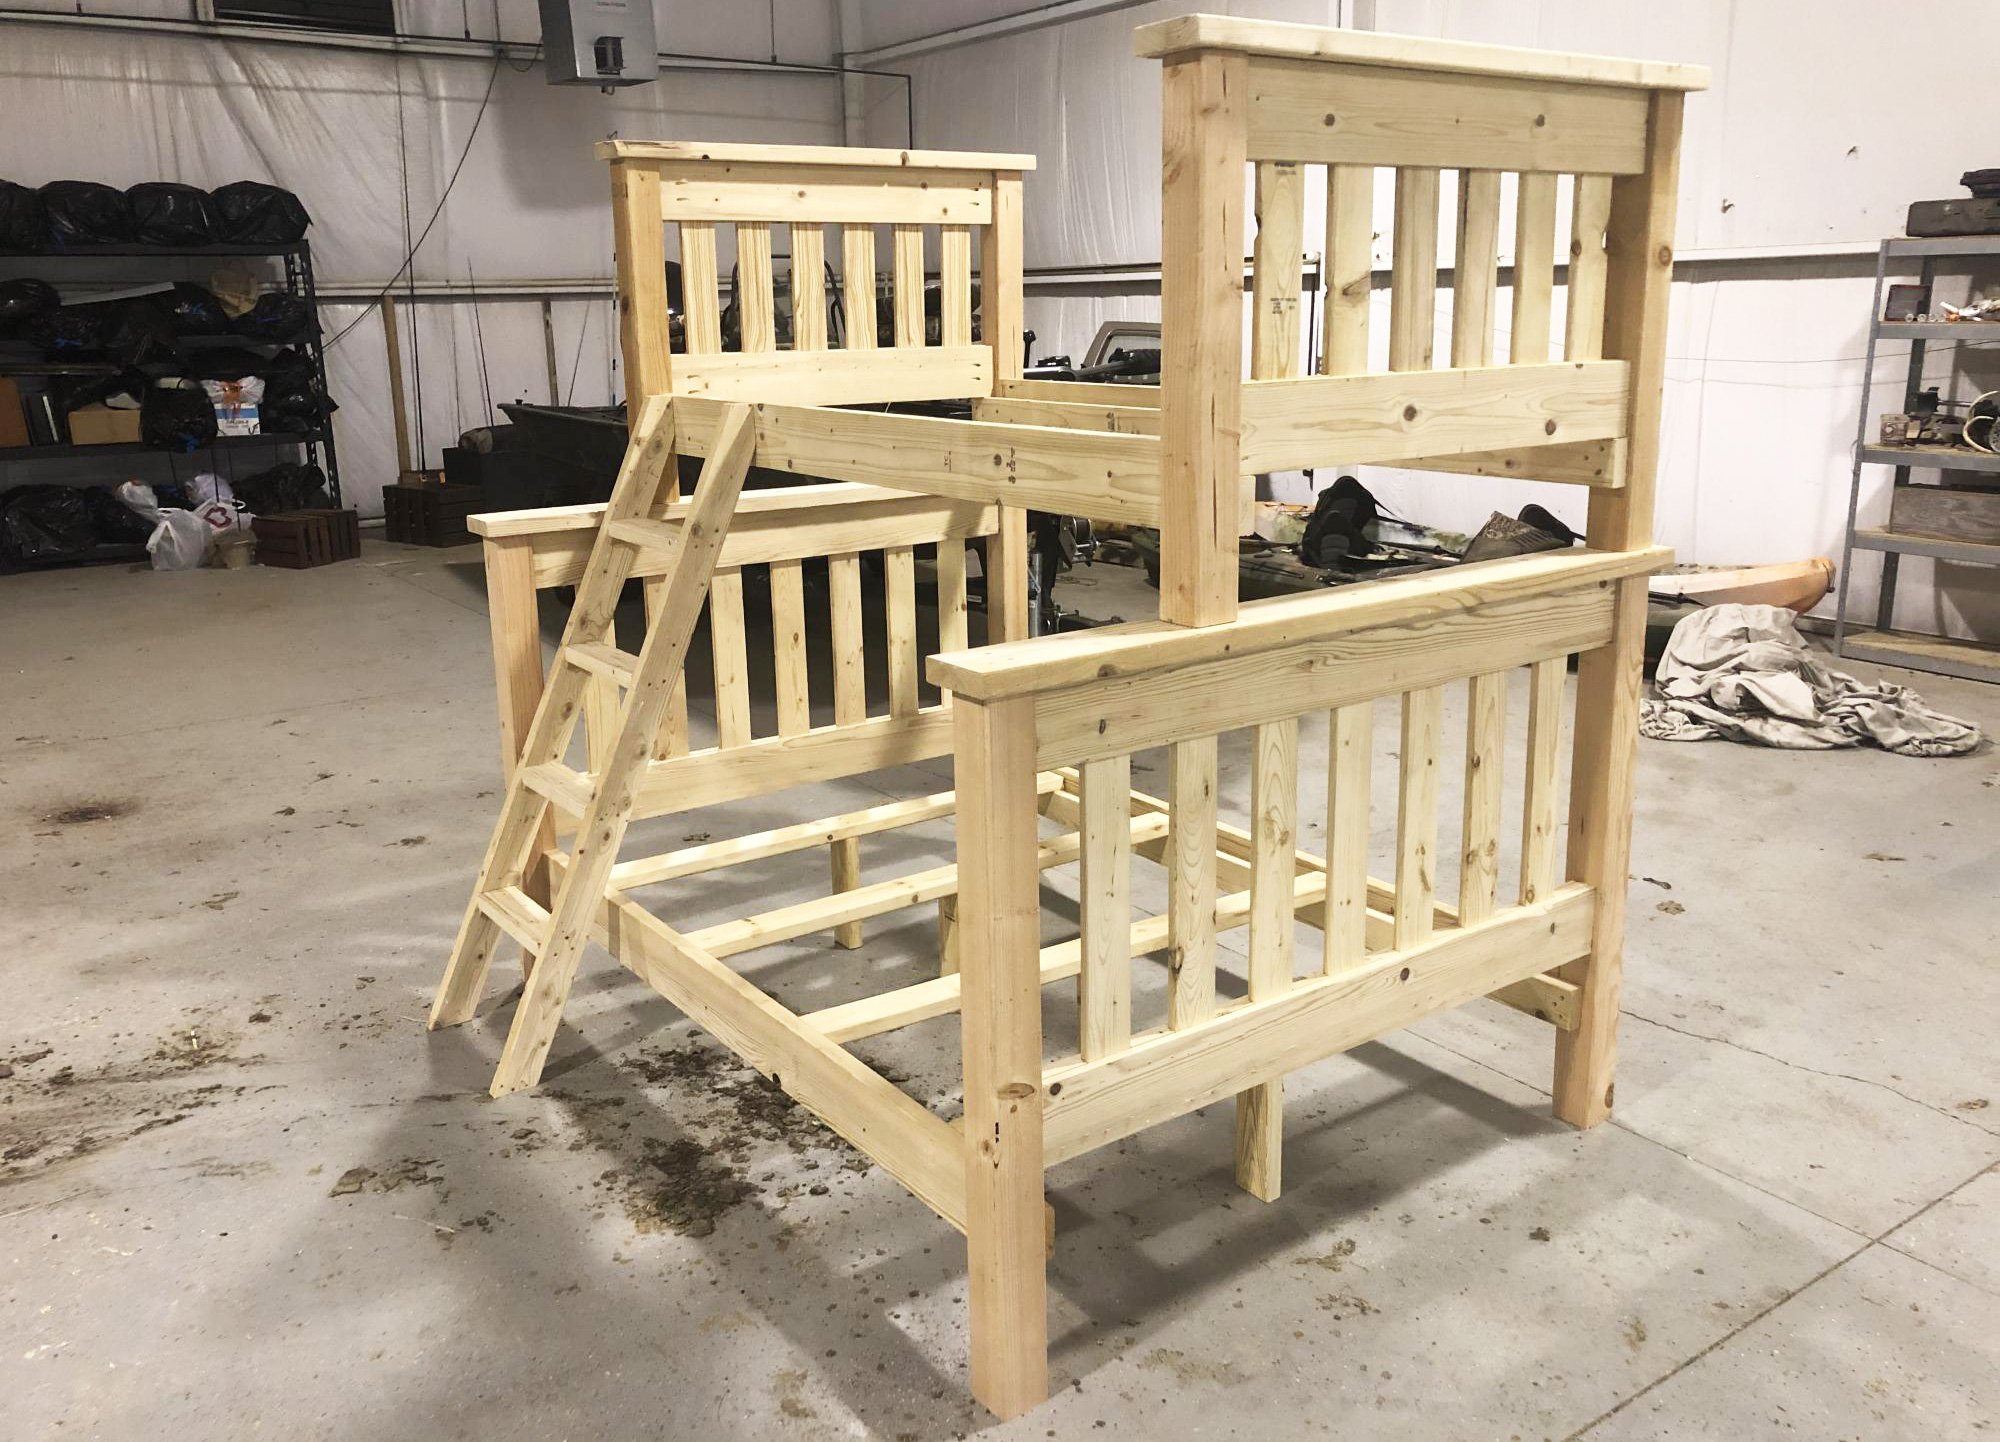

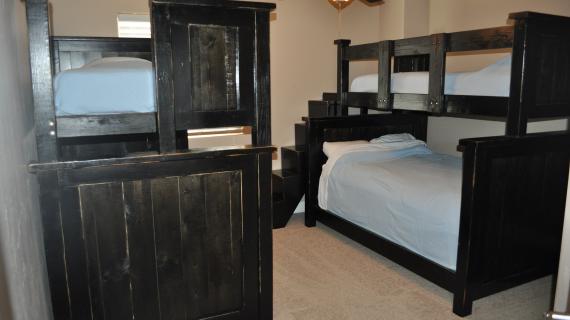
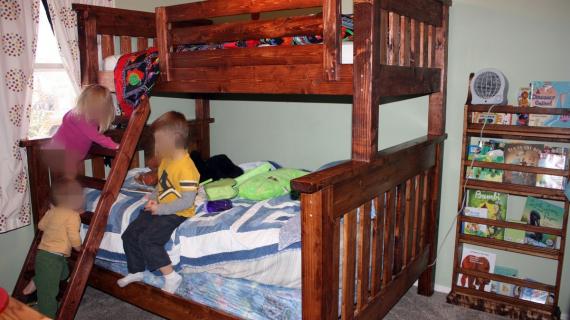
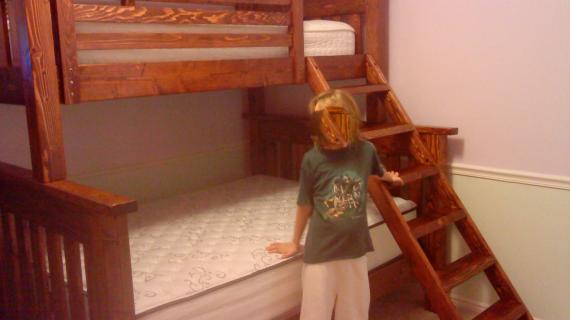
Build your own twin over full bunk beds! Ladder plans included. These free woodworking plans include step by step diagrams, cut list and shopping list.
We also have a twin over twin bunk bed version of this plan.

Preparation
See Simple Bed Plans
Make sure you measure your space before building. The bed parts can be assembled in the room, so doorways aren’t as big of an issue.
Instructions
Step 1
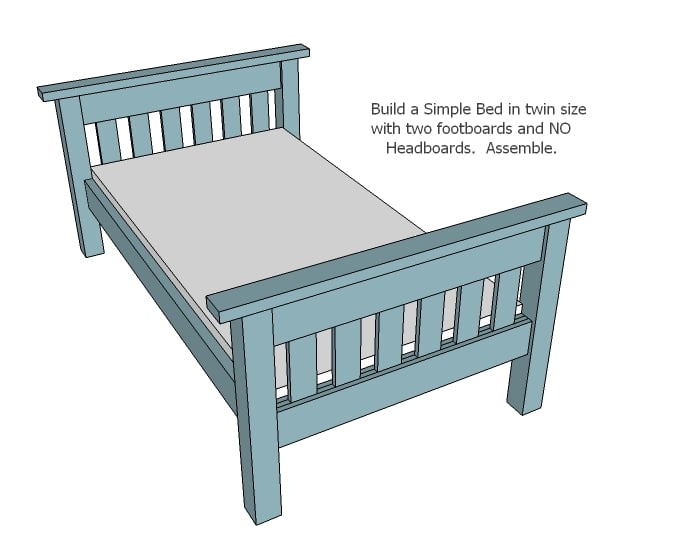
Build the Top Bunk
You will need to build a top bunk made up of two footboards. Simple twin size bunk plans are here. When you add the slats to the headers, start in the center and work your way out. If the spacers do not fit tight at the end spacers, don’t despair. Simpy cut a piece of 1×6 leftover from the header to the exact dimension and use it as the spacer instead of the 1×3 spacer.
Step 2
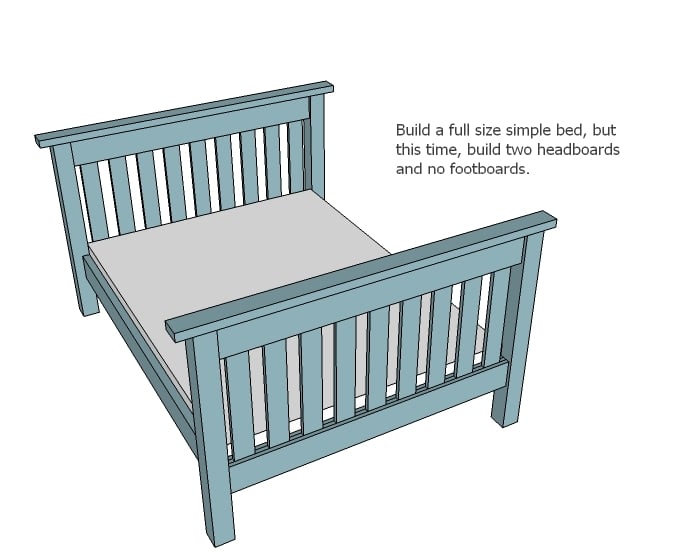
Build the Bottom Bunk For the bottom bunk, you will need to build the Full Size Simple bed, but this time, build two headboards and no footboards.
Step 3
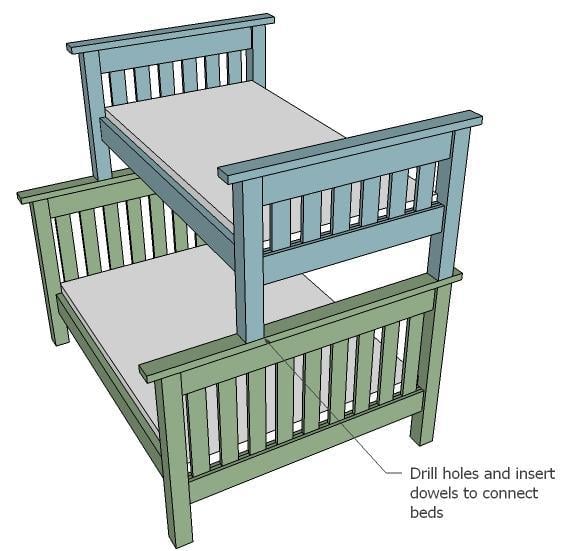
Assembly Measure the location of the top bunk and mark it on the headers for the bottom bunk. Find the center of the marks and drill a 1″ hole, 3″ deep. Then find the center of the bottom of the legs on the top bunk and drill a 1″ hole, 3″ deep. Use 6″ metal headless bolts or hardwood dowels to hold the bunks together through the drilled holes.
Step 4
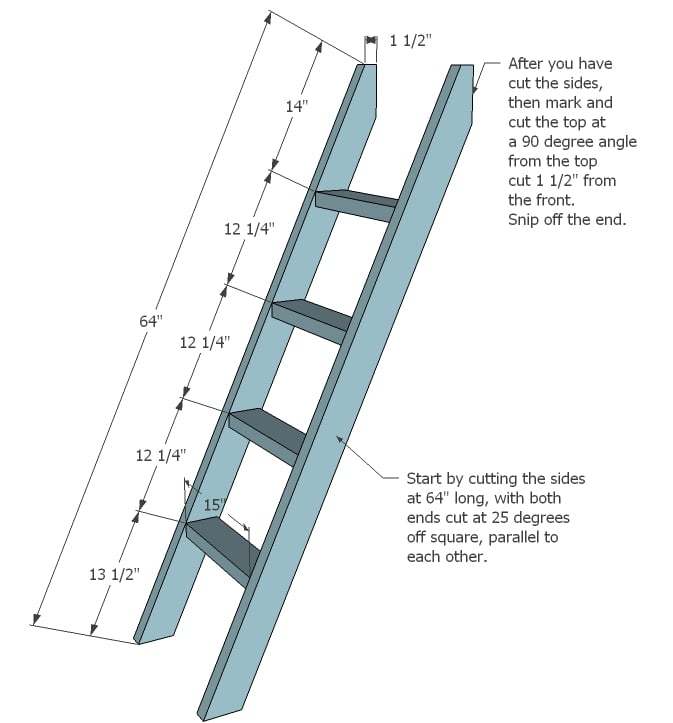
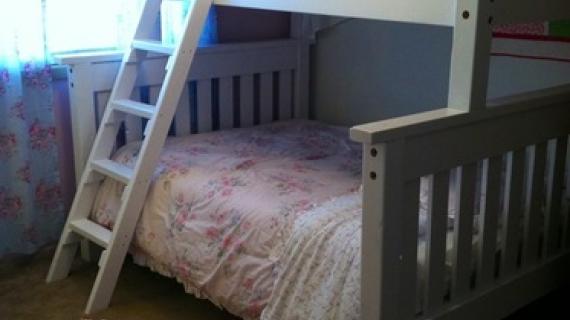
Ladder For the ladder, cut two 2x4s 64″ long, with both ends cut at 25 degrees off square parallel to each other. Then on the top edge, mark the top edge in 1 1/2″ from the front top corner. Use a square to mark a line perpendicular to the top cut downward. Cut this line off. These are your ladder sides. Measure and mark the ladder sides and screw the rungs to the ladder sides with 2″ screws and glue. The ladder can be attached with metal brackets or by screwing from the inside of the side rails of the top bunk. Guardrail plans area also available in the Twin Simple Bunk Plans.


Comments
bugnbelle (not verified)
Sun, 01/02/2011 - 20:53
I love your resolutions list
I love your resolutions list above! I am a newbie, can't wait to try some projects in the new year.
Abby (not verified)
Mon, 01/03/2011 - 00:27
OMG I stumbled upon your
OMG I stumbled upon your awesome blog about a month ago and it has me itching to get woodworking. My man is a die hard metal worker and hates to work with wood when I showed him some of your projects he was straight up "You know I hate working with wood"..... "ummmm babe IM totally doing it and I cant freaking wait!!". Might take me awhile to get the supplies together but I will be joining you in carpentry sometime in 2011! Thanx for the inspiration!
Tsu Dho Nimh (not verified)
Mon, 01/03/2011 - 06:37
Footboards or headboards for
Footboards or headboards for the top bunk? The picture says one thing and the instructions sah another.
Brittany (aka … (not verified)
Mon, 01/03/2011 - 07:58
Great instructions. I think
Great instructions. I think I'll need to step up my carpentry this year to get fit ;-).
Thanks for sharing.
Brittany
http://www.prettyhandygirl.com
Ana White (not verified)
Mon, 01/03/2011 - 08:00
Thanks for pointing this out!
Thanks for pointing this out! Just fixed it. 2 Headboards for the bottom bunk, 2 footboards for the top bunk.
Rebecca (not verified)
Mon, 01/03/2011 - 08:02
I would love to be your
I would love to be your neighbor. And not just to borrow tools from. ;) You have a great outlook on life. I am planning on more building and repurposing/refinishing projects this year. Thank you for sharing with us and encouraging us all.
Susie (not verified)
Mon, 01/03/2011 - 08:10
Wow! Beautiful! We bought a
Wow! Beautiful! We bought a twin over double for our boys last year. This one is so much nicer!
Lindsey S. (not verified)
Mon, 01/03/2011 - 08:23
Ana, this is great! My
Ana, this is great! My husband and I were hoping to build full over full bunkbeds. Would it be easy to convert this plan to a full over full?
jodie (not verified)
Mon, 01/03/2011 - 08:37
Great! I want to do this for
Great! I want to do this for my daughters. Can you do full over full with these same plans? Also, can you do a flat ladder that attaches to the bunk (I.e. Doesn't touch the floor)?
Chelle (not verified)
Mon, 01/03/2011 - 08:45
I have been learning what a
I have been learning what a serious workout carpentry really is! This past week I have been building the Simple Bunk Beds for my kids and I've done a good part of it on my own. I AM SO SORE! My arms and legs are aching! Woodworking is a full body workout, it even gets your heart rate up! The beds are almost done, I can't wait to share pictures.
Ana White (not verified)
Mon, 01/03/2011 - 08:48
Lindsey, I don't see why this
Lindsey, I don't see why this wouldn't work - just make sure your slat system is properly done - perhaps with a center support, so the top bunk is adequately supported. The ladder could also have less of an angle in that case too (this ladder is made to fit the wider bottom bunk).
Ana White (not verified)
Mon, 01/03/2011 - 08:49
Thanks Chelle for adding your
Thanks Chelle for adding your comment, I couldn't agree more! You use muscles you didn't know you had!
Yolanda (not verified)
Mon, 01/03/2011 - 08:59
Oh my goodness! How on earth
Oh my goodness! How on earth did I miss the laundry basket dresser?!Seriously, I have a baaaaaad problem with moving clothes from the laundry basket to the dresser. With that dresser, I wouldn’t have to bother and no one woud have to be bothered by my clothes living permanently in a laundry basket. And thank you for such simple plans for making the twin over full bunk beds. Happy New Year!
Amy Callahan (not verified)
Mon, 01/03/2011 - 09:01
Hi Ana...I'm one of the ones
Hi Ana...I'm one of the ones that has been waiting for this. Our upstairs bedroom is shared by our two boys. It has eaves that cut into our ceiling height, but we have a full height in the center. We're planning to switch the ladder to the other side of the bed, perhaps with less of an angle, so the "full" part of the lower bunk will tuck in under where the ceiling starts to eave. Hope that makes sense. It will be such a huge space saver :)
Jessica (not verified)
Mon, 01/03/2011 - 11:02
Ana - You are just 10
Ana -
You are just 10 kinds of amazing, I want you to know that! I love reading your site and though I haven't built a thing yet (for shame, I know!) I am amazed every time I read a new post. I get super excited over every new plan and I want to build stuff so desperately! Gotta make some room in that garage for me to do so... haha
But I just wanted to say that I was so excited about your reasons for building, esp. #6. I hadn't thought about just how green building is... thank you for showing me another reason for wanting to build! :)
Brooklyns_Mama (not verified)
Mon, 01/03/2011 - 13:23
The link to "your horrible
The link to "your horrible first project" isnt right =)
It pops up the Little Creations bunker <3
Kelli (not verified)
Mon, 01/03/2011 - 19:20
I want to build the bunk beds
I want to build the bunk beds instead of buying a set mostly because I want a sturdy bed and cost. One additional thing I would like to do is in place of the ladder have the stairs at the end of the bed with a built in dresser. Any help on this would be greatly appreciated.
Just a side note. I was directed toward your blog and I have to say you are one amazing woman!!! I love coming back to see what is new and get more ideas.
laree (not verified)
Tue, 01/04/2011 - 04:52
So, I'll admit, I didn't
So, I'll admit, I didn't really read this post, since I already made bunk beds. But then all of the sudden I started getting all kinds of comments on my blog, and realized they were referrals from you. I am tickled pink! Thank you so much Ana for featuring my room!
Keep it up - your site is the best!
Ana White (not verified)
Tue, 01/04/2011 - 22:14
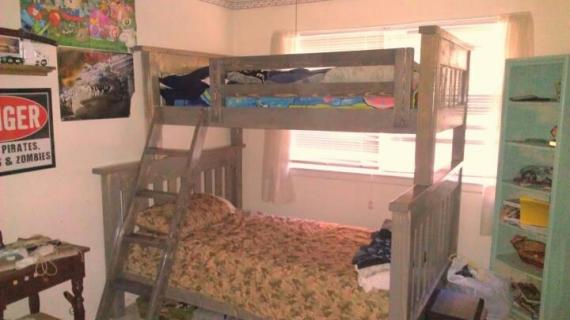
Just wanted to add another
Just wanted to add another photo from one of our readers on Facebook. What's so cool about this photo is the bed is built with all footboards, but the top bunk legs are just longer. Love this idea to, more of an open feel.

Ana White (not verified)
Mon, 01/10/2011 - 10:14
Amy, that does make sense,
Amy, that does make sense, and what a great idea for a sloped ceiling! Please send us pictures!
Susan (not verified)
Sun, 01/16/2011 - 16:17
Hi Ana! We just found your
Hi Ana! We just found your blog and LOVE it! We already have list of items we want to tackle...first being these bunk beds, twin over twin. I have a question though, we've seen several bunks now that have stairs instead of a ladder, since our boys are younger we thought this might be something to consider. Have you ever tried anything like that or any chance you have plans for stairs?? Just thought we'd ask....your plans are awesome and so seeem so easy to follow.
Thank you all these wonderful ideas/plans and your help. :)
aubri (not verified)
Sat, 02/05/2011 - 07:36
These plans are amazing!!!
These plans are amazing!!! Would it be possible to put a queen on bottom and twin on top?
hoopersh
Sun, 09/01/2013 - 17:01
The Plan link to the .PDF is not working
I love these beds and want to make them for my boys, but the .pdf link is not working. Is there somewhere else I can download the plans from?
Thanks so Much!
pequerg
Mon, 07/21/2014 - 12:36
pdf is not working...
Ana, i was looking for plans just like this one for my kids room but the pdf link doesn't work, just like the above comment says... Could you think you could repair the link or send me the pdf? Thanks and congrats for your webpage! It's great and very usefull!!
pequerg
Mon, 07/21/2014 - 12:37
pdf is not working...
Ana, i was looking for plans just like this one for my kids room but the pdf link doesn't work, just like the above comment says... Could you think you could repair the link or send me the pdf? Thanks and congrats for your webpage! It's great and very usefull!!
kmt
Sun, 08/10/2014 - 15:04
link to plans not working
My wife and I have falling in love with this design but the pdf link to the plans isn't working. Could you help me? Thanks. I love the site.
rzrsgirl
Mon, 03/02/2015 - 05:50
Building Supply List
Does anyone have the supply list need ?
Ana White Admin
Mon, 03/02/2015 - 10:59
plan
It states in the post to check out the simple bed plans http://ana-white.com/2009/11/plan-by-request-simple-bed-twin-sized.html Hope this helps!
dvmaguire
Sat, 05/23/2015 - 19:17
Bunk Bed 'plan'
I was very disappointed with what you call a 'Plan'. Generally plans have full dimensions and at least some instructions. These are absolutely terrible!
dvmaguire
Sat, 05/23/2015 - 19:17
Bunk Bed 'plan'
I was very disappointed with what you call a 'Plan'. Generally plans have full dimensions and at least some instructions. These are absolutely terrible!
Ana White Admin
Sun, 05/24/2015 - 13:20
Please Read the entire post.
We are sorry for your disappointment. If you read the entire post, this is how to convert the "simple bed plan" to bunk beds. The plan is the "simple bed" http://ana-white.com/2009/11/plan-by-request-simple-bed-twin-sized.html and the post about the full, which also is modified from the "twin simple bed plan" http://ana-white.com/2010/02/plans-simple-bed-full-size-inpsired-by.html
Hope this helps!
johnthomas19
Thu, 10/22/2015 - 12:05
Sturdy?
I think I'm going to tackle building this bad boy this weekend. My question has to do with how sturdy it is. My 4 yr old likes it when I lay down with him before bed. I'm a good 215 lbs. I'm concerned that the only thing keepng the top bunk attached to the bottom is four dowels. For folks who have built this bunk bed, can you tell me if it feels sturdy? Are you confident the top bunk could support 215 lbs (me) + 50 lbs (son)?
lauren6696
Mon, 07/04/2016 - 03:08
pdf isn't functioning
Hi! I love, love, love this plan and can't wait to use it. However, the PDF isn't functioning, can you put a new link in?
THANKS!
In reply to pdf isn't functioning by lauren6696
Ana White
Tue, 07/05/2016 - 10:00
Here is the printer friendly
Here is the printer friendly version for now. Thanks for your patience with
the site http://www.ana-white.com/print/595
Kevin K
Tue, 09/19/2017 - 20:18
So where are the plans?
I'm looking all over the place, and I don't see any giant red <DOWNLOAD> button anywhere.
Kevin K
Tue, 09/19/2017 - 20:46
Replying to myself. It took
Replying to myself. It took me a while to figure out this site. (Fire your web designer).
But, here's what I figured out:
1) You need the "Sinple Bed" plan first: http://www.ana-white.com/2009/11/plan-by-request-simple-bed-twin-sized…
2) Then you need the "Simple Bunk Bed" plan second: http://www.ana-white.com/2010/01/plans-how-to-modify-the-simple-bed-to-…
3) Then you need the "Twin over Full Bunk Bed" plans here: http://www.ana-white.com/2011/01/plans/twin-over-full-simple-bunk-bed-p…, but the .pdf link is broken so use the Printer Friendly version.
In reply to So where are the plans? by Kevin K
Ana White
Wed, 09/20/2017 - 20:30
Have you seen these?http:/
Have you seen these?
http://www.ana-white.com/2009/11/plan-by-request-simple-bed-twin-sized…
http://www.ana-white.com/2010/02/plans-simple-bed-full-size-inpsired-by…
Hope this helps!
Jen
paulcath
Fri, 02/02/2018 - 13:34
Twin over double bunk beds
Ana: Simple Bed (single) has the side rails listed as 2x6's. The double simple bed has 1x6 side rails. Does it matter which I use?
Thanks.
pc
Deano35
Fri, 03/16/2018 - 18:03
Cost
How do you get your lumber so cheap? Just ran some quick numbers and lumber alone is near $500 plus fasteners, glue, and finish. $100-150 doesn't seem like a realistic number.
mmcret
Fri, 06/21/2019 - 12:24
Where are the plans at I…
Where are the plans at I cannot locate them
dculberson
Mon, 10/19/2020 - 11:36
I built this bed and it…
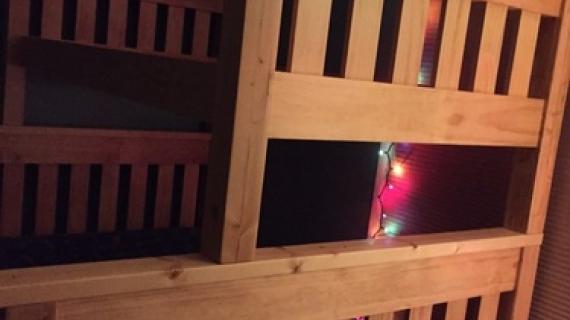
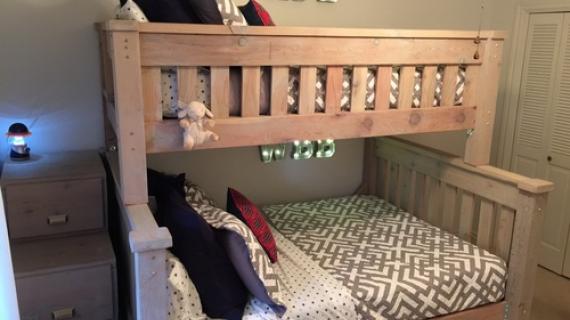
I built this bed and it turned out great! The kids love it. I added some custom LED reading lights to each bunk and the kiddos have their own switches to turn the lights on and off and they seem to enjoy the control it gives them. Everyone I've sent pics to has been impressed (darn COVID so nobody's seen it in person).
One note, the height on the ladder is incorrect. I made the ladder according to the plans and it came out too short. If you add up the component heights the top of the side rail on the upper bunk is 60.5" above the floor. (46.5" total height of lower bunk, plus 8.5" gap between top of lower bunk and bottom of upper bunk side rail, plus 5.5" high side rail = 60.5") The ladder is the hypotenuse of a right triangle with the bunk being a side leg of 60.5" and an acute angle of 25 degrees at the top so the ladder length should be roughly 66.75" (that's 66 3/4").
Unfortunately I didn't realize this until after the ladder was done and painted so my ladder just ends up looking a little funny ending a couple inches short of the top of the side rail.
UTVol
Mon, 11/30/2020 - 11:30
How did you attach the top…
How did you attach the top bed to to the bottom bed? I'm confused as to how to do it. Is there something somewhere that shows a picture?
Thanks!!
amartea
Fri, 01/01/2021 - 09:59
Thank you Ana!! My husband…
Thank you Ana!! My husband and I have followed so many of your plans and love following your directions.
I have a question about the bunk beds. We just completed them and there is a sway back and forth when my daughter moves in the top bunk. Is this normal or is there something we could do to remedy this.
Thank you again for sharing because we have enjoyed working as a family.
Alena
ThomasGarcia
Wed, 03/09/2022 - 09:53
Bunks bed plans
Hi Ana,
Your plans are amazing. Thank you for sharing them. I really like your plans for the Twin over Full bunk beds. My question is do you have plans for a twin XL over Queen bunk beds? If not, do you plan on designing something like that. Thank you for your response and I look forward to hearing from you.
Thomas