


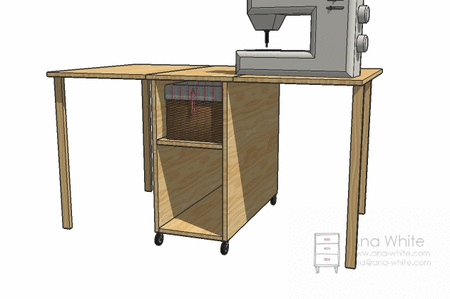
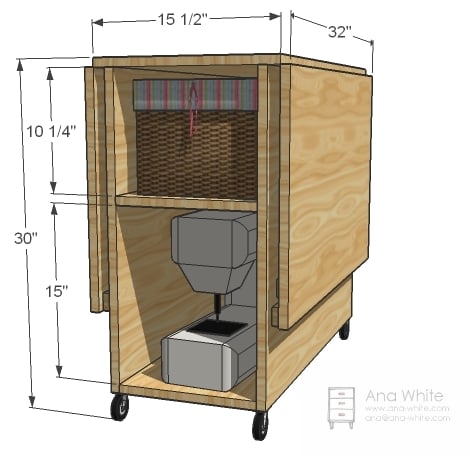
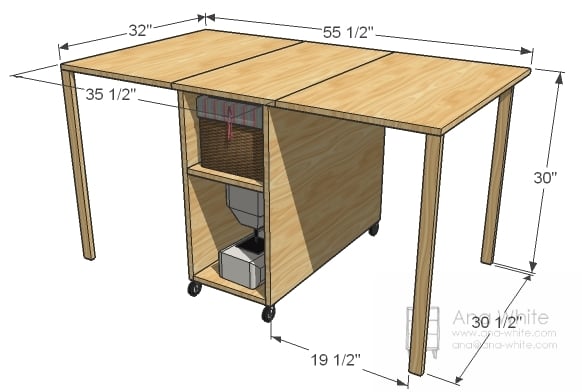
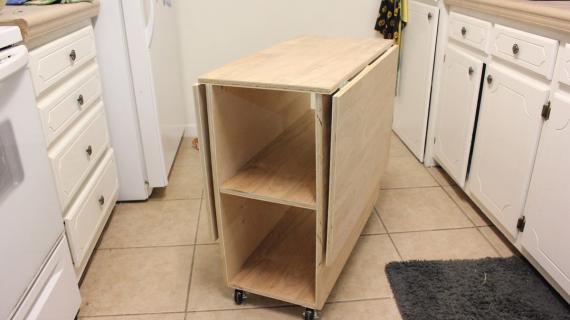
Build your own folding sewing table from one sheet of plywood! This is a free woodworking plan by Ana-White.com to help you create a dedicated sewing space, in just a few square feet! Folds out to 32" x 55", and folds down to roll through doorways and tuck away as an end table.
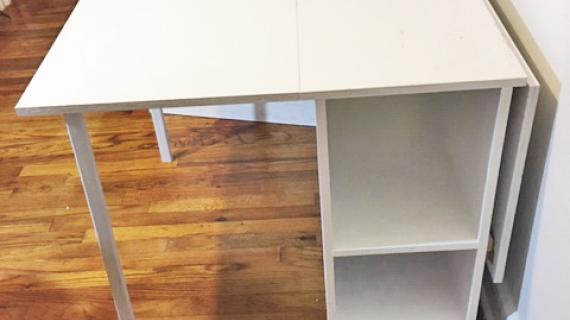
Photo by LEXAROO
Folding Sewing Table Plan Features
Build your own folding sewing table from one sheet of plywood using our free step by step plans. This folding sewing table features:
- Storage for a sewing machine and sewing basket
- Fold out wings to increase sewing and cutting space
- Wheels for easy moving between rooms
- Narrow profile rolls through doorways
Pin for Later!

Preparation
1 – Sheet of 3/4" thick sanded plywood or hardwood plywood
2 – 1x3 @ 8 feet long
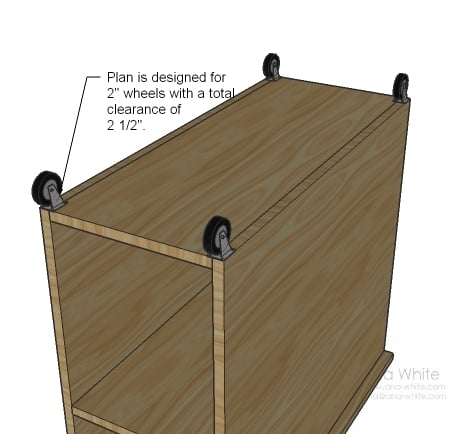
4 – 2″ Caster Wheels (Overall clearance of 2 1/2″) and screws for attaching caster wheels to the base (3/4" length most likely with a larger head)
5 – Sets of simple hinges (2-1/2" to 3" length) - ten total hinges
2" self tapping wood screws (spax or similar, can use trim screws)
- 2 - 3/4" plywood @ 32" x 20"
- 2 - 3/4" plywood @ 32" x 26-3/4"
- 1 - 3/4" plywood @ 32" x 15-1/2"
- 2 - 3/4" plywood @ 32" x 12"
- 4 – 1x3s @ 29 1/4″ (Legs – Measure these!)


Instructions
Step 1
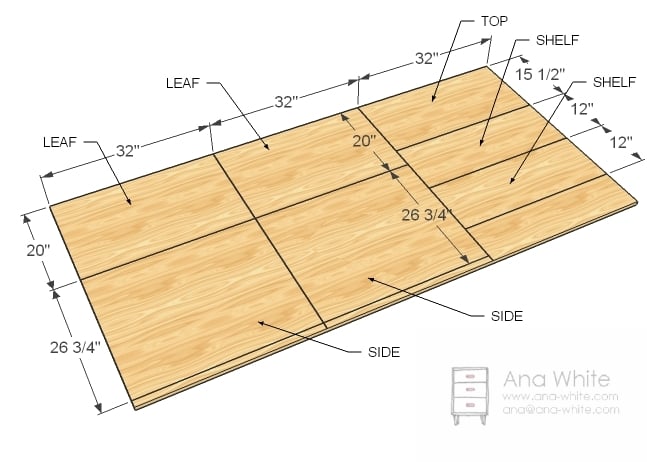
Lay the plywood out on top of scrap 1x boards or styrofoam.
Mark the plywood every 32" width wise with pencil lines. Set circular saw to depth slightly greater than thickness of plywood.
Cut on the pencil lines to create three equal sized pieces, each 32" x 48".
From the 32" wide pieces, cut down as shown in the diagram and cut list.
Step 2
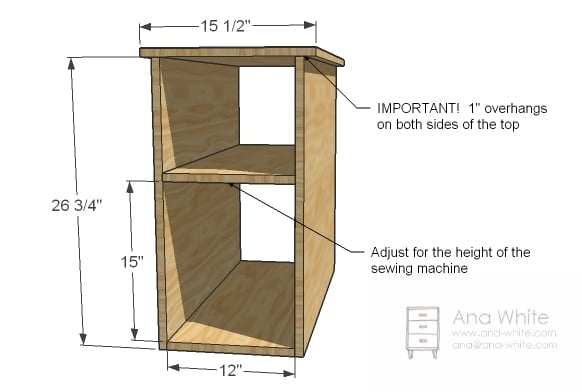
Assemble the main box as shown in the diagram, using the 2" screws.
Step 3
Attach wheels to base of the cabinet with the caster wheel screws.
Step 4
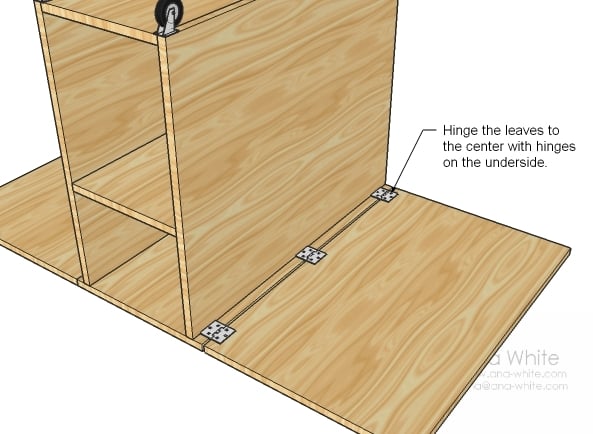
Position the cabinet face down on the floor and place the leaves next to the cabinet. Attach on underside with the simple hinges.
Step 5
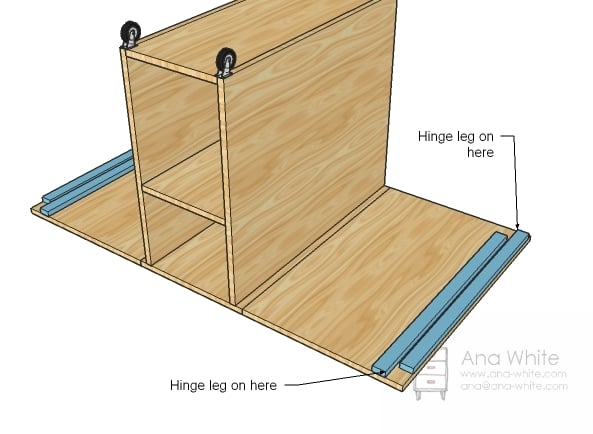
Measure the overall distance from the underside of the cabinet to the wheel bottom and cut the 1x3s to this length.
Attach legs to hinges and to the underside of the leaves. You can also use a fold out hinge for added security.
Step 6
Flip the table over and test the leg lengths. Cut down if necessary.
You want the legs to open slightly past 90 degrees in opposite angles, so the legs are slightly splayed out, to keep the project from collapsing.
You can also use table leg hinges.


Comments
Natali (not verified)
Wed, 11/17/2010 - 11:19
This is GENIUS!!! We have a
This is GENIUS!!! We have a really small townhome and this would work as a end table and a sewing table! AWESOME!
Margaret V (not verified)
Fri, 12/31/2010 - 18:09
I love you! Thank you for
I love you! Thank you for making your plans free!
Cheryl (not verified)
Sun, 01/02/2011 - 13:08
This is great! My parents
This is great! My parents are downsizing from a large house to a 2 bedroom apartment and I know my Mom would love this! I'm hoping to be able to make this for her as a surprise - for my Mom I'll even work in the freezing garage!
Janice (not verified)
Thu, 01/13/2011 - 13:42
Has anyone made one of these
Has anyone made one of these yet? I'd love to see a picture of it built. I am hoping to build this one soon!
Erin (not verified)
Sat, 01/15/2011 - 16:00
So I bought 1/2 inch
So I bought 1/2 inch plywood... is that going to work? Any tips?
Thanks!
Erin
Erin (not verified)
Wed, 01/26/2011 - 09:14
I made it. Unfortunately I
I made it. Unfortunately I made it with 1/2 inch plywood and I just don't think its sturdy enough. I'm going to make it again using at least 3/4 and I think I might use MDF instead as well. My plywood seemed to warp a little and its not holding very level. I didn't finish the wood but the cart is sitting in my garage and currently working quite nicely as a makeshift work table for other projects :) I'll see if I can post a picture.
http://www.facebook.com/photo.php?fbid=907302386839&set=a.811041993439…Janice (not verified)
Wed, 01/26/2011 - 13:55
I can't see the picture by
I can't see the picture by clicking on the link.
Tracy (not verified)
Thu, 02/17/2011 - 07:42
Just got back from Blue with
Just got back from Blue with the plywood cut and all the other pieces/supplies. I had bought a 2nd sewing machine a year or so ago to do a little side business that I ended up not doing. Inexpensive, nice little machine that I got around the holidays (so it was super cheap). Anyways, it's perfect for my budding-sewer! I have made my 3 girls' their Easter dresses every year since they were born (except for the one born ON Easter - but anyways!) ... I think this year I'll look for a simple sewing pattern and let my 10 yr old be a big part in the making of her dress... with her own machine on this really slick sewing table! Perfect!!!!
Danielle Perry (not verified)
Tue, 03/15/2011 - 22:26
Just what I needed
I've been trying to figure out how to make our loft area into my sewing area and the playroom as we are adding another child to our family (adopting!). This plan is so perfect as my table won't have to take up so much room. Thank you!
Katie Lee (not verified)
Mon, 04/11/2011 - 01:12
Hi, can anyone explain/link
Hi, can anyone explain/link to the 'locking mechanism' mentioned in the description?
Thanks!
jphiggins2
Fri, 04/29/2011 - 01:16
AMAZING!
This is great! I think I will try making one of these to use for a folding table in my TINY laundry room (located inside my bathroom... yeah tiny)
Debbie (not verified)
Tue, 05/17/2011 - 16:59
Oh my gosh, I have to make
Oh my gosh, I have to make this for myself. I think I can do this even though I have never picked up a tool in my life. It will be great in my small home.
Guest (not verified)
Fri, 06/10/2011 - 12:46
Licking Mechanism/Hinge
Katie, You will want to look for a locking hinge something like this: http://www.stationroadbaseboards.co.uk/z_pop_FHL038.htm
Alana Harris (not verified)
Mon, 07/11/2011 - 12:26
Too much "To Do"
I love this design. I visited Hobby Lobby with my girls this morning and came home wanting to sew for them. Just have to figure out where to do that in our new house. First, though... priorities say that I should go downstairs and start sanding on the Mom's Lego Table that we are building for my son! This is on the "To Do" list.
seasons
Fri, 07/29/2011 - 10:40
Wandering if this would be
Wandering if this would be easy enough to do for a first time project or is there something else I should start on?? I need a storage area... I don't truly need the extended out table but is pretty neat idea. We don't have enough storage even though we have a nice sized house. So my sewing machine is on the floor in the dining room. That or it gets stuck back in a closet that I can't reach it with the kids craft stuff. This is an awesome idea. We do have 2 other machines antique also on the floor but under a table out of the way of kids to fall over or hurt. They are from my dh's family and not sure what to do with them either...
Guest (not verified)
Sun, 11/27/2011 - 05:40
NEXT PROJECT
This is exactly what I am looking for. Well described and illustrated. Am printing a copy to put in my husband's job jar.
Thanks
pmp pdu (not verified)
Sun, 02/05/2012 - 02:06
Nice topic, thanks for the
Nice topic, thanks for the share.
Angel Rose
Wed, 03/14/2012 - 07:37
Legs
Is there anything put in place to keep the legs folded in when it is collapsed? If not, how can we solve this problem?
zohre (not verified)
Sat, 06/02/2012 - 09:57
good for job
just i need it...
Amblytoo (not verified)
Sun, 06/03/2012 - 11:45
Materials?
I bought MDF to build this cart out of, made my cuts, then tried drilling my practice holes into the side of the mdf and I could not drill the hole without making the MDF start to split. I tried drilling more slowly and with smaller drill bits to gradually make the hole larger, but I still had the same issue with the MDF splitting. Did anyone else have this issue or have any suggestions?
Anne Marie (not verified)
Tue, 06/05/2012 - 20:48
maybe this will help?...
Hello. I think mdf is horrible (great for a cheap budget) but horrible. Unfortunately I would recommend buying some good quality plywood. Stay clear of the ones under $15 and go for the real hardwood plywood. If you are already too far in with the mdf try using wood glue and see if that helps. Also stay clear of particleboard. Hope this helps!
Akiko (not verified)
Tue, 06/26/2012 - 15:53
FANTASTIC!
This is JUST what I needed! My spare room is small, and I was wondering what I was going to do with my futon (it's less than a year old and still very useful) when I bought my new modern sectional. I have a sewing area in my spare room. This just solved my problem.. I can get rid of the bulky table, replace it with this and have plenty of room for the futon to go in there.
Thanks!
Julieta (not verified)
Wed, 07/18/2012 - 17:42
Hermosa idea. Gracias por
Hermosa idea. Gracias por compartir!!!!
vegangel
Wed, 07/25/2012 - 06:47
How to lock legs & leaves?
This is an amazingly simple solution to my sewing table/storage needs. But I do want to use it for sewing as well.What should I use to lock the leaves and legs when they're folded out? Thanks!
ctychick
Sun, 11/29/2020 - 07:48
What ended up working for…
What ended up working for you?
happyvav (not verified)
Thu, 12/06/2012 - 12:25
Love your plans, Ana! I was
Love your plans, Ana!
I was wondering if you would maybe consider putting plans together for a different type of sewing table - one that's more of a book shelf or cabinet. I live in a tiny place with packed closets - no way I could roll this anywhere! This craft armoire http://www.dwelement.com/blog.php?post=107 reminds me of your kenmore bookshelf with a bit of a modification... I didn't see anywhere on the site to request plans, so sorry if this is the wrong place.
Ben Ben
Tue, 03/05/2013 - 13:11
Awesome plans
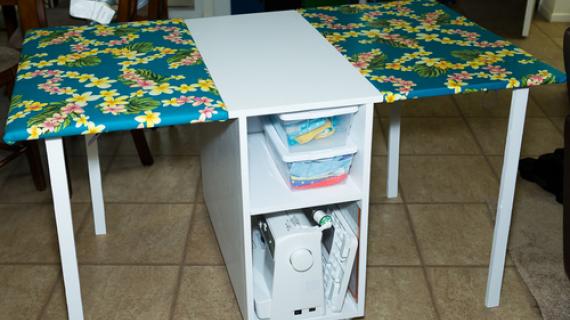
Thanks for the great idea! I built this table for my wife and it's quite an upgrade from what she was using before.
Our place is small so I modified the dimensions to fit our place and I used wooden brackets instead of legs.
I uploaded some pictures and posted on our blog:
http://bendrea.wordpress.com/2013/03/04/andreas-sewing-table/
jwk
Wed, 01/15/2014 - 18:49
a sewing table (cutting table??) for small spaces question
Has anyone ever altered this to make a taller, larger cutting table??
If so - might you have the new cut plan/measurement plan???!!!!!
mrs_gumby
Wed, 03/05/2014 - 07:39
Screw length
This is my first project from here. I'm fairly inexperienced, but it seems to me that 2 1/2" screws for a project made from 3/4" plywood seems a bit excessive. I don't have one of those kreg jig things, so I'm doing this the regular way, with pilot holes & countersinking the tops. But what size of screws should I use? 1 1/4" 1 1/2" Even the kreg jig site seems to think that 2 1/2 seems long. I really want this first project to turn out well, so that my husband will believe I really can do this.
In reply to Screw length by mrs_gumby
mrs_gumby
Wed, 03/05/2014 - 15:50
. . . and nevermind. I
. . . and nevermind. I talked to my Dad, with far more experience, and he said that if I'm not using additional little pieces of wood for support, and screwing from the top down into the plywood, that I'll need those extra inches to make sure it's got a good hold. And to use glue to when I'm putting these together. I made a few oopsies with assembly, coming from being a beginner. Things that I'm sure more experienced woodworkers take for granted as being standard operating procedure.
Jasoncwrd2002
Sun, 11/30/2014 - 21:12
Level top
So how did yall make the top level when the sides are up? I've got a little bump where they meet the center.
ABramlett
Sat, 09/12/2015 - 08:18
structural problem
Hey there,
I built this awhile ago and it was great at first, but with being moved around it has weakend the stability of the sides to the bottom (wobbles left and right very easily).
do you have any suggestions on making this more secure or solid?
Sadie423
Sat, 11/23/2019 - 19:48
I'd like to make this and…
I'd like to make this and use the table to actually sew with my machine. Would somebody please send links to the type of locking mechanism hardware I should purchase to use with the drop leaves and the legs? Thanks in advance!
ctychick
Sun, 11/29/2020 - 07:46
Did you ever find the…
Did you ever find the locking mechanism? If so, please share what worked for you. Thanks.
Wado Yonah
Sun, 05/10/2020 - 15:57
Making it now, with some modifications.
I am starting on this project today (Mother's Day) for my wife. She needs it to be taller so she can stand at it, So I am making it 36" h x 38" long. I am using larger wheels that lock and building a frame for it to set on. I will write it up in my brag space when it is completed.
I can't wait to see how it turns out.
Tammy Lynn
Sat, 11/07/2020 - 15:45
Probably best for intermediate woodworjers
Usually I love the plans by Ana White! Detailed, specific, and easy to follow. I've made tv stands, a kitchen table, and shelving using Ana's plans.
For some reason, I had a very difficult time with this build. Specific points of contention:
-Step 2: build a box. Build a box? Please help beginners understand how to build a box. What tools do we need to ensure the sides are square? How do I screw a vertical screw in?
-please warn beginners of how easy it is to split plywood when screwing into it. When I built my box in step 2, I was screwing two pieces together and splitting the plywood shelf as the screw went between the layers of wood.
-hinges. Details, please! I bought a pack of hinges and found out that they wouldn't work because they didn't lay flat. The second set I bought had screws that were too long for the plywood. So I had to use teeny screws to get the hinges on so that they didn't come through the other side. What are other people doing here?!!?!
-installing the wheels. The wheels came with 1.5" screws, which were too long for the plywood. So I had to add a plywood 'shim' in order to install the wheels.
-adding shims to the wheels made the height of the unit taller. So my legs no longer were the right length.
-the legs. When folded the bottom leg (yes, I said leg. I can't put the other leg on until I go back to home depot AGAIN) dangles down because the hinge isn't strong enough to hold it tightly. What hinges are people using for this?
Hopefully I just experienced a one off and others are finding success with this plan. However, I'm a fairly experienced wood worker and the lack of detail really hindered me in being successful at this project.
ctychick
Sun, 11/29/2020 - 07:45
Did you ever get answers to…
Did you ever get answers to your questions? I'm about to begin this project and I don't want to run into the same issues.
lexaroo
Sat, 12/19/2020 - 09:15
I can totally see how you…
I can totally see how you could run into these problems.
- Wood splitting-I used a Kreg Jig and the screws appropriate for that thickness so that the wood didn't split. https://learn.kregtool.com/learn/how-to-select-right-pocket-hole-screw/
https://youtu.be/mvO6zaIUO18
You could use self-drilling screws (Spax or GRK)
https://youtu.be/1GiYrFyNVUU
- Predrilling may also help
- For the hinges, I took the screws that came with the hinges to the hardware store (I like ACE it's easy to find hardware there) and bought screws that were slightly shorter than the width of my plywood.
- For the wheels, I did the same thing took the bolts that came with them so I had the right circumference and found slotted Cairrage bolt (You could use a stove bolt or a step bolt) https://youtu.be/arRd46h41e4
https://www.fastenersuperstore.com/fastener-guides/bolt-types
This lets you put a the rounded part on the inside of the box so the sewing machine doesn't catch it. Our bolts were a little long and caught on the wheels so we used a grinder to cut them down.
Hinges are just not strong enough for the use that our table would have needed so I bought some leg extenders on amazon and they worked a lot better. I ran into the same problem of the screws being too long and used the same screws I'd used on the hinges.
I made 3 trips to the hardware store during my build but it was worth it.
lexaroo
Sat, 12/19/2020 - 08:26
Very fun and useful build
I built this for my mother-in-law and it turned out great. I upgraded the legs with a locking extension I found on amazon.
https://smile.amazon.com/gp/product/B06VTJZHS6/ref=ppx_yo_dt_b_asin_tit…
sarydon
Tue, 01/19/2021 - 10:17
Finishing product???
Hi! Newbie here... this will be my first project. I will be using high grade hardwood plywood and want to finish it but I'm not sure what to use. I would like a satin-ish or hand rubbed type finish.... I'm torn between water based poly, tung oil or linseed oil. Any insight from someone with more experience???? HELP!
I'm also going to get the locking hinges that others have recommended for the legs and may use a small turned table leg instead of 1xs.
Thanks!!!
makaioX
Sun, 01/31/2021 - 23:24
Where do I place the screws?
So am I missing something? Where does one place their screws? I am seeing a lot projects where screws seem to be hidden or placed else where. Any help would be greatly appreciated.
sleepyndoc
Mon, 03/08/2021 - 15:10
Made this project over the weekend
My husband and I made this over the weekend. We could have done it in one day, but I prefer to stain and clear-coat prior to assembly. It's not perfect, but it's sturdy and functional and not bad for a table made by amateurs! Thanks so much for the pattern!