


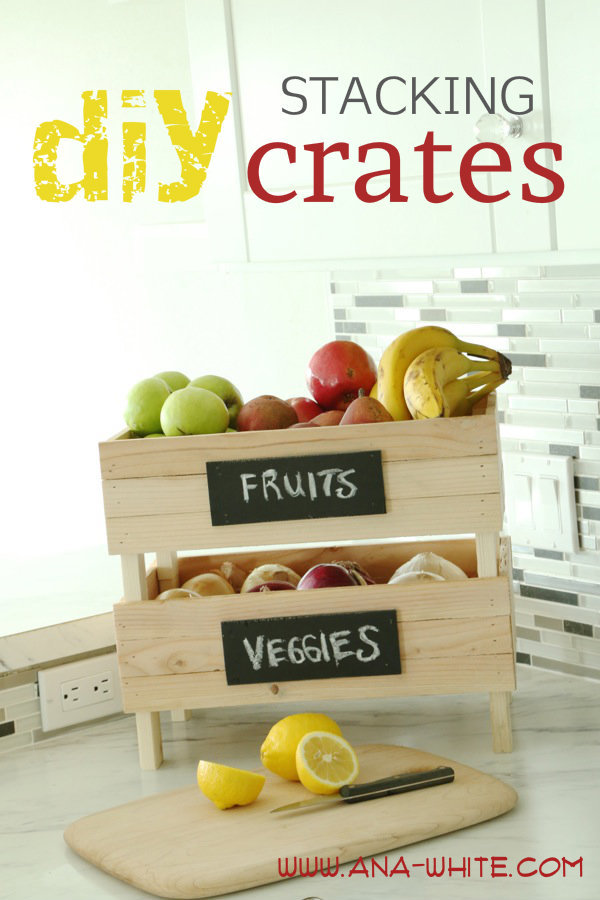
Stackable Fruit and Vegetable Storage Crates - free DIY Plans Ana-White.com


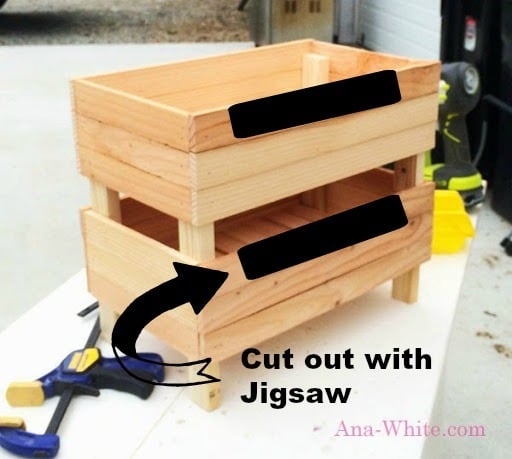
UPDATE: We've been using these vegetable storage crates for a few months and feel like there is not enough space between the two bins when stacked. A very easy update is to notch the top front slat down with a jigsaw or just not add at all.
Also, we've had quite a few people comment that they can't find wood lath, you can use regular 1x2s instead.
And check out this stained version using 1x boards -

Built by our_home_to_yours on Instagram.
Please do take the time to brag or share your projects when you build. It is very inspiring and helpful when you do!
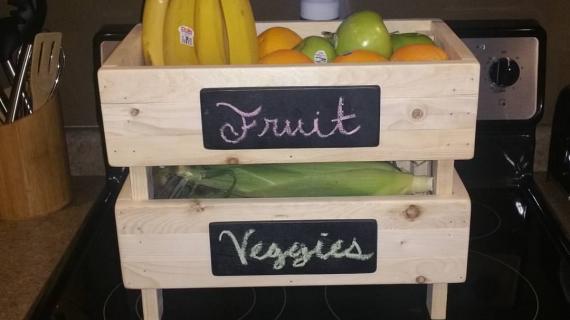
These stackable fruit and vegetable storage crates were simple, simple, simple.

And oh so cute!

I love that they stack.
I love that they are wood (there's reasons why produce is crated in wood!)
And did I mention like $3 to build each crate????
To begin with, I went ahead and made all of my cuts using the compound miter saw.
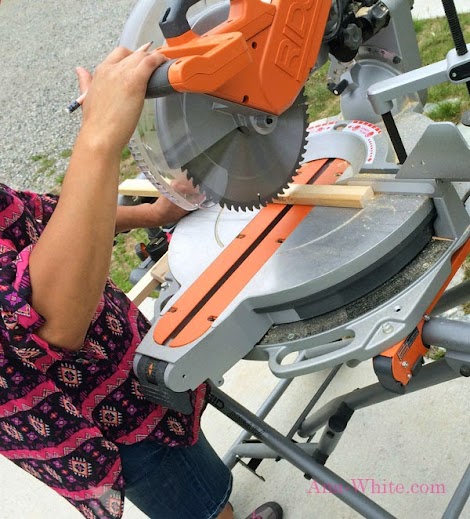
There's quite a bit of cutting in this project, so having a easy way to cut helps save a ton of time.
With everything cut, I started building by making the two ends. I used the Kreg Jig and screws since this is the main support piece. Produce can get heavy!


I just attached the bottom supports to the two legs.
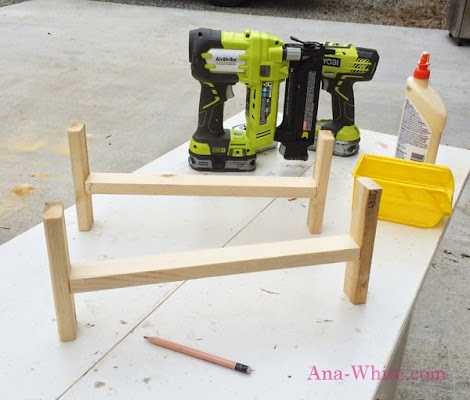
After that I attached the two legs together with some end slats.
Just nail and glue to legs - I used 3/4" nails.
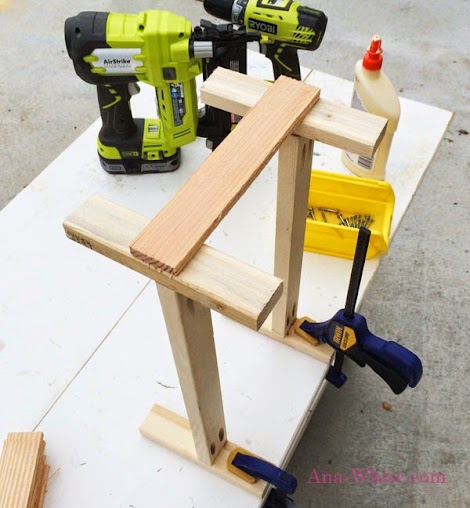
I did the same for both shorter sides.
And then I did the same for the longer sides.

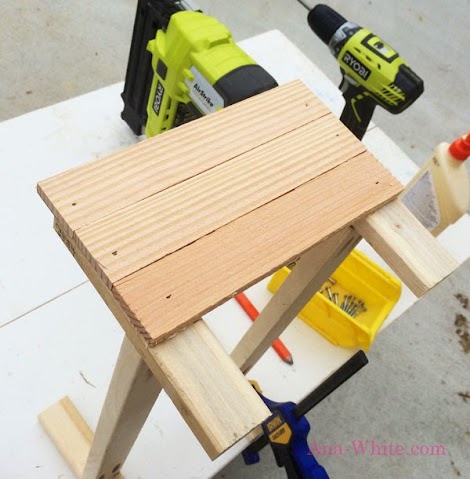
For the bottom slats, you just need to set them inside the crate. This creates nice air flow to keep your fruits and veggies longer.
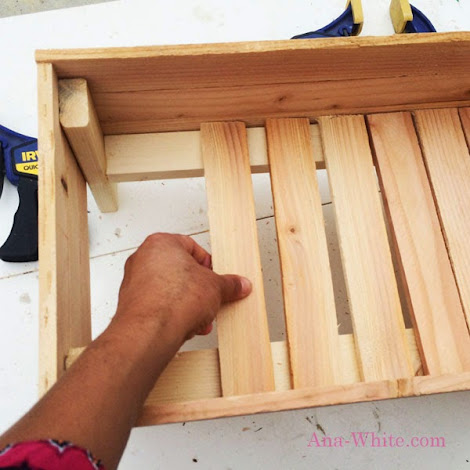
It also allows for easy clean up should your apples go sour on you.

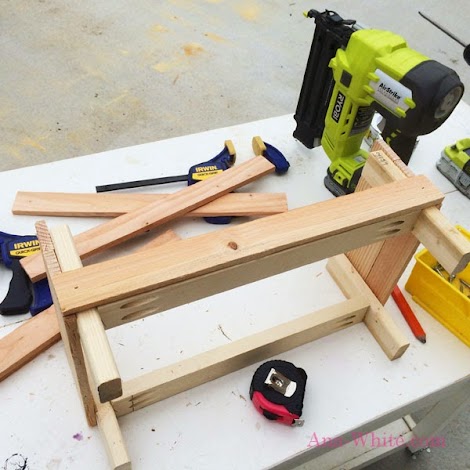
I built two of these just the same.
No finish required, since I wanted the wood to be food safe (you could add an oil finish used for cutting boards, like boiled linseed oil).
I just gave them a good sanding.
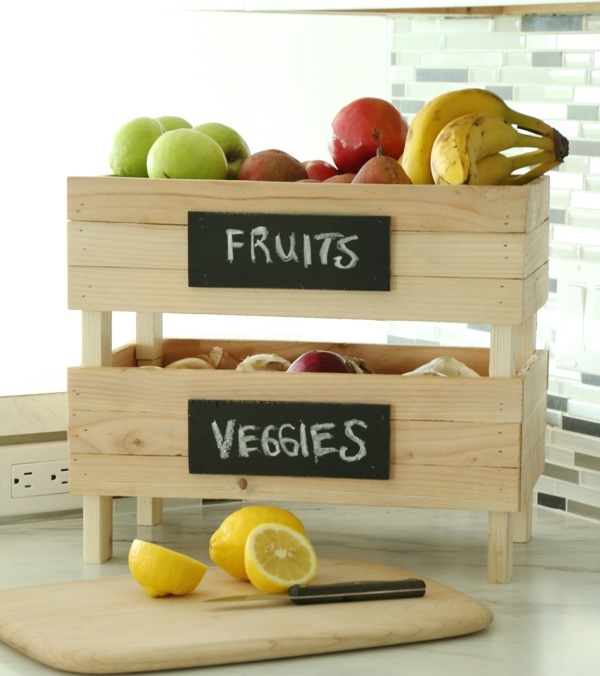
Then came the moment of truth. Will they stack?
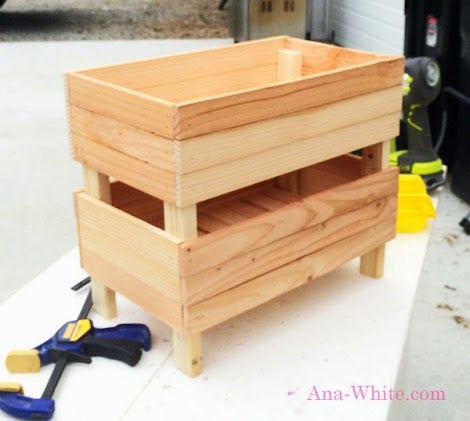
They fit together perfectly! TIP: If you have trouble with them stacking, consider sanding the legs down.
I couldn't wait to fill them with beautiful fruits and veggies! For some added charm I decided to make chalk labels. I cut small pieces of plywood and sprayed them with Rustoleum Chalk Paint, glued and nailed ( I recommend 1/2" nails) them onto the fronts and it was done!

Cute, isn't it!?!

Now it's your turn - make your own with the free plans following!
Preparation
- 1 - 1 x 2 x 8
- 5 - 4' wood lath pieces, usually comes in a bundle of 50 (you can also use 1x2s here or any scrap wood really)
- This shopping list is for 1 crate. You will need to multiply by the number of crates you want.
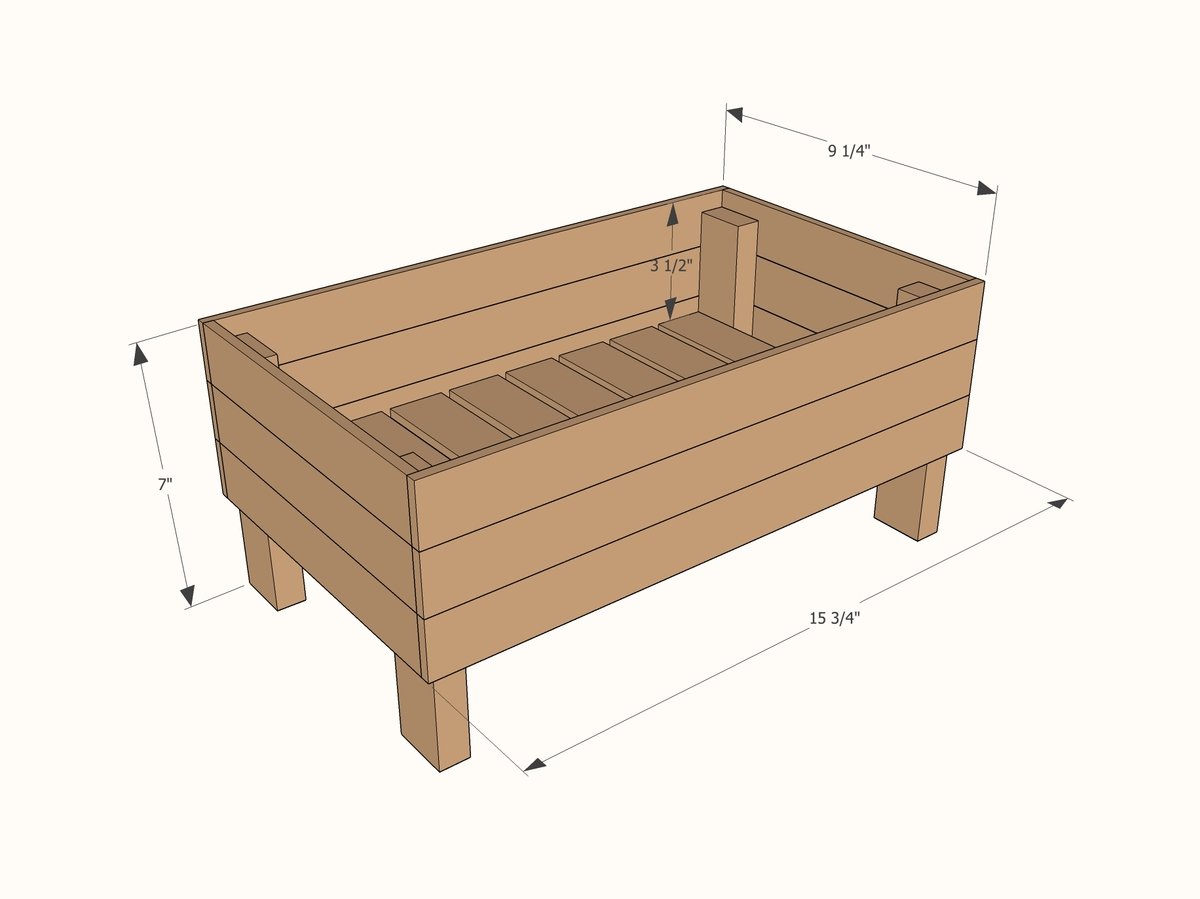
4 - 1 x 2 @ 6 1/2" Legs 2 - 1 x 2 @ 13 3/4" Bottom supports between legs 6 - Wood Lath Pieces @ 8 3/4" end slats 6 - Wood Lath Pieces @ 15 3/4" side slats, or cut to fit 8 - Wood Lath Pieces @ 8 3/4" inside bottom slats This is the cut list per crate. Depending on how many stacking crates you want, you need to multiply by that number.


Please read through the entire plan and all comments before beginning this project. It is also advisable to review the Getting Started Section. Take all necessary precautions to build safely and smartly. Work on a clean level surface, free of imperfections or debris. Always use straight boards. Check for square after each step. Always predrill holes before attaching with screws. Use glue with finish nails for a stronger hold. Wipe excess glue off bare wood for stained projects, as dried glue will not take stain. Be safe, have fun, and ask for help if you need it. Good luck!
Instructions
Step 1
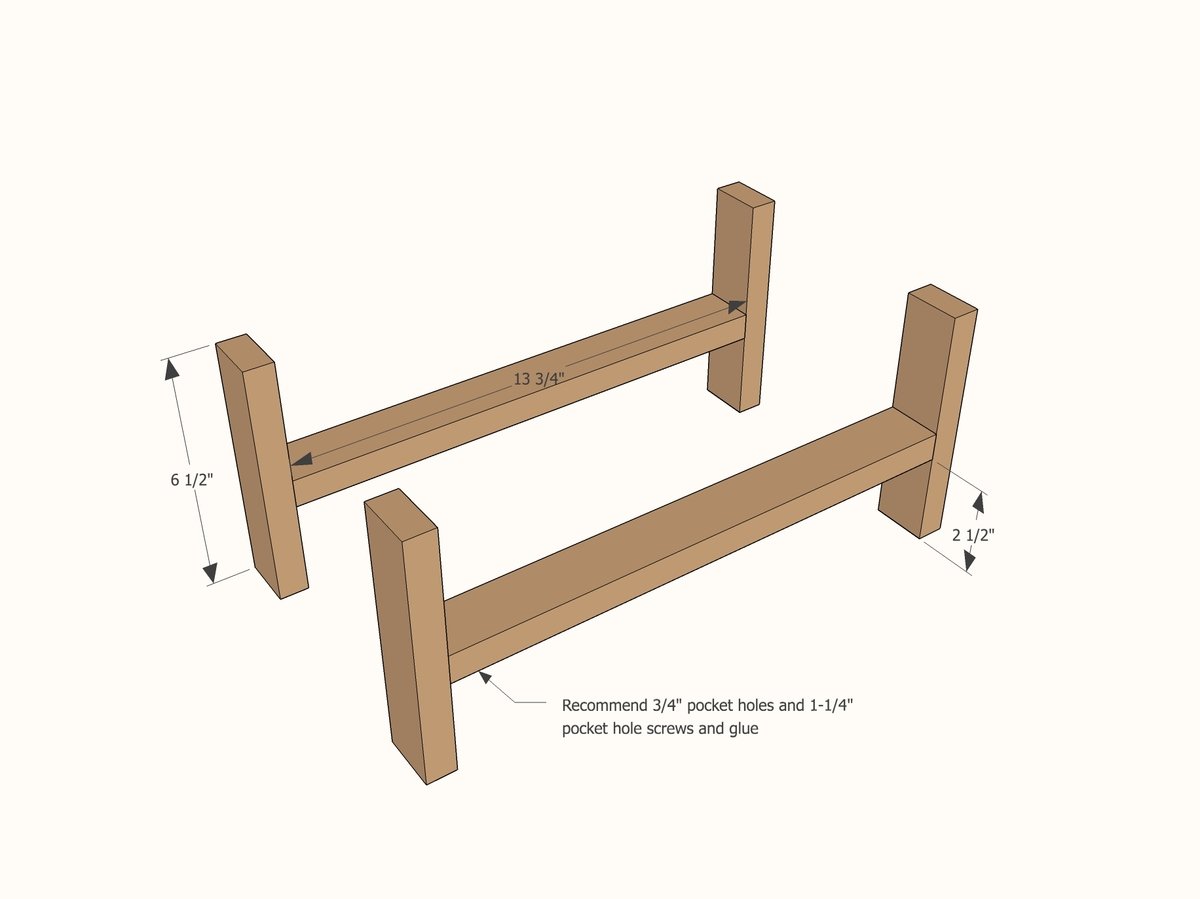
Build legs. Drill pocket holes in the bottom of the longer 1 x 2's on each side. Attach to shorter 1 x 2's (legs) with 1 1/4" PH screws and glue.
Step 2
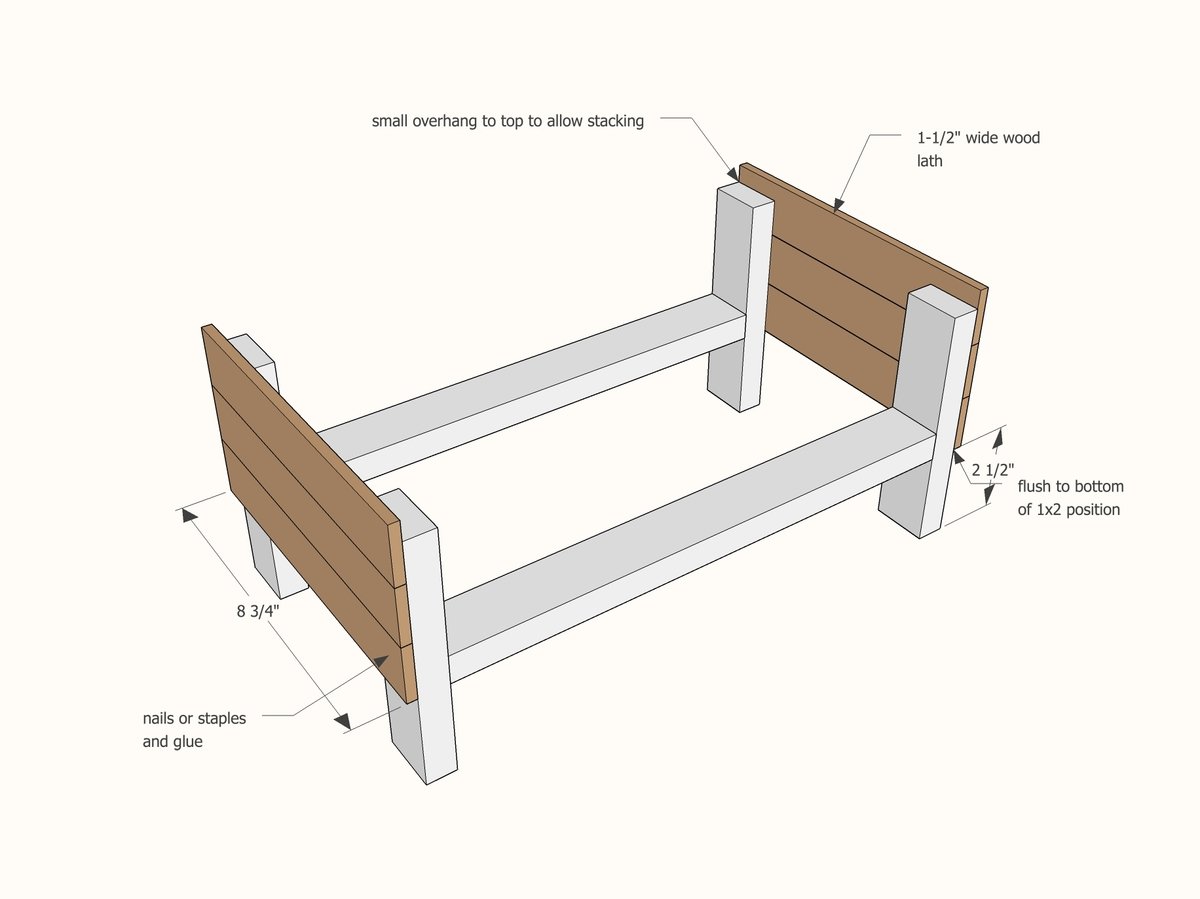
Attach End Slats with 3/4 inch nails and wood glue. Notice to start 2 1/2" from bottom, which will put the top wood lath slat above the top of the 1 x 2
Step 3
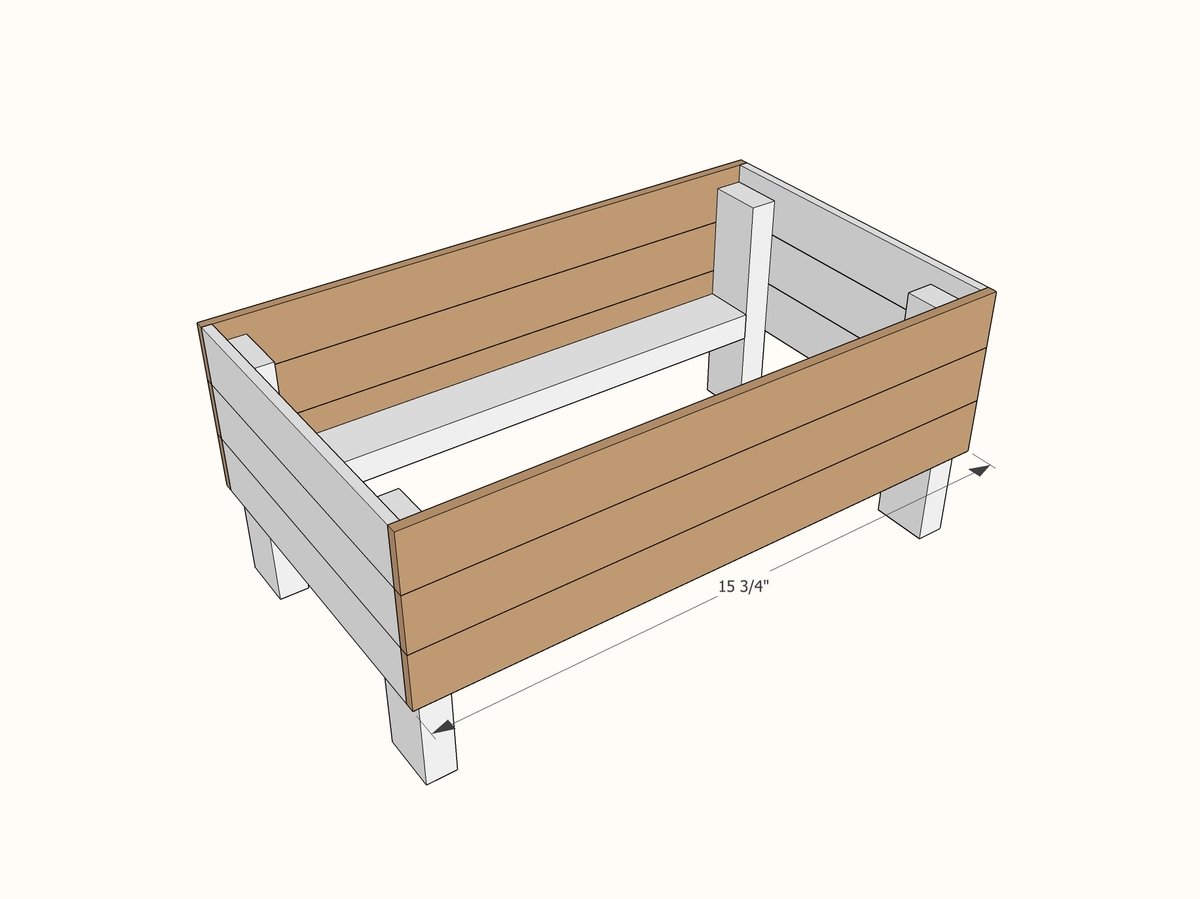
Attach the side slats the same way 3/4" nails and glue. I cut to fit after have the end slats holding the legs together.
Step 4
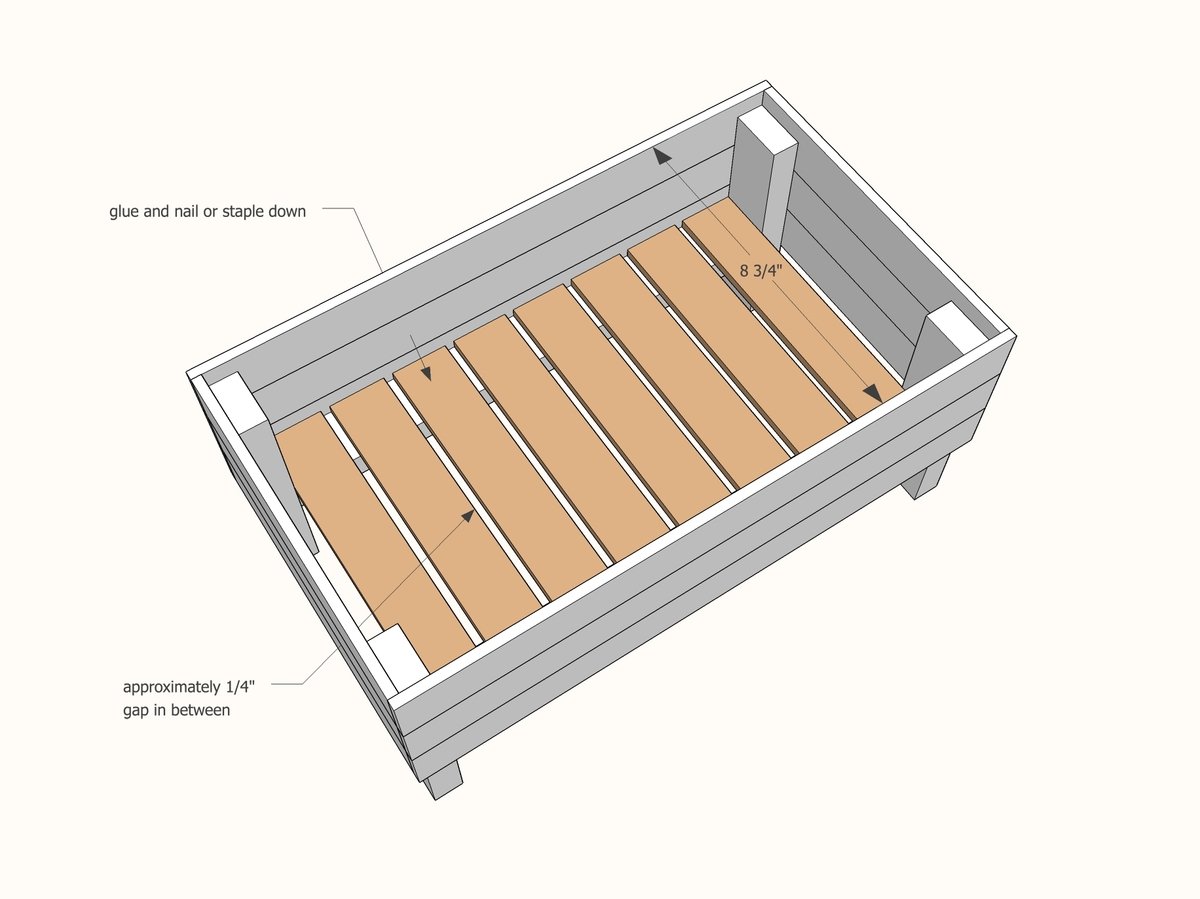
Set slats in bottom of crate. No need to glue and nail for easy removal.
It is always recommended to apply a test coat on a hidden area or scrap piece to ensure color evenness and adhesion. Use primer or wood conditioner as needed.

Comments
imortison
Mon, 09/01/2014 - 22:32
Question about the oil finish and wood lath pieces
Hi Ana, I really love this idea. Thanks so much for sharing! I plan to make this as my starter project.
I have Howard Cutting Board Oil at home, is it OK to use it for the last finish?
and may I ask what is the other name of 'wood lath pieces'? I searched it in the big box store but couldn't find it. I appreciate it very much!
NinaQuinoa
Fri, 09/26/2014 - 21:47
question about wood lath pieces
Thank you for such an amazing plan. I have searched for the wood lath pieces at Home Depot but could not find them. I wonder if you can share where you got them.
Thank you vey much.
LauraP
Sun, 04/12/2015 - 07:50
Hi Nina:
Hi Nina:
I ran into the same problem you did although I know I did buy lathe/lattice at one Home Depot in the moulding section but it was expensive at $1 a foot. Anyway, when I went searching this time, I couldn't find it. So I asked an employee, and he told me they give it away for free because they use it as the separators for their long pieces of wood. So basically, I went around the store and picked up all the bits of lathe on the floor which resulted in a nice little stash. It's not as smooth as the lathe I bought but a sanding will help.
crystalfarnam
Sat, 07/25/2015 - 13:36
This for sure wasnt a cheap
This for sure wasnt a cheap project...... :( I couldnt find wood lath pieces at Home Depot so I had to go to lowes and used Poplar craft wood. Which cost a crap ton...... First time I will say not the bet instructions and cost is too high..
mommyof2cuties
Tue, 06/07/2016 - 13:14
Wood lath
I found wood lath at Home Depot. I have to say, it wasn't easy to locate in the store & I had to ask a couple of employees. I bought a bundle of 50 pieces for about $16. They are pretty rough. My suggestion would be to sand them after you cut your pieces (before you assemble). I'm building some of these today because I have lots of lath left over from another project ☺. Hope that helps anyone who had the lath issue.
Kiesoj
Mon, 08/01/2016 - 11:58
Wood Lath
I am looking at making these, and beefing them up, for I can use them in the garage to help keep some of my specialty tools organized that did not come with a case or a bag. Now I have read and understand the concern when it comes to obtaining decent lath boards. Here's my fix for obtaining quality lath boards. I simply break out the table saw buy some 2x4s and make my own. Also when picking out required lumber for a project the last place I go to is Home Depot. If your Home Depot is anything like mine it's a sorry excuse for a store(lots of problems getting help from their employees), and especially the lumber yard with a poor selection of bad lumber. I went through a whole stack of 2x4s with a group of Boy Scouts that were working on an Eagle Scout projest for a local church and everything in the pile was bad(warped, cracked, broken, or was outside run with the bark still on). They wouldn't even bring down a fresh pallet to choose from. That was not an option to them. Only choice we had was the the pallet of discards on the floor. I also found it is more expensive to buy by the foot at Home Depot than going across the street to Lowe's and buying a whole board. Now if I am helping boild or building something special (Eagle Scout Project for example), I don't go to the big box stores I choose to go to the local home store that specializes in lumber. Just my 2cents.