

Claim two extra square feet in your closet with this amazing easy plan!

It's taken me weeks to get the courage to share the closet of a three year old with the world, but it's taken me months to take what was just a clever idea and turn it into . . .
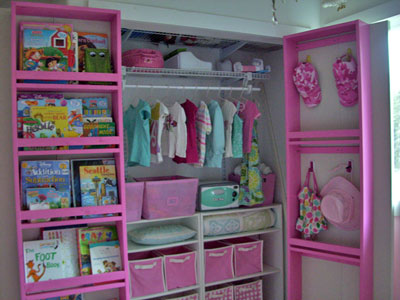

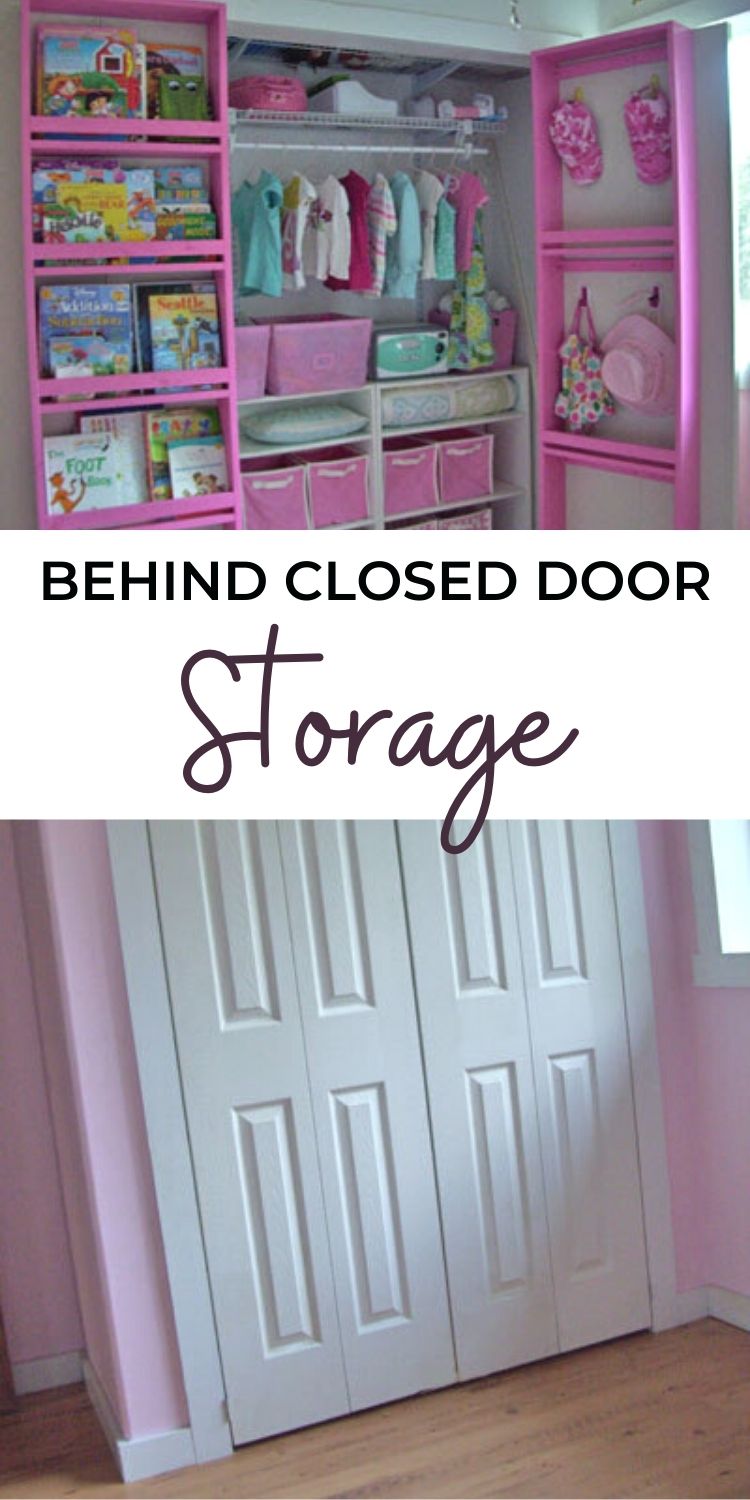
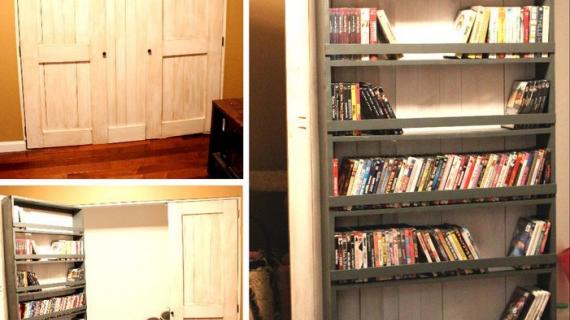
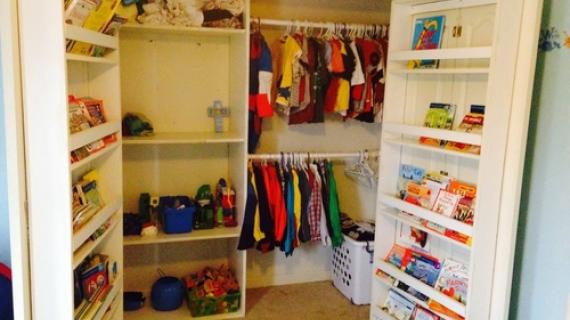
Here's the bottom. You can see how I simply built bookshelves, attached them to the inside of existing closet doors, put the doors on hinges, and added a couple extra square feet of storage to a tiny closet. Oh, those hooks are Command hooks from 3M - So easy to use, I love them!

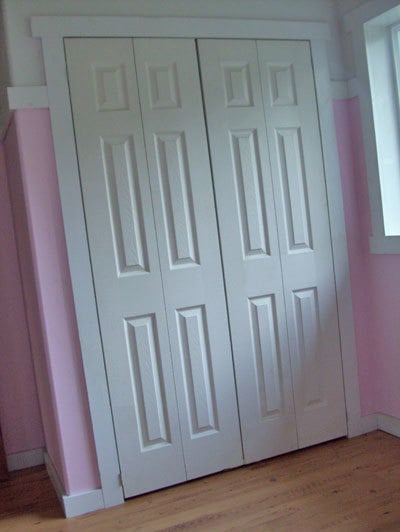
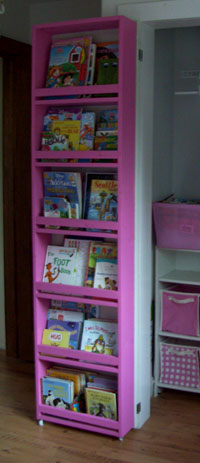
When open, the doors opens completely flush, giving you the most room to access the inside of the closet (as long as there is not a wall or something in the way). No those are not my bookcases (the saggy white ones), they are the last of the flat pack particle board furniture that I have in my home. When closed, the bookshelves sit in the door frame, taking up what used to be completely wasted space. And in a house the size of mine, with exactly three closets, every square inch of a closet is prime real estate.
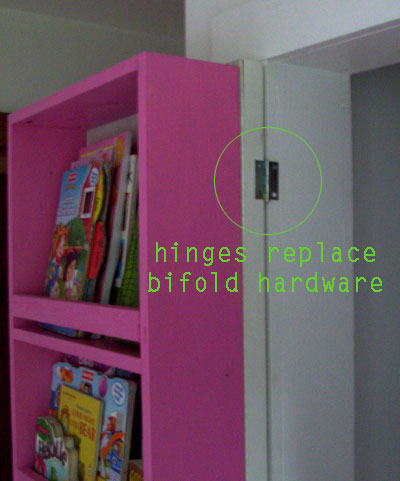
These are super easy to install. Simply remove the bifold door hardware and attach the bifold doors with standard hinges as shown in the photo
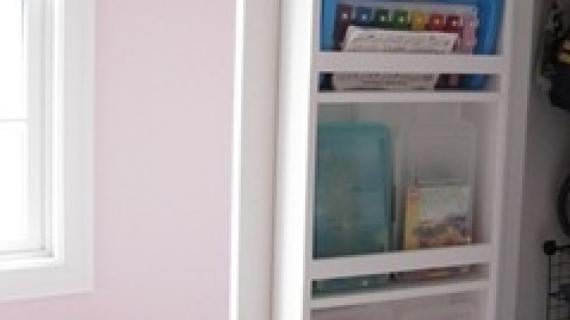
The weight of the doors rests on wheels, so you can load the doors up. In one closet door, I was able to store ALL of Grace's books.
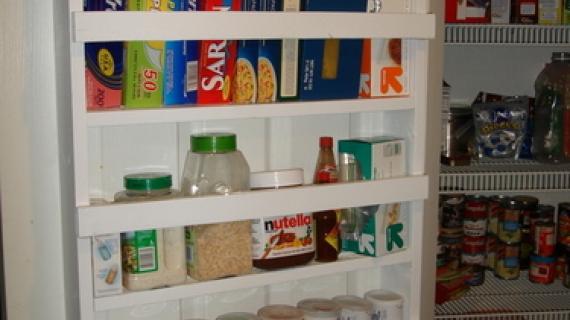
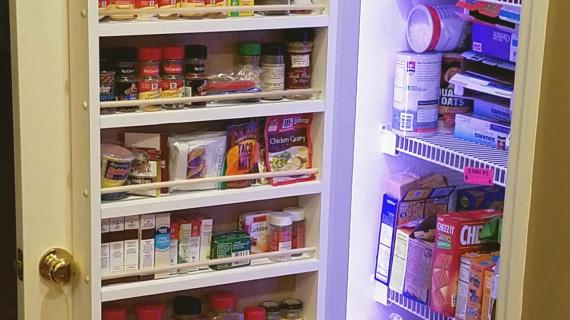
Think of the possibilities - pantry items, toiletries, towels, accessories, and did anyone mention shoes?
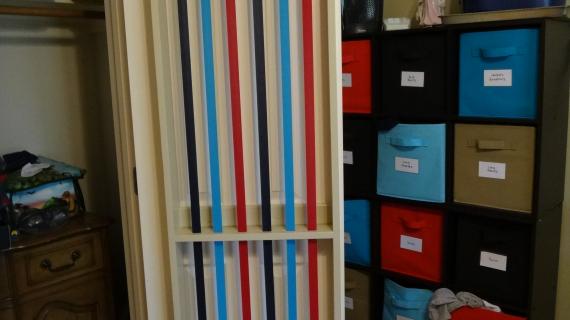
And best of all? I can close the doors live my dream of a simple, bare home, free of clutter. No one (besides you, my friends) would ever know what's behind my closet doors. All for around twenty bucks a door!
So wanna make your own? Here's how I did. You will need to alter your shelves to your own closet specifications. So get your measuring tape out!
Pin For Later!
Preparation
1x6 Boards Heavy duty hinges four caster wheels 1x2 Boards Anchoring bolts for hollow core doors Screws
Cut your boards to fit your closet and closet doors.


The success of this project greatly depends on building square, and installing level and square with a square closet opening.
Instructions
Step 1
First, measure your closet doors. If they are a standard 24″ wide, you will need to subtract 5 1/2″ to get a total door shelf of 18 1/2″ wide. That means all of the shelves will need to be cut at 17″ wide.
Measure the overall height of the doors and subtract two inches. Cut two 1x6s to this length. You will also need to cut as many shelves as desired to the shelf width (in my example, 17″ wide). Also cut 1×2 shelf trim to the shelf width, one more than the number you cut for shelves.
Step 2

Basically, you just build a shelf, as shown above, out of 1x6s. You have to make the shelf 5 1/2″ narrower than the closet door so that it has room to swing when opening and closing.
Step 3
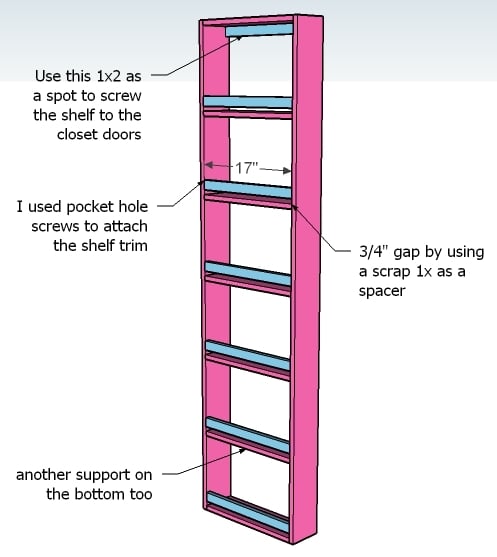
Then you attach the 1x2s as shelf trim and supports. I used my Kreg Jig™ to build Grace’s closet doors, but you could also simply use 2″ wood screws countersunk. Don’t forget the glue.
Step 4
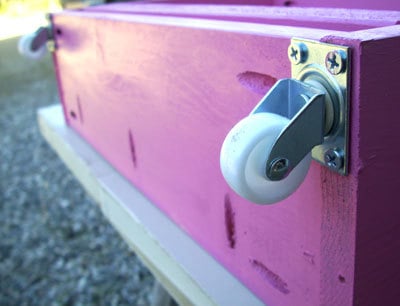
Then you attach the caster wheels to the bottom. You only need two caster wheels per door. I use 1 1/4″ caster wheels. Those are the pocket holes I used to build the shelf with.

Comments
noolygirl (not verified)
Mon, 08/23/2010 - 20:49
absolutely brilliant!!!!
absolutely brilliant!!!!
Tracy (not verified)
Mon, 08/23/2010 - 20:53
LOVE this!! It is something
LOVE this!! It is something I have been struggling with in my home. Lack of storage and messy kids closets!
It is now on the honey do list!! :)
BarefootTams (not verified)
Mon, 08/23/2010 - 20:56
Absolutely LOVE it! Great
Absolutely LOVE it! Great idea!
Paula (not verified)
Mon, 08/23/2010 - 20:58
I LOVE it. Her closet looks
I LOVE it. Her closet looks so great! I don't even have closet doors and now I want some, just for this... maybe in our next home.
senovia (not verified)
Mon, 08/23/2010 - 21:08
That's SO AWESOME!! Why
That's SO AWESOME!! Why doesn't every closet have those!?!!
southies (not verified)
Mon, 08/23/2010 - 21:29
OMG.... you are
OMG.... you are amazing!!!!!
Do you come in a bottle??!!
elei (not verified)
Mon, 08/23/2010 - 22:49
IN-CREDIBLE!!!
IN-CREDIBLE!!!
Suzan (not verified)
Mon, 08/23/2010 - 23:02
I have you beat! I have
I have you beat! I have exactly ONE real closet in my house!! (This is what happens when you buy a renovated home built in 1898 and the renovator was a man!) This is a fabulous way to make my large closet more storage effective. Thanks so much for the post!
diycat (not verified)
Tue, 08/24/2010 - 00:27
I love this idea! Could I
I love this idea! Could I attach it to a hollow core door though? Does that matter? Thx!
rudoo (not verified)
Tue, 08/24/2010 - 00:54
That is the coolest idea!!!!
That is the coolest idea!!!! I need to do that for my 2 year old!!!
Amy (not verified)
Tue, 08/24/2010 - 01:48
GENIUS! GENIUS! GENIUS! I
GENIUS! GENIUS! GENIUS! I just love it. And did I say I thought it was GENIUS!?
Teresa Pomerantz (not verified)
Tue, 08/24/2010 - 02:09
hahaha clutter free home :)
hahaha clutter free home :) I have 4 children 7 and under, I only see the carpet every couple of weeks when they are looking for a specific toy :)
That being said, that is an awesome idea- my boys room could use something like that.
momsmess (not verified)
Tue, 08/24/2010 - 02:12
Love this! We have those
Love this! We have those obnoxious sliding doors that never seem to open enough to be able to get anything in or out of the closet. I am definately going to change out our closet doors and add this amazing storage (shoes, anyone!)!
Amy@Crafty Spice (not verified)
Tue, 08/24/2010 - 02:28
Ack! I LOVE this! Awesome!
Ack! I LOVE this! Awesome!
The Willits Family (not verified)
Tue, 08/24/2010 - 02:30
Now you need to do plans for
Now you need to do plans for a walk in closet. I really want to build something inside ours. All the premade stuff is expensive and not what I want..PLEEEEEEASE!
The Cozy Cape (not verified)
Tue, 08/24/2010 - 02:31
Are those bifold doors? It
Are those bifold doors? It looks like it from the seem down each door? If, so did the wood just hold it so they don't fold? We have 2 bi fold doors on our TINY closets in our room and we could really use some more shoe space!!
Wendy (not verified)
Tue, 08/24/2010 - 02:33
I love this idea! One
I love this idea! One question- we have carpet. Would the casters work on carpet, or does anyone have any ideas to make it work in a carpeted room?
Lena (not verified)
Tue, 08/24/2010 - 02:33
That is AWESOME! I love it!
That is AWESOME! I love it!
Jen (not verified)
Tue, 08/24/2010 - 02:40
seriously ingenious!
seriously ingenious!
Tara (not verified)
Tue, 08/24/2010 - 02:53
I seriously love you. I just
I seriously love you. I just swapped the downstairs pantry and toy closet and added new shelves. I could totally use these shelves on both sets of bifolds. Did you just remove the hardware on top of the door to get them out of the track?
amycornwell (not verified)
Tue, 08/24/2010 - 02:56
I love this and have already
I love this and have already sent it to my hubby for his weekend project :) We'll see if my hint works. Great post. Thank you!
Jeff Branch (not verified)
Tue, 08/24/2010 - 03:00
I'm a big fan of pocket screw
I'm a big fan of pocket screw joinery. Nice work.
LoriD (not verified)
Tue, 08/24/2010 - 03:08
Amazing! I've been planning
Amazing! I've been planning a renovation to my closet at the front entrance and this just might be the thing! There's only 1 bifold door there and I was thinking of removing the hinge hardware in the middle to make two narrow, hinged doors.
KariBou (not verified)
Tue, 08/24/2010 - 03:10
I'm in love! This is
I'm in love! This is ingenious! Thank you for sharing the plans, too!
Suzanne (not verified)
Tue, 08/24/2010 - 03:10
I love it, I have to do this
I love it, I have to do this to ours, it would be fabulous for a craft/sewing room also, just think of the possibilities.
babeigotanidea.com
Kim (not verified)
Tue, 08/24/2010 - 03:12
Can you hear me squealing
Can you hear me squealing with delight all the way from Indiana. I love this. I hate the bi-fold doors. This is so awesome! I love you, I love you, I love you!!
Amanda@The Han… (not verified)
Tue, 08/24/2010 - 03:15
This is amazing, Anna! What a
This is amazing, Anna! What a great idea -- and I LOOOOOOVE all that pink! :) What a gorgeous closet Grace has!
Ty & Andi (not verified)
Tue, 08/24/2010 - 03:23
ok, I realize I may be really
ok, I realize I may be really slow, but how do you open the doors, do you stick your hand in the crack to pull them open? do they need any hardware?
I really love this idea. My son has the exact same type of closet!
Michelle (not verified)
Tue, 08/24/2010 - 03:24
Now if you could help me
Now if you could help me remedy the situation of floor to ceiling height sliding doors (which I despise), I could do something awesome like this. I desperately need better organized storage spaces like this with 2 kids and way too many toys and books.
Tricia (not verified)
Tue, 08/24/2010 - 03:31
I don't even know what to
I don't even know what to say. This is life-changing!! Seriously. Does it hurt, Ana? Having all of this genius inside your head? ;) I can't imagine that it doesn't. Um, double negative. You know what I mean. lol!
merideth (not verified)
Tue, 08/24/2010 - 03:41
life changing, as tricia
life changing, as tricia said, is right! i adore you, ana!!!!
Caroline (not verified)
Tue, 08/24/2010 - 03:44
GENIUS!!! This has officially
GENIUS!!! This has officially moved to the top of my project list!
famr_4evr (not verified)
Tue, 08/24/2010 - 03:47
Oh, holy cow!! That is the
Oh, holy cow!! That is the most amazing closet makeover I have ever seen!! Such a great use of space. I'm thinking of trying this in the boys' closet. It may help them fit everything. And find everything. thanks for sharing.
Heather (not verified)
Tue, 08/24/2010 - 04:08
Uh-Mazing. Love it. Love
Uh-Mazing. Love it. Love it. Love it! ...especially the "de-cluttering" aspect...so genius.
Leslie (not verified)
Tue, 08/24/2010 - 04:34
Um, that is amazing! I wish
Um, that is amazing! I wish I had a closet like that to transform. I've got an old farmhouse with tiny closets but, with a little planning, maybe I can work with one of THEM. Thanks for sharing this great idea. Yours is always the first blog I read every day!
Julie (not verified)
Tue, 08/24/2010 - 04:40
At first glance I thought, "I
At first glance I thought, "I wish my daughter's closet had real doors instead of bifolds so I could do that!" WOW - I can't believe that transformation. This is definitely getting bookmarked for a future project, thanks!
Summer (not verified)
Tue, 08/24/2010 - 04:40
Ana you are an ABSOLUTE
Ana you are an ABSOLUTE GENIUS!! I just got a brand new closet in my playroom and have been wracking my brain about how to maximize the toy storage possiblities for our 4 kids 5, 5, 3, and 1. Thank you for sharing your brilliant ideas!! Will this work if you have hollow core doors? Mine already swing out, but they are not real wood.
Laura (not verified)
Tue, 08/24/2010 - 04:41
OMG, that's amazing! And
OMG, that's amazing! And exactly what I need for my sewing room closet! You rock, thank you!
(I haven't commented before, but I've been following forever. I'm a "tool chick" too! Luv ya!)
Jennifer Knight (not verified)
Tue, 08/24/2010 - 04:46
Ana, I think this is the most
Ana, I think this is the most AWESOME idea I have ever seen! Can't wait to implement it!
InnaC (not verified)
Tue, 08/24/2010 - 05:09
That is a brilliant idea!
That is a brilliant idea!
Tim & Katie (not verified)
Tue, 08/24/2010 - 05:32
Once again, Ana, you have
Once again, Ana, you have amazed me! I have been struggling with my middle daughters room for weeks, because of the storage issue. I think this may have answered ALL of my questions. You rock!
DIY Girl (not verified)
Tue, 08/24/2010 - 05:42
Every time I visit your site,
Every time I visit your site, I find something else to add to my ever growing to do list. You are amazing!
Meredith (not verified)
Tue, 08/24/2010 - 06:07
Holy crap, batman!
Holy crap, batman! genius!!!!!
Janey (not verified)
Tue, 08/24/2010 - 06:22
I am soooo doing this. I need
I am soooo doing this. I need space to store the extra toiletries I get with coupons. This is perfect for the inside of my linen closet! I'm considering it for my pantry too, but I'm concerned that I still need the bi-fold doors to...um...bifold because of the limited space they have to open.
Cat (not verified)
Tue, 08/24/2010 - 06:31
this will be great in my
this will be great in my teeny pantry - I have some shallow shelves hanging on the door but they can't hold much. If I put the shelf on wheels so it's supported I could put all my canned goods in it!
Christine (not verified)
Tue, 08/24/2010 - 07:30
Thanks so much for sharing
Thanks so much for sharing this! I am going to try it out first in my pantry for a spice/can shelf! Then it will be on through the rest of the house! :0)
Thanks so much for all you do!!
Christine (not verified)
Tue, 08/24/2010 - 07:37
Ana, I have a question for
Ana, I have a question for you. Is it necessary to use screws as opposed to gluing the edges together and using a nailer gun? I guess I'm wondering what the rules are for using a nailer/brad nail versus screws?
Thanks! :0)
manielynn (not verified)
Tue, 08/24/2010 - 07:41
I seriously need a t-shirt
I seriously need a t-shirt that says "Ana is my hero!" I detest the bifold door in my bathroom! The people who put it in totally messed it up and it doesn't stay closed, but this might help. I love to bargain shop...never pay more than $1 for shampoo, conditioner, shower gel, etc. Consequently, we have a lot sitting around and it's always hard to find a place to put it. This is going to be perfect for that! Eventually when we get our laundry in there, it will be able to hold laundry stuff too. Ana you really are my hero!!!!
sheabella (not verified)
Tue, 08/24/2010 - 07:53
What a superb solution. Very
What a superb solution. Very Clever!! Did you use plastic caster wheels? I am wondering if the casters would wear a path on the hardwood after a while. Would it even help if they were plastic?
Again. good for you. I think it is a very well planned project and brilliant that there is a bookshelf.
;-)
tau (not verified)
Tue, 08/24/2010 - 08:02
Brilliant! Except we've got
Brilliant! Except we've got all pocket doors on the closets. I'll just have to consider how to use the bookcase bits.
Southies, I agree. We should each have 16oz of Ana daily.