


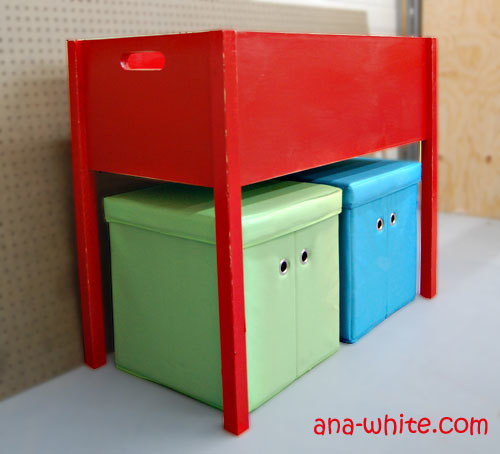
We love this raised toy box! There's room underneath for stools, storage or bigger toys!
Free step by step plans from Ana-White.com

Preparation
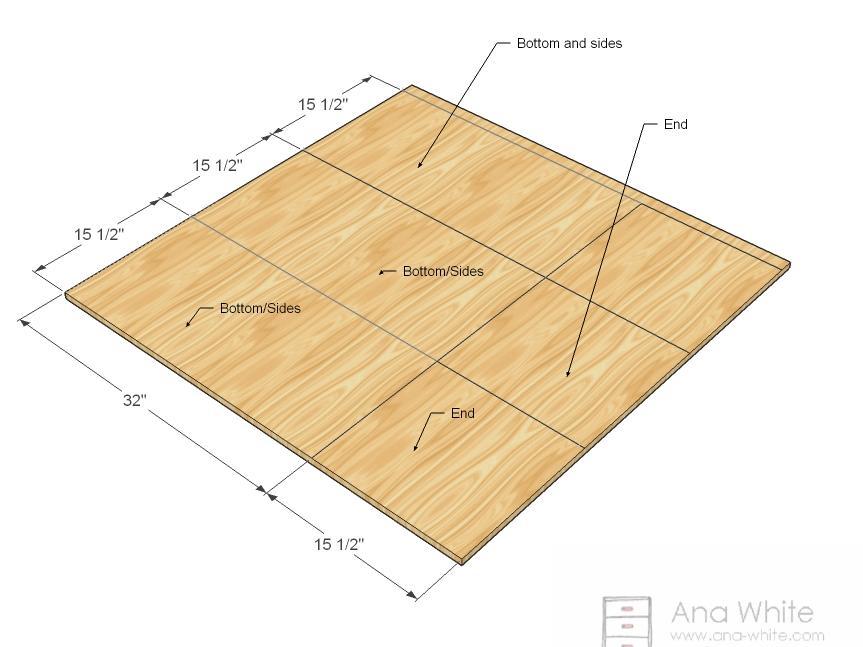
- 1/2 sheet of 3/4″ Plywood or MDF (I used MDF) cut into 15 1/2″ wide strips, 4 feet long (referred to as 1x16s) see diagram.
- 2 – 2x2s, 8 feet long
- 30 – 1 1/4″ pocket hole screws ) OR 2-1/2″ self tapping wood screws
- wood glue
- 3 – 3/4" plywood @ 15-1/2" x 32″ (Sides and Bottom) - cut first from the 15-1/2" wide plywood strips
- 2 – 1×16 @ 15 1/2″ x 15-1/2" (Sides) - cut from leftovers
- 4 – 2×2 @ 32″ (Legs)
Ask the home improvement store to cut your plywood into strips with their track saw, feeding the plywood through horizontally without readjusting the blade for a more accurate cut.


Instructions
Step 1
Cutting
If you plan carefully, as shown above, it will all fit on one sheet of plywood. Remember, you cannot mark all the cuts then cut as the saw blade takes up space too. Mark, cut, mark and so on. I highly recommend having your home improvement store at least ripping the plywood into easy to manage (and haul in your car) 15 1/2″ wide strips, 4 feet long. Then when you get home, all you have to do is make a few easy straight cuts.
Step 2
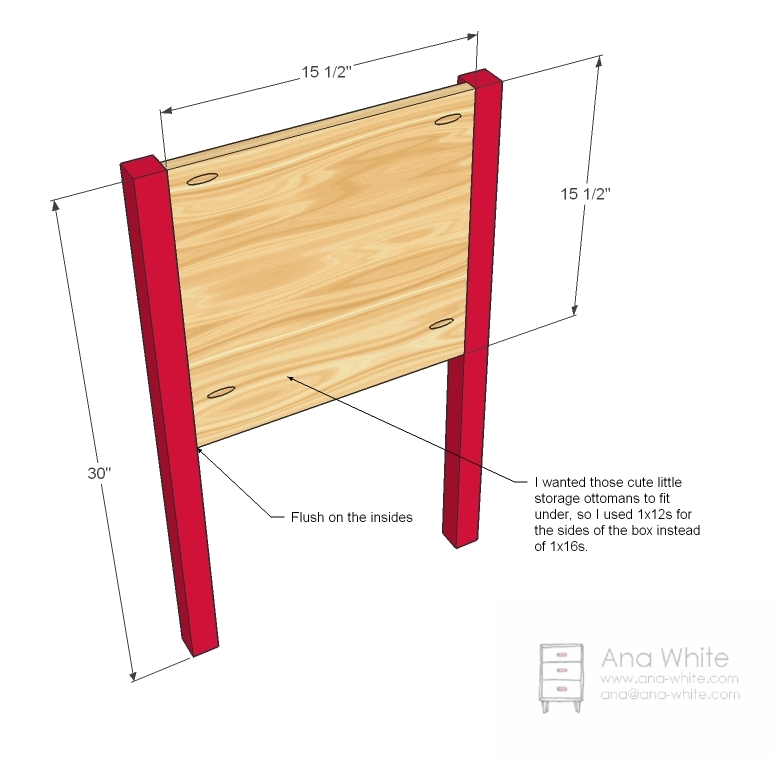
Ends
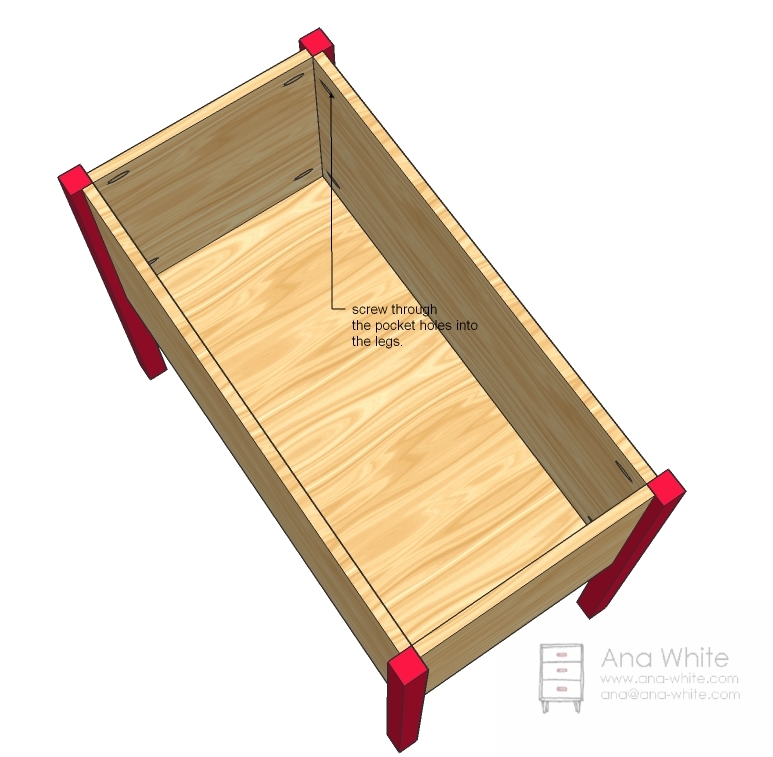
Drill all pocket hole sin all of the boards, as pictured in all of the diagrams. Then attach the legs to the ends as shown above. Use glue. You can alternately use 2″ wood screws and glue, just make sure you predrill all holes first with a countersink bit.
Step 3
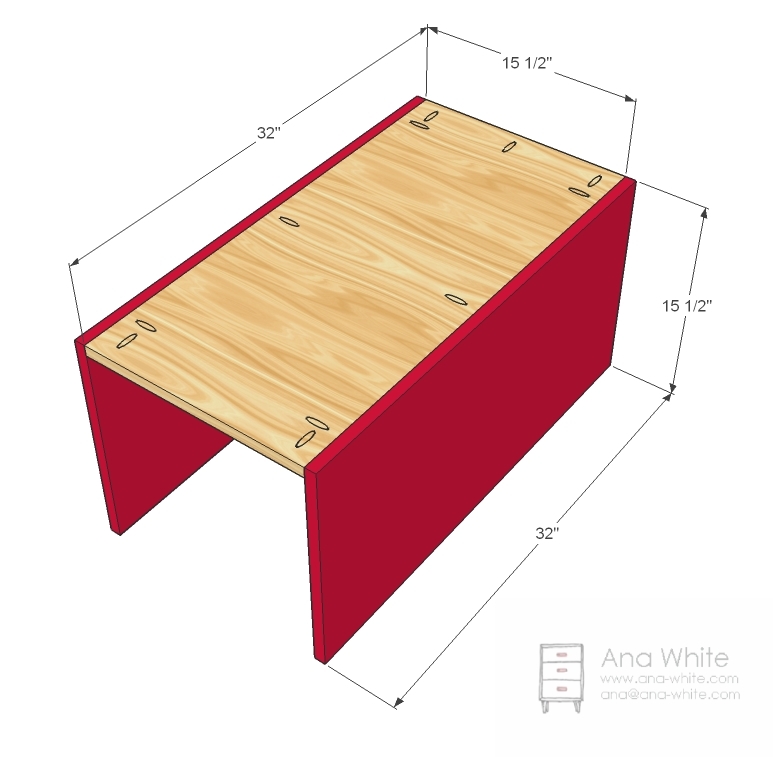
Box
Now attach the sides to the bottom as shown above. Use glue. Again, you can use 2″ screws and glue to joint the sides to the bottom, just make sure you also use a countersink bit. Also, if you are working with MDF and are screwing into the edges, make sure you predrill the entire distance of the screw shaft and use DRYWALL screws, as regular wood screws have a tapered shaft and in my experience, cause the MDF to basically blow apart. Drywall screws have a straight shaft.
Step 4
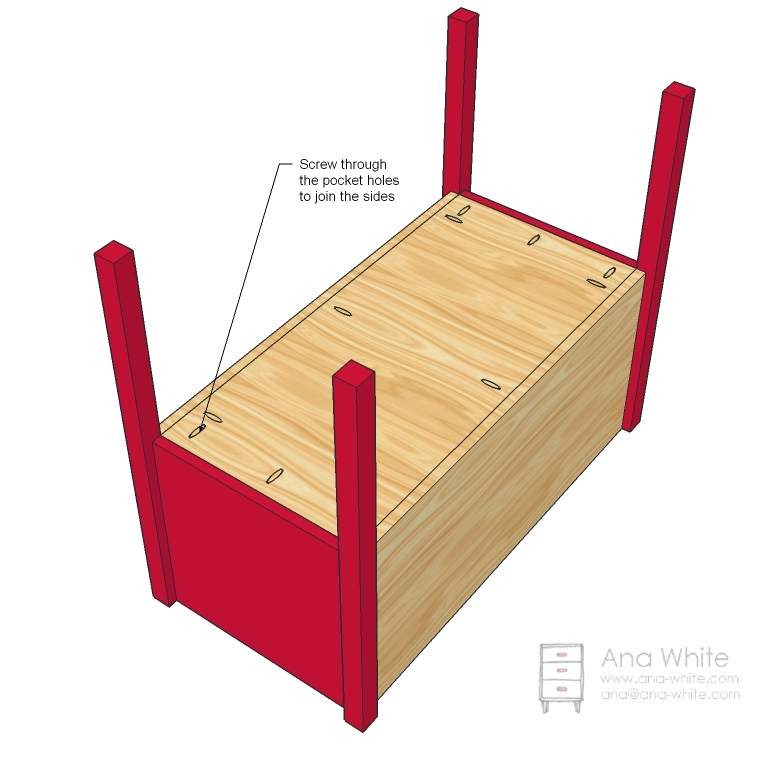
Ends
Now attach the box to the ends as shown above through the pocket holes in the bottom. Use glue. You can also attach with 2″ screws and glue, remember about the drywall screws and countersinking.
Step 5
Step 6
Handles
Our vintage crate carts were handy, so we just traced the holes in the ends, drilled holes and cut out the handles with a jig saw. You can see exactly how that is done in this post.

Comments
Colleen Lalonde (not verified)
Mon, 11/22/2010 - 19:59
This would be perfect for my
This would be perfect for my daughters room! There's a heat vent right in the perfect spot for a toy box and this would solve that perfectly!
Michelle (not verified)
Mon, 11/22/2010 - 20:07
This is the perfect idea! I
This is the perfect idea! I have 2 boys: 5 and 3 and their closet is ALWAYS a distaster, no matter what I do. This may be it! Thanks!
Holly (not verified)
Mon, 11/22/2010 - 21:00
Here's what I love, I just
Here's what I love, I just saw one of these at pbkids.com for the first time and came to your site to beg for a plan...and here it is...didn't even have to ask! :)
Ana White (not verified)
Mon, 11/22/2010 - 21:04
Holly, you MUST make this!
Holly, you MUST make this! It's so cute and easy and functional. I've had it built for a while now, and just haven't got to painting it . . . and now, oh my, the red is marvelous! Must build!
Shawn (not verified)
Tue, 11/23/2010 - 00:27
Love it Ana, I think it would
Love it Ana, I think it would make a nice planter box too!
Bethany (not verified)
Tue, 11/23/2010 - 02:46
I'm thinking that would make
I'm thinking that would make a pretty cool sand/rice table for my boys!
Whitney Smith (not verified)
Tue, 11/23/2010 - 03:26
Okay, thats it! I am going to
Okay, thats it! I am going to eBay and finding me a Kreg Jig, stat!
Cari (not verified)
Tue, 11/23/2010 - 04:41
This is just great! I, too,
This is just great! I, too, was thinking what a great planter it would be! I think if we modified the plans a little, this will work great this year - and keep my Min Pins out of the produce! The hubs and I are currently working on the Parsons Chair (slightly modified to be pub height, no cushion, but with a decorative backing by using an old overhead projector) and the Rustic Farm Table (also slightly modified to be square and pub height of 4' and to seat 8). I can't wait for them to be done to upload pics! I LOVE the smell of fresh cut wood! hehe (I know, not your typical female) I just love your plans! Thank you so much for sharing them!
Amy (not verified)
Tue, 11/23/2010 - 05:06
I was thinking the same
I was thinking the same thing!
Kasey (not verified)
Tue, 11/23/2010 - 05:25
This is so cute. I like the
This is so cute. I like the simplicity of it and that I could probably get my child to put her toys away because all she has to do is launch them in there.
Melissa Jones (not verified)
Tue, 11/23/2010 - 06:04
Ana, Thanks for the great
Ana,
Thanks for the great toy box plan and all the other toy and kid plans you have. I plan on doing the farmhouse toddler bed for my grandson, and 18" size doll bed for my daughter.
Have you seen the Plan shopping cart? So cool, would love to see plans for one of those.
Robin (not verified)
Tue, 11/23/2010 - 06:54
I love the idea of this as a
I love the idea of this as a rice box - my kids love the sandbox but sand it way too messy for me to be in the house - now vacumning up some loose rice kernals I can handle!
Jami (not verified)
Tue, 11/23/2010 - 07:14
Awesome plan! I think we'll
Awesome plan! I think we'll do this one for Christmas. But wait. . .pocket hole screws? I don't remember that phrase before. Do we HAVE to have them to use a pocket hole jig? Where's the best place to get them?
Celestra (not verified)
Tue, 11/23/2010 - 07:44
Toy troft! Super cute. My
Toy troft! Super cute. My little piggies could use one of these.
Vicky (not verified)
Tue, 11/23/2010 - 07:47
Love it love it love it! So
Love it love it love it! So many uses all over the house!
Ana White (not verified)
Tue, 11/23/2010 - 08:58
For those of you without a
For those of you without a pocket hole jig . . . or wanting a bottom shelf - here's how to do that.


Bmom (not verified)
Tue, 11/23/2010 - 15:23
very cute - I love it with
very cute - I love it with the shelf underneath too - but pull out storage / seating options for kids would be wonderful if I could find some little ottomans that I like!
two other quick thoughts:
...I'd add 1x2's to the top edge to make a flat, finished plane, which would conceal the top edge of the plywood and connect the legs (maybe even sand/router a slightly rounded edge on that?)
...could also be a great outdoor planter / porch toybox using decking material leftovers!
HammerTime (not verified)
Wed, 11/24/2010 - 05:49
Wow, Ana, you've done it
Wow, Ana, you've done it again! This would be perfect for my little "nephew" (my BFF's little guy). I love the idea of chalkboard paint. And I wonder if it could be put on casters so it can be moved around easily?
myra (not verified)
Wed, 11/24/2010 - 10:37
where can one get a pocket
where can one get a pocket jig for less than $50?
Ana White (not verified)
Wed, 11/24/2010 - 10:59
Myra, try Lowes or online at
Myra, try Lowes or online at Amazon.