
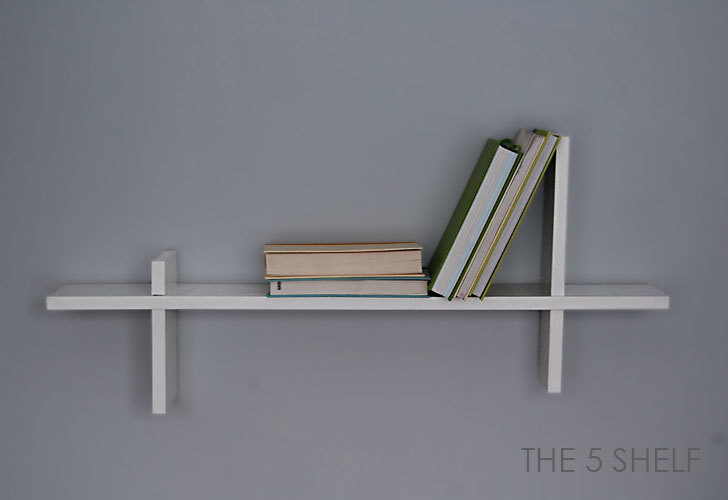

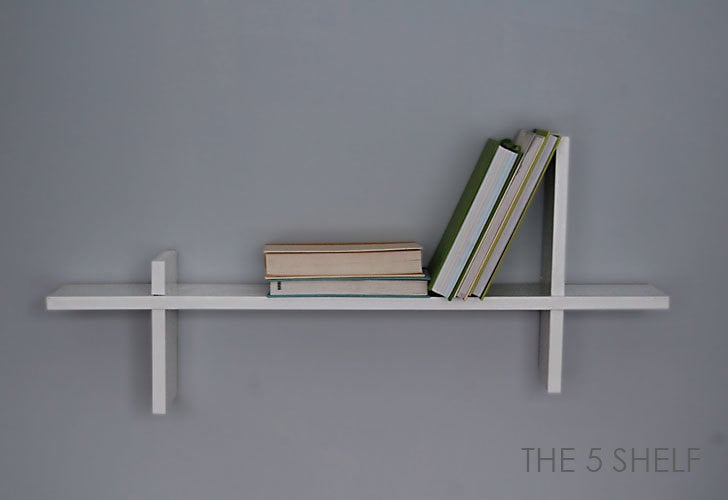
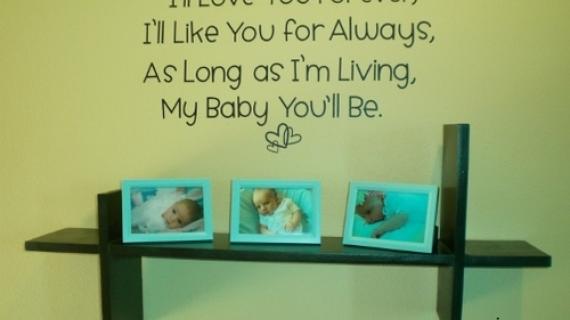
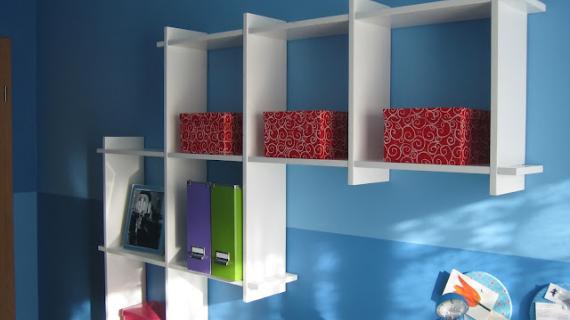
Modern style wall shelf, can be hung vertical or horizontal. Free plans from Ana-White.com

Preparation
1 – 1×6 board, 5 feet long 2 metal angles like these – they are just used to hang the shelves on the wall – don’t need anything fancy here. Check the hardware aisle. 3/4″ screws (you will only need 4 – two for each metal brace) 2″ screws (for attaching to the wall, use a dry wall anchoring system if you can’t locate a stud or wish to place the shelf not on a stud)
1 – 1×6 @ 36″ 1 – 1×6 @ 15″ 1 – 1×6 @ 9″


Instructions
Step 1
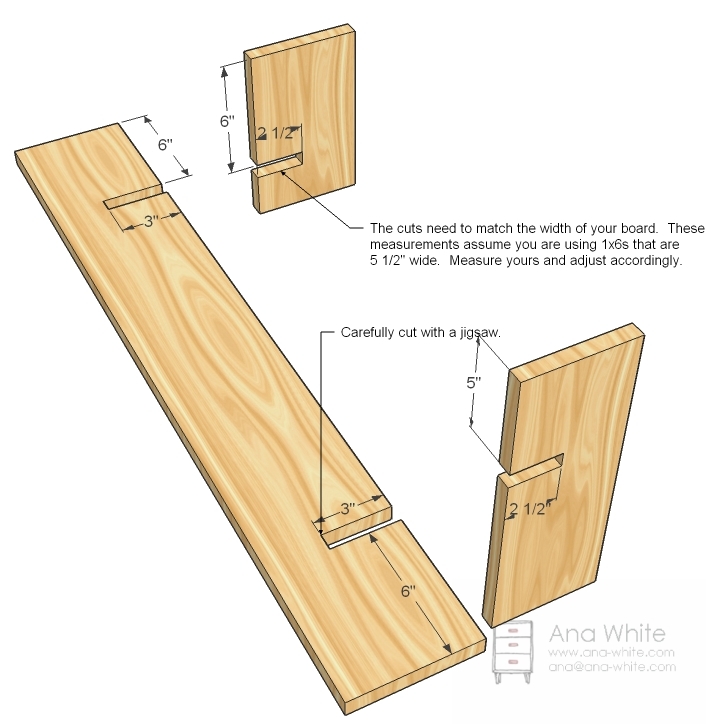
Notch Boards
Measure and mark the boards as shown above. Carefully cut the notches out with the jigsaw. I make the side cuts first, then go back and make a curved cut from the side to the opposite corner, and then go back and cut to the remaining corner.
Step 2
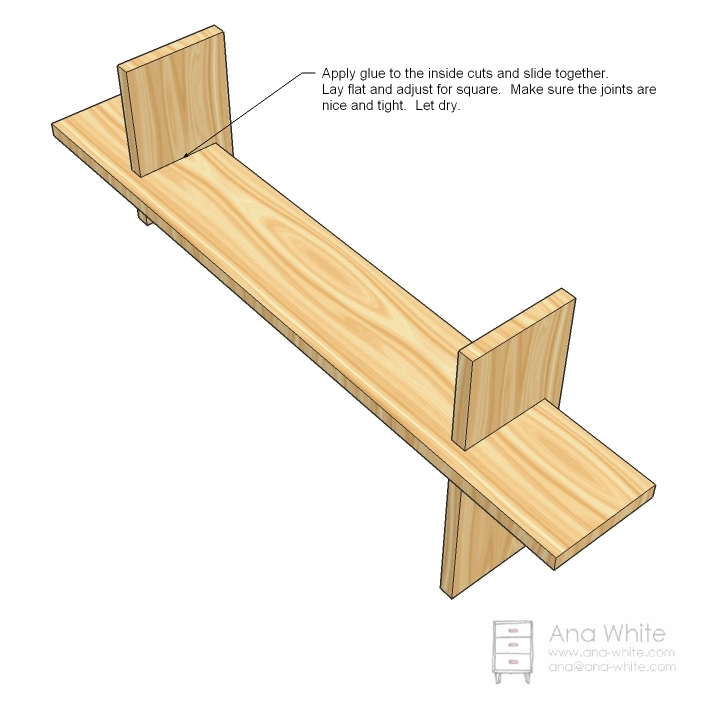
Assemble
Now at this stage, you really want to test the fit. Make sure the boards fit together snug. Pull apart and apply glue. Reassemble and adjust for square and let the glue dry.
Step 3

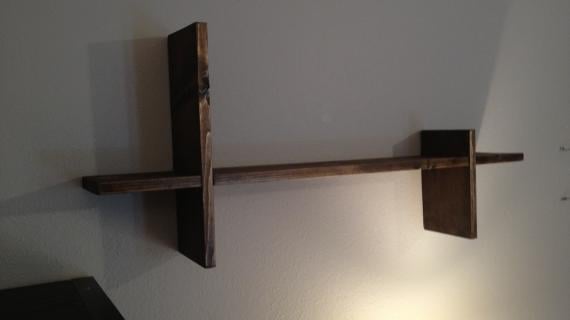
Hanging
Now use the metal angle braces to hang the shelves as you would any picture or shelf. If you cannot locate a stud in the wall, you can use a drywall anchoring system. Also, if you are planning on storing little weight (less than 16 pounds total) you can use Command strips from 3M – that’s what’s holding my shelves up!

Comments
Hedster (not verified)
Tue, 12/14/2010 - 21:40
Very cute - though you
Very cute - though you *could* hang it five ways - on an angle to sorta resemple a check-mark and use for cd's... then you can see the labels without turning your head sidways!
Loni (not verified)
Wed, 12/15/2010 - 02:40
I Love it! Perfect for my
I Love it! Perfect for my kitchen! Thanks!
Tracie (not verified)
Wed, 12/15/2010 - 02:50
I agree!! Perfect for a
I agree!! Perfect for a kitchen----I see cookbooks on it!

Sarah (not verified)
Wed, 12/15/2010 - 02:53
I imagine you could, but
I imagine you could, but asking just in case. Could you make both of the sides equal, so that it had a look of symmetry? Thanks for the plans! My kids are both getting beds for Christmas that my husband and I built. I will post pics when they are complete!
Jehan (not verified)
Wed, 12/15/2010 - 03:59
Sweet! I'm thinking display
Sweet! I'm thinking display space in the living room. Kind of like the wall of shelves in the West Elm catalog. Ana, totally off topic, but are you Filipina? Just curious :)
Rebecca (not verified)
Wed, 12/15/2010 - 04:06
My husband built something
My husband built something similar to this for my son to put his Transformers on.
aSprinkling (not verified)
Wed, 12/15/2010 - 04:21
Actually, you COULD hang it
Actually, you COULD hang it diagonally - particularly with the largest protrusion as the "bottom". Then, you would have 5 ways to hang it. :)
Ana White (not verified)
Wed, 12/15/2010 - 06:11
Absolutely! Can't wait to
Absolutely! Can't wait to see your beds, and I hope you make these shelves. So fun and easy!
Jim Reeves (not verified)
Wed, 12/15/2010 - 06:39
Ana, very nice as always, but
Ana, very nice as always, but am a bit confused on the upright cut 2 1/2 inches deep and the shelf 3 inches deep will they line up?
jim
Loni (not verified)
Wed, 12/15/2010 - 06:59
Yes they should, The plans
Yes they should, The plans call for 1x6's which (usually) only measure 5.5 inches. Of course measure your boards first to make sure and make adjustments as necessary :)
Loni (not verified)
Wed, 12/15/2010 - 07:01
I don't have a pantry, I've
I don't have a pantry, I've been using one of my cabinets, I was thinking open pantry? :)
Dorothy (not verified)
Wed, 12/15/2010 - 07:48
Yes, yes, yes!!! I about
Yes, yes, yes!!! I about jumped up and down when I saw this shelf! I need several shelves in our daughter's bedroom for her books and had an idea very similar to this one, but was waiting on my husband to make them. (He is the one with all the measurement skills and brains to figure things out.) Now I can do it myself -- all because of you!! Thank you, Thank you, THANK YOU!!! :-)
Tsu Dho Nimh (not verified)
Wed, 12/15/2010 - 12:49
Jim - The sum of the two
Jim - The sum of the two slots should equal the width a single board of the pair (if they are equal)
For the strongest joint, make them approximately equal depths.
Ryan Bruzan (not verified)
Wed, 12/15/2010 - 14:43
I have so many scraps and
I have so many scraps and have been reviewing ways of using them as opposed to not. Cool idea Ana!
Theresa (not verified)
Wed, 12/15/2010 - 16:03
A-M-A-Z-I-N-G so simple but
A-M-A-Z-I-N-G so simple but sooo classy This is my kind of project.
I may have to build a bigger house any plans for that Ana?
Janelle (not verified)
Wed, 12/15/2010 - 20:24
How many command strips did
How many command strips did you use to hold it up? I love this, it will perfect above the changing table in my babies' room!
Jon (not verified)
Sat, 01/08/2011 - 03:37
This looks like a great idea
This looks like a great idea for both of my kids rooms, but I am curious about the visibility of the metal bracket. Any suggestions for hiding it? Great plan!
jennifer c (not verified)
Sat, 01/08/2011 - 12:05
I feel silly asking this but
I feel silly asking this but I am an newbie at building... so how do you hide the metal brackets if you don't used command strips?
Ana White (not verified)
Sat, 01/08/2011 - 13:20
Jennifer, what I would do is
Jennifer, what I would do is look for the teeny tiny ones and then use them on top side in plain sight where you know a frame or some other object will cover them :)