
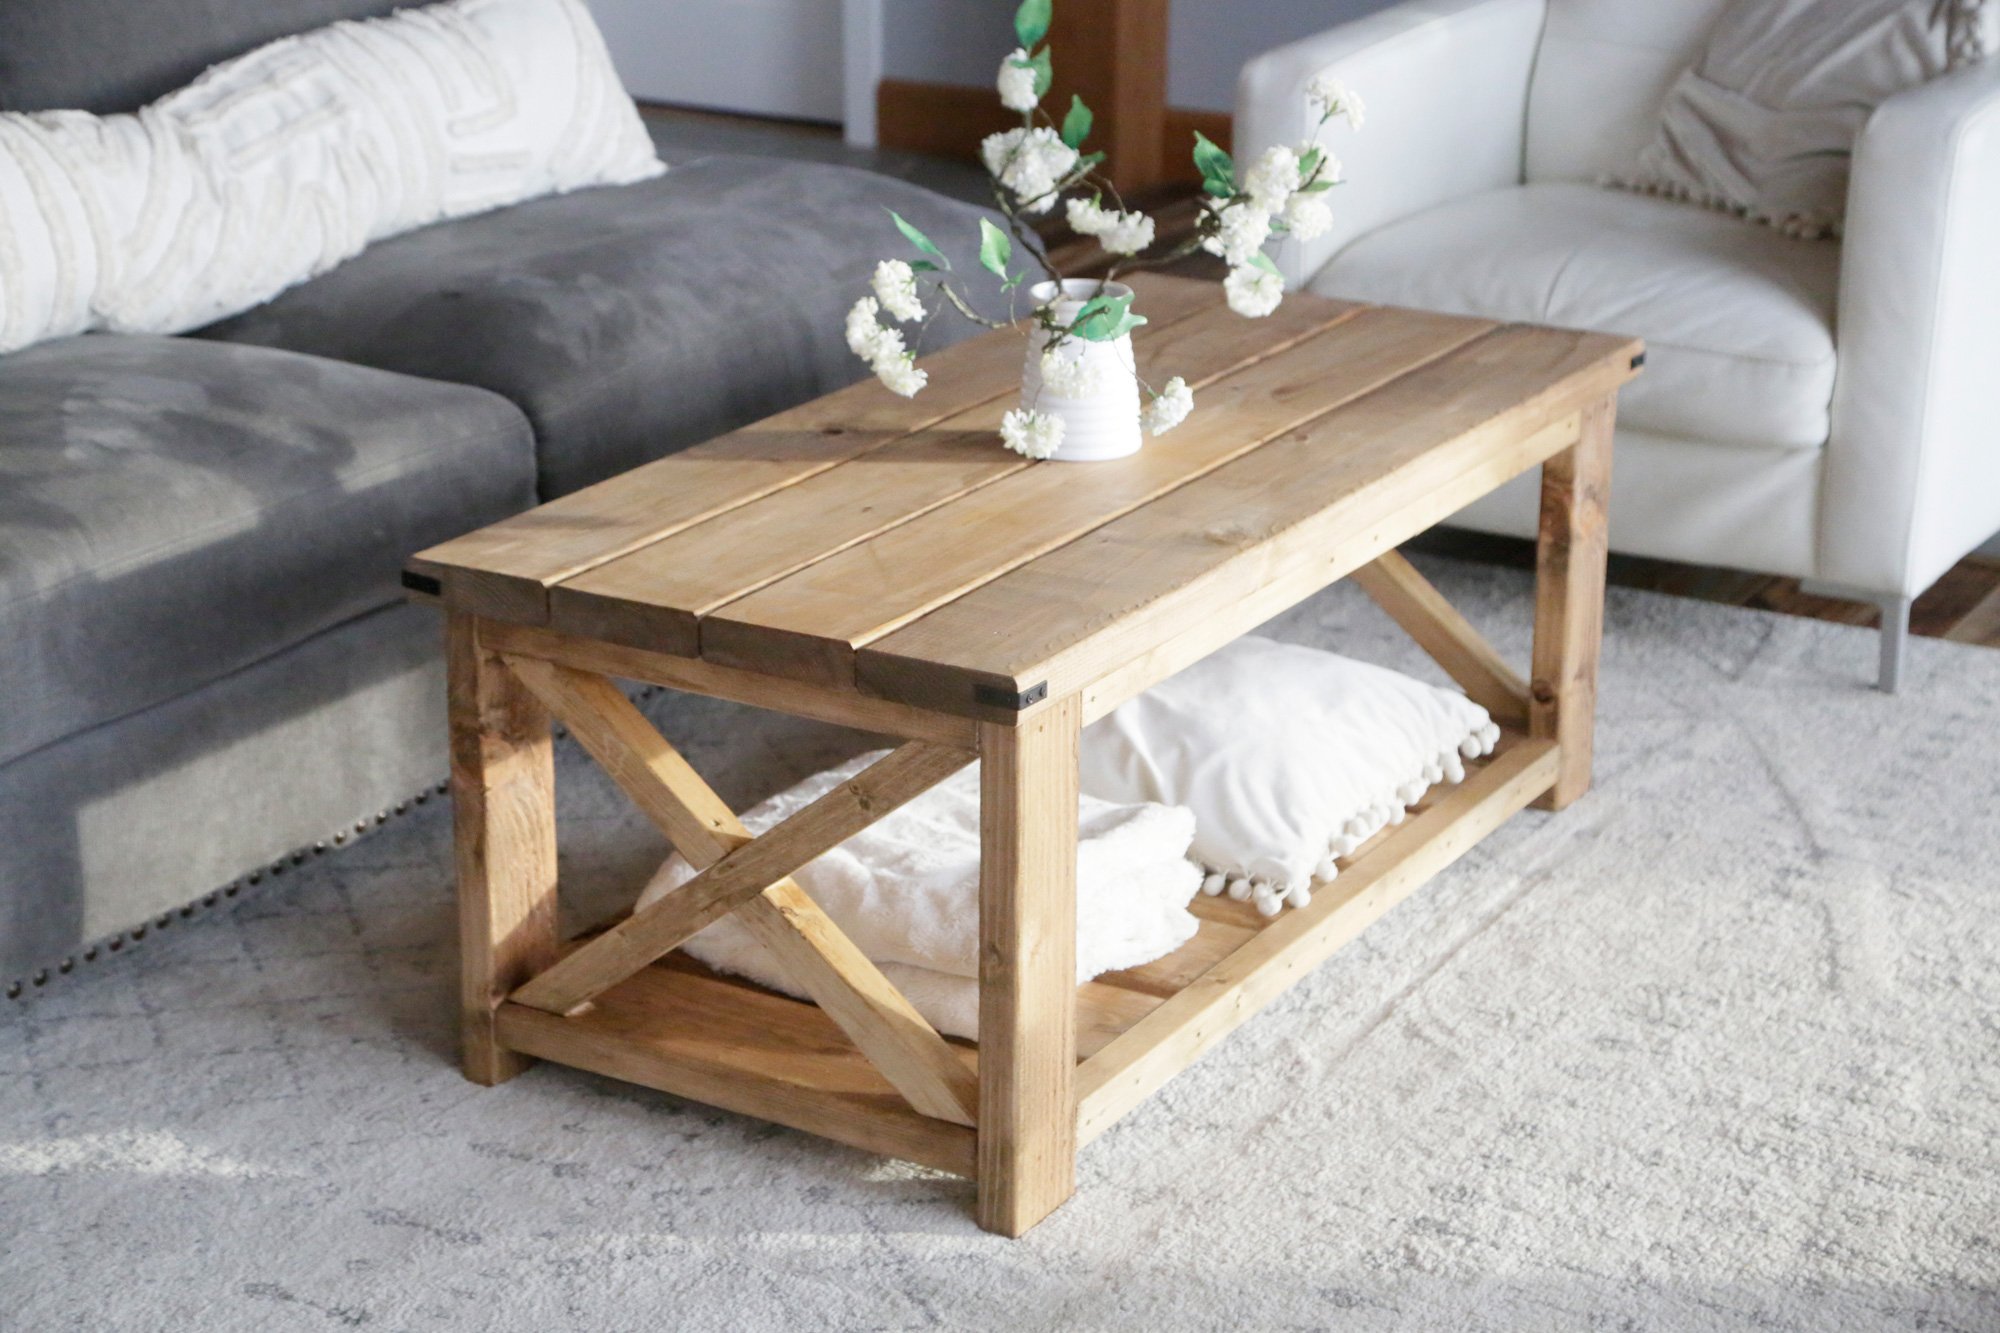

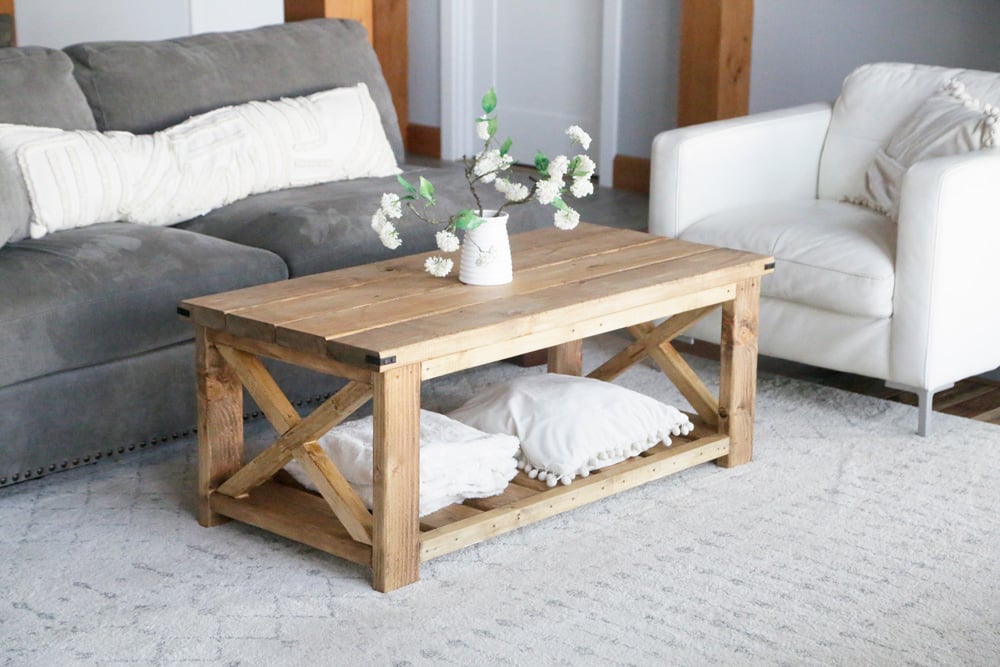
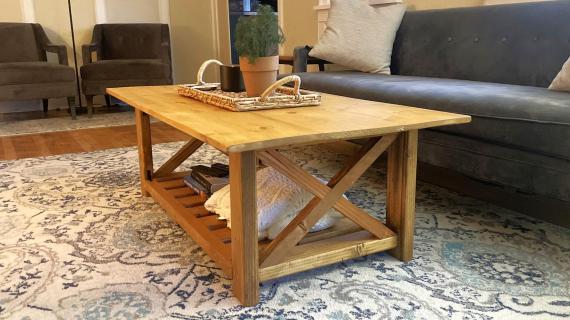
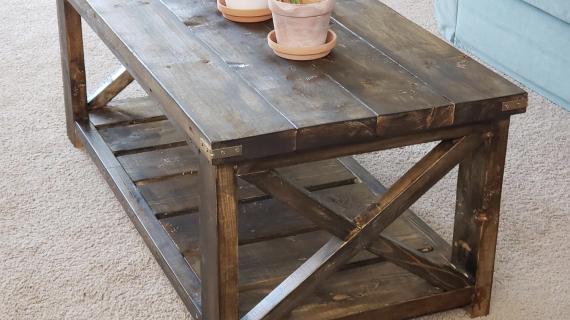
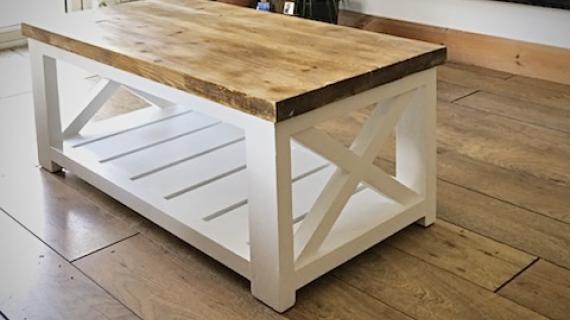
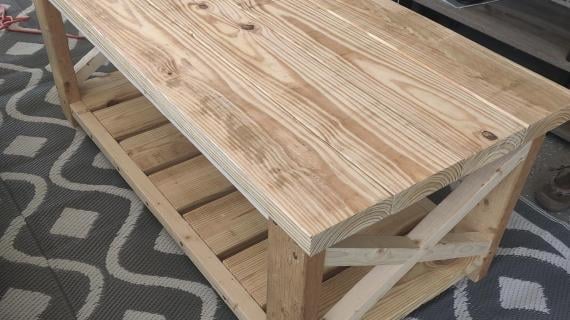
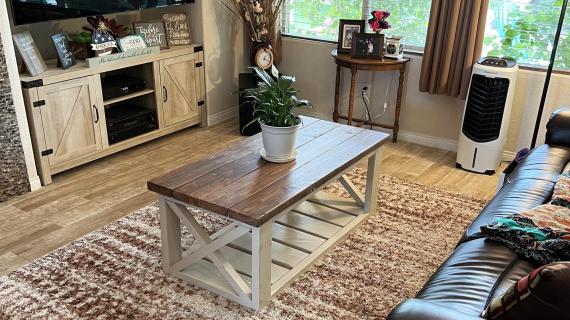
Build the farmhouse coffee table for under $40 with just a drill and a saw! This is a beginner friendly DIY project that should only take a couple hours to complete.
You'll love the results - an absolutely gorgeous farmhouse coffee table made from solid wood, perfectly proportioned, with a large bottom storage shelf.
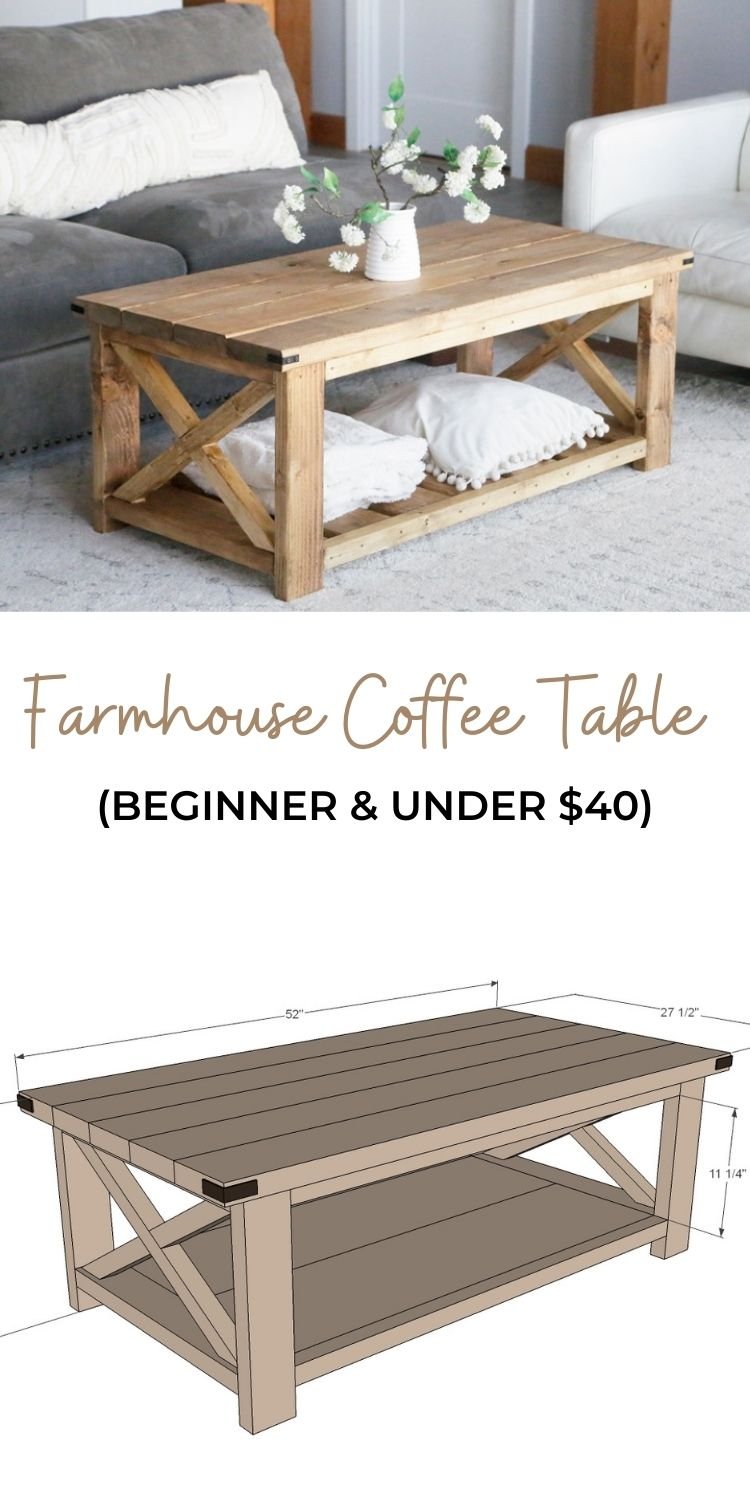
Our free plans make it easy! Step by step diagrams, shopping and cut list from Ana-White.com
![Farmhouse Coffee Table [Beginner/Under $40]](/sites/default/files/inline-images/2_25.jpg)


Dream of a gorgeous farmhouse coffee table, but don't want to spend hundreds of dollars?
YOU can build THIS coffee table for under $40!

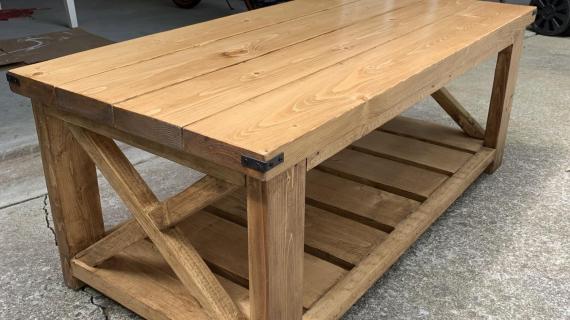
Farmhouse Coffee Table Features
- Solid wood design accepts stain with dimension and character
- Perfectly sized, beautifully proportioned
- Large bottom shelf for baskets and blankets
- QUICK and EASY to build with our simple plans
- Just screwed together - no nails, no pocket holes
- All materials available at Home Depot or Lowes
- Years later, this coffee table can be refinished and repaired (if needed) since it's solid wood
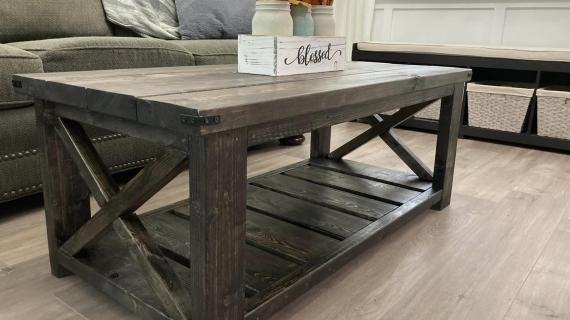
How is this Plan Different from the Rustic X Collection?
Our most popular coffee table is the Rustic X Coffee table. This coffee table is very similar in design. The big difference is HOW it's built and the tools required. The Rustic X Coffee table requires a Kreg Jig. The Rustic X Coffee table is slightly larger in size. It also has a solid bottom shelf (instead of the slatted design of the Farmhouse Coffee Table).
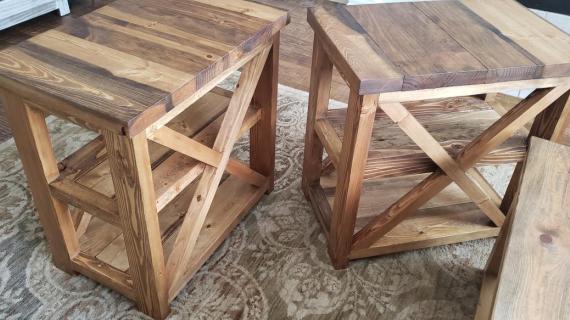
Are There Plans for the Matching Console Table and End Table?
Yes! We just added the matching Farmhouse Console Table plans and teh matching Farmhouse Side Tables plans (in two size options) here.
Video Tutorial
HOW this coffee table is built is everything. Watch me build it in our Farmhouse Coffee Table video tutorial:
Farmhouse Coffee Table Plans
The plans for this coffee table follow. Please share a photo when you are done building, we love seeing your projects! Can't wait to hear how yours turns out.
Pin For Later!

Preparation
- 4 - 2x6 @ 46" - tabletop boards
- 4 - 2x4 @ 16-1/2" - legs
- 10 - 2x6 @ 18" - shelf/ends
- 4 - 2x2 @ 37" - aprons/shelf sides
- 4 - 2x2 @ 19-1/2" - both ends cut at 52 degrees off square - ends ARE parallel - long point to short point measurement*
*The 2x2 X pieces can be scribe cut to fit as done in the video.


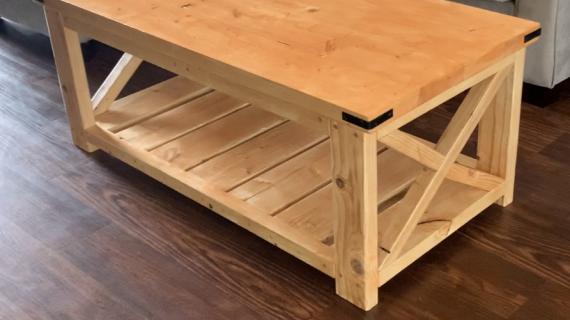
Instructions
Step 1

Attach legs to two of the 2x6 @ 18" with two screws per joint.
Use glue at all joints.
Build two.
Step 2

Set the two leg sets on a level surface.
Attach two leg sets together with 2x2s, two screws per joint and ample wood glue.
If your 2x2 is splitting, predrill holes first, then attach with screws.
TIP: Screws attached at a slight angle will help strengthen this joint.
Step 3

Place first long X piece in the coffee table end and attach with glue and screw from top and bottom.
Set second X piece along side first, and mark where the two pieces cross.
Cut the second piece along the marked lines.
Place two cut pieces inside the coffee table and attach from top and bottom and middle.
The second piece should be attached as shown from top.
This is all shown in the video tutorial.
Step 4

Attach one of the 2x6 @ 18" in about the center of the coffee table with two screws per joint and glue.
Step 5

Lay out the 2x6 tabletop boards on a flat, level surface, with best side of tabletop boards face down.
Apply glue to top edges of coffee table frame, and place coffee table frame upside down on the tabletop boards.
Screw the base to the underside of the tabletop boards. Use ample screws but reserve enough to complete the next step.
Step 6

Position the middle shelf slat centered on the coffee table bottom shelf.
Attach with 2 screws per joint.
Place remaining slats inside the frame and attach with 2 screws per joint. The gap is about 1" in between (slightly less).
TIP: If heavy loads are expected on the bottom shelf of the coffee table, place a 1x2 scrap about 20" long, underneath the shelf, centered and running lengthwise to the coffee table. This will act as a center "leg" for the shelf and considerably increase the strength of the bottom shelf.
Painted Finish: Fill holes with wood filler and let dry. Sand with 80-120 grit sandpaper. Remove all sanding residue with a vacuum. Prime and paint.


Comments
H3LL2P4Y
Sun, 11/10/2019 - 17:23
Any download plan for this…
Any download plan for this project?
nbv800
Sun, 12/05/2021 - 09:11
Thank you
Thank you
Ray_B
Thu, 11/14/2019 - 07:48
Awesome beginner plans!
This is IT! This will be my very first project ever that I'm going to build!
I like that I will not need use a pocket hole job from Kreg Jig (although this will be one of first purchases!). Simply awesome plans!
I will likely build at least two more night stand and/or end table versions of this plan. Will you please put in my vote for an "end table size version" of this "Farmhouse Coffee Table"? I'm very excited about building some for my family!
Thank you very much, Ana!
In reply to Awesome beginner plans! by Ray_B
Ana White
Thu, 11/14/2019 - 22:54
Sounds good, I'll get those…
Sounds good, I'll get those end table plans out. I was hoping someone would use the end table as a nightstand!
JillianHutt
Tue, 01/26/2021 - 11:17
End table plans?
Where can I find the end table plans? I've been looking, but the ones I've found require pocket holes.
In reply to Sounds good, I'll get those… by Ana White
sonialimo
Tue, 04/06/2021 - 00:47
Hi there; just came across…
Hi there; just came across this and I love it but I cannot find the plans for the end tables, I’d love to make them to use as side tables in the living room!
rbernier09
Tue, 11/26/2019 - 09:08
Wood type
Ana, what type of wood would you use? Would you ever build this with all spruce? Knotty pine 2" board has a hefty price where I live. Thanks in advance!
[email protected]
Fri, 12/06/2019 - 10:05
I used framing lumber and…
I used framing lumber and sanded it down really well. It was inexpensive and looks amazing.
[email protected]
Fri, 12/06/2019 - 10:04
Finished making mine and I…
Finished making mine and I love it!!
When will the side table plans be done? I really need one and have someone that wants me to make them a set.
In reply to Finished making mine and I… by [email protected]
Ana White
Sun, 12/08/2019 - 21:23
So glad to hear! I will get…
So glad to hear! I will get the side table plans posted in the next couple of days for you.
SuperGeorge
Mon, 12/30/2019 - 11:59
I attempted this as my first…
I attempted this as my first wood work project (aside from the work bench) and it wasn't bad. Learnt one or two things that should will be helpful going forward. I was afraid of the "X" so I went with a simple "--" instead.
In reply to I attempted this as my first… by SuperGeorge
pdw81375
Wed, 10/27/2021 - 18:13
Curious
Hey how did it turn out not using the X. I'm having a time with it. My miter saw went down and circular only goes up to 45° angle.
In reply to I attempted this as my first… by SuperGeorge
pdw81375
Wed, 10/27/2021 - 18:13
Curious
Hey how did it turn out not using the X. I'm having a time with it. My miter saw went down and circular only goes up to 45° angle.
mrphyjammusashi
Tue, 12/31/2019 - 08:18
Thank you!
Hey Ana, my wife and I just found your site, and what a great one it is for novice woodworkers like us. We just built a farmhouse kitchen table, and we are excited about making this farmhouse coffee table. Thank you for all you are sharing--it is a lot of fun, and gives a great feeling of accomplishment to the beginner. My wife is a Filipina from Mindanao and was wondering if you had Filipino ancestry? Thanks again, Cynthia and John
paytonhenry
Sun, 02/23/2020 - 12:35
Dimensions
Hi Ana, I am wanting to make this table but would like it to have another 2x6 on top so it is 28" wide, to do this would I just add on 6 inches to all the pieces of the frame that go width wise? Thank you!
beadmorrison1
Tue, 02/25/2020 - 08:02
Hi, would you know why my…
Hi, would you know why my wood may be splitting at certain joints? Is there a way to upload pictures because I'd like to show what's happening but if not basically the wood is splitting. Could I be screwing in too tight? I'm not using the exact recommended screws, I using ones that are the same length. They are 8x2 1/2.
Any help would be appreciated. Thanks!
cheerkat39
Mon, 05/25/2020 - 04:43
Mine did this at first too…
Mine did this at first too. I ended up having to pre-drill all my holes. And the first bit I used as too small and was still doing it, I used a #10 bit and then it worked and I didn’t have any other problems.
cheryllynn87
Thu, 05/07/2020 - 12:36
Love it!
This was my first project ever! I just built it today and it came out amazing! I’m so happy I found your page! I’m going to try some chairs next.
cheerkat39
Mon, 05/25/2020 - 04:41
I made this coffee table and…
I made this coffee table and 1 small end table so far. Working on a second small end table today. I love this table and the instructions were easy to follow. The only issue I had was the angle for the Xs. The angle given (52°) was not correct. Thankfully I had extra wood and could trace the angles I needed.
I sanded all of my boards before putting together which made it so nice. I actually used 2x4s for the Xs on my coffee table. I was splitting 2x4s in order to get 2x2s and my saw blade was dull and it was too hard so I just used 2x4s. It didn’t mess up the pattern at all and gives it a nice chunky look. I did however use 2x2s for the end table. I borrowed a saw from my MIL. I definitely like the look of the 2x2s better but the 2x4s work and aren’t bad if you need to go that route. I’m not sure how to attach a pic to this comment or I would.
SarahMartinez
Wed, 06/03/2020 - 07:11
Which stain?
Thank you so much for all of your plans! I was wondering what shade of stain you used? I love the color.
nancy.speirs
Mon, 06/22/2020 - 19:15
Love This!
Hi Ana,
Absolutely love this table! Thank you for sharing the plans:)
We needed something larger for our room, so my hubby tweaked the dimensions to enlarge it. He also wanted to attempt the creation of a solid piece for the top. Love the results:)
We would love to share a pic with you, if you could let me know how best to do that:)
Thanks again!!
alextt88
Mon, 07/13/2020 - 18:48
Hermoso
Hermoso
dean raynes
Wed, 07/29/2020 - 10:46
Amazing project!
Love this table...took just a few hours to build! Thank you. Just wish we could post pics in the comments!
Gabbys
Wed, 07/29/2020 - 18:07
Super Easy Plans For A Beautiful Table !
I’m a first time DIY-er and loved how easy to follow this plan was ! I ended up getting my wood at Home Depot and actually had them cut it there for me to make it a little easier! I highly recommend utilizing their cutting section if you don’t have a saw. I was able to build it all by myself with no issues at all. Ana you did such an amazing job with the instructions and the video was so helpful too! I’ll definitely be exploring your other project plans ! Love it! Thank you!
Janet Saunders
Sun, 08/02/2020 - 15:32
Excited for my first Project!
I'm excited, I've been wanting a new coffee table for a long time and also a new hobby. Think this is it, love it :)
Is there a print out for this project tho.?
Monika
Sun, 09/27/2020 - 18:20
Very cute coffee table
Very cute coffee table
Ironjen
Tue, 10/13/2020 - 07:40
In love with our new table!
Just finished building this! The plan was easy to follow, and it came out so much better than any of the $600 coffee tables we looked at in furniture stores!
The one thing we noticed about the decorative corner braces is that the included screws will hit each other when you’re attaching the two inner ones. We were able to angle them enough to use the included screws and keep the look, but I’d have bought shorter screws if I’d known I’d run into this issue!
Ours is finished in Varathane Dark Walnut.
alice
Fri, 10/16/2020 - 03:51
Hi Ana, I made this as my…
Hi Ana, I made this as my first ever project and it looks gorgeous, so I wanted to thank you for putting out the plans and super detailed instructions with the video. I would never have done it otherwise!
lmoranti
Sat, 10/17/2020 - 16:38
How fun was that!!!
This was a fun project for my first try. Not sure how to show pictures though
lacroix19
Sun, 12/27/2020 - 05:16
Circular Saw
Would it be possible to complete this project with a circular saw instead of the miter saw? I have not bought a miter saw but have a circular saw.
Thank you.
Linda7
Fri, 01/01/2021 - 12:25
Yes, you can...
Yes, she does mention early in the video that the cuts can also be made with a circular saw. Another person mentioned in his comments that he had the cuts made at Home Depot where he purchased his wood.
Hypke6
Tue, 01/12/2021 - 17:16
Miter Saw Angles
What miter angles does the saw need to have? When it says cut 52 degrees off square, does that mean you set the miter saw to 38 degrees or 52 degrees? What I am needing to know is will a saw with miter angles of 45 degrees left and right work for this table?
Willpowerx3
Tue, 01/19/2021 - 11:39
Miter Saw
Hi there, I would love to try this project. What type of Miter saw do you recommend and will a 10 inch do the job or does it have to be a 12 inch Miter saw? Thank you for your help!
Woodmaster
Thu, 02/04/2021 - 05:40
Absolutely love this work!…
Absolutely love this work! Chek out this great course to learn more about woodworking!
shorturl.at/aoMTU
Lori
Fri, 03/05/2021 - 09:47
square table plans?
Ana,
Would you consider making square table plans? I want to make four chairs for outdoors and place them around this same type x table. I think in addition to being square, it would also need to be a little wider. I'm new to building and don't trust my conversion skills! Thanks so much. I love all the plans you prepare and share so freely.
briankelly1986
Sun, 08/01/2021 - 06:21
Wood type?
Hi Ana
This is great!
Could you tell me what type of wood you used for your this project please?
Many thanks
Brian
dvv
Sat, 10/16/2021 - 21:45
Beginners beware
A few thoughts from an actual beginner - maybe they'll help others too.
- The lumber from Home Depot was pretty rough. I spent more time sanding then planned.
- I struggled to get nice straight angles and tight fits when putting together the sides especially. This caused some gaps in the other areas as well (nothing too bad, but not as nice as I'd hoped).
- The screws were kind of a pain without pilot holes, especially when I needed my other hand to steady the wood... hard to keep straight when trying to get them to bite.
- The screw heads are narrow, so they sink in easily but it also prevents them from tightening the wood pieces together when there's a gap (I was really counting on the screws closing some of my messy gaps, see earlier).
- I had no idea how to cut a 52 degree angle (my miter saw only goes to 45/50). Had to look up a video on a workaround.
ChantelleBradley
Sat, 10/30/2021 - 04:48
Using preserved pine
I am busy building this now. Cheapest wood I could get that is close enough to the same measurements in South Africa was pine. Used my table saw to cut them into 2x4 etc. We don't have the same sizes wood here. Just treated the wood pieces individually with outdoor wood preservative. Going to stain it tomorrow then put it together.
lainie
Fri, 12/17/2021 - 10:53
Coffee table bench sized
I just love this coffee table! I think it would make a very cute entry way bench. Would you possibly have plans for a bench 3ish feet long?