

How to build an outhouse free plans
Hi everyone! Hope you are doing well!
We've been so busy working on the tiny house, running Grace to sports and school and all the other stuff that keep mom's (and dad's so busy), it's been hard to keep up. Spring time is always a busy time, isn't it?
Many of you have been asking about the bathroom (or rather lack of one) in our tiny house build. So today I thought I'd do two things - answer what we will be doing for bathroom facilities and why, and then share with you the plans for our cabin's bathroom.
In Alaska, we've got quite the challenge to creating a functioning bathroom while living off grid.
- First there is climate. Composting toilets need to be 55F degrees or warmer to do their thing. In a warmer climate, you would just have consistent heat to the building, but in Alaska, where it is so cold and heat is so expensive, this isn't always reasonable. Or possible - in our second home cabin, we just have a wood stove and only keep heat in the cabin when we are present.
- So if we can't do a composting toilet, what about just putting in a sewer system? We've definitely considered this option, but there's two big issues. At our cabin, there is no access for heavy equipment, so could not excavate out a sewer system. And even if we did, we'd again have to add consistent heat to the cabin to keep water lines from freezing up or drain the water lines every single time we left our cabin.
- What about incinerating toilets? This option would probably work, but it would require us hauling fuel for the incinerating toilet, and everything we've read is they are loud and create odors outdoors. We felt like this would take away from the experience of escaping to our cabin in remote Alaska.
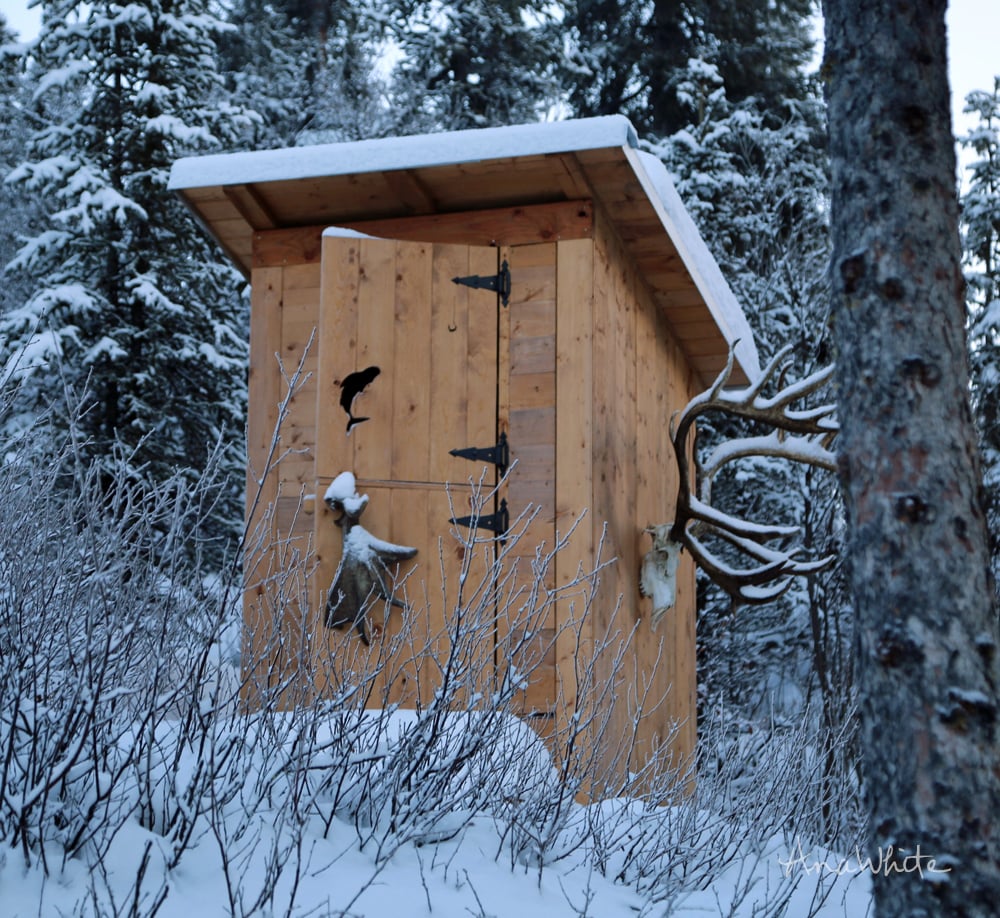
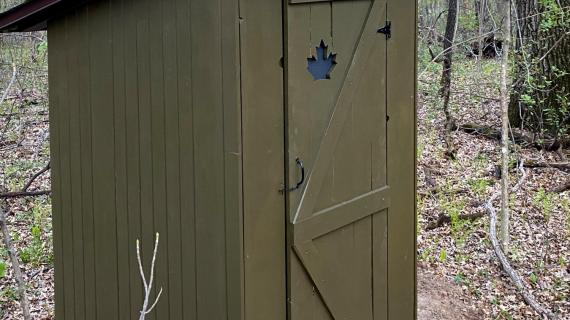
In Alaska, what most people do is dig a big hole in the ground, build a small shed type building over it, add a vent, and cut a moon shape out in the door.
And that's what we did.

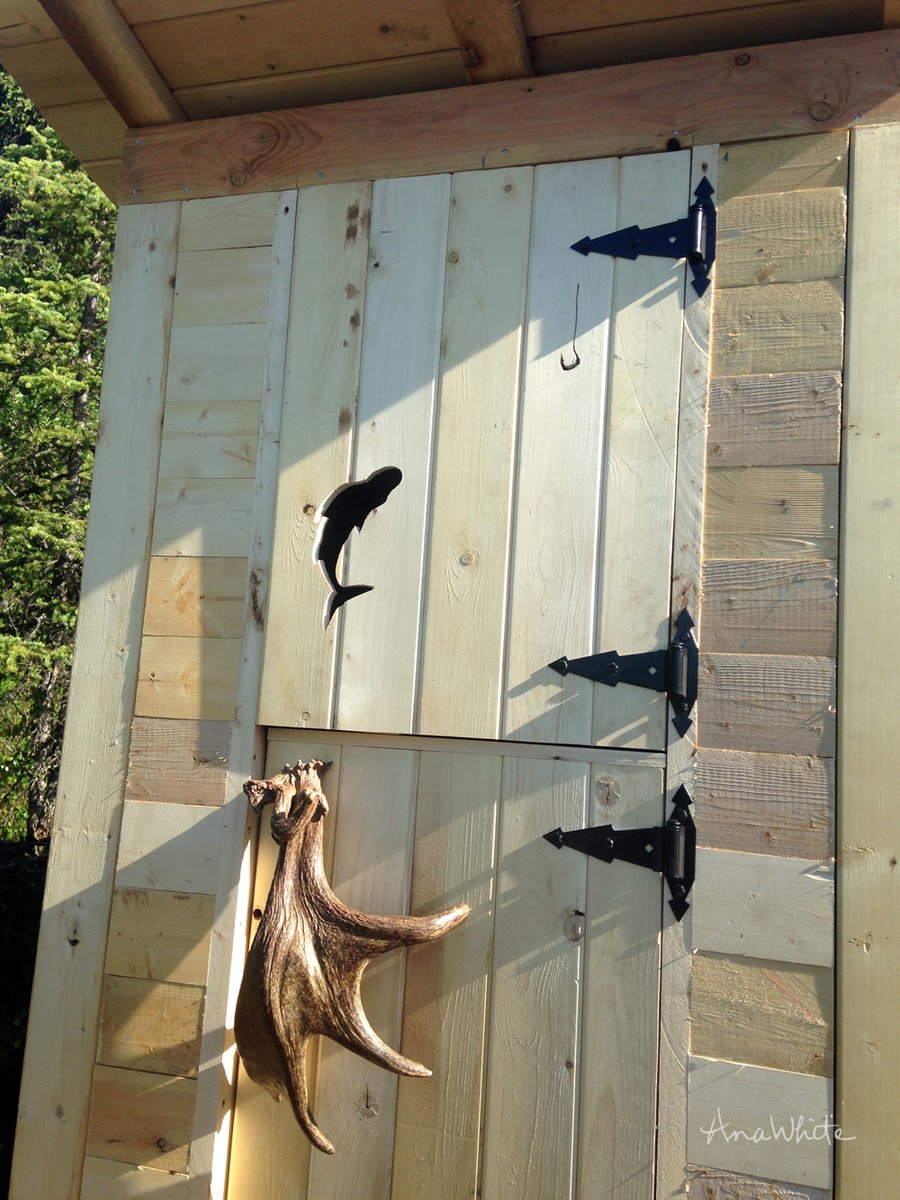
Well, technically, we cut a jumping fish and a hook out in the door.
Maybe it's because I'm from Alaska, where you just accept if you want to be outdoors, you have to be okay with a toilet that doesn't flush. Maybe I'm just weird. But I've actually never minded using the outhouse. If built right and vented, it does not smell and is easy to keep clean.

Let me take that back - when the temperatures get below -20F, that toilet seat can get pretty cold.
And then there's the times when you know a bear in roaming the area, and you've got to use the bathroom in the middle of the night.
But other than that, can't complain.

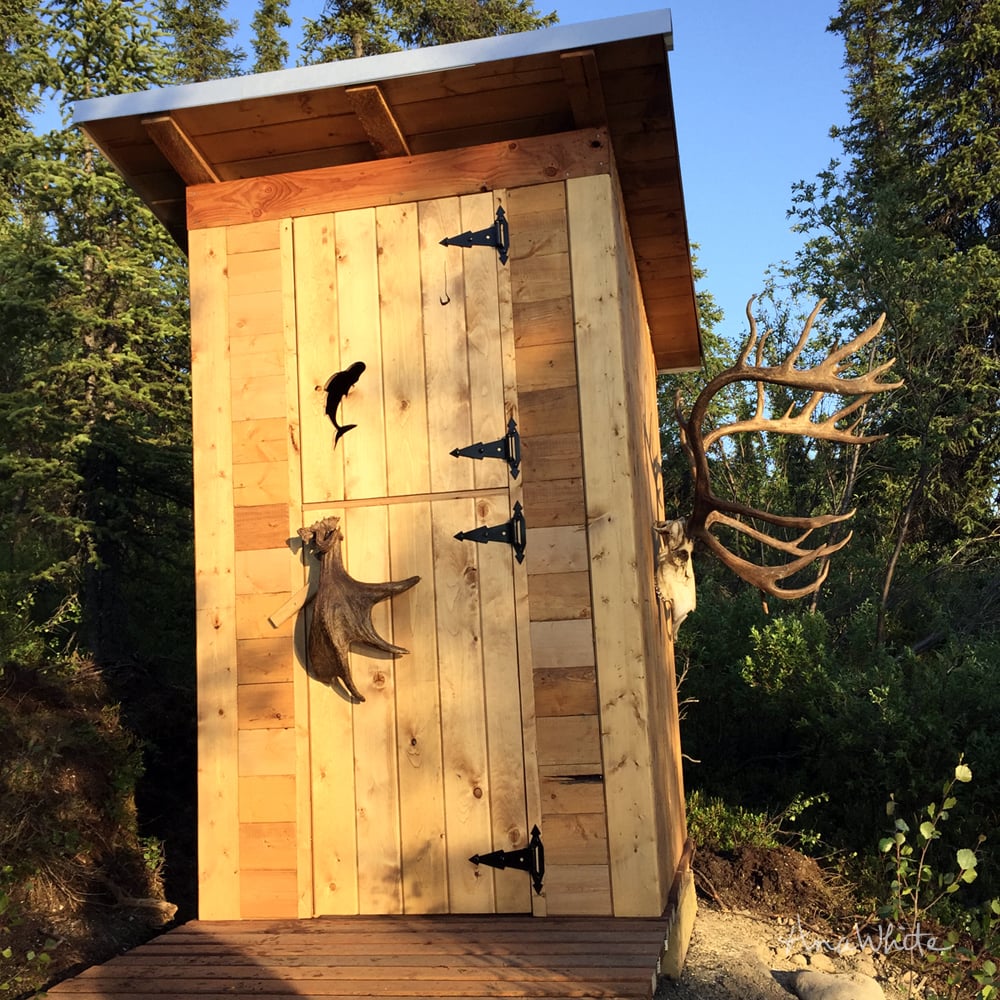
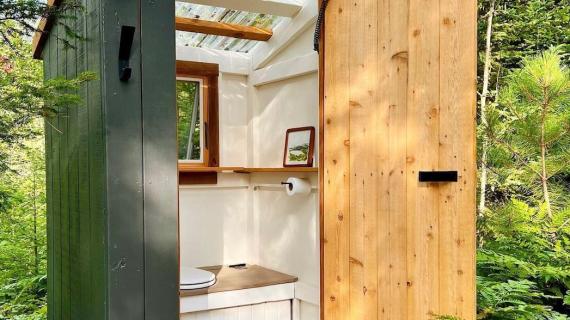
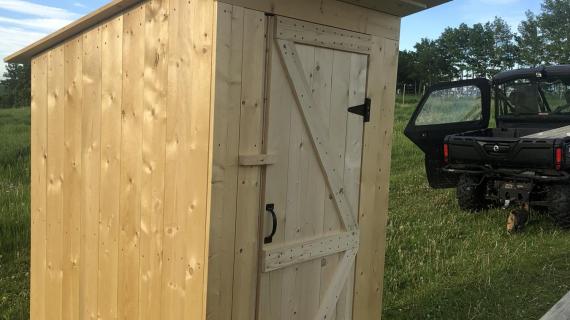
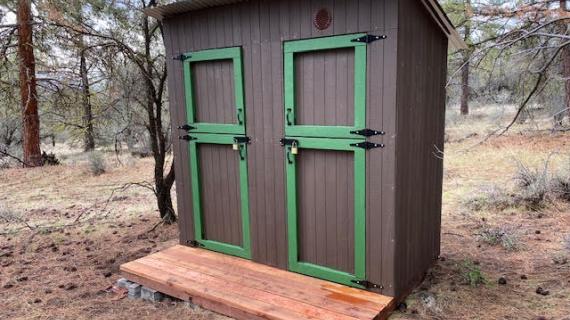
For our cabin outhouse, we used up scrap tongue and groove boards that were leftover from the wood ceiling and the loft floor. Of course, you can modify this plan to use plywood (might I suggest t1-11?).

For the door, we used 1x6 tongue and groove leftover from the wall planking to keep the door light, with the cross bracing inside.
We've built many other outhouses in the past, but this one if by far my favorite. Maybe it's the found antlers as a handle and coat hooks on the side. Or the tonuge and groove planking making it so pretty.
A few things I think we did on this outhouse that really helped design wise are
- The deck is big enough to stand on while opening the door. I know this sounds silly, but it just makes the whole experience easier and better to not be opening an door and stepping up into the outhouse. The larger deck also keeps weight away from the actual hole in the ground, preventing erosion. (If your soil is unstable make sure you do somthing to keep the hole from eroding in).
- The deck is slatted, keeping the floor clean. This seams like such a simple thing, but having the deck style floor really helps keep the floor clean. And if the outhouse looks clean, it is such a more pleasant experience.
- We actually put a large barrel in the bottom of the outhouse. This is to keep water out of the hole. The outhouse will compost in the summer months, but eventually will need to be pumped out. There is a company that does do this remote, so every few years, along with other cabin owners in the area, we will have the tank pumped. In drier soil conditions, you would simply dig another hole, move the outhouse, and fill the first hole in (no tank) and allow it to compost back to nature. Keep in mind, this is remote Alaska, where population is much less condensed.
- I made this outhouse roomy, so it is not cramped space to be in. There's plenty of room inside, and you never feel cramed or claustrophobic.
So what do you think? Would you build an outhouse? Our plans are following, check them out!
XO Ana
PS - If you missed our Cabin show on DIY Network, it airs again next Tuesday (March 1).
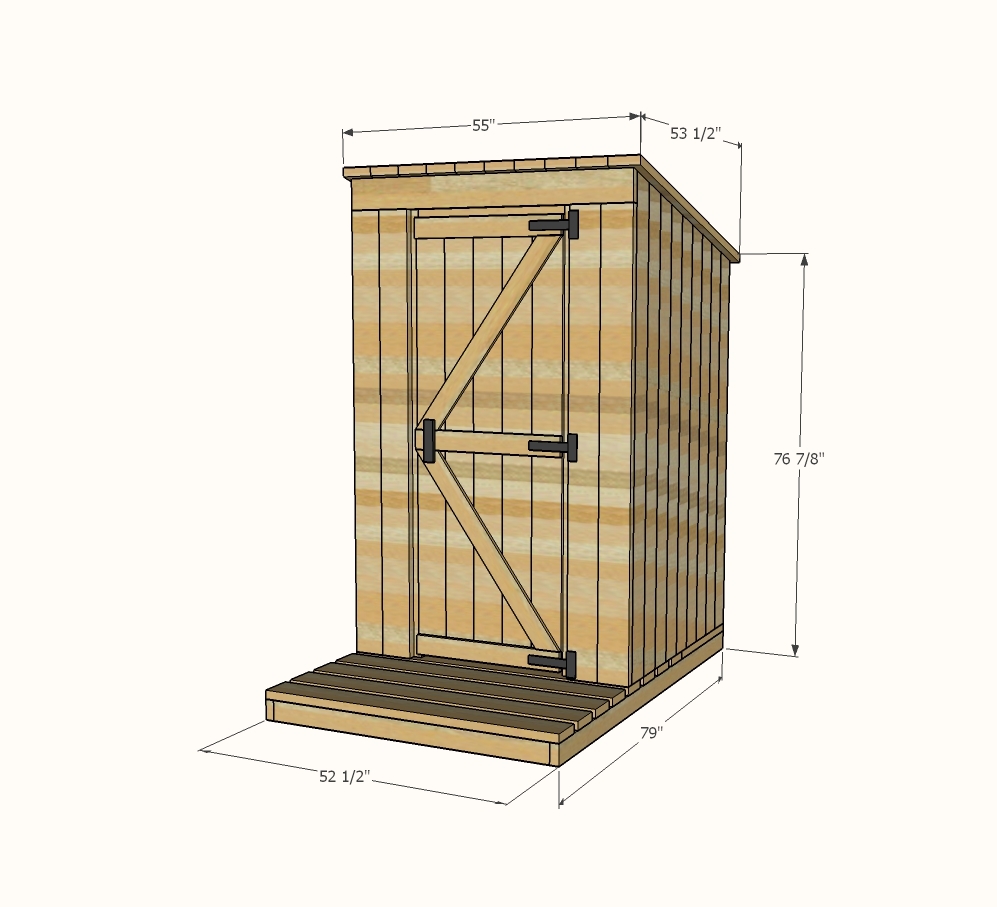
Preparation
DECK
2 - 2x4 @ 79"
3 - 2x4 @ 49-1/2"
2 - 2x4 @ 51-1/2"
8 - 2x6 @ 52-1/2"
2 - 2x4 @ 24-1/2"
1 - 2x2 @ 45-1/2"
SIDE WALL FRAMING
2 - 2x4 @ 84" long point measurement, one end cut at 15 degrees off square
2 - 2x4 @ 72-1/8" long point measurement, one end cut at 15 degrees off square
2 - 2x6 @ 42-1/2" - long point to short point both ends cut at 15 degrees off square, ends parallel
8 - 2x4 @ 41"
2 - 2x2 @ 9-1/2"
TIE IN FRAMING
2 - 2x6 @ 46-1/2"
6 - 2x4 @ 46-1/2"
2 - 2x4 @ 6-1/2" (small pieces on door framing at floor)
2 - 2x4 @ 78-7/8"
3/4" plywood @ 26" x 49-1/2" (seat area cover)
DOOR FRONT
1 - 2x6 @ 52-1/2"
4 - 2x6 @ 78-7/8"
2 - 2x2 @ 78-7/8"
1 - 2x2 @ 27-1/2"
DOOR (Suggested)
5 - 1x6 @ 78"
3 - 1x4 @ 27-1/2"
Cross support cut to fit
NOT LISTED - SIDING


Instructions
Step 1
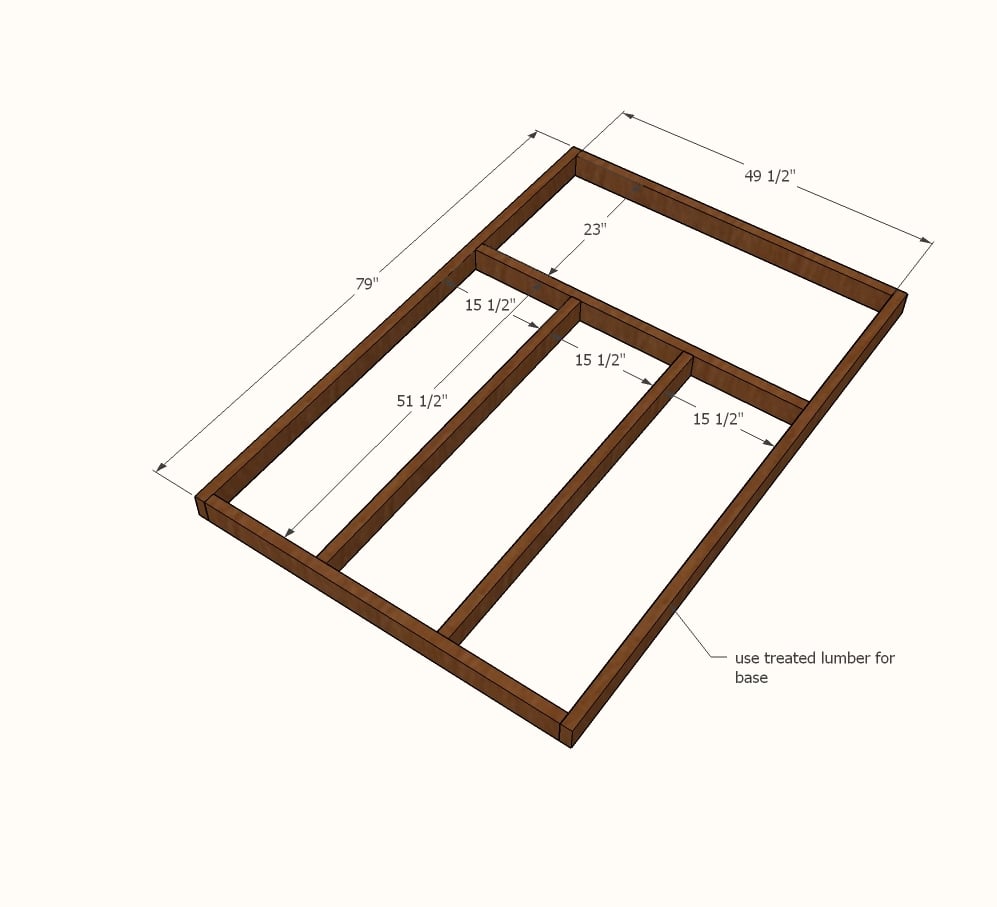
Frame the floor using either 3" exterior self tapping wood screws, or use a Kreg Jig set for 1-1/2" thick wood, with 2-1/2" long pocket hole screws. Adjust the frame for square. You may need to further support the floor with beams, depending on how the outhouse hole is excavated and the soil.
Step 2
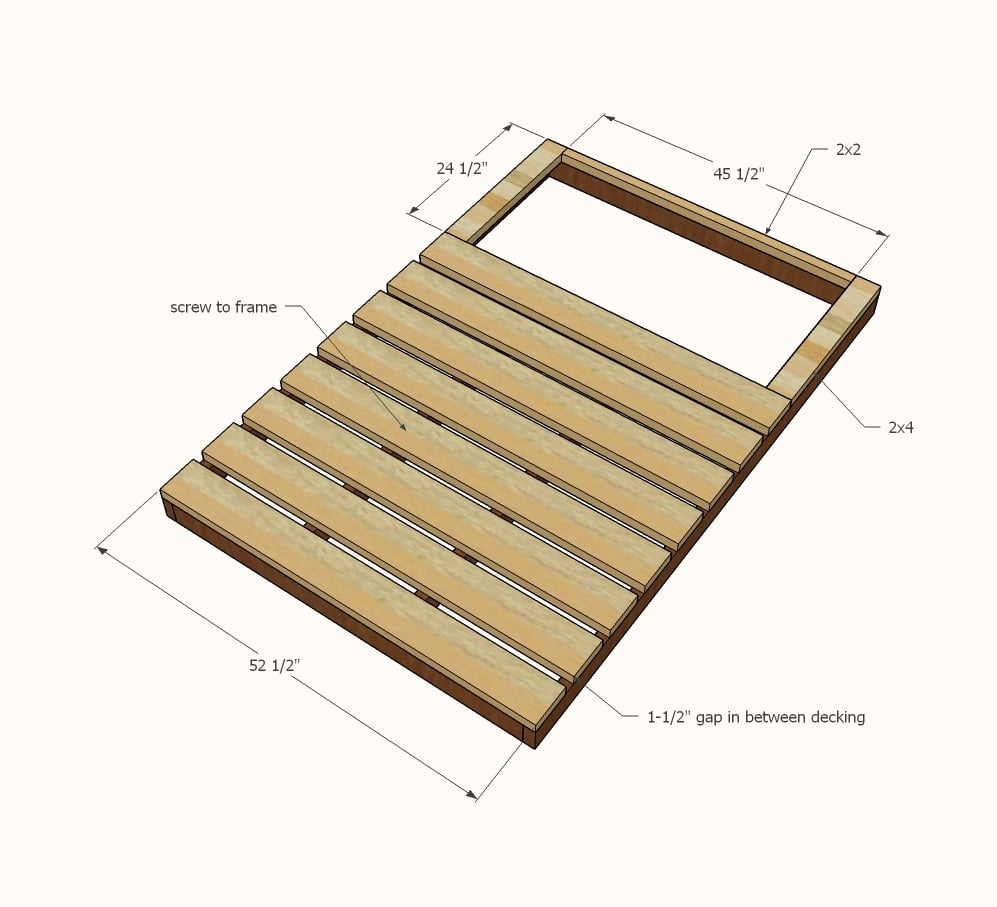
Add decking on top with 2-1/2" screws and glue. Once the deck is done, move to final position and level.
Step 3
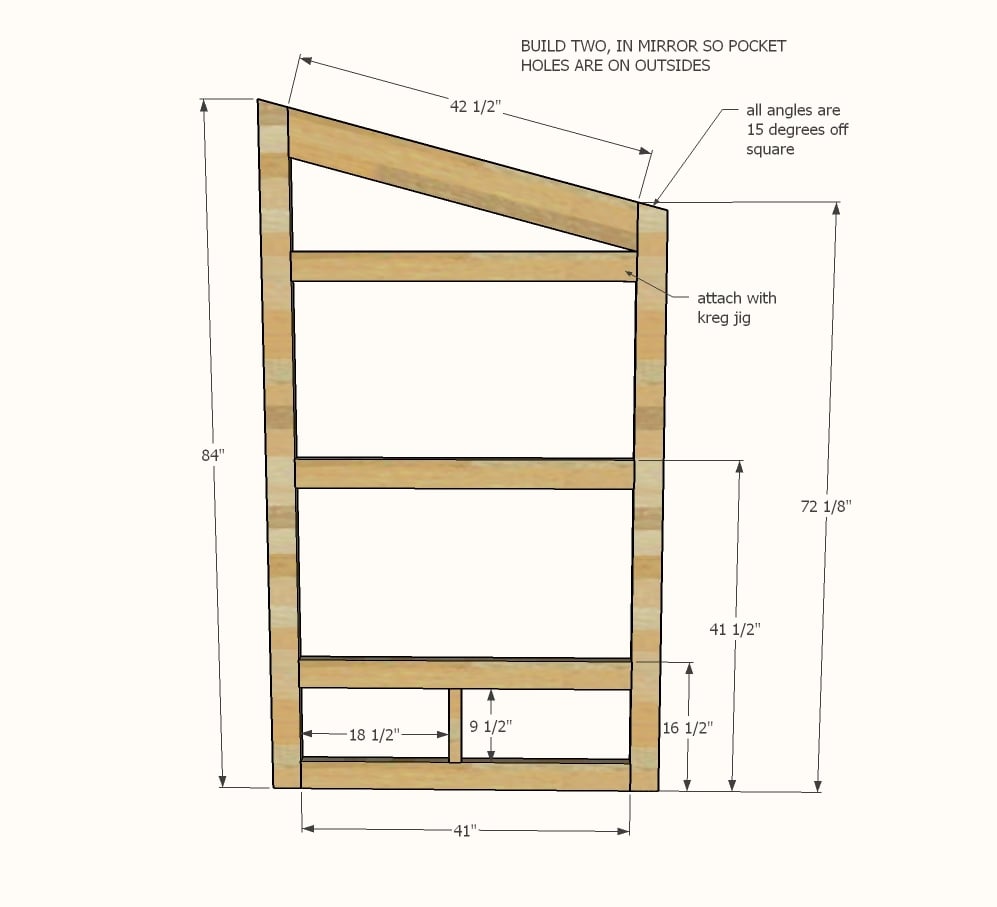
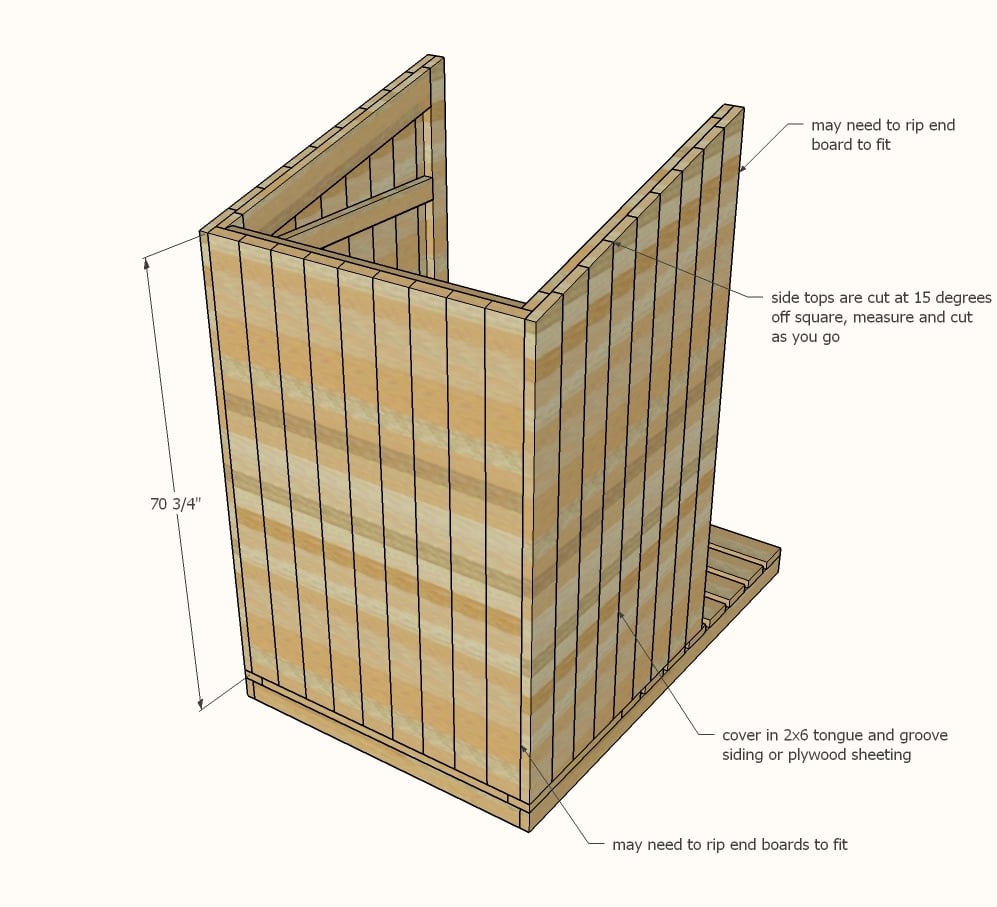
Build the two side walls with Kreg Jig, 1-1/2" setting and 2-1/2" pocket hole screws. Remember to build so the pocket holes are placed on the outsides to be hidden in later steps with siding. TIP: Drill 1-1/2" pocket holes facing downward on bottom boards for attaching to deck in next step.
Step 4
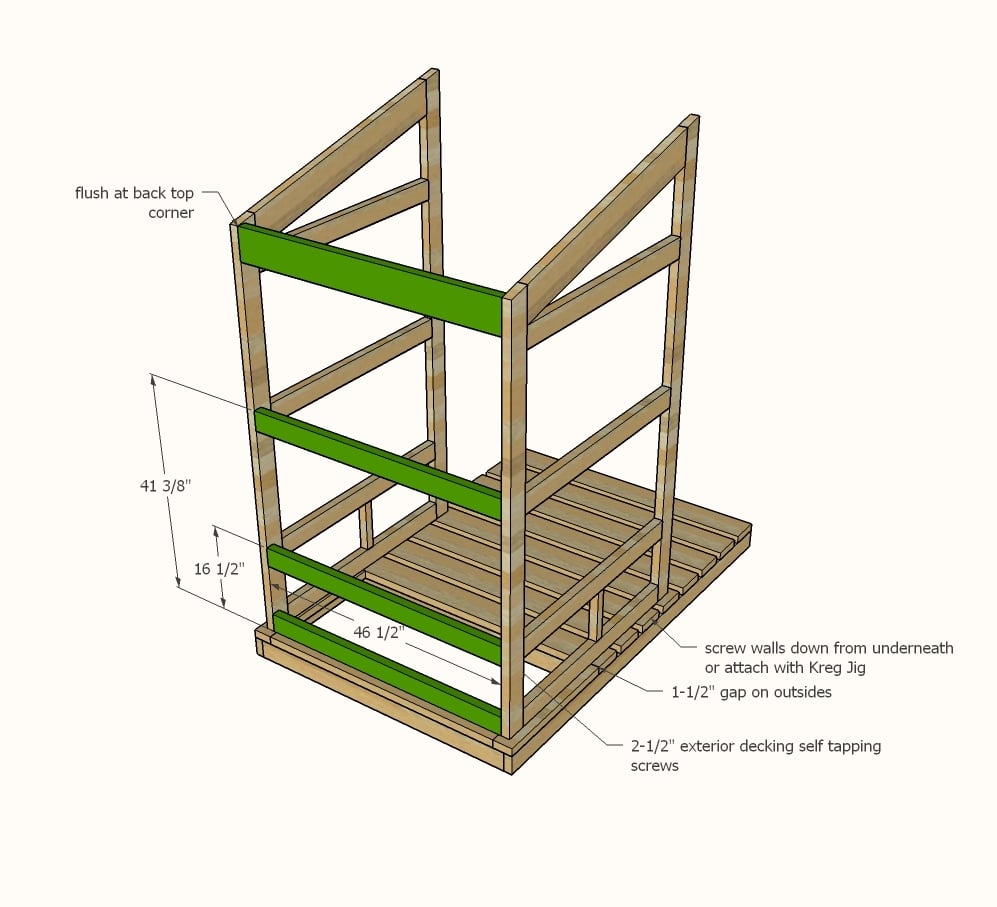
TIP: Drill 1-1/2" pocket holes along back edge of bottom board for attaching to deck. With all pocket holes on outside, attach the two side walls together with 3" wood screws. Adjust for square and attach to floor.
Step 5
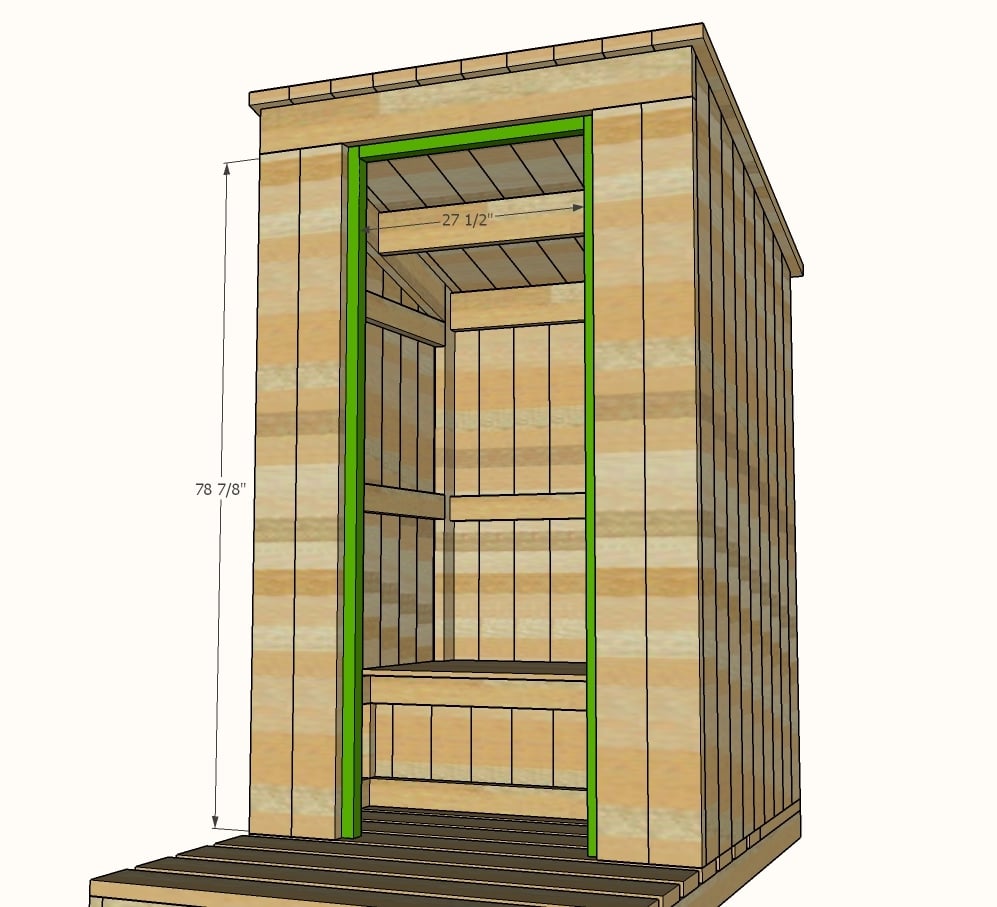
Step 6
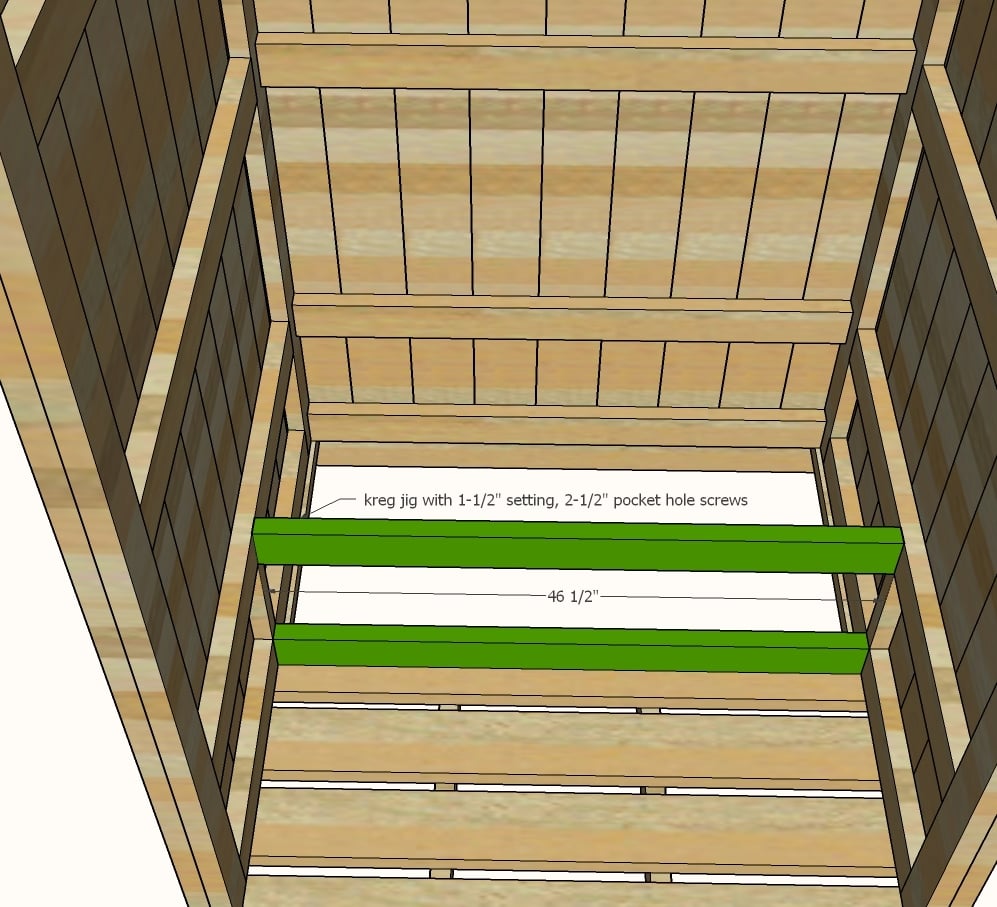
Drill 1-1/2" pocket holes on each end of the interior seat support boards. Attach to sides with 2-1/2" pocket hole screws and glue.
Step 7
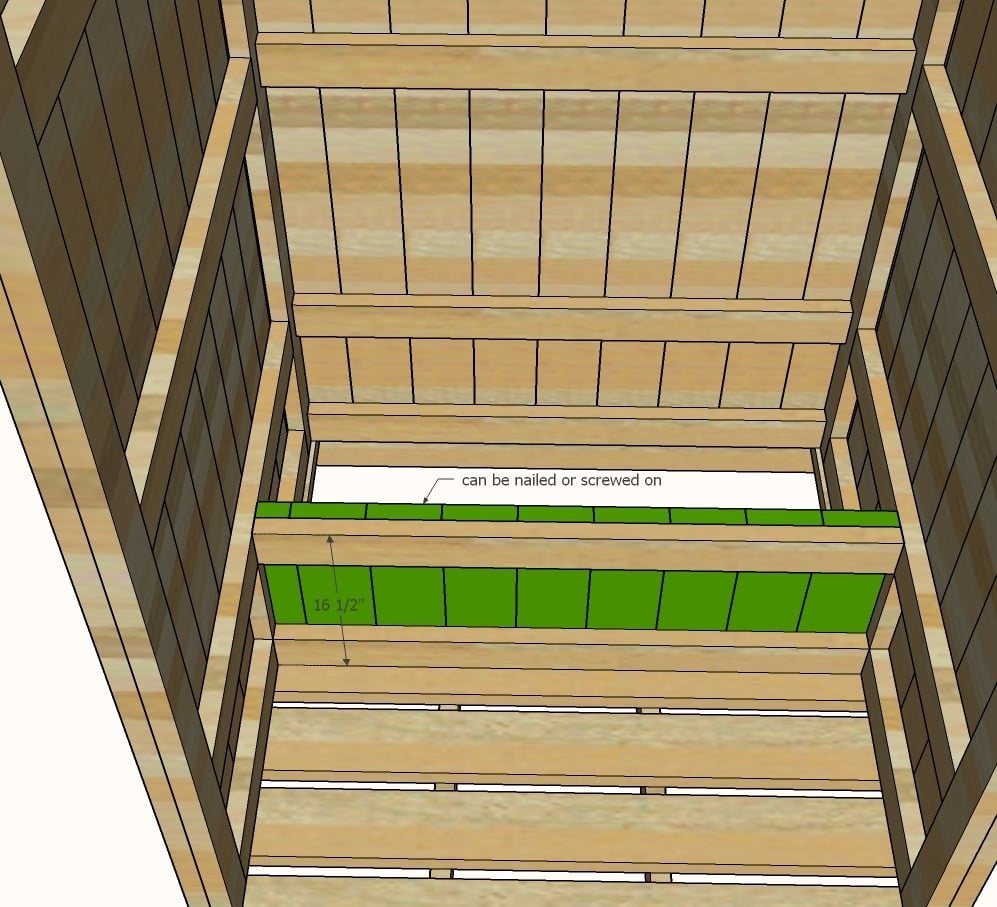
Use scrap 2x material to fill in area in front of seat. Screw or nail on.
Step 8
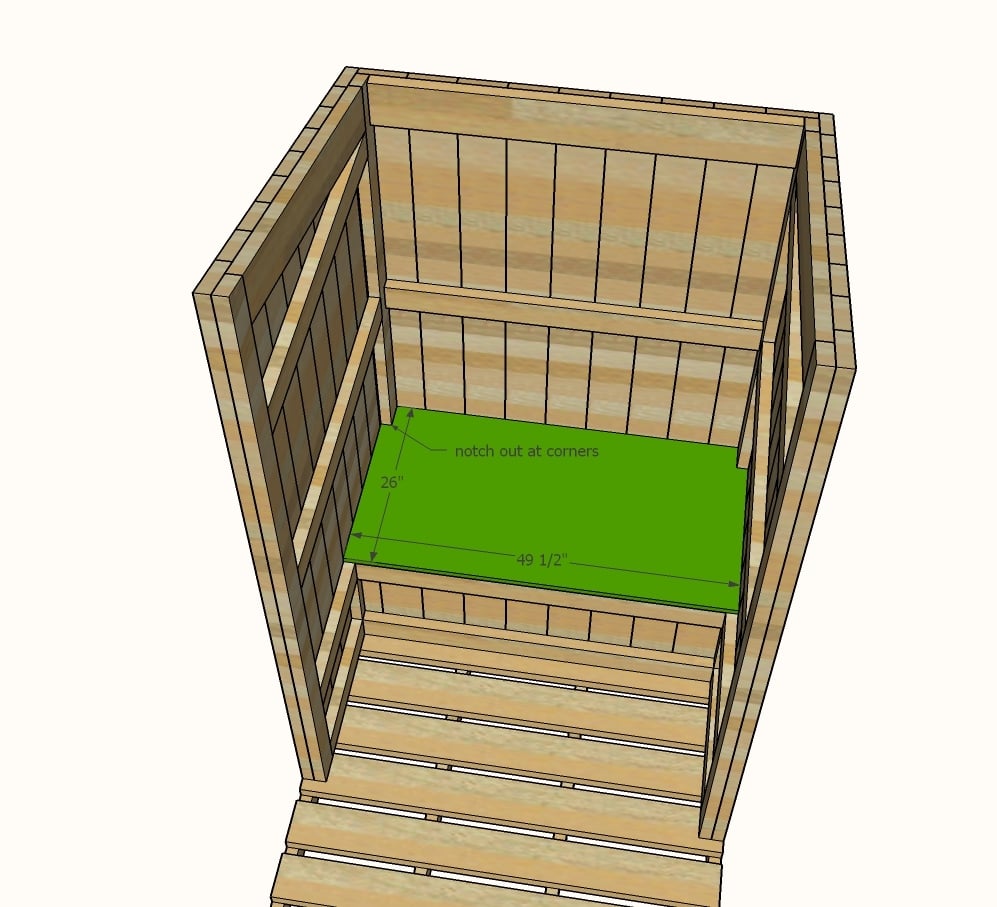
Cut 3/4" plywood to fit. Screw to seat framing. Do not use glue so is removable if necessary.
Step 9

Attach remaining framing for supporting the front siding.
Step 10
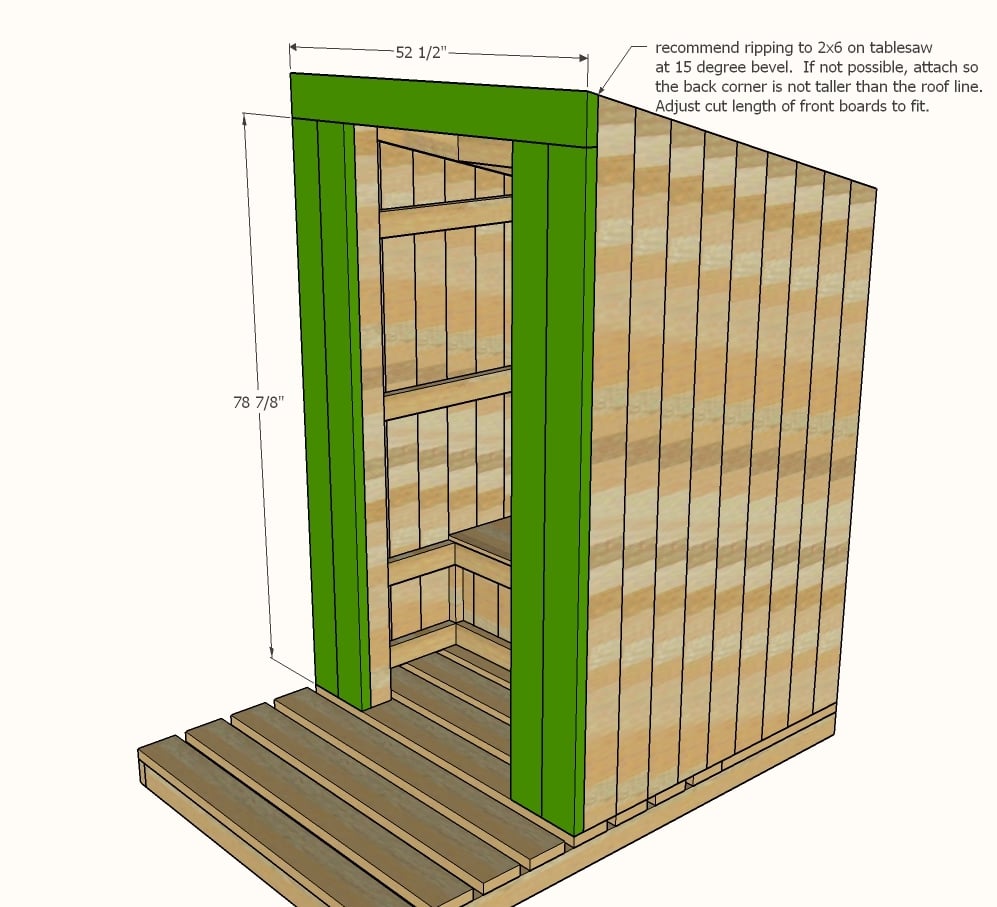
Add the front siding pieces or 2x6s (as shown in cut list).
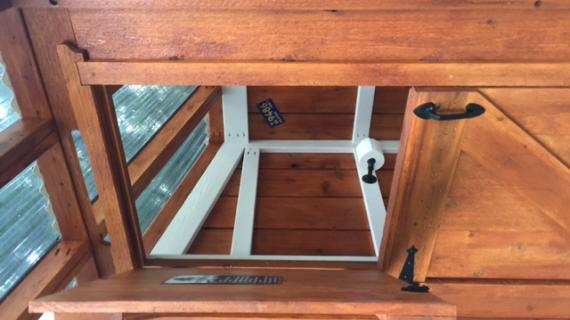
Step 11
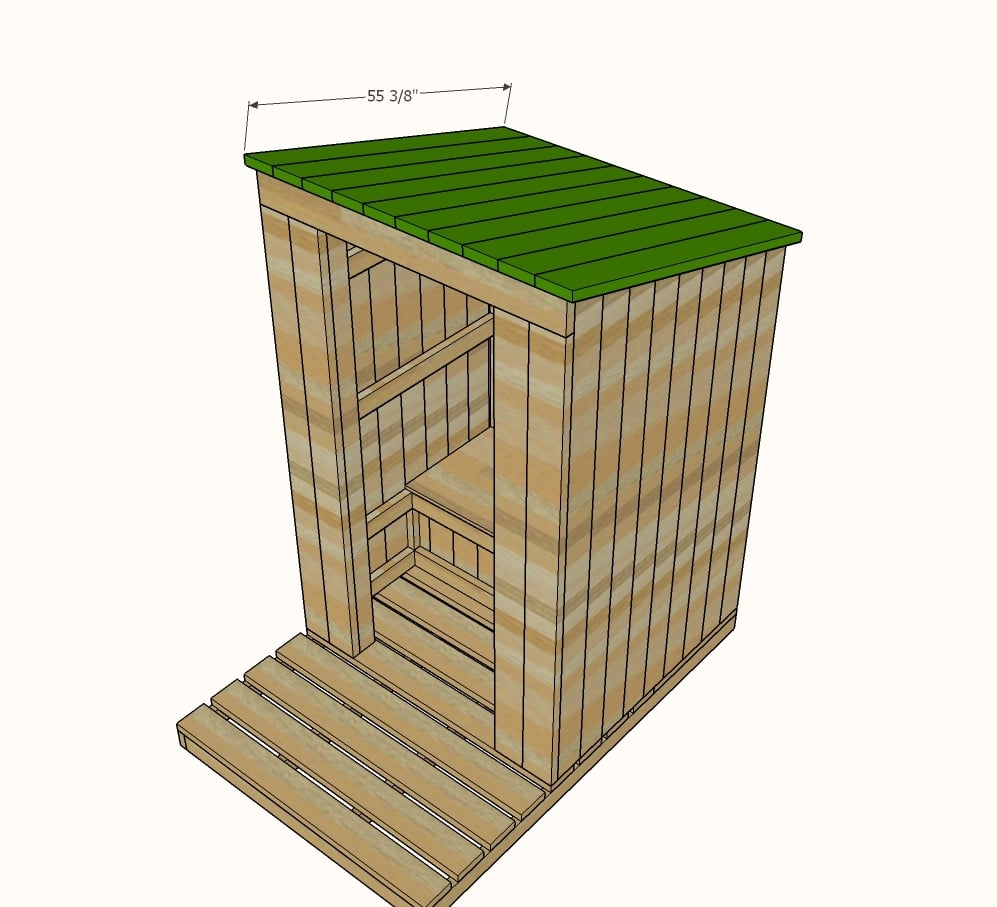
Plywood or 2x6 tongue and groove boards can be used for the roofing. Attach to rafters and side walls and all support boards.
Step 12
Add the 2x2 door stop to give the door something to stop on.
Step 13
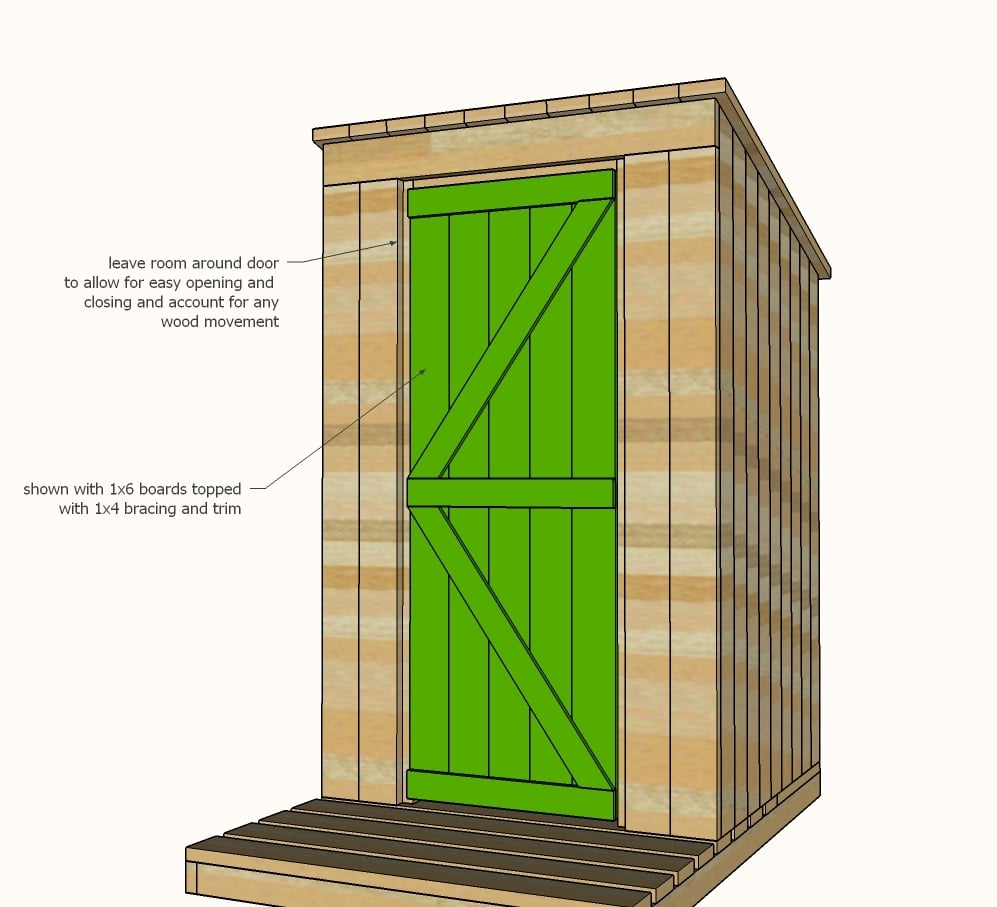
Build the door and hang inside the opening. Make sure there is a gap at the bottom for easy opening and closing.


Comments
Pam the Goatherd
Mon, 02/29/2016 - 17:01
YES!YES!YES!We have talked
YES!YES!YES!
We have talked about building an outhouse on our property for years. Even had our kids dig the hole at one point (when they are teenagers. Now they are in their late 20s and early 30s). But the hole collapsed and now trees have grown up in that spot because we never got around to actually building the little building. We plan on putting in treated posts and building a box to stabilize the walls of the hole. These plans of yours will definitely come in handy. Thanks again, Ana!
thetinyhouse
Fri, 07/15/2016 - 07:42
materials list?
Ana- I love these plans! I'm going to build one and modify it to be a bucket-style toilet rather than a pit. I was curious if you have a materials list? I love the cut list but for the purposes of heading to the lumber yard it would be awesome if you included a materials list!
Speedbump
Sat, 05/16/2020 - 09:18
By my calculations, the…
By my calculations, the material needed (not including siding) as follows (all 8 ft lengths):
Treated lumber: 7 - 2x4’s
Untreated lumber:
3 - 2x2’s
13 - 2x4’s
14 - 2x6’s
5 - 1x6’s
1 - 1x4
Winterguy
Tue, 10/29/2019 - 06:56
I built this outhouse. I was…
I built this outhouse. I was in a rushed and felt that I didn't have time to think. Just needed something to print and follow. Do not use plywood, use the tongue and groove for roof and exterior.
Step 5: A sheet of exterior siding is 48 x 96. Same dimensions are used for plywood for a roof. I had various areas of this build that was at 51" or 52" wide....which adds up to having to purchase another sheet of material for this build. Also, structural support for snow load for plywood is not appropriate. None of the ridge headers are supported by a stud, underneath them. So, I'm questioning if it can hold 3-4' of snow.
The 2 x 6 tongue and groove for exterior, would be more appropriate for snow load.
CH
Mon, 01/13/2020 - 15:30
OUTHOUSE MISSING PARTS
THANKS FOR THE PLANS. LOOKS GREAT - BUT - CAN YOU ELUCIDATAE HOW/WHAT YOU PLACED IN THE HOLE OR DIMENSIONS OF HOLE SO IT CAN BE PUMPED OUT? HOW FREQUENTLY TO DO SO? WHAT MATERIALS FOR THE AREA THAT HOLDS THE 'DEPOSITS' :) THANK YOU! CH
CH
Mon, 01/13/2020 - 15:30
OUTHOUSE MISSING PARTS
THANKS FOR THE PLANS. LOOKS GREAT - BUT - CAN YOU ELUCIDATAE HOW/WHAT YOU PLACED IN THE HOLE OR DIMENSIONS OF HOLE SO IT CAN BE PUMPED OUT? HOW FREQUENTLY TO DO SO? WHAT MATERIALS FOR THE AREA THAT HOLDS THE 'DEPOSITS' :) THANK YOU! CH