
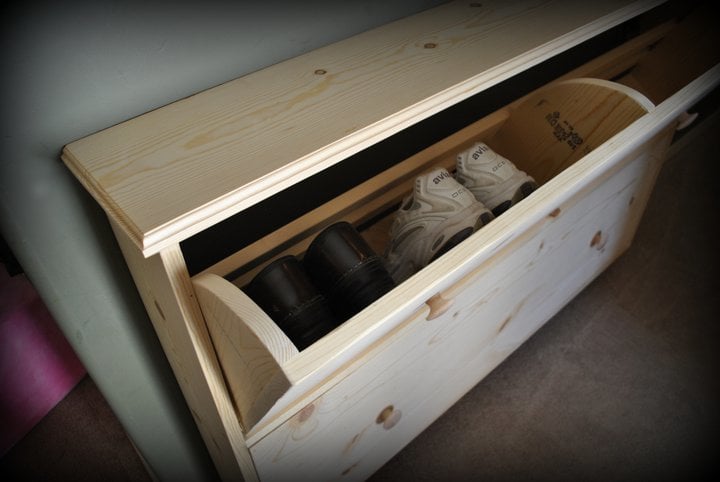

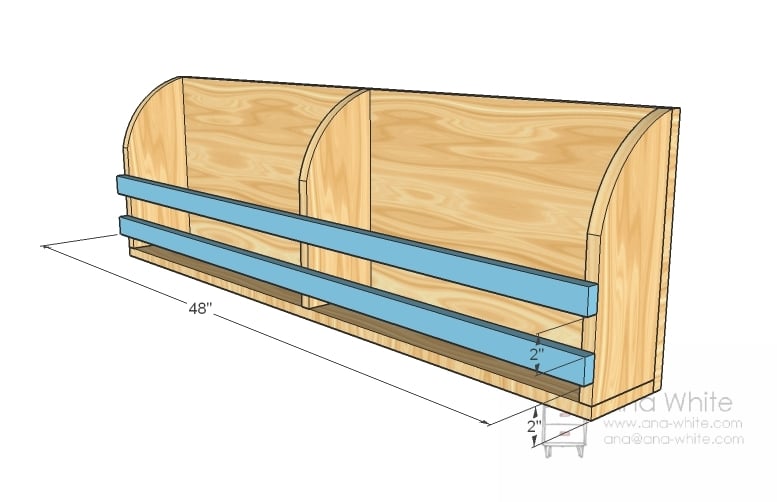
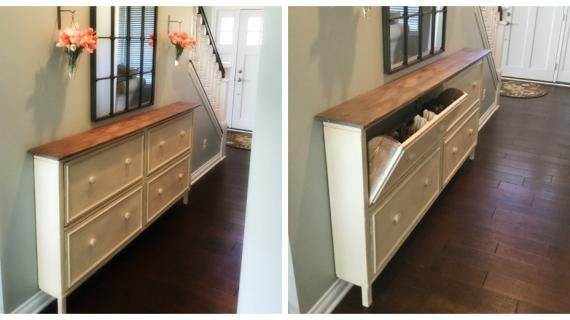
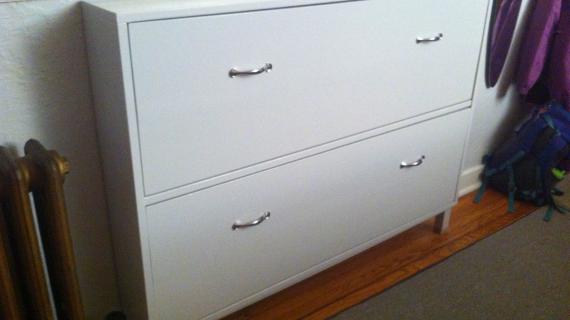
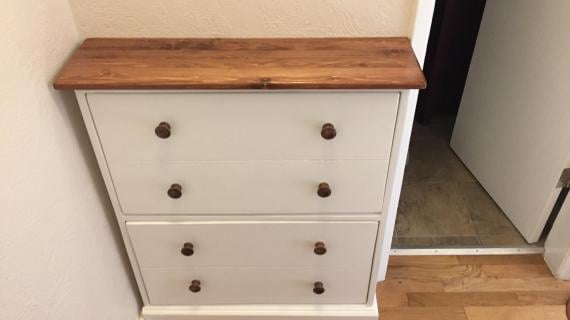
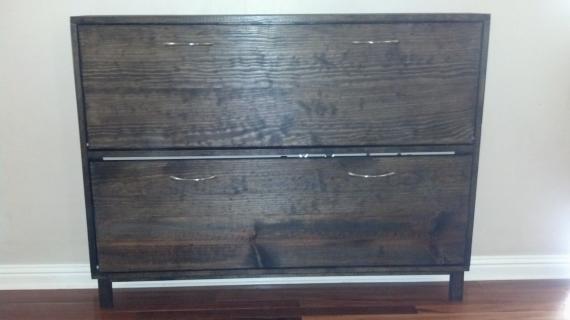
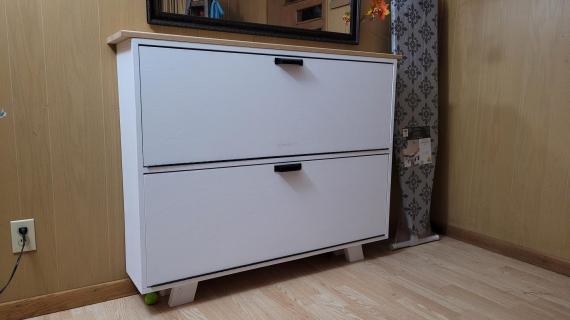
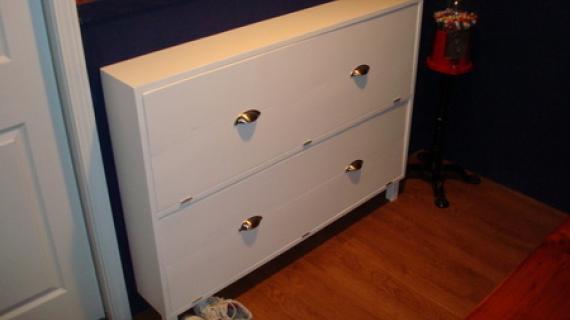
A narrow tilt out shoe storage unit that looks like a console table, acts like an entire shoe closet! Special thanks to Niki for sharing her photo.
Preparation
- 4 – 1×8, 8 foot length
- 2 – 1×6, 8 foot length
- scrap 2x2s for the feet
- 3 – 1×2, 8 foot length
- 4 – 3/8″ wood dowel pins, 1 1/2″ long or two sets of traditional hinges
- 2″ screws or 1 1/4″ pocket hole screws
- 1 1/4″ self tapping screws
- 2″ brad nails
- wood glue
- 4 magnetic cabinet clasps
- knobs or pulls
- A used fabric belt or strap
- Finishing Supplies
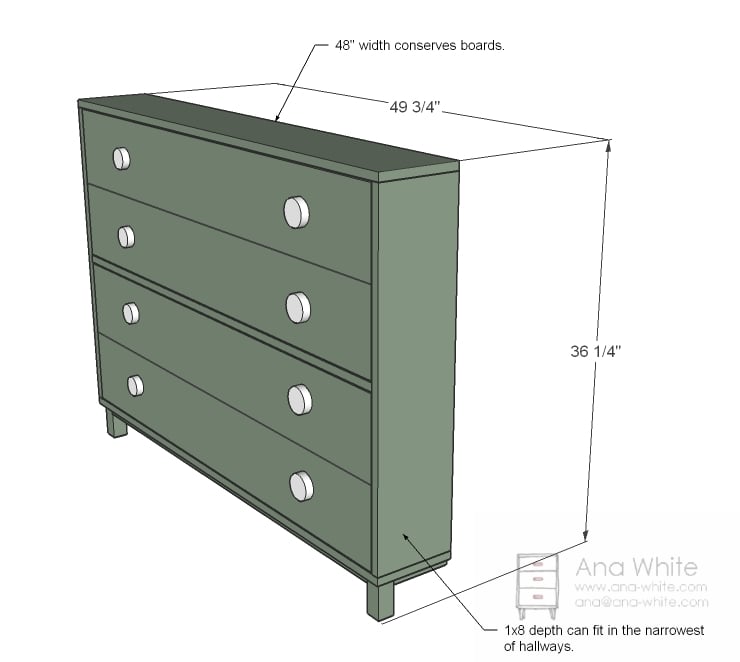
- 4 – 1x8s @ 47″ Door Faces (measurements differ from diagrams to conserve boards)
- 1 – 1×8 @ 47 1/4″ Middle Shelf (measurements differ from diagram to conserve boards)
- 2 – 1x8s @ 48 3/4″ (Top and Bottom (measurements differ from diagram to conserve boards)
- 2 – 1x8s @ APPROXIMATELY 31″ (See step 2) Sides
- 2 – 1×6 @ 47″ (Bin Bottom) (measurement differs from diagram to conserve boards)
- 6 – 1×6 @ 14″ (Approximate)
- 4 – 1×2 @ 47″ (Bin Backs)
- 1 – 1×2 @ 47 1/4″ (Cleat)
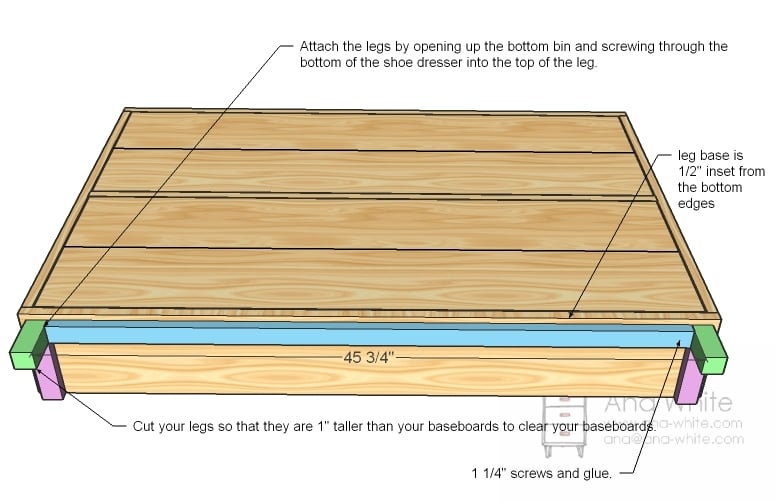
- 2 - 2×2 @ Your Base Board + 1″ (Legs)
- 1 – 1×2 @ 44 3/4″ (Front Apron)
- 2 – 1×2 @ 5″ (Side Aprons)


I have marked this one Advanced not because it is difficult to build, but because it could be easy to mess up. Please don’t tackle this as a first project.
Instructions
Step 1
Door Faces
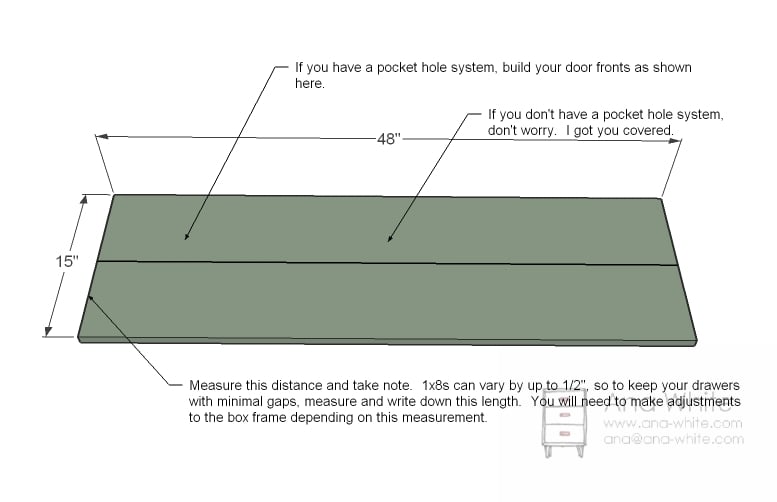
Cut your door faces. If you have a Kreg Jig™, attach door faces to make two doors. If not, that’s okay, I got you covered in the next step. Measure the overall height of the doors and take note of this. 1x8s differ from mill to mill, so be aware and build according to your board widths.
Step 2
Bins
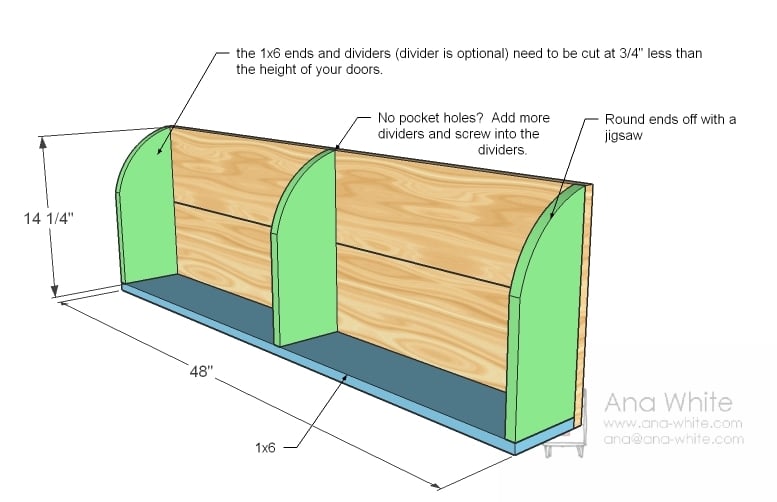
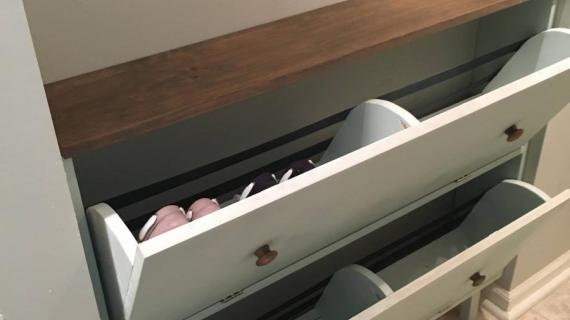
Start by attaching the 1×6 to the bottom of the doors as shown above with 2″ screws or pocket hole screws. Use glue. Then cut your bin dividers according to the height of your doors and round corners off. Attach in place. If you did not build your door faces in step 1, you can use finish nails and glue to attach the door faces to the dividers. You can use more dividers to add more support for the door faces (and more division of your shoe storage).
Step 3
Bin Backs
You need something to keep the shoes from tipping out. How about a couple of 1x2s? Screw and glue in place.
Step 4
Box
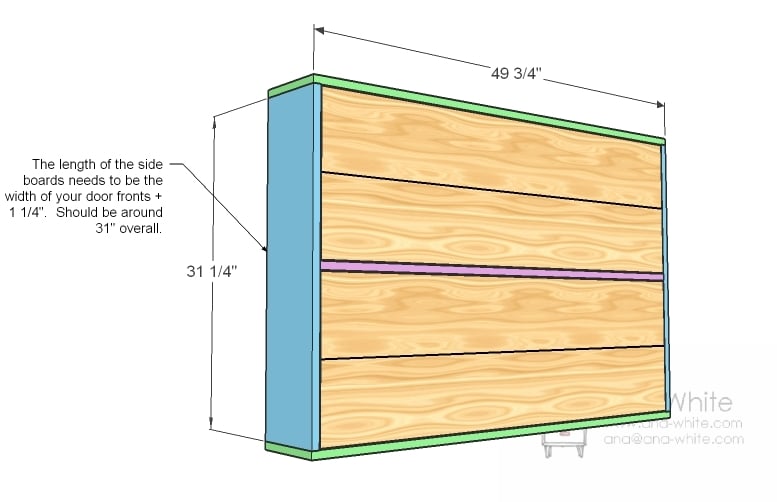
The box needs to be build around your bins, with a 1/8″ gap around the door faces. We’ve aleady accounted for the gaps on the sides of the doors, but not the top and bottom. As shown in the diagram, figure the exact measurement of the sides and cut. Build your box.
Step 5
Step 6
Dowels
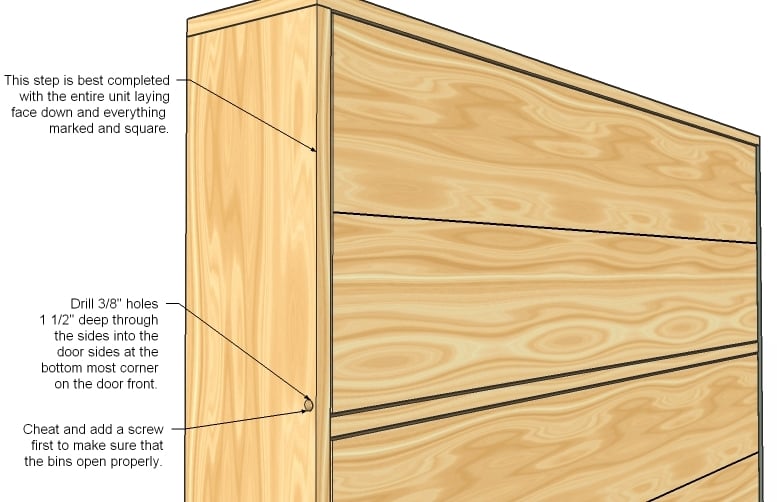
Now this is the tricky part. Not so much trick to do but trick for me to explain. Clamp the bins centered in their box, with a 1/8″ gap around all sides. If you don’t have clamps, 1 1/4″ screws could do the trick from the inside of the bins. Drill a 3/8″ hole at the bottommost front corner of your bins, careful to make sure the hole drills into the bins and does not miss the bins. The hole needs to be the depth of your wood dowels. Insert the dowels and test the bins out. Alternatively, you can use traditional hinges.
Step 7
Footer
Attach the footer to the bottom as shown above.
Step 8
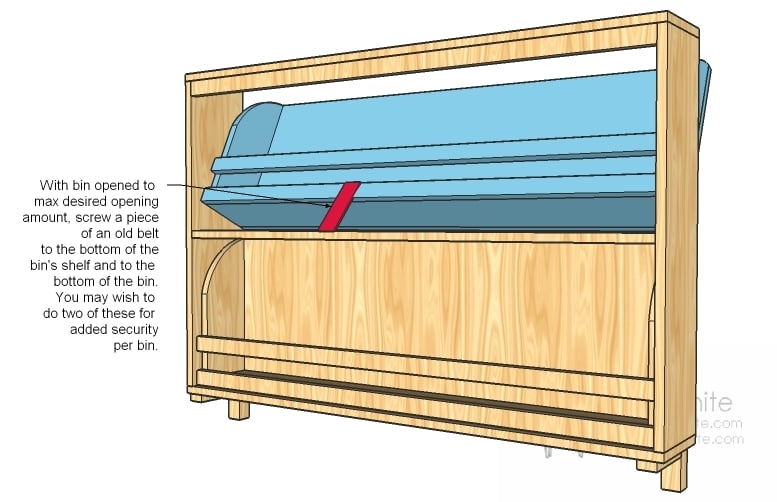
The Used Belt
Have someone give you a hand, because this one is tricky to handle here. There’s only two front legs and the bins keep flopping open . . . I know Tilt the bin out to the desired max opening. Cut a piece of the belt to and screw it to the bin and the shelf below the bin. Make two straps per bin.
Step 9
Assembly
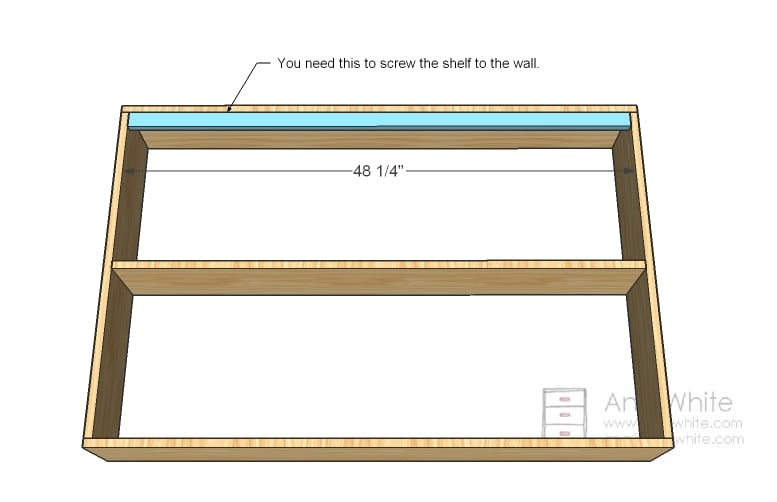
Keep the bins shut using the magnetic clasps. I used them on the sides for a nice tight fit. Screw the cleat to a stud in the wall behind the shoe dresser to keep it in place and to keep it from falling forward when the bins open.

Comments
liz @ bon temp… (not verified)
Wed, 01/05/2011 - 21:12
i LOVE this!! I was just
i LOVE this!! I was just looking at a similar (but not nearly as cute) shoe 'dresser' on IKEA's site today. Yours is way cuter!
Susan (not verified)
Wed, 01/05/2011 - 21:14
Anna White, you rock! I have
Anna White, you rock! I have always wanted one of these, but too cheap to buy one from Ikea LOL Now, I won't have to!
Mindy (not verified)
Wed, 01/05/2011 - 21:17
You've got to be kidding me.
You've got to be kidding me. I've been coveting this shoe dresser for two years. Now, it shall be mine.
Jen (not verified)
Wed, 01/05/2011 - 21:19
I love this! I have a CD/DVD
I love this! I have a CD/DVD organizer that works on the same principle and it is my favorite piece of furniture. I love that you found a way to make this work for shoes!
Mina (not verified)
Wed, 01/05/2011 - 21:19
love it!
love it!
Niki (not verified)
Wed, 01/05/2011 - 21:55
The pile of shoes in my
The pile of shoes in my laundry room will soon be GONE!
gugs (not verified)
Thu, 01/06/2011 - 00:14
Could you set the back legs
Could you set the back legs in 1/2-3/4 of an inch so the base boards won't interfere?
lynnp (not verified)
Thu, 01/06/2011 - 01:55
Another great project. I
Another great project. I swear you read minds. We all must be sending you psychic messages in our frustration and need. Lucky for us, we have you to lead the way! Awesome!
Carrie (not verified)
Thu, 01/06/2011 - 02:15
LOVE IT!
LOVE IT!
Maureen (not verified)
Thu, 01/06/2011 - 02:40
I have been wanting a shoe
I have been wanting a shoe dresser for three years! Almost broke down at Ikea last week and bought one for $100. Sooooooo glad I didn't! Everything on my to-do list is now pushed back; I'm making this this weekend!!! Even though I am not advanced, haha! Thank you Ana!!
Amy (not verified)
Thu, 01/06/2011 - 02:41
THANK YOU!!! The pile of
THANK YOU!!! The pile of shoes has been driving me crazy but didn't have enough room to store them. This will work perfect!!! You're an angel!
TRU @ TRU TALE… (not verified)
Thu, 01/06/2011 - 03:03
That is a fantastic way to
That is a fantastic way to hide shoes in the entry. They are always such an eyesore, aren't they?
Mary Anne (not verified)
Thu, 01/06/2011 - 03:05
Genius, Ana! This can be made
Genius, Ana! This can be made to look like a vintage dresser or console, and nobody would know! Faux apothecary drawer fronts would look awesome on this too. Love the tilt-out bins instead of just an open cavity.
Melissa (not verified)
Thu, 01/06/2011 - 03:08
Like everyone else I was just
Like everyone else I was just looking at the shoe dressing at Ikea. I need something in our narrow entry way and thought it would be great! Thanks for the plans!
Emily (not verified)
Thu, 01/06/2011 - 03:08
I think I neeeeeeeeeeed this.
I think I neeeeeeeeeeed this. With a literally MAN-made closet (super-long length, but just deep enough for hangers and narrower-than-standard door, and I rent, so I can't fix it or it would totally be worth knocking out some wall) I've had a cheap over-the-door rack to contain my enormous amount of shoes! But with that tiny space, it gets crammed and snags on the door while closing, and on clothes while opening. But MEANWHILE, I have plenty of wallspace! If I can rig this to where I can add a bookshelf to the top and it not fall over... I always need space for more books! THANK YOU ANA!
Jillian Mitchell (not verified)
Thu, 01/06/2011 - 03:20
I love this! How is it that I
I love this! How is it that I had no knowledge of a shoe dresser? I'm shocked and I love it!! Thank you
JuliaSays (not verified)
Thu, 01/06/2011 - 03:29
I, too, have been coveting
I, too, have been coveting the shoe dresser at Ikea. I am not ready to build this yet (need a little more practice) but I love it and I WILL do it eventually!
Lynzie (not verified)
Thu, 01/06/2011 - 03:29
Is it just me, or is everyone
Is it just me, or is everyone seeing the same thing? I would LOVE to build this! But the plans I'm seeing have the right side cut off... Help!
Shellei (not verified)
Thu, 01/06/2011 - 03:51
This is so awesome. I'm
This is so awesome. I'm always getting on my kids to put their shoes in the front hall closet instead of taking them off where ever they happen to be. Although, I really do need something for boots- big, break- your- toe- when- you- trip- over- them- Army boots. Since my husband has been gone for the last 6 months, it hasn't been a big deal- since they all stayed where I put them after he left. But he'll be home soon and my toes are already in pain. I was going to make him grace's shelves and maybe put some doors on it. I have one cut up in my garage right now that I hope to be able to assemble this weekend.
Wendy (not verified)
Thu, 01/06/2011 - 03:58
I've had an Ikea shoe dresser
I've had an Ikea shoe dresser for a few years. The shoes have migrated a bit and I have an empty drawer. It works great for a filing station too!! Right there in the entry for mail and papers and such.
Amy S. (not verified)
Thu, 01/06/2011 - 04:15
I have loved so many of your
I have loved so many of your posts, but this one is something that I really need and not just want. So perfect for our narrow hallway in from the garage when we dump shoes. The nearest Ikea is 313 miles and you can't order the shoe cabinet online so I will build this one!!! Thanks so much.
KBerrie (not verified)
Thu, 01/06/2011 - 04:17
You got to stop it! Too many
You got to stop it! Too many things on my to-do list! ;-)
Betsy (not verified)
Thu, 01/06/2011 - 04:21
I LOVE IT! I hate how all the
I LOVE IT! I hate how all the shoes clutter up the entryway - can't wait to get started on this one!
KBerrie (not verified)
Thu, 01/06/2011 - 04:23
Definitely way cuter than
Definitely way cuter than IKEA's!
Heather (not verified)
Thu, 01/06/2011 - 04:41
I always know if I wait long
I always know if I wait long enough you will provide me with what i need. Call me lazy if you will. I too saw th Kiea shoe bins and have wanted them but didn't want to shell out money for something that may not fit. This is perfect and I can modify it to the new addition we are putting on!
Alison (not verified)
Thu, 01/06/2011 - 04:44
Holy freakin' cow! And I was
Holy freakin' cow! And I was just thinking that I really need to cut back on my shoes because I have no storage space. Anna, you're such an enabler!!! :)
Cori (not verified)
Thu, 01/06/2011 - 05:19
So I must ask, what lovely
So I must ask, what lovely color is that on that Ana? I love it, and I need it!
karin marie smith (not verified)
Thu, 01/06/2011 - 05:21
This is so clever! I saw
This is so clever! I saw something like this in the new Storage magazine but yours is mucho better because:
A)Cheaper!!
B)I can build one myself!
Now I'm excited we have tons of shoes & no place for them! I'd prolly have to make a smaller one due to our small house &less space.
Oh, also in storage magazine is the Pottery Barn Day bed but I was like HAHA! I can make one cheaper! I'm debating on which bed to make my 2 1/2 year old she likes space; to move around & the toddler bed isn't working. But we got a tiny room because she shares with her sister. I'm also gonna build the closet storage because a tiny room deff. needs more storage! Thanks so much for the plans! I look forward to your posts everyday!
Karin Marie:)
Aimee (not verified)
Thu, 01/06/2011 - 05:32
So exciting! I saw a
So exciting! I saw a similiar thing at Ikea but didn't want to pay what they were asking. This is a must do project for us! Thanks!
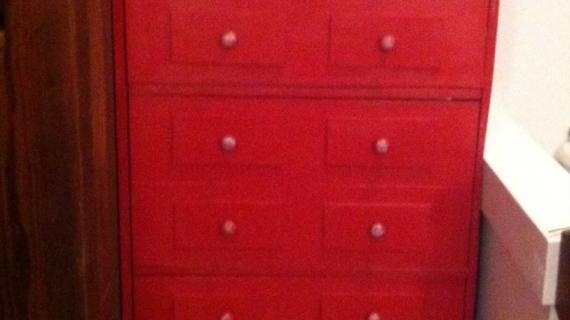
Ana White (not verified)
Thu, 01/06/2011 - 05:32
The Ram wanted green . . .
The Ram wanted green . . . it's a stain from Olympic Stain, I believe called Moss Green, for exterior applications.
Chuck (not verified)
Thu, 01/06/2011 - 05:46
I think your shopping list
I think your shopping list off. I think it needs another 8' 1x8.
I was making a cut sheet for this so I could make one this weekend.
kerry (not verified)
Thu, 01/06/2011 - 06:23
Fabulous!!! I'm smack in the
Fabulous!!! I'm smack in the middle of building the kids locker for my front hallway w/ the shelf on the bottom for shoes instead of the top for bins. This, however, I NEED! I'm already thinking where it will go! Love it!!!
Lisa P (not verified)
Thu, 01/06/2011 - 06:42
OHHH I sooo need this too! 5
OHHH I sooo need this too! 5 of us in a teeny tiny house with no storage and too many shoes! We've looked at the Ikea one every time we are there but never bought it. I would way rather build it anyways! Brilliant...thank-you.
Lisa P
Annalea (not verified)
Thu, 01/06/2011 - 07:18
Thank you Thank You THANK
Thank you Thank You THANK YOU!!!
With eight of us in the house, there's a serious shoe-storage problem around here. lol This is the perfect solution . . . and for many times less than premade options. Now, to figure out where to put it in this rental . . .
Christine (not verified)
Thu, 01/06/2011 - 07:22
Perfect for me!! We just had
Perfect for me!! We just had a "disagreement" about how we are not going to build a coat rack to go by the door (since you come right into the dining room & hubby thinks it looks tacky, but I think it is tackier to have a constant pile). But the kids STILL put their coats and shoes by the door. This way, they can be truly HIDDEN and handy!
Tsu Dho Nimh (not verified)
Thu, 01/06/2011 - 07:34
Could this be attached to the
Could this be attached to the door of an entry closet - like that bedroom closet door thing.
AmyLynn (not verified)
Thu, 01/06/2011 - 08:26
This could work great in my
This could work great in my craft room for so many things!!!
Carolina (not verified)
Thu, 01/06/2011 - 08:45
Hi Ana! Thanks for this
Hi Ana! Thanks for this wonderful plan! We're planning on building it this weekend but I noticed some parts of the instructions were cut off of the pdf as well as on the website. Am I right? Thanks again, you're the BEST!
Alison (not verified)
Thu, 01/06/2011 - 09:28
Ana, How many pairs of shoes
Ana,
How many pairs of shoes would you say this holds? I have a lot... :)
Ana White (not verified)
Thu, 01/06/2011 - 09:56
Heels and flats can go
Heels and flats can go stacked . . . I would say about 12 pairs of smaller shoes (heels/flats) and perhaps 8 pairs of sneakers. This is per bin, so double that. It's huge.
farm-marm (not verified)
Thu, 01/06/2011 - 11:27
looking at the plans...the
looking at the plans...the "shelves/drawers" look like the bookcase/shelves from the inside view! he he just my randomness there...! ;)
Michelle (not verified)
Thu, 01/06/2011 - 14:33
Ana, I have shamelessly
Ana, I have shamelessly begged for this, and now it will be MINE!!
I LOVE LOVE LOVE the idea of making apothecary drawer fronts! Will be distressing the you-know-what out of it... move over Ikea and PB!!
Theresa (not verified)
Thu, 01/06/2011 - 16:53
I LOVE IT. You must be able
I LOVE IT. You must be able to read minds. I have wanted one of these forever...Thank You Ana. You are terrific.
orangesugar (not verified)
Fri, 01/07/2011 - 03:57
On a shoe storage related
On a shoe storage related note, this would be an awesome plan for people with lots of closet space and a lot of shoes which I aspire to be someday.
http://www.ballarddesigns.com/sarah-storage-tower/163126
Jennifer Clark (not verified)
Sat, 01/08/2011 - 07:27
I just started this on
I just started this on Friday! You need to buy 5 1x8 x 8ft long. (you will have 1/2 of it left over. For the faces though I am using a 1x16x 96in paint grade panel, but I am leaving it natural. I love the checkerboard look on it.
Jenny (not verified)
Sat, 01/08/2011 - 08:54
You are a genius! Thank you
You are a genius! Thank you so much for these plans. This is exactly what we need for our tiny entry area. My husband, who is never excited about new projects, is about this one.
Chelle (not verified)
Sat, 01/08/2011 - 16:11
I'm not sure I understand the
I'm not sure I understand the dowel part but otherwise, I am in love with this plan. I have a TINY entryway and finding something that could fit in it is almost impossible but THIS would fit!
Chelle (not verified)
Sat, 01/08/2011 - 16:15
Also, wouldn't taller shoes
Also, wouldn't taller shoes fit if you put them in sideways? You wouldn't fit as many, but you could get them in there, I think.
Erin (not verified)
Sat, 01/08/2011 - 20:40
Okay, so here's the deal. I
Okay, so here's the deal. I love, love, love your site and you've inspired me in so many ways...so much so that I asked my own personal Santa for a Kreg jig for Christmas and I got it! (So, as soon as my garage gets a bit warmer, I've got a long list of things I'll be building!) With regard to this shoe dresser, the problem my family always runs into is that we're tall. Seriously tall. My husband and two sons each wear size 13 shoes (and growing in the case of #2 son)...my 11-year old daughter is wearing an 8 1/2 or 9 and I stopped at a 10. These folding drawer things NEVER fit our shoes (let alone boots). So, how would I modify this to fit OUR shoes? Any advice would be greatly appreciated.
Jenny (not verified)
Sun, 01/09/2011 - 11:26
Lynzie, if you click on the
Lynzie, if you click on the image, it opens up to the whole size so you can see everything. Good Luck!