
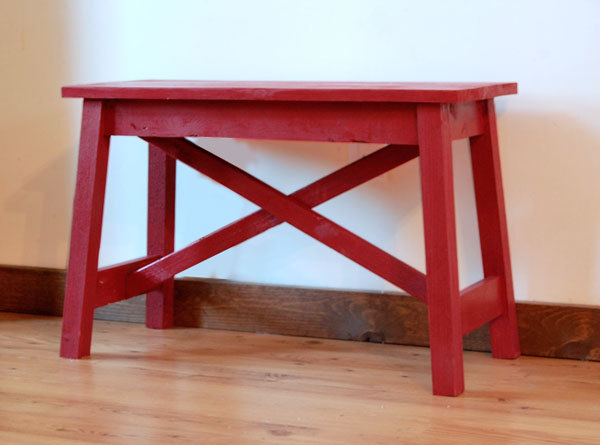

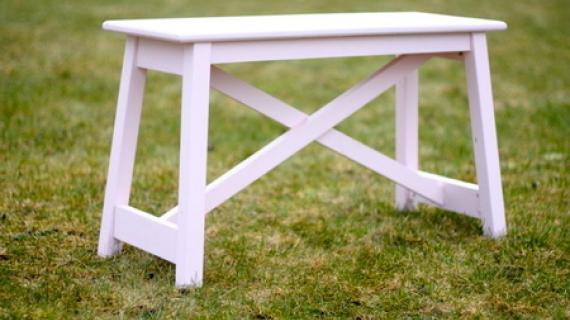
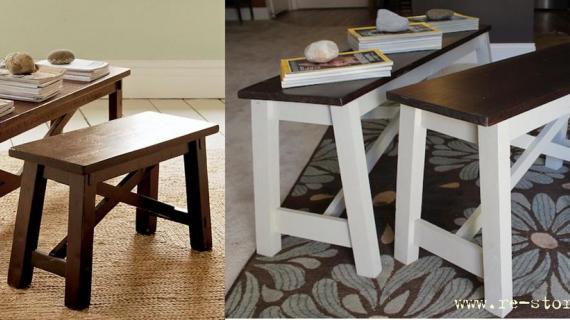
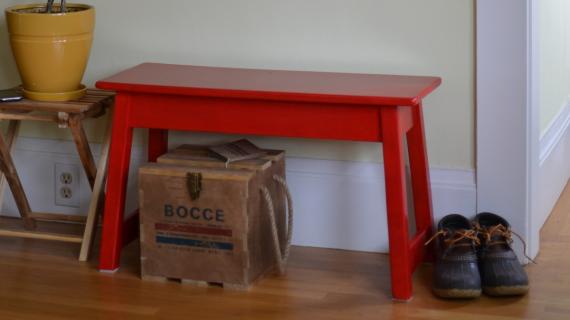
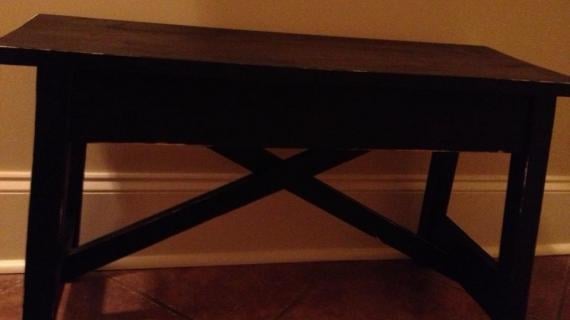
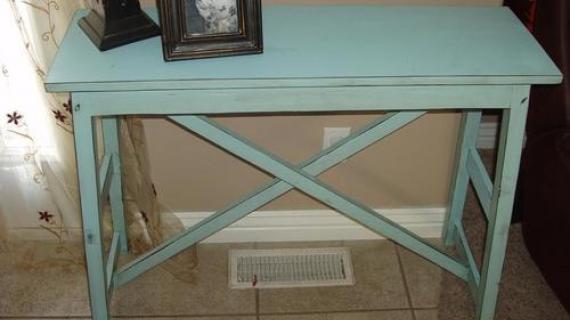
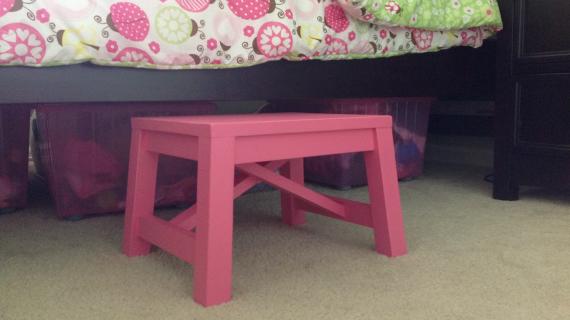
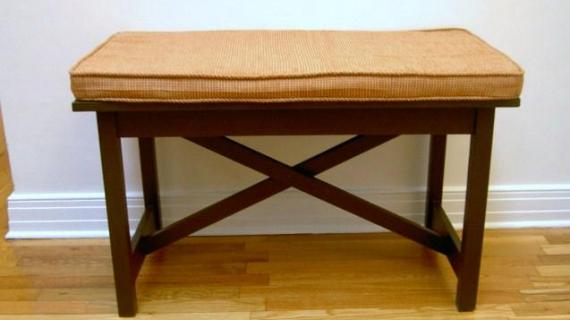
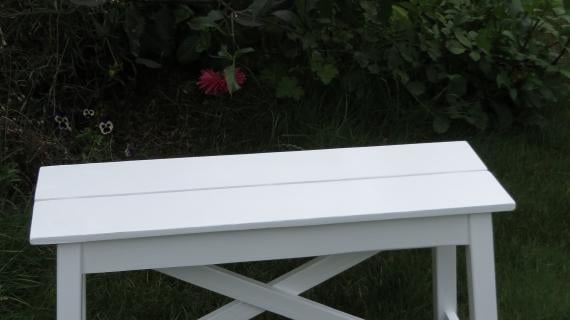
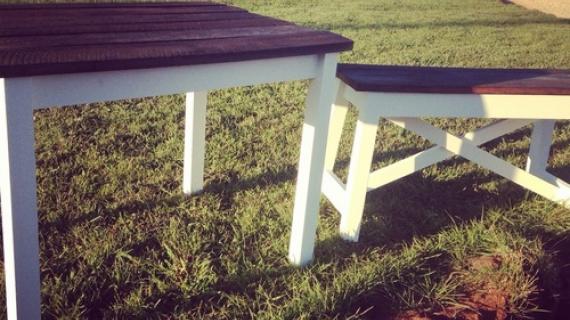
We love this cute bench! The splayed legs are extra sturdy, and the size is just perfect for moving around the home, to use as you need. It works as a nightstand, seating, or an entryway or bath bench.
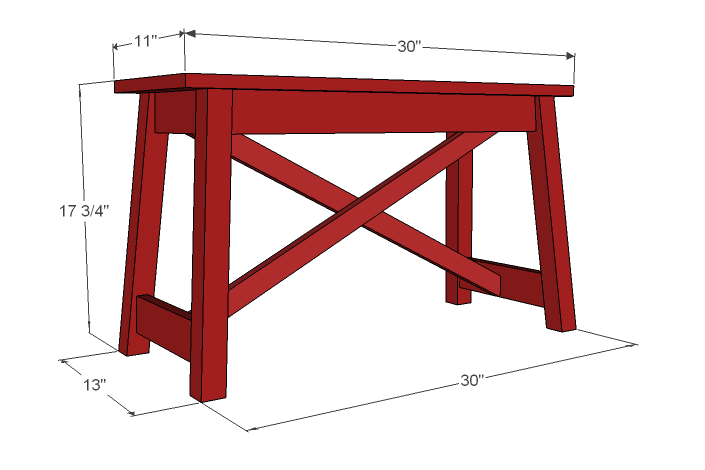
You can easily alter the length by just increasing the aprons and top sizes.
Our free step by step plans include lots of diagrams, shopping list and cut list.
Preparation
- 1 – 2×2 @ 8 feet long
- 2 – 1×3 @ 8 feet long
- 1 - 1x2 @ 8 feet long
- 1 – 1×4 @ 8 feet long
- 1 – 1×12 @ 30″ long
- 2″ and 2 1/2″ screws or pocket hole screws
- Glue, wood filler, 120 grit sandpaper and finishing supplies
- 4 – 2×2 @ 17 1/4″, end cut parallel to each other at a 5 degree angle off square and a 5 degree bevel
- 2 – 1×3 @ 7″ (both ends cut 5 degrees off square, NOT parallel to each other, short point to short point)
- 2 – 1×3 @ 9 1/4″ (Both ends cut at 5 degrees off square, NOT parallel to each other, short point to short point)
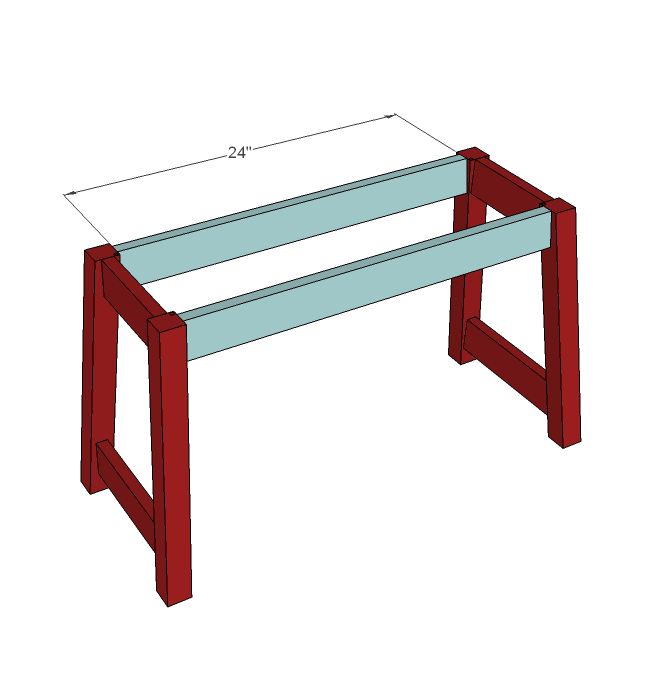
- 2 – 1×3 @ 24″ (both ends cut at 5 degrees off square, NOT parallel to each other, short point to short point)
- 2 – 1×2 @ 48″ (approximate, just cut your 1×2 in half)
- 1 – 1×12 @ 30″ (Top)
This list has been updated per reader comments.


Instructions
Step 1
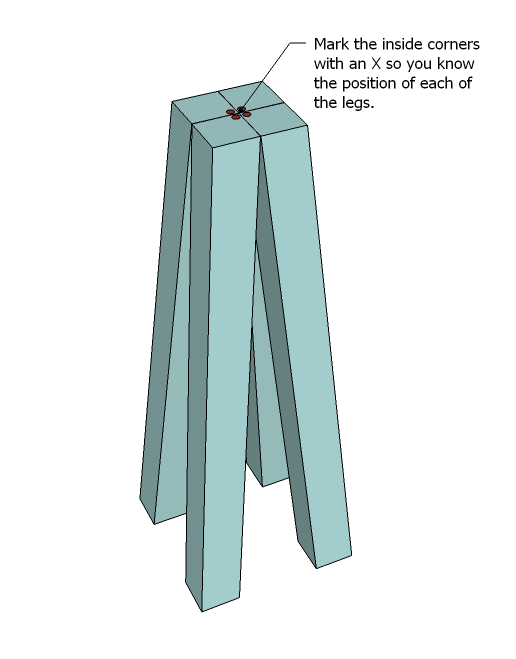
Cut the Legs
Just like yesterday’s Simple Stool Plan, you will need to cut your legs at a double bevel. I highly recommend a compound miter saw set at 5 degrees angle (this would be like rotating your saw so that it makes a pizza shaped cut) and a five degree bevel (this would be like cutting carrots, with the knife blade cutting at an angle away from your hand as you cut diagonal strips) at the same time. The legs are the ONLY pieces that need to be cut at a double bevel. The legs need to be cut at 5 degrees off square (angle) and a 5 degree bevel, 17 1/4″ to 17 1/4″, with the ends parallel to each other (so you would make your first cut, slide your board down 17 1/4″ and make a second cut to have your first leg. Then simply slide your board down and make a third cut to have two legs. Then slide the board again and so on until all four legs are cut. Line your legs us as shown above, and mark the inside corner. This is very important, as with such a slight angle, it will be easy (I’ve done it many times) to get confused as to what direction your legs should be placed at.
Step 2
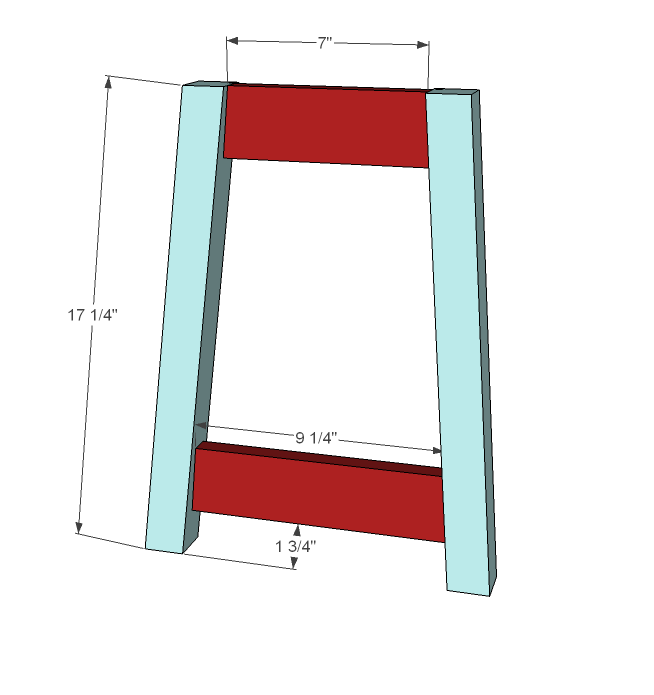
End Apron and Base
Okay, start by marking the placement of the end boards as shown above. Predrill your holes (I used pocket holes, but you could use countersunk screws and glue). Center the boards on the legs and attach. The boards should be parallel to the ground, not in line with the legs. The top is flush with the top. You will need to make two of these. Remember the placement of the mark on the top of the leg. End pieces are cut at 5 degrees off square, ends NOT parallel to each other, measurement given is short point to short point.
Step 3
Side Aprons
Attach the side aprons to the ends as shown above, same as above. The top aprons are cut at 5 degrees of square, ends NOT parallel to each other, measurement given is short point to short point.
Step 4
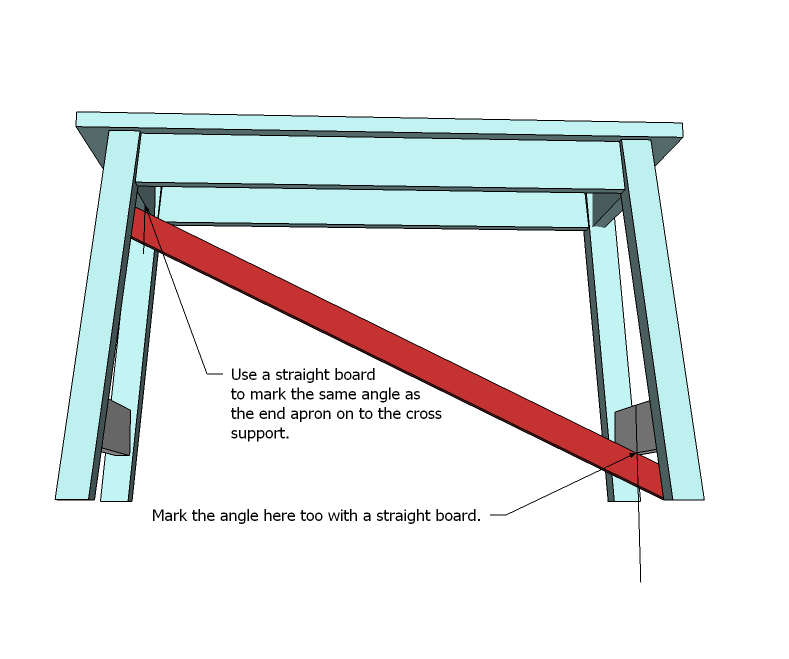
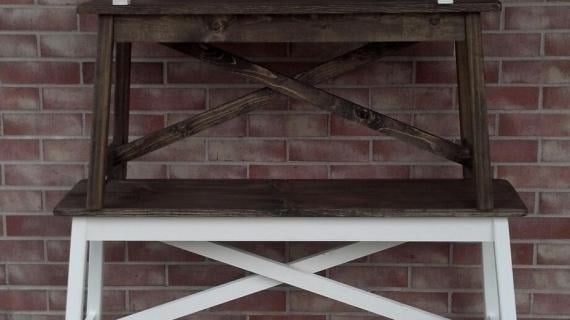
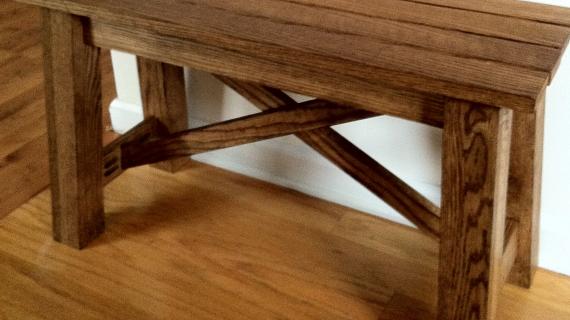
Cutting Cross Supports
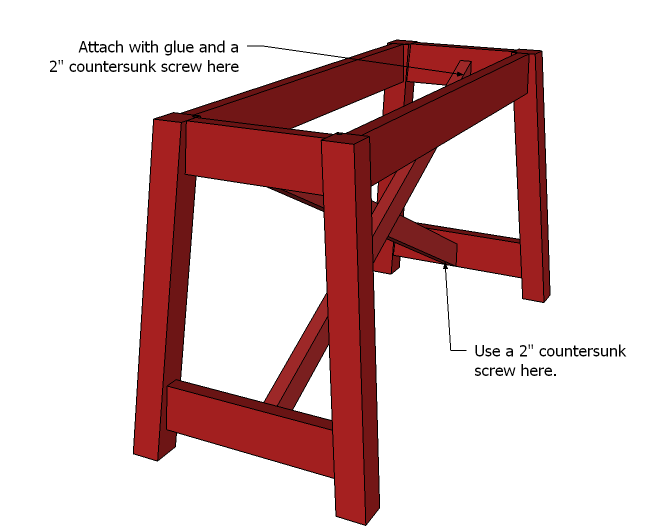
I wanted to do this step so that you could make your bench longer without trouble. And also, I understand that if you just slightly moved your aprons in or out, it would change your measurements and angles for the cross support. So good old common sense is going to help us out today. Mark the centers of the top and bottom aprons. Flip the bench over. Grab one of the 1x2s cut at 48″ and rest it on the bottom of the top apron and the bottom of the opposite side base board. Use a square or scrap wood piece to mark the angle of the apron and side base board onto the 1×2 as shown in the diagram above. Cut these marks as shown above. Fit, (see fit below) cut again, and fit until you are happy with the fit. You will need to cut two of these. The top and bottom angles ARE NOT THE SAME so you will need to pay attention to the rotation of your cross supports.
Step 5
Step 6

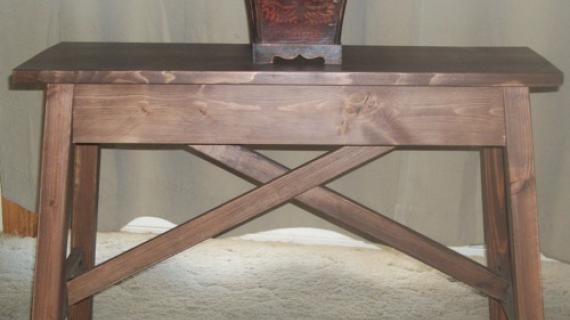
Top
Mark the underside of the top 1 1/2″ in from both ends. Attach to the top (I knew I was painting so I just used 2″ screws through the top) with screws and glue. The side overhangs should be approximately 1/2″ (depends on your 1×12 width).

Comments
Michelle (not verified)
Wed, 01/19/2011 - 11:08
I cant wait to make this. I
I cant wait to make this. I am going to use it as a little table next to a chair I sit in to read. Perfect for a stack of books and lamp. :)
Hope you are doing well....we were talking about Alaska the other day and I was like "I wonder if Ana has a S.A.D lamp?" :)
Eve (not verified)
Wed, 01/19/2011 - 11:13
This is exactly what I needed
This is exactly what I needed :D my mom just got a new dining table and I have been looking for benches for her. These bench legs will match her table perfectly! Thanks so much Ana :D
Nicky Hurt (not verified)
Wed, 01/19/2011 - 11:28
Love it! I'm in Anchorage,
Love it!
I'm in Anchorage, and last year got me more than this winter did. Maybe that's because I'm in the throws of moving and I know I'm leaving Alaska in March.
Misty (not verified)
Wed, 01/19/2011 - 11:31
Love EVERYTHING about this
Love EVERYTHING about this piece! Wow.
Laura (not verified)
Wed, 01/19/2011 - 11:44
I love this! The red is
I love this! The red is fabulous! and, I really like your new blog with extra entries from readers who have improved on their talents (thanks to you)! The more ideas here, the better! Besides that, I can't possibly imagine you building everything on here--your house would be FULL of furniture at some point, and you'd be building into the wee hours of every night. This also encourages us, as readers, to design something worthy of posting (so far, they'll all been great).
p.s. Hopefully your nose feels better soon.
Peggy (not verified)
Wed, 01/19/2011 - 12:04
Longtime lurker, first time
Longtime lurker, first time commenting.... I am always so AMAZED at what I find on this site every day, and I do check it EVERY SINGLE DAY!!! I have been left speechless, gotten cold chills (in a good way!), all kinds of thoughts and feelings from all the beautiful things made here. But this- THIS- bench is the cutest freakin thing I have ever seen!!!!!! I don't know if it's the color, the shape, or the sum of all its parts, but I am truly blown away by the cuteness factor!!! Great job, Ana!!! Keep'em comin, from you and all the others who dare to show they can do it themselves. And just so you know, I'll be building this here bench very soon!!! Thanks again!
Jenny (not verified)
Wed, 01/19/2011 - 12:13
Cute bench! Can't make one
Cute bench! Can't make one now, though, since I'm about to build the ladder for the almost-finished loft bed in my garage. :-) I just had to pipe up and say my son broke my nose when he was about 18 months old. We were playing on my bed and he hit it just right. Just a hairline fracture, but still! That think hurt forever.
Mindy (not verified)
Wed, 01/19/2011 - 12:30
love, love, love it.
love, love, love it.
Jenny (not verified)
Wed, 01/19/2011 - 13:01
I love this bench! Ouch
I love this bench!
Ouch about your nose! My daughter has done that to me too, but it's never swelled. I hope it's not broken!
Pam the Goatherd (not verified)
Wed, 01/19/2011 - 13:31
Ouch! They really should put
Ouch! They really should put info about the full contact kid-stuff in the new parent instruction books. Don't forget to wear a mouth guard along with your helmet!!! I hope your nose heals up soon. One positive about living in Alaska is that you shouldn't have any problems finding ice to put on your nose to get the swelling to go down.
This bench is so adorable and I love, love, love the red!
Joy (not verified)
Wed, 01/19/2011 - 13:33
Hi Anna, I'm sorry about
Hi Anna,
I'm sorry about your nose. I knock a tooth out of my mom's mouth when I was young.
I wonder is there any way to make the leg cuts with a simple miter was?
I love your site; it's the first one I check each morning. I'm in the process of making the tilt out shoe bin. It's going together well so far.
Thank you for all!
Joy
Gwenevere (not verified)
Wed, 01/19/2011 - 13:54
I've had my nose cracked in
I've had my nose cracked in that exact same way plus some....watch out for the time when you are helping put pants on your little one and to get them on all the way they do a little wiggle and jump (I do it to). The jump usually happens while you still have a grip on the waistband and are leaning over them - Crack!
Sara B (not verified)
Wed, 01/19/2011 - 18:43
Thanks so much for this
Thanks so much for this explanation: "5 degrees angle (this would be like rotating your saw so that it makes a pizza shaped cut) and a five degree bevel (this would be like cutting carrots, with the knife blade cutting at an angle away from your hand as you cut diagonal strips) at the same time." The bevel vs angle thing was confusing me, but no more! :)
SJC (not verified)
Thu, 01/20/2011 - 03:20
I just found a free large
I just found a free large frame to make into a giant chalkboard for my daughter and I need a bench to sit under it --- this one is perfect!
Oh, and she gave me a black eye while jumping on the couch in the "family room" at a funeral home about 5 minutes before I was supposed to get up and do the eulogy. So there are worse times to be blindsided by a hard headed toddler!
Jeannine (not verified)
Thu, 01/20/2011 - 03:55
That is a great bench, and
That is a great bench, and the most beautiful color RED! Do you know the color name/mfg?
Lynn in Canada (not verified)
Thu, 01/20/2011 - 04:41
I'm sorry to hear about your
I'm sorry to hear about your nose and I did something similar this past fall but I walked into a 2x4 sticking out at 90 degrees from a fence post (dont' ask, hubbie got the message). It cracked and swelled (and I don't need a bigger nose, thank you) but I was ok in about a week. Hope you will be too - that REALLY REALLY hurts.
Ana and anyone else out there - do you fill all your pocketholes with wood filler? I just got a Kreg jig and I also got the mini-kreg because the holes are so big with the regular size Kreg jig, I was a bit taken aback - takes a lot of wood filler! The mini-Kreg is only good for certain projects and only pan-head screws but it makes such dainty holes - I do prefer them. I must have gone through half my wood filler container filling those pocket-holes - any advice on using wood filler would be appreciated - I never get a clean fill, you can tell there is filler there - is it the brand I'm using? My technique? Even after I paint, you can tell I tried to fill a hole there...
kerry davis (not verified)
Thu, 01/20/2011 - 06:18
Lynn - I use wod filler on my
Lynn - I use wod filler on my pocket holes too, and you can always tell. I'm super new to this, so would benefit from anyone who has tips to offer you. Maybe it's to fill & sand again? I'm super impatient, so this could be part of my problem....
orangesugar (not verified)
Thu, 01/20/2011 - 06:51
I've never used them but Kreg
I've never used them but Kreg sells pocket hole plugs.
Tamara Knowles (not verified)
Thu, 01/20/2011 - 07:39
Hey Anna, Just wanted to
Hey Anna,
Just wanted to say THANKS for all the wonderful plans. I'm currently on my second project and can't wait to start the next, and the next, and the next :) Just thought I'd let you know if you are in need of some sunshine we can help! We live and run a company in the Bahamas for kayaking and sailing expeditions. We have a place you could stay and could show you a good time if you want to come to our little island :) check us out...www.outislandexplorers.com and let me know if you want more info!
Thanks again for all the wonderful projects and encouragement!
Carrie (not verified)
Thu, 01/20/2011 - 08:05
My biggest "contact sport"
My biggest "contact sport" situation with my kids was my middle slammed her head into my jaw - thought it was broken or dislocated. Never a dull moment with kids :) Love the bench!
Michelle (not verified)
Thu, 01/20/2011 - 14:23
LOVE this bench! It will be
LOVE this bench! It will be mine (shortly after the laundry basket dresser I'm making for a friend!)
My daughter broke my nose about a year ago... it felt like brain freeze without the ice cream, LOL. It's only very slightly crooked. (((Hugs))) to you, mama!
Neala (not verified)
Thu, 01/20/2011 - 19:35
Ow! My daughter did that
Ow! My daughter did that too, flinging herself around in midst of a tantrum and cracked my nose which gave me a good black eye! Who knew that 2 year olds have such solid little noggins? You're so used to cradling a soft baby head you don't realize how painful and rock-hard they become! Hope it heals soon!
Wendy (not verified)
Sat, 01/22/2011 - 11:44
I decided to make this little
I decided to make this little bench today. It is my first project and it is so fun!
I just wanted to write and make a little correction in your shopping list - you need 2 2x2's at 8 feet long, not just one. Or probably more like 1 and a half 2x2's. The first 2x2 for the legs (which leaves about 47 inches leftover) and another 2x2 to cut in half and use as cross supports.
Thanks for all your plans - I have a list of all the things I want to make next...
ps - the whole 5 degree angle and 5 degree bevel turned out to not be as hard as I imagined.
Wendy (not verified)
Sat, 01/22/2011 - 11:51
err - a correction to my
err - a correction to my correction - :)
1x2's not 2x2's
you need 2 1x2's at 8 feet long- one for the side aprons and another for the criss cross. The aprons take up about a half a 1x2 at 8 feet long, but that doesn't leave quite enough for two criss cross's.
Or maybe the error is that the side aprons should be cut from the 1x3's instead of the 1x2's..... which actually makes more sense.... off to cut some 1x3's!
sorry!
Tracy Smith (not verified)
Wed, 01/26/2011 - 16:06
My daughter just asked me to
My daughter just asked me to make her a bench for the piano that we inherited from my Grandmother after she passed. This will be a great starter project and help fill a need in our little house. Thanks so much for posting plans, creating this community and giving some inspiration to a mother of three teenagers who is looking to support her family after brain cancer took her husbands livelihood from him. You are so awesome and at 34, I've finally figured out what I want to be when I grow up - Ana White! LOL Seriously I just want to build and create and you've inspired me to do it! THANK YOU!!!!!!!!!
Christina (not verified)
Mon, 01/31/2011 - 11:23
I love this bench, it will be
I love this bench, it will be great. Can the seat be made with a 2x12 board instead?
Ana White (not verified)
Mon, 01/31/2011 - 12:14
Absolutely! It will make the
Absolutely! It will make the bench seat a tad higher, but there should be no other issue.
Tracy Smith (not verified)
Mon, 02/21/2011 - 18:38
Ya, I got it built tonight...
Ya, I got it built tonight... we stain it tomorrow! Such a cute and sturdy bench, however, there is some discrepancy in the wood buy list. If you follow the shopping list, it shows a 1x4x8 but there isn't any cutting instructions in the cut list. There also isn't any 1x2's listed in the shopping list.... So, there need to be some corrections made. We bought the 1x4 but didn't use it at all.
I'm assuming that the shopping list should read as:
1 2x2 @ 8'
1 1x3 @ 8'
1 1x2 @ 8'
1 1X4 @ 8'
1 1X12 @ 30"
Then, in the cut list, the 1x2 @ 24" should actually be the 1x4 @ 24".
We didn't figure this out until we were done building and realized we had a 1x4 that we didn't use. :-) It's cute even without the 1x4. Thanks Ana for the plans and the inspiration, cuz it was a blast to build even with the oops'.
Nichole Hancock (not verified)
Wed, 03/02/2011 - 04:10
We just built two of these
We just built two of these great benches. I extended them to 48" long, to fit on the sides of my store bought farmhouse table. They feel super sturdy and should last even with 5 boys on them :). Thanks for the great step by step plans... it made it so easy to do.
Kimberly (not verified)
Mon, 03/07/2011 - 16:45
This is so friggin' cute!
This is so friggin' cute!
Sonya (not verified)
Thu, 03/10/2011 - 17:55
The shopping list and cut
The shopping list and cut list are off somewhere. There's a 1x4 on the shopping list but none listed on the cut list. Also, the long aprons are the 24" pieces should be 1x3's. It wasn't a problem for me since I'm making it with scraps I already have. Thanks for all you do!
ashdent
Thu, 04/14/2011 - 18:29
Cedar bench
I made this bench out of cedar and just applied a clear protective finish and it really made the knots and grain pop. It looks FANTASTIC and is very sturdy. Thanks for the plan!
Guest (not verified)
Thu, 05/05/2011 - 12:03
Issues
This bench appears sturdy, but in the pictures on the hardwood floor the legs are not all the same length. Also, the reinforcements take up a lot of room underneath. It is a heavy and simple design, but not really that clever.
Sue Yasinsky (not verified)
Fri, 05/27/2011 - 15:56
My next coffee table
Wow! I adore this design and am seriously considering it for a new coffee table. After downhsizing, my older heavy coffee table just doesn't work. Of course there are adgustments to be made to create a coffee table. I can't wait to lighten up my family room. Thanks so much for the plans.
Guest (not verified)
Sun, 12/04/2011 - 07:11
i will start now
i'll try to start right now..but i wish i can
Terri Rino
Wed, 12/07/2011 - 11:36
Drill question
Ana,I am shopping for a drill to use with the Kreg jig we just bought. I noticed in the tutorial video that you used 2 different drills. What is the reason for that, and what drill would you suggest I buy? Thanks, Terri
rgh1948
Thu, 03/01/2012 - 16:36
drill for Kreg
Terri
You need a high rpm drill for the best pocket hole drilling.
A slow drill will actually overheat the bit and burn the wood. I bought a Dewalt D21002 3/8" 0-2500 rpm from Ace Hardware. The other drill is best to use a drill/driver with
an ajustable clutch so you don't overdrive the Kreg screws in soft woods.
A good source for info is the Kreg jig web site. their forums are very good for info.
Hope this helped.
Bob
rgh1948
Thu, 03/01/2012 - 09:31
ends
how do you keep the end apron horizontal pieces perpendicular
with the ground while centering them on the legs. I am new to building and that's a challenge.
I blogged this question but then I realized you could use the comment area of the project.
Thanks for any help.
Angel Rose
Tue, 04/03/2012 - 12:01
Support Beams
HELP! I am having a heck of a time with the support beams . . . the X. By some miracle I got of them to fit, but I cannot seem to make the right cuts on the other. I go from too long to too short with one ( 1/8th inch cut) I tried it four times. HELP!!
Any further help in making those cuts would be very helpful!
Thanks
Ryn0nTX (not verified)
Sun, 07/08/2012 - 20:19
May be elementary but...
Hi Ana... (and everyone else).
I just wanted to point something really silly out....but may save another "rookie" from making the same mistake. When you buy a 1" x 4" board....guess what? ...it is only 3/4" x 3 1/2" !!! Really! After I set my Kreg to 1" thick stock! Well that just sucked after shooting screws through the legs. All ROOKIES (like myself)...take note.
Also, I never needed the 2 1/2" screws? What are they for?
Thanks for a great how-to on a cool looking bench.
-Ryan
JeannieW. (not verified)
Sun, 07/08/2012 - 20:53
Kreg Jig videos
There are several videos on the kregtool website, also, my Kreg Jig set came with a DVD. Both of these were very helpful to me when I got started. Here is the web address: http://www.kregtool.com/media.html
fusionmom (not verified)
Fri, 07/20/2012 - 00:14
Love it
I can't wait to make this bench. The red color is fantastic. The directions look easy enough that even I can do it. I hope so. Maybe my family will believe in me and not think that I am such a
MelanieCS (not verified)
Wed, 11/14/2012 - 13:48
Help
What is the 1x4 for??
In reply to Help by MelanieCS (not verified)
hhoward
Fri, 05/10/2013 - 11:53
1 x 4
I think that is why she suggests reading all the instructions first. I didn't, and I bought the 1 x 4. It is not needed, must just be a mistake. I was even able to get by with only (1) 1 x 3 and I made mine a few inches longer. I used the 1 x 4 and additional 1 x 3 to make a food tray to go along with it. The 1 x 4 wasn't long enough to do the bottom for this tray, so I substituted in 4 cuts of 1 x 3 instead.
http://www.shanty-2-chic.com/2012/04/diy-casserole-tray.html
Alexandra Pflug
Sun, 01/13/2013 - 15:36
Fun to make
My husband, father, and I made 8 of these benches in varying lengths for Christmas gifts this year. It was a lot of fun, and once we put jigs in place to keep everything consistent it was a breeze. I made a brag post, but it isn't showing up on my computer. Have fun with this plan. It is simple to follow and makes a beautiful, versatile little bench.
wendykeeler
Mon, 08/05/2013 - 16:54
rustic x bench
LOVE this bench! Made a trial run and will post it soon. But I want to make the bench 40" long for a table. Will it be strong enough to hold 2 adults/3 kids? I'm thinking yes, but..... I saw you have a double x bench, but 54" is way too long.
thanks.... [email protected]
kegrove
Thu, 11/13/2014 - 15:52
Hold an adult?
Any weight capacity?