
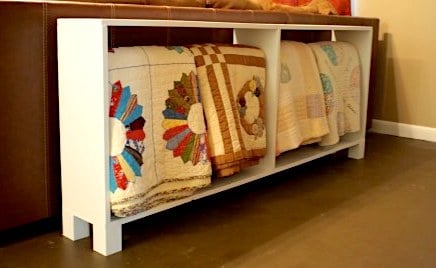

Build your own console table quilt rack! This simple plan holds quilts and serves as a console tabletop. Free step by step plans with diagrams, shopping and cut list from Ana-White.com
Preparation
• 3 – 1x10x6′ boards
• 1 – 6′ long dowel rod (I chose the 1″ thickness)
• 1 – 2×2 @ 24″ (you can use scrap 2×2′s, 4×4′s, or whatever else for the feet. You’ll need six 4″ long pieces)
• 3/4″ screws (about 50)
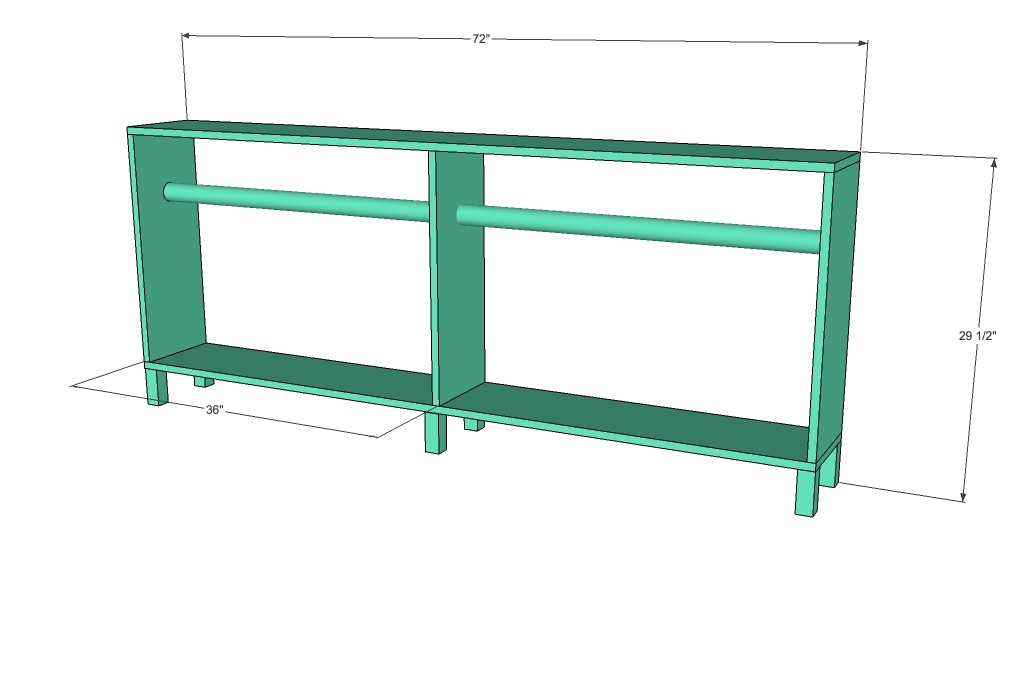
• 2 – 1×10′s @ 72″ (no cutting on these, yay!)
• 3 – 1×10 @ 24″
• dowel @ 70.5″ (I’d cut this last, and measure the distance just to be safe)


Instructions
Step 1

*If you have a hole saw bit (we happened to have one available that was 1 1/4″ thick) this step is easier. If you don’t, you can trace the edge of your rod onto the board and use a jigsaw. Please don’t judge me and my hole. It’s not centered, or 4 1/2″ down in this image. I just tried to whip up a visual really quick, and Sketchup hates me.
Grab one of your 24″ long 1×10′s. Find the center of the board, and measure 4 1/2″ down. Mark the center of your hole. Drill it out, and make sure your rod fits through.
While you’re measuring, you should go ahead and find that same center dot on your two 24″ long end boards that aren’t getting a hole. Predrill/Countersink the holes, this is what will secure your dowel.
Step 2
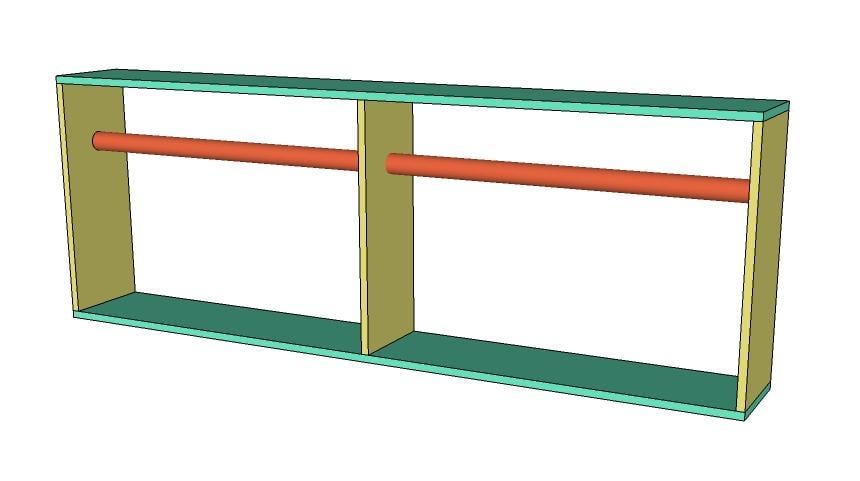
Build the box.
Start by pre-drilling/countersinking your holes on the two ends. Then measure 36″ to the center and predrill for your center (the one with the cutout) board.
• IMPORTANT! Screw your 2 end boards in first, then slide your dowel through the middle board before drilling it in place. It is nearly impossible to fit it in after you screw the center board down.
The easiest way I found to piece it together was by laying one of the long boards on the ground, stacking the 3 short boards on top (only 1 end has to be in the right position right now, so the rest are just to balance and level it) and setting the second long board on top. Screw in the two ends, slip your dowel through your center board, then drill it in too. Flip over, and repeat on the bottom board.
Using the marks you made in step 1, line up your dowel and drill a screw in from the outside into the dowel, check for level on both ends.
Step 3
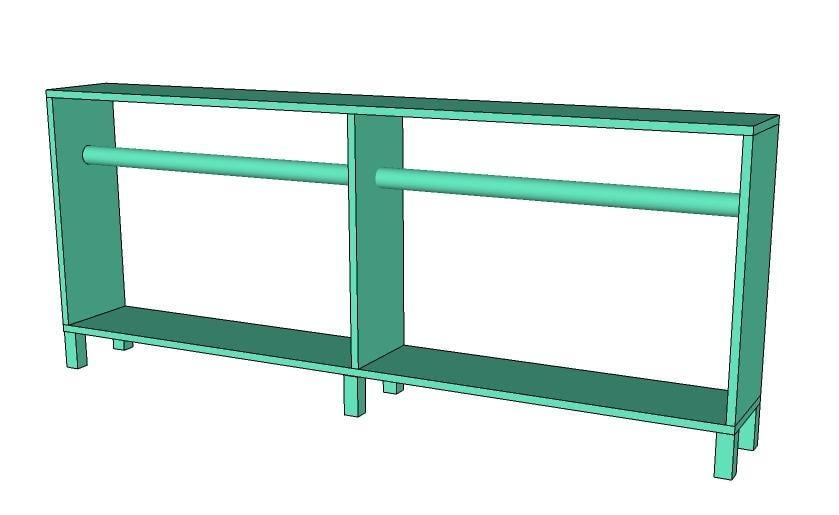
Attach your feet. I used 3 screws per foot, so they wouldn’t twist. But my feet were 3×3 table legs, so you can probably get away with just 1 or 2 if you’re using a 2×2. I propped the box up on the four feet, then just drilled down into them.
Voila! Now you have a slim-lined, modern way to display quilts or store afghans and throws for your couch. you can even stack bins on the bottom shelf, or use it for shoe storage. Toss a basket and a few candles on top, and you’re ready to go!

Comments
leigh7911 (not verified)
Tue, 01/25/2011 - 12:00
Clever, very clever! Mind,
Clever, very clever! Mind, I'm not sure where I'd put this in my house, but I do have quilts that could use some displaying...
Angela (not verified)
Tue, 01/25/2011 - 12:21
I've been wanting a quilt
I've been wanting a quilt rack. Thanks!
Laura (not verified)
Tue, 01/25/2011 - 12:54
I would LOVE to see the one
I would LOVE to see the one you already made! The stand and the quilts :) Great job!
Danielle (not verified)
Tue, 01/25/2011 - 16:31
I am a quilter and I am soooo
I am a quilter and I am soooo building this. Awesome plan!!!!!
Bethany (not verified)
Tue, 01/25/2011 - 17:12
Oh Ana this is genius!
Oh Ana this is genius! Simple, but genius. :) I love it. You musta known us crafters would love something like this. I just finished my second quilt so this is perfect. Thank you!
Sara (not verified)
Tue, 01/25/2011 - 18:21
Oooooh, I quilt and am
Oooooh, I quilt and am planning my new sewing room and this is SO going on my to-do list!
Brooke (not verified)
Tue, 01/25/2011 - 18:49
Hey Guys! I designed and
Hey Guys! I designed and built the quilt rack, but I guess I uploaded the wrong first picture. It was supposed to be a pic of the real thing. Here's the link on my blog to it, http://killerbdesign.wordpress.com/2011/01/25/modern-quilt-rack-plans/ . We moved into my husband's grandmother's house, and she had the most gorgeous collection of hand-sewn quilts. I knew we needed to figure out a way to display them, and this was my solution!
Silky (not verified)
Tue, 01/25/2011 - 22:28
That's a wonderful plan!
That's a wonderful plan! Thank you!
Bethany (not verified)
Wed, 01/26/2011 - 04:29
Oops :) Brooke - thanks for
Oops :) Brooke - thanks for the genius plan hehe, it's awesome!
Rebecca (not verified)
Wed, 01/26/2011 - 06:22
LOVE this! When I have a
LOVE this! When I have a bigger space I'll make this for sure. Those quilts are hand sewn? Gorgeous!
Erica R. (not verified)
Wed, 01/26/2011 - 20:42
what a fabulous idea! I'll
what a fabulous idea! I'll definitely be making one.
Erica R. (not verified)
Wed, 01/26/2011 - 20:44
what a fabulous idea! Great
what a fabulous idea! Great job, I'll definitely be making one.
ShannonG (not verified)
Thu, 01/27/2011 - 17:52
This is brilliant! I have so
This is brilliant! I have so many floating blankets around my house, and have been looking for a long, narrow console to go behind my couch. Not sure when I'll have the time or the guts to try something like this, but maybe.
One thought that might make the dowel part a little easier: what about buying a closet rod and the little closet rod holders? One side would slip out, so getting perfect fit might not be so tough. (I've been working a lot with closets lately.)
Krista @ The D… (not verified)
Fri, 01/28/2011 - 06:57
Love it! Right now we use a
Love it! Right now we use a chest but I like the idea of a "modern" quilt rack. Sometimes the racks can be too traditional for my tastes.
Mishka (not verified)
Tue, 02/15/2011 - 16:02
My dad's going to make me and
My dad's going to make me and my mom one of these awesome quilt racks once the weather improves. Thanks so much for the inspiration.
Guest (not verified)
Mon, 03/28/2011 - 17:38
Perfect for the foot of my bed in the small bedroom!