

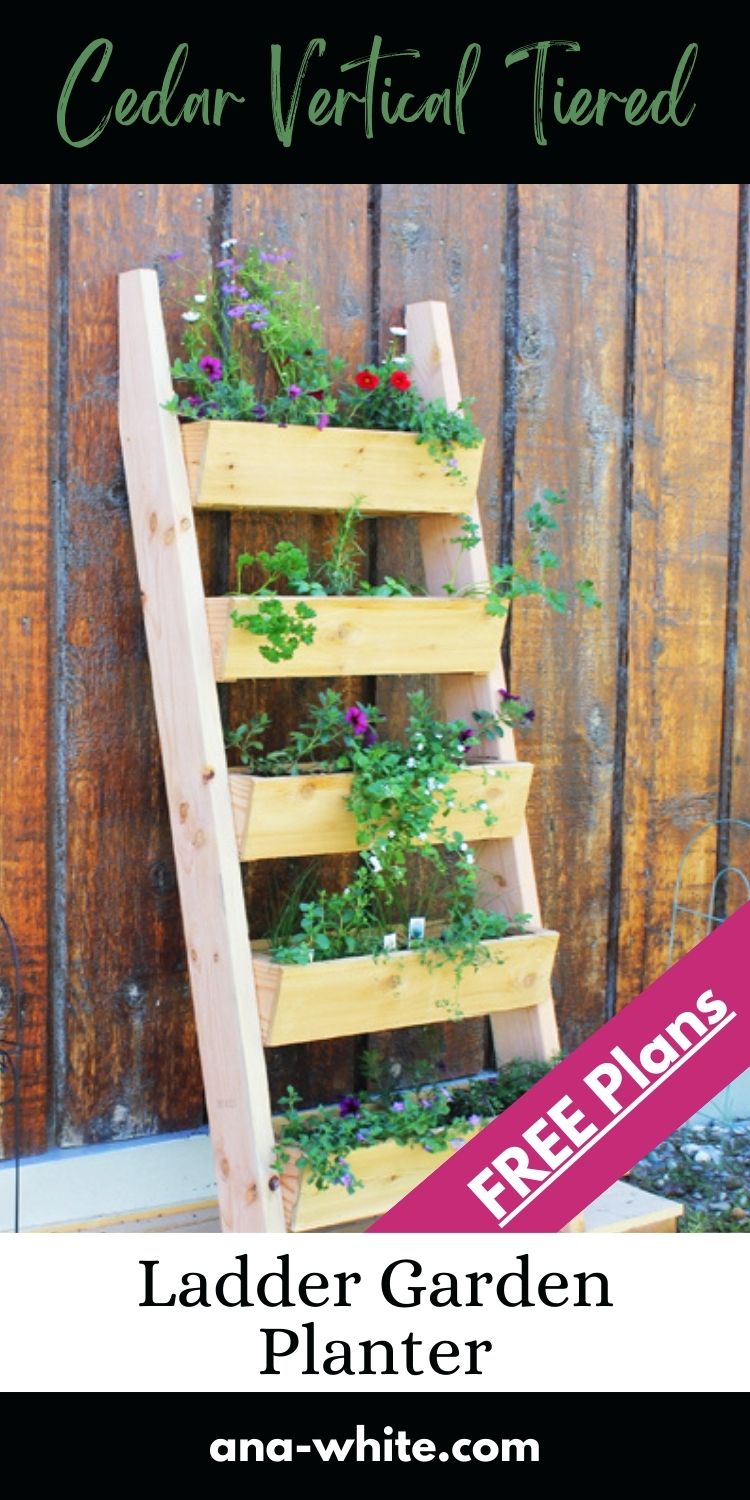
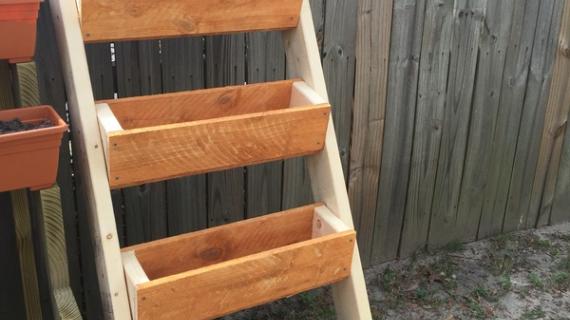
Build your own cedar ladder garden planter for about $20 using inexpensive cedar fence pickets - free plans from ana-white.com

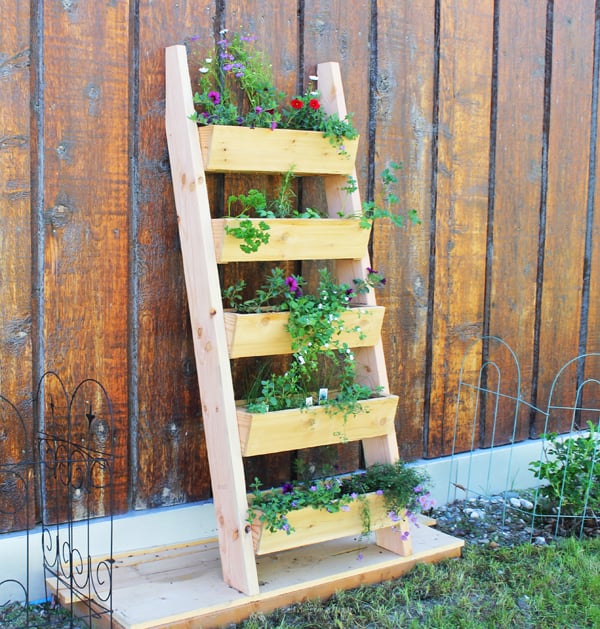
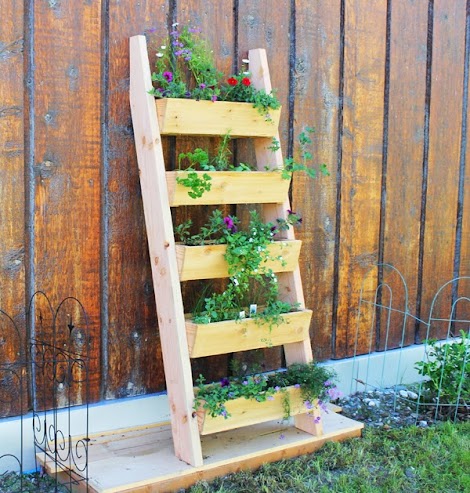
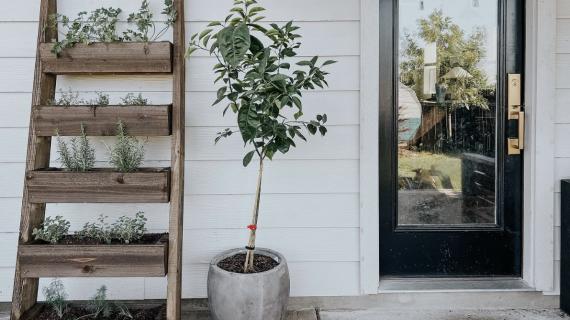
Here’s a way to garden even if you have minimal space - a vertical garden ladder planter! It's perfect for tiny backyards or a patio or balcony - even if you live in a small apartment in the city.
Made of cedar fence pickets, this ladder planter will hold up to the elements but only costs about $20 to build. It’s a beginner project and you only need a few tools to tackle it.
My friend Jen built this for her mother-in-law. She’s a beginner builder- I've asked Jen to share her tips and challenges as she built this tiered ladder planter - here's from Jen:
----
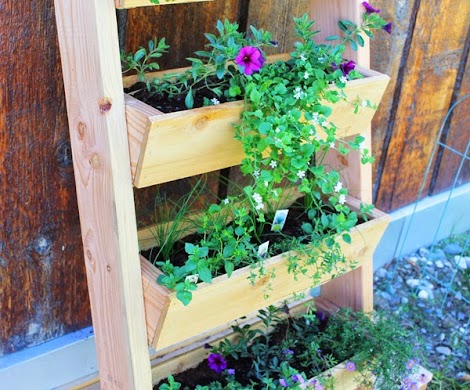
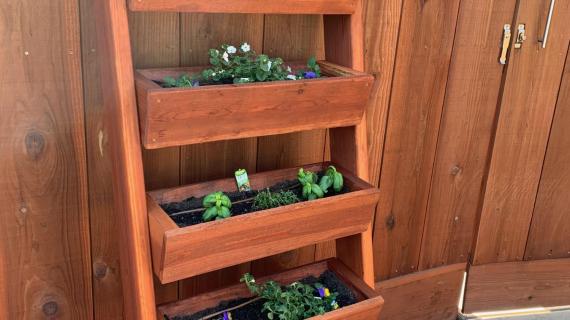
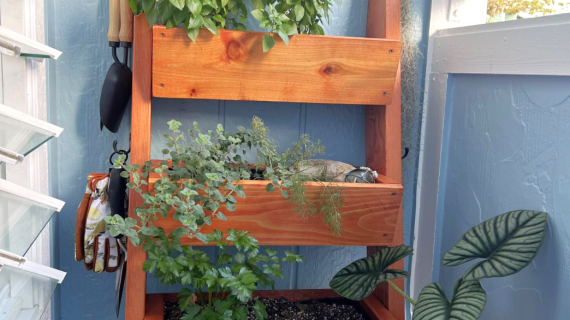
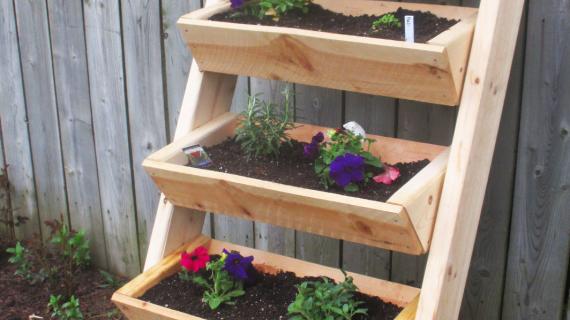
After the last project I couldn't wait to get started on this one. Another simple build with great results! What I like about this is it could be used as a regular flower planter, an herb planter, or as I did with herbs and flowers to mix it up a little.
I got right to work and got all cuts done and layed out. Then I started attaching with the handy staple gun. Did I mention I love that thing! I'm pretty sure it's my new best friend - quick and easy, that's how I like it!
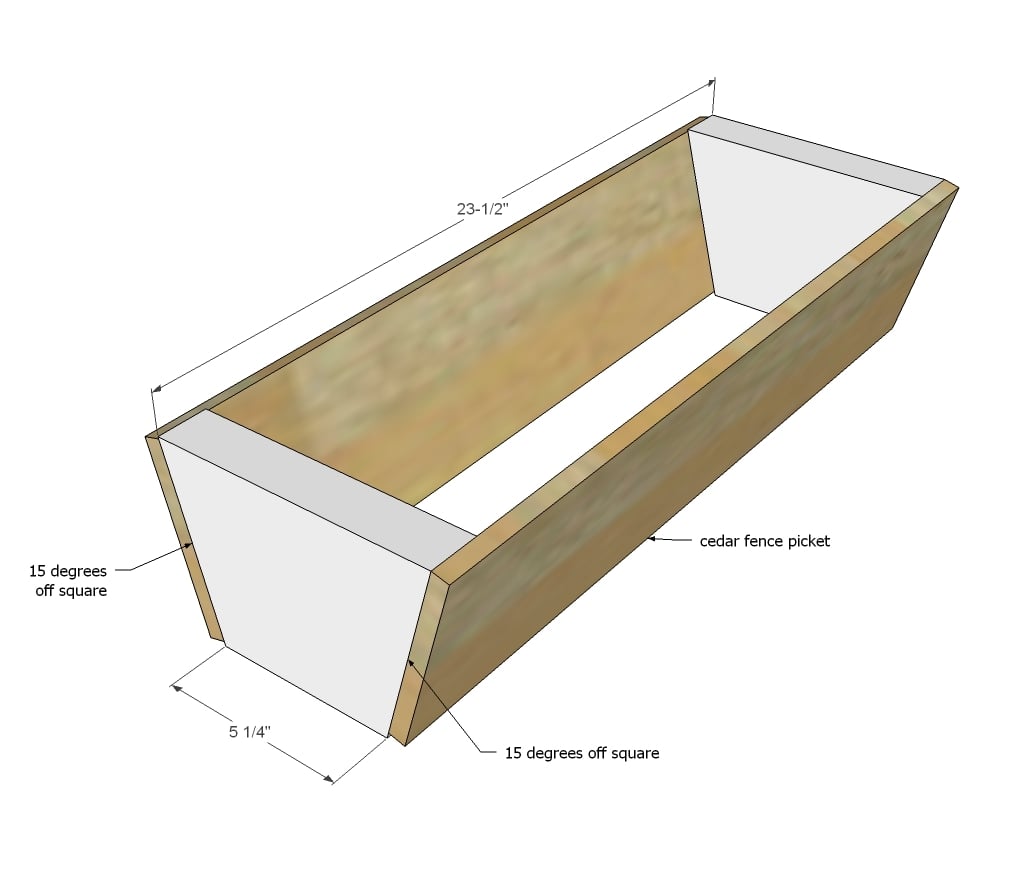
The compound miter saw is great for the angled cuts. I needed 10 of the end pieces at 15 degrees off square, not parallel. Instead of adjusting the miter from side to side I simply made my first end cut, then used it as a template to mark the rest of the boards as I cut. Then all I needed to do instead of adjusting the saw is flip the board each time I cut. It worked much better than how I invisioned it would in my head.
Once I had all the end pieces cut, I attached them to the sides with the staple gun.

After that I measured my opening and cut the bottom pieces as I went I shoved them in from the top, and there were my five boxes done. I shot a few staples for extra hold on the bottom pieces from the outside of each box.

Now for the frame. I was a little intimidated by the top cut, but my saw was already set to 15 degrees, so I just wacked the ends off parallel as directed in the cut list. Then I used a carpenters square to cut the back off the tops, perpendicular to the 15 degree top cut. It sounds complicated but it actually is easy. TIP: If you don't have a carpenter's square, just use a scrap of wood or even a hardcover book.
I didn't have a circular saw, so decided to use the jig saw to cut this part. I haven't really used a jig saw before, but all and all it went pretty well. I just took my time and was sure to stay on the outside edge of the line I had drawn. I won't like, the first cut wasn't perfect, but it worked.
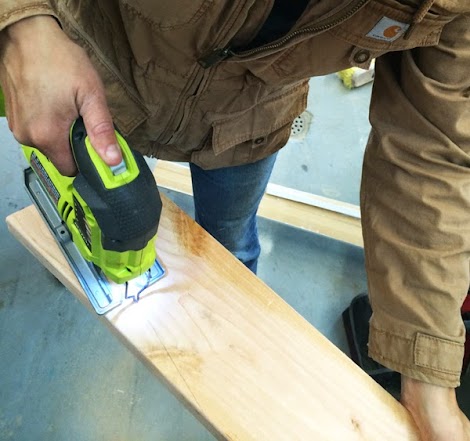
After the first upright was cut, I used it to trace the line on the second board. Then, once again, used the jig saw to cut on the traced line. This time it went even better. Practice makes perfect!
Now came the time to attach the boxes to the frame. I started from the top and worked my way down. I marked my starting point on both uprights at the same time for consistency. Then I screwed the box to one leg from the inside of the box, then placed the other leg and did the same.
First box down!

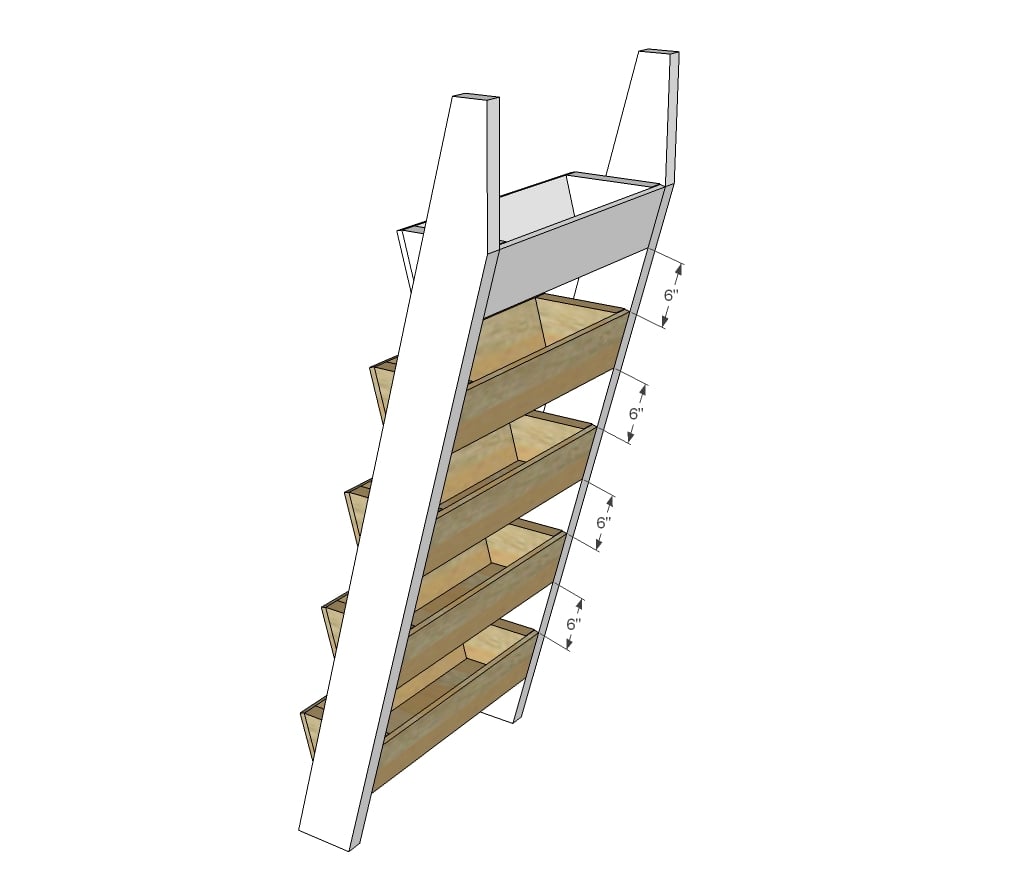
Now I had a starting point for the rest of the boxes. So I cut a spacer at 6 inches (see photo below) to make the placing easier. Be sure to keep the spacer at an angle to follow the line of the first box attached. Once I had it placed I screwed the second box from the inside of the box to the frame, and so on and so forth with the rest of the boxes.

It made it easier to turn the frame on its side to place the screws. Clamps are your friend here if you don't have an extra hand.

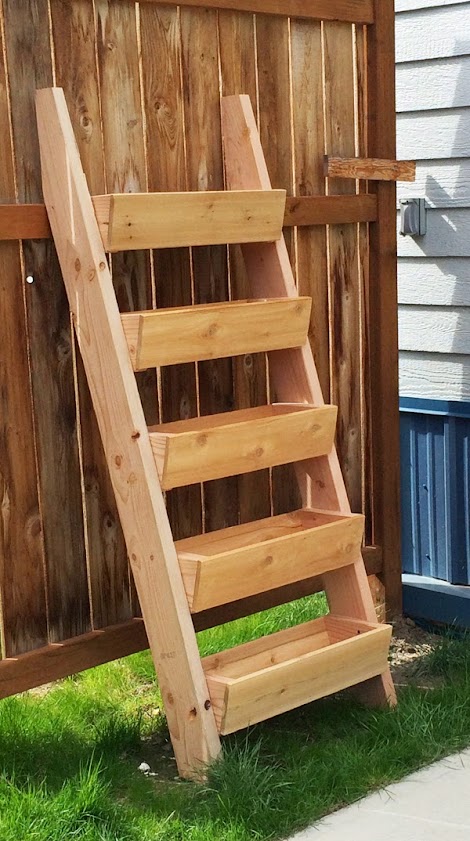
Now all I had to do was stand it up, and there was the finished product, a beautiful versatile vertical planter!
Be sure to drill holes in the bottom of each box to allow for drainage. I drilled after it was all attached, but you could do it after building the boxes before attaching them to the frame.
Now it was time to plant it! I showed my mother-in-law the planter and she loved it, so I decided it would look great in her back yard.
So off we went to get some flowers and herbs.
Turned out pretty well if you ask me!
It's amazing what you can build with $20 bucks in lumber in a couple of hours!
I hope you have as much fun building this as I did!
---
Thanks Jen! Of course, plans follow - please share your finished planter with us if you build!!!
XO Ana + Family
Pin For Later!
Preparation
5 - 5-1/2" wide cedar fence pickets (dogeared is fine) 72" length
2 - 10' long 2x6
20 - 2-1/2" long exterior decking screws (for attaching boxes to legs)
1-1/4" galvanized nails or staples (for making boxes)
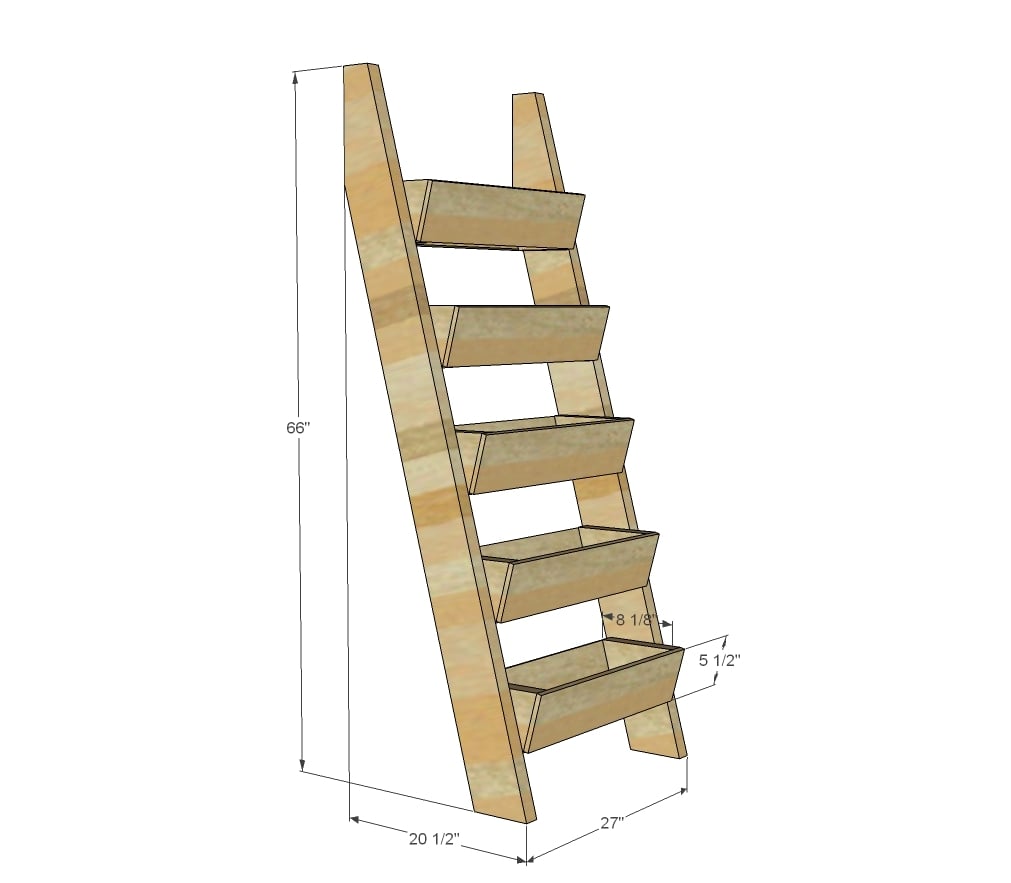
10 - 2x6 @ 5-1/4" both ends cut at 15 degrees off square, ends are NOT parallel
10 - 5-1/2" wide cedar fence pickets @ 23-1/2"
5 - 5-1/2" wide cedar fence pickets @ 20-1/2" (cut to fit)
2 - 2x6 @ 68-3/8" both ends cut at 15 degrees off square, ends ARE parallel


Please read through the entire plan and all comments before beginning this project. It is also advisable to review the Getting Started Section. Take all necessary precautions to build safely and smartly. Work on a clean level surface, free of imperfections or debris. Always use straight boards. Check for square after each step. Always predrill holes before attaching with screws. Use glue with finish nails for a stronger hold. Wipe excess glue off bare wood for stained projects, as dried glue will not take stain. Be safe, have fun, and ask for help if you need it. Good luck!
Instructions
Step 1
Attach two of the longer cedar fence picket pieces to two ends. I used 1-1/4" galvanized staples, but you could also use screws or nails.
Step 2
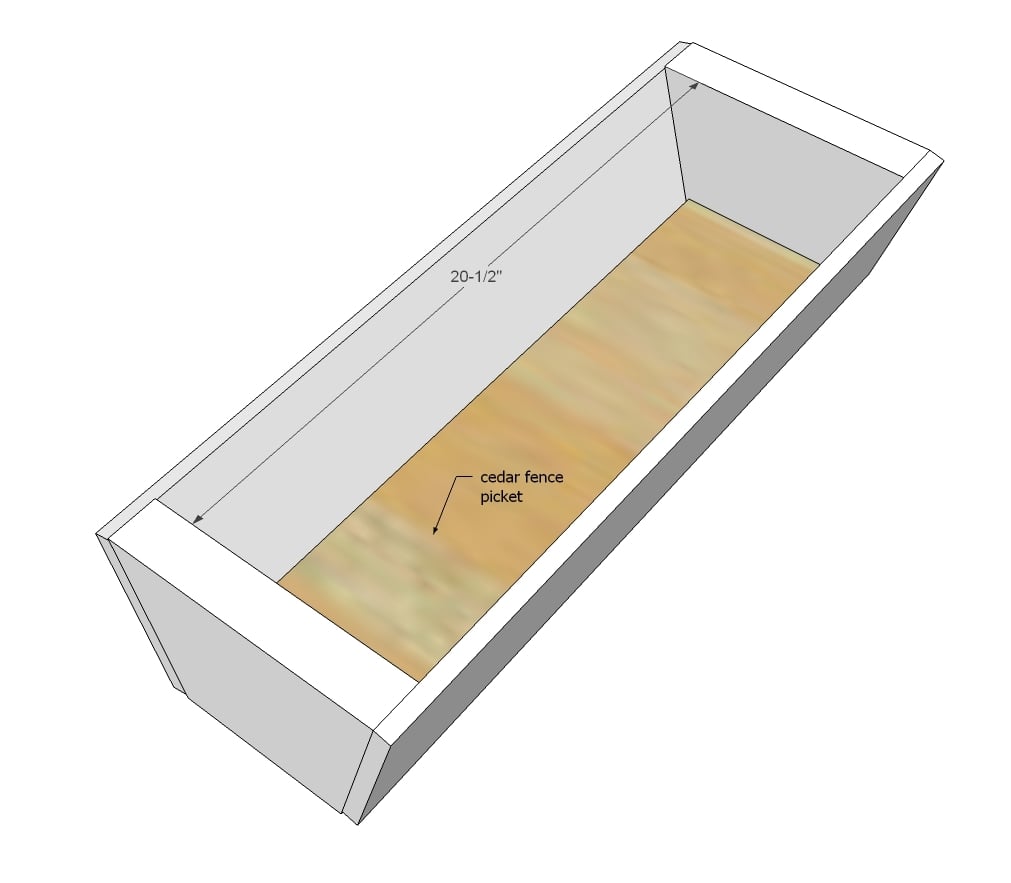
I placed the bottoms in from the top, and then added a few staples to keep them in place.
Step 3
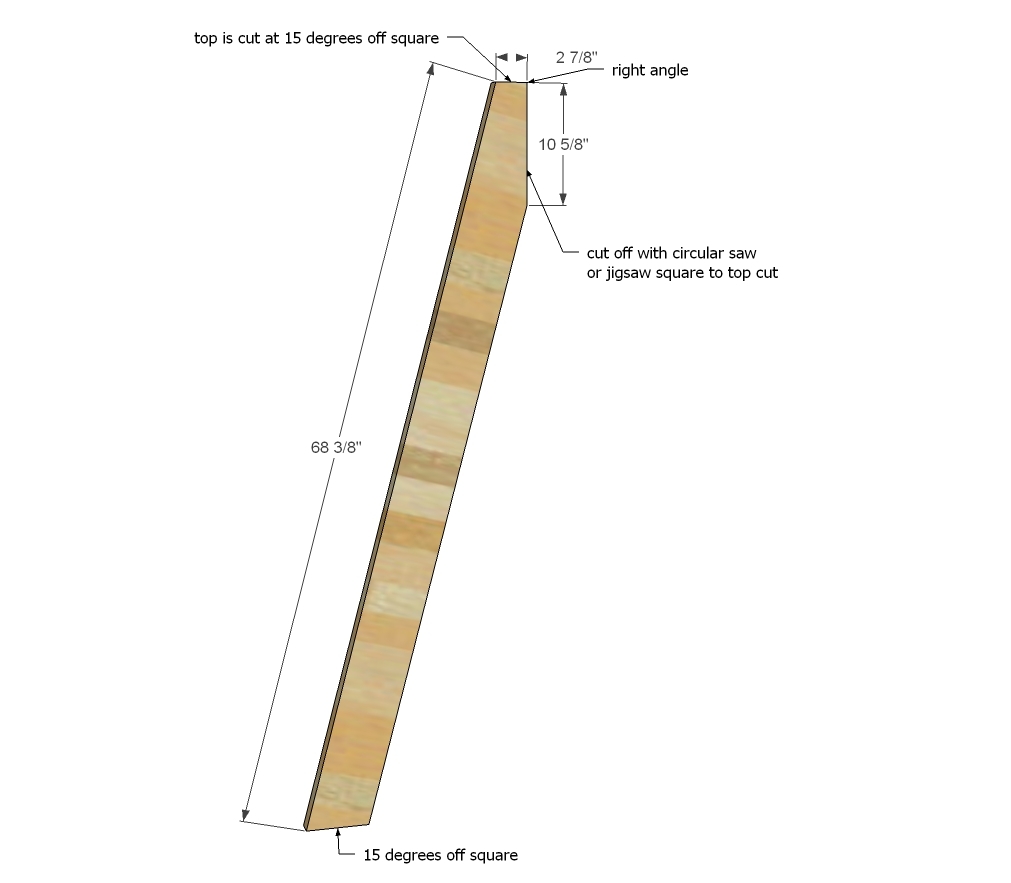
The sides are simply cut with ends parallel at 15 degrees, then the back is cut off perpendicular to the top 15 degree cut. It's easier than you'd think. I used a jigsaw but the right tool would have been a circular saw. Start your cut on the top as you will have more to bit into.
Step 4
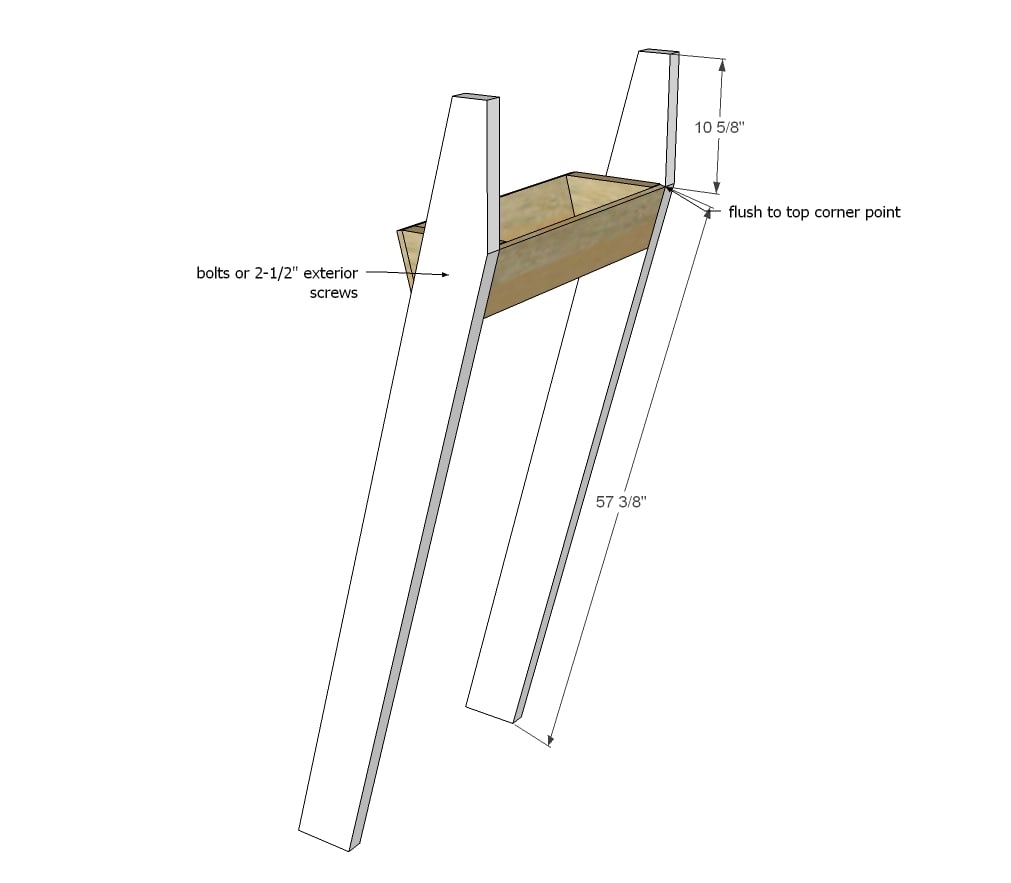
Mark the placement of the top planter on both legs first to make sure you place the planter in exactly the same spot on both legs. Then I attached from inside with 2-1/2" exterior decking screws. The 2x6s I used were very hard to drill into, so I ended up predrilling as well.
Step 5
It is always recommended to apply a test coat on a hidden area or scrap piece to ensure color evenness and adhesion. Use primer or wood conditioner as needed.


Comments
dmcarwin
Thu, 06/19/2014 - 21:28
Love them!
Very cute!!! You girls are killing it!
ccookwood
Mon, 02/02/2015 - 10:12
Not understanding the directions...
I don't understand the following statement can someone help me out.
10 - 2x6 @ 5-1/4" both ends cut at 15 degrees off square, ends are NOT parallel
Or give me a link explaining how to do this.
Bander
Mon, 02/02/2015 - 16:05
ccookwood, look at the
ccookwood, look at the diagram right below "cut list". Notice the pieces in the ends, they are 5-1/4' at the bottom then flare out or widen on both sides as you go up. The angle there is 15 deg off perpendicular or "square".
The easiest way to make this cut is with a compound miter saw, just rotate the table part so it is set at 15 deg and make a cut across the width board just far enough from the end that the angled edge is the new end. Then just flip the board over LENGTHWISE and make another cut where it is 5-1/4" inches from the nearest corner of the previous cut.
claybrookes
Mon, 05/04/2015 - 10:40
Great project! 2 changes to the shopping list
Just finished my planter yesterday. It turned out great! Just want to mention a couple revisions to the shopping list to spare others extra trips to the store. 1. You'll need a total of 6 fence pickets (shopping list states 5). I don't think the short sides were figured into the shopping list. 2. The 2 1/2 in. screws are too long. The total thickness of the picket and 2x6 is 2 1/8 inches, so I used 2 inch screws. Thanks again for posting this project. I love my planter!
claybrookes
Mon, 05/04/2015 - 10:54
Disregard previous comment-I read the cut list wrong
Whoops - no changes needed to the shopping list. I didn't realize the small sides aren't fence pickets - they're 2x6's, so the 2 1/2 inch screws are correct. I was short because I could only find 8 ft 2x6's. Thanks!
ccookwood
Mon, 05/18/2015 - 11:31
wood...
Sorry dumb questions here, so the boxes are made from the cedar fence pickets and the sides are the 2x6's?
In reply to wood... by ccookwood
Ana White
Mon, 05/18/2015 - 11:59
Yes
That is correct.
Mike C
Tue, 03/01/2016 - 15:58
Lumber Prices
Love this planter and plan to build one of my own, but question how this can be built for under $20. In the Los Angeles, CA area where I'm from, a single cedar 2x6 in 6' lengths will run you over $30. My local Home Depot doesn't even carry cedar 2x6's. I haven't priced out the entire lumber materials list, but am pretty sure it will be well over $100 at the local lumber yard. I may need to use redwood to keep my material costs reasonable. Where were you able to find such inexpensive cedar?
sherardmc
Mon, 03/07/2016 - 11:50
Dimensions
Hi, I am confused about the dimensions.
sherardmc
Mon, 03/07/2016 - 14:41
So I just saw that 2x6 lumber
So I just saw that 2x6 lumber is actually 1 1/2" thick and not 2". So that explains number 1. I still can't figure out the second question though.
MarPHL
Sun, 03/27/2016 - 06:11
Cute but cedar is expensive here...
I love this planter and I was all gung ho about making it, but then I priced out the lumber and it came to $116...cedar is expensive where I live! (Philadelphia, PA) I have considered using the ACQ treated lumber, which doesn't have arsenic, and I've heard mixed opinions. I would be using it to plant strawberries and herbs. Any thoughts?
chickymcnuffin
Wed, 03/07/2018 - 11:36
Where do you get the cedar
Where do you get the cedar fence pickets? I'm assuming Lowes or Home Depot? Do you have a link of what type? And also what type of 2x6's did you get?
DragonSoundz
Sat, 06/06/2020 - 18:24
search "cedar fence picket"…
search "cedar fence picket" at Lowe's website; I found them for $2.57 each! I'm gonna try to make this tomorrow after I buy the materials :)
Justjess1125
Tue, 03/27/2018 - 19:58
End pieces
So I'm confused how do you get a 2x 6 which means it's only 5.5 inches wide to be 5.25 inches wide at the bottom when cutting a 15 degree angle? That would only be 1/8 inch off either side which means you could only cut off a tiny corner piece which would not look like the pic
DragonSoundz
Sat, 06/06/2020 - 19:21
Hey y'all - I think there…
Hey y'all - I think there does need to be a clarification/correction on the cut list for the end pieces. Each end piece should be 5-1/4" at the BOTTOM only (see STEP 1) , which means that the TOP should be around 8" (or 8-1/8" as shown in the main 'Dimensions' graphic above the preparation list). Another commenter mentioned this, and I figured it out while trying to do the math. I haven't tried yet but i'll keep y'all posted -- I'm gonna try the following cut for the end pieces: 10 pieces of 2x6 @ 8 inches (5 ends from each 2x6x10' should leave about 80", plenty left for each side post).
Justjess1125
Tue, 03/27/2018 - 20:22
Also
If the pickets are 5.5 inches tall then why cut the 2x6 to 5.25? It leaves a gap
Jim Hinton
Sun, 04/05/2020 - 09:15
Bottoms are very difficult to fit
Hi, so I have built many of these and they are fantastic. The only thing I wanted to mention i s that the bottoms just dont drop in, at least not low enough to have enough room for dirt. You really need a skill saw or table saw added to this list of tools. I always need to rip each bottom a good bit to get it to fit properly. I would go out on a limb and say this is the most difficult part of the building process.
DragonSoundz
Sat, 06/06/2020 - 19:28
hey Jim, see my reply above…
hey Jim, see my reply above about the measurements for the end pieces. If you make the BOTTOM of each end piece 5-1/4" (and each side would flare up at the 15 degree cut to the TOP, which would have to be around 8"). If you do it this way, you def won't need to worry about ripping the cedar fence pickets for the bottoms! (you just have to cut them to length because they are already 5.5" wide). :)
judybees
Tue, 05/05/2020 - 05:14
Wood
Where is the best place to purchase the wood? It says $20 project but when I proceed the wood at my local store it’s alot more. Thanks!
judybees
Tue, 05/05/2020 - 05:15
Meant to say priced the wood.
Meant to say priced the wood.
DragonSoundz
Sat, 06/06/2020 - 18:22
Cedar Fence Pickets at Lowe's are $2.57
I found Cedar Fence pickets at Lowe's for $2.57 each. Search "cedar fence picket" at lowes.com (or go here: https://www.lowes.com/pd/Severe-Weather-Common-5-8-in-x-5-1-2-in-x-6-ft… )
DragonSoundz
Sat, 06/06/2020 - 18:22
Cedar Fence Pickets at Lowe's are $2.57
I found Cedar Fence pickets at Lowe's for $2.57 each. Search "cedar fence picket" at lowes.com (or go here: https://www.lowes.com/pd/Severe-Weather-Common-5-8-in-x-5-1-2-in-x-6-ft… )
qmo65
Sun, 04/24/2022 - 10:01
Finishing
Is there a plant friendly stain recommended?