

Free plans to build this bed! It's easy and made of solid wood! Check out the plans!

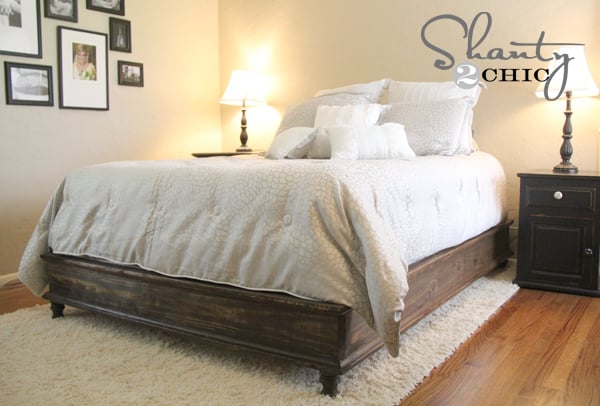
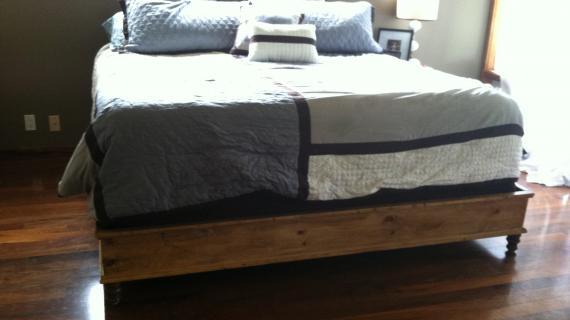
Well, it's been a little while since we've had an adult bed posted, so I'm delighted to share these plans with you today! I'm thinking awesome wedding gift???
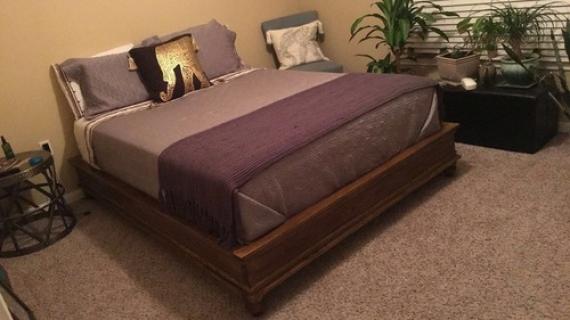
I partnered up with my friend and platform bed builder extraordinaire Whitney from Shanty2Chic on this bed ...
Whitney who made this bed ... well, actually two of them!
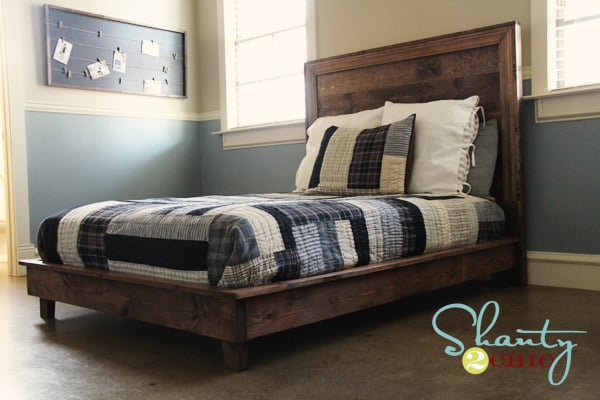
And this bed too!

Now she's built this bed!
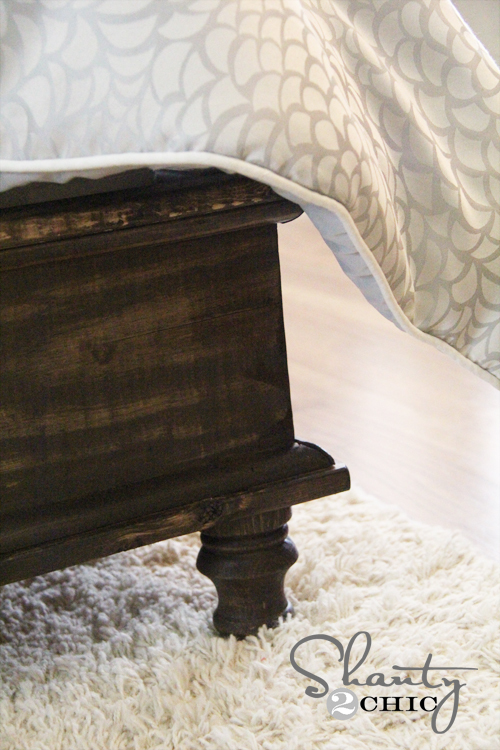
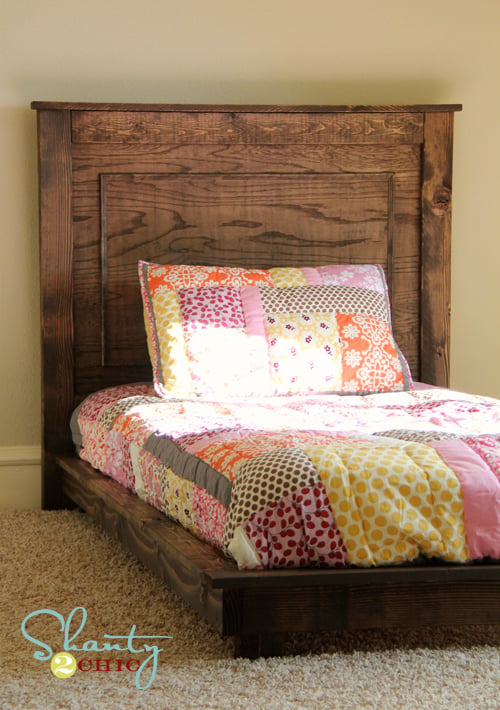
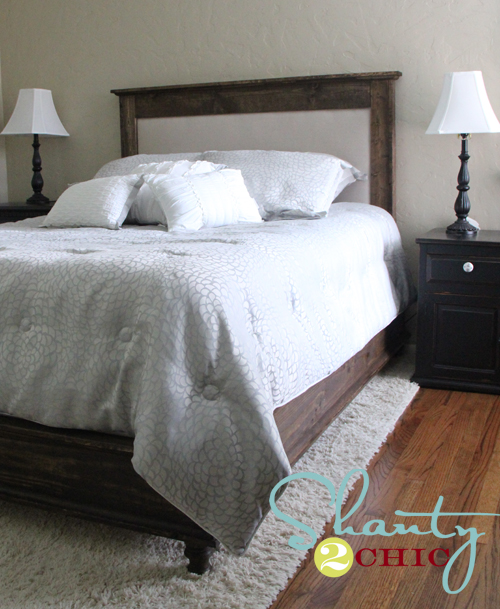
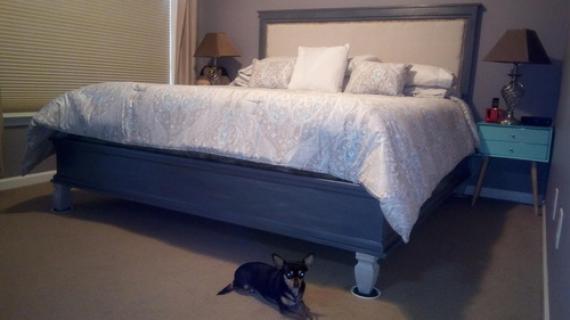
I had so much fun building this bed for my sister. I love how it's so traditional and modern at the same time. I had it built and stained in 3 hours! It's definitely one of my favorite builds yet!
The cost for wood was around $150, but I know with furring strips it would save on cost.
Want to build this bed too? The plans follow!
And make sure you stop over and check out construction photos and tips and more pics of this bed over at Shanty2chic.
Preparation
4 – 4” tall Furniture Feet
8 – 3/4" x 3/4" moulding, 8 feet long (if you can, 4 of the 8 can be 6 feet long)
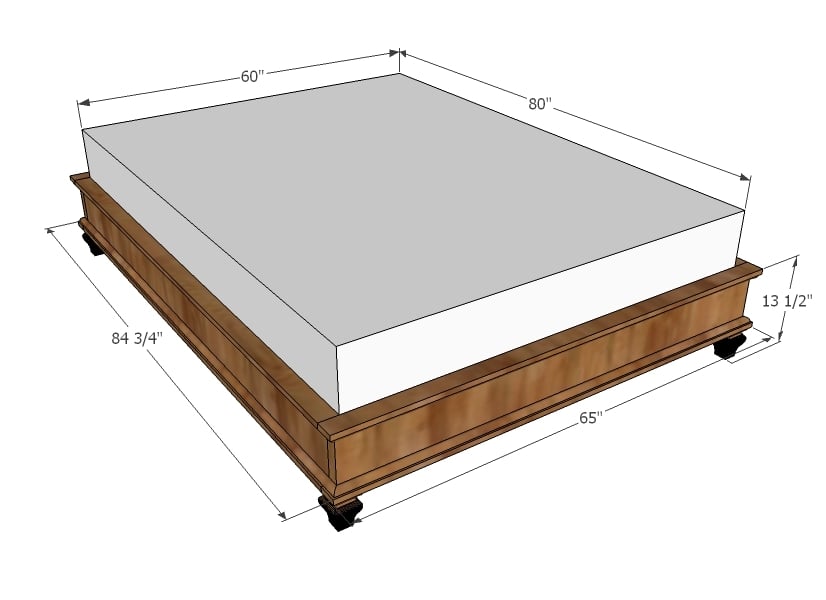
2 – 2x8 @ 8 feet long
1 – 2x8 @ 12 feet long (cut in half)
3 – 2x4 @ 8 feet long
8 – 1x3 @ 8 feet long
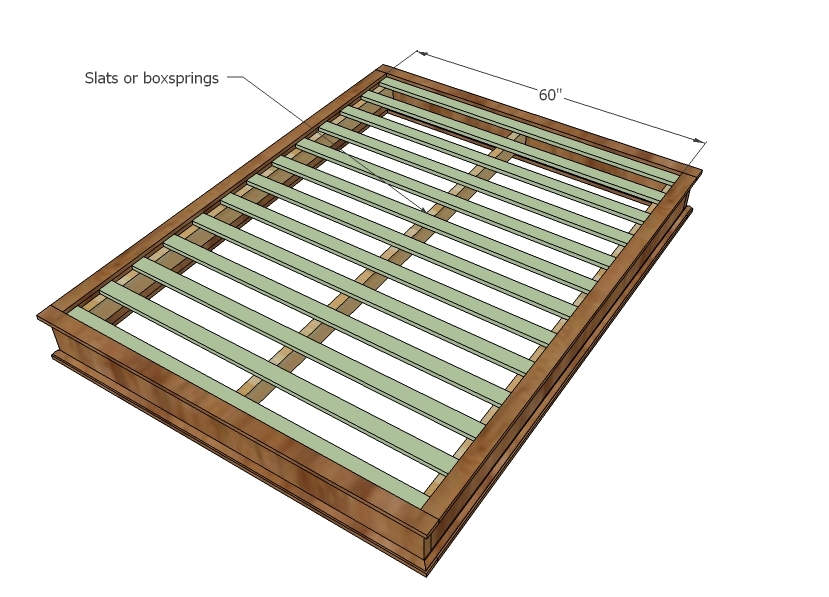
Wood slats or box spring
2 – 2x8 @ 63”
2 – 2x8 @ 80”
3 – 2x4 @ 80”
4 – 1x3 @ 80”
4 – 1x3 @ 65”
4 – 3/4" x 3/4" moulding @ 63” (shortest point, both ends mitered at 45 degrees off square)
4 – 3/4" x 3/4" moulding @ 83” (shortest point, both ends mitered at 45 degrees off square)


Please read through the entire plan and all comments before beginning this project. It is also advisable to review the Getting Started Section. Take all necessary precautions to build safely and smartly. Work on a clean level surface, free of imperfections or debris. Always use straight boards. Check for square after each step. Always predrill holes before attaching with screws. Use glue with finish nails for a stronger hold. Wipe excess glue off bare wood for stained projects, as dried glue will not take stain. Be safe, have fun, and ask for help if you need it. Good luck!
Instructions
Step 1
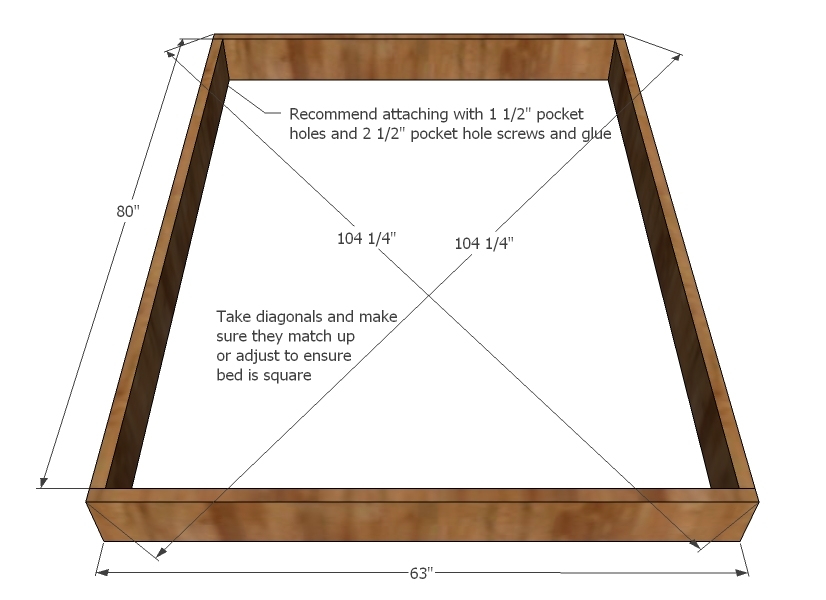
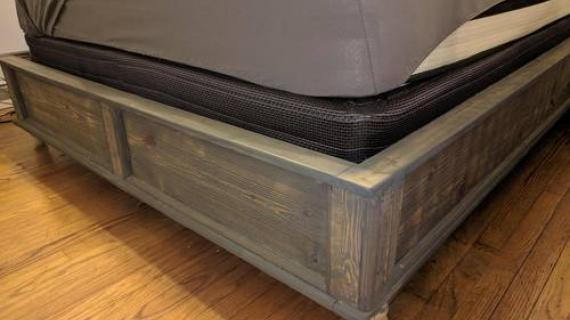
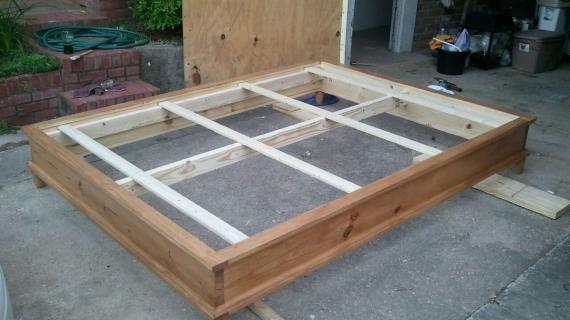
Okay! What we do here is just build a big box. But you have to make sure the box is square. So take diagonals and make sure they match. And if they don't, force them to match.
This bed was put together using a Kreg Jig. Use 1 1/2" Pocket Holes and 2 1/2" PH screws for building the frame.
Step 2
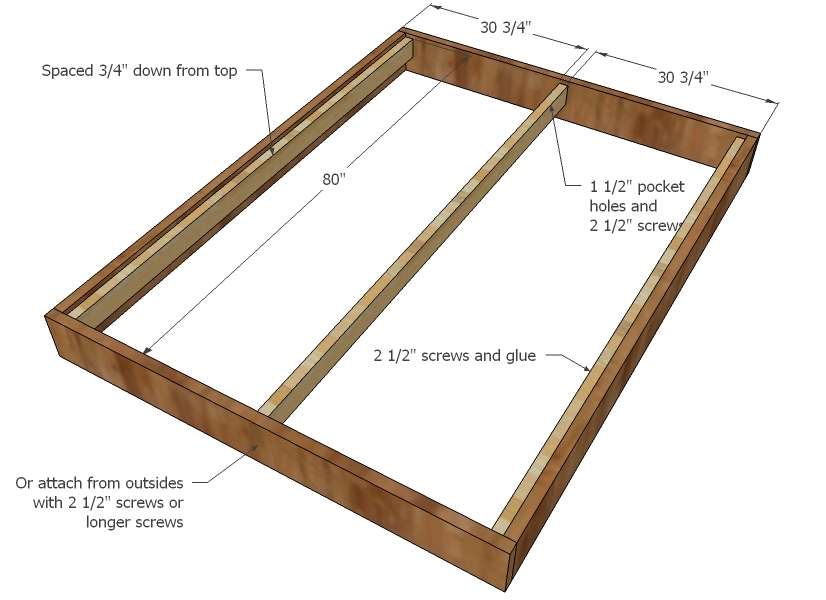
These are the supports for the mattresses. With a queen size, you will need a center support as well.
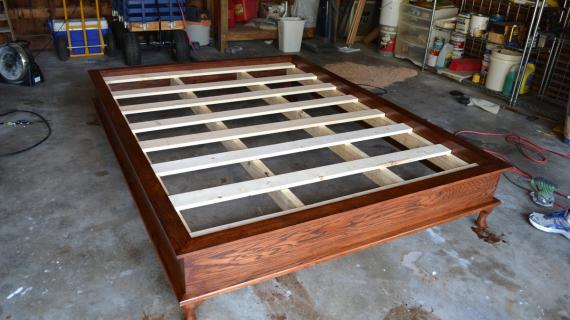
Step 3
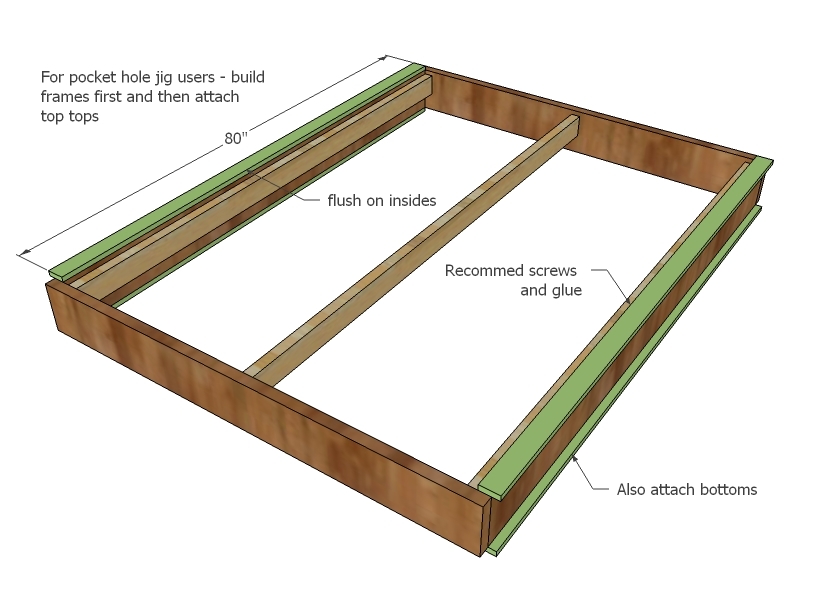
Now we just trim the sides.
Step 4
And the front and back.
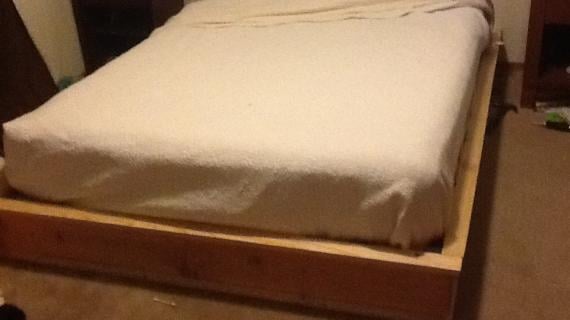
NOTE: If you are planning on pushing this bed all the way against the headboard wall, you may wish to swap out the 1x3 on the headboard side for 1x2s. This will minimize the gap between the mattress and the wall behind the bed.
Step 5
Step 6
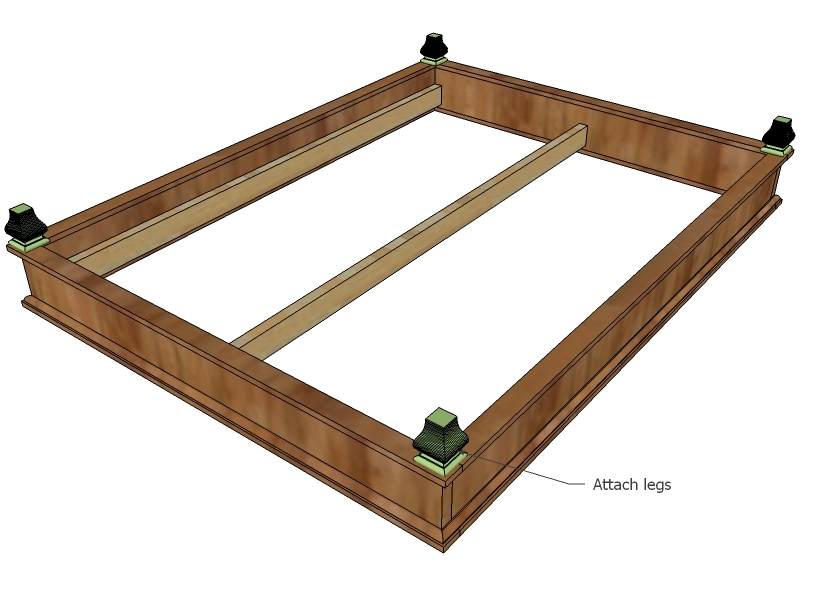
Attach legs as instructed by the leg manufacturer.
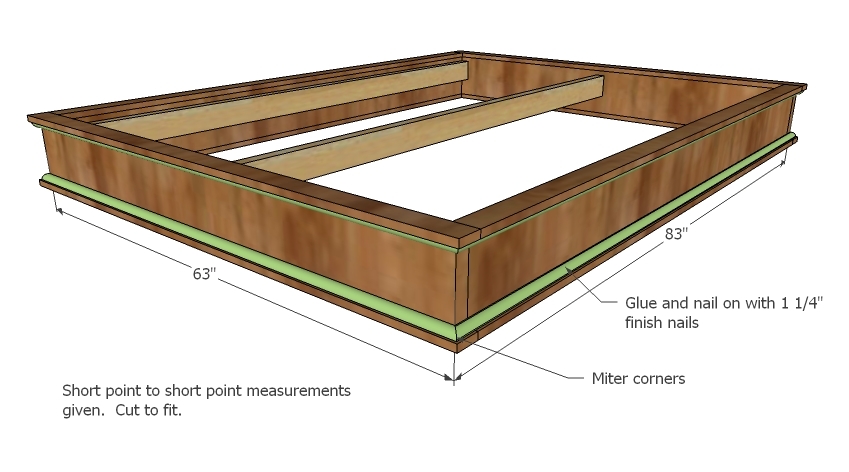
Step 7
Step 8
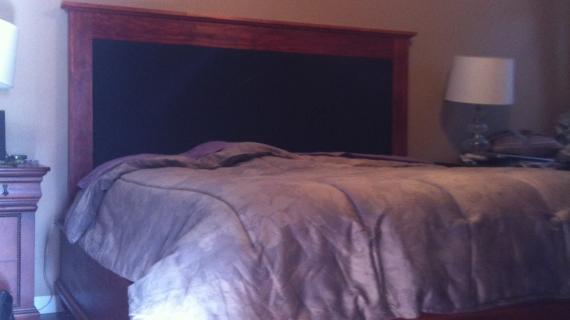
And we also have the matching headboard plans up too!
It is always recommended to apply a test coat on a hidden area or scrap piece to ensure color evenness and adhesion. Use primer or wood conditioner as needed.


Comments
Guest (not verified)
Thu, 03/22/2012 - 11:14
Bed
Bed Frame
Dave C (not verified)
Thu, 03/22/2012 - 12:09
King size too
Do you have the dimensions/cut list for the king size version of this great bed?
Ana White
Thu, 03/22/2012 - 12:22
Hi Dave, I don't yet. What
Hi Dave, I don't yet. What type of king do you have? You can just increase width as most kings are the same length of queen size. I would consider two supports instead of just the one, with a center leg on each to support center of bed.
stefani (not verified)
Sun, 06/17/2012 - 21:13
i have a king and am wanting
i have a king and am wanting to build this badly. i see you had the 2x8's 3 inches longer than what a queen mattress is. should i increase the width by 3" more than what my king mattress is? is that just so the mattress fits inside the fram?
In reply to i have a king and am wanting by stefani (not verified)
claydowling
Mon, 06/18/2012 - 05:12
Good Adjustments
That's what I would recommend. You can also check these things as you go, before you cut everything.
Dave C (not verified)
Thu, 03/22/2012 - 12:42
Thanks
I can't remember the make/model, but I will just measure the width and adjust accordingly ALSO adding another support beam in the middle w/ a leg in the center of each one.
Ana, I wanted to thank you for this wonderful site. I eagerly check my RSS feeds hoping for a new design on your blog. You designs are great and your instructions are clear enough so that even I can use them. Keep up the fantastic work.
- Dave
redhead_61
Thu, 03/22/2012 - 17:15
Love this
I am totally contemplating one more big build before baby comes and I was totally thinking of something just for me for once. This has totally tipped me in that direction. This is the perfect combination of modern platform for my husband, and girly enough for me!
Guest (not verified)
Sun, 03/25/2012 - 00:21
Bed Frame
Can you just make it for me actually and I'll just pay you? I love the frame.
Rachelle (not verified)
Sun, 03/25/2012 - 09:43
Turning this bed into a storage bed (Cal King)
Hi Ana,
I love your website and I have been so inspired by you! I am in between houses right now, but when I get into my next home, I plan to set up a workshop and make my own furniture! My question is creating this bed for a Cal King Mattress but also adding this feature with hydraulics and a board in the bottom:http://www.overstock.com/Home-Garden/Lucca-Chocolate-California-King-si…
I love the idea of all of that dust free storage as I like a very clean room but I like to keep changing out my bedlinens (and storing off season clothing). Any suggestions? Thank you so much!
Rachelle
Lacey (not verified)
Sun, 03/25/2012 - 19:03
I really like the look of
I really like the look of this bed, but am wanting to make it for my daughter's room and she will not be needing a queen size. For the Fillman platform bed, could I use those measurements for length and height for this and then adjust the others accordingly so that I could make this in a twin size? We are closing on our new home very soon and I am rushing like crazy to get my son and daughters bedroom sets made so that they have all the pieces they need in their new rooms when we move in. Any feedback would be greatly appreciated.
Texicali_girl
Tue, 04/03/2012 - 07:52
Hydraulic Lifts
Hi Ana,
I love this! Been looking for a platform for my son's room. I'll have to cut it down for a full-sized bed, and I'm going to add the hydraulics that Rachelle mentioned. I'll make a frame with the slats attached to fit on the rails. I'll add a 1"x10" to the head of the frame and attach the frame to it with a piano hinge. then add hydraulic trunk openers to the sides about a third of the way down from the hinge. They lift about 50 lbs, which should be plenty for the mattress itself. It will make it a little more expensive, but the added storage will be worth it!!
Guest (not verified)
Tue, 04/03/2012 - 16:36
Love the Bed!!!
What kind of wood did you use for is bed? I really like the color.
Kaptain Kirk (not verified)
Wed, 04/04/2012 - 18:53
Great project
Please tell us.
What kind of wood did you use for this bed?
I would to start ASAP
Thanks
cmm314 (not verified)
Fri, 05/11/2012 - 06:21
Also interested in the type
Also interested in the type of wood used...looks great!
Kmeenan (not verified)
Sun, 04/08/2012 - 16:20
ease to build
I am a beginner and while I am used to power drills, I have never actually built something myself. I am just starting to stretch and do new things (just redid the tile in my bathroom). How difficult would this be for someone who has never built anything from scratch.
Thanks for posting such great plans. I have seen lots of things I would love to tackle. While this is large it seems the most simple of all the things I would like to do.
In reply to ease to build by Kmeenan (not verified)
claydowling
Sun, 04/08/2012 - 18:35
Fairly easy
This is probably a pretty good project to start with. It's fairly simple, and even if you make mistakes (everyone makes mistakes, so don't feel bad), I think the project is simple enough that you can easily correct and come up with a good finished product.
Guest (not verified)
Fri, 04/13/2012 - 14:37
What would the demensions be
What would the demensions be for a king bed? I love it but I really want it in king.
Deb@themisadve… (not verified)
Sat, 04/14/2012 - 13:40
assembly/ two halves for moving?
I have a question - my house is narrow and my stairs can barely squeeze a full size box spring up, so I know this would never work. Is there a way to either make this in two pieces? Or what would be the best option in my situation?
Deb@themisadve… (not verified)
Sat, 04/14/2012 - 13:43
My stairs are too
My stairs are too narrow/small for this bed to fit through. What would be the best solution to make it work. Is there a way to build this in two pieces and then attach the two pieces together?
anandmistry
Tue, 04/17/2012 - 22:36
I have some confusion with Cut List!
First of all, This is really great plan for bed. I'm beginner in furniture making and want to learn wooden bed making at my own. You have described price of wood about $150 but, in India that price may high. I don't mind with it. But, I've confusion about cut list..Can you provide some additional images for cut list? If yes, so it may help me more! BTW: This is my first comment on your website and eager to read more in future!
mdubs
Wed, 06/06/2012 - 06:07
Full size?
What would the dimensions/ cuts be for a full size bed??? Headboard too?
sognoinunastella
Sat, 06/30/2012 - 11:43
What kind of wood did you use?
Hi,
I'm trying to build this bed, although mine is a little bit different. But I was wondering what kinda of wood you used and/or recommend?
Also would you happen to have dimensions for creating a "full" size instead of queen size bed?
Thank you for the help!
sognoinunastella
Sun, 07/01/2012 - 10:07
Full Dimensions?
So I did some math and turned this into a full.
I was thinking the original box would be 57"x75"
So my cut list:
2 – 2x8” @ 75” Side Rails
2 – 2x8” @ 57” foot/head rail
Then for the mattress supports
2 – 2x2” @ 75” Side Supports
1 – 2x6” @ 75” Central support
Then for the trim:
4 – 1x3” @ 75” Side-trim
2 – 1x3” @ 59” foot trim
2 – 1x2” @ 59” head trim
The moulding:
2 – 3/4" x 3/4" moulding @ 59”
4 – 3/4" x 3/4" moulding @ 79”
Do you think these dimensions are accurate.. i went with the design for the Hailey platform bed to figure these...
Thank you for the design, this bed is beautiful!!!
Susan S. (not verified)
Mon, 10/22/2012 - 12:29
Narrow stairs
I would love to make this platform bed, or one with storage underneath, but my bedroom is upstairs in a 95 y/o farmhouse. We had difficulty getting a queen size box spring up the stairs (there's a landing and turn in them). My question is, is there a way to adjust these plans so that we can put it together in the bedroom, and take it apart without demolishing it if/when we have to move it? Or is there another plan for a platform bed I should try? Thanks!
Susan
2th Doc
Thu, 02/07/2013 - 08:01
Make bed to dismantle
I have the same problem as a few of you, and that is not being able to get the bed frame upstairs. So, I made a few simple changes to the bed. It changes the aesthetics a bit, but it works, and it's simple. I'm sure there are other ways, but this is what I did. Instead of joining the 2x8's with pocket hole screws and glue, I just drilled two holes on the each side of the headboard and foot board and used 4" lag screws into the ends of the side boards. Use a paddle bit to make the screws recessed, and then you can paint some plastic caps to put into the hole and cover the lags. For the top and bottom 1x3 frame/moulding, have the 2x8 frame assembled and then fit the 1x3 but only attach them to each individual 2x8, and not to each other, so when you take apart the 2x8's, the 1x3 & moulding is attached to each side still. Hope this helps; I can clarify if needed.
2th Doc
Thu, 02/07/2013 - 08:02
Make bed to dismantle
.
IgotThis
Sat, 03/09/2013 - 14:30
I would like to build this to
I would like to build this to go with:
http://ana-white.com/2012/07/plans/mantel-moulding-headboard
Im just worried that the dimensions are different and I wont be able to match the headboard with the chatwick frame. The dimensions of headboard are 63" ..chadwick is 60" in length..am I looking at this correctly?do I need to make the frame bigger? Would my queen mattress be too small for the frame if I make it bigger?
Any thoughts would be greatly appreciated!
acer439
Sun, 04/07/2013 - 04:48
Going to attempt this bed
Hi I am going to attempt to build this queen bed in the next couple of weeks my wife and i were looking to buy a queen size bed but they are so expensive and are all made out of compressed wood and i don't think they will hold up my wife says i don't have the patience to build this but am going to attempt it i love the look and style of the bed you have made wish me luck will post pictures after i get it finished. I have one question can this bed be made without the legs on it so the frame sits right on the floor?
logansam54
Tue, 09/03/2013 - 15:17
Chestwick Platform Bed....height
Is there a way to adjust this so the bed isn't quite so high when you have a box spring? My mattress is already pretty high up from the floor!
Thanks!
Elise
Melissa Dussault
Mon, 10/28/2013 - 10:24
Height
I am not going to be using a bedspring, so if I want to make the bed higher, is it just as simple as using taller legs? And how tall would be 'too tall'? This will be my first project, and I am super excited!
Areye26
Thu, 01/23/2014 - 21:35
King size
I have been looking for something like this for awhile for my king size bed 80" x 76" finally found something I love! This plan is to small for my bed can you send me or tell me what the dimension/cut sizes be?
Thanks!
Trisha1981
Sun, 06/05/2016 - 07:51
Height/stability
Love this bed! I have 3 questions:
1) I love a tall bed, if I use the box spring, about how tall can I expect the bed to be?
2) For attaching the headboard, how likely is it that I'd have to attach to the wall too? I really don't want to do that.
3) How hard is it to disassemble/reassemble to get it moved in to place? Will skipping the wood glue cause issues?
Thanks so much!!
abwright
Sun, 10/28/2018 - 13:06
Dimensions to make a California King bed?
I like this bed a lot but my existing mattress is California King and in good shape. If nobody has the dimensions, can you tell me how I can measure my mattress for the California King? Thanks!