
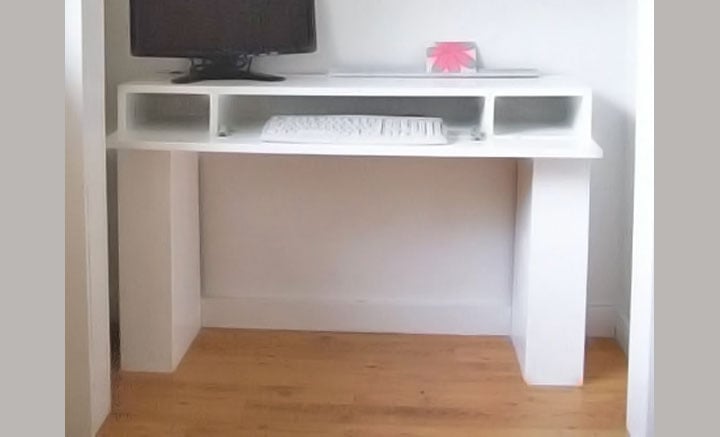

No room for a desk? This beautiful console table flips open to hide a laptop or a keyboard! You'll love it's narrow profile, hidden storage in the legs, and simple to build design. Free plans from Ana-White.com
Pin For Later!

Preparation
6 Frameless Full Overlay Euro Style Hinges like these
1 – 1×12 @ 8′ Length (cut top and shelf from this board)
1 - 1x12 @ 10' length (cut all other cuts, largest first, from this board)
1 – 1×6 @ 8′ Length
1-1/4" brad nails or 2" self tapping star bit screws or 1-1/4" pocket hole screws (or a combination of all of the above
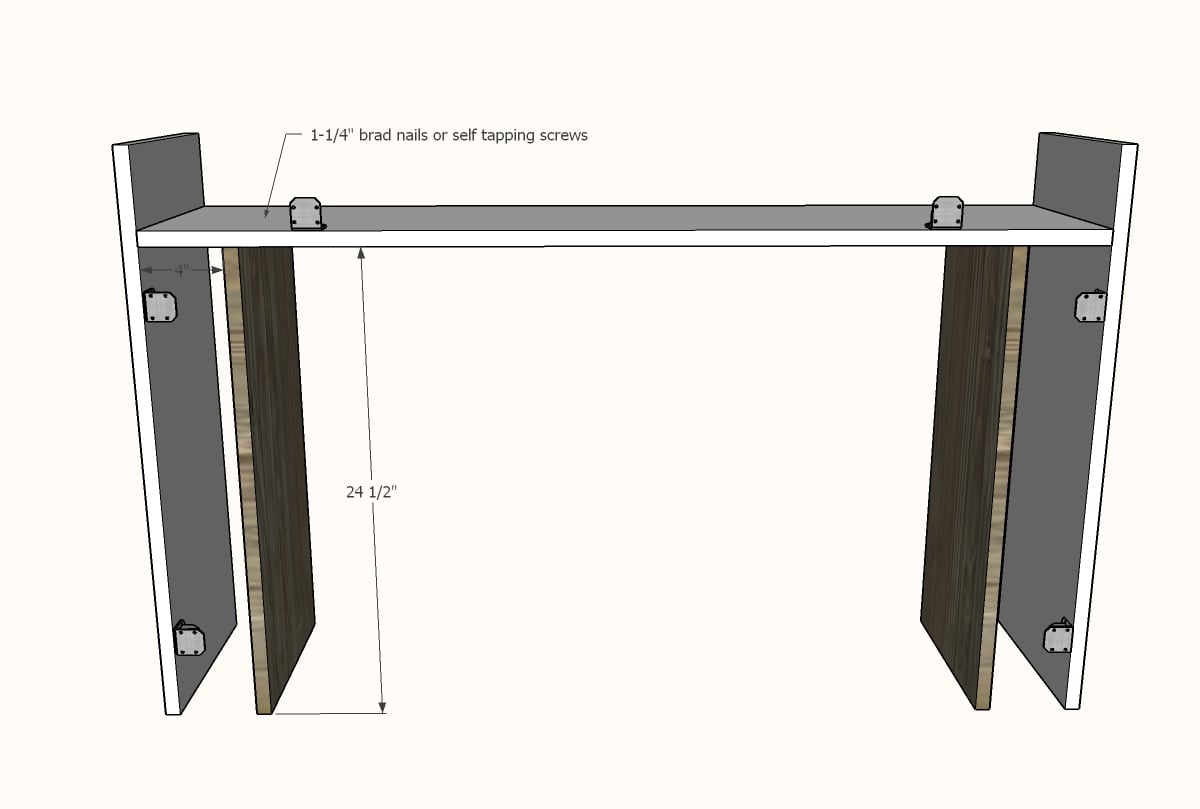
2 - 1x12 @ 29-1/4" - outer legs
1 - 1x12 @ 46-1/2" - shelf
2 - 1x12 @ 24-1/2" - inner legs
1 - 1x12 @ 48" - top
6 - 1x12 @ 4" - dividers
1 - 1x6 @ 48" - keyboard fold down
2 - 1x6 @ 23-3/4" - storage leg doors


Instructions
Step 1
Attach legs to the desk tray using your choice of fastener - 1-1/4" brad nails and wood glue, 2" self tapping wood screws, or 3/4" pocket holes with 1-1/4" pocket hole screws. You can use any combination of these fasteners to build throughout the plans, considering that the brad nails are cheapest, easiest and easiest to hide, but pocket hole screws will create a stronger joint.
Recommend for this step: Pocket Holes
TIP: The 1x12 @ 4" pieces can be used as a temporary spacer to set your shelf height.
Step 2
I recommend installing the hinges at this point, since it will be hard to get a drill inside the project as we progress further. Simply screw to the project as shown, with the flat front flush to the front edges of the project. You can use a scrap piece of wood to help you place the hinges, making sure they are flush to the front.
Exact location is not essential, just close the locations in the diagram is good.
Step 3
Attach the inner leg piece to the shelf.
Recommended: Pocket Holes
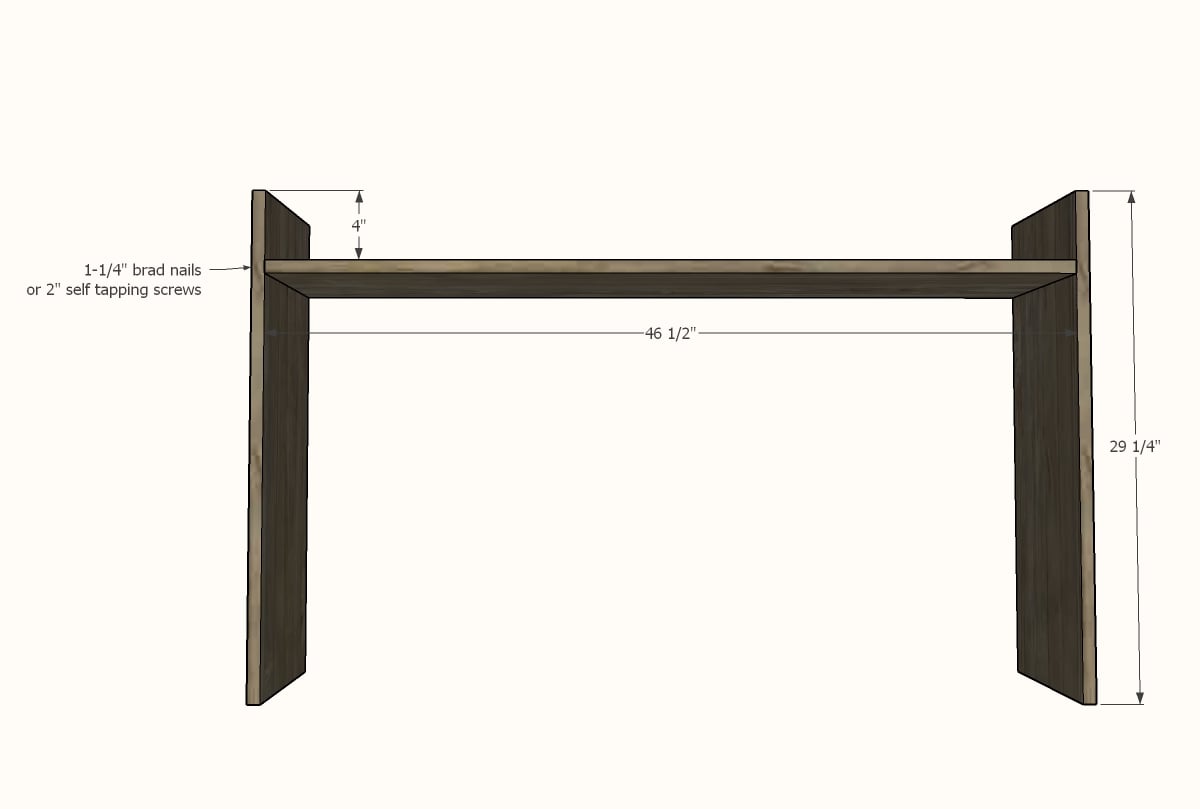
Step 4

Attach top to the outer legs.
Recommended: 1-1/4" brad nails with glue since they are easiest to hide.
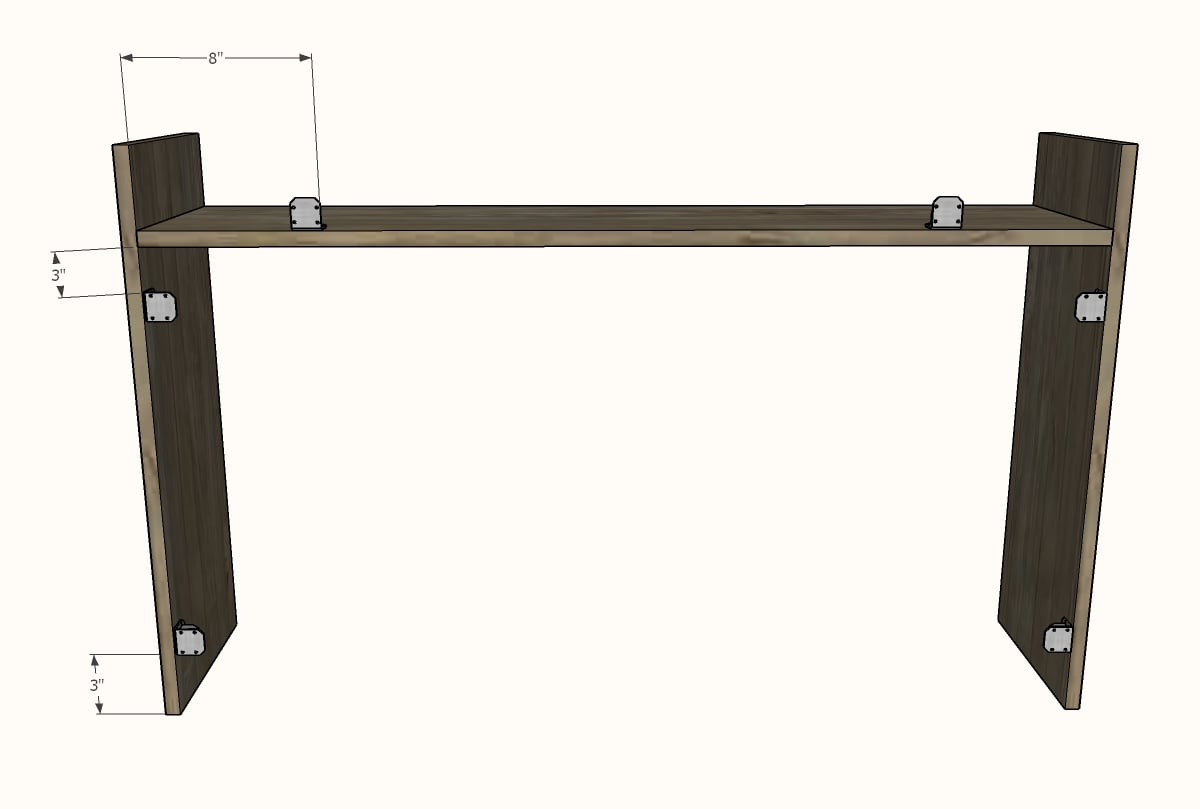
Step 5
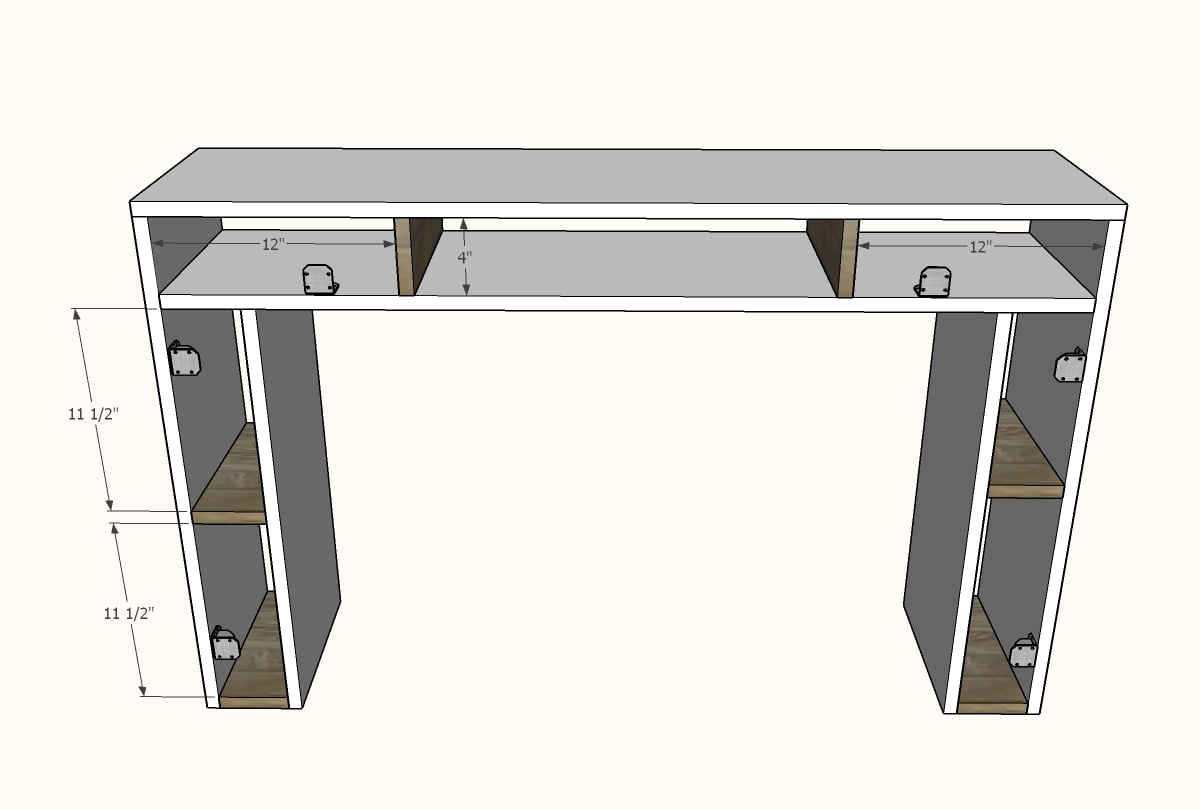
Attach dividers inside the project as shown - I've placed them so you can fit an 8-1/2" x 11" book/paper in the openings, but you can move the dividers around a good bit without changing the structure of the project.
Recommended: 1-1/4" brad nails and glue.
Step 6

Position the 1x6 drawer faces under the project and attach through the hinges with screws to fasten.
Step 7
If you find you need additional support, fully enclosing the back with 1x6s (same as door faces but attached with 1-1/4" brad nails and glue) will increase the stability and strength of the project (but add costs).
The keyboard fold down can be further strengthened by a hidden chain or hinge supports on the insides of the dividers.

Comments
Aubergine (not verified)
Tue, 05/11/2010 - 21:43
if you weren't using it as a
if you weren't using it as a all the time desk it would look so cool with a matching bench same plan just 50%
Ana as always your stuff is stunning thank you for sharing we are all grateful.
Heidi (not verified)
Wed, 05/12/2010 - 04:39
I love this desk! I may have
I love this desk! I may have to tackle this with my husband as our first attempt at building furniture.
Jennifer (not verified)
Wed, 05/12/2010 - 05:59
This is really cool! I just
This is really cool! I just love the simplicity of it.
Hmmm... If anyone is in the market for a new computer, the Dell Studio Hybrid would fit inside the legs of this perfectly - just make sure to cut out openings in the back for ventilation. :)
It's a really small, narrow desktop. I have one hooked up to my TV downstairs and most people can't even tell it's a computer!
Jennifer
Natty (not verified)
Wed, 05/12/2010 - 07:24
Ditto on the bench idea. I
Ditto on the bench idea. I would use this as a vanity. The storage is perfect for small baskets filled with all my make-up and stuff. you could also change it to have a locking hinged top with a mirror on the inside so you could open it up and get ready and then close it up and everything is tucked away. :) So, I've got ideas, now I just need the nail gun :P
Lynne in NC (not verified)
Wed, 05/12/2010 - 09:20
This is amazing! Thanks for
This is amazing! Thanks for sharing the photos and plans.
Peace.
Pat (not verified)
Wed, 05/12/2010 - 10:11
Anna, Are you going modern on
Anna,
Are you going modern on us Ana? (LOL)
I love it ! ...especially the storage concept. My condo is just 950 sq feet. So I know what you mean.
Pat
Vanilla Comfort (not verified)
Wed, 05/12/2010 - 10:20
I've been thinking about this
I've been thinking about this desk ever since you first shared pictures, and now that you've planted the idea of hiding the CPU tower I'm sold. I have a small, short and thin CPU tower so I think it will fit just fine. I would love to hide the modem, router, and all the wires too. I'm just not sure how the modern design will look in my living area. I love the look though, so I might just go for it!
Allie (not verified)
Wed, 05/12/2010 - 19:46
Ana, I haven't gotten around
Ana, I haven't gotten around to saying it yet, but: THANK YOU so much for your site, your plans, and your time. I love this site so much. I am so excited to build this desk and so much more. This plan in particular is fantastic for hiding all my office things from my inquisitive toddler! Lol! THANK YOU!!!
Allie (not verified)
Wed, 05/12/2010 - 19:47
Oh, and I love the coffee and
Oh, and I love the coffee and end tables linked in this post! YES, make plans for them... if you have time! lol
Jenny (not verified)
Thu, 05/13/2010 - 09:12
Ana, where is your CPU tower
Ana, where is your CPU tower hiding? I know it's not in the leg of the desk, but where did you put it so that it is out of sight?
I love, love, love the idea of concealed storage in this desk. We have an office/baby's room in one, and hiding all the grab-able things from baby would be divine.
Ana White (not verified)
Thu, 05/13/2010 - 12:46
I actually work from a
I actually work from a laptop, but the screen is going bad and it's tiny. So I hide my laptop in desktop and use a USB mouse and a monitor. I'm LOVING my desk, can't wait to see yours.
Maulana (not verified)
Sat, 07/03/2010 - 23:34
it is really simple n
it is really simple n functional.
with white color that give brightness..
http://www.ergonomicdeskchair-s.com
Krista Nicole (not verified)
Fri, 07/23/2010 - 06:44
Hi Ana,I made this desk with
Hi Ana,
I made this desk with a few modifications for size because I wanted it a little deeper but the front of mine will not stay properly shut. I installed the same type of hinges but it still stands ajar. I put in some magnetic closures in hopes that would help. I have adjusted the placement of the hinges but it still won't shut properly.
Do you have any suggestions to solve my problem?
Thanks!
Ana White (not verified)
Fri, 07/23/2010 - 08:44
Krista, maybe you could try
Krista, maybe you could try to move the hinges out? To me, it sounds like the hinges need to be adjusted. The hinges should have a little "play" room, try perhaps backing the screws out a tiny bit (where the hinge connect to the desk, not the door) and pulling the door directly out and then tightening the screws. Hope this helps! Ana
Genevieve (not verified)
Tue, 07/27/2010 - 14:41
I am starting my MBA in the
I am starting my MBA in the fall and also have limited square feet, this makes a great vanity and desk combined! I'm definitely going to do glossy white! Sorry Ana.
Laura McMillin Lewis (not verified)
Tue, 08/03/2010 - 05:49
If using the legs for CPU
If using the legs for CPU storage, please be sure to remove the back of the leg entirely and do not place the desk flush with the wall in order to get proper ventilation. CPUs do not like to be warm and will overheat in a closed environment.
Otherwise... LOVE it!!
Chelsea (not verified)
Fri, 10/01/2010 - 17:43
I have mine glued and ready
I have mine glued and ready for paint! Right now the plan is blue, we shall see what happens when I get to the paint store tomorrow. I made mine out of MDF so it is just glued and not screwed together, we shall see how that goes. My hinges look a bit different but they are the same time. I drill pilot holes for the attachment to the desk so I am hoping I can paint the put the screws in by hand.
Ana White (not verified)
Sat, 10/02/2010 - 08:35
Chelsea, it looks fantastic!
Chelsea, it looks fantastic! Thanks so much for adding a photo! Ana
Easy DIY Plans… (not verified)
Sun, 10/17/2010 - 19:40
[...] was nothing wrong with
[...] was nothing wrong with my previous desk. It just that I’m spending more and more time at my desk, and need something bigger. That, [...]
Michelle (not verified)
Tue, 10/19/2010 - 06:51
I bought the wood today to
I bought the wood today to make this desk. I'm thinking that there was probably a more economical way for me to build it... I bought 3 - 1x12x8, and 2 - 1x6x8 which equaled $51.94 (and then 17.82 for the hinges)...I think the wood was called "whitewood". I'm REALLY excited to make this desk but am thinking maybe there was a cheaper wood that I should have looked for, or I should have done it with the MDF? Any suggestions would be wonderful! We have several projects we are wanting to make so if i'd be cheaper to do this in MDF, I could possibly save the boards I just bought for a project that needs real wood! Thank you so much for the wonderful plans Ana, I've told almost all of my friends about your website and they have a hard time believing that you provide these amazing plans for them to use for free!