


How to build a drop leaf storage table with free, simple, step by step plans from Ana-White.com


For years now, I've been wanting to make this table.
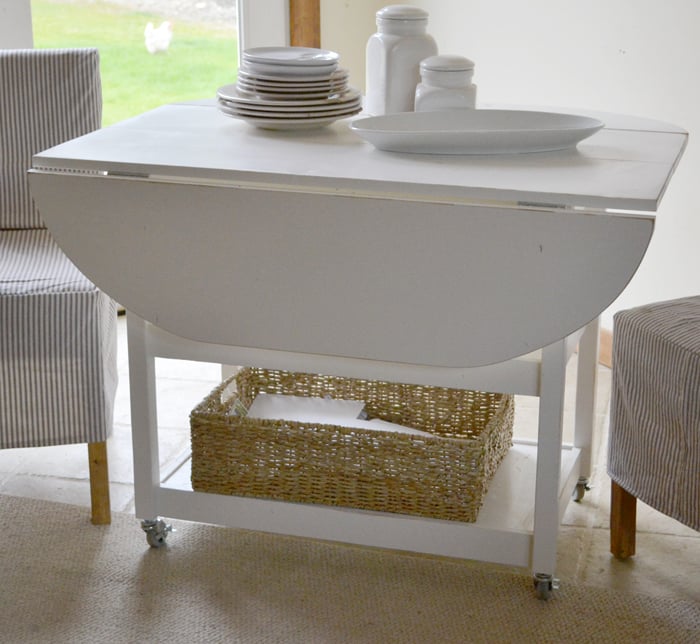
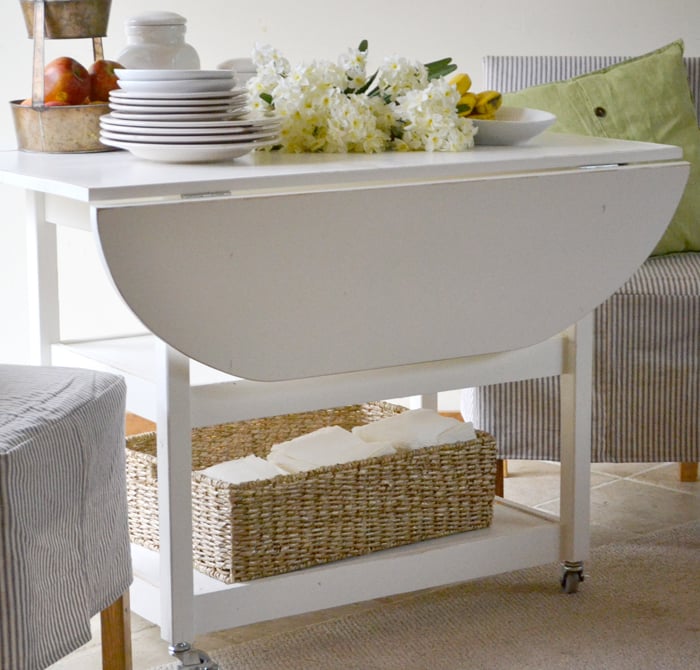
It's inspired by the Pottery Barn Shayne Table, but mine is a little smaller to fit my smaller space, and also optimized for lumber cuts. And I put caster wheels on mine.
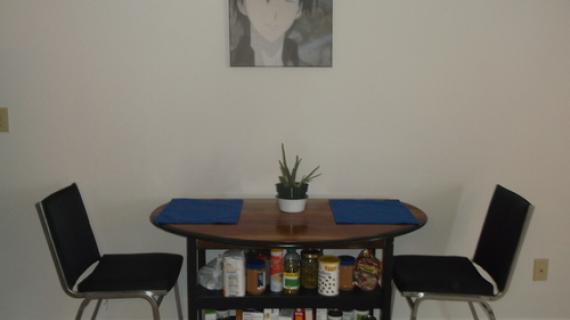
You see, we have this itty bitty dining room - which is just right for my itty bitty family of three. But our family of three can expand exponentially with one relative popping in to say hello and ending up staying for dinner. This happens quite often.

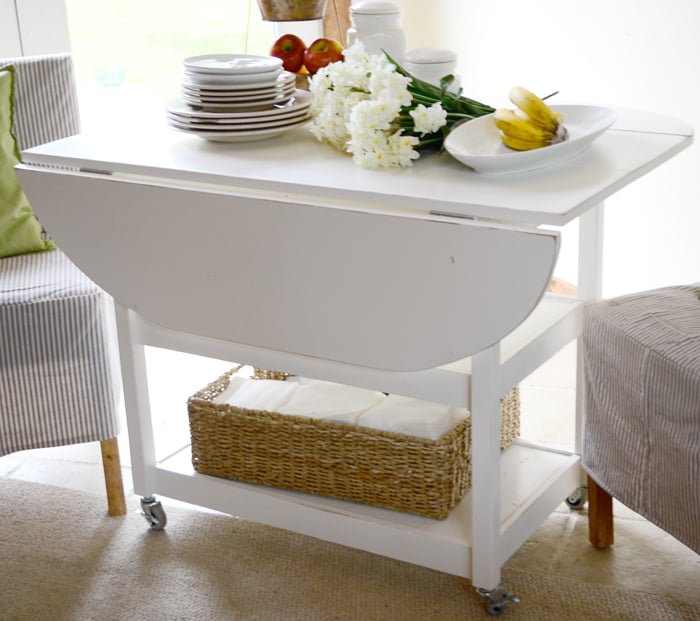
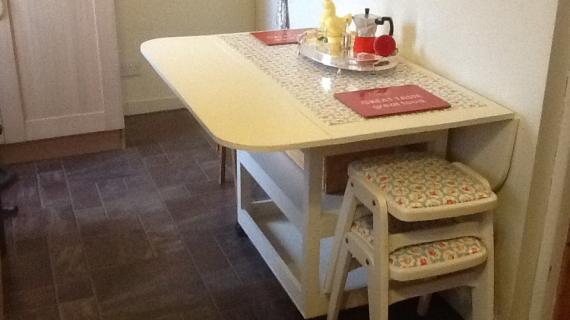
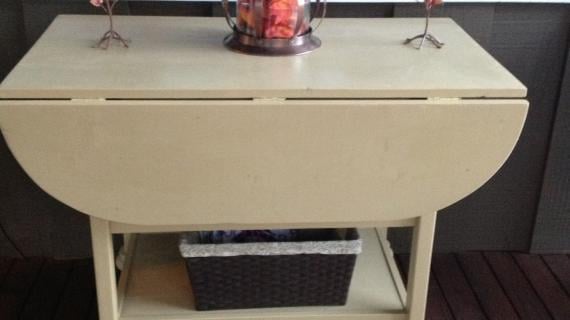
With this new table, we can go from seating for a few ...

To seating for quite a few more

By just pulling the leaf up.
And then it's quick and easy to go back to the small table that is much easier to walk around.
I don't know why I've waited so long to build this table. Once I drew the plans up and started working, it was only a few hours to build it! And using leftover 1x16s from my closet, the total cost of this project was about $50!
Here's a breakdown of costs
2 - 1x12 @ 8 feet long - $24
2 - 2x2 @ 8 feet long $4
2 - 1x3 @ 8 feet long $3
1 - 1x4 @ 8 feet long $5
Set of 4 2" caster wheels - $4
2 - Sets Drop Leaf Table Supports - $7
2 - Sets Basic Hinges - $2
$50 bucks! Beat that with a stick ... uh, I mean board!!!!
Enjoy the plans!
Good luck building your own drop leaf storage table and please share photos with us when you are done! Can't wait to see!
Preparation
2 – 2x2 @ 8 feet long
1 – 1x4 @ 8 feet long
2 – 1x3 @ 8 feet long
2 – 1x12 @ 8 feet long
1 – ½ sheet ¾” plywood
2 - sets of basic hinges
2 - Drop Leaf Support 8 inch Pair
4 - 2" caster wheels
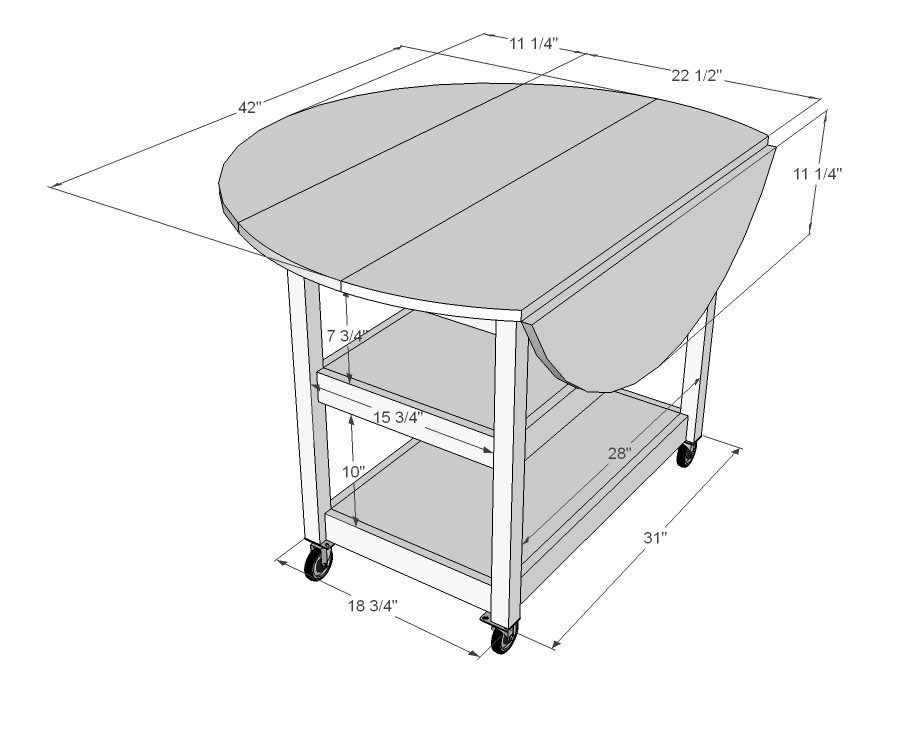
4 – 2x2 @ 26 ¼”
2 – 1x4 @ 15 ¾”
4 – 1x3 @ 15 ¾”
2 – ¾” Plywood 15 ¾” x 28”
2 – 1x4 @ 28”
4 – 1x3 @ 28”
4 – 1x12 @ 42”


Please read through the entire plan and all comments before beginning this project. It is also advisable to review the Getting Started Section. Take all necessary precautions to build safely and smartly. Work on a clean level surface, free of imperfections or debris. Always use straight boards. Check for square after each step. Always predrill holes before attaching with screws. Use glue with finish nails for a stronger hold. Wipe excess glue off bare wood for stained projects, as dried glue will not take stain. Be safe, have fun, and ask for help if you need it. Good luck!
Instructions
Step 1
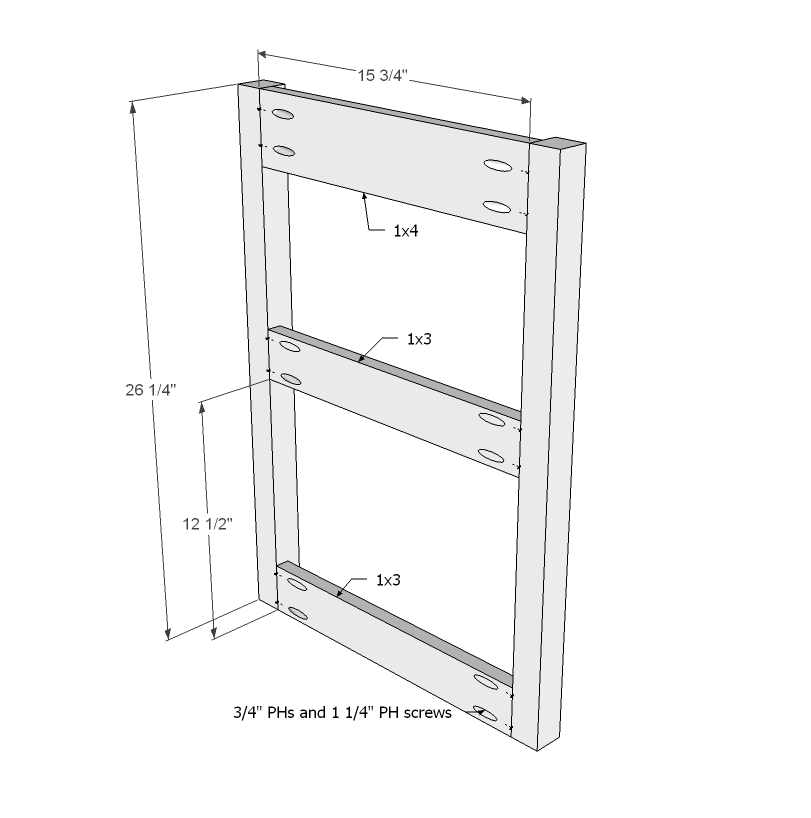
Start by building two ends. Super easy. Keep the insides flush, hiding the 3/4" pocket holes to insides, and joining with 1 1/4" pocket hole screws and glue.
TIP: Drill 3/4" pocket holes facing upward on insides of top aprons for later attaching your tabletop.
Step 2
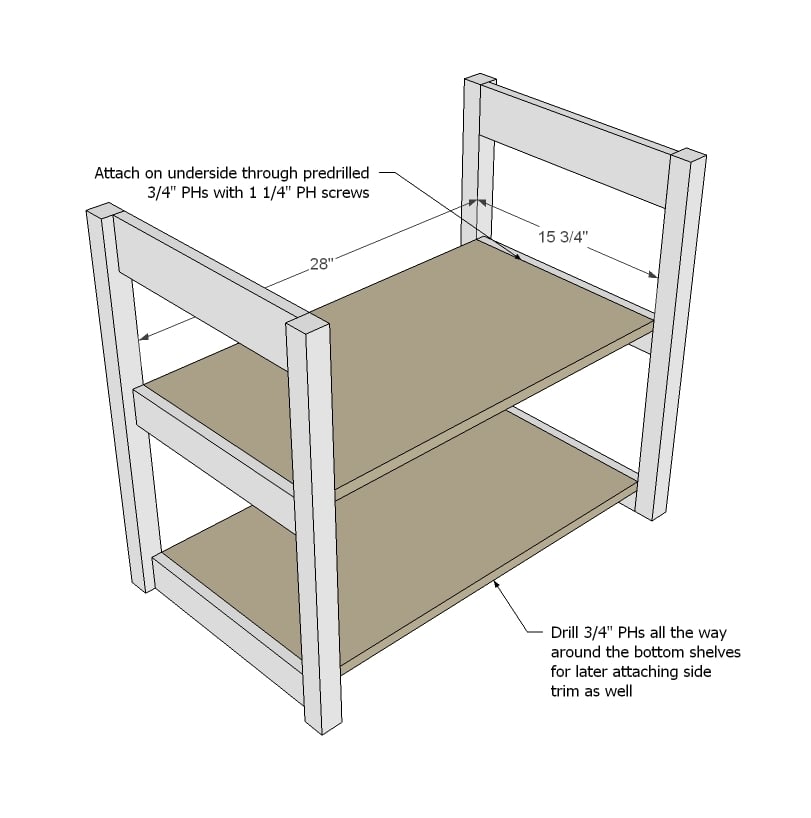
Drill 3/4" pocket holes all the way around both shelves. Attach to legs as shown in diagram.
Step 3
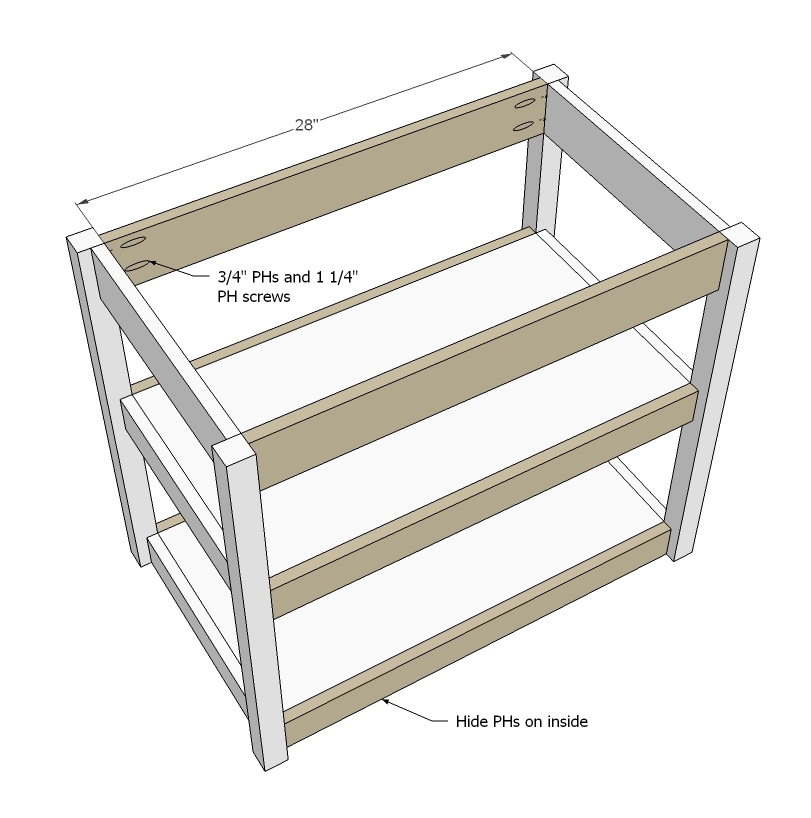
Then add your side trim with 3/4" PHs and 1 1/4" PH screws, attaching the shelves also to the corresponding trim.
TIP: Drill 3/4" pocket holes facing upward on insides of top aprons before attaching to table for later attaching your tabletop.
Step 4
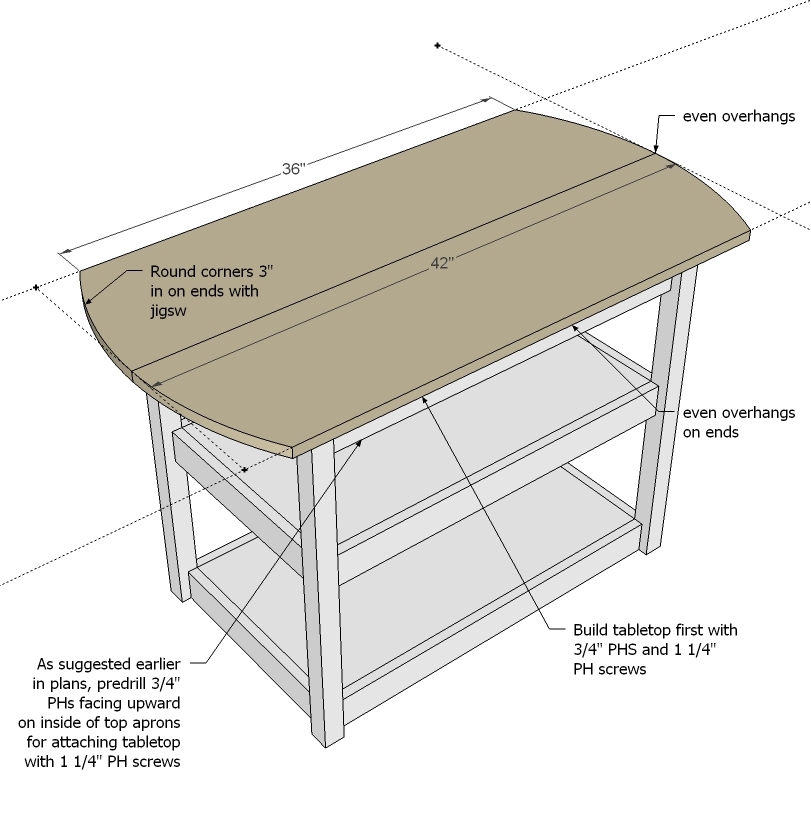
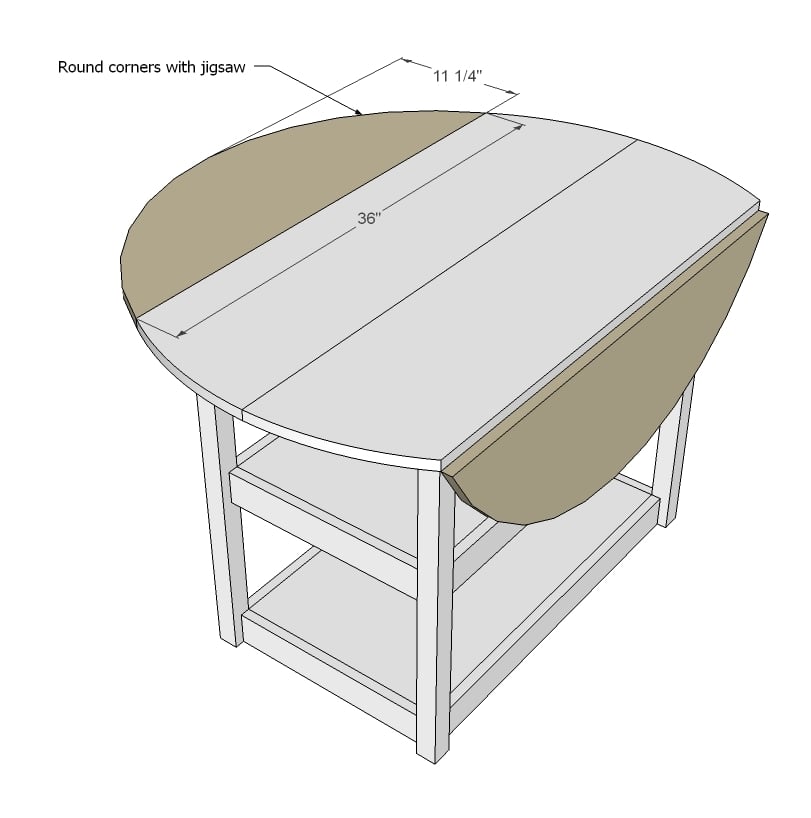
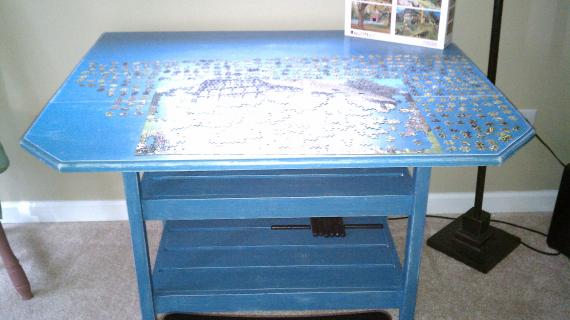
What I actually did here was build my tabletop with a row of 3/4" pocket holes/ 1 1/4" pocket hole screws down the center (and glue) and attached to tabletop. Then I attached the two leaves, so the tabletop is a giant square. Then I drew out the arch shape I liked and cut with a jigsaw.
Here's a video on cutting arches with a jigsaw. Just be very careful to make sure your jigsaw blade isn't beveling as it cuts the wood, and go slow. Use a very sharp, appropriate blade. And remember, you can always take more wood off later! Practice, practice!
Step 5
Step 6
I also posted a step by step tutorial on how I finished this table here.
Step 7
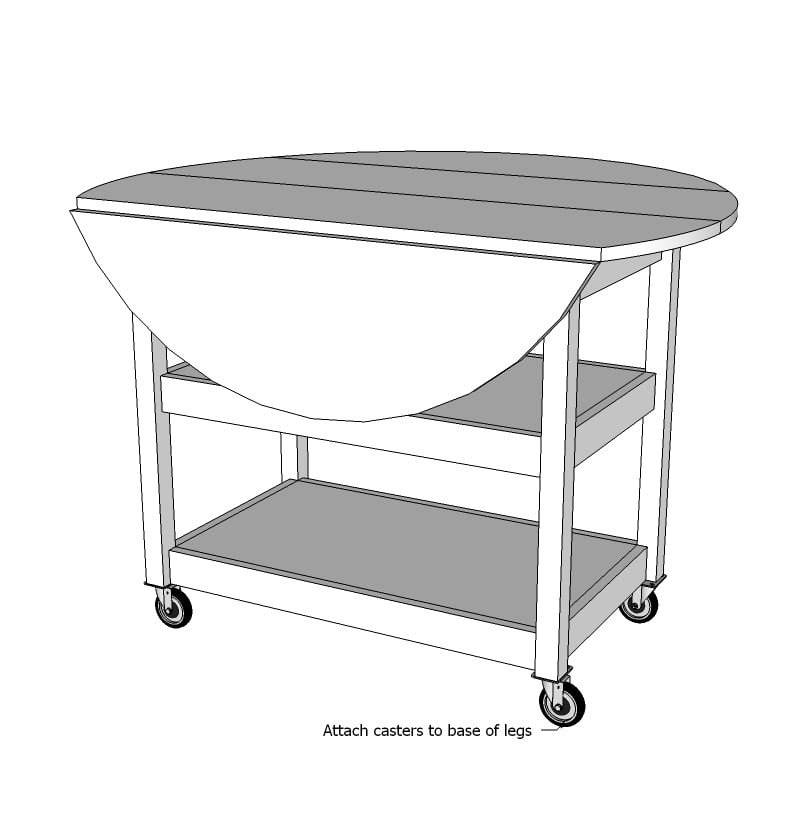
Add the caster wheels to bottom. I actually did the bolt kind - but a word of caution - I did have some trouble with my caster wheel bolt colliding with the pocket hole screws from the bottom shelf trim, so you may want to opt for the plate kind instead.
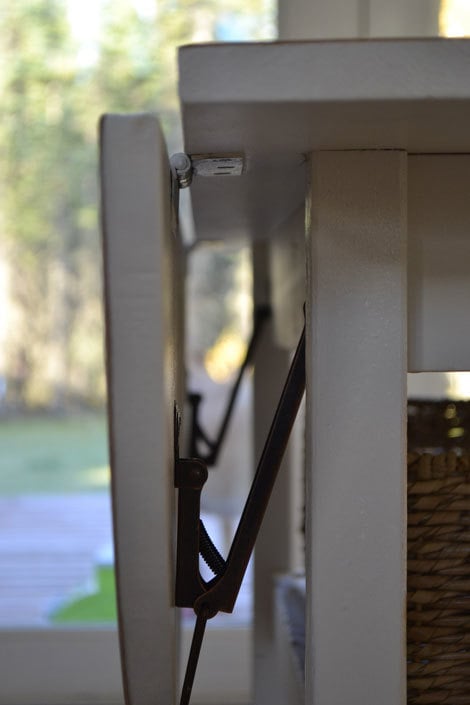
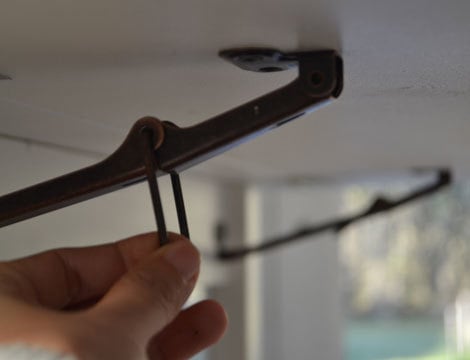
Step 8
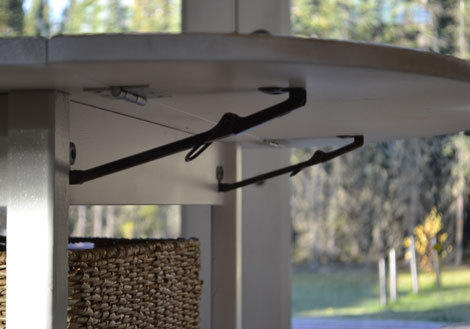
And we waited two weeks for these to come in the mail and they were worth it! They are called Drop Leaf Support 8 inch Pair and no, they are not rock solid, but they are plenty sturdy for our purposes and install in seconds! I recommend installing them about half way down the table apron - you may need to do a little trial and error to get things just right.
It is always recommended to apply a test coat on a hidden area or scrap piece to ensure color evenness and adhesion. Use primer or wood conditioner as needed.

Comments
Seattle Annie (not verified)
Wed, 09/12/2012 - 21:15
WOW! I am regularly awed by
WOW! I am regularly awed by you and have made several of your plans (with hubby's help) We are moving to a new house and need this table badly. You are inspired Ana!
natasha
Thu, 09/13/2012 - 08:08
love it
hey I was wondering if anyone knows where I can get the drop leaf supports online that ships to canada?
thanks
TiffanyO (not verified)
Thu, 09/13/2012 - 10:22
Dropleaf table
I love your table, it is beautiful! I was wondering if there is any way to make a drop leaf with a way to open and add additonal leaves.
JenP (not verified)
Fri, 11/02/2012 - 09:07
I would also like some advice
I would also like some advice to make this with additional leaves and would love some suggestions!
Greer (not verified)
Thu, 09/13/2012 - 11:03
DANG...WHAT A WOMAN!
I'm thrilled to find you, Ana. As early as age 30 I was interested in building furniture - even tried building a sofa, but only got as far as the frame - and did a pretty poor job at that. A few years later I signed up to take a woodworking class at night. I made it to one class and couldn't get back (I worked for a crazy pressure cooker law firm and my life just wasn't my own - spent many late nights there).
I recently found your blog. I've ordered your book (can't wait for it to arrive) along with a book on using a jig, etc. (I'm gonna be prepared!) and am excited about trying some of your projects and, just as excited about learning some of your techniques.
Your Homepage field won't take my website info., but if you're interested you can check out my shop website at www.h2hconsignment.com or my House to House Furnishings Consignment facebook page.
Thanks for sharing all you've learned, Ana. It's a blessing to all us chronically creative closet carpenters!! DANG...WHAT A WOMAN!!!!!!!
Ana White
Sun, 09/16/2012 - 09:41
After using this table for a
After using this table for a few weeks I do have a suggestion. Cut the tops 48" long instead of 42. This will give you about 3 extra inches on the end to make sitting at ends better. Thanks everyone for reading and commenting hope to see your tables soon!
Smarti1957 (not verified)
Thu, 09/27/2012 - 21:42
Drop-Leaf Table
I've been wanting one of these for a long time. Even bought the drop-leaf support hinges (Ikea has REAL sturdy locking ones that aren't expensive) but never had THIS kind of plan to make my own. Now I think I will make one and keep the rectangular top, just because it would fit my place better. THANKS for sharing. You do amazing work.
Jake
Wed, 11/28/2012 - 18:04
I Know What You Are Gonna Say....!
I really like this table and I really need one for the kitchen now. But I don't like to use my jig saw because it and I never seem to want to go in the same direction. So here is my plan. I want to build the table as a rectangle and to use 4x4 legs rather than the 2x2s. I know you love seeing your fans try new things so I know you are gonna say .. "Go For It!" but I wondered if you thought the fatter legs would make the table look funny? If they do how about 2x4s?
Jaclyn (not verified)
Mon, 12/24/2012 - 09:56
Butcher block top
Does anyone know if I can make this top, square, out of butcher block instead?
Brenna (not verified)
Wed, 01/09/2013 - 13:59
I don't see why you couldn't!
I don't see why you couldn't! I think it would look great with butcher block on top!
Brenna (not verified)
Wed, 01/09/2013 - 13:58
Drop Leaf Supports & Casters
Just the project I was looking for! I'd love to try this with a rectangular top for the sewing room (perfect because I could wheel it out of the way when not in use).
Anyone have any suggestions on where to get the drop-leaf supports in Canada though? Unfortunately the ones on Amazon aren't available for Canadian shipping. Also, having some troubles finding reasonably priced locking casters.
Thanks so much!
Metrohippymom (not verified)
Fri, 01/11/2013 - 12:55
12" wide boards
Hi, I have a question for you: The two 12" wide boards make the table top but the finished width of the tabletop is 22.5" wide. I'm going crazy trying to figure out why. Help! :-)
PaulT (not verified)
Tue, 01/22/2013 - 17:38
Not Dimensional lumber
The two 12" wide boards make a final width of 22.5" because the 1x12's you see at a hardware store are really .75 X 11.25. So, 11.25 twice is 22.5.
DPittas
Sat, 10/05/2013 - 11:11
Hinges
Ana... Building this table for my daughter. My question is there any other hinge that might be stronger for the drop leaf? My daughter is only twenty one and out on her own. Need I say anything more...
Douglas
Chiclevic
Sun, 04/20/2014 - 19:40
Kreg Jig and Pocket holes
Hi!
I have a question... In my country you can't find the Kreg Jig on sale, it just doesn't exist here. I thought about ordering one online... but then I would also need to buy the special screws online as well...
My question is, is it really needed? Is it used because is more stable? If I build this table with the 'usual' screw technique, will it disassemble with time?
Thanks, and sorry for my English!
Dasenka
Inquisitive
Wed, 06/03/2015 - 07:40
Slight change
I love this design! So my youngest daughter (college student) is moving to her first, very small, unfurnished apartment and I am trying to put together some furniture. My husband and I are planning to build this with a twist. We purchased a used cherry cocktail table with drop leaves. It actually opens out oval. We are planning to build the bottom like this plan, conforming to the apron already on the cocktail table. We will just be unscrewing the Queen Ann Legs and replacing them with this shelving plan, and adding the wheels. Thanks Ana for such great inspiration. I will post a picture when we are done. The plan is to leave the cherry top and paint the shelf assembly black.
MaLori
Sun, 10/04/2015 - 15:44
Drop Leaf Table
How have I not heard of this site? I am thrilled to find it and LOVE!!! the dropleaf table! Gonna try it! :)