
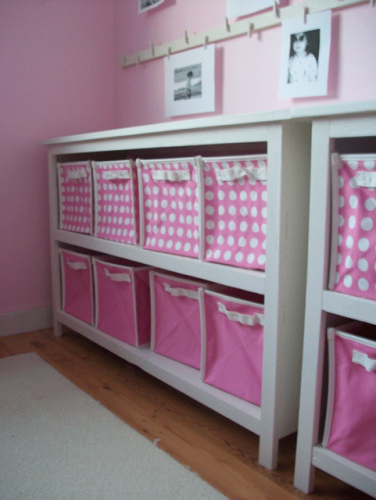

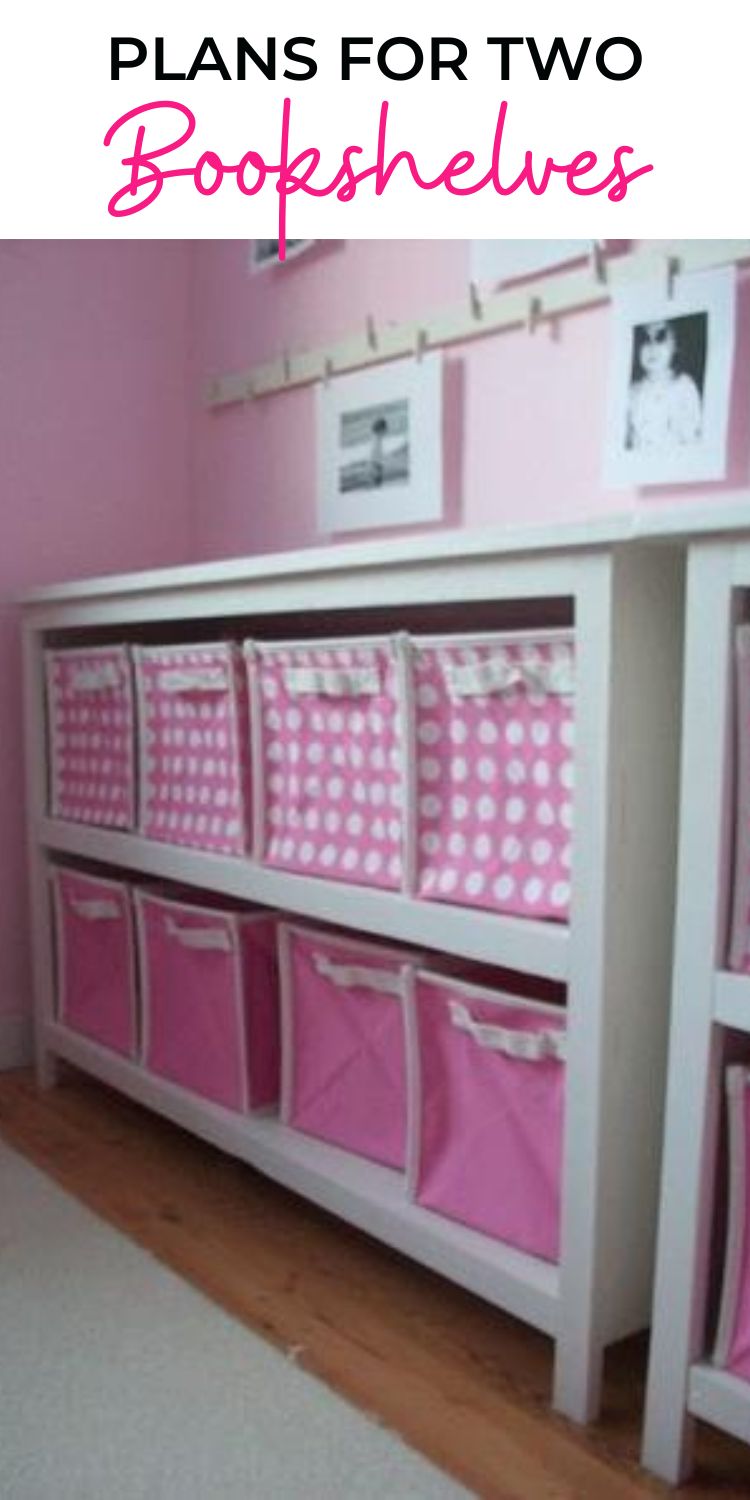
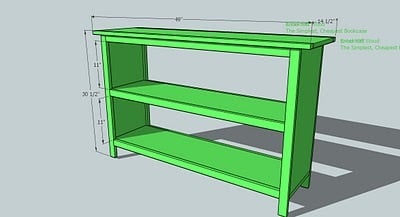
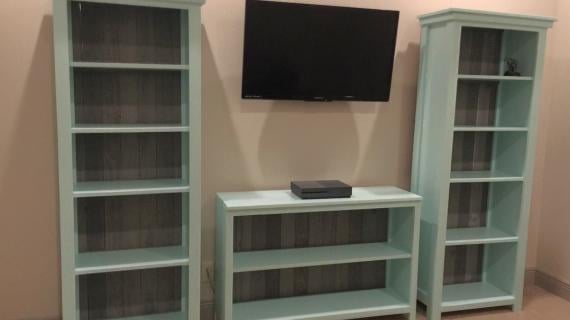
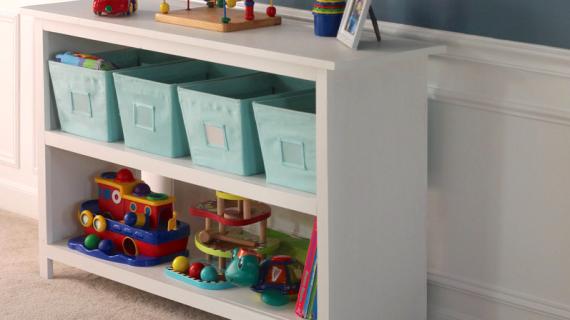
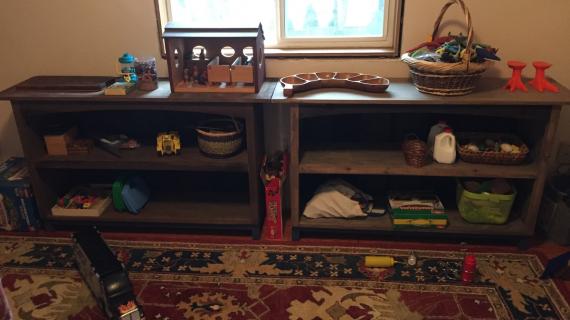
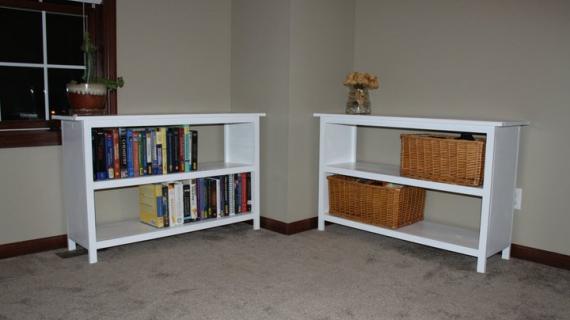
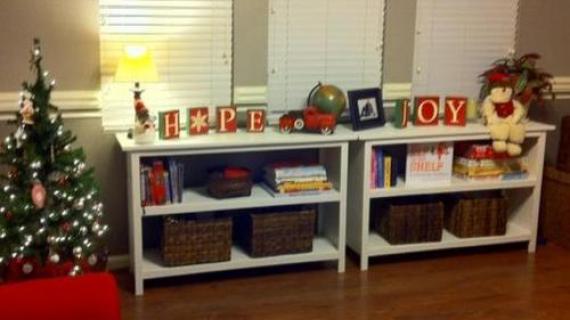
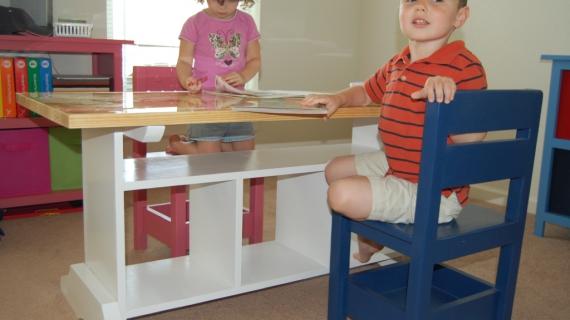
Here's a basic woodworking plan for a bookshelf built using 1x12s. The face frame on the front and back make up the legs and front and back overhangs. Free step by step plans from Ana-White.com
Pin For Later!

Preparation
- 2 - 1×12 pine boards
- 5 - 1×2 pine boards
A) 2 – 1x12 @ 44″ (Shelves)
B) 2 – 1x12 @ 25 3/4″ (Sides)
C) 2 – 1×2 @ 44″ (Top Supports)
D) 4 – 1×2 @ 29 3/4” (Legs)
E) 4 – 1×2 @ 42 1/2″ (Shelf Trim)
F) 2 – 1×2 @ 11 1/2″ (Bottom Side Trim)
G) 1 – 1x12 @ 49″ (Top)
H) 2 – 1×2 @ 49″ (Top Trim)
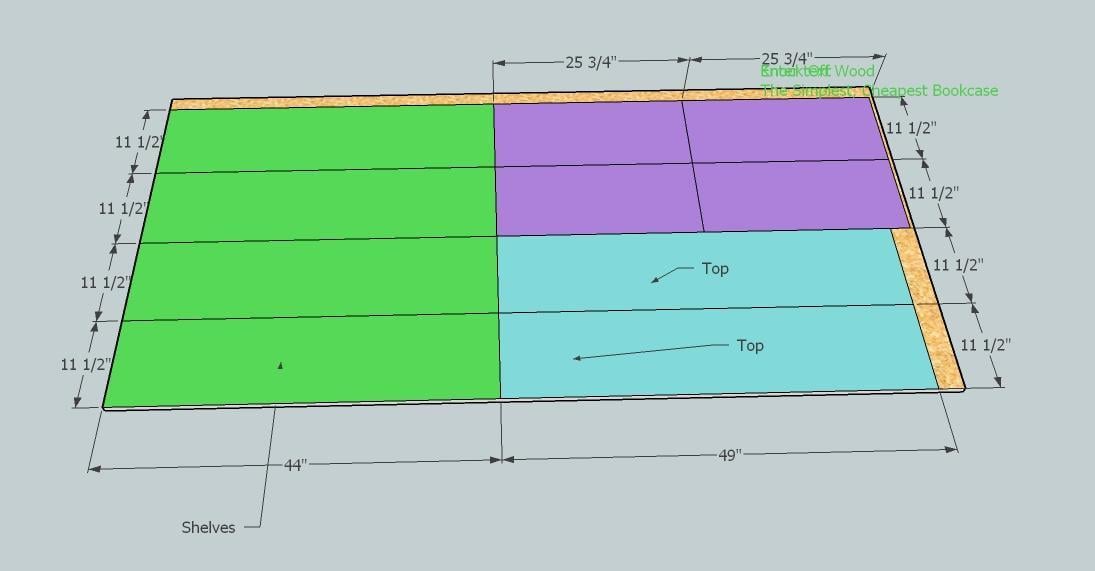
THIS PLAN IS FOR 2 BOOKCASES!!! Have Home Depot or Lowes cut your sheet of MDF into 11 1/2″ strips, 8 feet long. Remeber that the saw blade takes up 1/4″ (approximately) so you CANNOT mark the plywood and cut. You must mark one cut, cut, mark the next cut and so forth. General Directions. See the post on choosing your wood type. I built my bookcases out of MDF and had success by not nailing within 1″ of the edges. I used lots of glue. Cut all your boards first and use 2″ nails unless otherwise specified. Always take a square after each step (See HOW-TO section).


Instructions
Step 1
Optional Plywood Ripping Diagram
You can also use plywood or MDF to build this bookshelf. One sheet of plywood will build two bookshelves. Here's how to cut the plywood for two bookshelves
Have your plywood or MDF cut into 11 1/2" wide strips to create 1x12 boards. Carefully follow the cutting layout here to conserve boards and get exactly two bookshelves out of 1 sheet of plywood.
Step 2
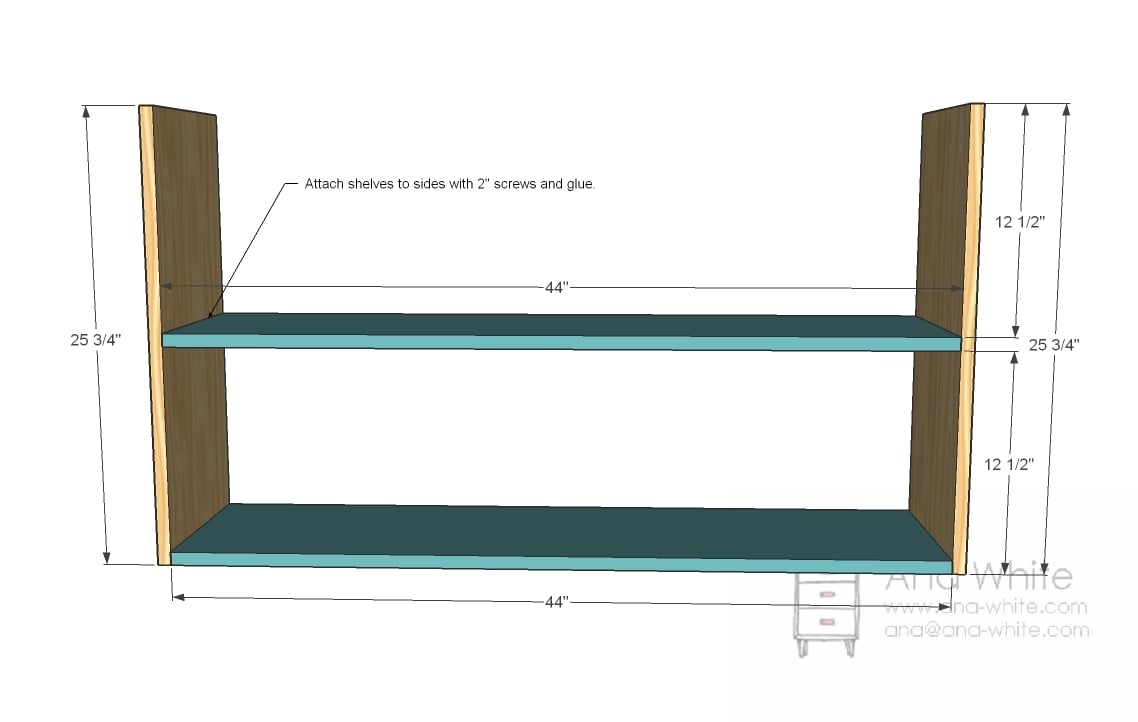
Attach the sides to the shelves with either 2" nails and glue or 2" screws and glue. This shelf is fully framed, so nails will suffice, but screws - though harder to hide - are stronger.
Step 3
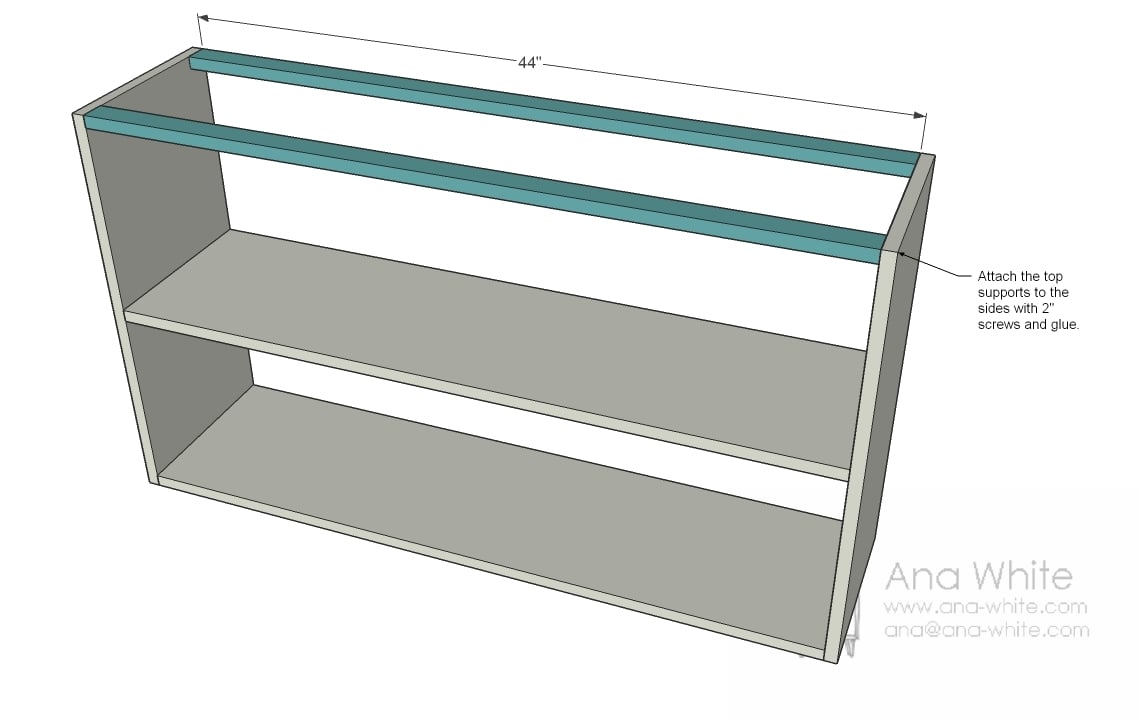
Top Supports. Add the top supports (C, Green) as shown above.
Step 4

Attach the top to the bookcase as shown above. You can fasten through the supports to hide screw/nail holes.
Step 5
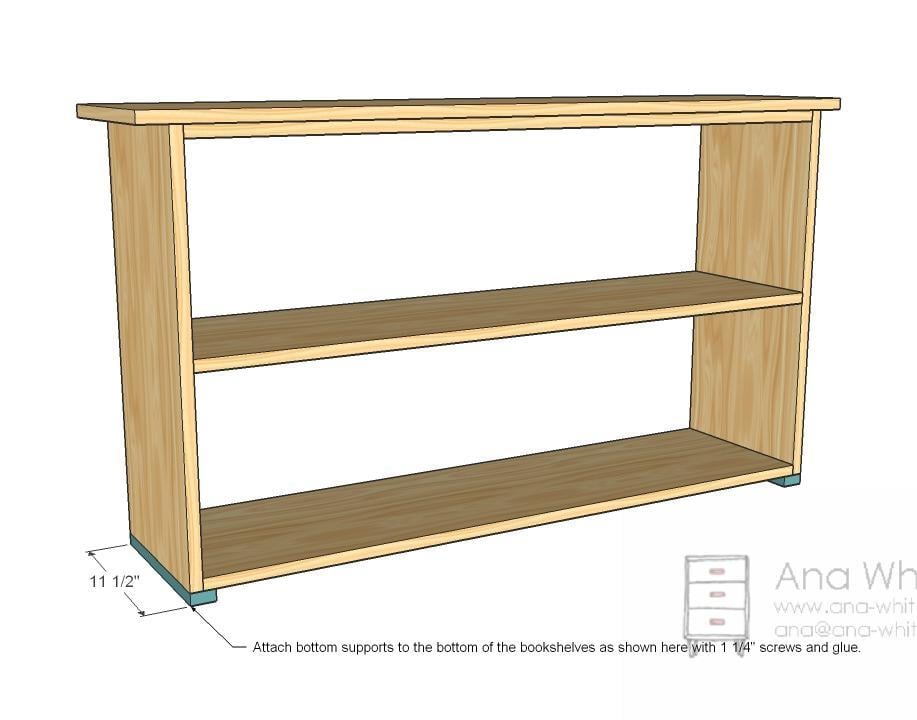
Attach the bottom trim pieces with 1-1/4" brad nails and wood glue.
Step 6
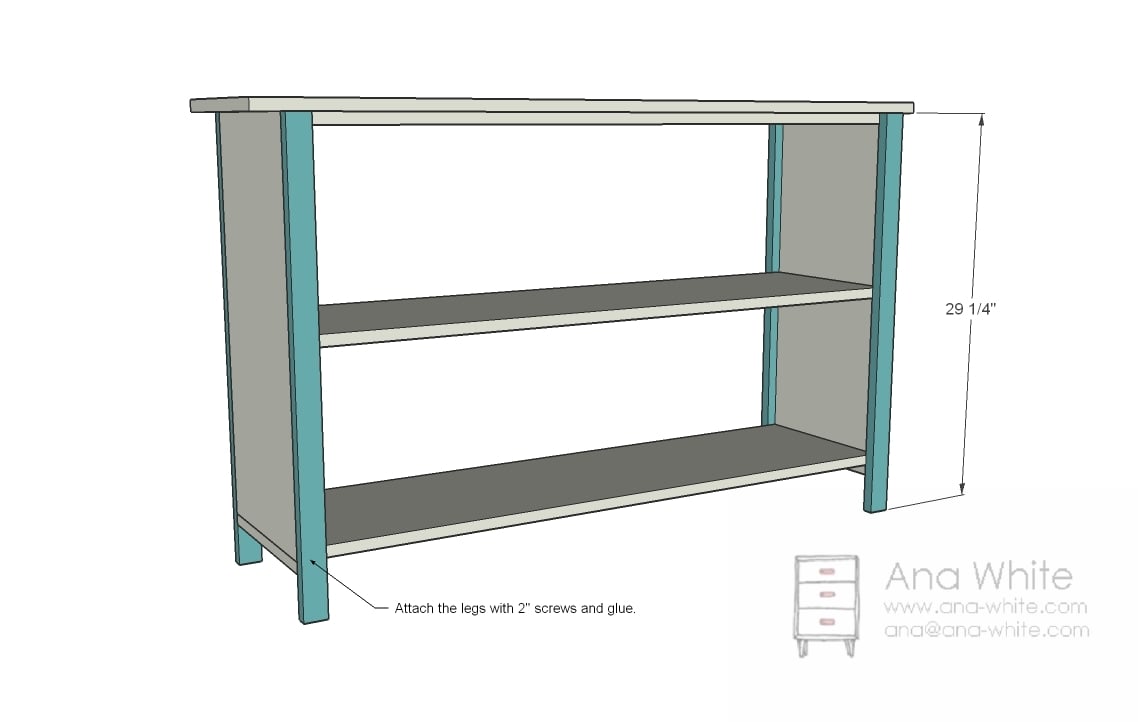
Now it's time for the legs. Flush to the top and outsides. Use 2" finish nails and glue or screws and glue.
Step 7
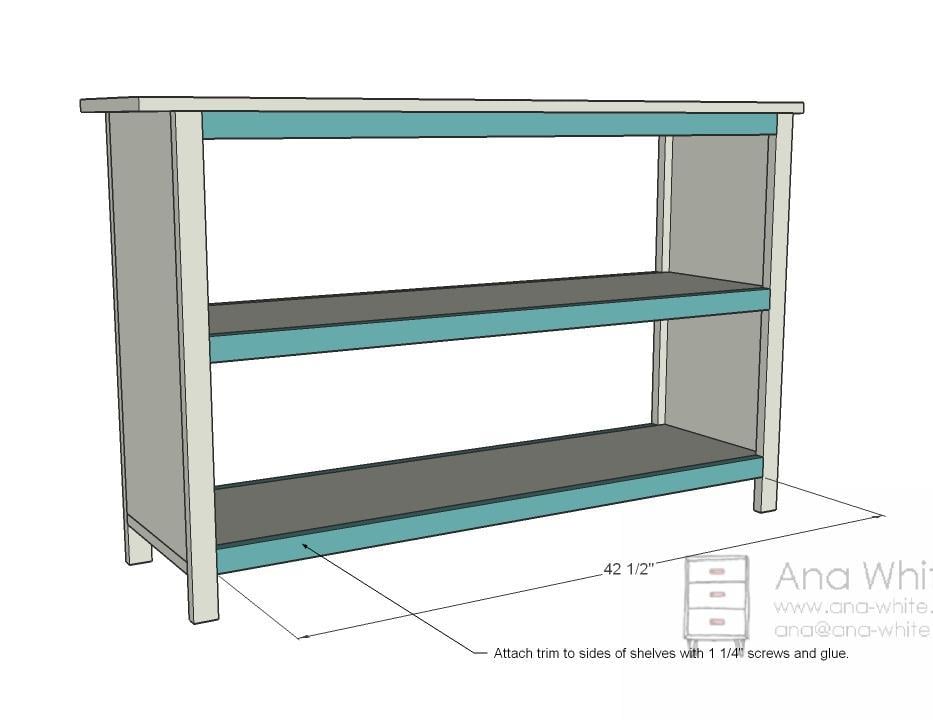
Shelf trim. Attach the shelf trim just like you did the legs. You should also fasten 2" finish nails through the sides of the legs into the shelf trim.
Step 8

Finally, attach the top trim as shown above. I would use finish nails here to hide holes. Don't forget your glue.
Step 9
Fill nail holes with putty and sand and finish as desired.

Comments
Jennie (not verified)
Thu, 01/07/2010 - 19:11
WOw! These are so fabulous.
WOw! These are so fabulous. I could find a spot for those. Thanks for all the details. Great Job!
Jennie @ Cinnaberry Suite
Candace@crafty… (not verified)
Thu, 01/07/2010 - 19:34
I am really going to make
I am really going to make these...very soon! I love them!!
Karen (not verified)
Thu, 01/07/2010 - 20:11
Thanks for the photos, Ana.
Thanks for the photos, Ana. With the layout plan (what do you call that?) and your build plans you have enhanced what was an awesome resource to start with!
Maryann @ Dome… (not verified)
Thu, 01/07/2010 - 20:38
Love these! You have some
Love these! You have some amazing creations. I'm following you!
Amanda (not verified)
Thu, 01/07/2010 - 21:32
These shelves are great, and
These shelves are great, and your SketchUp tutorial is outstanding! Thanks for sharing!
Liz (not verified)
Fri, 01/08/2010 - 00:43
WOW, what a phenomenal job!
WOW, what a phenomenal job! I'm impressed.=)I have 4 little girl's who would love this. Thanks for sharing! ~Liz
Gina (not verified)
Fri, 01/08/2010 - 03:20
AMAZING!!
AMAZING!!
valerie (not verified)
Fri, 01/08/2010 - 03:20
These look great!! I am going
These look great!! I am going to try these!! Thanks so much for the plans.
Kellie (not verified)
Fri, 01/08/2010 - 04:09
These are really amazing!
These are really amazing! Thank you for sharing your wealth of knowledge. I know that this is a sight for woman to get their woodworking on, but my husband and 12 year old son are learning to build this year together, and I am certain he will enjoy looking through your site as well!
Ellen (not verified)
Fri, 01/08/2010 - 05:43
I just found you-You have
I just found you-You have created a very inspiring blog, I feel like I can go get some lumber and put a project together in no time. I am a devoted follower now!!
ShellBell (not verified)
Fri, 01/08/2010 - 06:19
These are great! What if you
These are great! What if you don't have a nail gun? Can you just use a regular hammer and nail?
Brooke - in Oregon (not verified)
Fri, 01/08/2010 - 06:28
Just found you from Ucreate
Just found you from Ucreate it and I LOVE your blog! I can actually DO this project. Thanks!!
Kacey R. (not verified)
Fri, 01/08/2010 - 07:00
I cannot tell you how giddy I
I cannot tell you how giddy I am to have found your blog through Be Different...Act Normal. You are my hero! ;-) LOVE these book cases. Did you buy your storage containers from PB Kids or did you find them somewhere else? This is going on my To Do List for sure!
Ana White (not verified)
Fri, 01/08/2010 - 07:09
Storage Containers are from
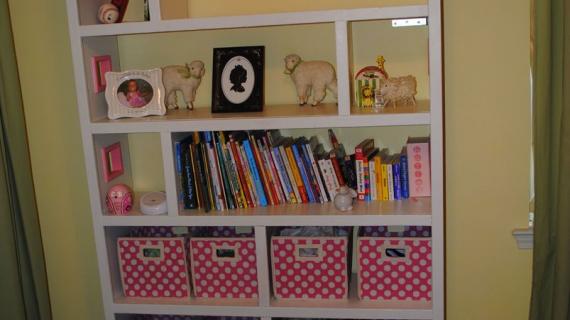
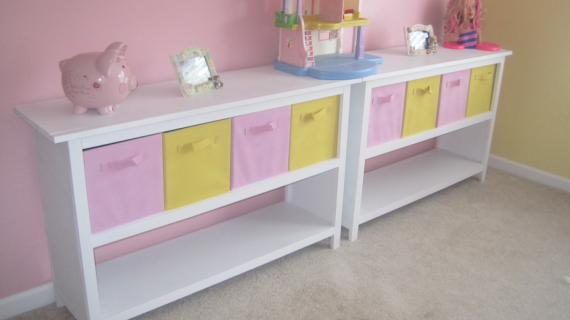
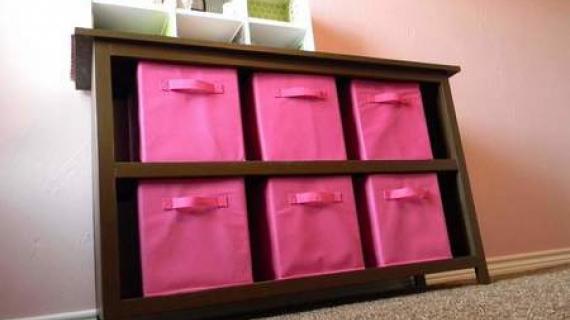
Storage Containers are from PBKids. That was the best I could find. If you use this link, the sale is even better for some reason. The bins are $6.99 for the solid, $8.99 for the dotted, and the HUGE tote was $25. The Tote is huge (see post on Goofing Off) my daughter and I can fit inside it together. Great place for stuffed animals and blankets. Very high quality stuff.
Here is the link:
http://www.potterybarnkids.com/products/canvas-storage-collection/?pkey…
Greg (not verified)
Sun, 01/08/2012 - 08:04
Grace's Bookshelves height question
Hi Anna,
First of all thank you for this site and all the cool plans. I made the doll bunkbeds (x2) for my two daughters for Christmas and they absolutely love them.
My question on these bookshelves is regarding the height of the shelf openings after trimming out. You have a post in this thread stating that the opening is 11 1/2" high but all the diagrams show 11" high and the baskets you reference from PBKids are 14" high. I'm not sure what "standard" baskets are but should we tweak the height of our bookshelf to accomodate a certain basket or are there plenty of basket options out there?
Greg (not verified)
Sun, 01/08/2012 - 08:12
I may have answered my own
I may have answered my own question. Apologies for not reading the PBKids site more closely. Looks like you used the 10x10" square popup baskets for your shelves? Is that correct? If so that fits well with the openings.
therichardsfam (not verified)
Fri, 01/08/2010 - 08:39
I can't wait to try out some
I can't wait to try out some of these ideas. Thanks for posting, I hope that I can do a couple of these projects myself.
Kate @ That's … (not verified)
Fri, 01/08/2010 - 09:08
Totally lovin' the pink saw
Totally lovin' the pink saw horses!
Kacey R. (not verified)
Fri, 01/08/2010 - 09:28
Thanks for the link Ana!
Thanks for the link Ana!
Christina (not verified)
Fri, 01/08/2010 - 09:31
Found your blog through
Found your blog through UCreate. LOVE it! Thanks so much for sharing your awesome plans. =)
Nicky (not verified)
Fri, 01/08/2010 - 11:46
I read your project on U
I read your project on U Create. These projects you're creating are awesome. I feel inspired! I became a facebook Fan.
N. Kimmel
Rebecca (not verified)
Fri, 01/08/2010 - 11:47
oh man I wish I had found
oh man I wish I had found your blog before Christmas! We converted our loft office into a playroom and built shelves very similar to these, but being amateur carpenters, they didn't turn out quite how my hubby was hoping. So glad I found you through Ucreate and that you didn't quit blogging!!
Dana (not verified)
Fri, 01/08/2010 - 12:03
Love this. Wonder, based
Love this. Wonder, based upon the measurements, the actual shelf space should hold 12x12 paper, right? It's 12 1/2 between shelves? If that is the case this would be awesome for scrapbook room!
Ana White (not verified)
Fri, 01/08/2010 - 12:24
Dana, after you put the trim
Dana, after you put the trim on the face of the shelves, the height is only 11 1/2". You will need to just add an extra 2" to the height of all the sides and the legs. Then add 1" between the shelves when you fasten to the sides. This will affect your plywood layout for cutting, so be aware of this.
Kathy (not verified)
Fri, 01/08/2010 - 15:57
First of all, I love your
First of all, I love your pink sawhorses. :)
I found your blog on Ucreate and I felt an instant bond when I saw your before and after pictures of your daughter's room! I am going to make a set of these for both my girls' room and my boy's room. Thank you so much!
bagfashionista (not verified)
Fri, 01/08/2010 - 16:06
you.are.amazing. I am so glad
you.are.amazing. I am so glad that Ucreate had you be a guest blogger for a day.
These are exactly what i'm wanting for my daughter's room and was going to bug hubby to make it...now, maybe i'll just tackle it myself. It sure would be faster!!!
Funky Junk Interiors (not verified)
Fri, 01/08/2010 - 20:07
So smiling here. :) I can't
So smiling here. :) I can't wait for my workshop to get organized! I am going to try one of your plans! One day. Soon!
Donna
Destination Seaborn (not verified)
Fri, 01/08/2010 - 20:48
Thank you! Thank you! THANK
Thank you! Thank you! THANK YOU! Can you tell that I'm excited? I have been begging my husband to build something like this for the past year! I can't wait to show him this plan! YOU'RE AWESOME! ~Lisa
Em (not verified)
Sat, 01/09/2010 - 03:05
You are AWESOME!!!!!!! I am
You are AWESOME!!!!!!! I am so excited I found your Blog- almost every piece of furniture you have palns for are one I love! We are going to make the bookcases this weekend! Thank You Thank You Thank You!!!!!!
Sabrina (not verified)
Sat, 01/09/2010 - 04:48
GREAT JOB! I mean WOW!
GREAT JOB! I mean WOW! These look great and I'm a big PB fan...not the PB price though. Thanks for sharing all the detailed plans too.
Anonymous (not verified)
Sat, 01/09/2010 - 06:51
Oh my! Found you through
Oh my! Found you through UCreate. LOVE, LOVE, LOVE your blog. I'm not sure my hubby thinks I'm capable, but I am totally learning how to do this. Thanks for making it attainable!!
Kari @ Ucreate (not verified)
Sat, 01/09/2010 - 06:57
Ana,THANK YOU again for being
Ana,
THANK YOU again for being a creative guest on Ucreate!! I knew my readers would love you as much as I do!!
Anonymous (not verified)
Sun, 01/10/2010 - 00:03
Ana, I have never made
Ana, I have never made anything like this in my life, but I've been wanting to learn how to build. That being said, do you think this would be a good beginning project? It doesn't seem to take a lot of special tools.
Valerie
~ RM (not verified)
Sun, 01/10/2010 - 08:25
I'm dying to get an nail gun~
I'm dying to get an nail gun~ Could you tell me what to look for, what kind you have, brand nails you prefer and what size air compressor?? I know that's an awful lot of questions, but I don't know much about them! It's very difficult for me to keep everything square when I'm pounding nails in the 'old fashion' way!
Babymichaels (at) hotmail (dot) com
or mamacancraft.blogspot
Thanks!! :)
Ana White (not verified)
Sun, 01/10/2010 - 11:28
This is a great beginner
This is a great beginner project. Not only is the entry cost low, it is fairly simple and will teach you basic skills like lining up your boards and cutting your trim pieces flush.
I have all the pictures of building these bookcases. I will post a post on working with MDF and basic construction skills, so check back.
Good luck, and thank you all for commenting and stopping by!
Virginia's Loo… (not verified)
Sat, 01/16/2010 - 13:54
Ana - I must be blind or
Ana - I must be blind or dumb. I cannot find the website for the baskets...Can you email me the site at [email protected] please. LOVE your site, what an inspiration to us all! You are doing what I dream of doing... I am sooo glad I found you!
Sarah (not verified)
Sat, 01/16/2010 - 17:05
Ana - I love your site! Wow!
Ana - I love your site! Wow! Could you post the plans to add doors (four) to this simple bookcase? I've been looking for a lowboy/hutch for my kitchen and this would be perfect with doors.
Anonymous (not verified)
Sun, 01/17/2010 - 10:11
Ana-My husband and I built
Ana-My husband and I built this bookcase for the boys' playroom. Your plans and tutorial were a great help! We have plans to do other projects in the future. Thanks for sharing your knowledge and I look forward to seeing what you come up with next!!
Carmi (not verified)
Wed, 01/20/2010 - 14:13
This week at Kmart of all
This week at Kmart of all places they have some pop up square totes on sale for $2.50!!! They come in green, pink, blue, red and beige. The beige are on sale for $5.99
Jeannine (not verified)
Thu, 01/21/2010 - 07:33
I know you get a lot of
I know you get a lot of questions, but I'm going to add one more... I love these bookshelves, just what I need for my dining room that we are converting to an office... My problem is that I need one that is 43" long(6" shorter than your plan) and one that is 54" long (6" longer than your plan). So my questions, do you think I can still make 2 out of one piece of MDF? I am assuming my shelf pieces would be cut 6" longer or shorter - depending on which one I am making - correct? and last question, do you think adding 6 inches to the length will effect the integrety/strength of the unit? Thanks in advance for any help you can provide. I want to try to make these myself - without hubbys help!!!
Christina (not verified)
Mon, 01/25/2010 - 10:52
So, found the blog today
So, found the blog today through the Shanty2Chic girls. Love love love! Thanks for all the inspiration!
I was wondering, do you think these shelves would be large enough for a diaper changing station? Big enough for the changing pad and for a little bin next to it for supplies?
I love everything! Thanks for it all!
micki @ ADD ho… (not verified)
Tue, 01/26/2010 - 19:03
ultimate stupid question: Can
ultimate stupid question: Can Home depot make all the cuts I need? I don't have a special saw at home to cut this. but dang, I need to make this!
Ana White (not verified)
Thu, 01/28/2010 - 07:54
mikki, lowe's cut all my
mikki, lowe's cut all my boards. this really helps! I would call first because some Home Depots and Lowes do and some don't. I would try other hardware stores, too.
Kae G (not verified)
Sun, 02/07/2010 - 16:24
Stop! Please stop!! My
Stop! Please stop!! My husband's going to get rid of me with the project list I have now! :) You are fabulous!
Shelley (not verified)
Tue, 02/16/2010 - 07:51
I am ubber excited about
I am ubber excited about starting this project. I will be elated if my shelves turn out 1/2 as nice as yours. Thanks for your posts & inspiration. You Rule!!!!
EB (not verified)
Sat, 02/20/2010 - 10:18
I found you through
I found you through Shanty2Chic and I am already hooked! My husband and I just picked up all of our materials today for these bookshelves and are about to get started. Our first baby is due in four and a half weeks and these will go in the nursery. So far the material gathering has been easy and we got everything cut at Home Depot. I'll post again when we are finished. Thanks for these wonderful plans! :)
Rivka (not verified)
Mon, 03/08/2010 - 18:14
OOOoooohhhhhhh Ana!!! I can't
OOOoooohhhhhhh Ana!!! I can't tell you how excited I am to have found your blog. I also LOVE furniture and am hopeful that I will get to do a few projects this Summer. Was wondering if you have any plans for a Cal King Platform bed? Thank you again. This is just what a busy wanna-be building mom needs!
Dana Stone
Tue, 03/22/2011 - 22:34
I just built this! I am so
I just built this! I am so excited! I finally built something!
Guest (not verified)
Wed, 03/23/2011 - 17:55
Hi Ana, wonderful plans! I'd
Hi Ana, wonderful plans! I'd like to build these shelves, but I'm having an awful time trying to read the text in the plan illustrations (such as the cutting layout.) Clicking on the pics allows me to "View Image," but it's the same small size. Am I missing something somewhere on the page that will take me to a larger image to view? Thanks!! : )
In reply to Hi Ana, wonderful plans! I'd by Guest (not verified)
Ana White
Wed, 03/23/2011 - 18:27
Thank you for letting me know.
Just uploaded larger images, should be fixed! Really appreciate that you took your time to let me know so I could fix it! Thank you so much! Ana