

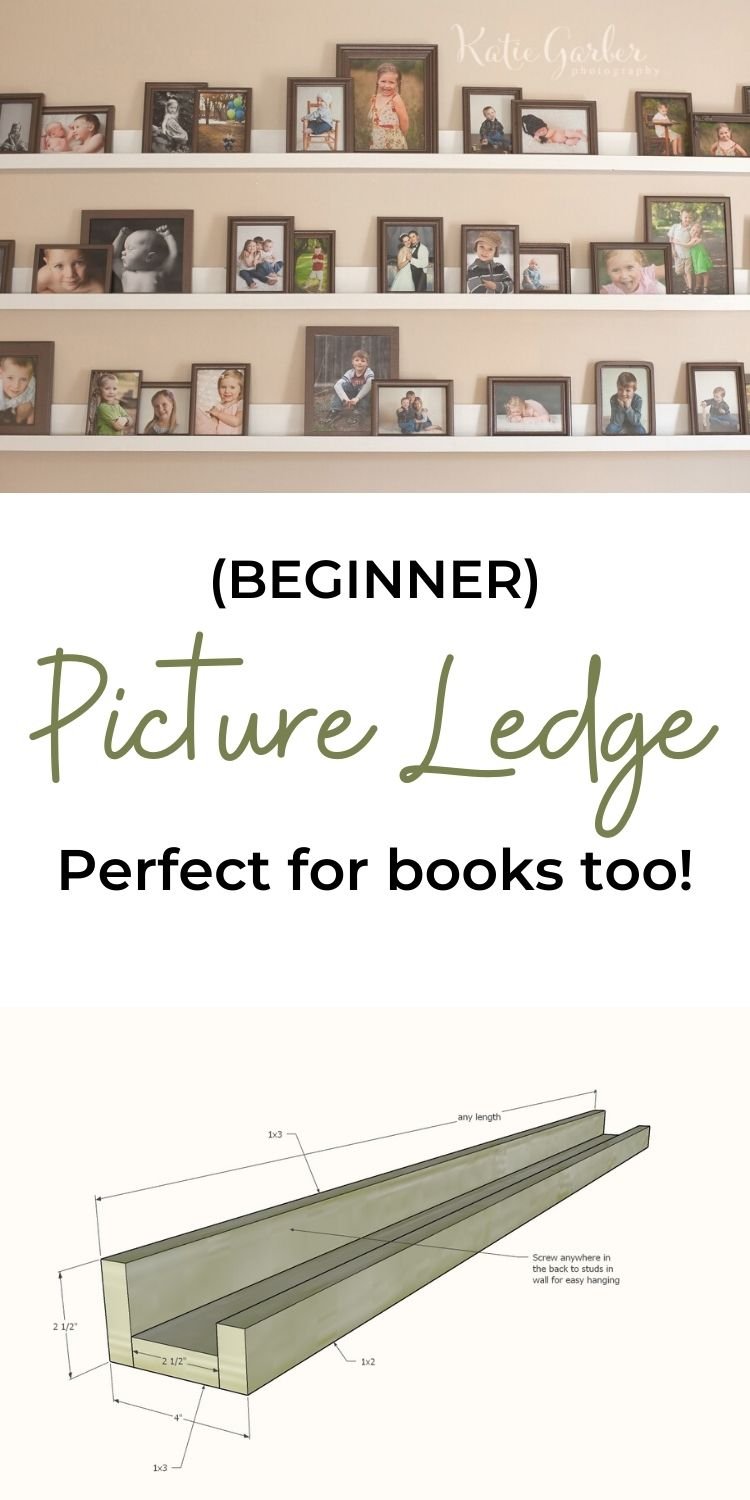
You can build your own picture ledge or gallery ledge for about a DOLLAR a foot. This easy to build picture ledge tutorial requires NO cutting and basic tools. Paint or stain any color you choose. Thousands of people have built this shelf and you can too - free step by step plans from Ana-White.com

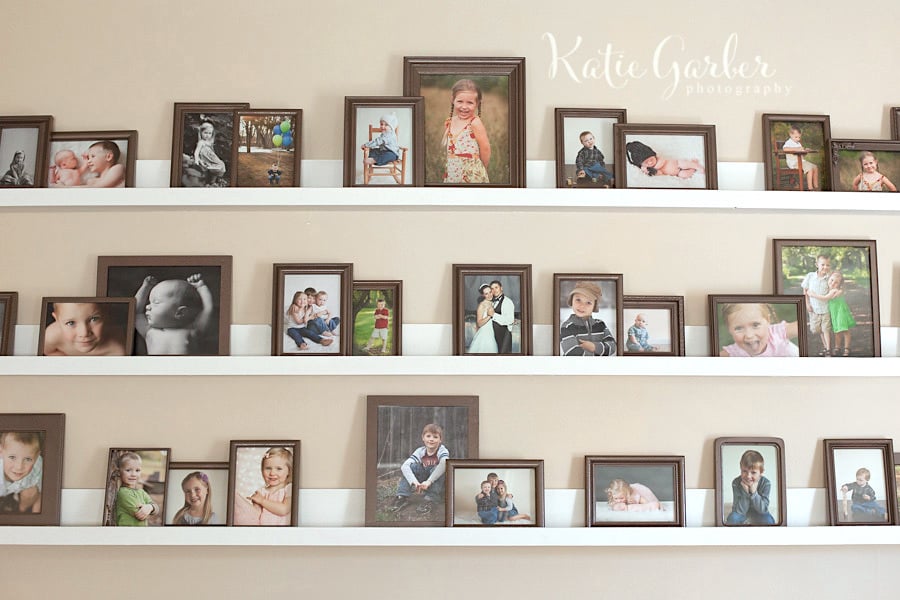
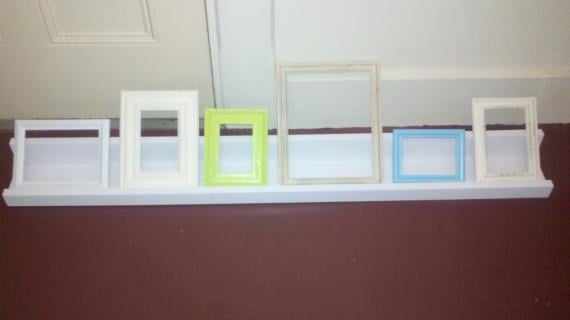
Reader submitted photo by Katie Garber
Need an inexpensive and beautiful way to display books, photos, decor or more on your walls? Our famous $10 picture ledge shelves are easy to build (you can even build these without cutting a single board!), can be built in any length, and are easy to hang!
What You'll Need
- Off the shelf pine boards available at any home improvement store
- Drill (used to build and hang the shelves)
- Screws (used to build and to hang the shelves)
- Paint or stain
- Level is recommended for hanging the shelves
- A stud finder is recommended for locating the studs in the wall to hang the shelves on
If you want to customize the overall length of the shelves, you'll also need a tape measure and any saw that can cut wood (this includes a handsaw).
But I'm Not Handy
These picture ledge shelves have been built thousands of times, by beginners everywhere. In fact, we recommend this project as your first project because it is SO easy and SO affordable! Our step by step tutorial makes it easy.
YOU can do this!
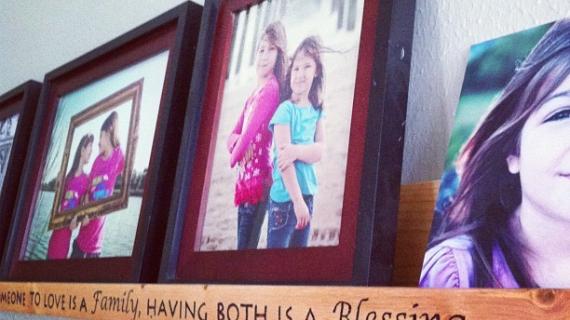
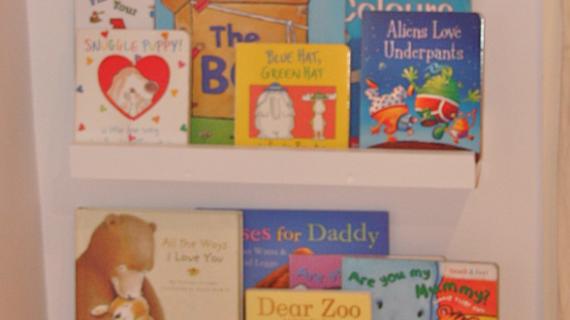
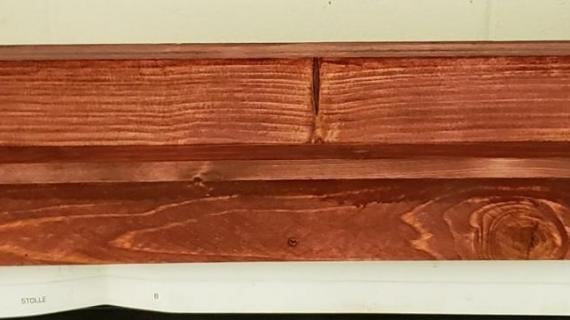
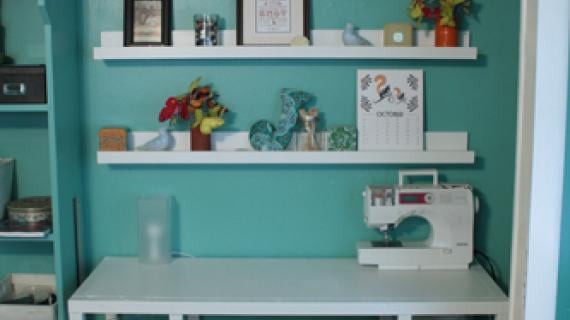
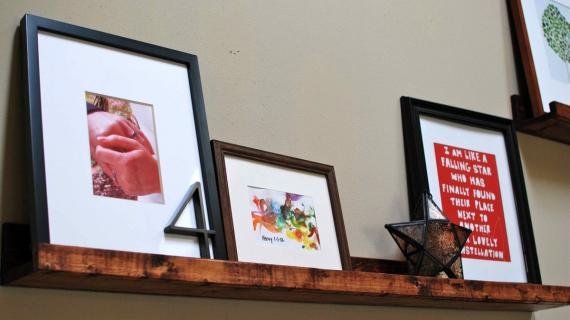
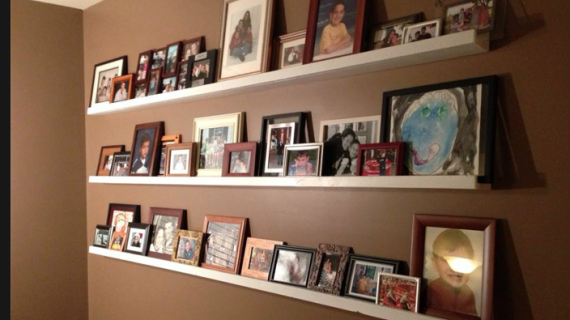
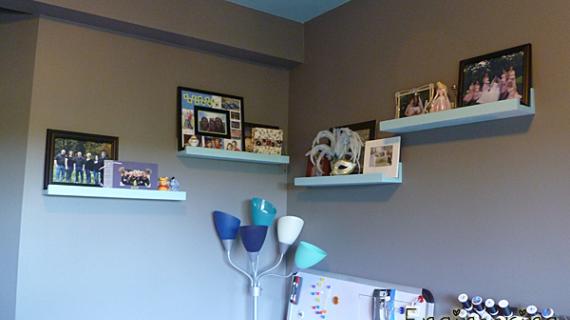
Reader Submitted Photos from Our Picture Ledge Tutorial
Here's a few different versions of our picture ledge, submitted by readers, and used in different ways.
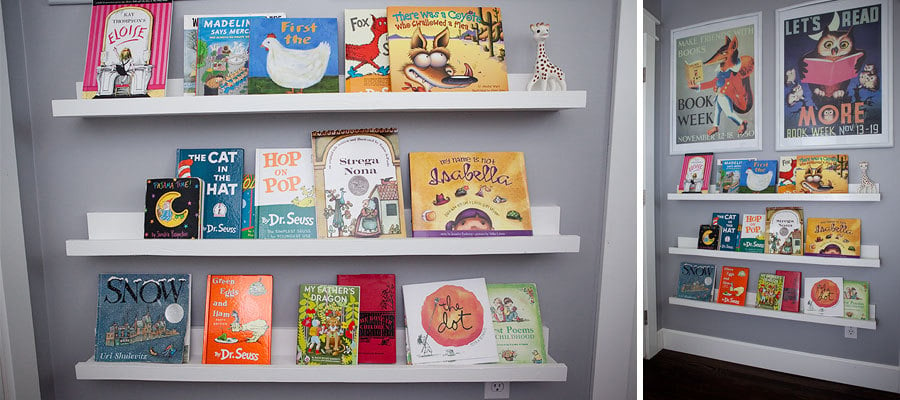
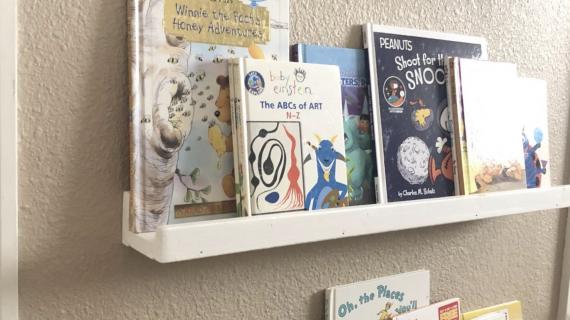
Book ledges by Crisaphi

Reading nook by karahart
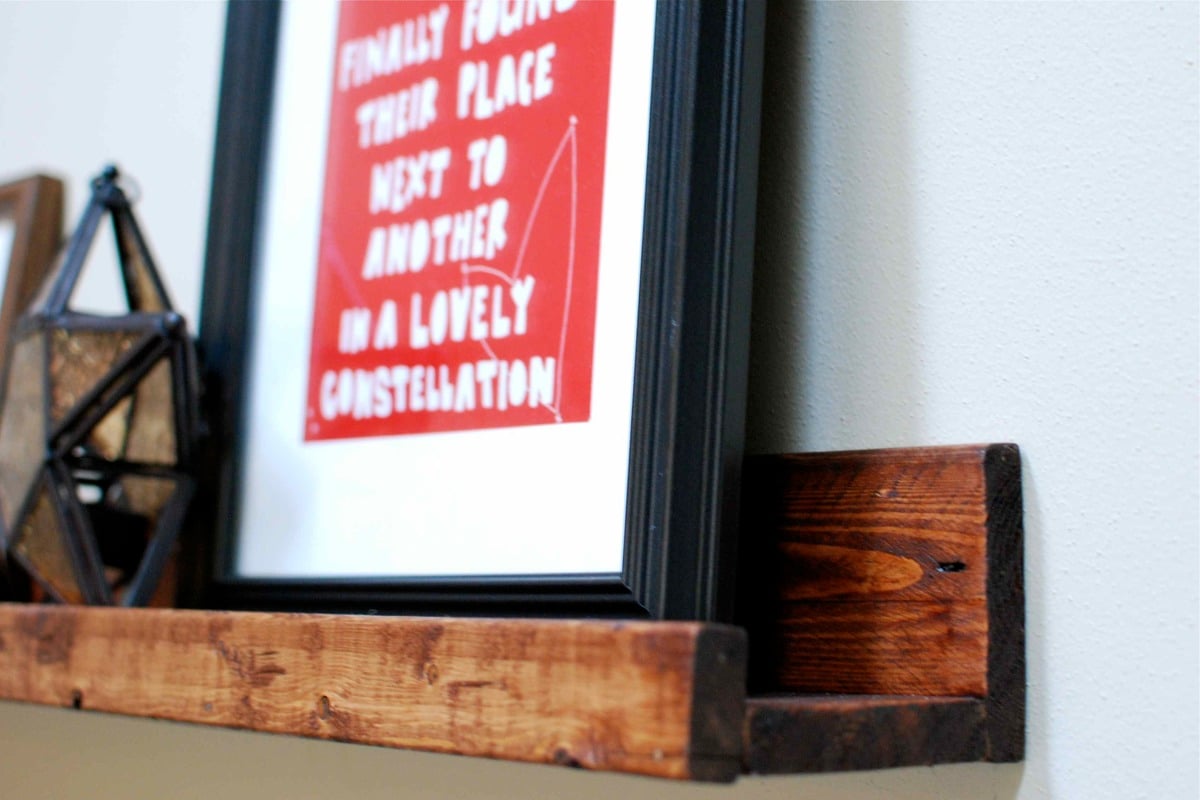
Rustic Stain by a.stauff

Easy Picture Ledge Tutorial
Pin For Later!
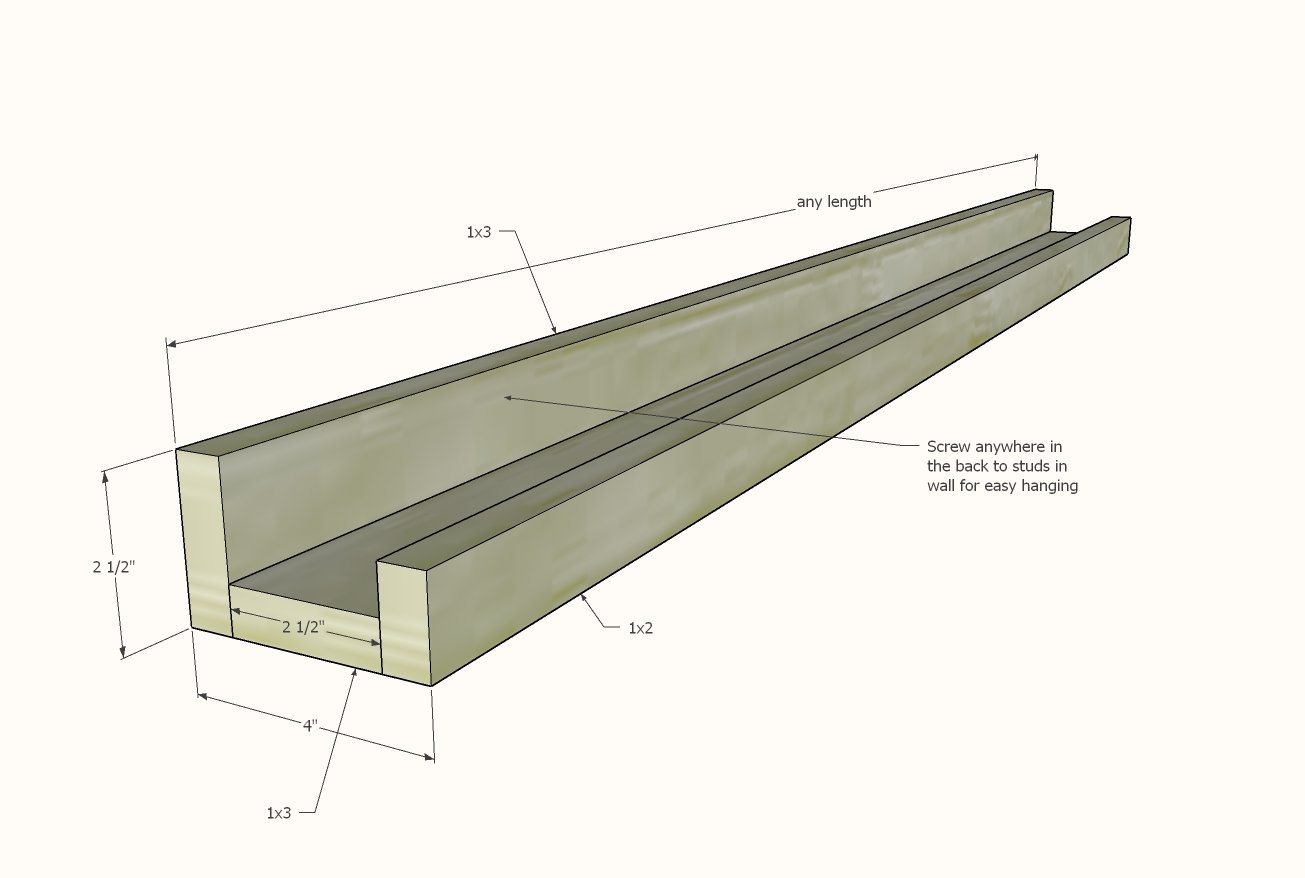
Avoid going to short (less than 24") because it may be hard to find a stud in the wall)
You can also make the shelf deeper by simply replacing the bottom 1x3 board with a 1x4, 1x6 or 1x8 board
Preparation
For (1) 8 foot long gallery ledge
- 2 - 1x3 @ 8 feet long
- 1 - 1x2 @ 8 feet long
- For every foot of shelving, you'll need about (3) 2" wood trim screws (like these that also include the drill bit)
What Type of Wood?
- The least expensive is pine furring strips (about $2 for a 1x3 and $1 for a 1x2) and will paint just fine and stain to that rustic look everyone is after these days
- You can use a select pine or hardwood board as well if you are trying to match other woodwork in your home or are looking for a more refined look
- I don't recommend MDF as it doesn't have much structural integrity
For 8 foot long shelving, NO cuts are necessary.
For shorter shelves, simply cut
- 2 - 1x3 @ desired length of shelving
- 1 - 1x2 @ desired length of shelving
EXAMPLE: For 36" long shelves, you would cut two 1x3 @ 36" and 1 - 1x2 @ 36"


Instructions
Step 1
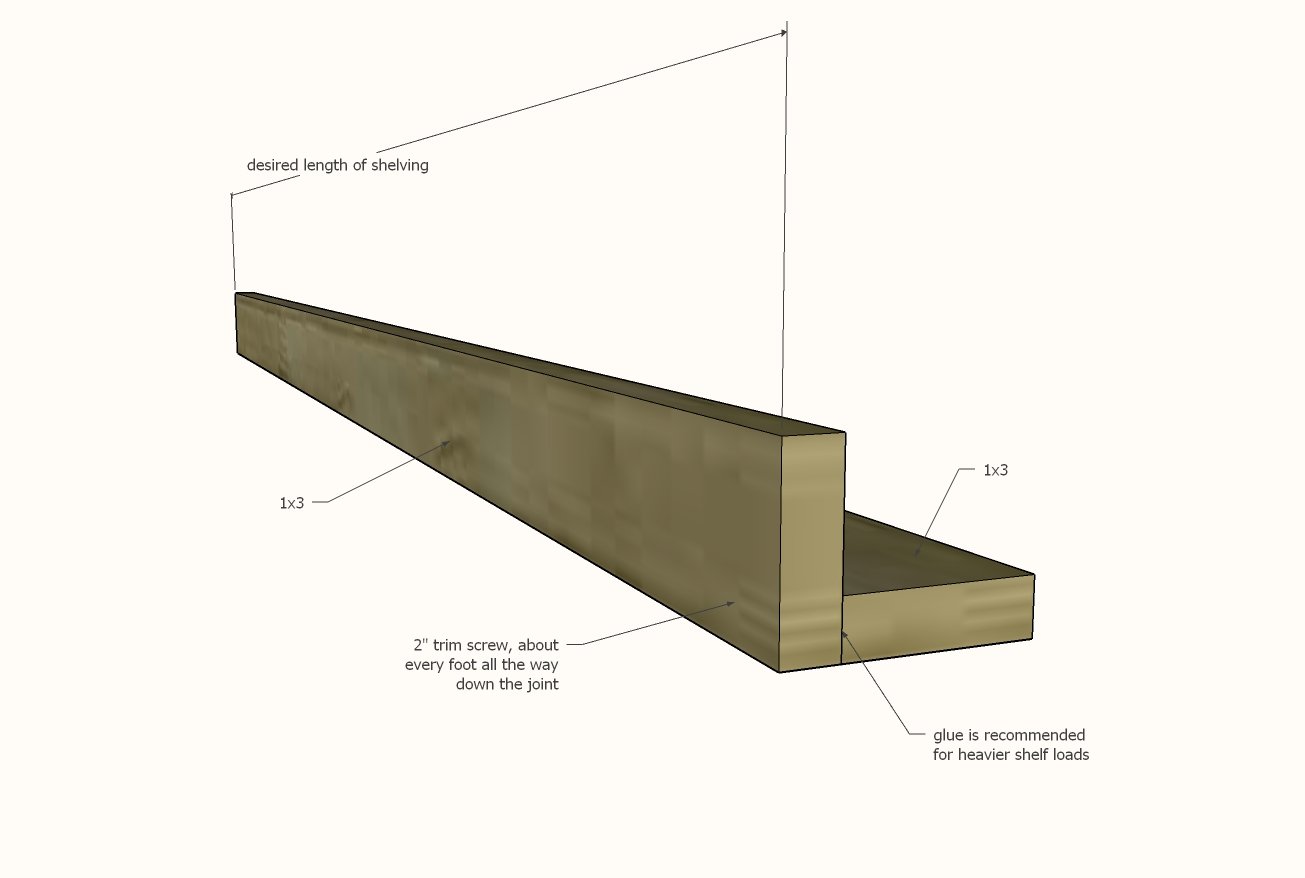
Attach the two 1x3 boards together with 2" trim screws, about every 12".
Step 2
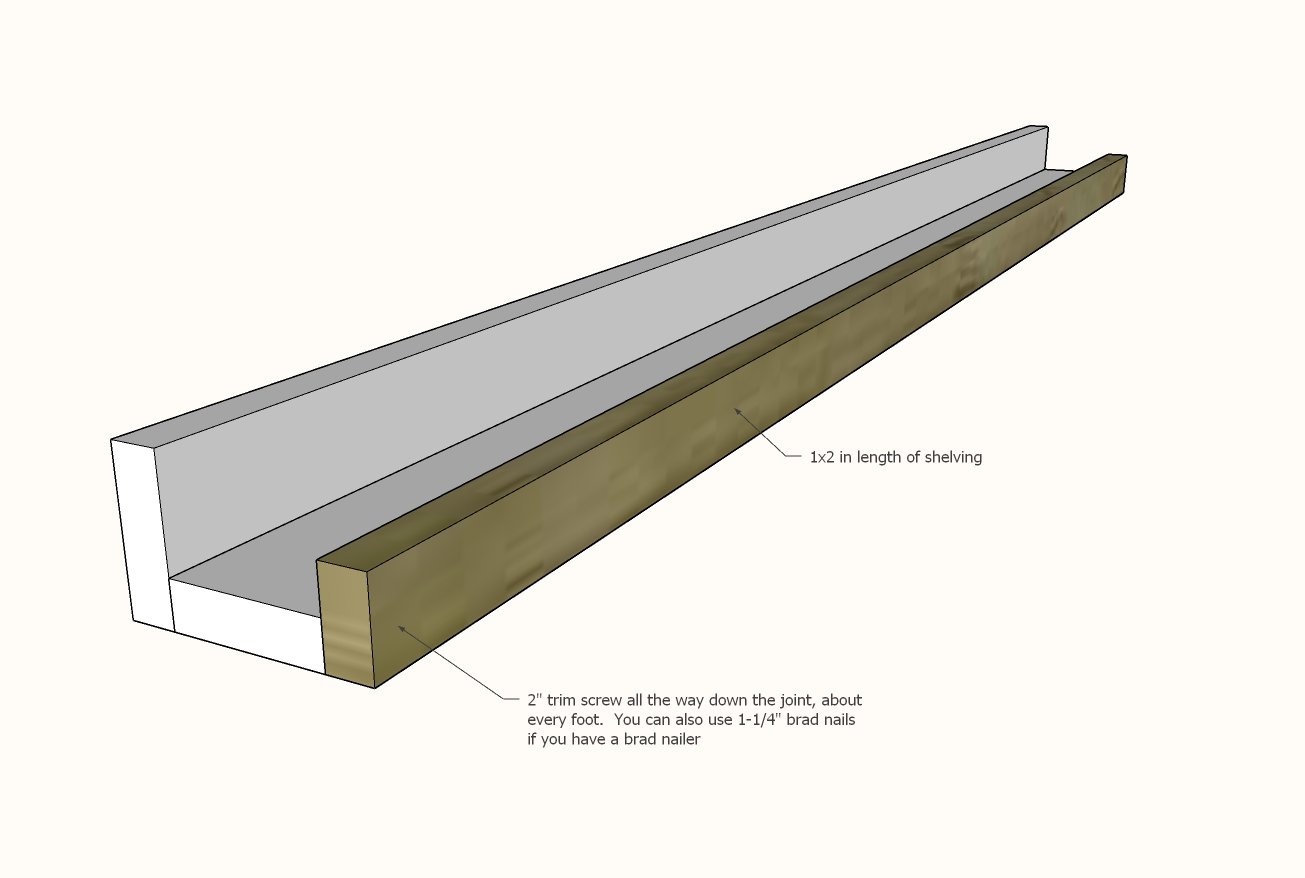
Attach the 1x2 to the front, with the 2" trim screws.
If you have a brad nailer, 1-1/4" brad nails and glue can also be used and will be easier to finish than screws.
- For a painted finish, fill the screw or nail holes in the front 1x2 only with wood filler. Let the wood filler dry and then lightly sand any excess off. Then paint as desired.
- For a stained finish, lightly sand the project. Then apply wood stain of your choice. Then use a stain matched wood filler to fill any holes.
Step 3
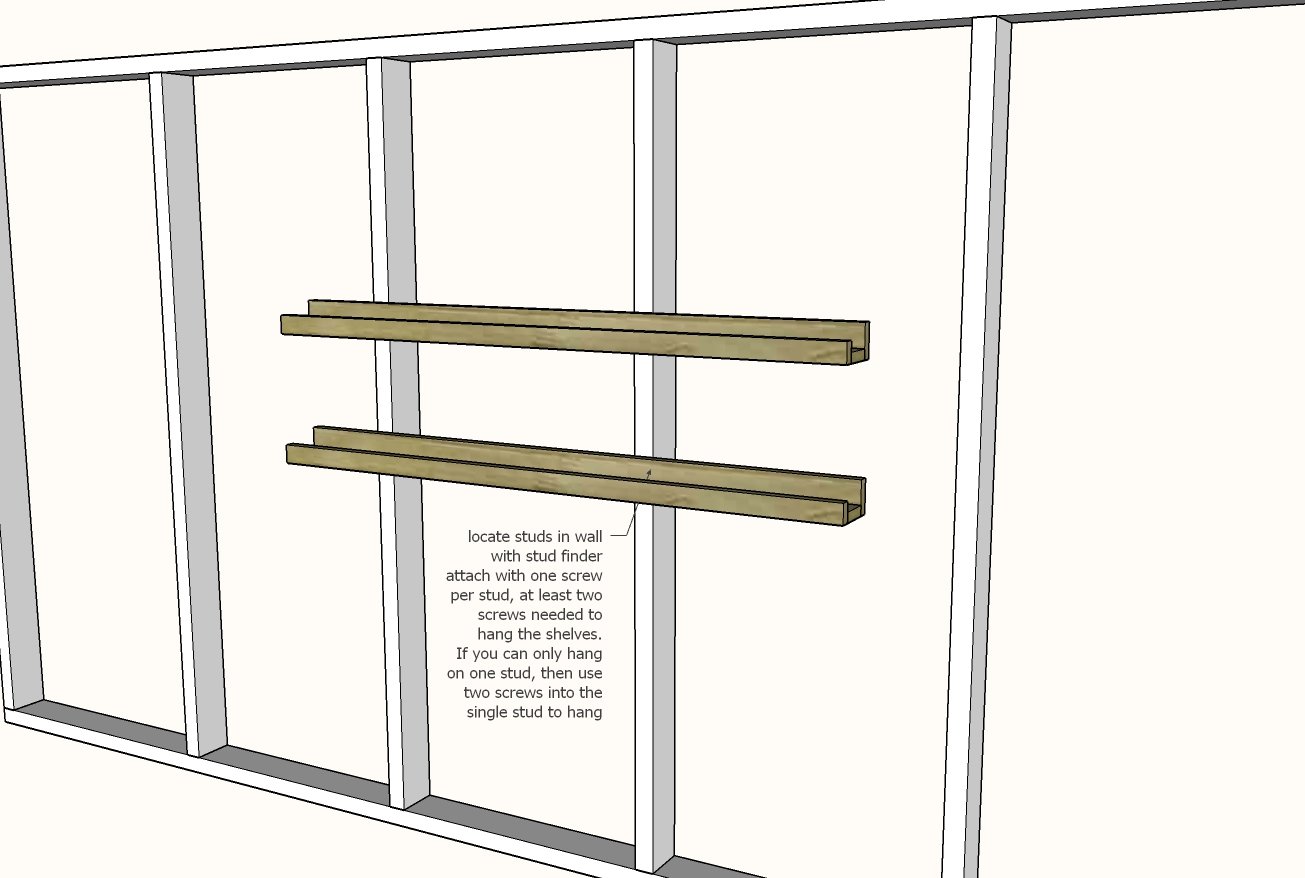
Locate studs in the wall with a stud finder.
Mark with a pencil.
Place the picture ledge up on the wall at the desired location and screw through the back 1x3 into the studs in the wall.
- At least two screws are needed to hang the picture ledge.
- One screw per stud in the wall
- If only one stud behind the picture ledge, than use two screws to attach to the one stud


Comments
malissa (not verified)
Fri, 10/08/2010 - 11:23
can you make the ledge part
can you make the ledge part wider? i was looking at shelved just like this that you could either lay wine bottles on or store wine glass in but i think you'd have to use more than a 1x4. any thoughts?
Tsu Dho Nimh
Mon, 03/28/2011 - 07:20
Malissa - You can make the
Malissa -
You can make the ledge wider, BUT ... All of the weight you place on the ledge is held by the screws through the back into the ledge. The ledge will tend to pull down and away from its backboard. And eventually fall off. And there goes the wine, all over the floor. :(
1 - Use MORE nails or screws, and glue too, to attach the bottom of the ledge.
2 - Add a small angle brace (those "L-shaped steel things) at each end and the middle, attached BELOW the ledge to reinforce the wood.
OR:
Use a taller backboard, and add a triangular brace under the ledge to support the weight.
Melissa (not verified)
Fri, 10/08/2010 - 11:38
Sheela, I'm definitely not an
Sheela, I'm definitely not an expert, but for paint on wood I like to use a brush, then go over it with a mini roller immediately, while the paint is still wet (I don't like brush strokes, but there are people who do). You will still be able to see the grain, though, if you use this method. I personally don't use spray because it's so messy (especially if sprayed in a breeze! ;)). But plenty of people love it. A lot of times the professionally made furniture where you see "nothing" is because it's made using MDF, which doesn't have a grain to it like wood. Good luck on your project! Eventually you'll find the finishing process that works best for you. :)
Helen Rickertsen (not verified)
Fri, 10/08/2010 - 11:42
We were a few days to early
We were a few days to early to use your design, but just hung our gallery ledges last night. Every time I walk into the room I smile. My husband and I love your site and are so grateful for the fabulous and simple designs. One project at a time we are slowly putting our first home together. THANK YOU!
Sheela (not verified)
Fri, 10/08/2010 - 12:09
Thanks for the finishing tips
Thanks for the finishing tips ladies. Spray paint is definitely wonderful, but it's hard to find the exact shade you want sometimes, so I use latex in those cases. I'll keep trying different techniques until I get it just right (or at least close enough!) :)
Laura (not verified)
Fri, 10/08/2010 - 15:30
Perfect for picture books.
Perfect for picture books. Another project to add to my son's winter list!
Ana White (not verified)
Fri, 10/08/2010 - 16:15
Malissa - it should work in
Malissa - it should work in theory, but when I get home, I would like to do a demo and test it out first :) The wider the shelf, the more leverage = less support :( Really want to add the stemware holders too!
Kelli (not verified)
Fri, 10/08/2010 - 18:36
Good point! Thanks. I think
Good point! Thanks. I think I'm just going to make them for my bedroom. I can't wait!
Fawn (not verified)
Sat, 10/09/2010 - 15:27
SNOWING!?!
SNOWING!?!
sumi (not verified)
Sat, 10/09/2010 - 15:32
I am glad that I found your
I am glad that I found your website. that is exactly what I have been looking for. I love to do wood working and i love pottery barn style. I found your website is very useful. I have to try to find my time to start one project at a time for my daughter.
Thank you for wonderful website. :-) I will share mine when I have done.
Lani (not verified)
Sat, 10/09/2010 - 16:13
My husband and I just made
My husband and I just made two of these ledges. It was so cheap- $10 for two 8 foot ledges- wonderful! Thank you so much!
TNSLB (not verified)
Sat, 10/09/2010 - 18:12
Do you think you could do
Do you think you could do keyhole hangers with this? With the screws in the studs, of course. I need to start keeping an eye on freecycle for picture frames :)
Thanks Ana!
Vicki Bennett (not verified)
Sat, 10/09/2010 - 18:50
you are SO BRILLIANT!!! this
you are SO BRILLIANT!!! this is absolutely perfect for my sister's bare dining room wall, thank you so much :)
Vicki (not verified)
Sun, 10/10/2010 - 05:24
I love this site! Just found
I love this site! Just found it yesterday and you inspired me to start decorating my new home. I had been afraid to hang anything, didn't know what I wanted to do with the walls. My 12 year old son made the shelves for his first project, one of many! He loves doing this and had help with advice and tools from his uncle. He plans on making the Spa bench next weekend. I wish I knew how to add the image so I could show the photo of the shelves and frames he painted, I love them!
Sha~ (not verified)
Sun, 10/10/2010 - 07:28
You can adjust the size all
You can adjust the size all you want, but keep weight in mind when you attach it to the wall. Do some research on fasteners for different wall types and I am sure it will be great!
Samantha (not verified)
Sun, 10/10/2010 - 14:52
I am working on a desk from
I am working on a desk from the design-your-own PB knock off plans and these ledges will go perfect above my desk! check out my progress on http://www.smithomg.blogspot.com LOVE your site!! I think all the furniture in my house will be handmade before I'm done with it! :)
Tara @ Tara Be… (not verified)
Sun, 10/10/2010 - 17:09
Ana, it looks great!! I like
Ana, it looks great!! I like that all of your frames are the same color, but I also like ones that are mismatched. I can't decide how I want to do my gallery wall!
Tsu Dho Nimh (not verified)
Tue, 10/12/2010 - 02:32
Malissa - I just measured my
Malissa - I just measured my wine bottle and they are less than 4 inches across the bottom. You should be able to stand them up on the ledges. Test with some scraps before you build.
PB shows their ledges over a bar holding liquor.
Just be absolutely sure you have the back strip screwed into the studs with 3-inch wood screws, and fasten the shelf part to the back part with a screw every 4 to 6 inches.
Fawn (not verified)
Tue, 10/12/2010 - 03:56
That looks great. I built
That looks great. I built some of these to use a book display/shelves for my non readers a while back. The books face forward so it makes it easier for them to pick a book. They work awesome. I can't wait to dive in and try one of your plans. I am just having a hard time deciding which one. They are all so great :)

Socco (not verified)
Tue, 10/12/2010 - 10:06
Hola, Super post, tienen
Hola, Super post, tienen que marcarlo en Digg
Have a nice day
[url=http://www.freepornflv.com/]Socco[/url]
Lea (not verified)
Wed, 10/13/2010 - 03:30
Ten dollar ledges? Not
Ten dollar ledges? Not hardly. More like five dollar ledges. That's how much I had to invest yesterday at Orange to pick up the wood I needed to build one of these. Of course, I already have the screws, nails, glue, primer, and paint, so those are all purchases I didn't have to make. Today I'll be sanding and priming and painting, and tomorrow I'll install this ledge to display my kids artwork. I can't wait to see the pride on their faces when they see their work shown so prominently, and I'm really looking forward to clearing the front of the fridge.
Jay (not verified)
Wed, 10/13/2010 - 07:22
You should be able to make
You should be able to make wider shelves to hold wine bottles like in the link you posted. I would make sure to use screws to contect the 2 parts of the shelves - much stronger than nails. Also if you put sides on the shelves it should help hold the shelf together.
When you attach to the wall make sure you go into studs in the wall or use heavy duty anchors.
sarahhiggs (not verified)
Wed, 10/13/2010 - 16:08
oh the joys of living in the
oh the joys of living in the north... we are in northern BC and it's going to snow any day..I feel your pain Ana!
Shelly (not verified)
Wed, 10/13/2010 - 18:10
I was just thinking today
I was just thinking today that these, made from reclaimed pallets, would solve my lack of storage issue in the kitchen. In 2 years we plan to completely redo the kitchen (you'll have the cabinet plans up by then, right) but for now I am in desperate need of space in my TINY kitchen(less than 5ft of counter, 2 lower cabinets, 2 half deep lower cabinets, 2 half deep/half width drawers), 2 upper cabinets, 1 over fridge/over stove cabinet). I have 25 sq foot of floor space. Anyhow, there are many narrow wall spaces between windows, doorways, etc that 18-29" shelves will fit. I am thinking canned goods, cereal, pasta, spices. I am so desperate for space. If I can get the food on the walls, I can get the pots and pans out of the coat closet.
Meg (not verified)
Thu, 10/14/2010 - 15:05
I built mine for $20 AND I
I built mine for $20 AND I had to buy a new bottle of wood glue!
Thanks Ana. I love these! It is just what I needed to fill a wall in my basement. My hubs was happy two- less holes in the wall than the picture collage I had planned!!!
I will post pics once I paint and hang them!
Sharon Lambirth (not verified)
Fri, 10/15/2010 - 07:50
I would love to find a MOPS
I would love to find a MOPS group near me and do this project. How fun!
Shannon King (not verified)
Fri, 10/15/2010 - 18:41
How high did you hang the
How high did you hang the first shelf? And how many inches between shelves? I am almost ready to stain my New bed, thanks for all you do.
Aimee (not verified)
Sat, 10/16/2010 - 05:26
I love this! I'm going to
I love this! I'm going to feature it at http://www.onthelap.org in our bookcase series. Stop by and visit sometime!
Shannon King (not verified)
Sat, 10/16/2010 - 13:10
Don't forget to "break" the
Don't forget to "break" the edges by sanding to make them less fragile. I just finished 3 shelves in less than 35 min! And all from scraps from my farm house bed! Thanks for the in-between measurements. There is an awesome sanding block at the Lowe's in Canada, that you can change the sandpaper, but the spongy ones in the states work well too.
Christine (not verified)
Mon, 10/18/2010 - 03:33
My father and I made four
My father and I made four shelves yesterday with help from my 8 and 11 year old sons. Ours are 5'2" to fit exactly between two walls. We spent a lot of time measuring (twice) and cutting the wood by hand with a mitre box. We also spent extra time counter sinking the screws. It took us about four hours to build four shelves. Now I need to fill in the holes where we nailed the front and then prime and paint. I spent extra to get good quality wood - very straight, smooth and no knots. The wood, primer, and paint cost around 80 dollars. We never could have gotten the custom fit from a catalog. I think I spent about a quarter of the price and I have some great pictures of my sons spending time with their grandfather. We also have enough wood left over to make 2 shelves about 1'8" long. I'm so glad I found this website.
Vicky (not verified)
Mon, 10/18/2010 - 09:58
I'm so excited, I just
I'm so excited, I just started on these today for my son's room.
Katie (not verified)
Mon, 10/18/2010 - 16:34
Has anyone done this with
Has anyone done this with multicolored frames or shelves? Can you share pics?
Carol (not verified)
Wed, 10/20/2010 - 19:08
How do you attach the shelves
How do you attach the shelves to the wall?
Krista @ The D… (not verified)
Wed, 10/20/2010 - 22:00
Carol. I was wondering the
Carol. I was wondering the same thing.
I was going to buy some floating shelves for my baby's room but now I'm thinking I'm going to do this instead! Not only will I be able to put up some picture frames, but can you imagine an entire gallery of children books?!? It will look so cool....now I have to get the hubbs to show me about to work his power tools.
i_am_joey (not verified)
Tue, 10/26/2010 - 05:19
@krista @carol ana
@krista
@carol
ana mentioned to screw the back 1 x 4 to the wall with screws. for strength, locate the studs.
Natalie (not verified)
Tue, 10/26/2010 - 18:09
I have three young kids who
I have three young kids who love books. We get over 100 books every three weeks when we hit the library. Needless to say, book storage has always been a bit of an issue. I had all sorts of ideas for storage, and decided on something almost exactly like this. Now each kid has a shelf like this running the length of their bed and there are (almost) no more books on the floor :)
Janea (not verified)
Wed, 10/27/2010 - 06:21
Love this. I can't wait to
Love this. I can't wait to see the finished product. Will you paint the frames and shelves all the same color?
Victoria (not verified)
Thu, 10/28/2010 - 14:46
I just built these shelves
I just built these shelves and payed about $20 for super fine pine (not sure that's what it's called but it was that or some fairly rough boards and since i was in a hurry that's what i got) plus the spray paint and wall anchors. I substituted 1x3s for the 1x4s because my sister's dining room is narrow and i assembled them just a bit narrower but we clamped all 3 8' boards together and with two cuts we had everything cut down to 4' pieces and assembled both shelves in about 5 minutes, now we're just hoping for it to be warm enough to spray paint tomorrow. Part of the reason they came together so quickly is that we used my husband's super cool finishing nail gun (it has a fuel cell instead of needing an air compressor, very very cool) and shot enough nails in for it to be secure but no predrilling needed! Thanks so much Ana, as soon as they're painted and up i'll post pictures of them in my sister's dining room. This was the perfect $20 solution for her super small dining room!
Loni (not verified)
Thu, 10/28/2010 - 17:08
I'm building these now! I
I'm building these now! I can't wai to show pics!
Heidi (not verified)
Wed, 11/24/2010 - 07:53
I just did these for my
I just did these for my dining room and I LOVE them! so easy to do! They look like I bought them from a store and because I made them, I was able to get exactly the stain to match the room! thanks so much for sharing these! Can't wait to try more projects!!
Jessica P (not verified)
Mon, 12/06/2010 - 14:29
We made some of these to use
We made some of these to use as book storage for our daughter's room. We are about to make some as a picture gallery for the living room and can't wait!

Stephanie (not verified)
Wed, 12/08/2010 - 16:29
Just built two 8 foot shelves
Just built two 8 foot shelves for the living room. LOVE them. Gave the room some interest on a long wall without large artwork. The hardest part (as always) is finding the studs. I drilled into the studs with 3" wood screws at two foot intervals. Make sure your wood is not bowed when purchasing - ours is and it hung fine but is not snug against the wall in the middle - you can't tell by looking though! Thanks Ana, these are lovely and easy and I will be making more!

Tess S (not verified)
Thu, 12/23/2010 - 02:21
my husband just built one of
my husband just built one of these for our dining room. we're waiting for the stain to dry. i can't wait to hang it!
Larissa (not verified)
Thu, 12/23/2010 - 09:25
Ana, I just found you and
Ana, I just found you and dare I say love at first sight? I LOVE to build things but have never used a plan. Most things look like I don't use a plan. I CANNOT wait to get started. All I can say at this time is HUGE Thank You for your time and effort to share all of this wonderful information with the world! You are a blessing I am certain I will cherish for as long as all the wonderful furniture I can now make for my home will last! Mahalo Ana
-LJ
Crystal (not verified)
Wed, 12/29/2010 - 18:05
Does anyone have pics of the
Does anyone have pics of the ledges stained? I'm debating on stain or black paint. My hubby just built 3 8 footers for me today. I can't wait to get them up!
Chelle (not verified)
Sun, 01/02/2011 - 10:43
I think I am going to run
I think I am going to run these along an entire wall of my daughter's room to display her pretty things and framed photos. I'd been wanting to put crown moulding up in her room but I'm thinking edging out the room with these shelves about 8" down from the ceiling could be just as good.
Jaime (not verified)
Tue, 01/11/2011 - 11:53
Thanks for a great idea Ana.
Thanks for a great idea Ana. I just made these out of scraps from the garage so mine are the 'ZERO DOLLAR LEDGES'. Love your plans as always.
http://thatsmyletter.blogspot.com/2011/01/l-is-for-ledges.html
Angie (not verified)
Thu, 01/13/2011 - 04:22
These would be perfect to
These would be perfect to display my ever growing collection of pint glasses. I was looking for a low profile shelf but a ledge to keep them in place. I think I'll try to make a few this weekend. Keep up the great work!
SandyPants (not verified)
Tue, 01/18/2011 - 06:20
I just made this over the
I just made this over the weekend! So easy and it looks so good! Thanks for the great idea. I love this website!
Laura (not verified)
Tue, 01/18/2011 - 17:21
Just finished these and love
Just finished these and love them! We wanted a 6 ft length to fit on our wall, so bought a 12 ft long board and cut it in half. I couldn't believe the price a certain barn store is asking for $10 worth of wood! Used English Chestnut stain and they look great.