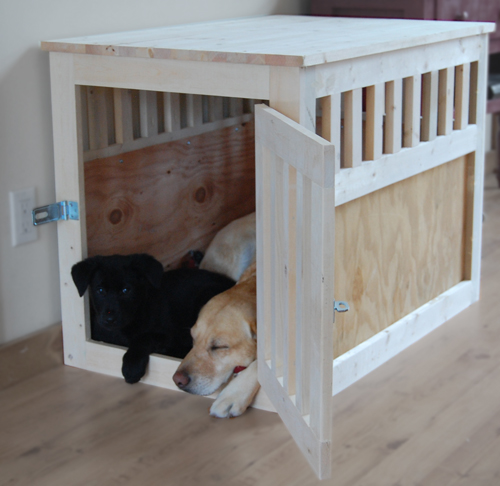
Build your own wood pet kennel with our free step by step woodworking plans.
Dimensions
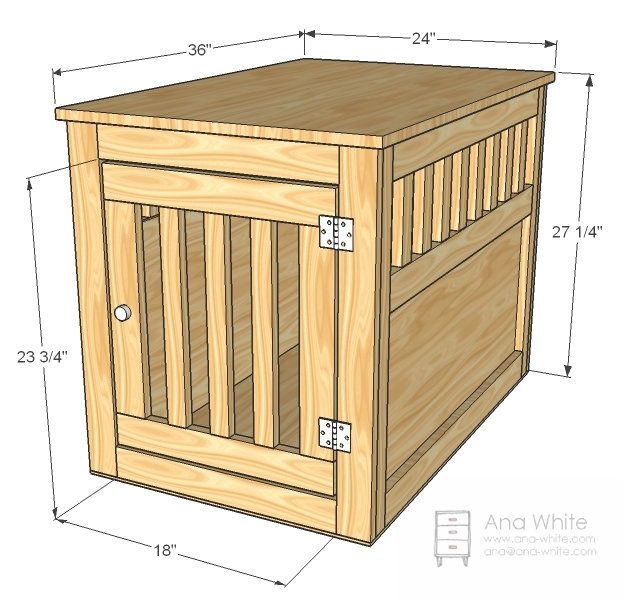
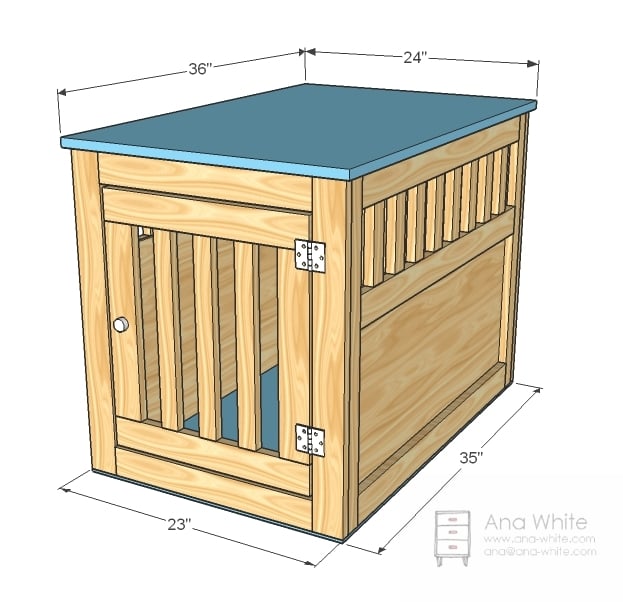
24" wide x 27" tall x 36" long. This is a big kennel.
Preparation
Shopping List
- 1 – 24″ x 36″ Pine Project Panel or 3/4″ plywood or MDF
- 5 – 1×3 Boards, 8′ Long
- 1 – sheet of 1/4″ plywood
- 4 – 1×2 Boards, 8′ Long
- 1 – set of hinges
- 1 – latch
- 1 1/4″ pocket hole screws
- wood glue
- 3/4" brad nails
Common Materials
Cut List
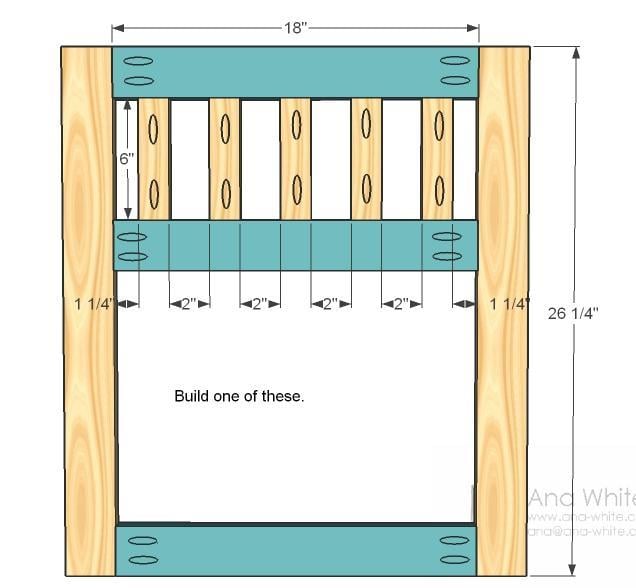
- 21 – 1×2 @ 6″ (Rails)
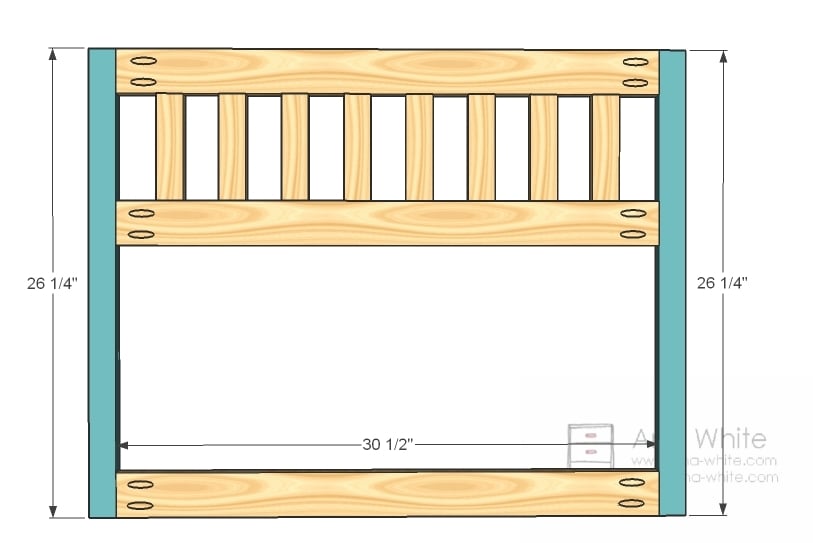
- 6 – 1×3 @ 30 1/2″ (Side Boards)
- 4 – 1×2 @ 26 1/4″ (Side Legs)
- 4 – 1×3 @ 26 1/4″ (End Legs)
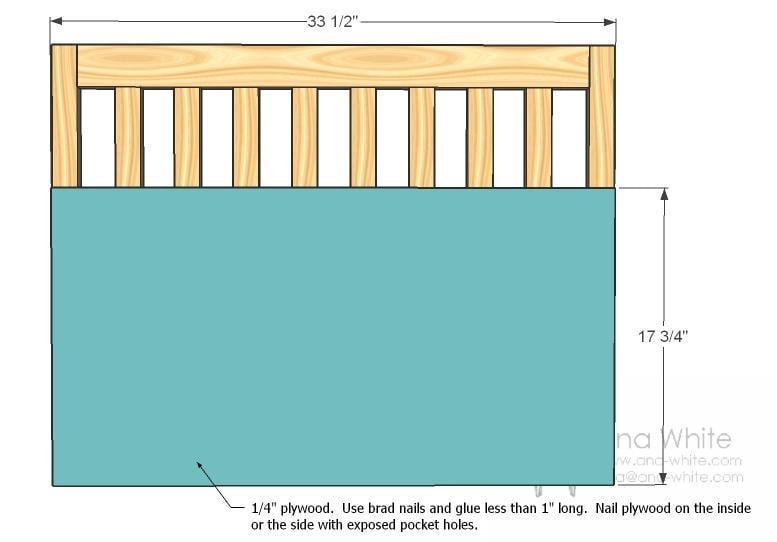
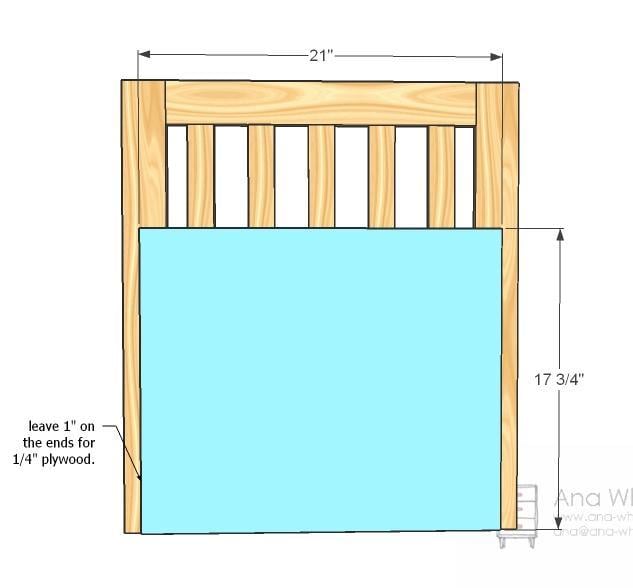
- 1 – 1/4″ Plywood @ 17 3/4″ x 33 1/2″
- 1 – 1/4″ Plywood @ 17 3/4″ x 21″
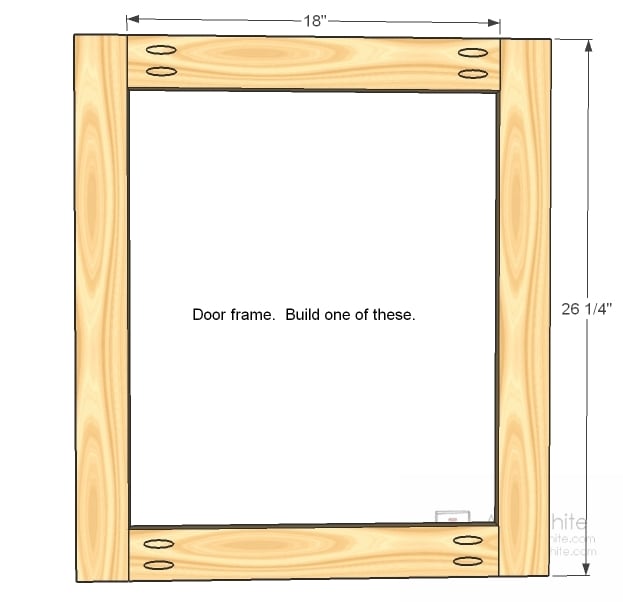
- 5 – 1×3 @ 18″ (Door Frame and Back Boards)
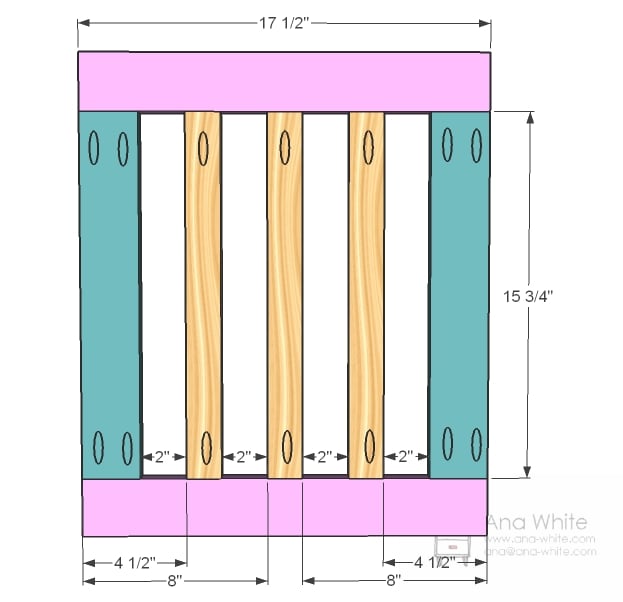
- 2 – 1×3 @ 17 1/2″ (Door Top and bottom)
- 2 – 1×2 @ 15 3/4″ (Door Sides)
- 3 – 1×2 @ 15 3/4″ (Door Rails)
General Instructions
Drill Pocket Holes
There is not way around it on this one – you gotta have a Kreg Jig™. Drill all pocket holes first.
Instructions
Step 1
Step 3
Step 6
Step 8
Step 9
Assembly
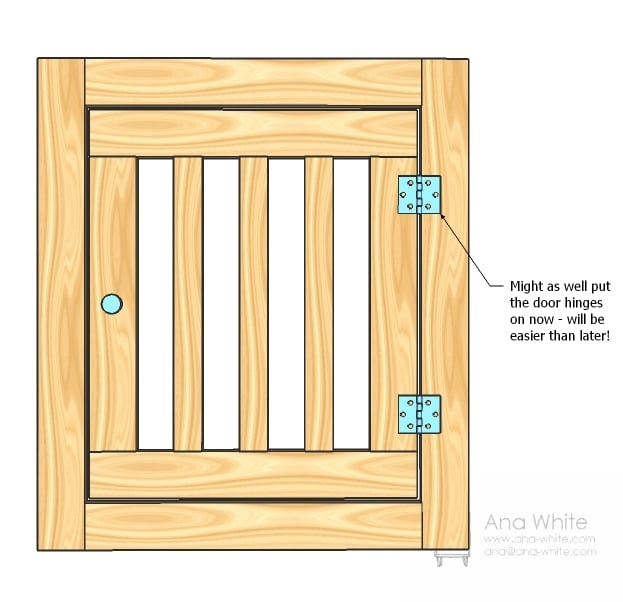
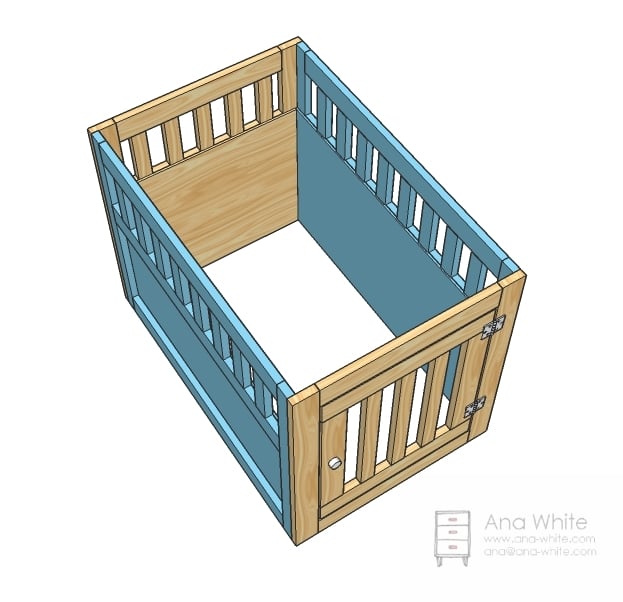
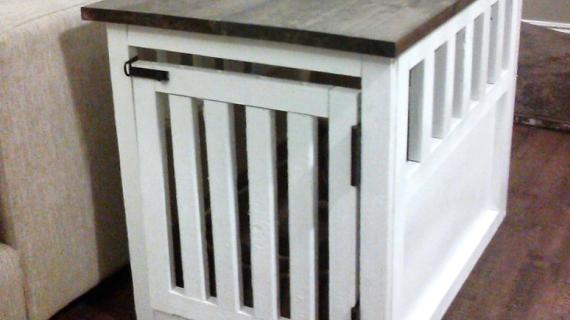
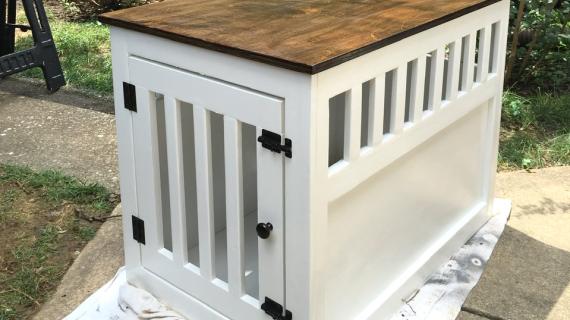
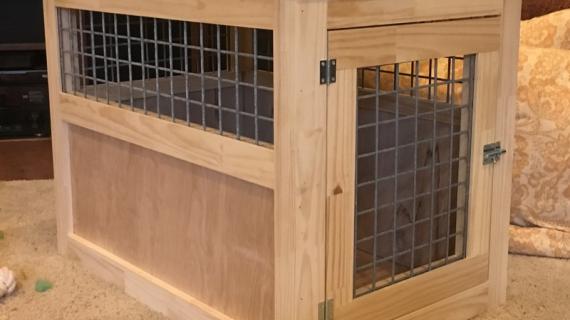
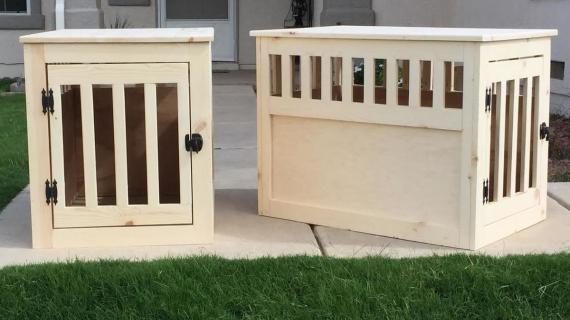
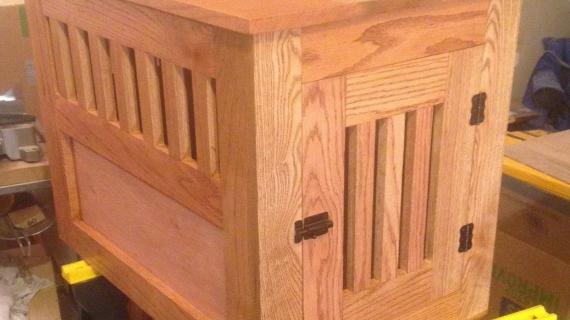
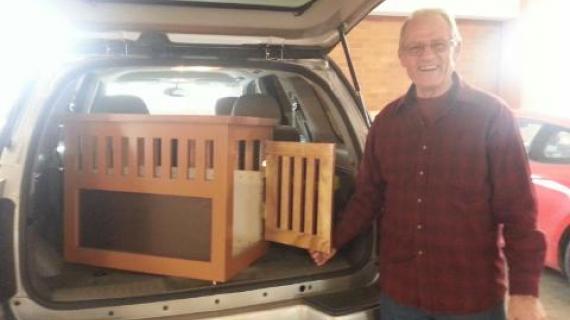
So you have really just built four walls. Now assemble the walls! I highly recommend finishing the walls separately first – then you can easily assemble and reassemble the crate as needed. Another idea – use corner brackets to screw the walls together from the inside. Then you can break the crate down to flat pieces for storage and travel. I filled all the pocket holes with wood filler three times and let dry. Then sanded with 120 grit sandpaper. Still need to paint



Comments
Winnie Kelly (not verified)
Wed, 10/13/2010 - 18:31
You so totally rock!! I'm an
You so totally rock!! I'm an animal control officer and I'm going to have to get cracking -- I'll need about twelve of these for me, friends, relations, and would-be-animal-adopters, and that's just THIS month! Thank you SO MUCH!!! :)
Tammy (not verified)
Wed, 10/13/2010 - 18:31
I love it! I think my dog
I love it! I think my dog would eat through it though :(
krisart1980 (not verified)
Tue, 08/14/2012 - 04:02
I agree. I ended up building
I agree. I ended up building doors from 2x3 frame and 2x2 slats and the dogs ate through them and those were just a simple design
I cant see doing this much work and getting the same result.
my doors were build as I had said 2X3 frame with 2X2 with 45ed ends screwed to the outside surface so they are easily replaceable if they get chewed. looks kinds like deck railing.
Katie (not verified)
Wed, 10/13/2010 - 18:49
I am so excited about this!
I am so excited about this! And I just got a kreg jig last week! As soon as i am done with my table I will be building one (or two... or three..)! :)
Kristin (not verified)
Wed, 10/13/2010 - 18:59
I love this!! So much more
I love this!! So much more than our project we threw together last winter when we brought our puppy home. This way you don't have the added expense of the metal crate. Might just have to talk the hubby into letting me make one of these for the next one =]

Krista @ The D… (not verified)
Wed, 10/13/2010 - 19:06
My husband made me one of
My husband made me one of these crates as a wedding present (he also surprised me with a puppy). He used solid wood and as a result the stupid thing cost like 500 bucks! This is a much better idea!
You do have to be careful about puppies chewing through. If you can some how use metal for the bars, you would be in better shape. Our kennel is missing one bar now since the puppies chewed through it.
Great project. Way more stylish than a big ol plastic or metal one hanging out in the middle of the room!
Kurt (not verified)
Wed, 10/13/2010 - 19:28
Wow, that's a nice-looking
Wow, that's a nice-looking crate. I am reorganizing a few rooms of my house and was toying with building something for my dogs after looking at your website and getting some ideas. I eventually settled on a few metal crates that I found online, figuring I might take forever to build a homemade one. I just ordered them the other day, in fact. I figured after they arrived, I would build something like the table Kristin shows above to go over them. I think having a table or something like that will optimize the space in the room where I'm intending to put them, by giving me additional surfaces for storing things in that room. Maybe I'll post some pictures when I actually get them built.
Gwenevere (not verified)
Thu, 10/14/2010 - 00:09
This almost makes me want to
This almost makes me want to get a dog.
Sharon Lambirth (not verified)
Thu, 10/14/2010 - 00:26
Amazing Ana, just amazing.You
Amazing Ana, just amazing.You take the mystery out of these and all the projects we would otherwise find intimidating. With each plan that comes across the screen I am more and more amazed! <3 this!
HonestNiceWoman (not verified)
Thu, 10/14/2010 - 01:38
I love this project!! I will
I love this project!! I will link this to you in my blog. I am the person that posted on your FB post that I run the Fan Page for the local Animal Shelter. (I have several FB profiles that I follow you from - I don't want to miss a thing that you post!)
~Kelly Lamb
Danielle (not verified)
Thu, 10/14/2010 - 02:08
Hmmmm do you think that this
Hmmmm do you think that this would fit our Mastiff? She is only 7mo and about 65 lbs. She will get between 120 and 200lbs?
Sugar (not verified)
Sun, 01/06/2013 - 11:46
Average female mastiff is
Average female mastiff is minimun 27.5" at the shoulder. Although I'm sure you know that now! LOL!
Amy (not verified)
Thu, 10/14/2010 - 02:23
This is absolutely beautiful!
This is absolutely beautiful! I've seen lesser kennels for $200!! The only thing I would add (as a vet and raiser of many puppies) is that I would build the dimensions to fit a plastic liner in the bottom for accidents. Or you could "rubberize" the bottom and perhaps two inches up the sides of the bottom for easy cleanup and protect your wood better than just paint. Otherwise, this is perfect!
In reply to This is absolutely beautiful! by Amy (not verified)
absorbing_life
Wed, 07/11/2012 - 15:38
Great Idea!!
Even the most well trained dogs have accidents or get sick....I'll consider this before building ours!
Stacey Keith (not verified)
Thu, 10/14/2010 - 02:31
The lack of paint may be a
The lack of paint may be a healthier option for that puppy incase she starts chewing it! And, it's beautiful raw! Great job! Beautiful girls!
jess (not verified)
Thu, 10/14/2010 - 02:35
AWESOME!!!!!! When you said
AWESOME!!!!!! When you said that you had a new family member, this is what I was hoping for. We have a Lab/Dane mix that we crate when we are leaving and his wire crate is such an eyesore!!! I was using paper and pencil the other day trying to figure out how to build this and now you have done it for me. I am so EXCITED!!!!!! Definitely my next project!!!
Carole Zullo (not verified)
Thu, 10/14/2010 - 02:56
Can't wait to build it. Just
Can't wait to build it. Just what we need for our furbaby. Thanks so much!
Sheila (not verified)
Thu, 10/14/2010 - 03:34
Awesome! I am looking to
Awesome! I am looking to modify some of your plans to make a double enclosure for our bearded dragons. They have outgrown their homes and the cost to buy 2- 55 gal tanks is insane.
Catherine (not verified)
Thu, 10/14/2010 - 04:21
I'm thinking this will be
I'm thinking this will be great with a custom cushion fitted for the top to look like a bench seat to disguise the crate even more. How perfect!
Nancy O (not verified)
Thu, 10/14/2010 - 04:46
I love furbaby furniture!
I love furbaby furniture! There could be a collection of raised dog bowls too :)
Britni B. (not verified)
Thu, 10/14/2010 - 05:04
This is amazing!! Thank you
This is amazing!! Thank you so much!
Tanjia (not verified)
Thu, 10/14/2010 - 05:09
Absolutely love this one! I
Absolutely love this one! I can't wait to get my workshop set up in the basement so I can start building again.
Laurel (not verified)
Thu, 10/14/2010 - 05:11
yay!!! You took my
yay!!! You took my suggestion/request!! :) Or maybe you already were working on it but I feel special anyway :D Thank you so much! I am going to get cracking on this baby!! :)
Jeanne (not verified)
Thu, 10/14/2010 - 05:15
Wow, that is beautiful! My
Wow, that is beautiful! My dog doesn't like crates, but that might be big enough for him to like. We just have a small foldable table in our basement that we put his comfy dog pad on and he feels out of the way. Or he goes and finds a pile of dirty laundry to lay on.
MaryF (not verified)
Thu, 10/14/2010 - 05:44
Fantastic!! Thank you, Ana.
Fantastic!! Thank you, Ana. I'm going to try to adapt this plan to house my cat's litter box.
Rae (not verified)
Thu, 10/14/2010 - 06:05
LOVE THIS! And I bet you
LOVE THIS!
And I bet you could make the walls taller or add a spacer all around on the bottom and then slap that piece of plywood she talked about on it - then it would be good for a standard size crate pan. I cannot imagine it would be fun to clean up puppy puke or pee in this by climbing in so a slide out crate pan would work so much better. The standard size crate pan for this crate would be 23x36.
stephanie oldfield (not verified)
Thu, 10/14/2010 - 06:05
I love these, I want to build
I love these, I want to build two of these minus the doors and use for end tables. That way they are functional and the dogs have a space that is NOT the couch.
Julie (not verified)
Thu, 10/14/2010 - 06:30
I love this! Has anyone had
I love this! Has anyone had experience switching from a wire crate to something like this? I'm worried my dogs will feel too confined since it's not as see-through/breathable as a wire one. I don't want to build the whole thing if they're not going to like it!
Anne (not verified)
Thu, 10/14/2010 - 06:47
Ana!! I officially am in
Ana!! I officially am in love with you!! This crate rocks!! Whenever we have parties or friends over we "hide" the big ugly plastic crates in the laundry room. Do you think I could take these plans and scale them down to make two smaller crates???
Melissa (not verified)
Thu, 10/14/2010 - 07:11
This is a beautiful dog
This is a beautiful dog crate! I would love to see more pet projects, especially raised pet feeders (at various heights from cat/tiny dog up to big dog) similar to the Tryde Coffee Table but with holes to pop in bowls; pet beds; litter pan hider for cats; etc. We're all spoiling ourselves with your plans, so the pets are getting jealous. ;)
Congrats on your new puppy!
AmyLynn (not verified)
Thu, 10/14/2010 - 07:13
Oh my goodness...I have no
Oh my goodness...I have no words...this does not happen often! I found the project for this weekend! I'm going to cut a hole in the back of this and use it as a much prettier substitute than the covered cat litter box! You're the best Ana!
Stacy (not verified)
Thu, 10/14/2010 - 08:09
Your timing is perfect for
Your timing is perfect for two reasons ... first - my 15 year old daughter's pomeranian puppy will now need to spend the days inside since it's getting colder and this will make a perfect indoor "house" for him and second - she can start working on her carpenter skills by helping build this beautiful crate for her puppy!!!
Rachael (not verified)
Thu, 10/14/2010 - 08:19
Ana, I love this crate! I
Ana, I love this crate! I have an English Mastiff puppy and am in desperate need of a crate big enough for her. She is currently 9 months old and 108 pounds. She is expected to get up to 180 before she is done growing!!! Can you help me size this so it's much, much bigger? The biggest crates out there are 48x36 and she's already too big for this one!!!
BTW-YOU ARE AMAZING!!! I love al of your stuff!!!
Kayleen @ This… (not verified)
Thu, 10/14/2010 - 08:52
Ana, thank-you so much for
Ana, thank-you so much for your plans. I've been watching your blog for so long and dreaming of the things I would build. my husband and I just finished our twin farmhouse bed with a trundle for our girls and we LOVE it! Thanks again. . . your talents amaze me!
Kayleen
Katrinagiselle (not verified)
Thu, 10/14/2010 - 12:21
You don't know how excited I
You don't know how excited I am for this post. Just this last weekend, I was looking at Overstock.com to purchase this exact item! It is well over $200, and I just couldn't do it. I am so glad I didn't. On Overstock, they say you can use this crate as a end table for the living room which is perfect for me since I live in an apartment. :) In the next couple of weekends, I am making this! Totally dig you Ana <3
Kerry (not verified)
Thu, 10/14/2010 - 12:28
I really think you should
I really think you should decorate the inside of the crate in some way! Wouldn't you hate to live in a house that was all-black on the inside? How depressing. I think a black house (on the outside) can be very chic, though, as evidenced by one of my favorite buildings in New York (photo below)

What do you think? Maybe wallpaper? Maybe a nice pink and white stripe on the inside? Maybe they need little window coverings to make it more cozy and den-like? Do you think they need soft goods on the walls like a crib or looney bin?
I think it could be a nice homey touch.
Tsu Dho Nimh (not verified)
Thu, 10/14/2010 - 12:44
"All my girls – Grace, Nala
"All my girls – Grace, Nala (who weighs 90lbs) and Avery all fit in there."
PICS!!! I want pictures of that, or it never happened.
Tsu Dho Nimh (not verified)
Thu, 10/14/2010 - 12:45
I just looked at the
I just looked at the dimensions ... you could put a larger top on that and use it for a dining table.
It's great!
Loni (not verified)
Thu, 10/14/2010 - 14:28
The first picture on this
The first picture on this post is the most ADORABLE dog pic I have ever seen! I love it!
And Now I need to build this home for my Buck, because the wire kennel is an eyesore, and it'll be easier to find it a permanant spot. I'm thinking I put the door on the long side and double it as a bedside table! (very very small house, his current wire kennel is in the middle of my kitchen, lol)

Logan (not verified)
Thu, 10/14/2010 - 14:33
There actually is a way
There actually is a way around NEEDING to use a pocket hole jig. Use dowels. One dowel in the center of the slat and a little glue on the slat will hold it very securely, and it's completely invisible. It does require a little patience (a home-made hole-drilling jig is also handy).
Loni (not verified)
Thu, 10/14/2010 - 14:48
Um, sorry, quick question
Um, sorry, quick question since you do already have this built. What are your thoughts on if I were to make this larger? Buck's current kennel is 28" wide, 43" in length, and 31 inches tall. And this size is perfect for him. He can stand up, its only a couple inches longer than him and he can stretch out while laying down.
Will it be ok if I build it that size? and is there a way to make a simple break down version without having to unscrew the 4 walls?
Thank you!
Jen (not verified)
Thu, 10/14/2010 - 15:35
I would love to see more pet
I would love to see more pet crafts. Im living with 6 cats in my aparment and help the lady upstairs with her 4 and dog. they need some crafty love. I love this crate, gonna build one for the cats to hide in. WAIT, even better, I bet i could put a litter box in there if I left the front open :D
Rachel (not verified)
Thu, 10/14/2010 - 18:57
SO FUNNY! I just found your
SO FUNNY! I just found your website like three days ago, I've been looking at making one of these, just not really sure how I wanted to go about it....and then there it was in my inbox!
Now I just have to decide how much smaller to make mine...I want one that is just big enough for my beagle....She currently has a HUGE metal crate that takes up TOO much space in my home.
Thanks again, I'll be getting started asap!
Sarah Kelly (not verified)
Fri, 10/15/2010 - 04:27
Gorgeous! So much better
Gorgeous! So much better than the black metal thing. I don't think you should paint it though--it's too pretty! How about stain with perhaps a touch of paint (on the 'rails'?) for emphasis.
Kerry, I'd be depressed in a black house too, but dogs are den animals and love the cozy places like a crate. So many people see crates as a terrible thing to do to dogs but my experiences on the first 2 days of using one made me a believer. (Ok, sorry to highjack the thread for the crate-preaching;) )
kate @ www.bro… (not verified)
Fri, 10/15/2010 - 09:39
Love it! I'd love to see a
Love it! I'd love to see a design for a dog bed that's as simple as that. Could you whip up one of those??
Megan (not verified)
Fri, 10/15/2010 - 11:37
I love this crate, it looks
I love this crate, it looks so great!! Just remember that if your dogs are chewers, the wood might not stand up too well, and you should watch painting especially. Some paints can be harmful if the dogs are chewing on them.
Amy C (not verified)
Sat, 10/16/2010 - 03:57
Ana, I can't say thank you
Ana, I can't say thank you enough for posting a diy dog crate! We rescued a German Shepherd who was just under a year old and already close to a 100 lbs (but he was underweight!) Supposed to be housebroken and crate trained but was actually neither and has a bit of separation anxiety combined with puppy energy and desire to chew. Basically, can't be left to roam the house unchecked. He has destroyed two crates so far (one of the clam shell type plastic ones with the wire door and the full on heavy duty all wire crate looks like it got hit with a semi truck). The only solution we've found for the meantime is to muzzle him when we're gone (which none of us like) to keep him from destroying the house as he barks in the backyard. Obviously a lot of training needed but such a great personality otherwise. I'm hoping to build this a bit sturdier, wear him out so he's tired enough to sleep and work on getting him used to it. Not an easy chore but I think it'll be helped out a lot by your plan! Thank you, thank you, thank you!
Melissa (not verified)
Mon, 10/18/2010 - 07:47
I just looked at one of these
I just looked at one of these online couldn't believe they wanted $500. Then I thought surely plans can be made.. then of course ta da.. you truly are a mind reader.. This top of my list :) Thanks Ana
Lisa (not verified)
Mon, 10/18/2010 - 10:52
Thank you so much Ana! I have
Thank you so much Ana! I have been planning on building some crates for my FOUR small dogs but haven't gotton around to drawing plans yet. Now I don't have to! I do need to shrink them down though, lol! I actually think I might build two end-table-size ones for either side of the couch. They will be in corners with the couch in the middle and although they aren't as stylish as some END tables I might choose to build, they are certainly way more stylish than any other dog crate would look in a family room! And they fit our lifestyle: our dogs are part of our family too!
*Can I add a request? There is a little pet/dog cubby sort thing in the Ballards catalog with a place for food, leashes, etc, and it would be really easy to build I think. I'm sure a lot of us could figure it out ourselves now thanks to you, but now that you've added this dog crate plan, you will be attracting a lot of dog lovers and it might be a cool idea to have a few pet friendly plans available! :-) If I ever find the time, I want to build several crates and one of these cubbies for my mudroom- where the dogs hang out when no ones home.
Sharon (not verified)
Mon, 10/18/2010 - 11:27
I LOVE it - I think i may
I LOVE it - I think i may have to hack the design to make end tables for my living room (my pup already has a crate he likes)