


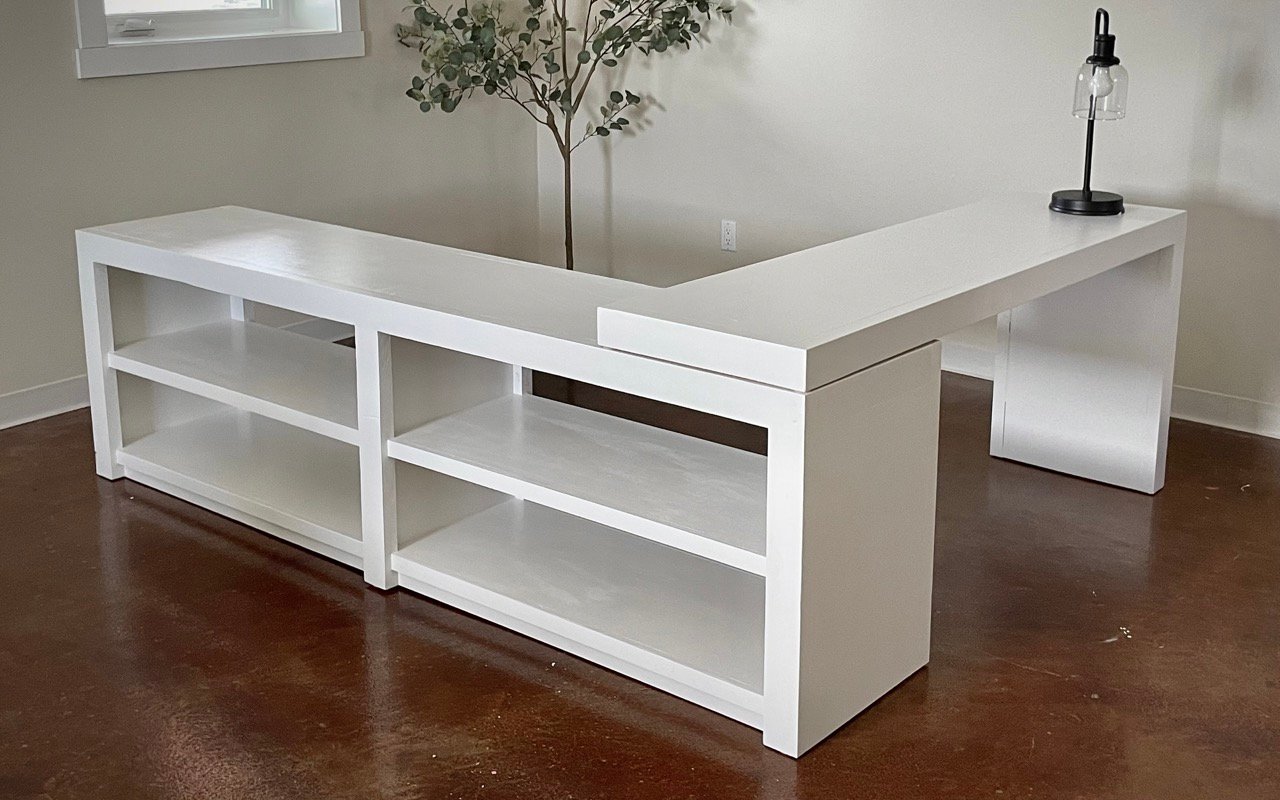
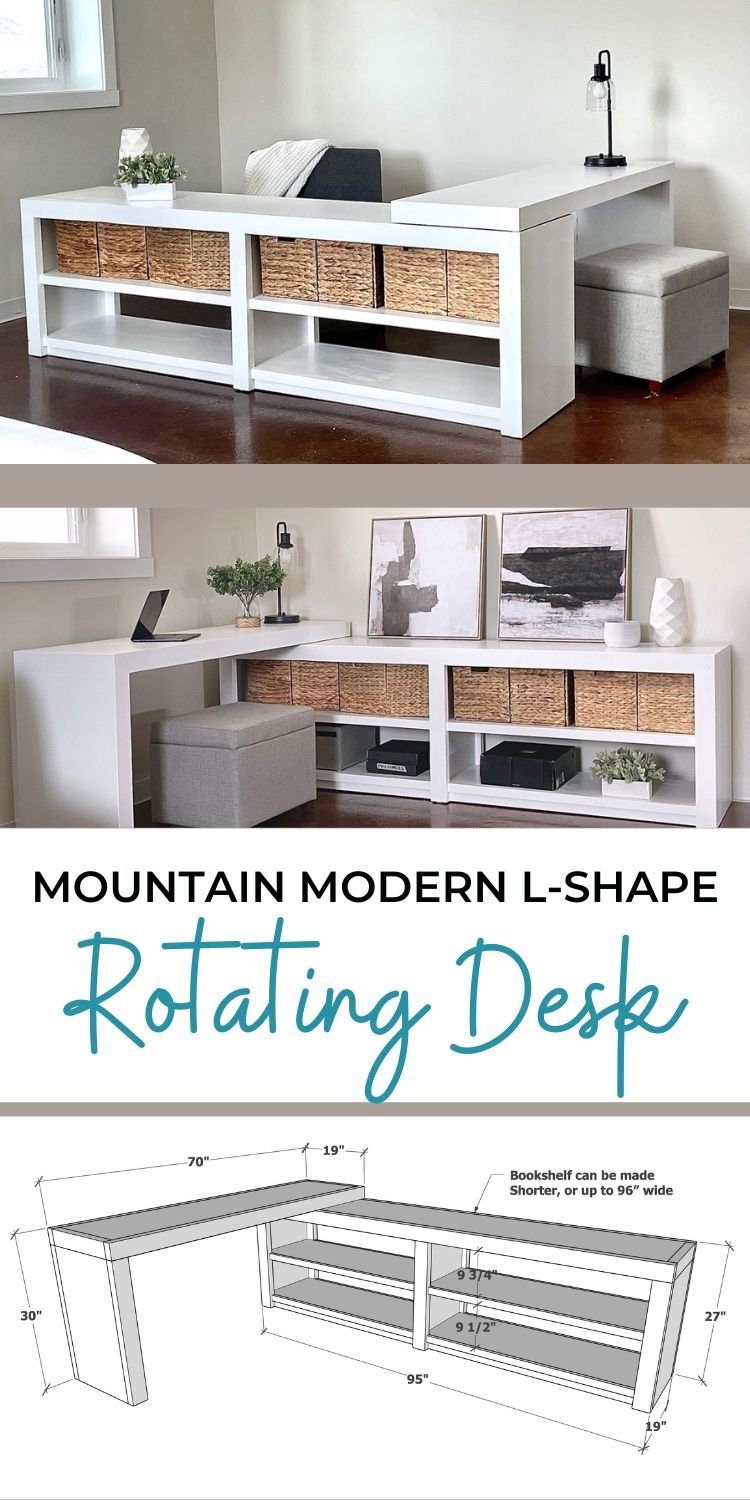
Modern, clean lines paired with a flexible design that can be configured to accommodate different room shapes, projects and users - this desk system features ample storage and a generous desktop. Finished on all sides, this desk can be centered in a room. It's built from two sheets of plywood and some 2x4s. The total cost was around $200.
This is a free project plan with step by step instructions to help you build your own custom desk.
Related: Mountain Modern Bookshelf Plans
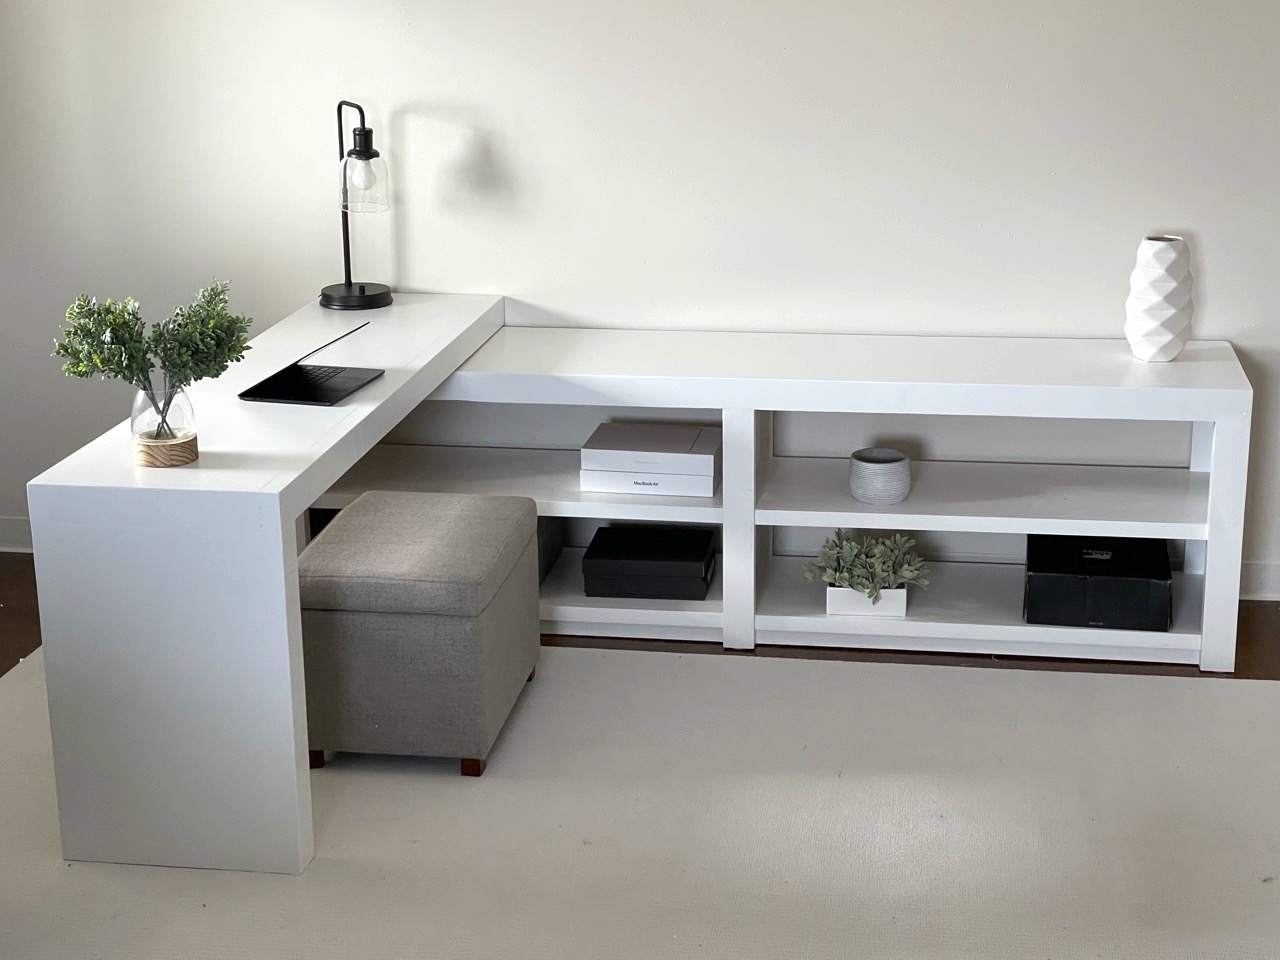
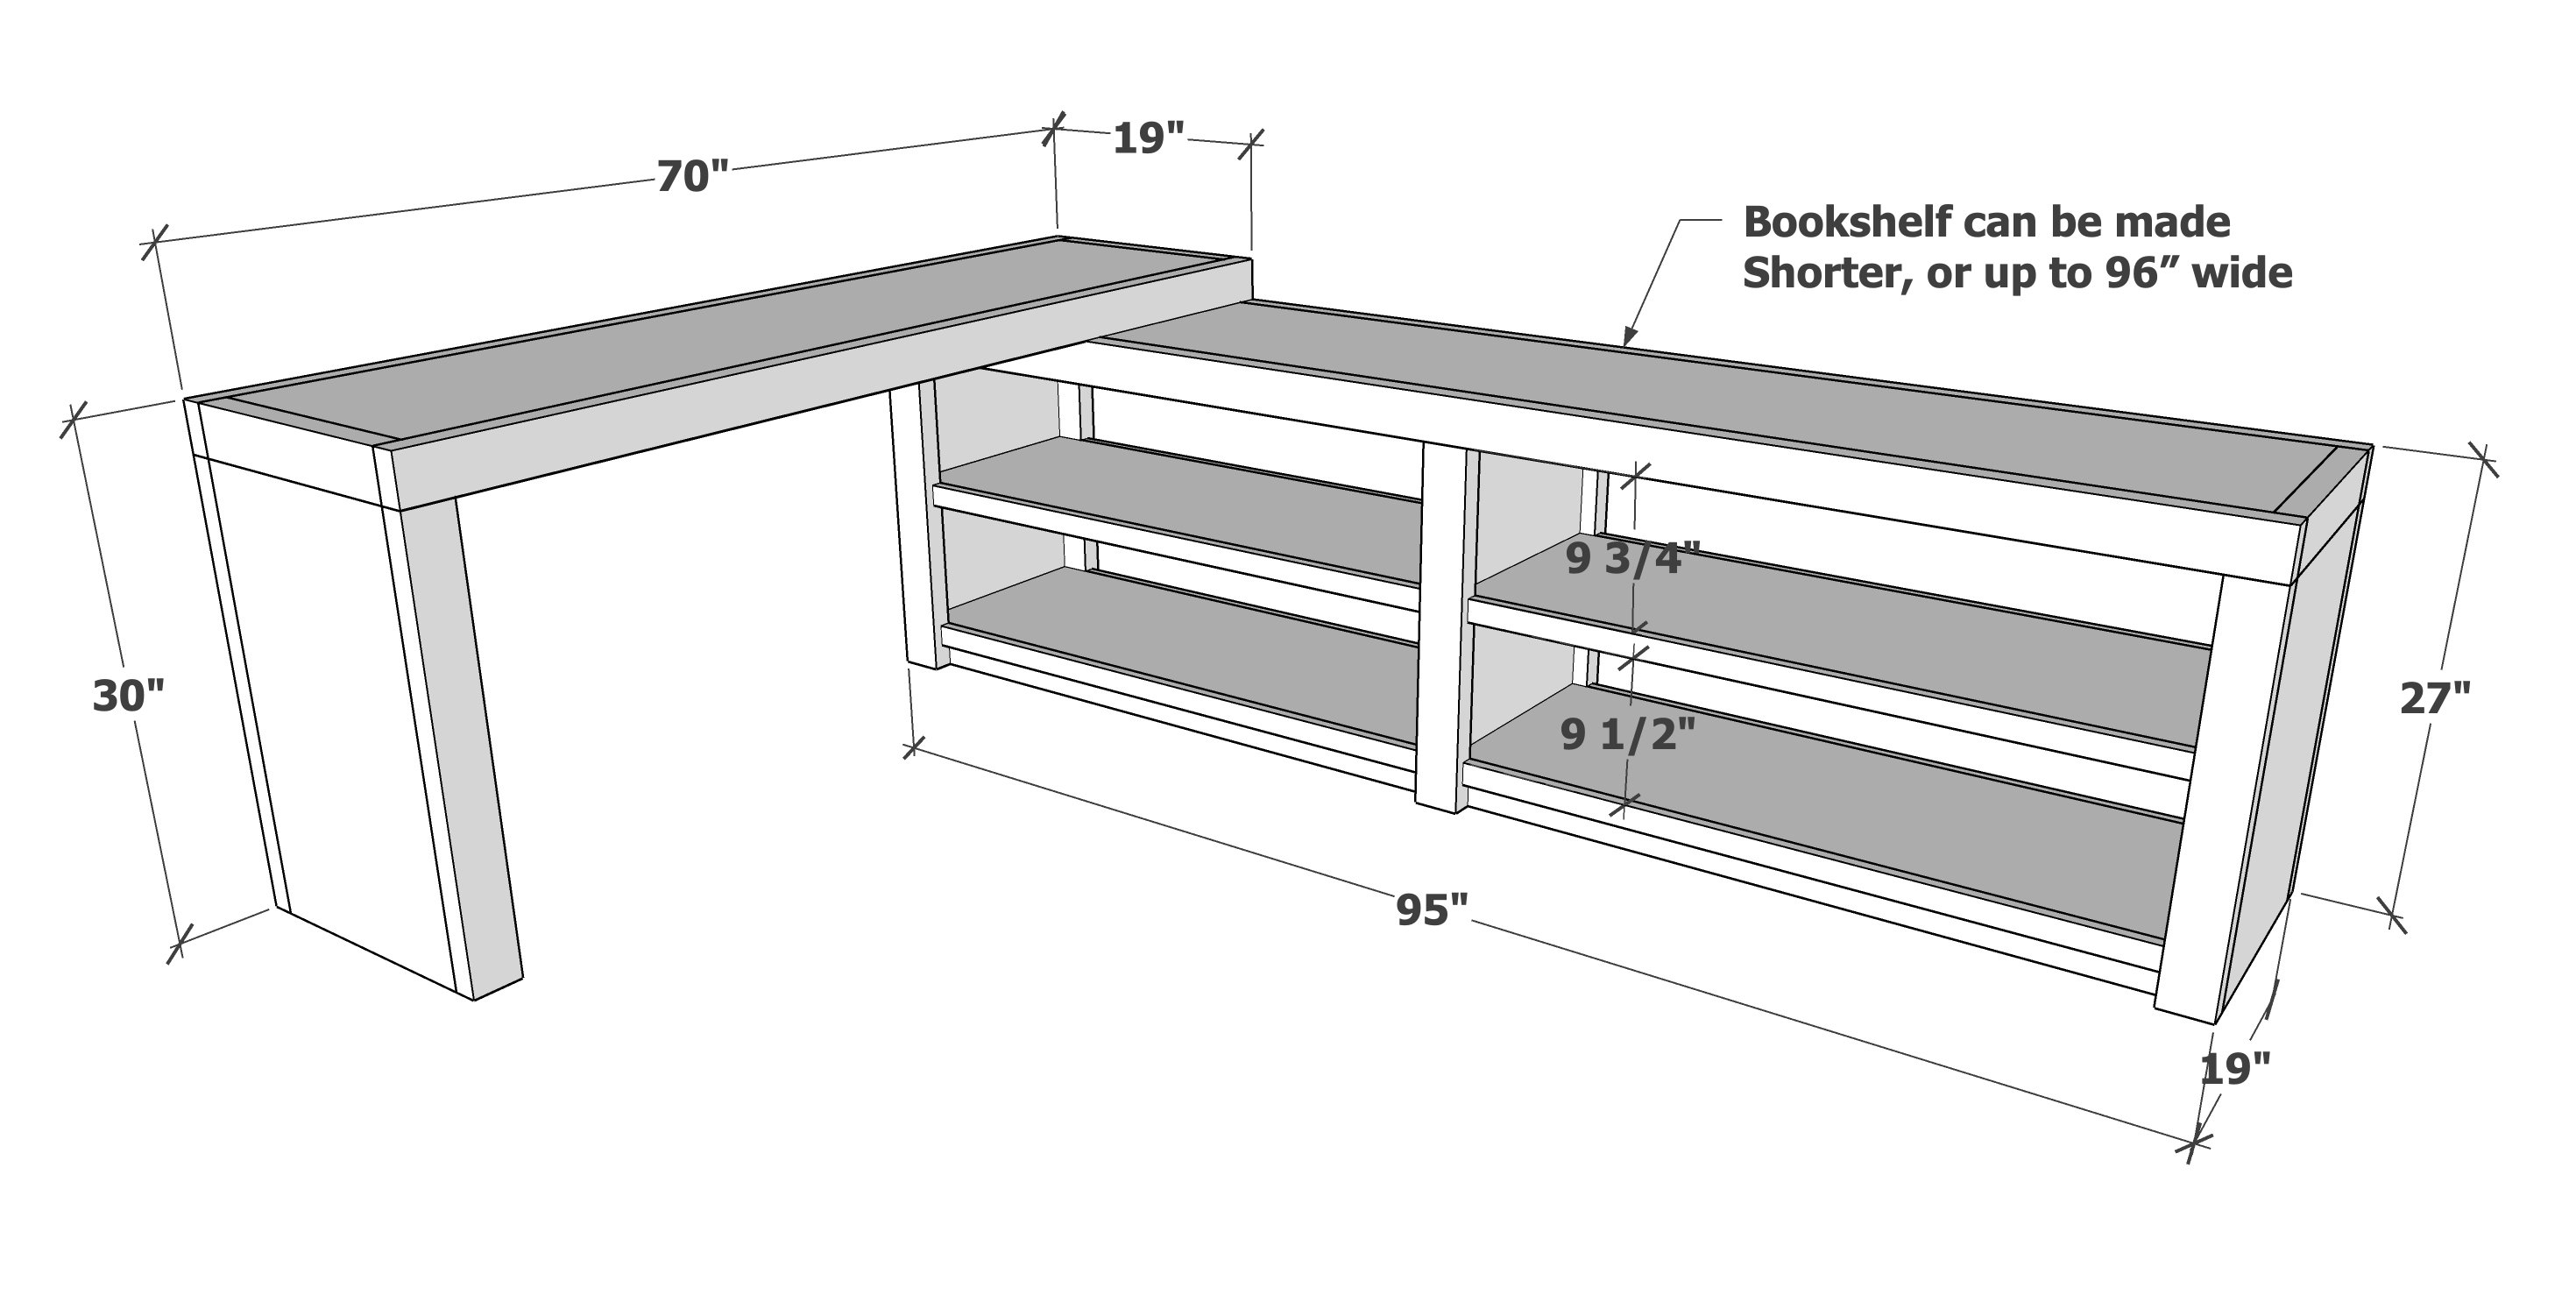
L Shape Rotating Desk Configuration
This desk system can be configured in so many ways. It can be placed against the wall, or freestanding in the center of the room since it's finished on all sides.
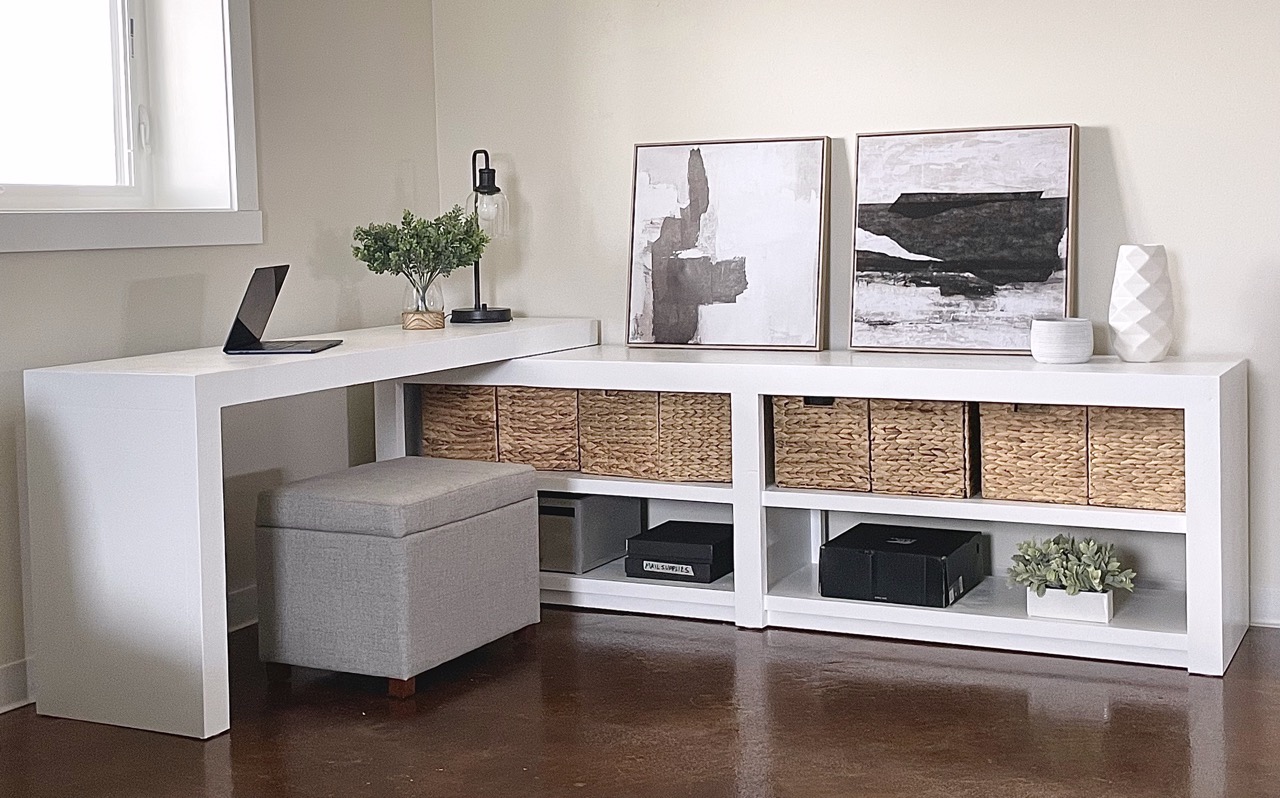
Corner Configuration: Desk arranged as a corner desk, against the wall
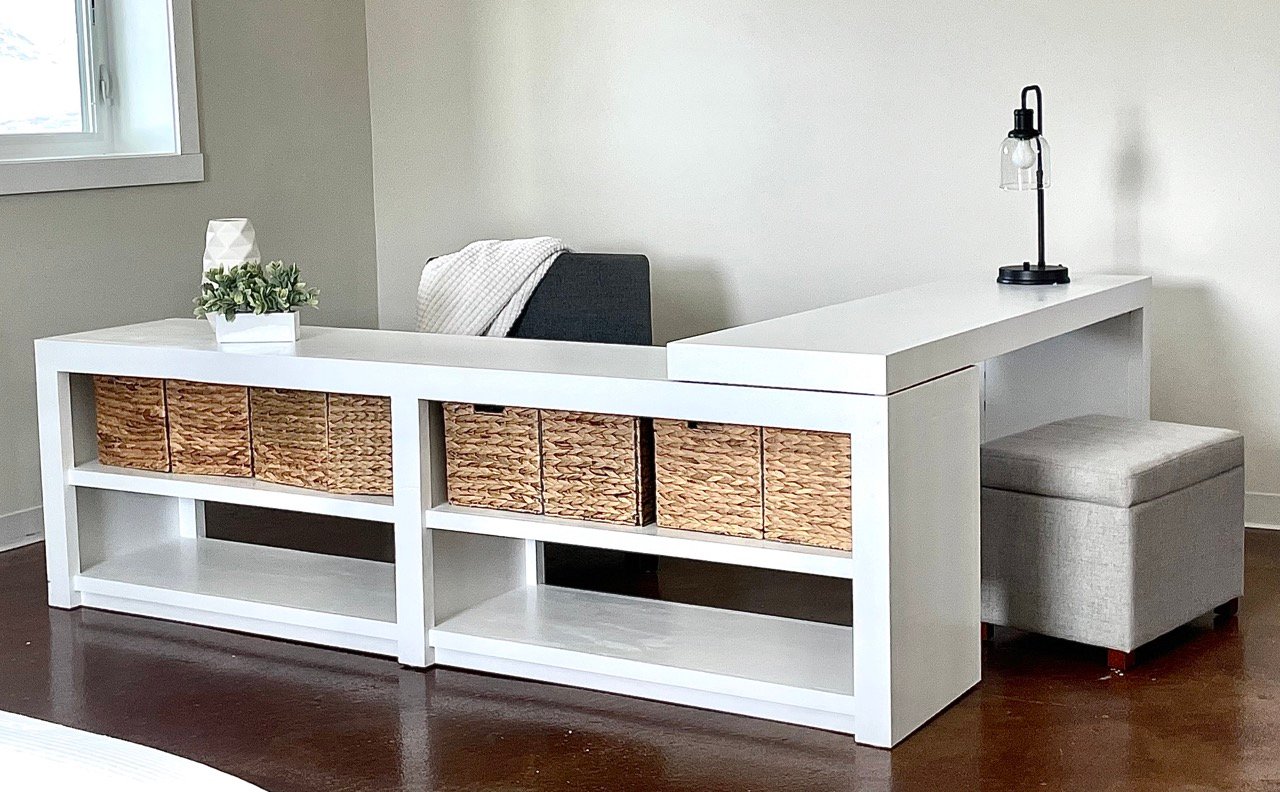
Peninsula Configuration: All sides of all pieces of the desk are finished, so can be configured as an L shaped desk in the center of a room. Seating can be placed on both sides of the desktop.
Centered in Room: This desk is finished on all sides, so can be placed in the center of the room - it does not need to be placed against a wall.
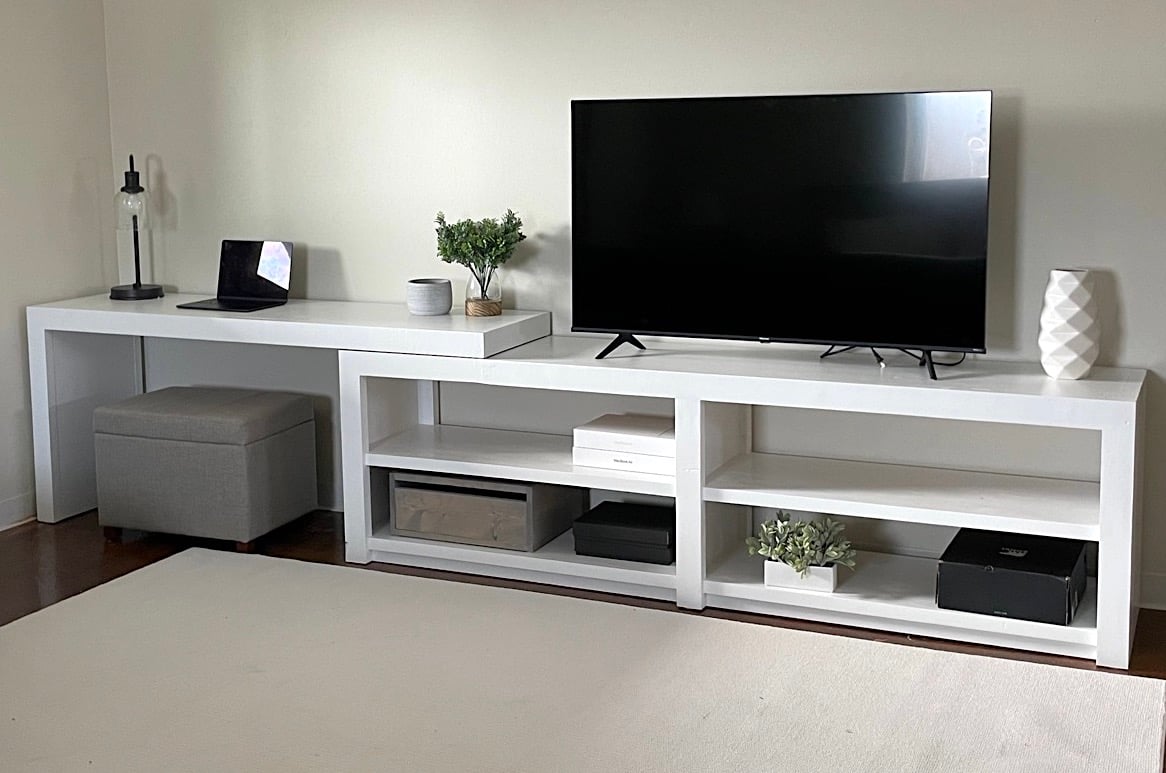
Desk and TV Straight Configuration: When you need both a desk and TV on the same wall, placed straight, this desk system can deliver both, and adjust in size for a perfect fit. We are using this configuration for a Airbnb rental, so the bedroom has both a desk and tv, but it looks cohesive.

Why I Built This Desk
I needed a 12 foot long wall system that provided both a desk and media center, with some storage, for an Airbnb rental project. I have been wanting to do a corner or L shaped rotating desk for a long time, and thought this was the perfect push to take on this giant desk project.
I love this modern style, it is inspired by a Pottery Barn Desk retailing for $1800 (for a smaller size), I was able to build it for about $200.
If I had done cabinetry, it would have been much more expensive and much more work. This was a very good solution that looks and works amazing.
How I Built This Desk
This desk certainly wasn't an easy project - it is huge. My husband helped me, the two of us were able to put the desk together in an afternoon. The sanding and painting took another day, working on and off as coats of paint dried. You could definitely tackle this over a weekend.
Here's the basic steps -
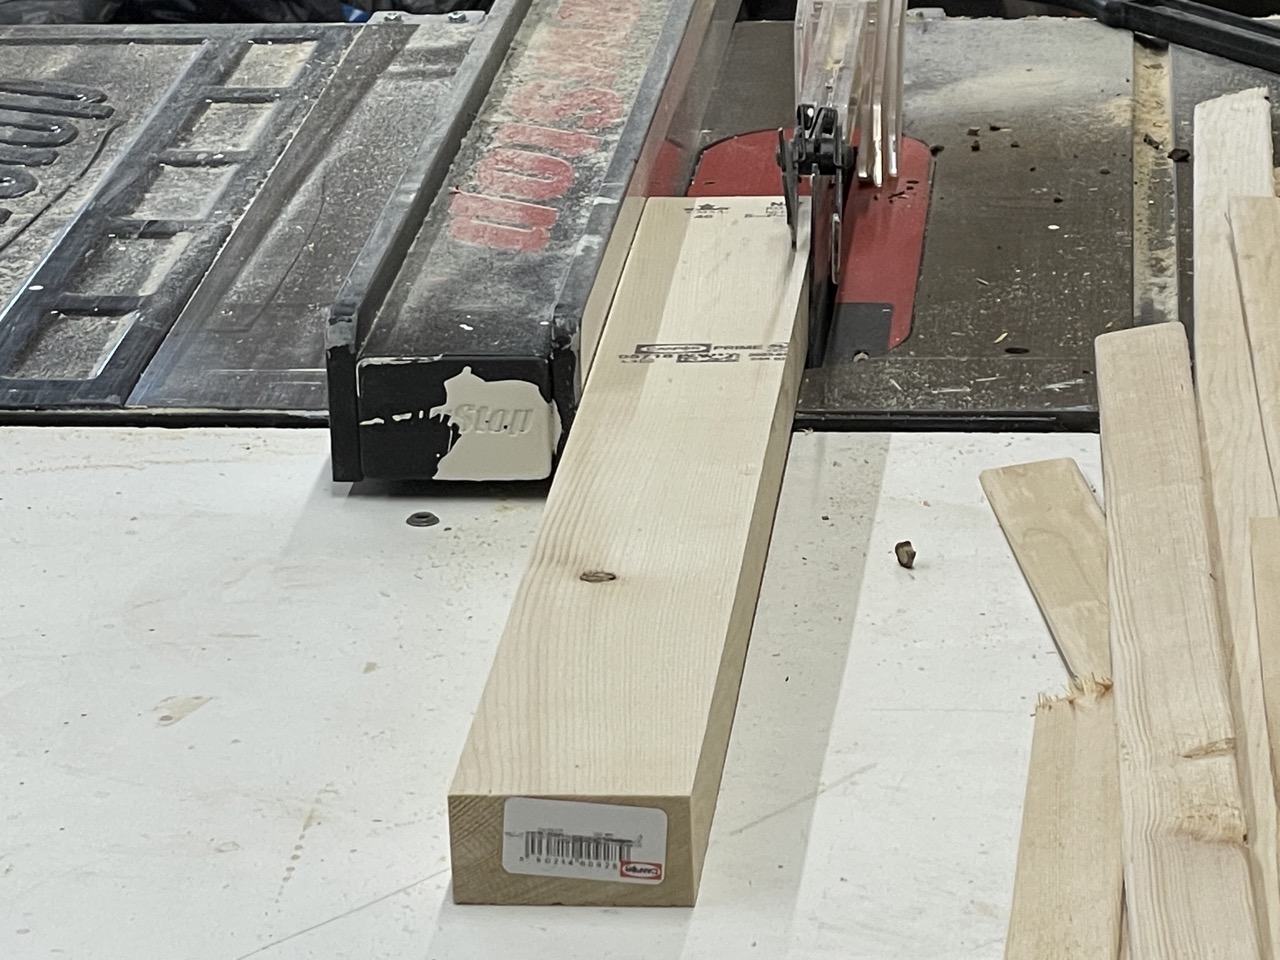
Ripping on Tablesaw
You'll need a tablesaw to do a good job on this project. You are saving $1600+ by building yourself, this is a big, nice piece - invest in a tablesaw.
The two sheets of plywood need to be ripped into 6 pieces, each 15-3/4" wide. The rip widths must be identical.
The 2x4s should be ripped twice, so the rounded edges are removed and the 2x4 width is 3". I ran the boards through first at 3-1/4" and then ran the second side through with the fence set at 3".
Assembling with Pocket Holes
For a professional looking project, pocket holes are the way to go. This is the same method furniture and cabinet companies use. It is a miracle that you can do pocket holes at home with a $100 tool.
Pocket holes give you precision and hidden fasteners that hold up over time.
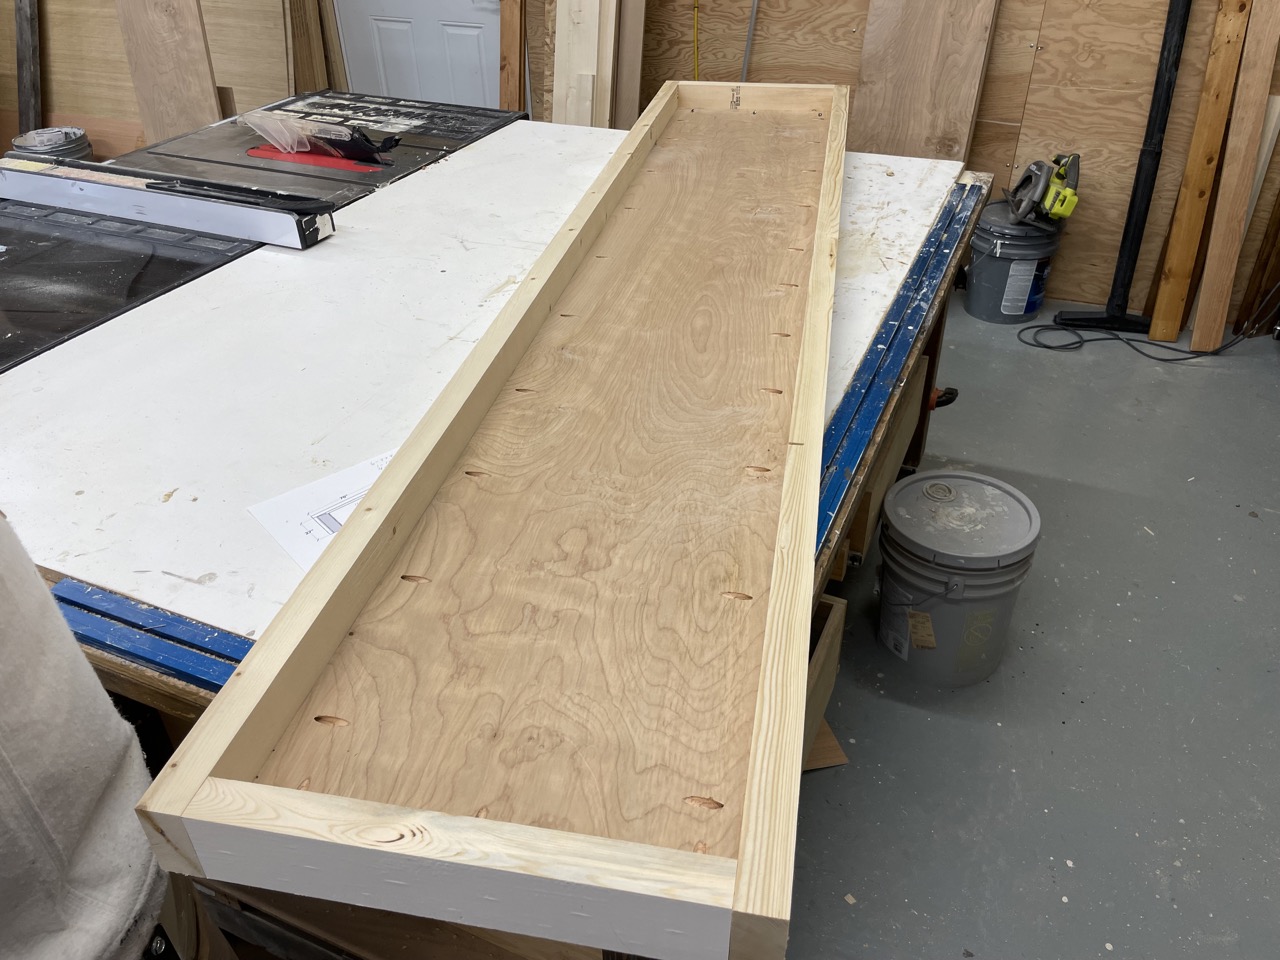
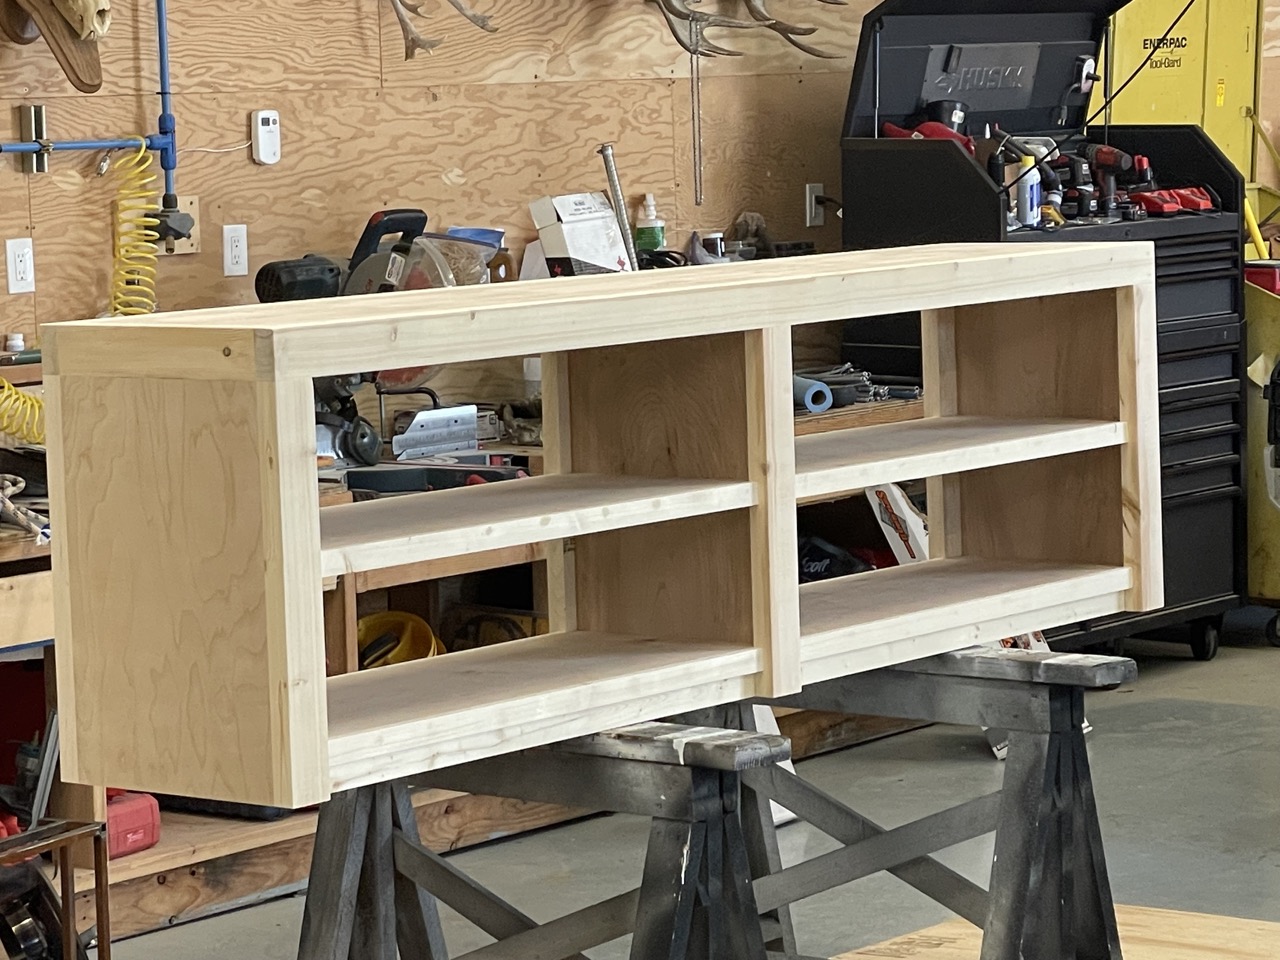
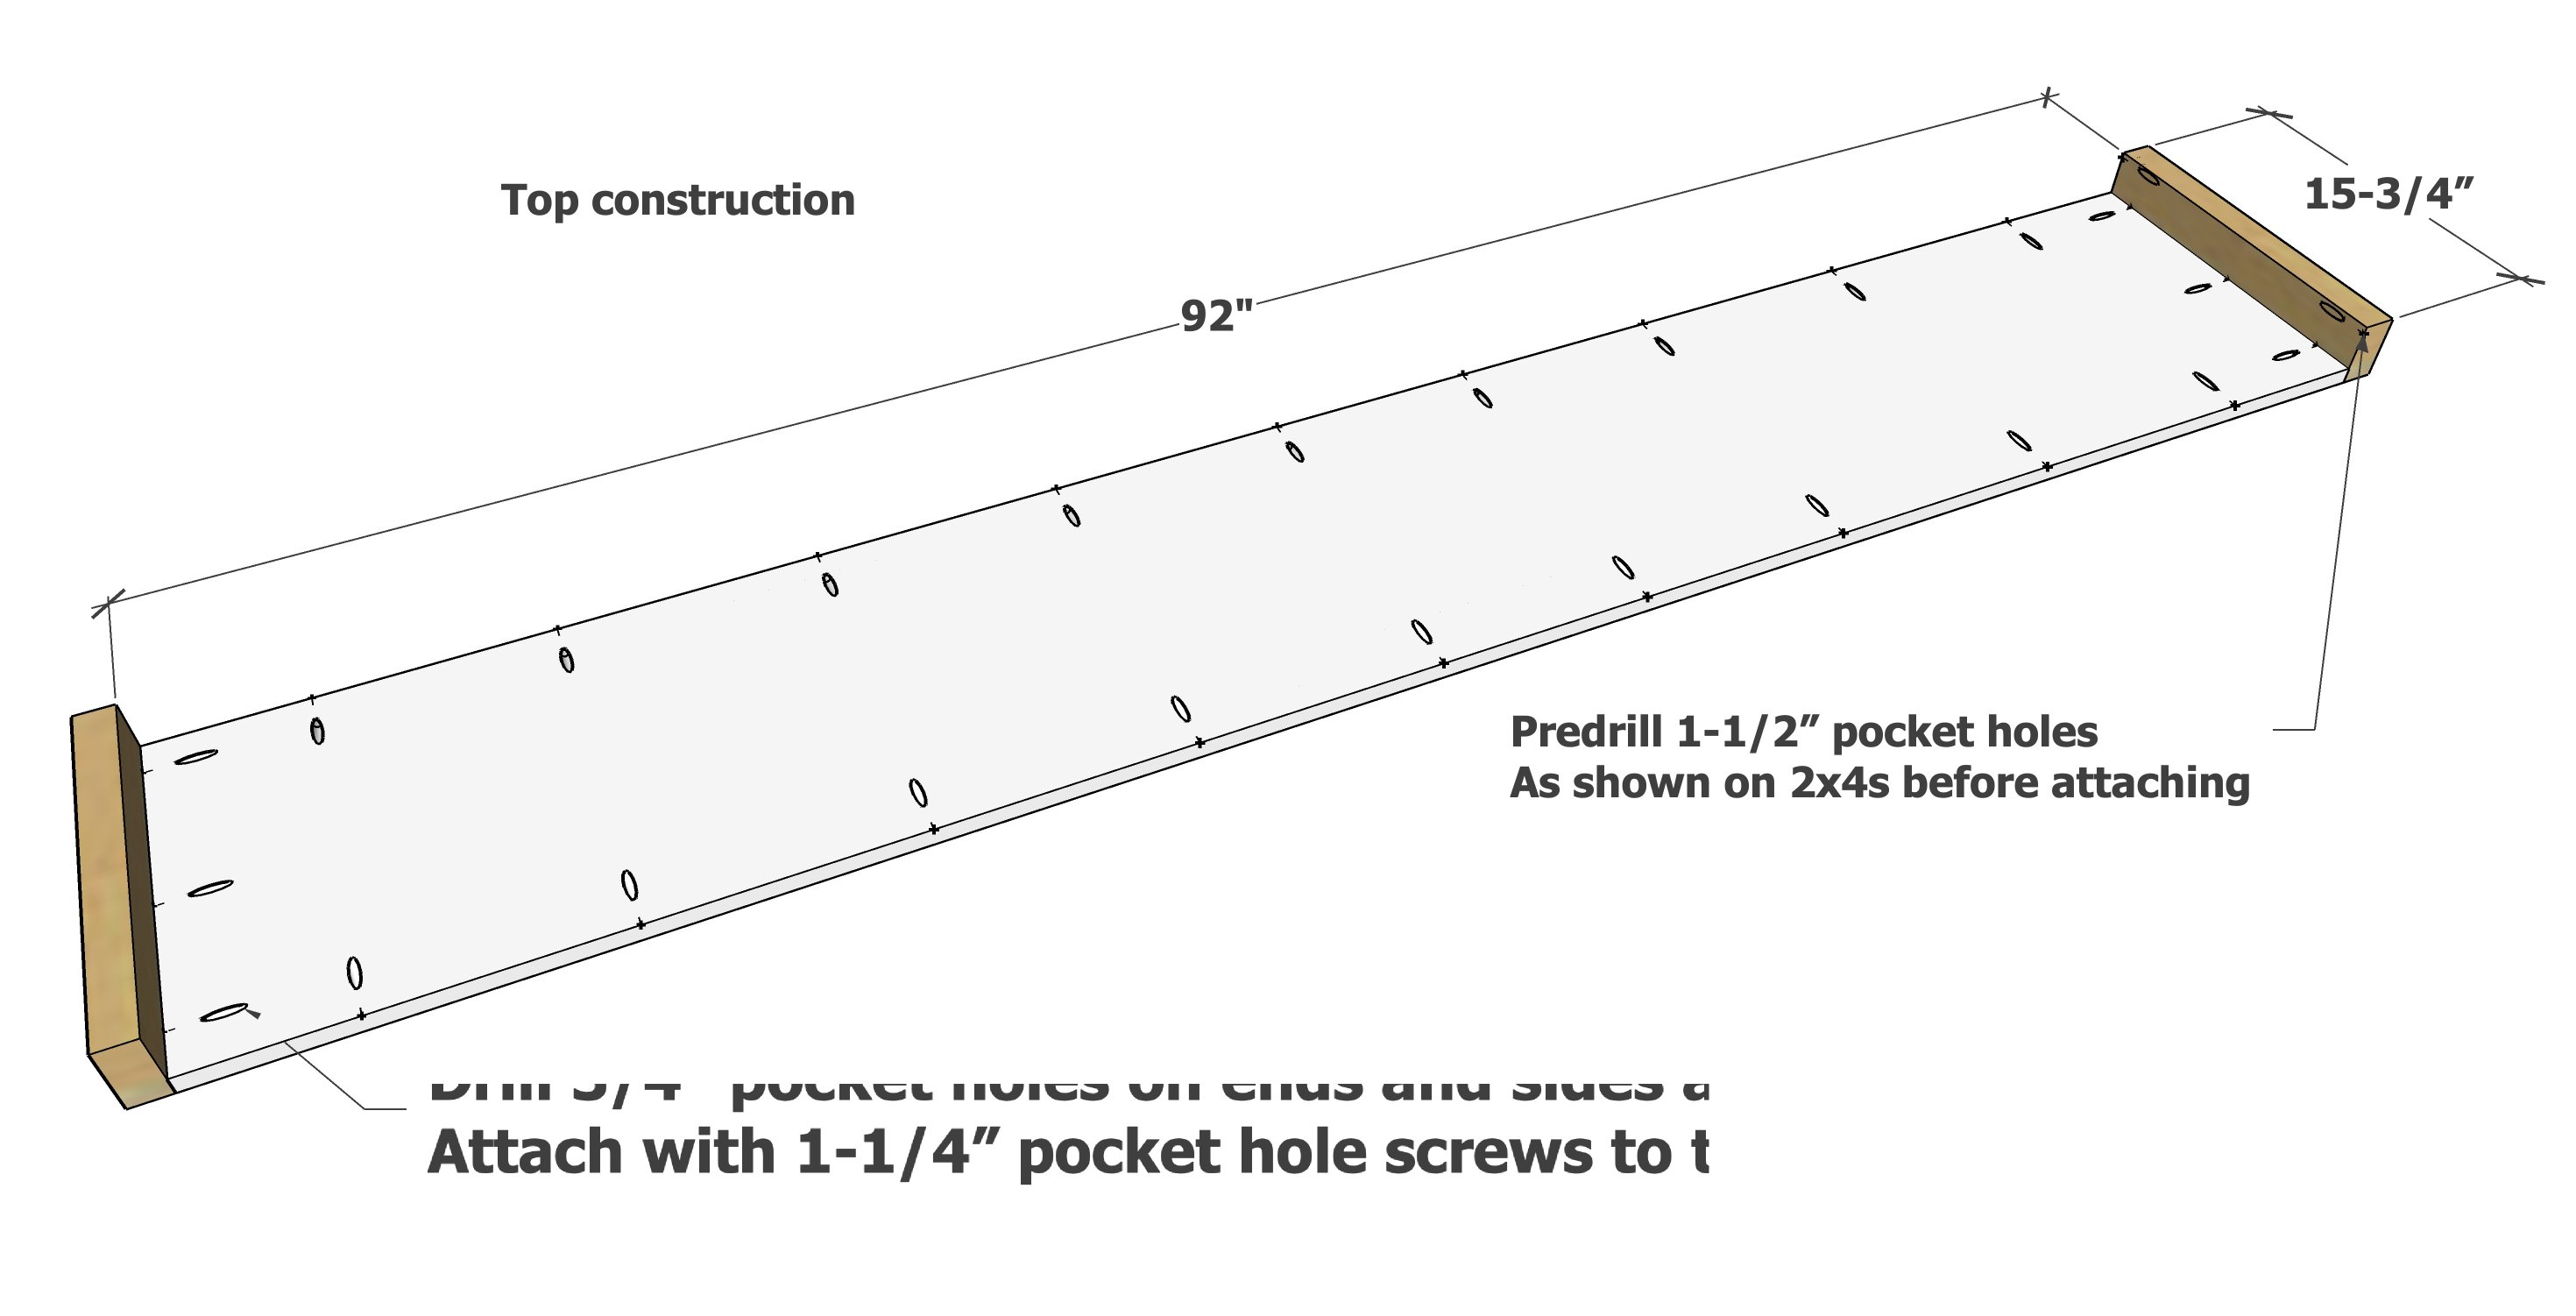
First I built the two tabletop pieces. They are 3/4" plywood framed with the ripped 2x4s.
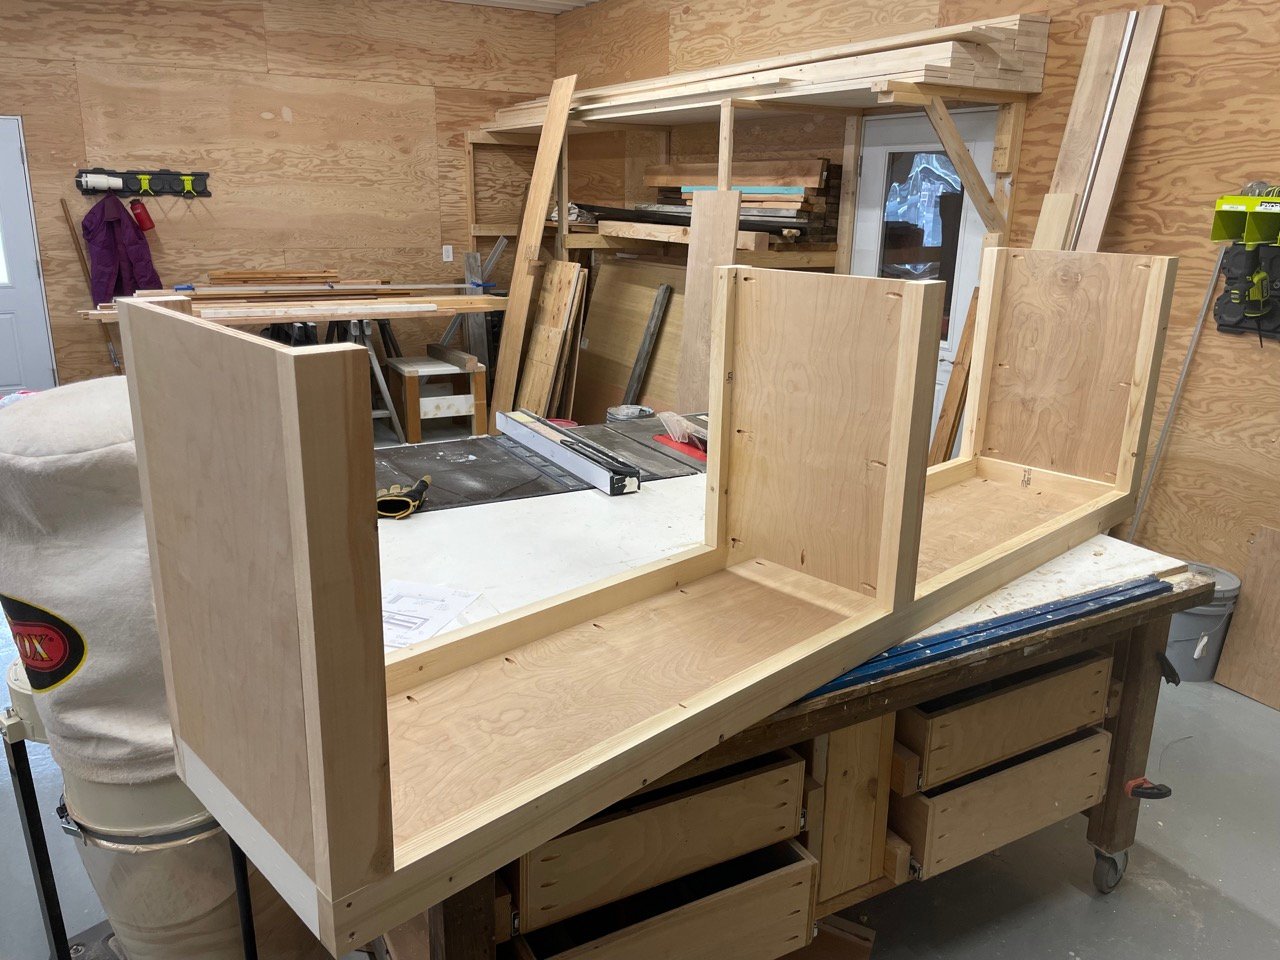
Then I attached the "legs" and inset the plywood panels.
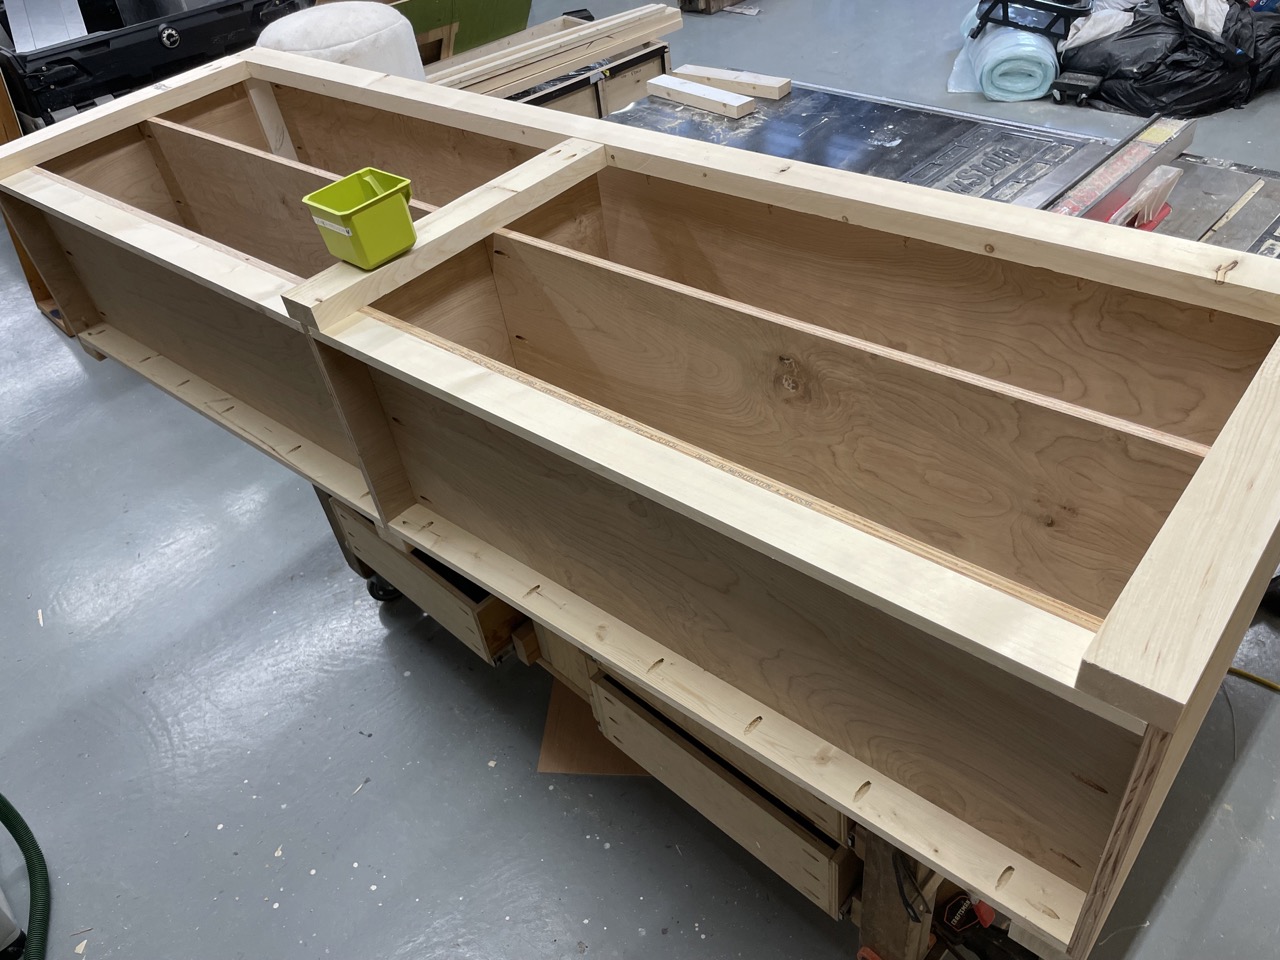
From there, I set the shelves in between the legs and the 1x3 bottom trim. I also attached the 1x3 bottom trim with pocket holes to the shelf bottom.
The final step was attaching the 1x2 trim to the shelf faces. I used 1-1/4" brad nails and wood glue.

The desktop pieces i built the same way. It is very strong with this method - we did testing on it.
To finish the inside of the leg we added cleats with 1-1/4" brad nails
And then covered it with plywood. I did use 1/4" plywood (we ran out of 3/4") but the plans call for 3/4".
Finishing the Desk
The finish is a huge deal. It takes me as long to finish a project as it does to build it.
There were some nail holes to fill. We filled them with wood filler and let dry.
The entire project was sanded with 120 grit sandpaper.
I did slightly round the outside edges with the sander, sharp knife edges can get busted off easily.
I used a mini roller and brush for corners to paint. It took three light coats. A light, fine grit sanding was done between coats for a super smooth finish.
Modern L Shaped Rotating Desk Plans
Here's the free plans to build this desk. You can easily modify the sizes to fit your space and needs too.
Pin For Later!
Preparation
- 2 sheets of 3/4" thick cabinet grade plywood, ripped intro 6 strips, 15-3/4" wide x 8 feet long
- 6 - 2x4x10, pine (yellow toned), ripped down to 3" wide (take 1/4" off each side for square edges)
- 2 - 1x3 @ 8 feet long
- 5 - 1x2 @ 8 feet long
- 24 - 2-1/2" pocket hole screws
- 150 - 1-1/4" pocket hole screws
- 1-1/4" brad nails
- wood glue
- 12 felt pads (1" diameter or similar) for protecting bottoms of bookshelf, desk feet and bottom of desk where it sits on the bookshelf)
3/4" Plywood Cuts - Rip the 3/4" plywood into 6 strips, each 15-3/4" wide
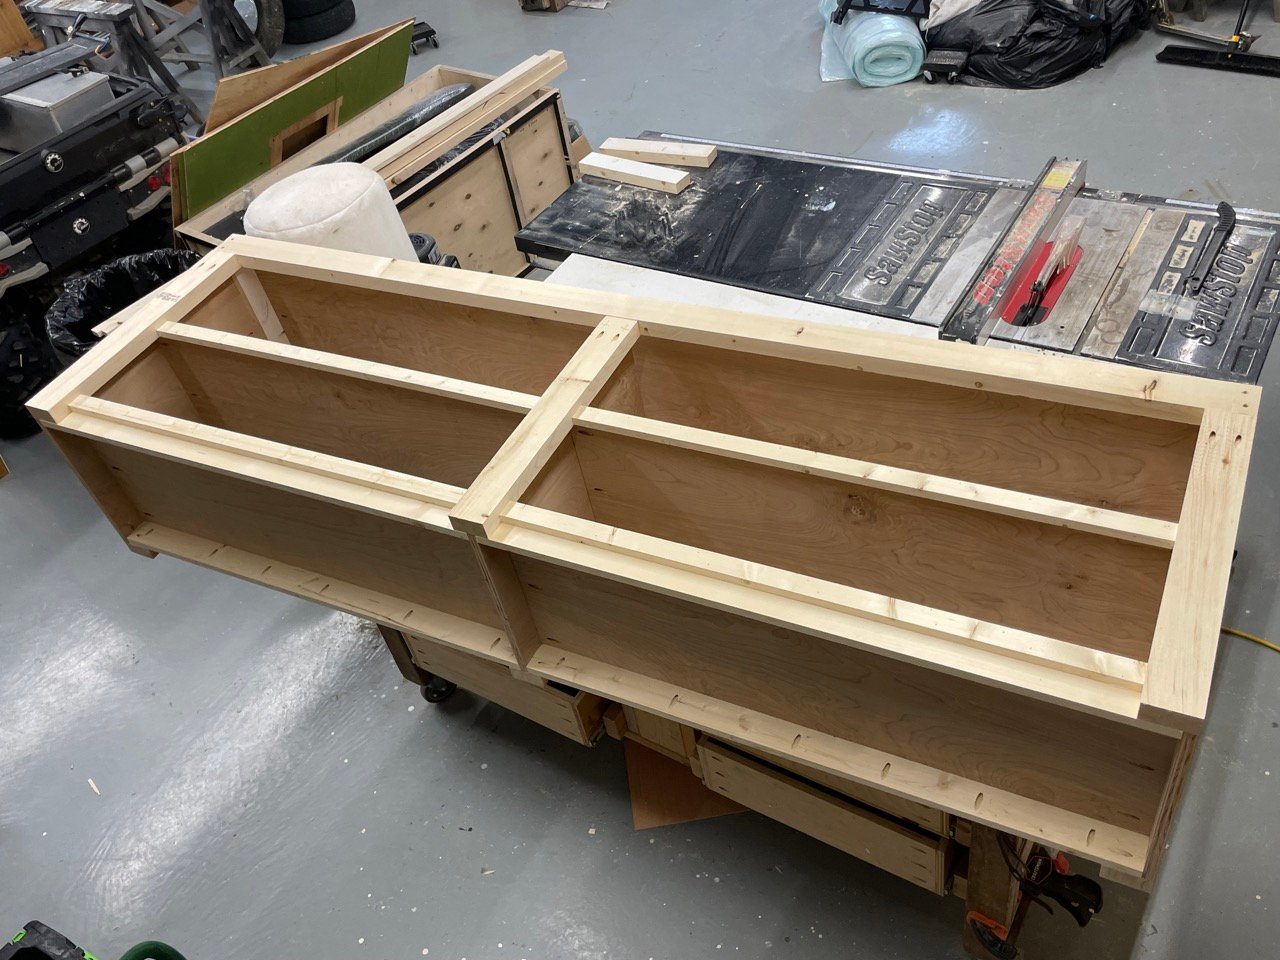
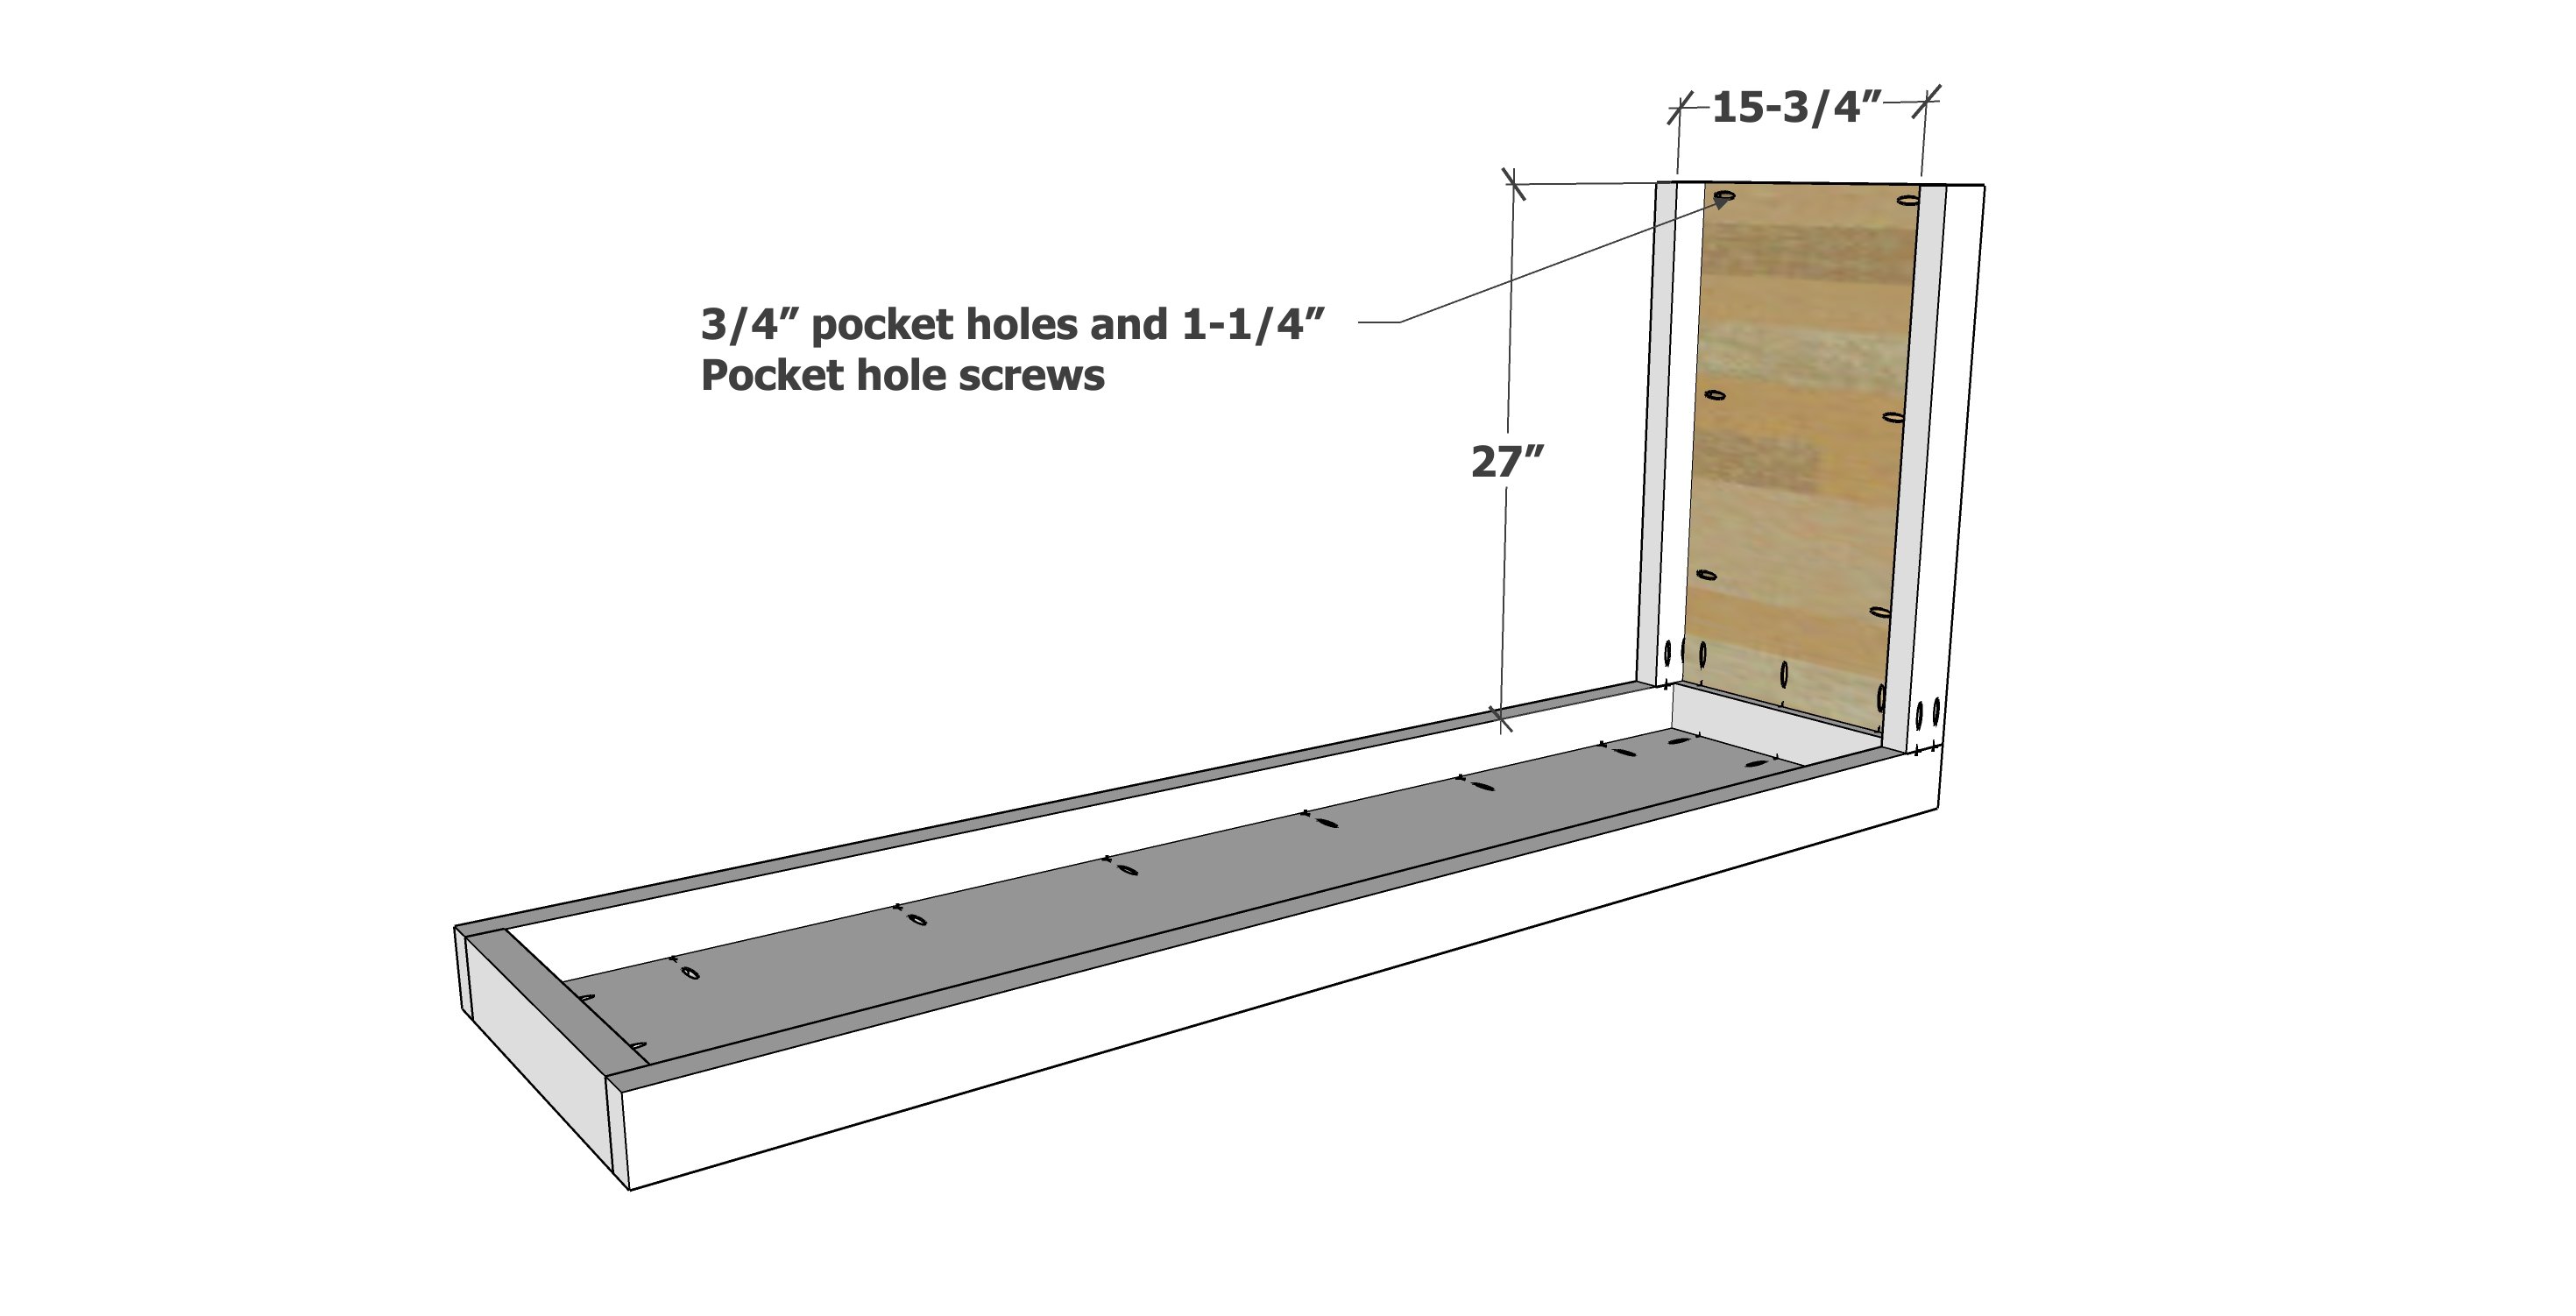
- 1 - 3/4" plywood @ 15-3/4" x 92" - bookshelf top (drill 3/4" pocket holes along all four edges)
- 2 - 3/4" plywood @ 15-3/4" x 24" - bookshelf sides (drill 3/4" pocket holes on top and side edges, place as shown in step 4)
- 1 - 3/4" plywood @ 15-3/4" x 26-1/4" - bookshelf center (drill 3/4" pocket holes on top and side edges, place as shown in step 4)
- 4 - 3/4" plywood @ 15-3/4" x 46-3/8" - shelves (drill 3/4" pocket holes on ends only)
- 1 - 3/4" plywood @ 15-3/4" x 67" - desk top (drill 3/4" pocket holes along all four edges)
- 1 - 3/4" plywood @ 27" - desk leg - matches height of bookshelf (drill 3/4" pocket holes along top and side edges)
- 1 - 3/4" plywood @ 29-1/4" - desk inside leg (drill 3/4" pocket holes on top edge only)
2x4 cuts - rip 2x4s down to 3" wide first
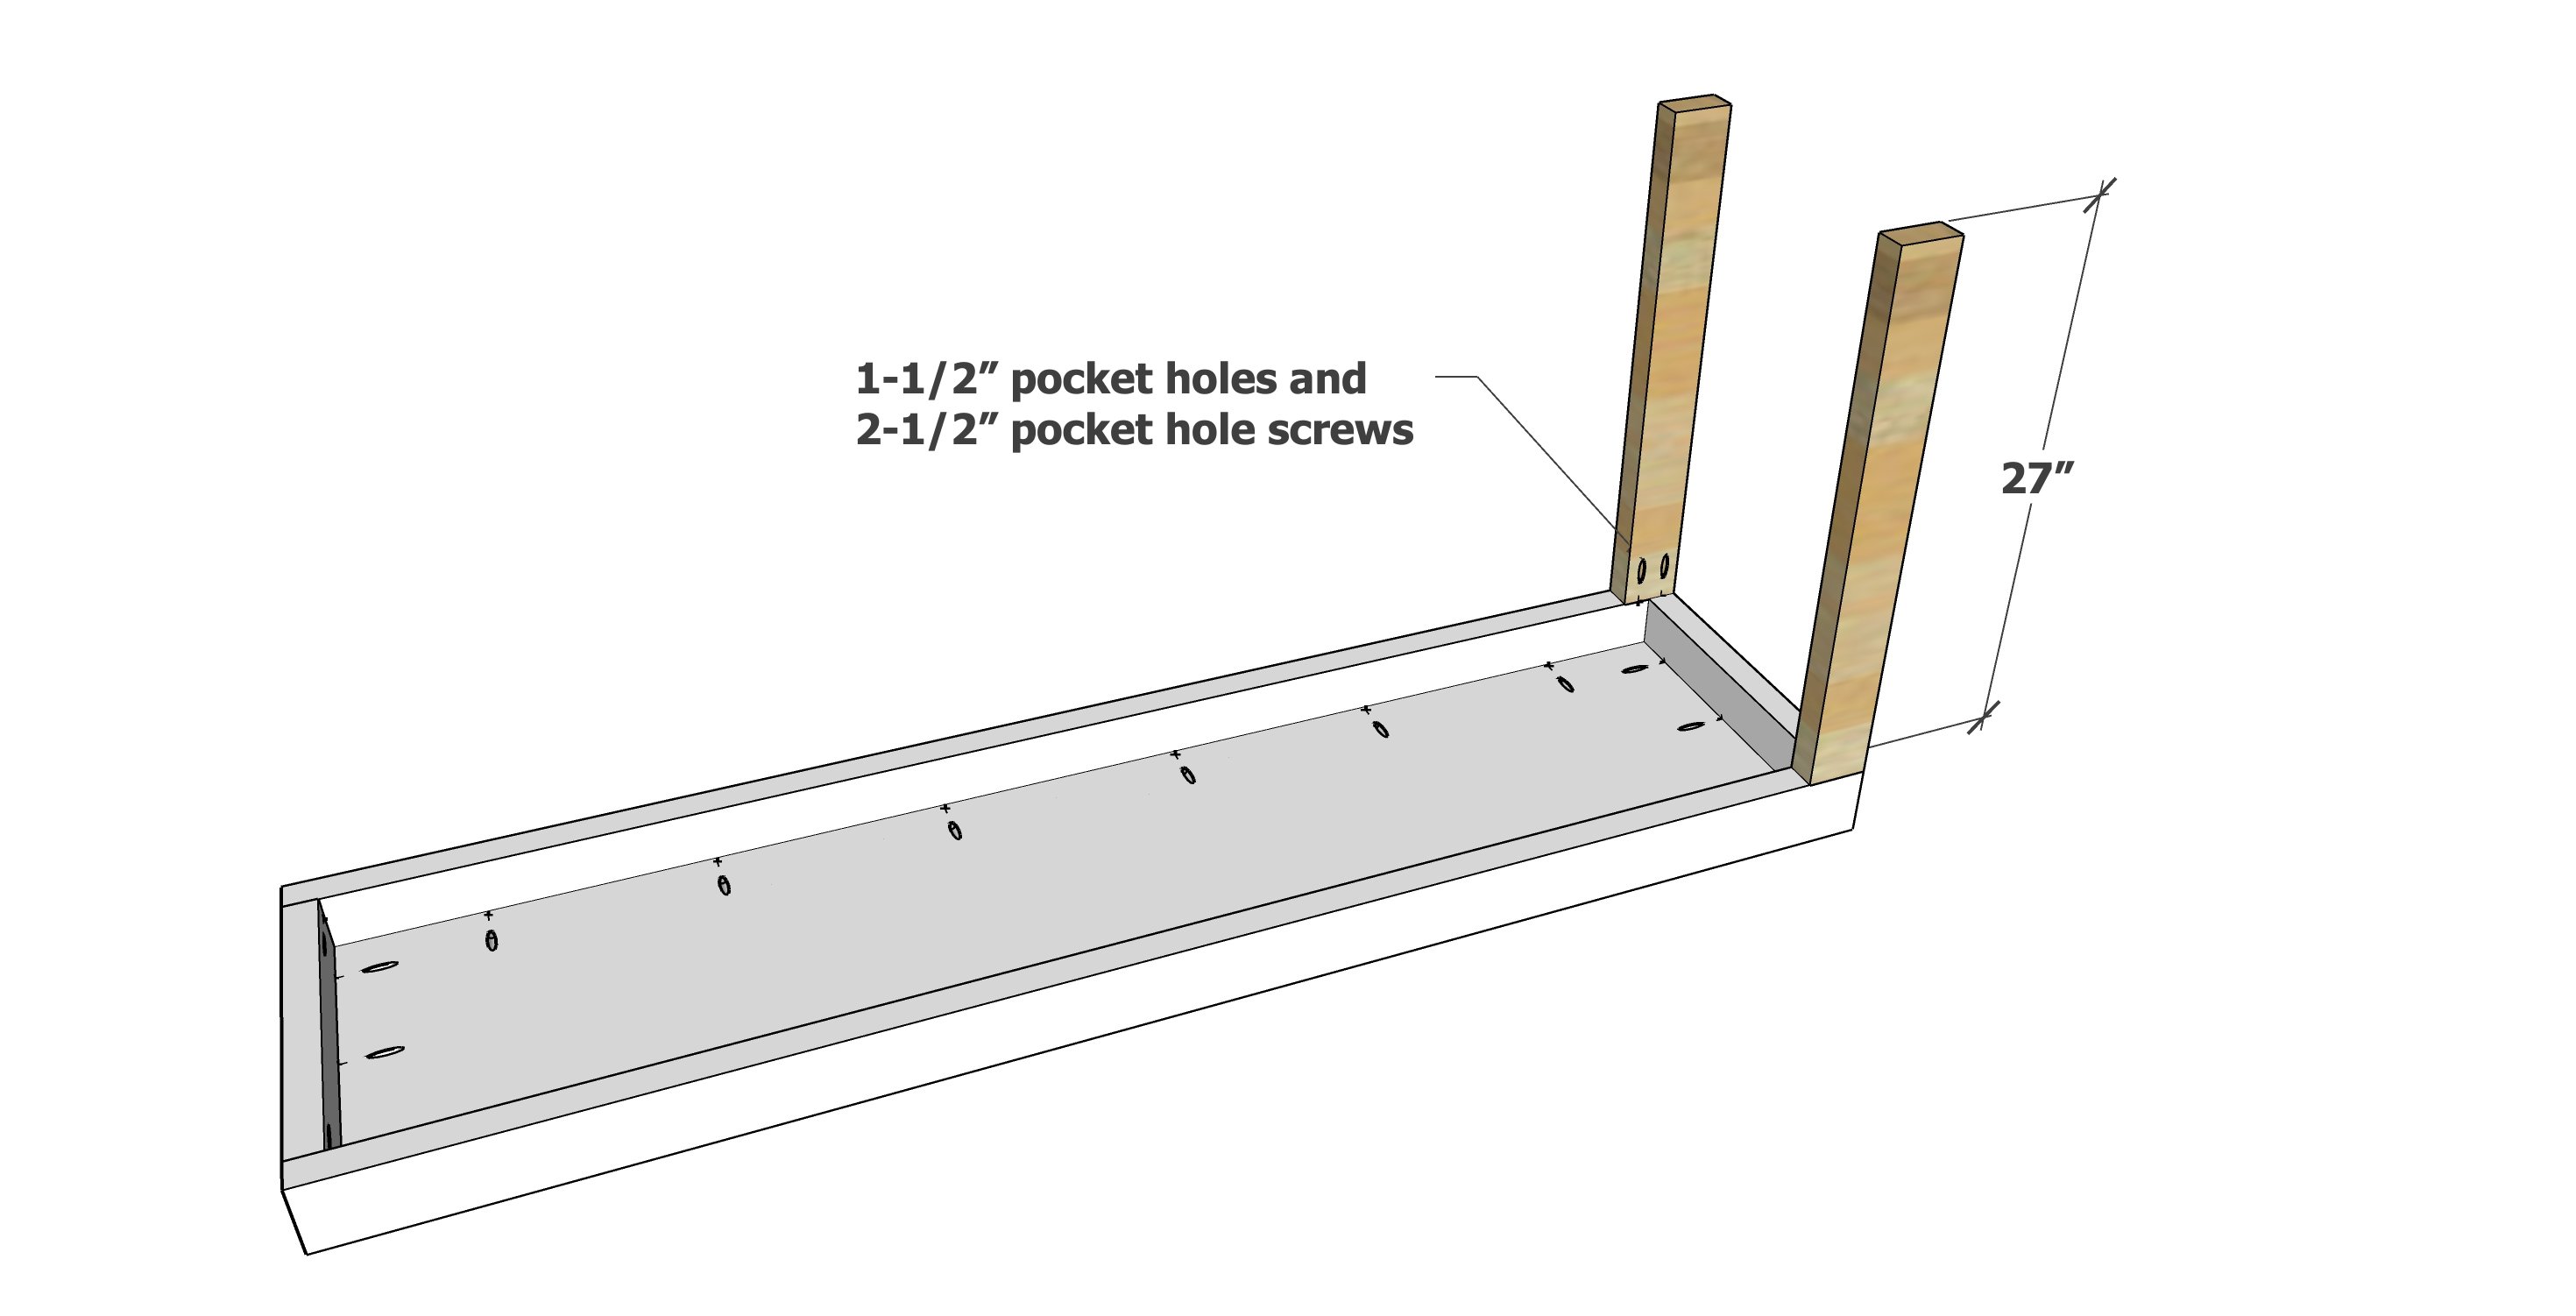
- 4 - 2x4 @ 15-3/4" - ends for tabletops (drill 1-1/2" pocket holes on each end)
- 2 - 2x4 @ 95" - sides of bookshelf tabletop - measure and cut to fit
- 6 - 2x4 @ 24" - bookshelf legs (drill two 1-1/2" pocket holes on one end)
- 2 - 2x4 @ 70" - sides of desk tabletop - measure and cut to fit
- 2 - 2x4 @ 27" - matches height of the bookshelf - desk legs (drill two 1-1/2" pocket holes on one end)
1x Trim Pieces
- 4 - 1x3 @ 46-3/8" - bottom supports (drill 3/4" pocket holes on ends and along top edge)
- 8 - 1x2 @ 43" - shelf trim, cut to fit
- 2 - 1x2 @ 27" - desktop leg trim


TIP: Drill the 1-1/2" pocket holes first in the 2x4s.
Then set the pocket hole jig to 3/4" setting and drill remaining holes.
This is to avoid having to reset the jig for different wood thicknesses multiple times.
Instructions
Step 1
Attach the 2x4 ends to the bookshelf tabletop.
Step 2
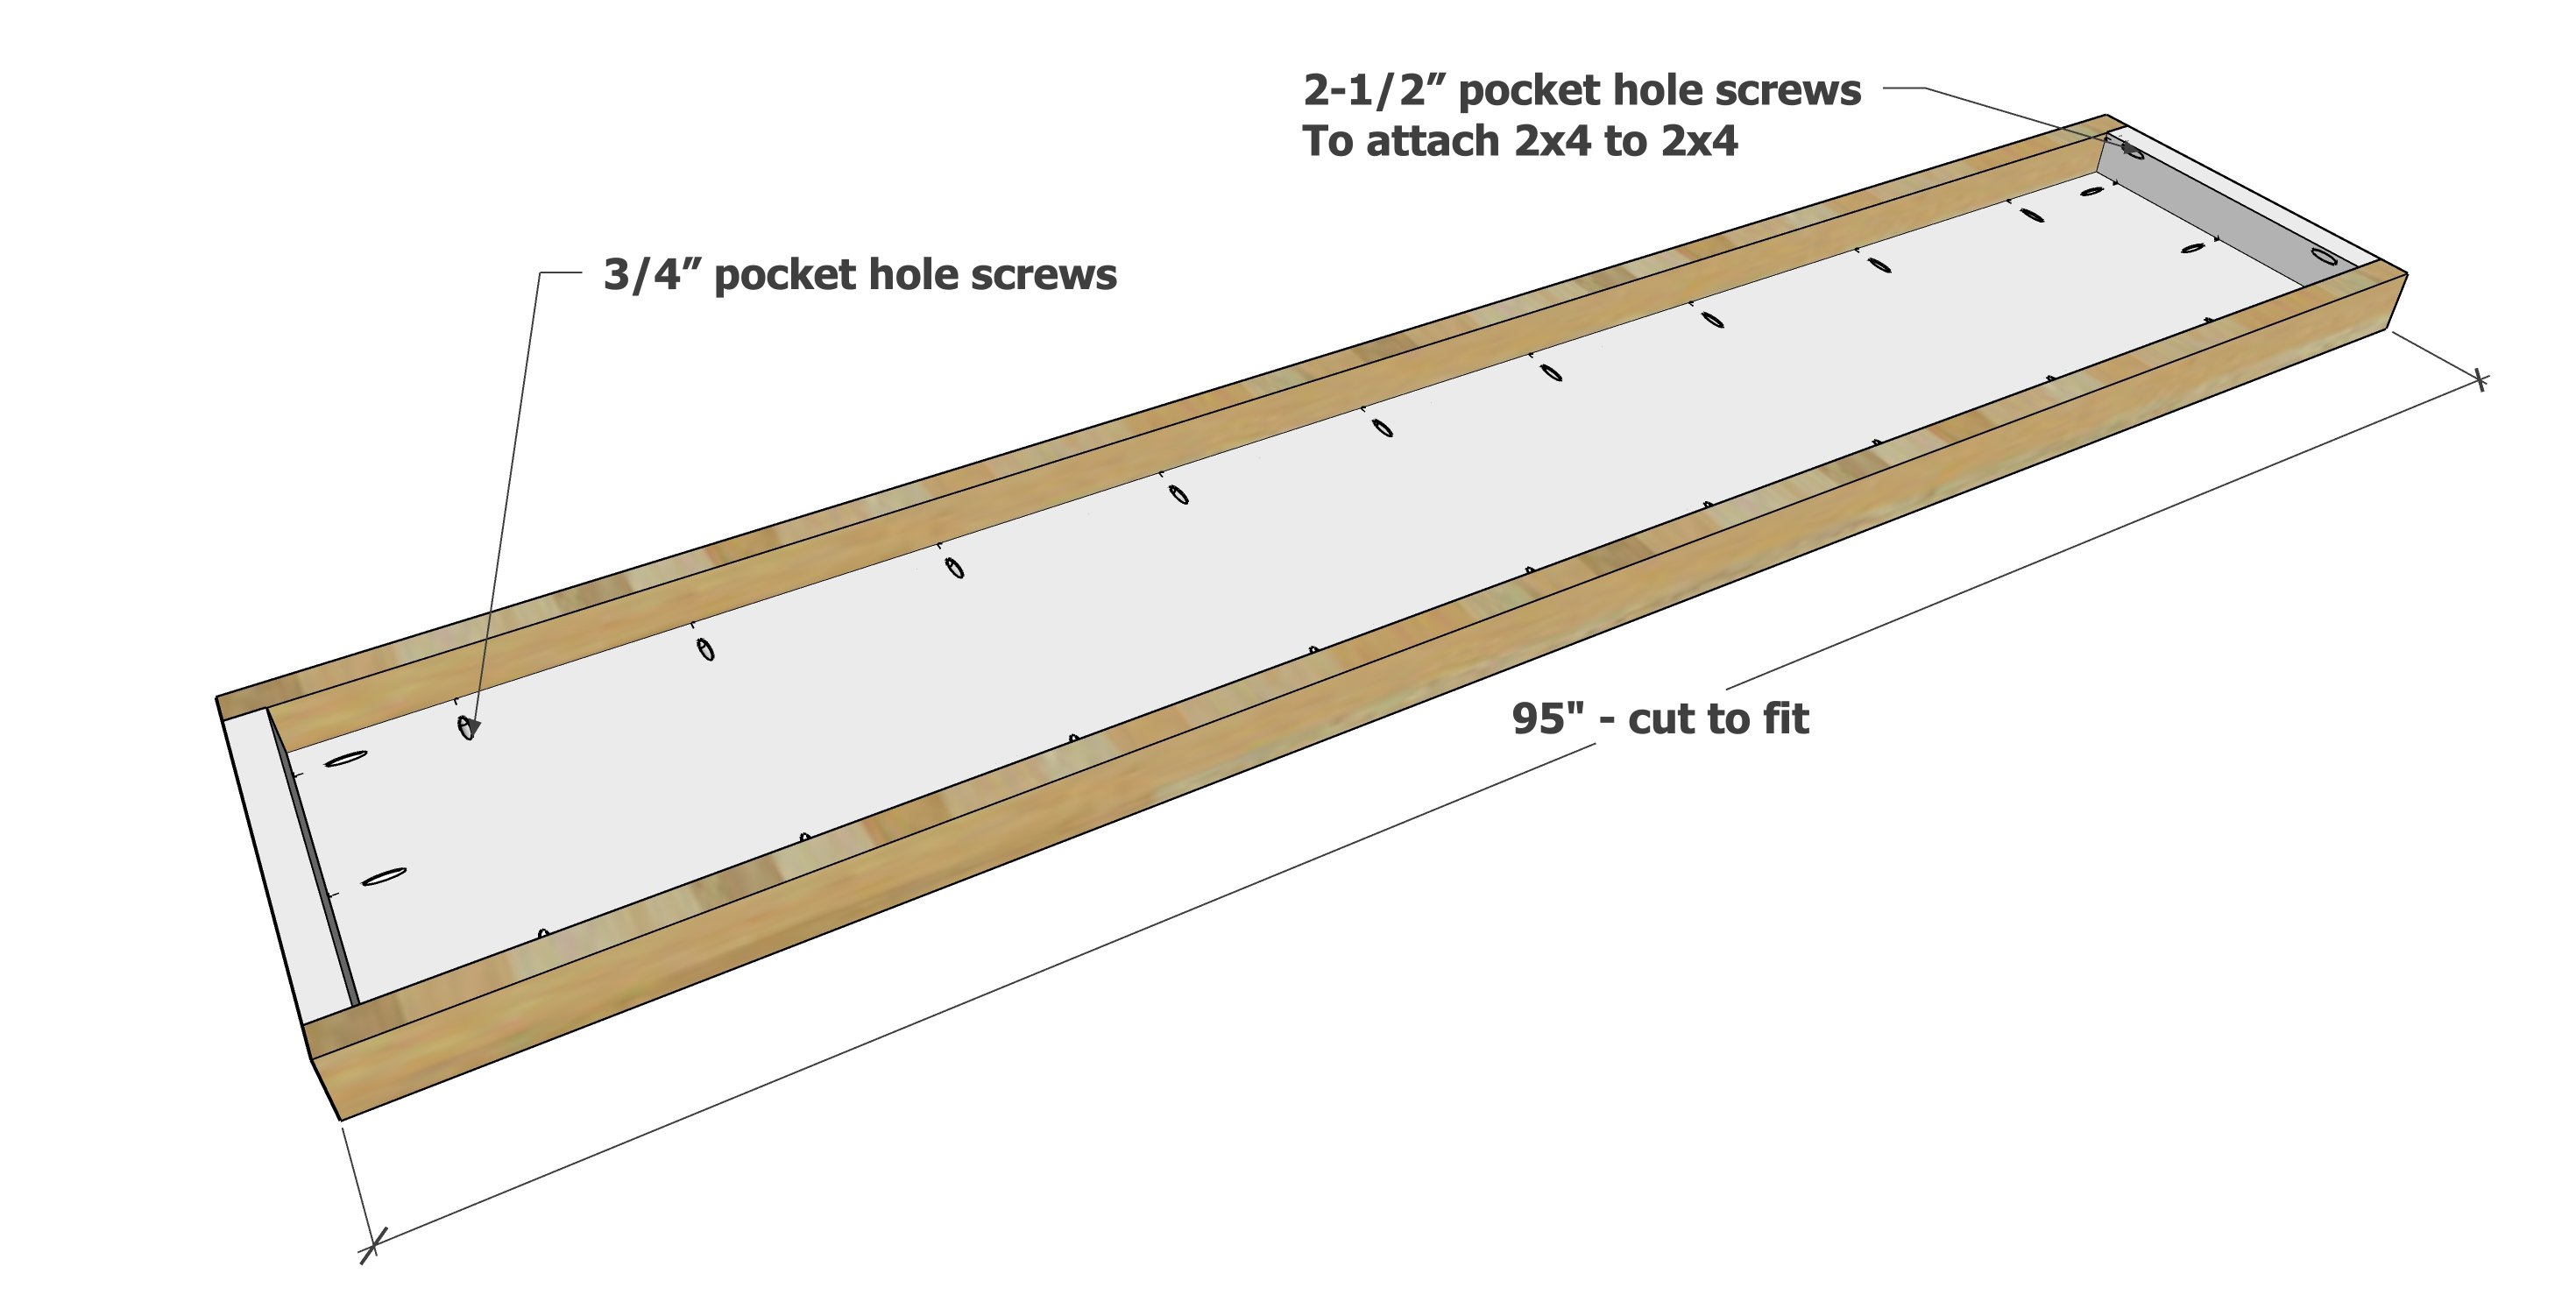
Then attach the 2x4 side trim. Also attach the two 2x4 pieces together with the predrilled 1-1/2" pocket hole.
Step 3
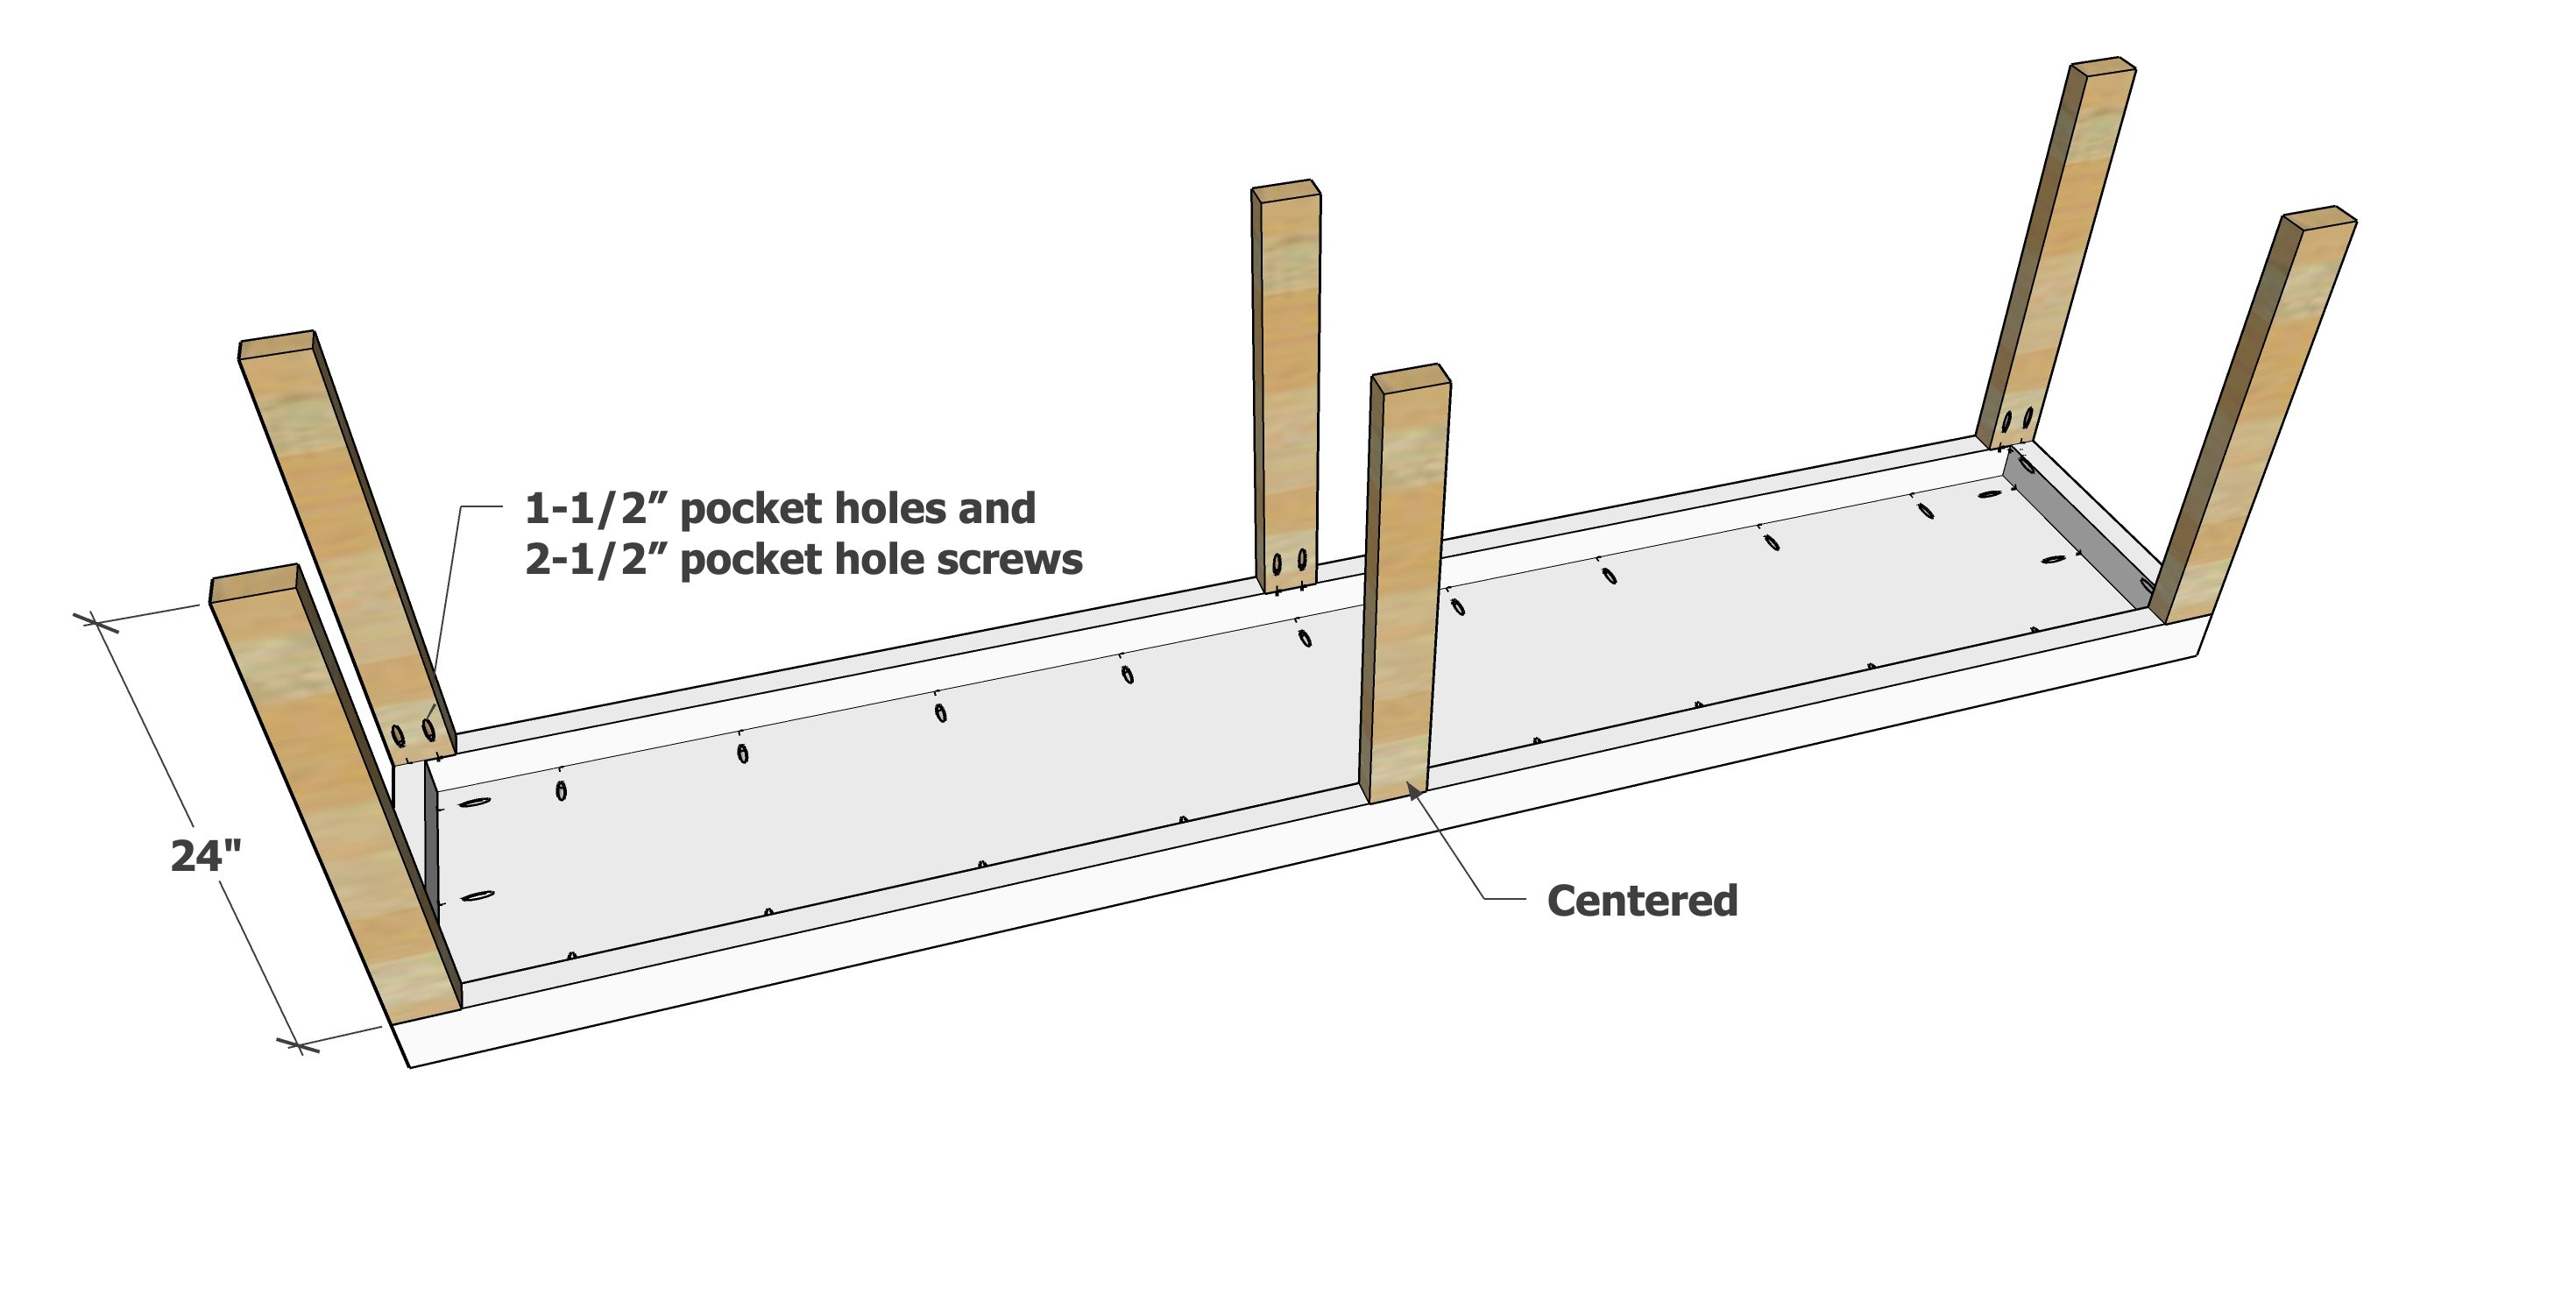
Attach the legs to the 2x4 frame.
Step 4
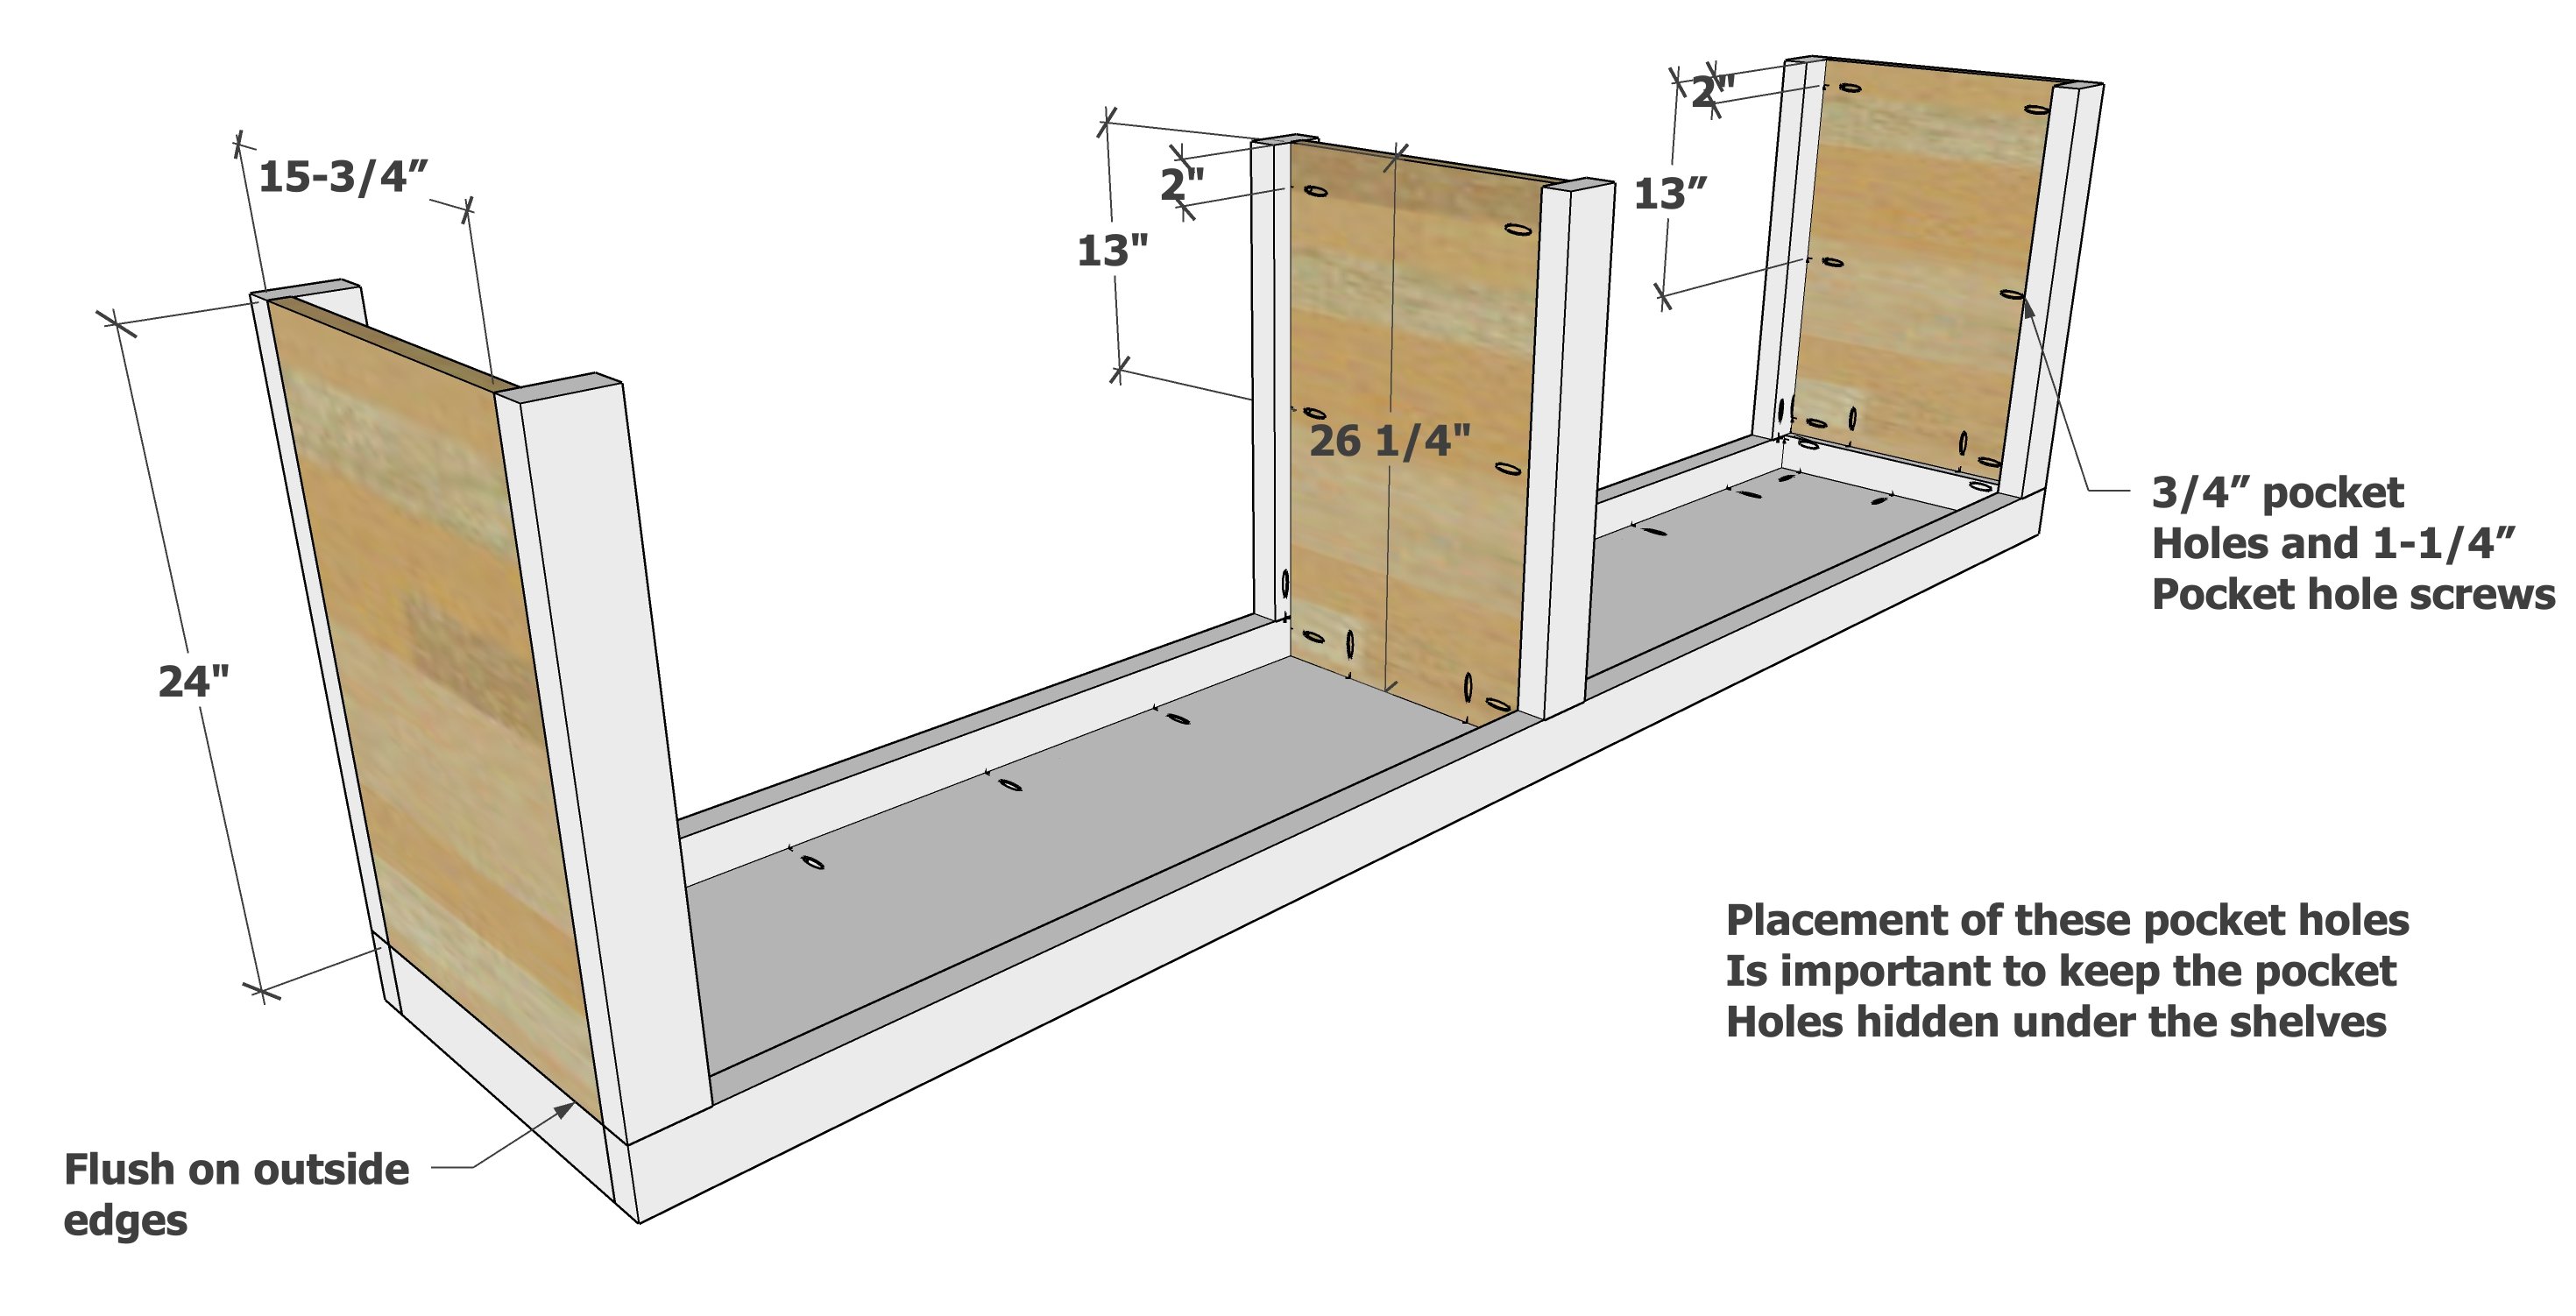
Set the 3/4" plywood inside the 2x4s and attach with pocket hole screws.
The center panel needs to be perfectly centered on the desktop.
IMPORTANT: The pocket holes in the plywood panels are carefully placed so they are hidden under the shelves.
Step 5
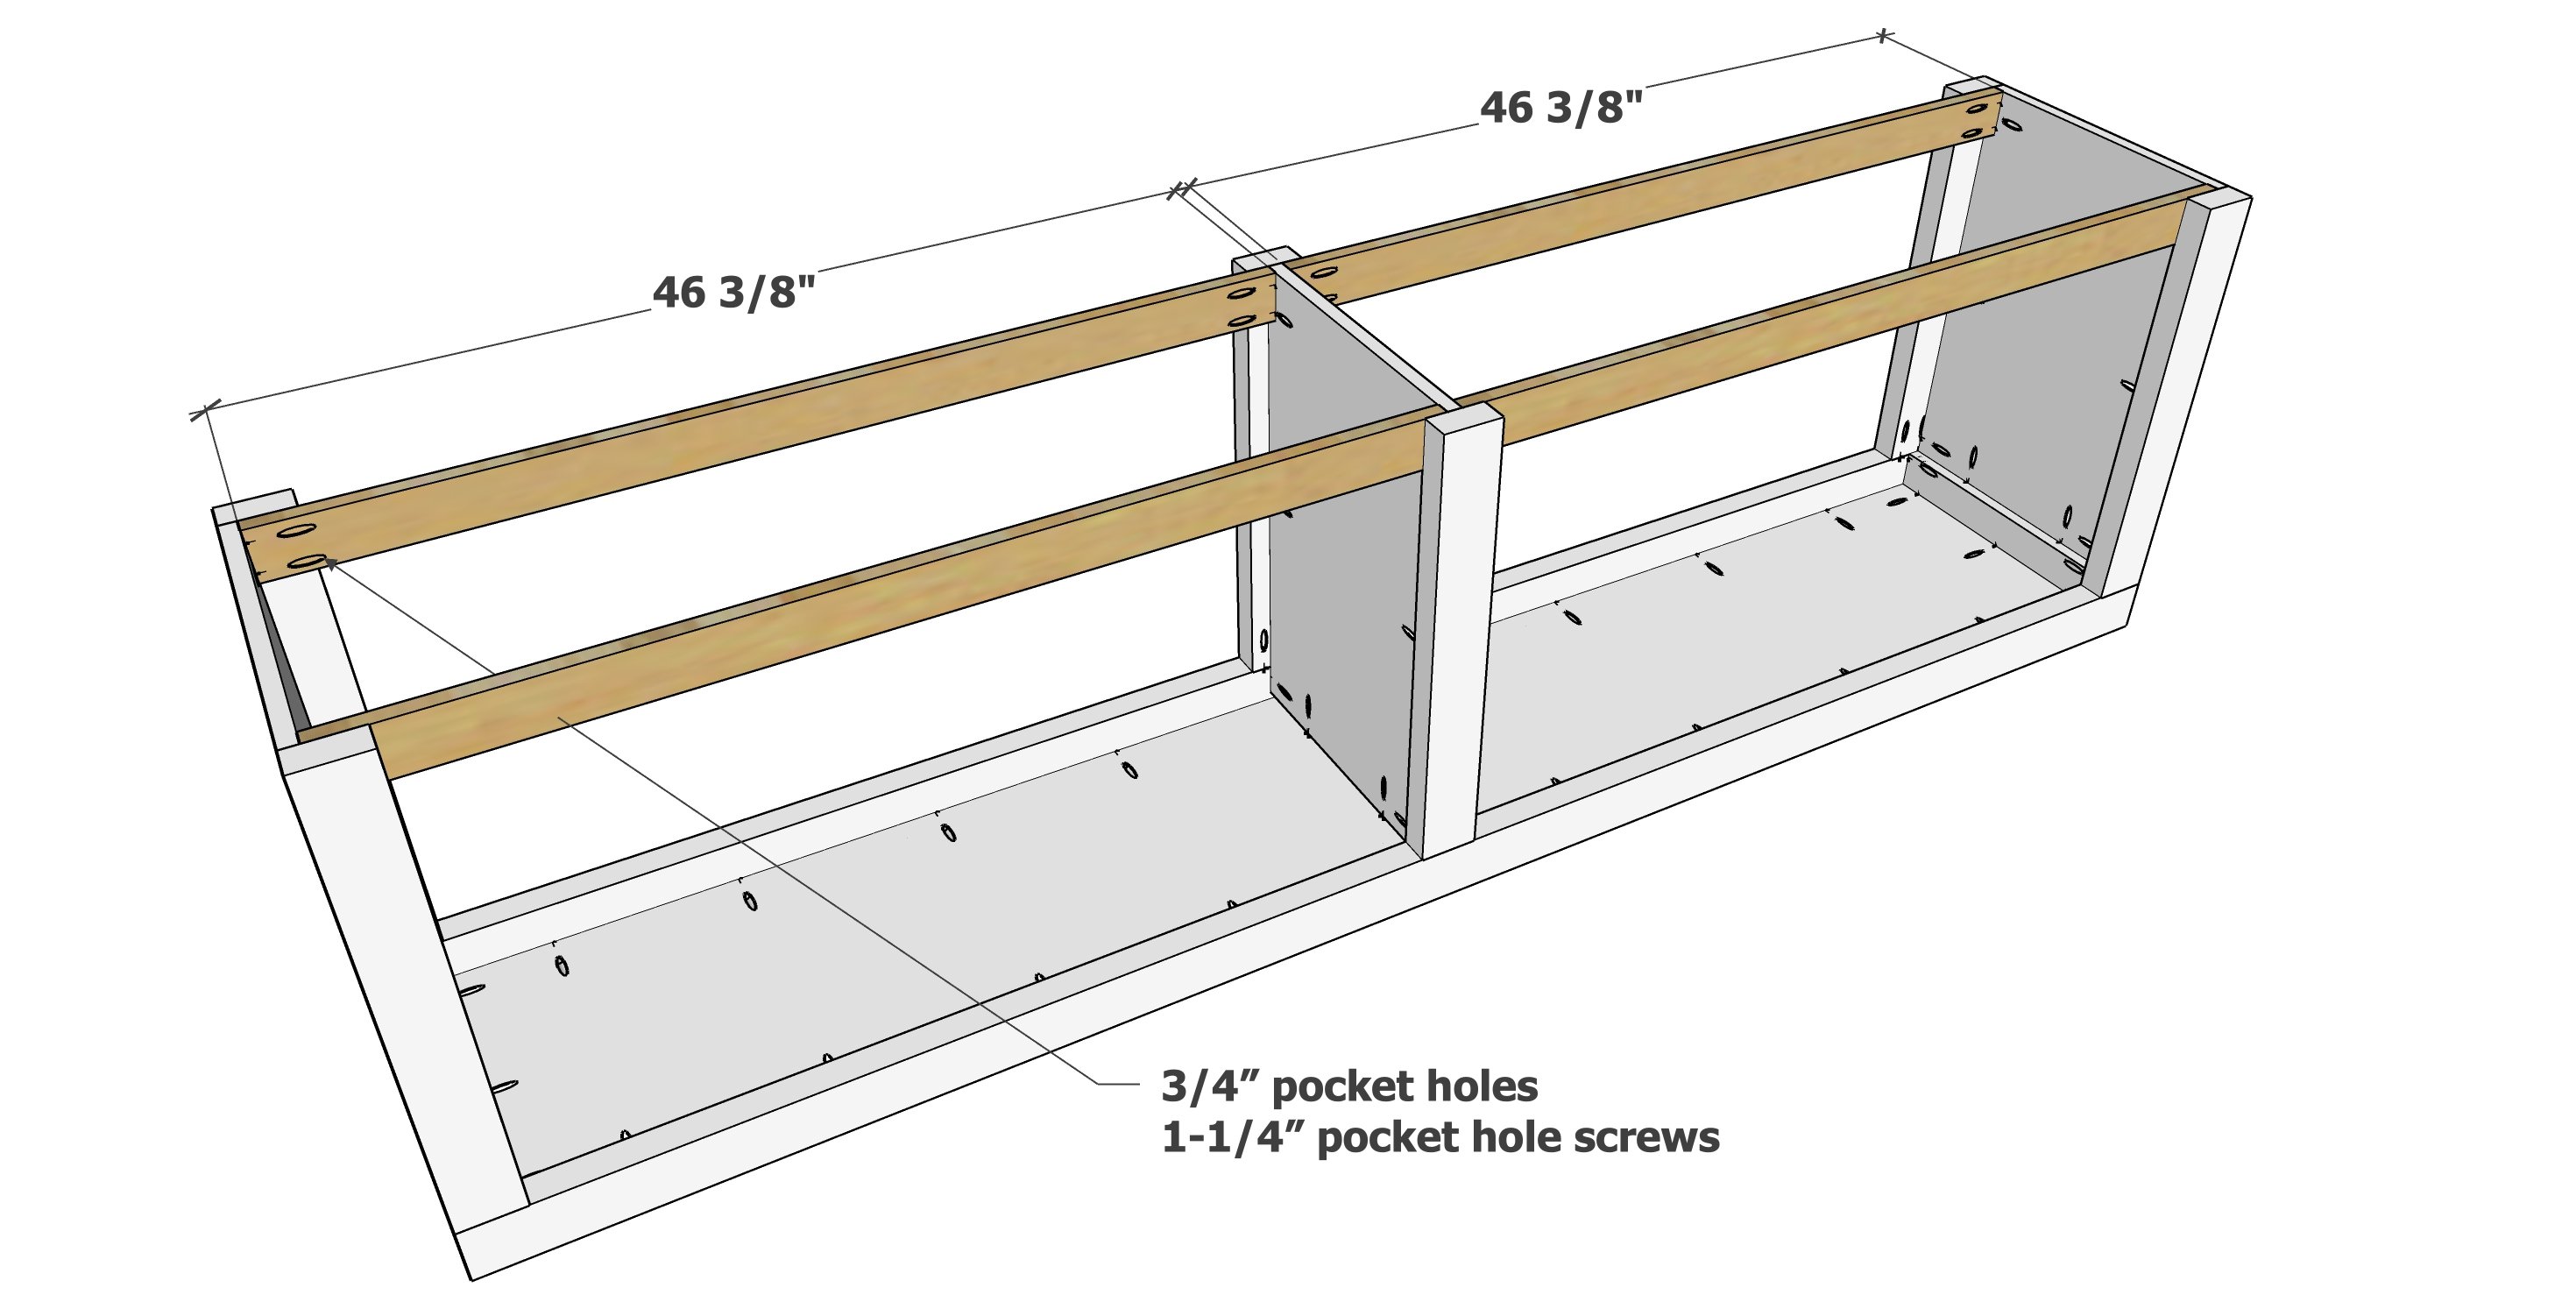
Attach the 1x3 trim to the bottom.
Step 6
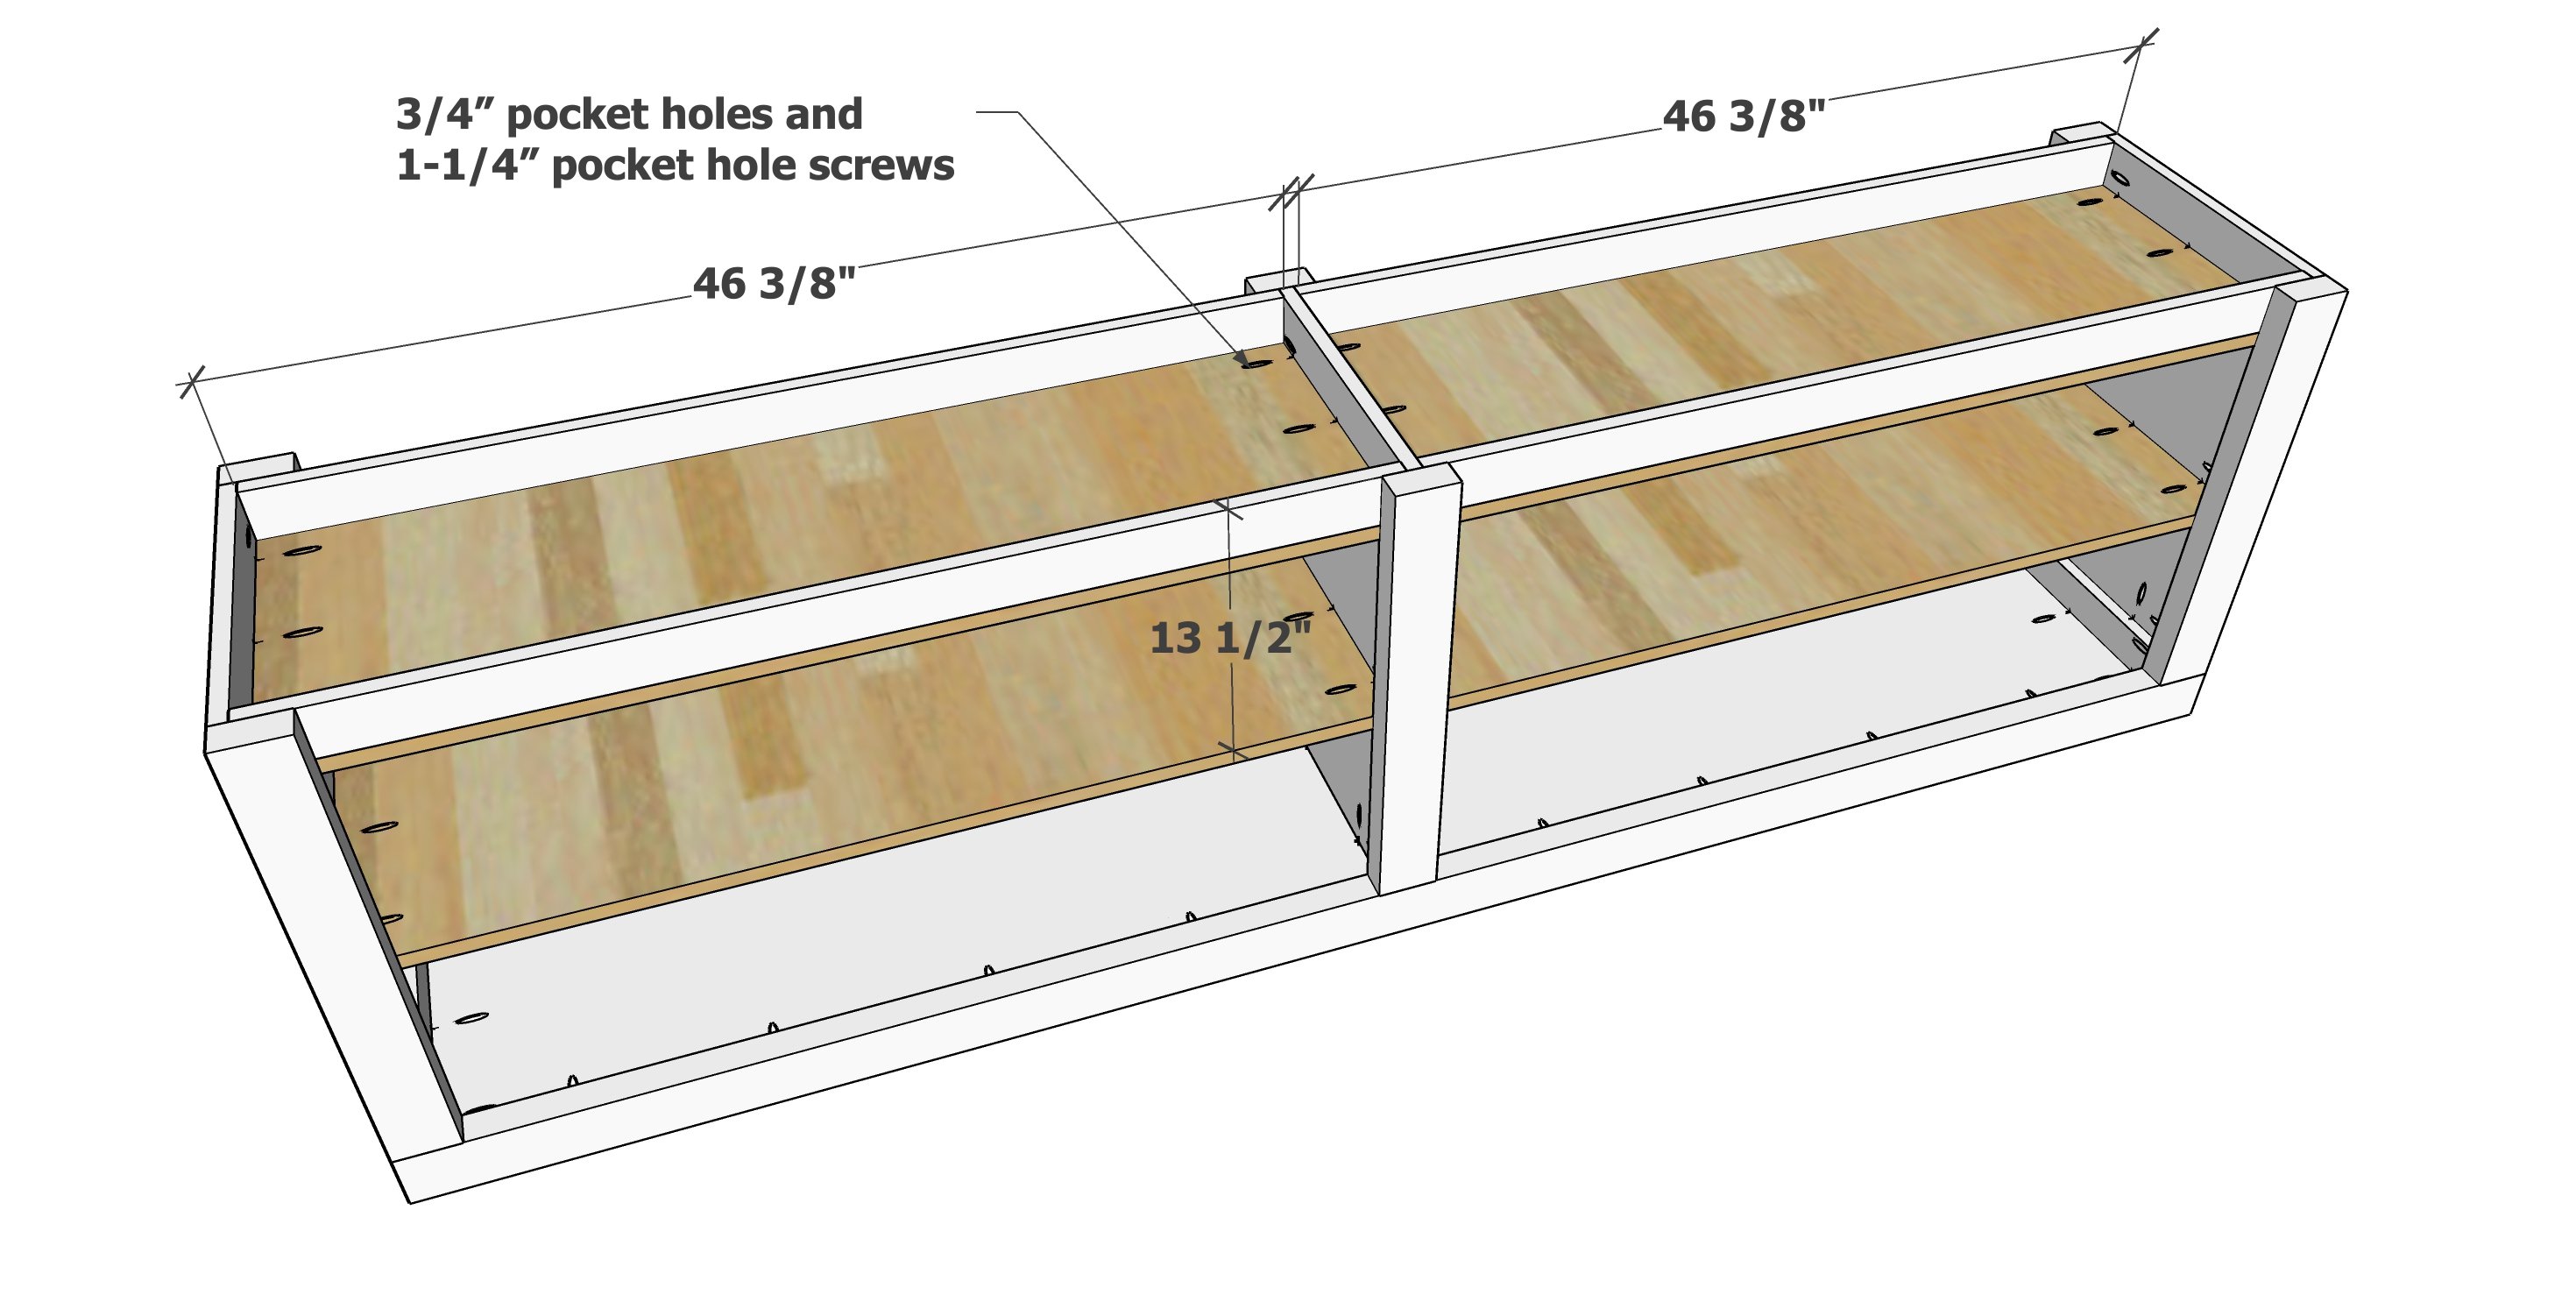
Set the shelves in and attach.
Step 7
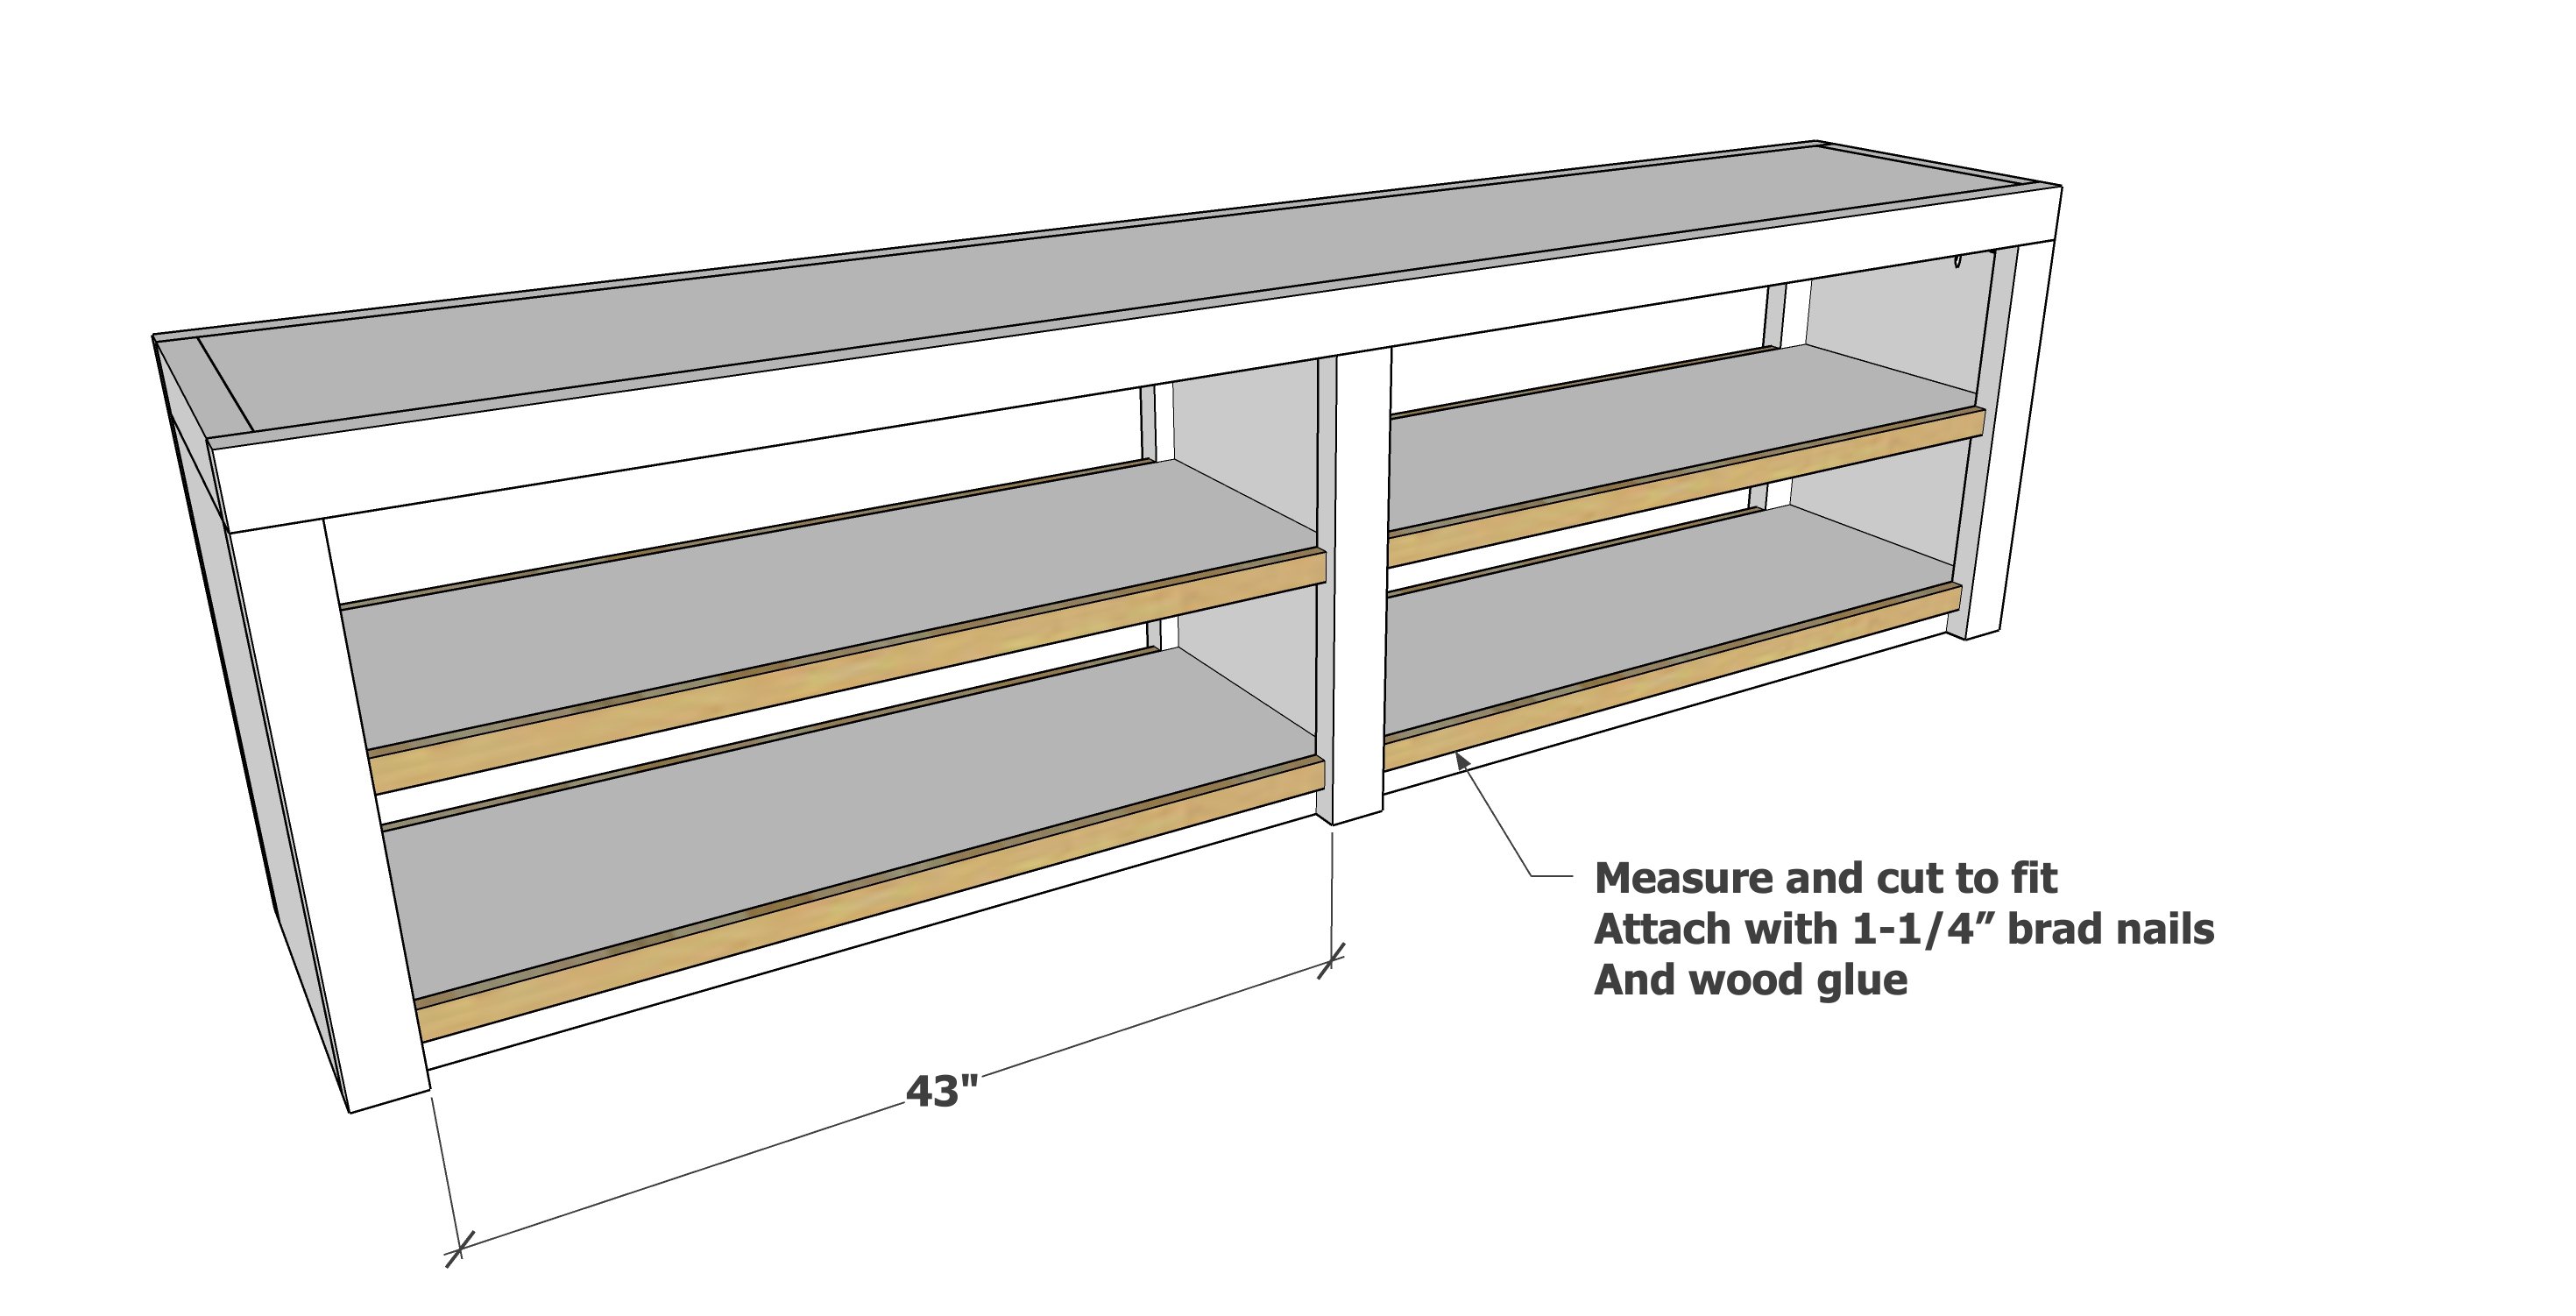
Trim the shelves with 1x2s and attach with glue and 1-1/4" brad nails.
This completes the bookshelf portion.
Step 8

Repeat steps to build the desk tabletop.
Step 9

Step 10
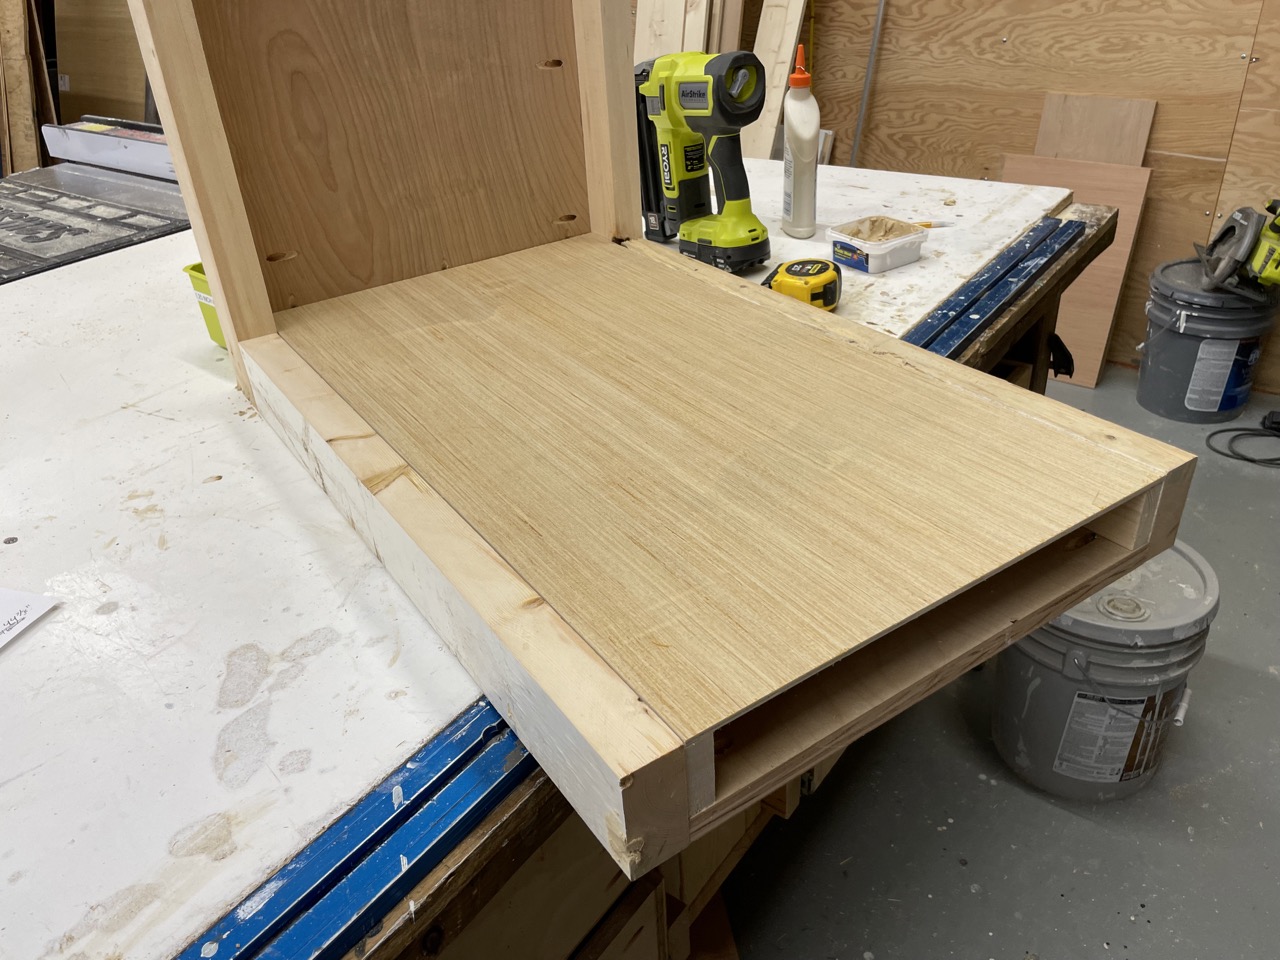
Add legs to one side of the desk tabletop.
NOTE: The legs need to be the same height as the bookshelf. Measure the bookshelf overall height and make sure it matches, or cut the legs to match.
Step 11
Add the plywood panel flush to the outside.
Step 12
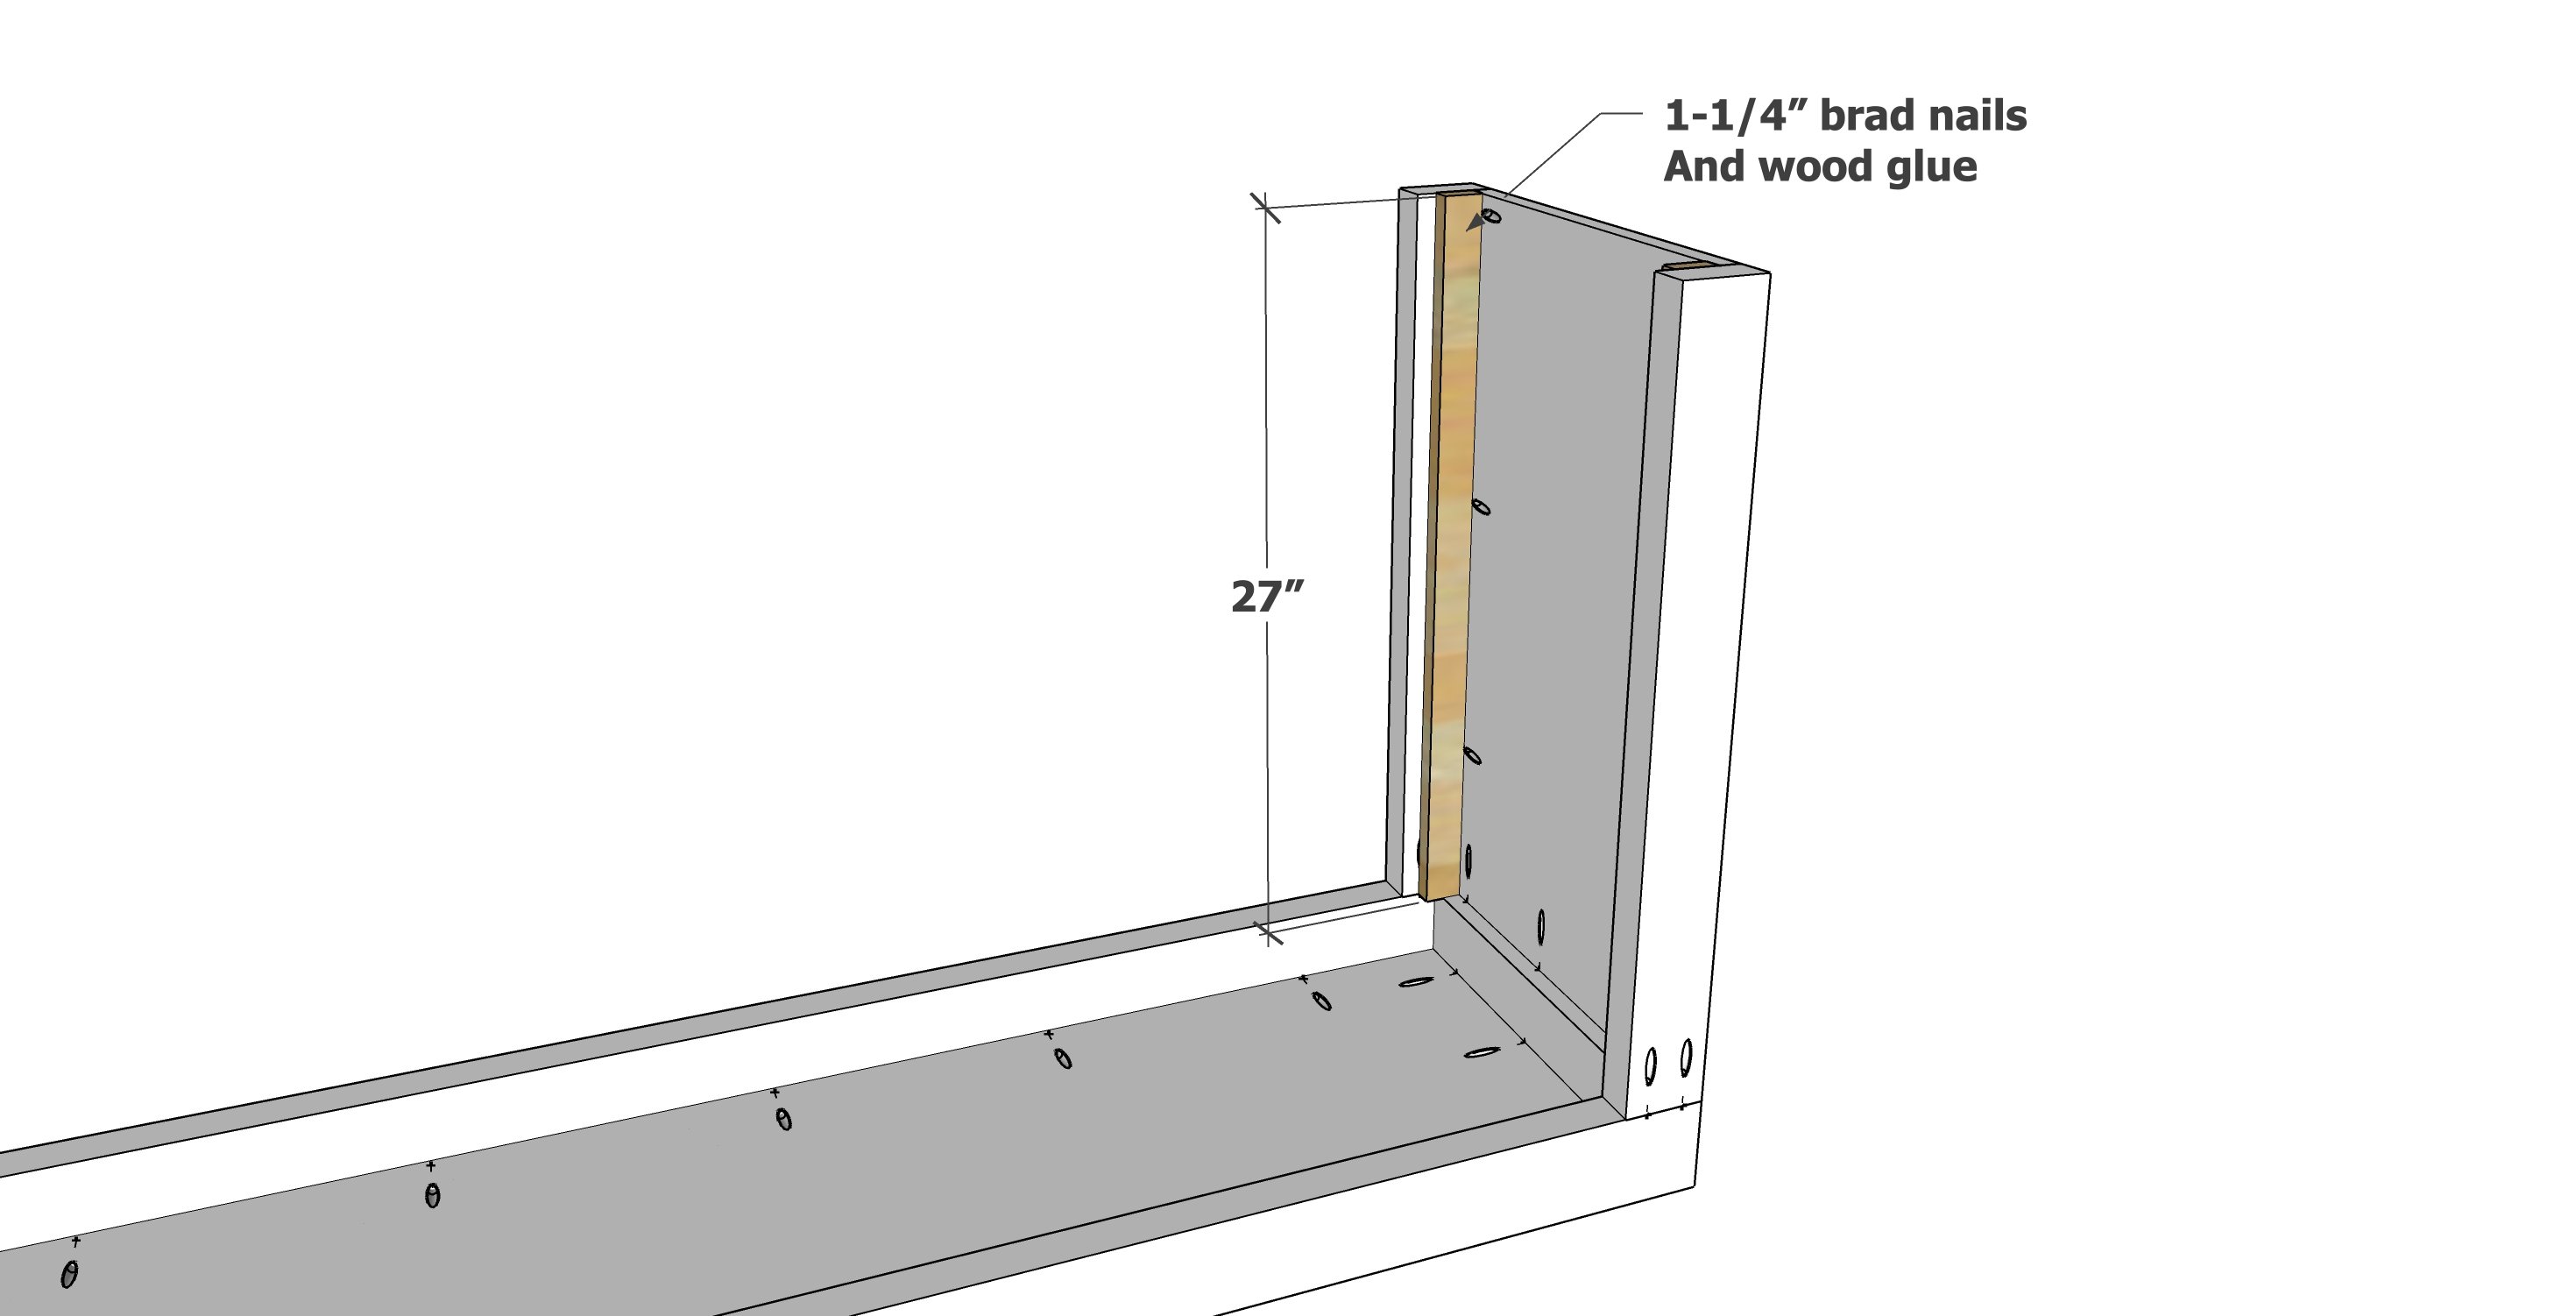
Nail on 1x2 cleats on the inside.
Step 13
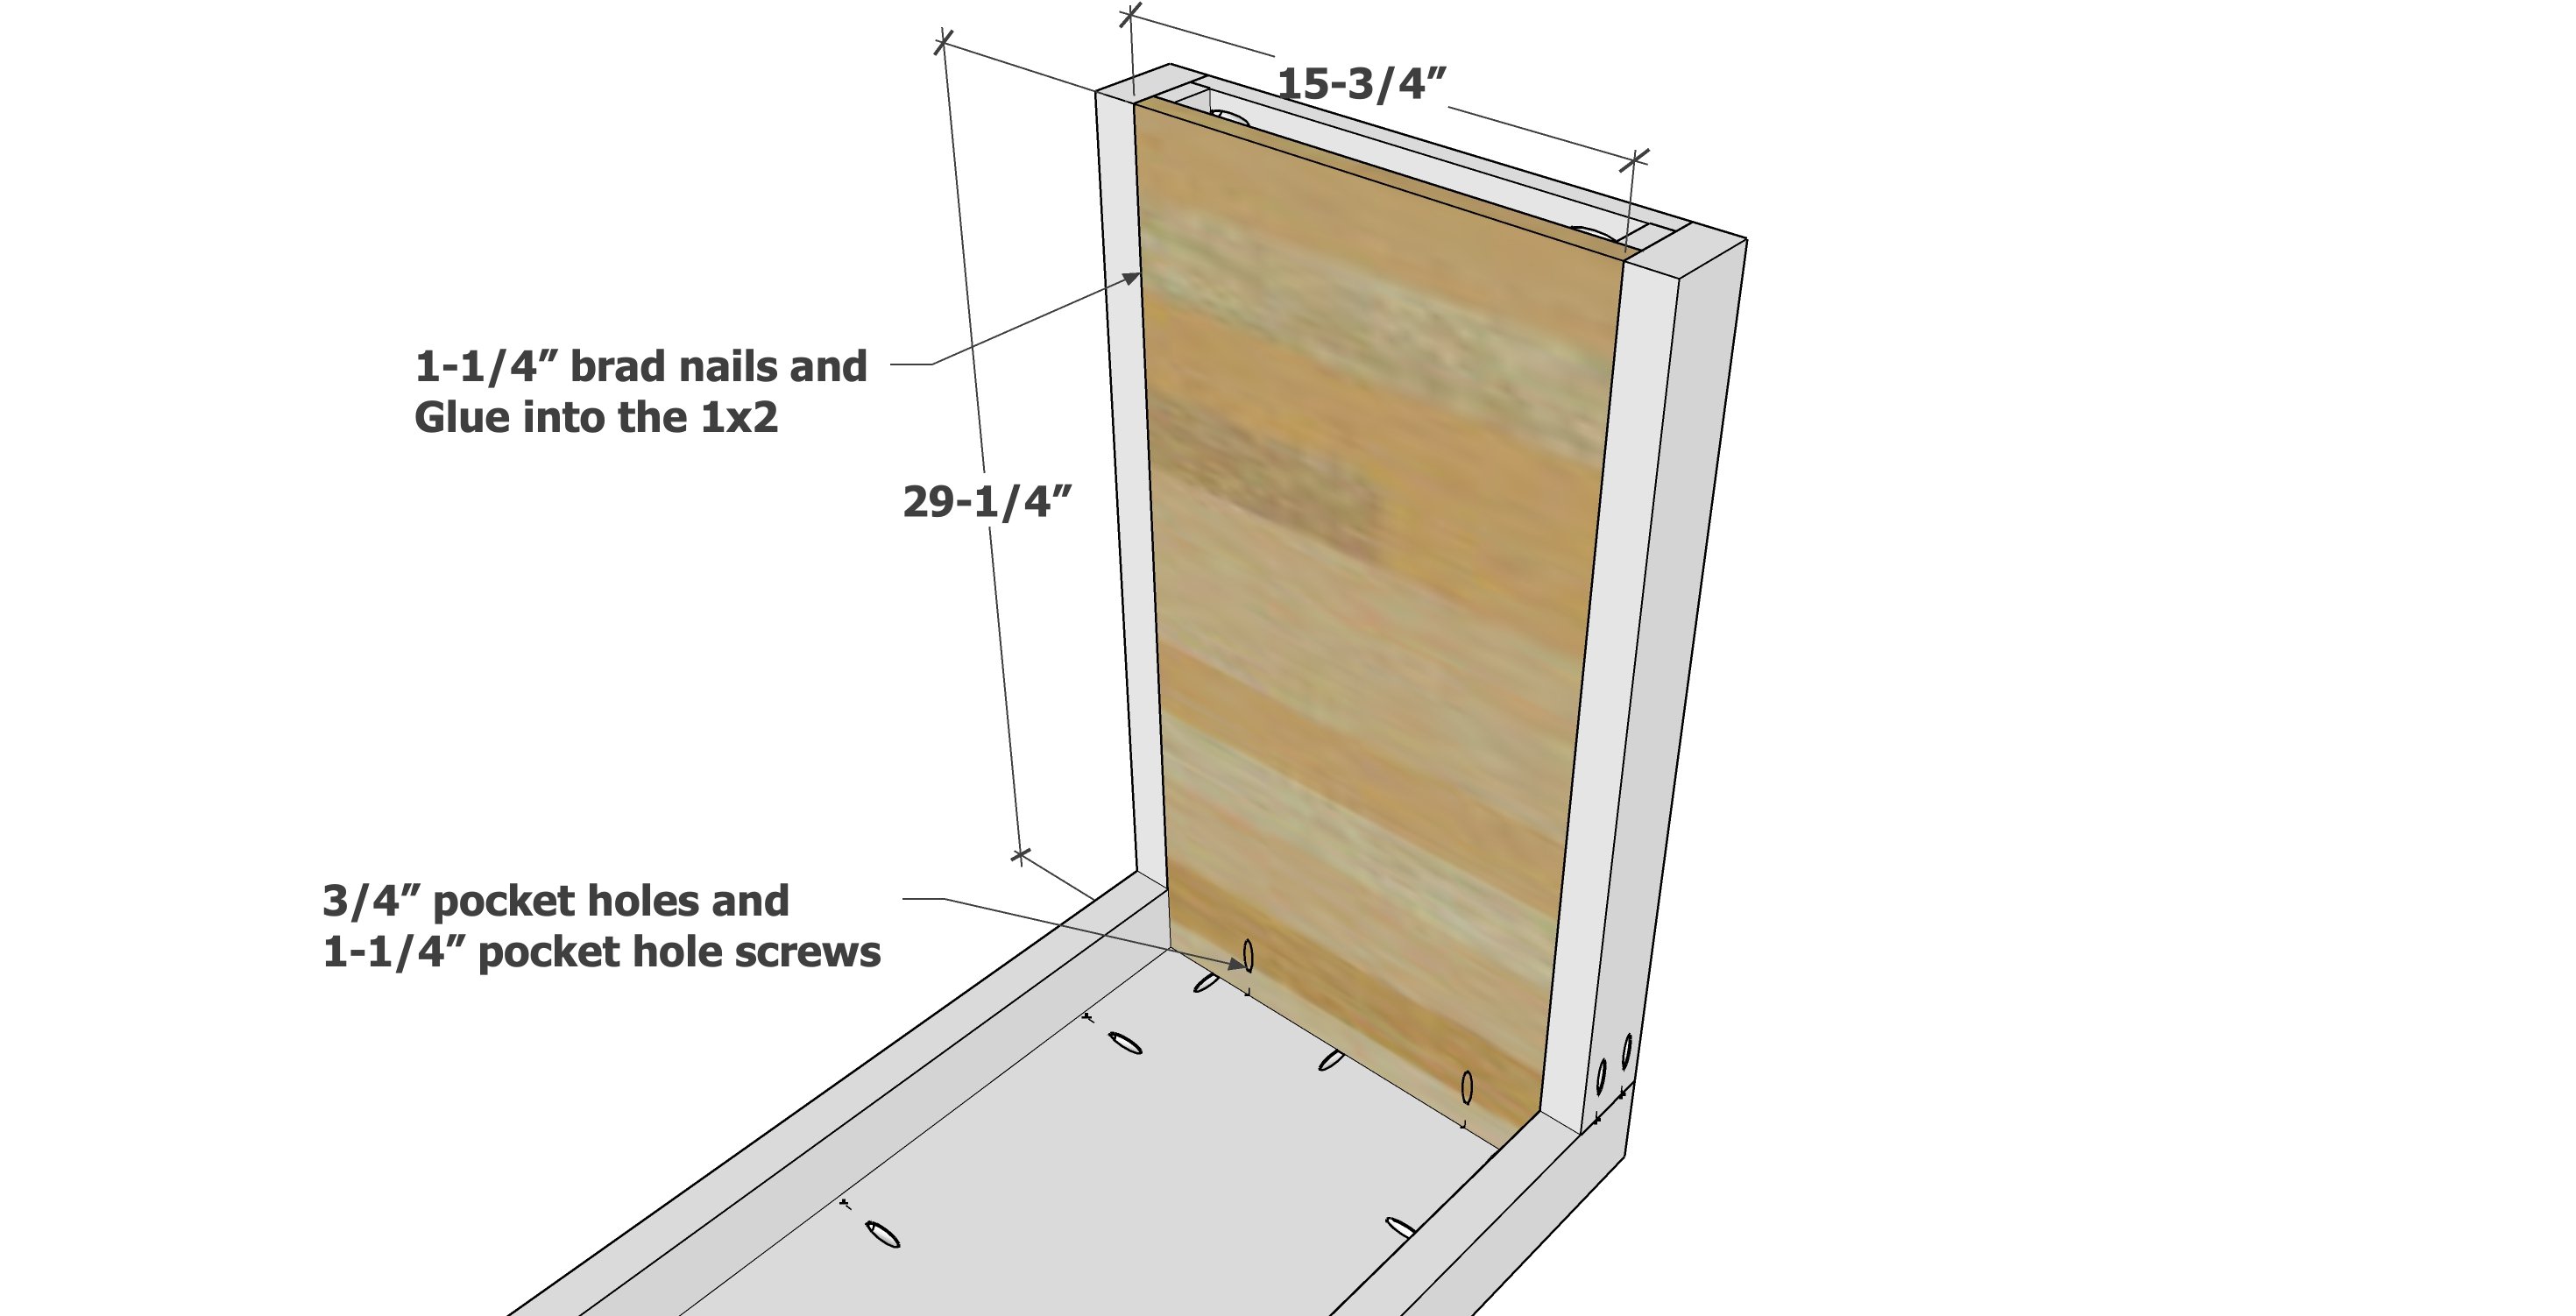
Attach the remaining plywood panel to the inside of the desk leg with 1-1/4" brad nails and glue.
Remove sanding residue with vacuum with soft bristled brush.
Wipe with damp lint free cloth.
I did a light sanding between coats with fine sandpaper, wiping sanding residue off with damp cloth.
After the paint dried, I added the felt pads to the bottom of legs and the underside of the desktop where it sits on the bookshelf.

