
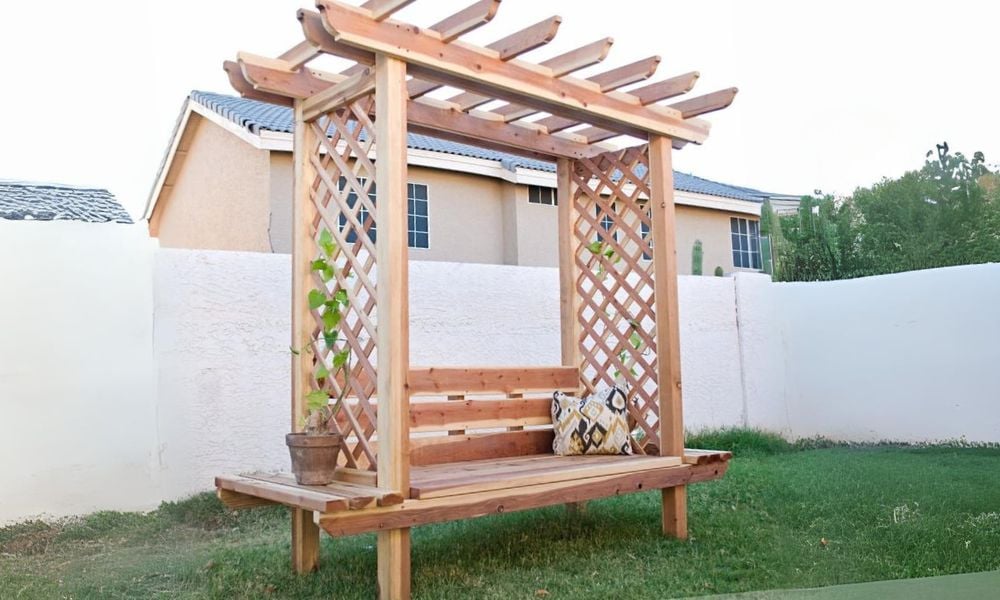

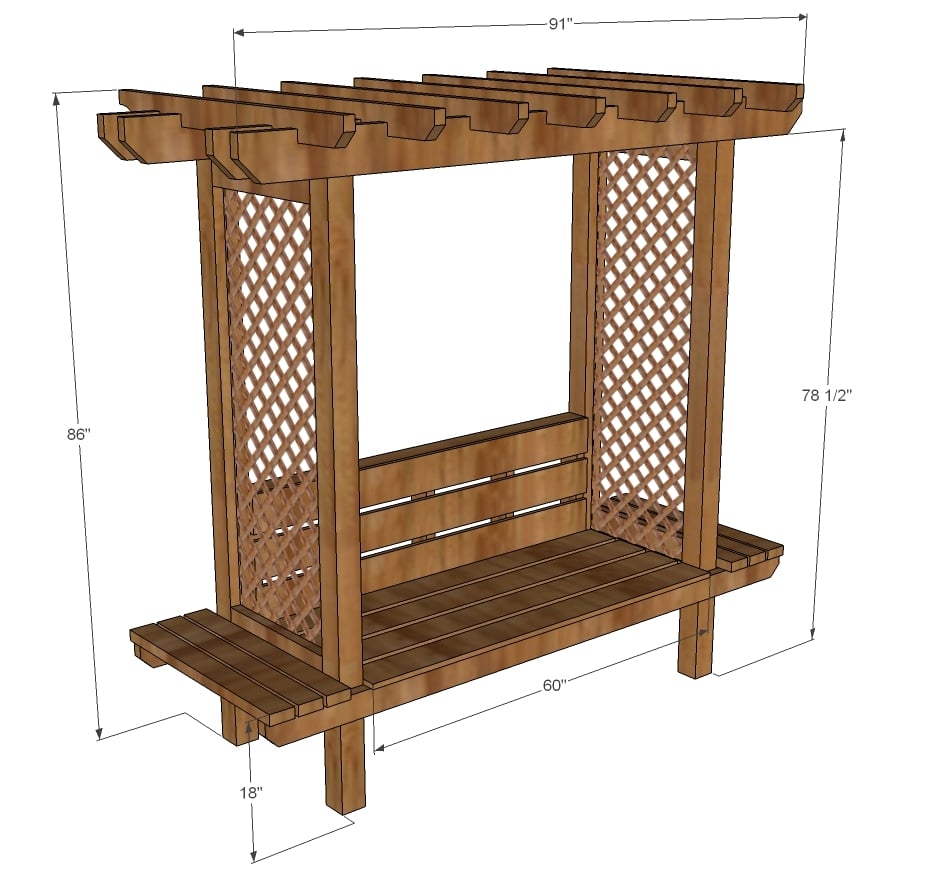
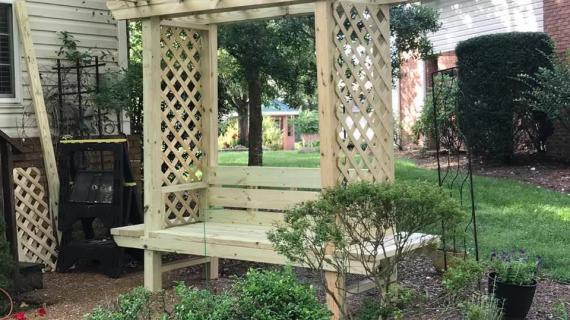
Build your own wood arbor bench with free arbor bench plans from Ana-White.com

A long while back - like last summer - my friend Gina saw this child's arbor bench project I posted (worked on with my good friend Kirsten from The Crafting Chicks)
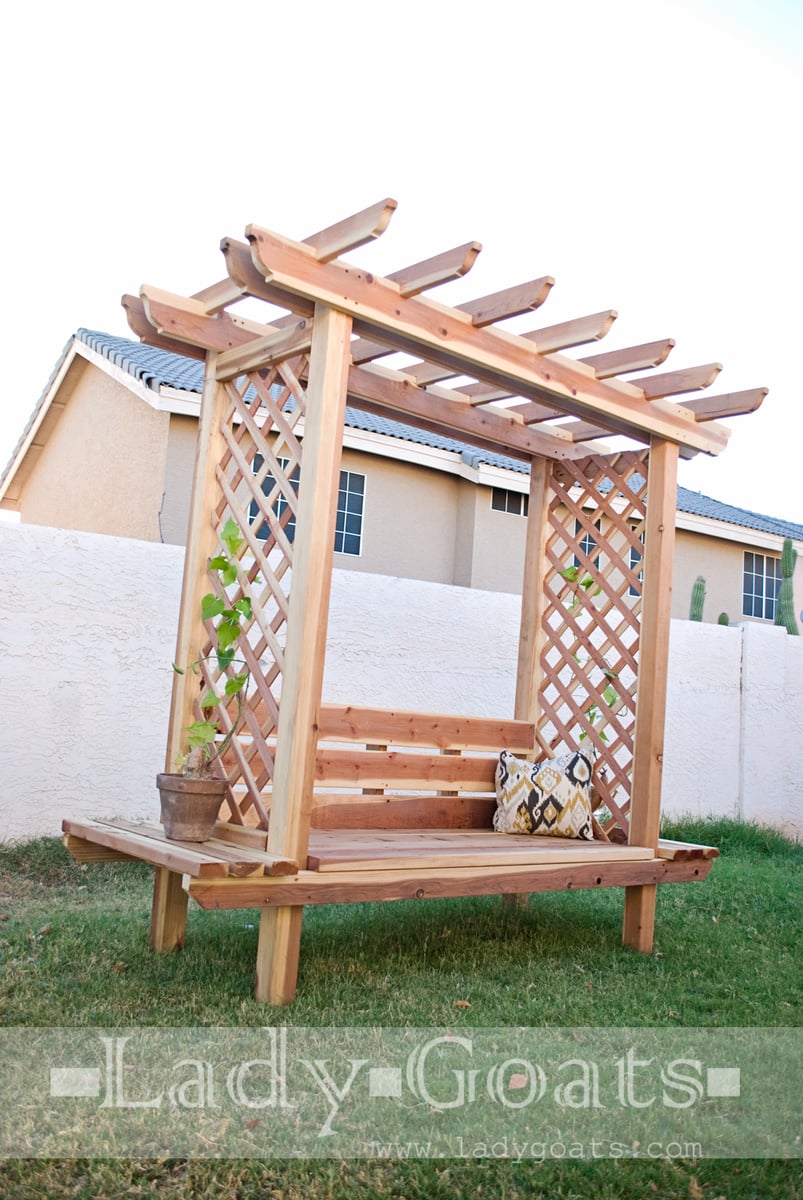
My friend Gina from Lady Goats saw this pergola I designed (plans are available here) and asked if we could style the arbor bench like it.

We've got free plans below, but make sure you read Gina from Lady Goat's full building post - she's got TONS of tips and tricks to help you through your own build!
Preparation
- 4 - 4x4 posts @ 84" (legs)
- 4 - 2x4 @ 21" (side supports)
- 2 - 2x4 @ 91" (bottom seat front/back aprons)
- 4 - 2x6 @ 91" (top lower rafters)
- 7 - 2x4 @ 48" (top upper rafters)
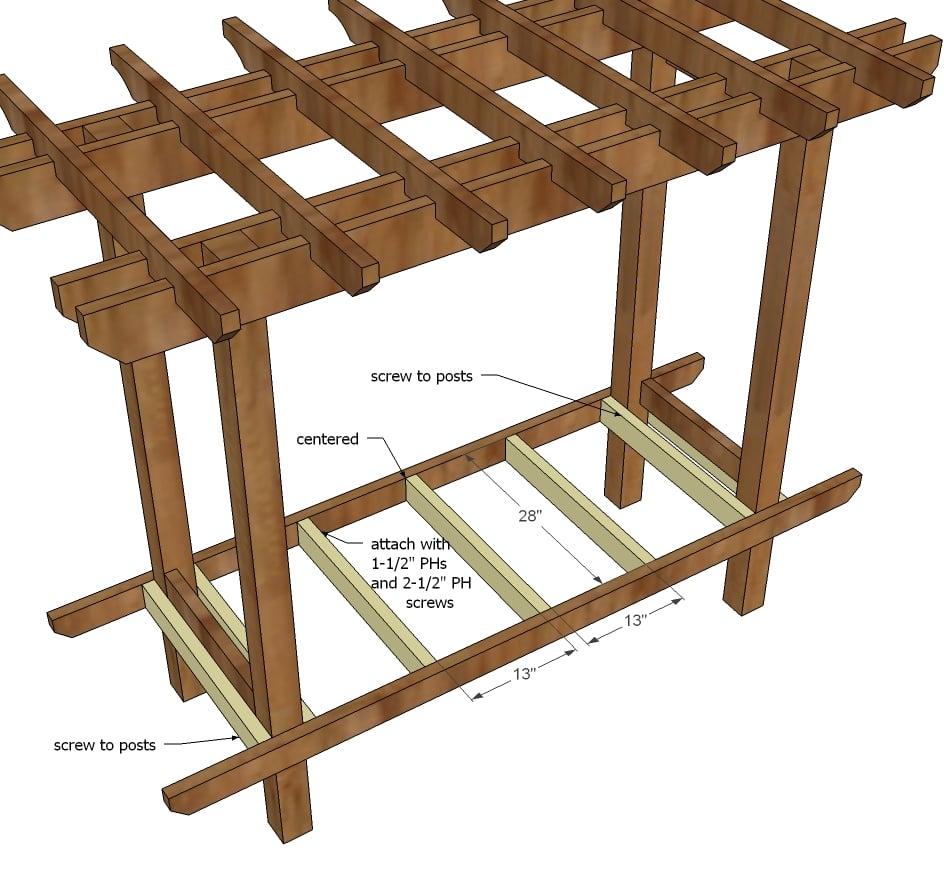
- 4 - 2x4 @ 28" (seat supports)
- 2 - 2x4 @ 60" (back support framing)
- 5 - 2x4 @ 15-1/2" (back support framing)
- 7 - 1x6 (or 2x6) @ 60" (seat boards)
- 6 - 2x4 @ 33" (side shelves)
- Anchoring system for anchoring to ground to keep from tipping
- NOTE: Recommend exterior screws
- 4 - 4 x 4 x 8
- 12 - 2 x 4 x 8
- 1 - 2 x 4 x 10
- 3 - 2 x 6 x 10
- 5 - 2 x 6 x 8
- 1 - 4 x 8 lattice panel


This project needs to be anchored to the ground to prevent tipping.
Instructions
Step 1
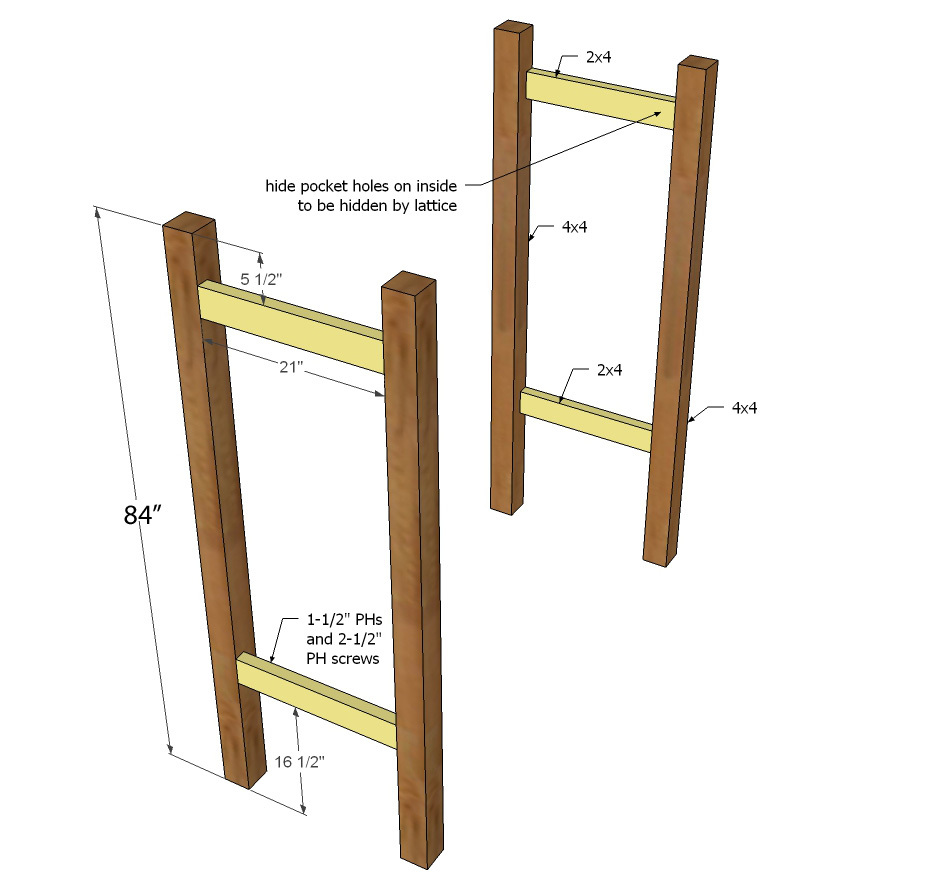
Start by building the two ends by attaching with pocket holes the side pieces to the posts.
Step 2

Next, attach the front and back seat aprons to the outsides of the posts.
Step 3
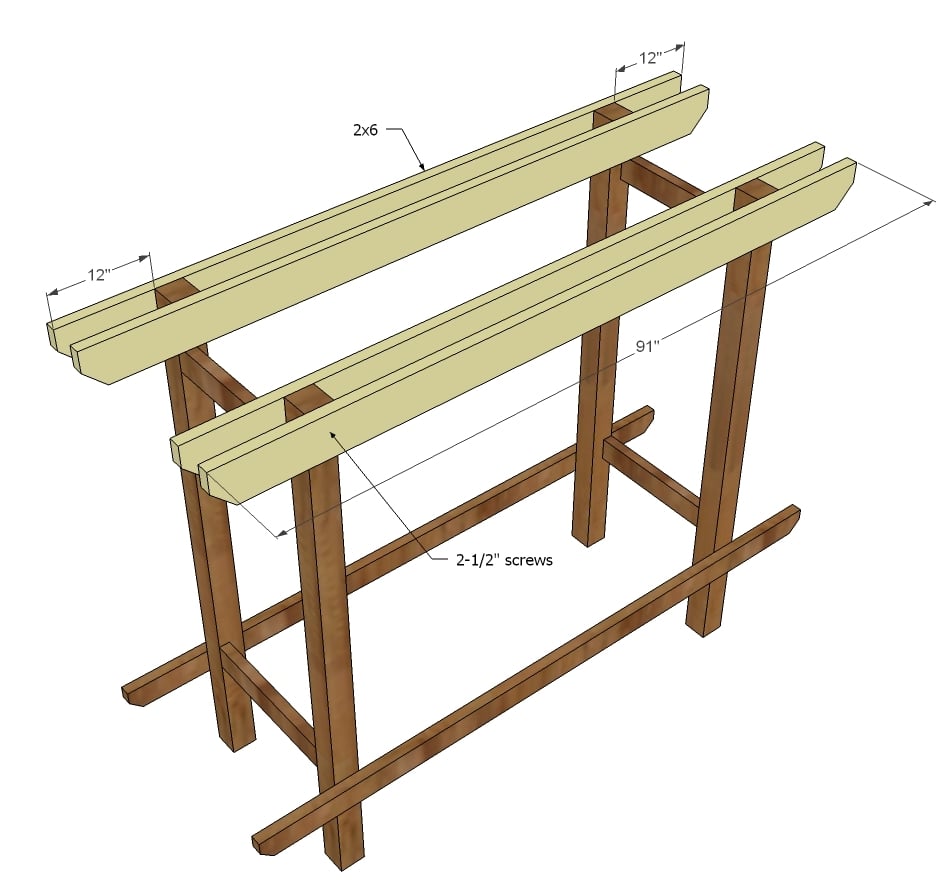
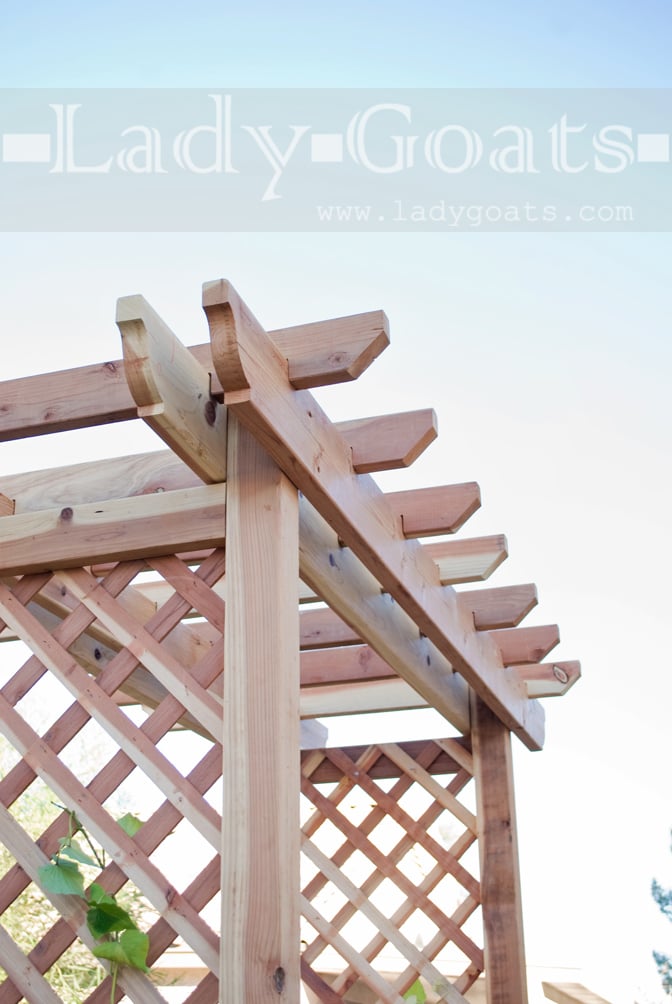
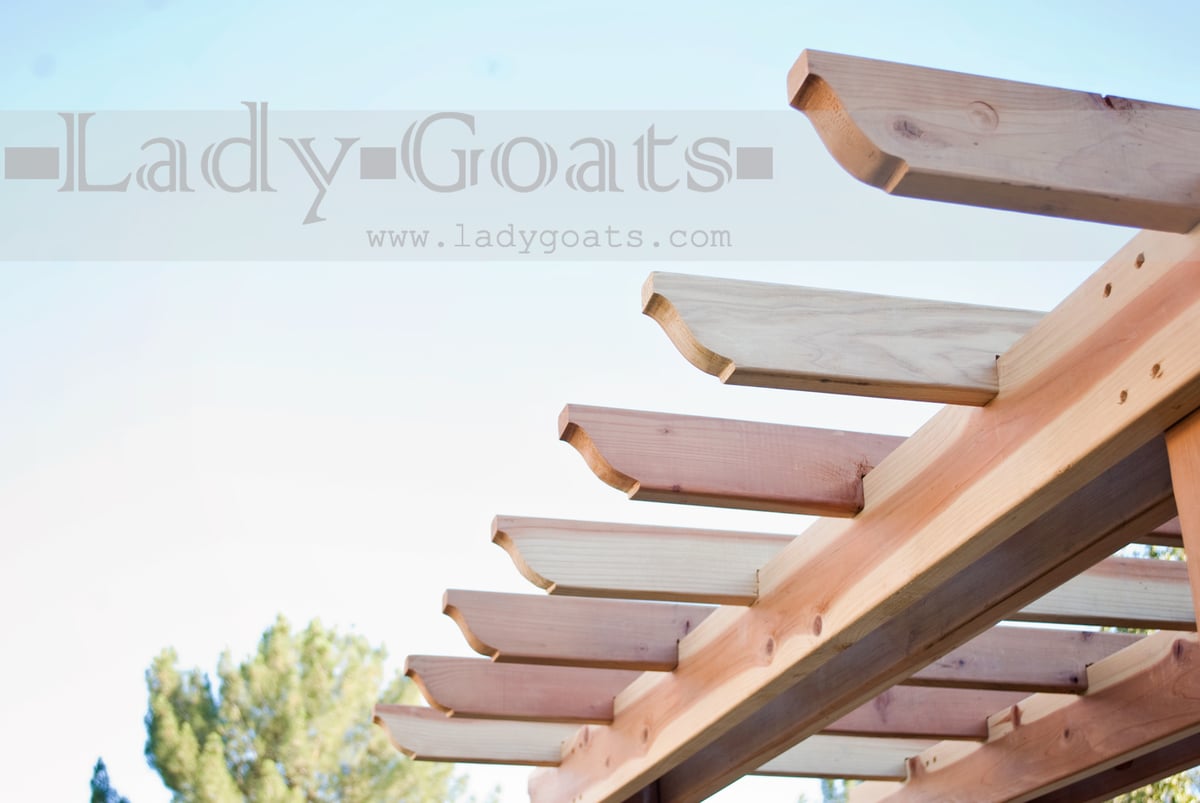
Attach lower rafters to tops of posts.
TIP: Predrill holes and start screws on ground first.
Step 4
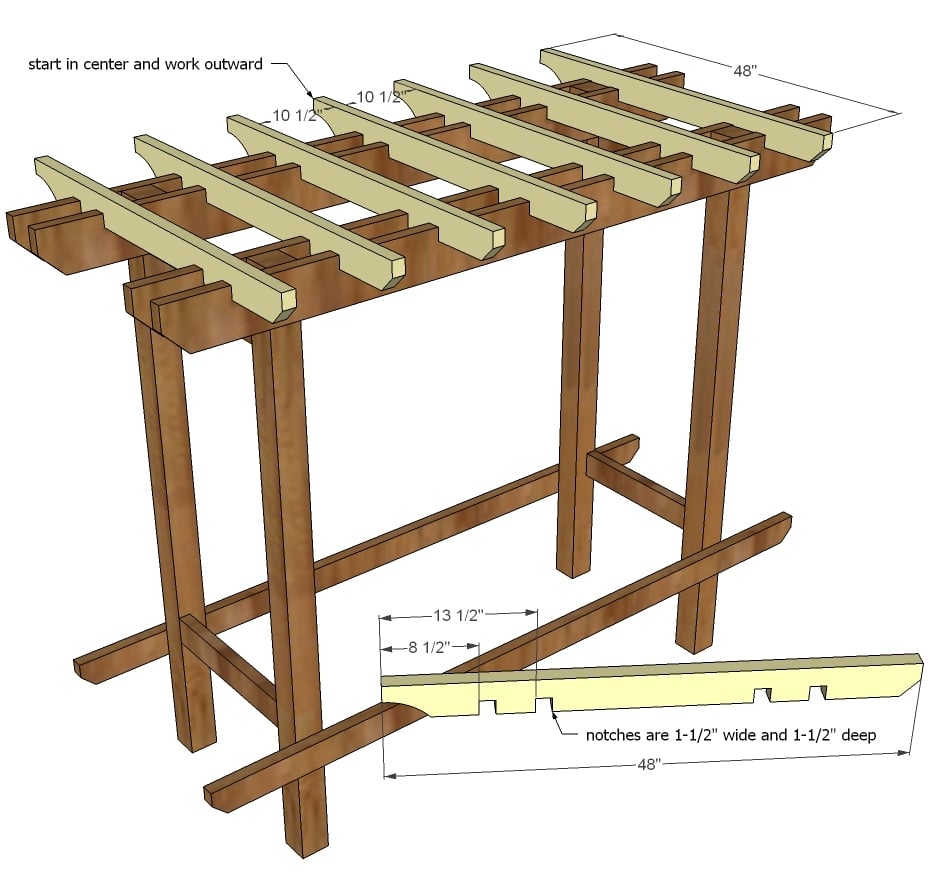
Cut the upper row of rafters and notch and place on top. Screw down.
Step 5
Step 6
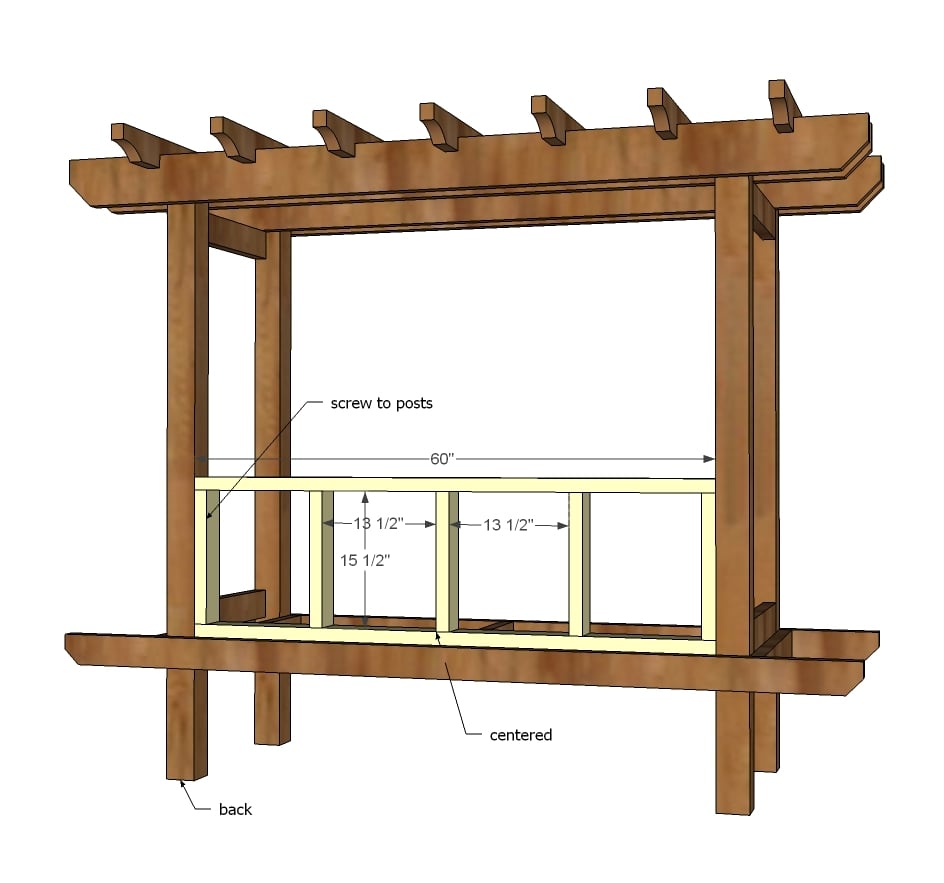
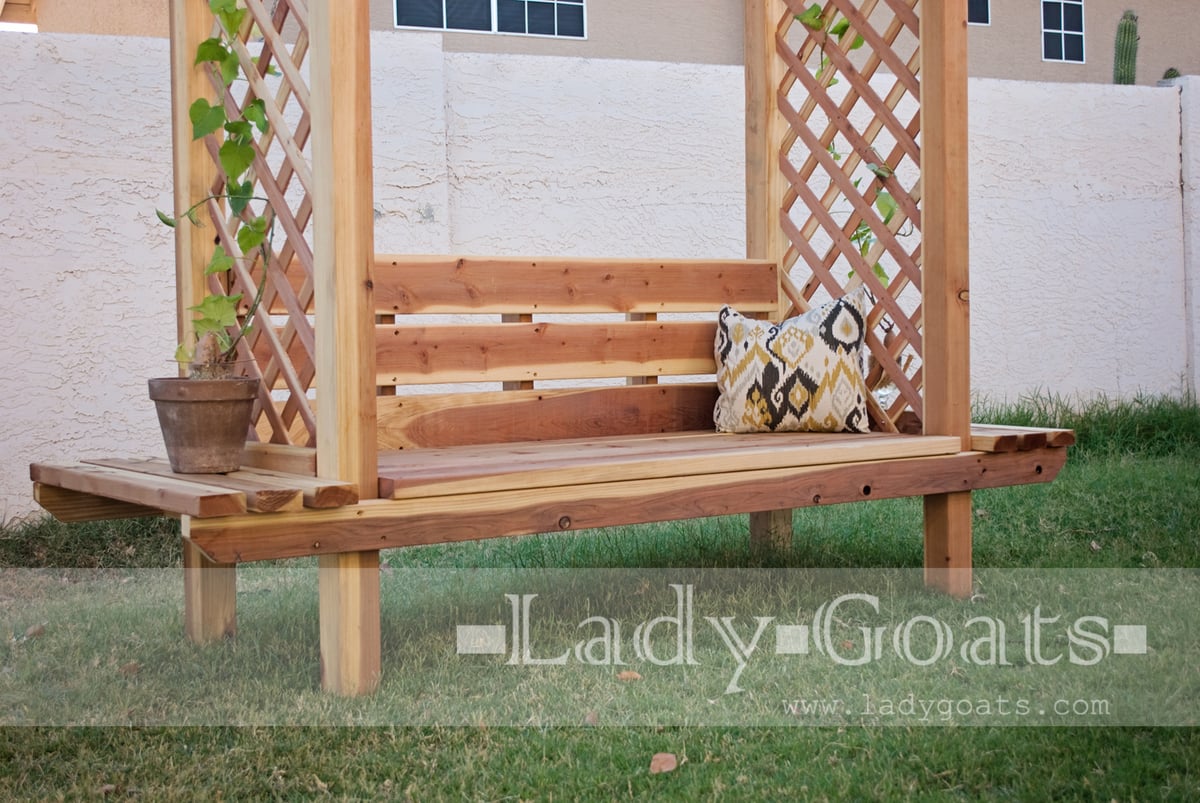
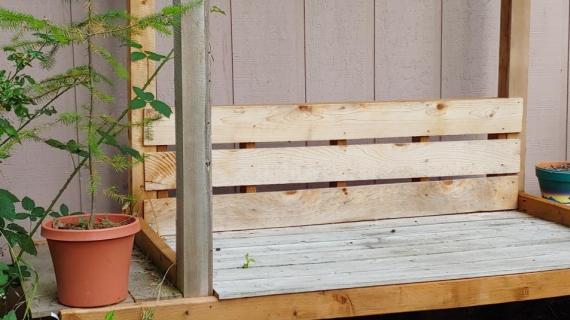
Build back seat framing and attach between posts and top of back seat support.
Step 7

Place seat boards on top of seat, and to back seat framing.
Step 8
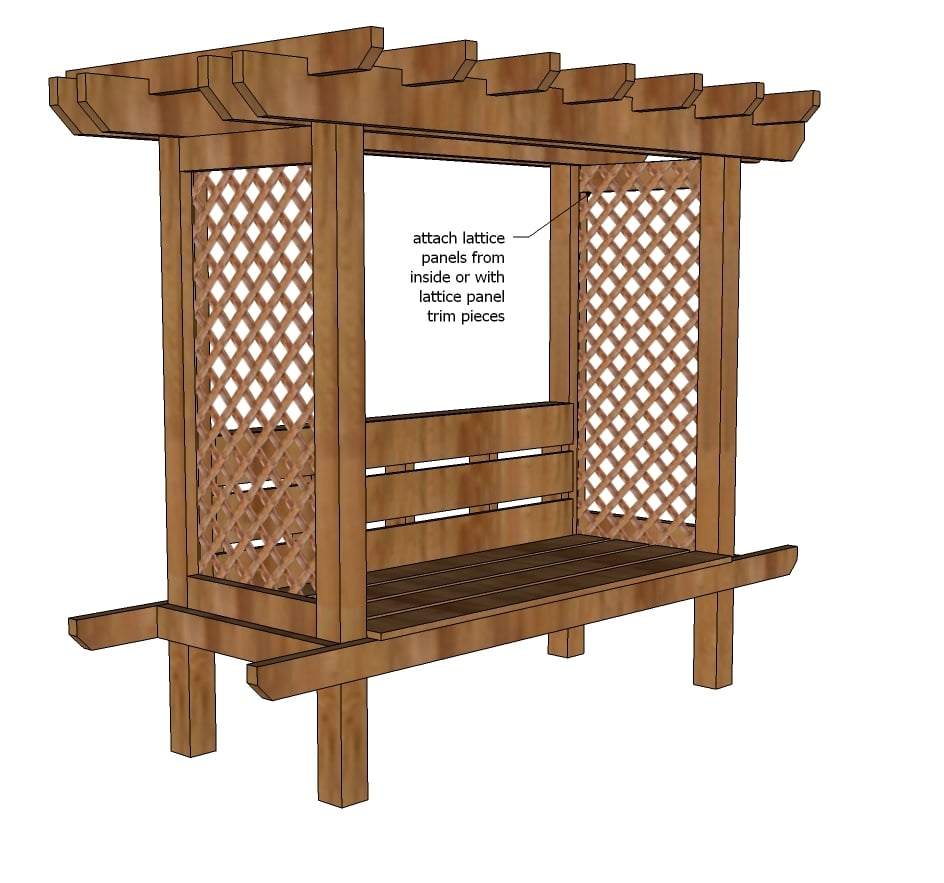
Add lattice to inside of the sides - you may wish to add additional wood trim supports around the lattice panels.
Step 9
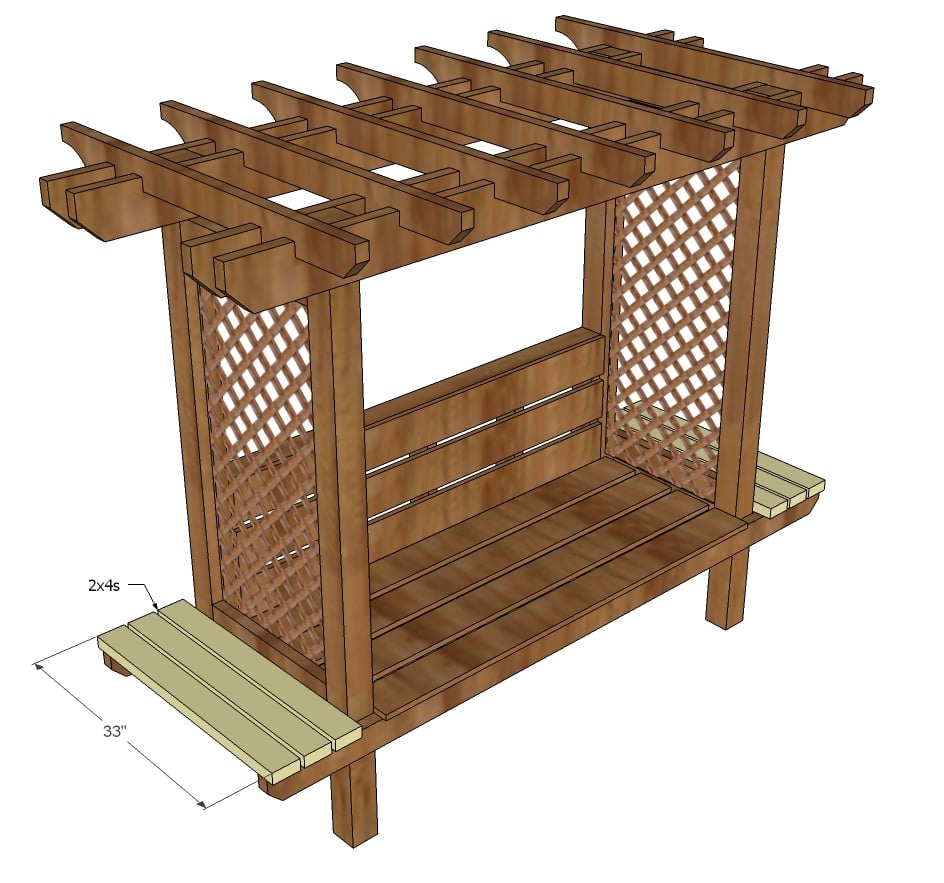
Finish off ends with boards (perfect spot for a plant!)
It is always recommended to apply a test coat on a hidden area or scrap piece to ensure color evenness and adhesion. Use primer or wood conditioner as needed.

Comments
yusleepin
Sat, 06/14/2014 - 05:23
Awesome plans as usual Ana!
Awesome plans as usual Ana! I can't wait to make this someday. Thank you for all the time and inspiration you provide on your site!
One small side note though: the shopping list and cut lists are swapped in this plan.
Nicorae_24
Mon, 05/11/2015 - 09:10
Can't wait to make this!
This site never fails to give me the perfect item for every area of my home...and the mini version is adorable!
mcnessa
Fri, 07/10/2015 - 07:13
Seat Support & Rafters
The cut list calls for four 2x4s cut at 28 inches. The diagram on Step 5 highlights seven 2x4s cut at 28 inches. The choice is yours, I went with seven.
Rafters - I don't own a table saw, so I held the rafters together with clamps, measured and marked the cuts for notches, then set my circular saw for a depth of 1.5 inches. I knocked out the wood cleanly between the cuts with a hammer and chisel. While the cuts were exactly the same for all the rafters, I did have to make a few minor adjustments to a couple of notch cuts to compensate for slight bows in the 2x6 boards the rafters sat on.
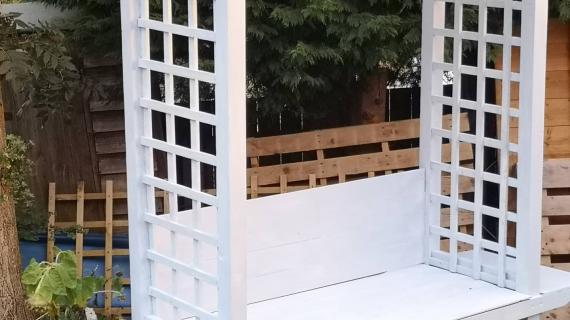
Relatively minor issues for a great weekend project. You should try it! I was very pleased with the results. Thank-you Ana!!!
Hokulani1
Thu, 01/21/2016 - 07:50
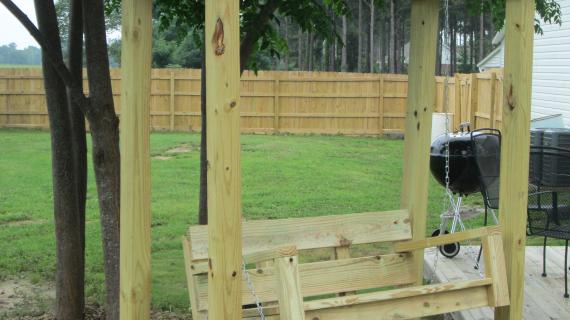
Use for a swing base?
Hi Ana! This Arbor is beautiful. I was wondering if you think this is sturdy and suitable for a swing base instead of doing an A frame. I would omit the inside bench so the children's swing(s) can go there, and maybe keep the small outside benches on each side. Please give me your thoughts. Thank you so much!
Aiden Eagle Scout
Fri, 03/02/2018 - 14:24
Great plan!
We used the design to make a bench for an Eagle Project for the Rescued Pets Movement. I did the work with my Grandfather purchasing, measuring, and cutting all the wood. It took one day to purchase and cut the wood and another day to build it. I had some members of my scout troop come by to help sand and paint the bench. That took about 4 hours with five scouts. After making it some of my family members want one of their own!