
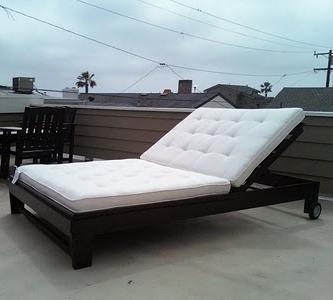

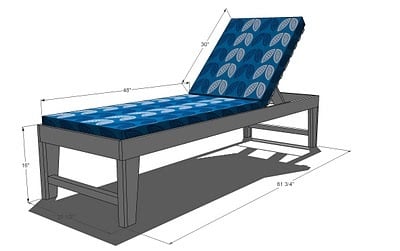
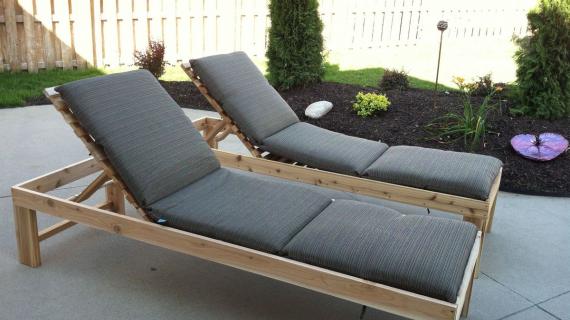
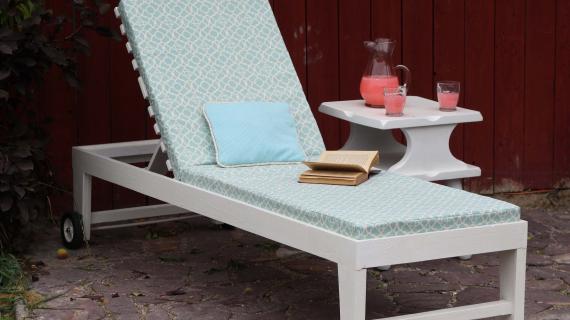
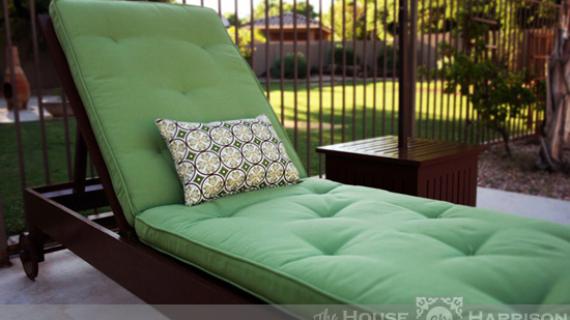
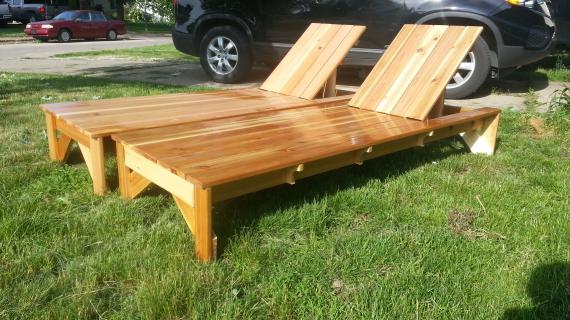
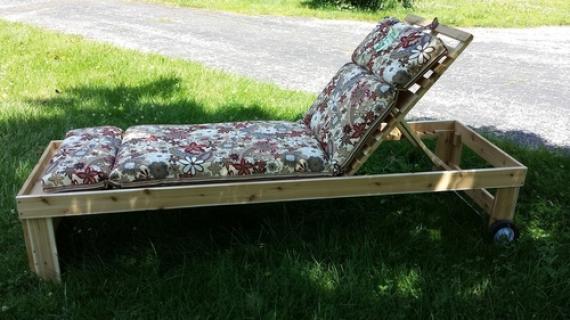
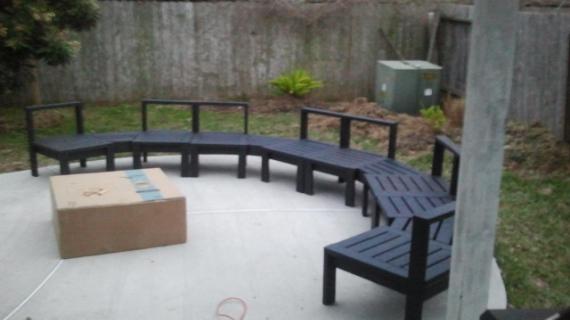
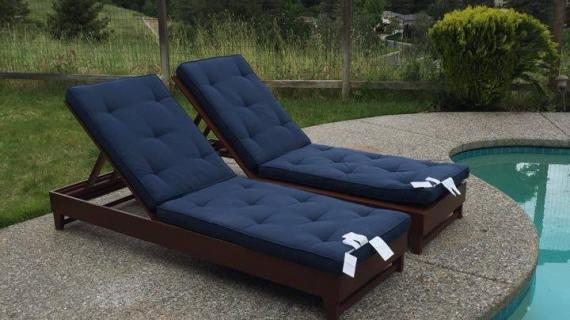
Plans are for a single lounger, but can be easily modified, as one of our readers did, to a double. Featuring no special hardware, slatted wood design, adjustable back angles, and optional wheels.
Preparation
Shopping List
1 – 2×2 8′ Long
10 – 1×2 8′ Long
5 – 1×4, 8′ Long
2″ Screws
1 1/4″ Screws
5 Hinges
1 – 24″ 3/4″ Dowel
4 – 3/4″ Pipe Straps
Wood Glue
Wood Filler
Finishing Supplies
24″ Wide Foam, 48″ and 30″ long for Cushions
Fabric for Cushions, 2 1/2″ yards (approximately)
2 – 1×2 @ 73 1/4″ (Side Stringers)
1 – 2×2 @ 22 1/2″ (Base Support)
2 – 1×4 @ 81 3/4″ (Sides)
4 – 1×4 @ 14″ (Inside Leg Piece)
2 – 1×4 @ 24″ (Front and Back)
2 – 2×2 @ 22 1/2″ (Stretchers)
4 – 1×4 @ 12 1/2″ (Outer Leg)
4 – 1×2 @ 12 1/2″ (Fronts and Backs of Legs)
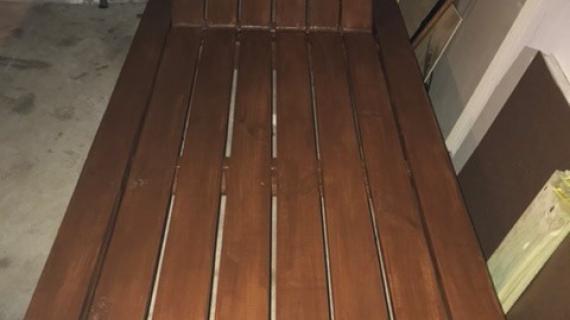
24 – 1×2 @ 24″ (Main Slats)
2 – 1×4 @ 24″ (Support Slats)
3 – 1×2 @ 30 1/2″ (Back Stringers)
2 – 1×4 @ 16 1/2″ (Back Incline Support)
1 – 3/4″ Hardwood Dowel or Pipe @ 24″ (Back Incline Catch)


This is an advanced project, make sure you fully understand how this lounger works before beginning. Work on a clean level surface. Check for square after each step. Predrill and countersink your screws. Use necessary safety precautions and equipment.
Instructions
Step 1
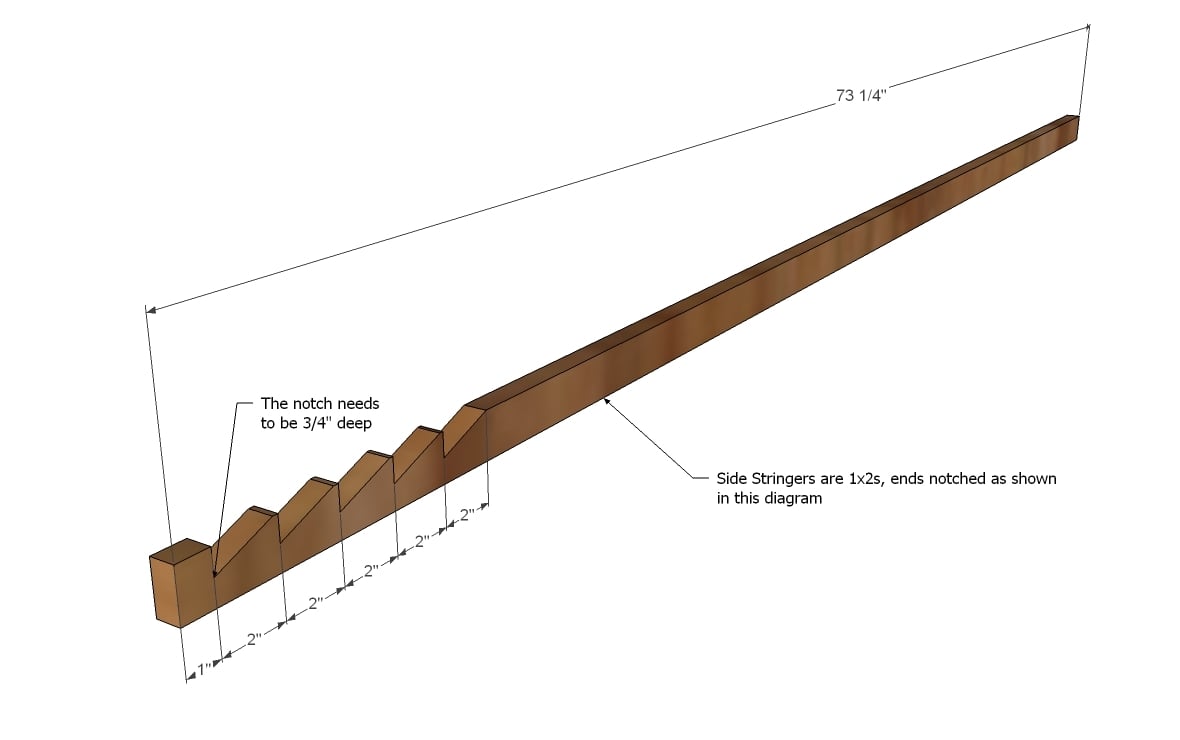
Side Stringers. Notch out your side stringers as shown here. You could actually add more notches for more customization if you would like.
Step 2
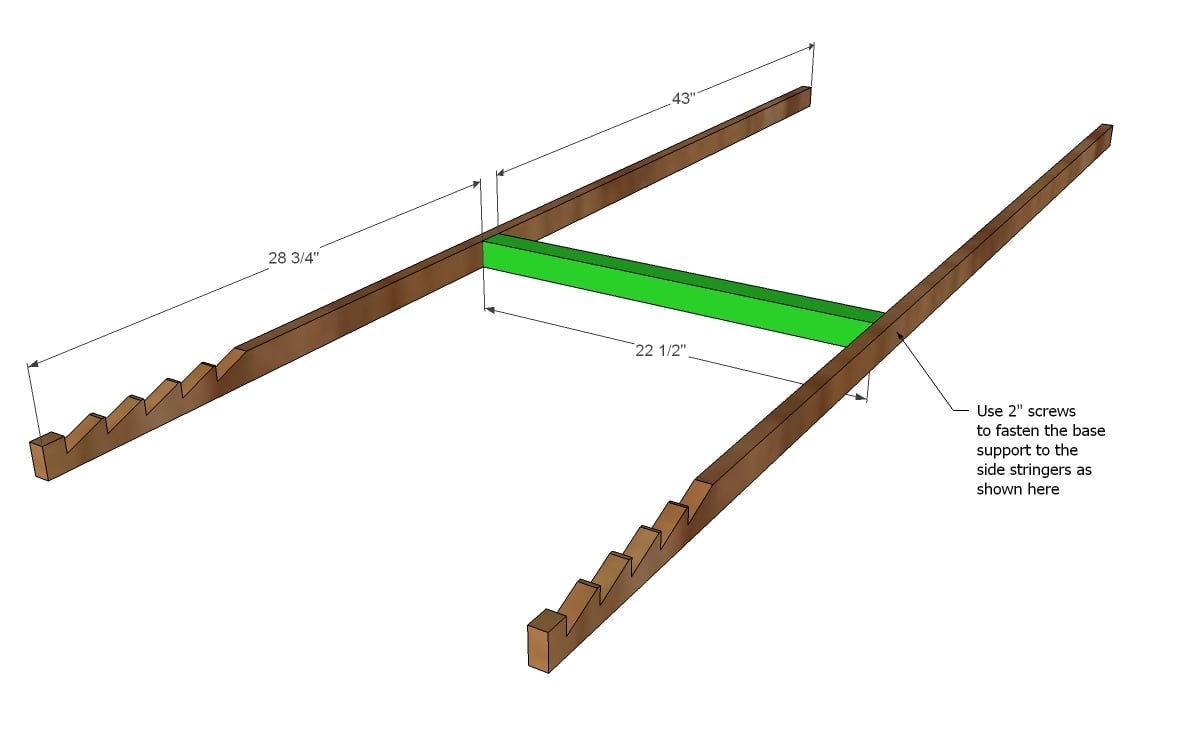
Base Support. Use 2″ screws and glue to fasten the base support as shown here.
Step 3

Sides. Fasten the sides to the side stringers, keeping bottom edges flush. Use glue and 1 1/4″ screws or nails. There will be a 4 1/4″ difference on the front and back ends of the stringer and the sides, as shown above.
Step 4
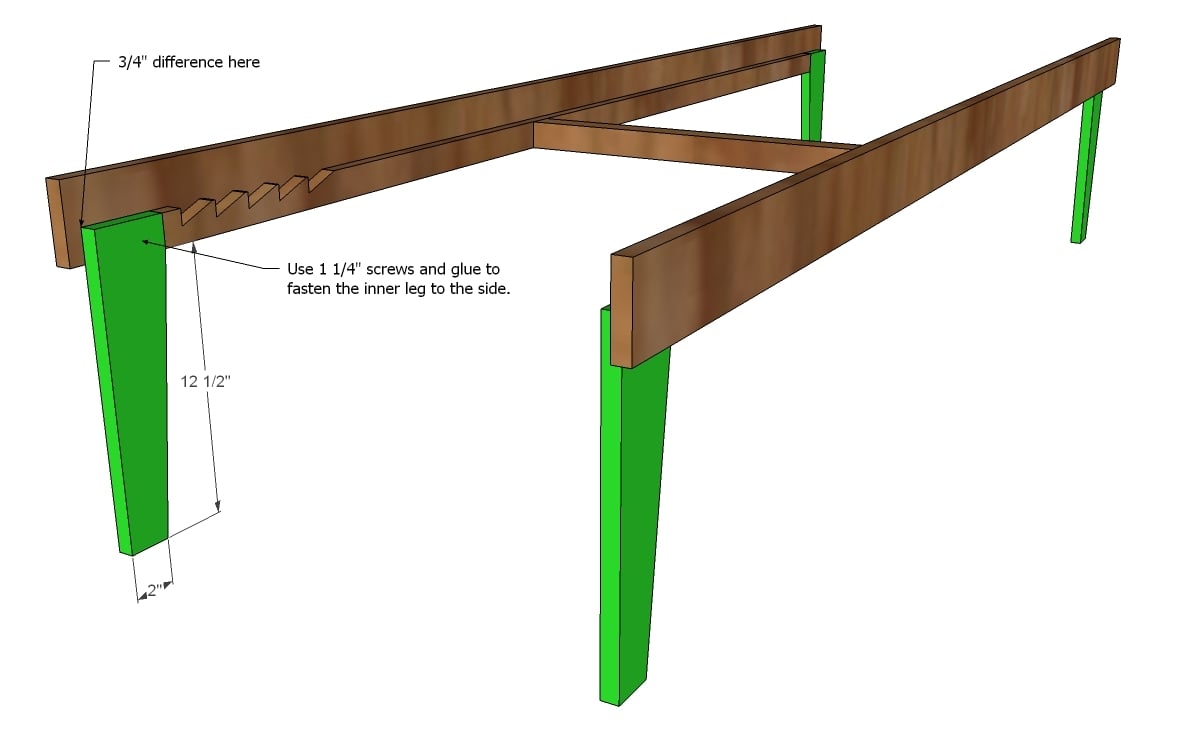
Inside Legs. First cut your inside leg to a taper, as shown above. Then fasten the inside leg to the sides, using glue and 1 1/4″ screws.
Step 5
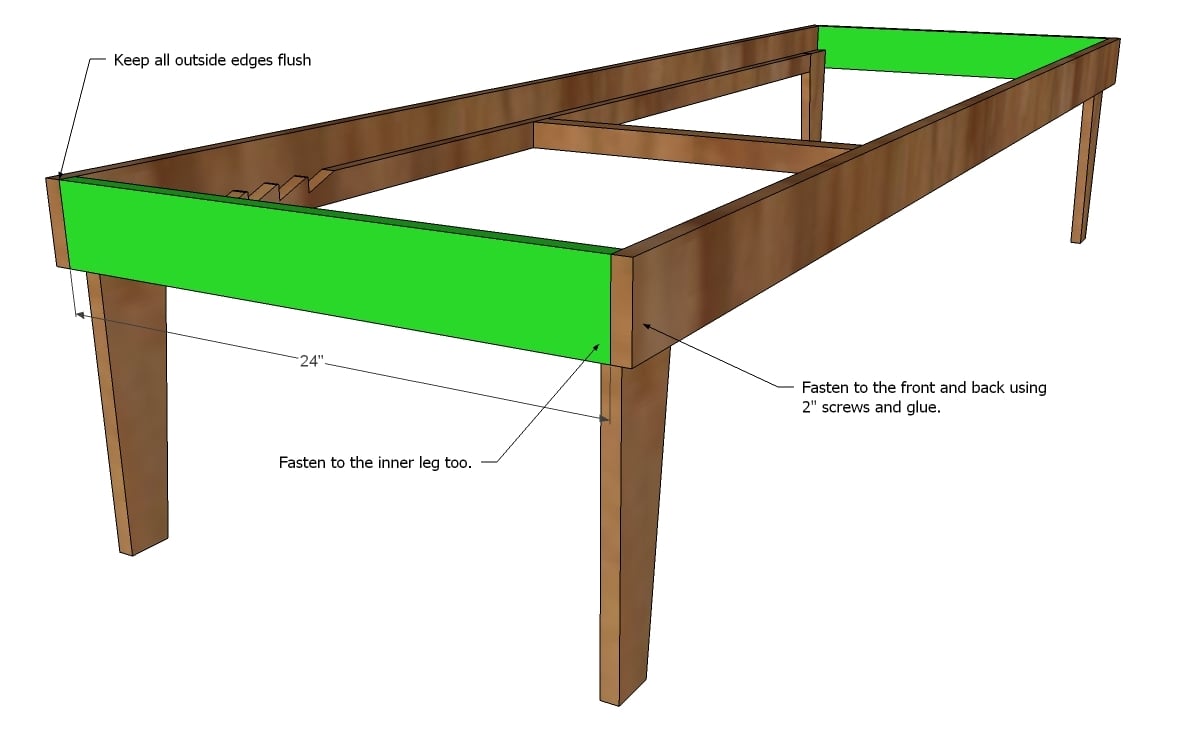
Step 6

Stretchers. Fasten the stretcher to the inner legs as shown here. Use 2″ screws and glue.
Step 7

Finishing the legs. First, cut the taper of the outer leg as shown here so it matches the inner leg. Fasten the outer leg to the inner leg using 1 1/4″ nails. Fasten through the insides. Then fasten the fronts of the legs (or the backs for the back legs) to the inner and outer leg pieces.
Step 8
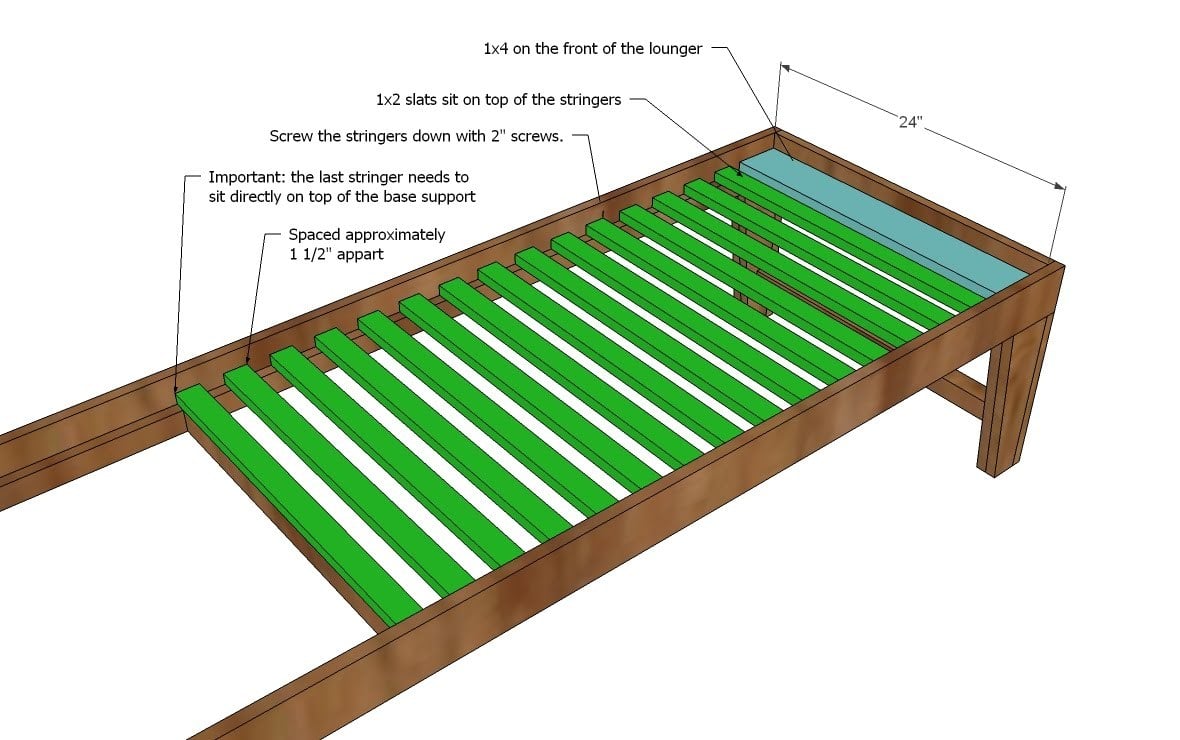
Main Slats. As shown above, fasten the main slats to the stringers. Start with the 1×4 front piece and the last slat that sits on top of the base support. Then fill in with slats, approximately 1 1/2″ apart. Screw down with 2″ screws and glue.
Step 9
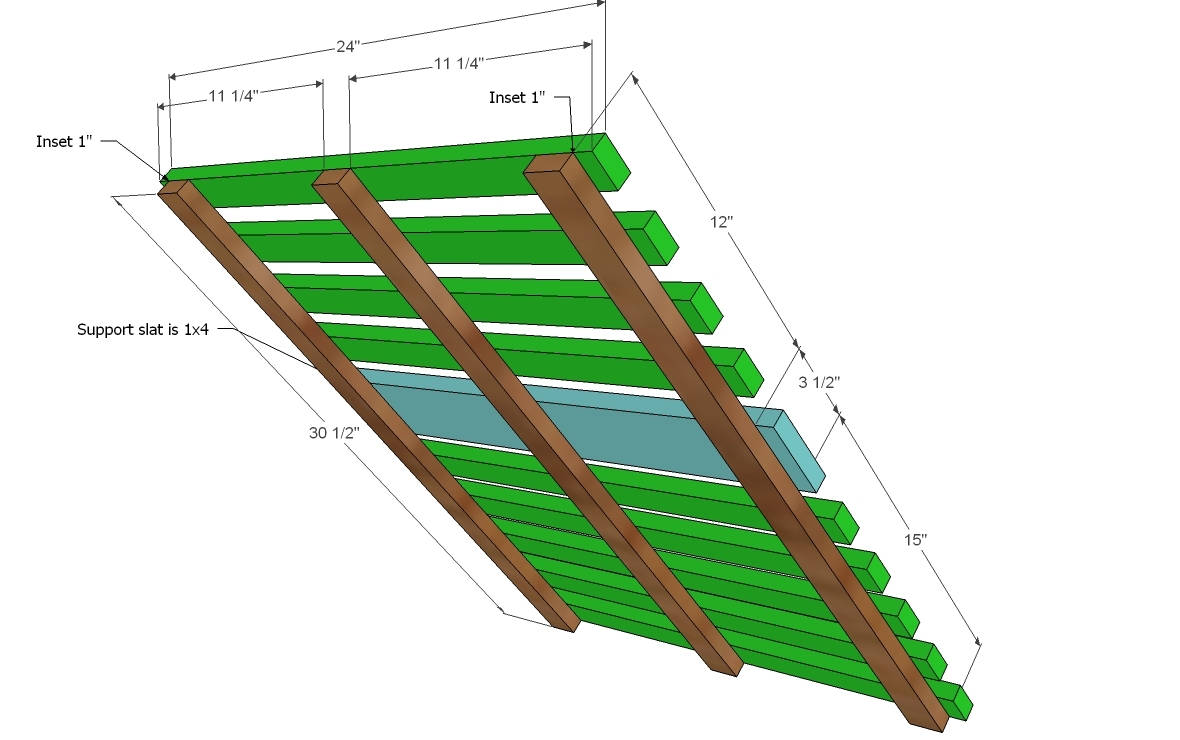
Back. Build the back as shown above. Keep the top and bottom edges flush with the back stringers, but there will be a 1″ difference on the slats and the stringers, as shown above. Use 1 1/4″ screws to fasten through the back stringers into the backs of the slats to hide your screws.
Step 10
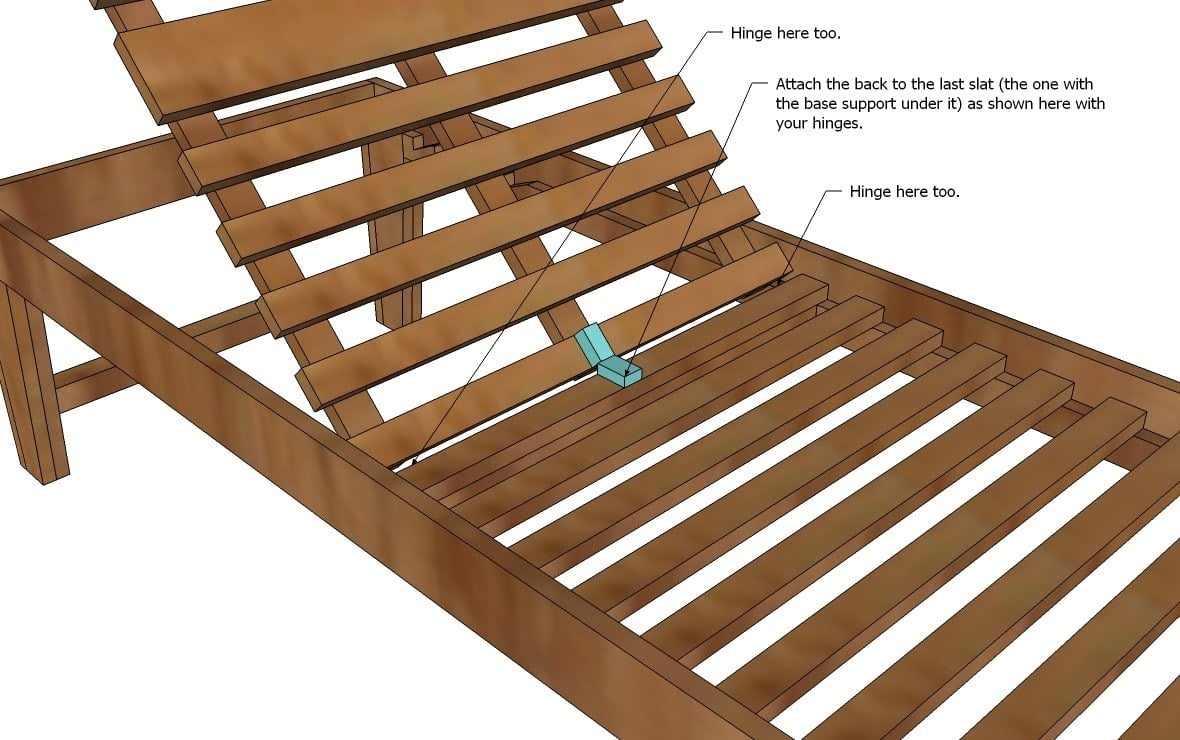
Attaching the Back. Lay the back in the lounger, and attach the last slat of the back to the last slat on the lounger. Simply lay the hinges flat on top of the slats and screw in place. Position the hinges so that the pin rests in a gap between the back slat and the seat slat. Use three hinges, all positioned over the back stringers.
Step 11
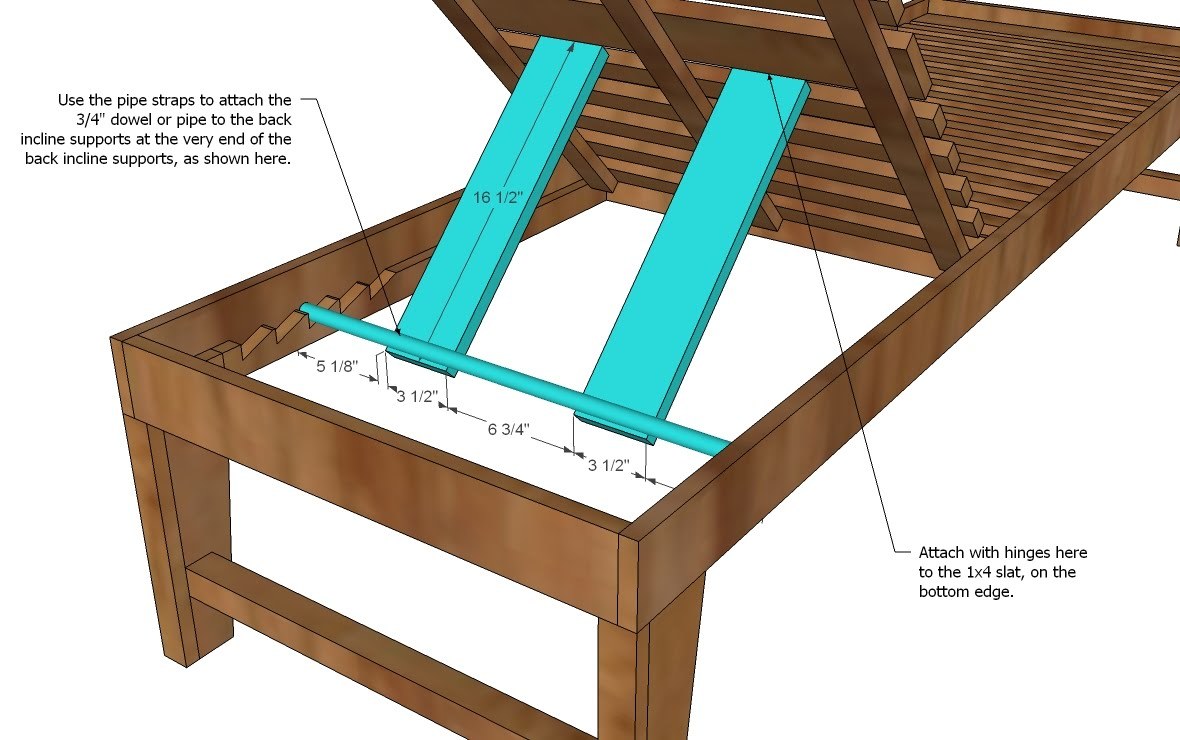
Incline Support. Attach the dowel with the pipe straps to the incline supports and use the hinges to attach the incline supports to the 1×4 back slat. The dowel needs to be on the very end of the incline supports so that the dowel can fold to the top when the recliner is layed flat.
Step 12
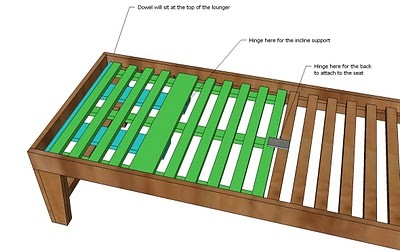
Mechanics. I added this diagram to help illustrate how the lounger will appear when in the flat position. Notice how the dowel sits above the last slat on the back?

Comments
Viola (not verified)
Fri, 04/02/2010 - 09:29
Thank you so much Ana. You
Thank you so much Ana. You truly are amazing. I so appreciate your hard work and dedication. I hope things are working out better for you.
JessA (not verified)
Fri, 04/02/2010 - 09:33
This is stunning! I am
This is stunning! I am always in awe of your talent!
Serena (not verified)
Fri, 04/02/2010 - 09:40
Wow! I am amazed that you
Wow! I am amazed that you know how to draw up plans for something so complicated. Thanks for taking the time and thought to put this together. This will be great for the summertime!
TheSimplePoppy (not verified)
Fri, 04/02/2010 - 09:45
I have always loved these
I have always loved these loungers - and the cost is always so prohibitive. I wonder how hard it would be to double them, but still have each side fold individually? Awesome plans!
jill g (not verified)
Fri, 04/02/2010 - 09:58
YAY! I am sooo excited. I'm
YAY! I am sooo excited. I'm in the process of purchasing a second hand table saw and then this project is MINE! I plan to build two of these. THANKS ANA!
Regina (not verified)
Fri, 04/02/2010 - 11:38
These plans look fantastic!
These plans look fantastic! I'm not quite at this level yet, but I fully intend to give these a shot towards the end of the summer!
Cricket (not verified)
Fri, 04/02/2010 - 11:54
You are amazing. Not only do
You are amazing. Not only do you make a mean lounger, I am consistently amazed at the way you make woodworking accessible to everyone. And that means making up your plans so we can actually afford to put foam on the lounger after we build it. Awesome. I love your site, and it has me eying the large pile of old barn wood in my backyard.
Lacking Productivity (not verified)
Fri, 04/02/2010 - 12:15
This makes me so so so
This makes me so so so excited to get to where I feel advanced enough to do this! I have wanted chairs like this for year...but the price tag was always WAY out of my price range.
You rock my socks off!
Spencer & Lori… (not verified)
Fri, 04/02/2010 - 12:35
Are you kidding me! This is
Are you kidding me! This is amazing! Especially after I looked and saw how much they are to buy! Yikes!
About Us (not verified)
Fri, 04/02/2010 - 12:53
First, I have 5 kids and one
First, I have 5 kids and one of them is a 4 month old. My weekly trip to the grocery store is pure trauma! So I laughed as I read the first part of this. I was so hoping you would do one like this. We are going to build 2 of these!
sophie, Inzaburbs (not verified)
Fri, 04/02/2010 - 13:05
Ana, just last night I was
Ana, just last night I was looking at the WE website and sighing, wishing you had plans for the modern farmhouse table. I must have missed it first time round, because when I went back to look for something else to make - there it was!
I still resolved to write to you one day and ask you to make those modern outdoor loungers. Did you read my mind ??????
I am going to have to practice practice practice though- since you put it in the advanced section I will just have to get advanced :-)
Anonymous (not verified)
Fri, 04/02/2010 - 13:08
You ROCK~!!!!! I've been
You ROCK~!!!!! I've been spending hours on your site for weeks but haven't yet said anything. I'm shocked because I've been looking this whole week for chaise loungers or plans to build them myself, and now you all of a sudden have one. It's like you read minds!!! THANKS SO MUCH! You are amazing! I wish we had more time in a day so you could blog constantly for us and still spend time with your children. =)
Shanon Ridenour (not verified)
Fri, 04/02/2010 - 14:31
I was lusting over chaises
I was lusting over chaises just like this last summer! Yet another project I'm itching to try out. Thank you for sharing your talents with all of us.
Annalea (not verified)
Fri, 04/02/2010 - 15:12
I'll chime in:Ana, your rock!
I'll chime in:
Ana, your rock! I love how you deconstructed the mechanics of a chaise lounge, and made them accessible. I can't wait to see what folks come up with!
Sleep well . . .
Janey (not verified)
Fri, 04/02/2010 - 15:45
Yay! Thank you! I can't wait
Yay! Thank you! I can't wait to get started on them.
Kaybi (not verified)
Fri, 04/02/2010 - 17:27
You are so smart! Thank you,
You are so smart! Thank you, thank you, thank you!!!
Jenny @ Anythi… (not verified)
Fri, 04/02/2010 - 17:39
Oh I have been so hoping that
Oh I have been so hoping that you would post these plans and you totally made my Friday! I can't wait to get started!
Pacific NW Blogfan (not verified)
Fri, 04/02/2010 - 21:46
I'm diggin' it. Great job.
I'm diggin' it. Great job.
Work at Home Dad (not verified)
Fri, 04/02/2010 - 23:29
Wow that is so nice. Thank
Wow that is so nice. Thank you for sharing it.
Anonymous (not verified)
Sat, 04/03/2010 - 00:43
Ana, I had a look at the RH
Ana, I had a look at the RH website from your link. That Belvedere Loveseat is divine.
Stephanie (not verified)
Sat, 04/03/2010 - 04:04
Wonder if this cold be done
Wonder if this cold be done in Azek or other similiar material so it is weather proof, Perhaps one day try some thing in Knock off Azek, so it's a new arena for you!!!!
KRISTINA CIPOL… (not verified)
Sat, 04/03/2010 - 06:00
Thank you SO much for
Thank you SO much for sharing! The fact that you take the time out to post plans etc is SO nice of you! I've always loved these chairs but they are usually expensive...so making them a project may just be more doable! Thanks again! :)
Chrissy Jordan (not verified)
Sat, 04/03/2010 - 09:48
You are uh-mazing! Thank you
You are uh-mazing! Thank you for sharing your life with us! I am going to make two of these and join them with an attached umbrella for a cabana feel. But first we're making the picnic table for our son, can't wait. :)
Melissa (not verified)
Sun, 04/04/2010 - 19:08
Just a suggestion for anyone
Just a suggestion for anyone who is going to make this. When you make your padding, cover it with Sunbrella or some similar type of fabric that will not fade in the sun. We got the PB one (at a discount store, of course, and about the same price you could build it for), but it did not have the Sunbrella fabric, and what used to be red is now light orange. We have to recover it, and we only got it about a year ago.
Kristi (not verified)
Mon, 04/05/2010 - 11:58
You are incredible! And
You are incredible! And psychic- I was thinking of these yesterday as I planted my umbrella holder. I have a HUGE pot that I put a pvc pipe in and then surround with flowers. Rainy days, it sits outside and holds sunny flowers. On bright days, I push aside a few leaves and slide in the umbrella.
Swear to goodness, I was standing there yesterday thinking, "I wonder when she's going to put up the plans for those gorgeous wood lounges? They would be perfect here..."
THANK YOU!
Remodelaholic (not verified)
Mon, 04/05/2010 - 16:20
This is so perfect I have
This is so perfect I have been wanting some of these for ages! Thank you!
JackieSue (not verified)
Mon, 04/12/2010 - 20:19
HELP!! =) I just wanted to
HELP!! =) I just wanted to ask... (first of all, I'm the anonymous quoter from April 2nd...I guess I didn't log on that day.) Anyhow, I'm in the middle of this project but was a little confused about the front legs because there's not a detailed diagram of that portion. I figured it was just assumed to be close to the same as the back legs, but there is much more space up there than in the back so I was hoping you could clarify to help me. THANKS SOOOOO MUCH, I'm so excited to be doing this project!
JackieSue (not verified)
Mon, 04/12/2010 - 21:11
Ok so I kept going and
Ok so I kept going and according to my measurements, I'm thinking maybe the sides are supposed to be 76 1/4 rather than 73 1/4. Could that be true? You tell me. =) Thanks again! I just love you and your plans~!!!
Ana White (not verified)
Tue, 04/13/2010 - 03:51
Hmmmm . .. . The cleat
Hmmmm . .. . The cleat should be centered on the sides so that there is 4 1/4" space on both the front and the back. 73 1/3 + 4 1/4 + 4 1/4 = 81 3/4.
Hope this helps. Ana
JackieSue (not verified)
Tue, 04/13/2010 - 08:13
Thank you!!! So you might
Thank you!!! So you might want to change the plans to say 81 1/4 rather than 83 3/4. ? Pictures to come... =)
Ana White (not verified)
Tue, 04/13/2010 - 08:20
oh, thanks for being patient
oh, thanks for being patient with me! All fixed!
Jennifer (not verified)
Thu, 04/15/2010 - 01:56
We just threw out our old
We just threw out our old ones, so this will be great! I'll have to get Hubbie on it right away....I keep thinking that I need to learn to use these tools and get it done myself. You are VERY inspiring.
charlotteannette (not verified)
Mon, 04/19/2010 - 06:57
Oh man I totally should have
Oh man I totally should have read the comments before I started, but I also noticed the 84 vs 81 discrepancy, and just hacked off the last 3 inches of the sides. I am not done yet, but I have a question--do you think I made a mistake trying to do this in cedar?? ANA help! Its a really soft wood, is it going to hold up?
I am going to make a second one, but should i do it in some harder wood?
Ana White (not verified)
Mon, 04/19/2010 - 06:59
Cedar works, will hold up to
Cedar works, will hold up to weather. Can't wait to see your finished chair!
Alberta Mama (not verified)
Mon, 05/03/2010 - 12:46
Hey Ana,I was at Pottery Barn
Hey Ana,
I was at Pottery Barn last week looking at these really closely as I really, really want to build one and they have just used a piece of 1x3 (I think) wood instead of a dowel. I am going to try it. Also, they only had three height settings, so your plan is much more custom!
marabama (not verified)
Sat, 07/03/2010 - 18:42
Like many others I have
Like many others I have become addicted to your website and to woodworking.Last year I made my first project ever, a pair of basic adirondack chairs that my daughter decided would make her an excellant birthday present. Still wanting a pair of my own, this year I decided to make another set and a friend of mine decided they would look really good on his pool deck. So now I'm working on the chaise and I love it. This one's mine all mine! Just remember folks if you don't go ahead and try an advanced project like I did you will always think of yourself as a beginner
Doug (not verified)
Mon, 08/16/2010 - 14:00
Ana - I gotta tell you the
Ana - I gotta tell you the plans are great! The colors that focus on the steps to be performed are excellent. Looks like maybe your using Google SketchUp? I am building now and using 8" side boards and all in cedar. So far its looking great. Its the first time I've worked with cedar and a nice wood to work with. Not really that much more $ than finished pine either. I did have trouble finding 1x2's so just bought 1x4's and ripped them in half.
peter oa sullivan (not verified)
Thu, 10/07/2010 - 23:50
im doing my leaving cert in
im doing my leaving cert in killarney and u have no idea how much u have helped me u have saved me sume amount of work with this cutting list when im finished i will send u a picture tnks
Cale (not verified)
Wed, 12/01/2010 - 17:02
i recently (like today) found
i recently (like today) found your website... and i have to say "Thank You"... After shopping around, scouring the Internet, pricing out the budget, and realizing how expensive buy four of these lounge chair would be. I realized it couldnt be that hard just to make it myself. One problem the plans; i can see the basic shapes, but i couldnt figure out the measurements, nor did i think about countersinking the screws, or wood-filler, etc. So "Thank You" your site is enormous help.
Anna (not verified)
Fri, 02/18/2011 - 08:29
Brilliant!
Brilliant!
helpme (not verified)
Mon, 02/21/2011 - 13:36
help! i'm in the process of
help! i'm in the process of building this chaise and i am using white pine that i purchased from home depot since it was the only wood available. every time i screw two pieces together, the wood is splitting at the screw. the wood is very soft and very light, but i bought it because the only other option was pressure treated. is the problem with the wood, the screws, or am i just an idiot?
In reply to help! i'm in the process of by helpme (not verified)
claydowling
Wed, 04/06/2011 - 12:02
Pre-drilling
There are a couple of tricks to using screws with 1x material.
First, always pre-drill a pilot hole. Use a drill bit the same size as or slightly smaller than the shaft of the screw (i.e. thinner than the threads). Just hold them up next to each other, it's not precision measurement. If in doubt, go smaller.
The second is to countersink the screws. You can buy a countersink that includes a drill bit for the pilot hole at and of the big box stores. Or you can buy a hand countersink at Harbor Freight. I prefer the later, but either works quite well.
Also, never use a self-taping screw like a drywall screw in 1x material. Sometimes you'll get away with it, but it's more likely that the wood will split. If not right away, then the first time the joint is stressed. Proper wood screws are always what you should use. The angled base on the head is less likely to cause splitting than the curved base of a drywall or deck screw. It should just nestle snugly into the countersunk hole. A properly countersunk screw has a certain elegance to its appearance.
Ryan (not verified)
Wed, 04/06/2011 - 09:48
Measurement issue
Maybe someone who has done this before can help me because i can't seem to comprehend the measurements lol. so I am looking at the plan and it say to leave 4 and 1/4 inch at each end of the stringers and then attach legs to leave 3/4 of an inch. That all makes sense but then how can you attach a 1x4 to the front and back and make everything flush. Won't there be an extra 1/4 inch overhang???? Help Pleasseeee
In reply to Measurement issue by Ryan (not verified)
claydowling
Wed, 04/06/2011 - 12:45
Easy mistake
A 1x4 is nominally 3/4" thick. It was 1" before surfacing, which is how lumber is priced.
Ryan (not verified)
Wed, 04/06/2011 - 13:15
I feel dumb....thank you so
I feel dumb....thank you so much...i've been dying to try this but didn't want to screw up
constantia
Tue, 05/03/2011 - 11:18
Wheels
Did anyone attach the wheels? I think I know how the West Elm wheels are attached (which I really like that look). Just trying to get ideas from someone who's already done it.
kent (not verified)
Mon, 05/30/2011 - 20:33
chaise lounge plans
Thank you Anna for your free internet lounge plans. I made a few modifications to the back. One can reach through and read a book on their stomach. I also added rear wheels. Cheers! Kent
Guest (not verified)
Thu, 06/23/2011 - 13:38
Love these plans. I am in the
Love these plans. I am in the middle of making two with douglas fir but i have a question... So do I use a one hole pipe strap so that the dowel can get to the end of the supports? I bought a two hole and in order to screw it to the supports, the dowel will be almost an inch from the end. Also, the 3/4" pipe straps do not attach the dowel snug. there is enough room for the dowel to slip out. Is that right? Thanks.
Double Chaise? (not verified)
Tue, 01/10/2012 - 10:48
Double Chaise
I'm hoping that someone would be able to post the specifications for the double chaise? Any help?
Thanks.
npalacios281
Mon, 01/16/2012 - 11:33
I look forward to this project
I have been wanting pool furniture for the longest. However, I am a bit confused between the shop list and the cut list. The first couple items on the shop list are wood cuts right?