Play Kitchen Stove and Sink with Running Water

Play kitchen DIY plans with real working sinking
Difficulty
Beginner Projects
| Print this plan

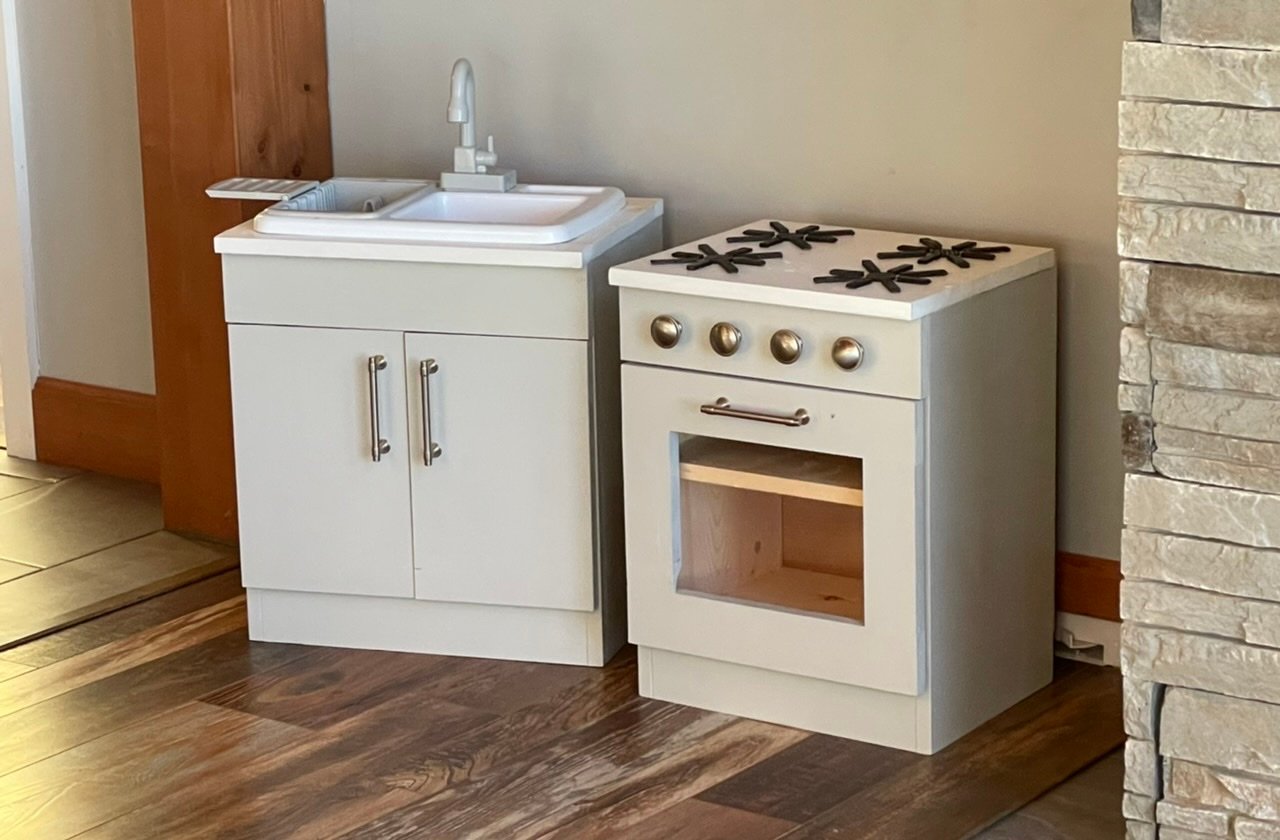
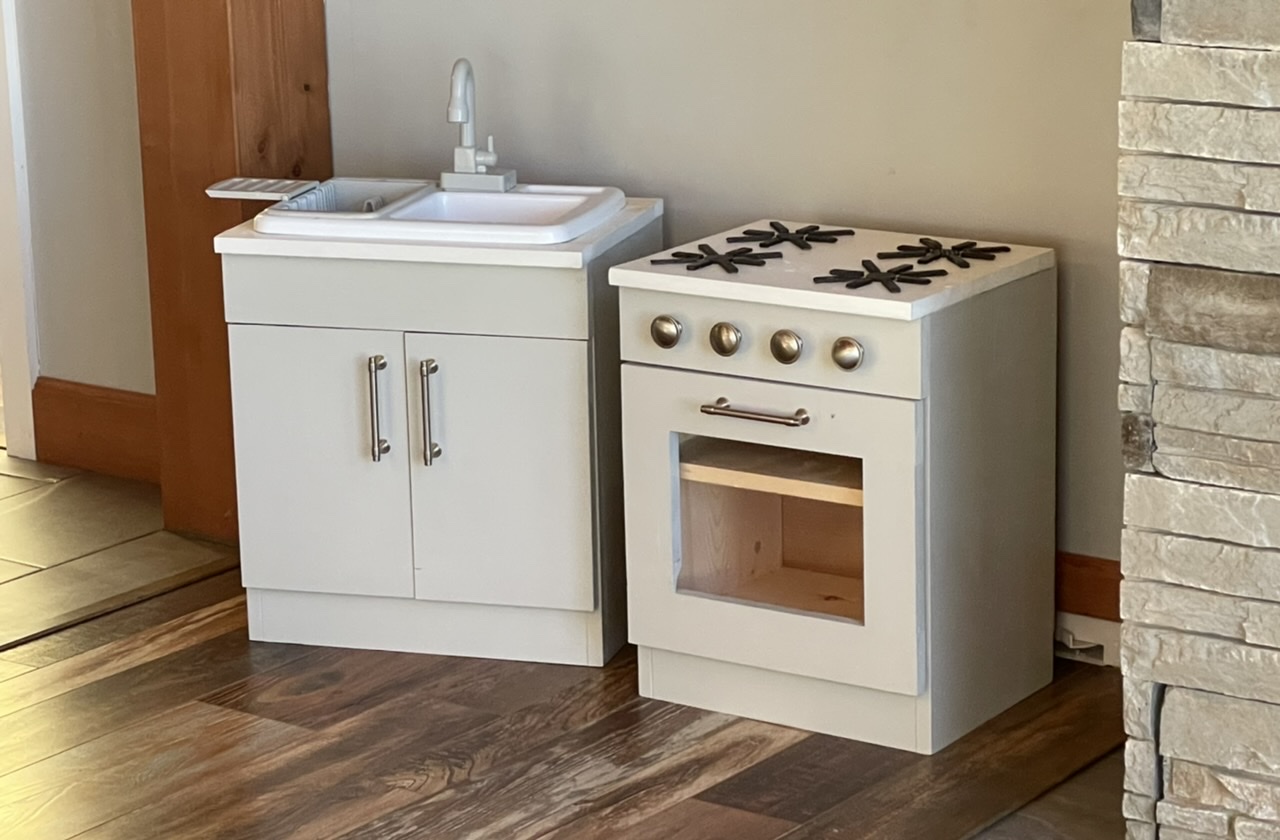
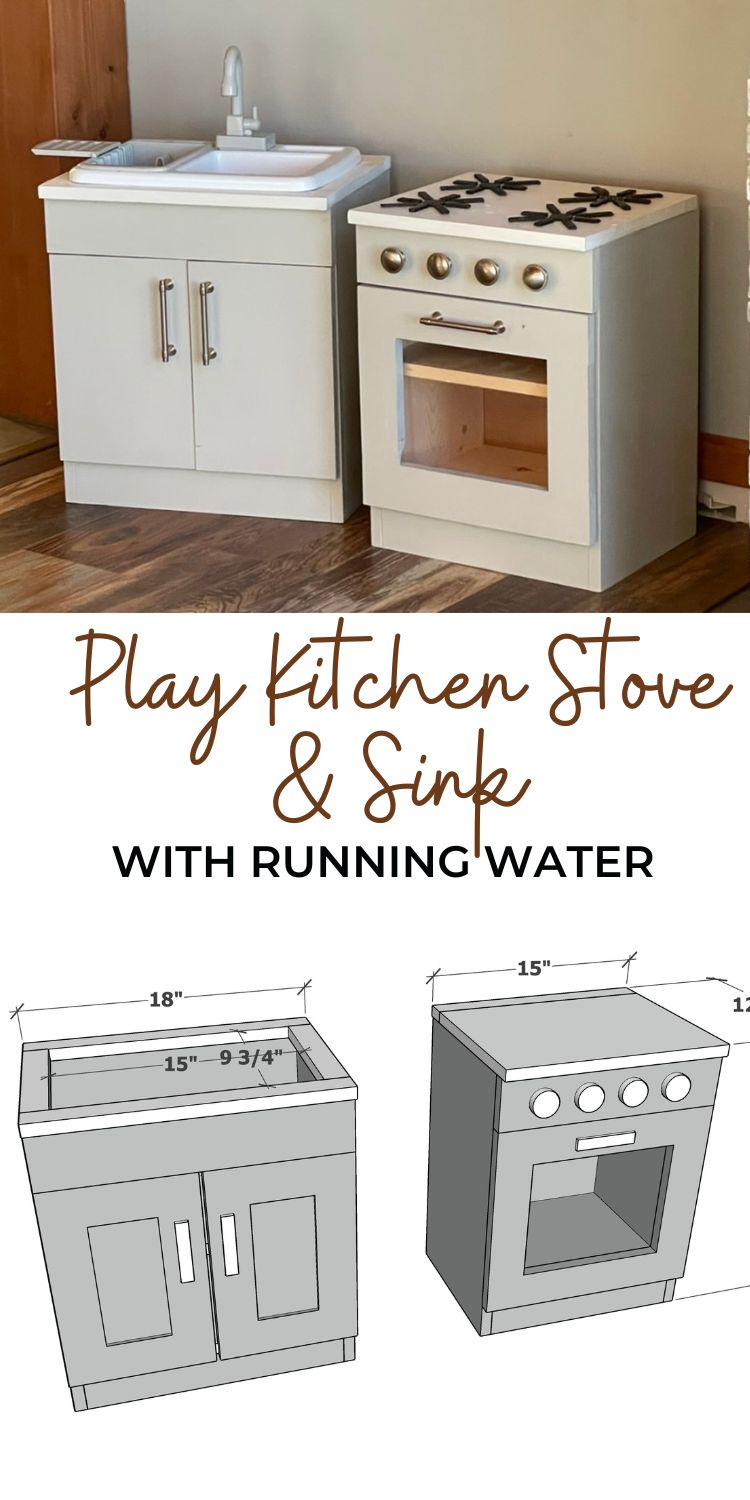
Free plans to build a play kitchen sink and stove with a real working sink!  This is an easy build project and makes the cutest little play set. Free step by step plans with diagrams from Ana-White.com

This easy to build play kitchen features a real working sink.  The free plans include step by step diagrams, shopping and cut lists, designed by Ana White.

play kitchen real working sink running water

play kitchen real working sink running water

Are you looking for a great pretend play toy set to inspire hours of device free play?  

For my four year old daughter, I build her a brand new kitchen set, styled after how real kitchen cabinets are built.

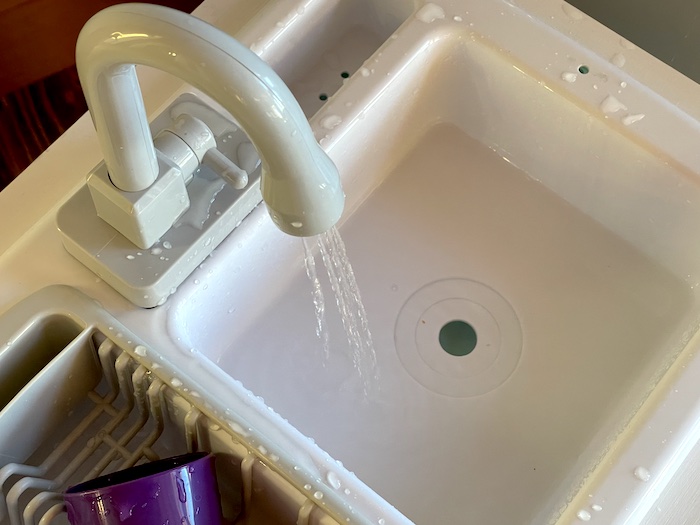
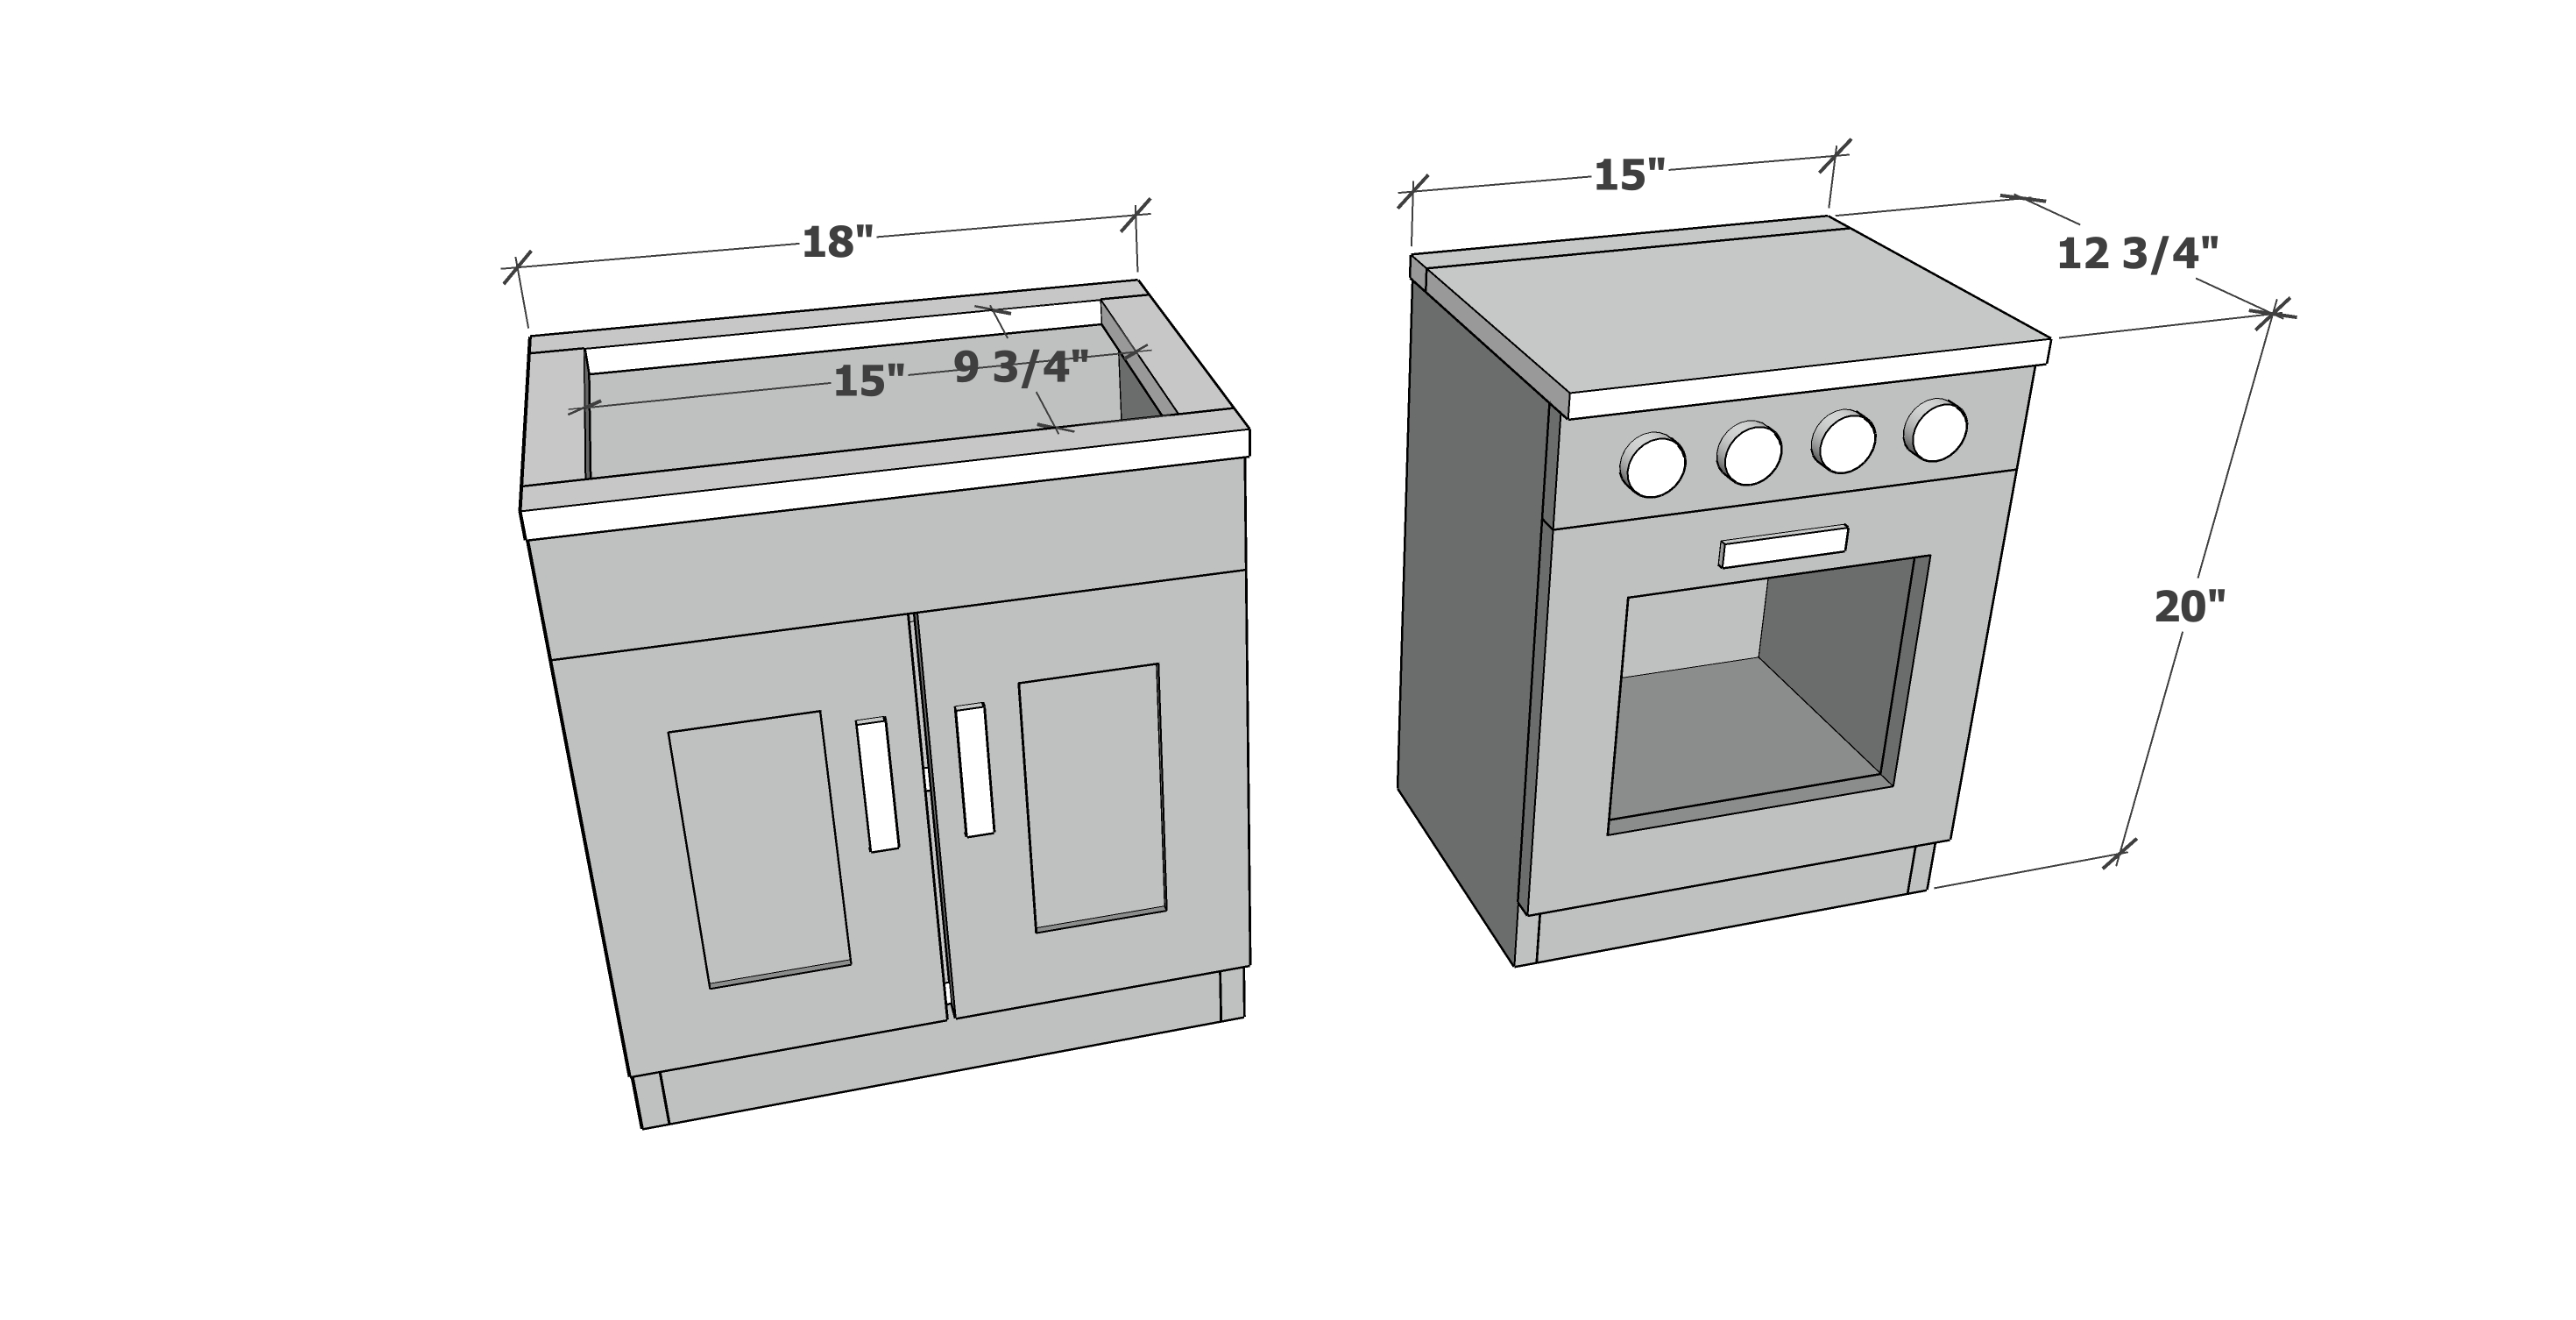
To make it extra special, I sized it to fit an inexpensive amazon ordered plastic working sink toy.

This play kitchen stove and sink set are beautiful enough to place in my kitchen, and fun enough for constant use. 

I spent about $100 on the set (I used leftover paint and had the knobs).

I'm so glad to be able to share these plans with you.

MORE PRETEND PLAY PLANS

Want more DIY pretend play plans? Here's a roundup of some of our favorites!

pretend play toy plans

Pin For Later!

Play Kitchen Stove and Sink with Running Water

Dimensions
play kitchen dimensions
sized for preschool age, dimensions shown in diagram

Preparation

Shopping List

SINK SHOPPING LIST

  • 1 - 1x12 @ 5 feet long
  • 1 - 1x4 @ 18" long
  • 1 - 1x3 @ 8 feet long
  • 1 - 1x10 @ 16-1/2" long (shelf)
  • 1 - 1x2 @ 5 feet long
  • 1/4" plywood, minimum size 18" x 19-1/4" plus scrap piece for door backs
  • Sink with running water, sized about 16" x 10-3/4", I used this one
  • 1-1/4" and 5/8" brad nails
  • wood glue
  • 1-1/4" pocket hole screws for building the doors and top
  • 4 surface mount hinges and 2 magnetic clasps

STOVE SHOPPING LIST

  • 1 - 1x12 @ 6 feet long
  • 1 - 1x4 @ 15"
  • 1- 1x3 @ 8 feet long
  • 1 - 1x10 @ 13-1/2" long (shelf)
  • 1 - 1x2 @ 15" long
  • 1/4" plywood, minimum size 15" x 19-1/4"
  • acrylic glass piece 9" x 11"
  • 1-1/4" and 5/8" brad nails
  • wood glue
  • 1-1/4" pocket hole screws for building doors
  • 2 surface mount hinges and 1 magnetic clasp
Cut List

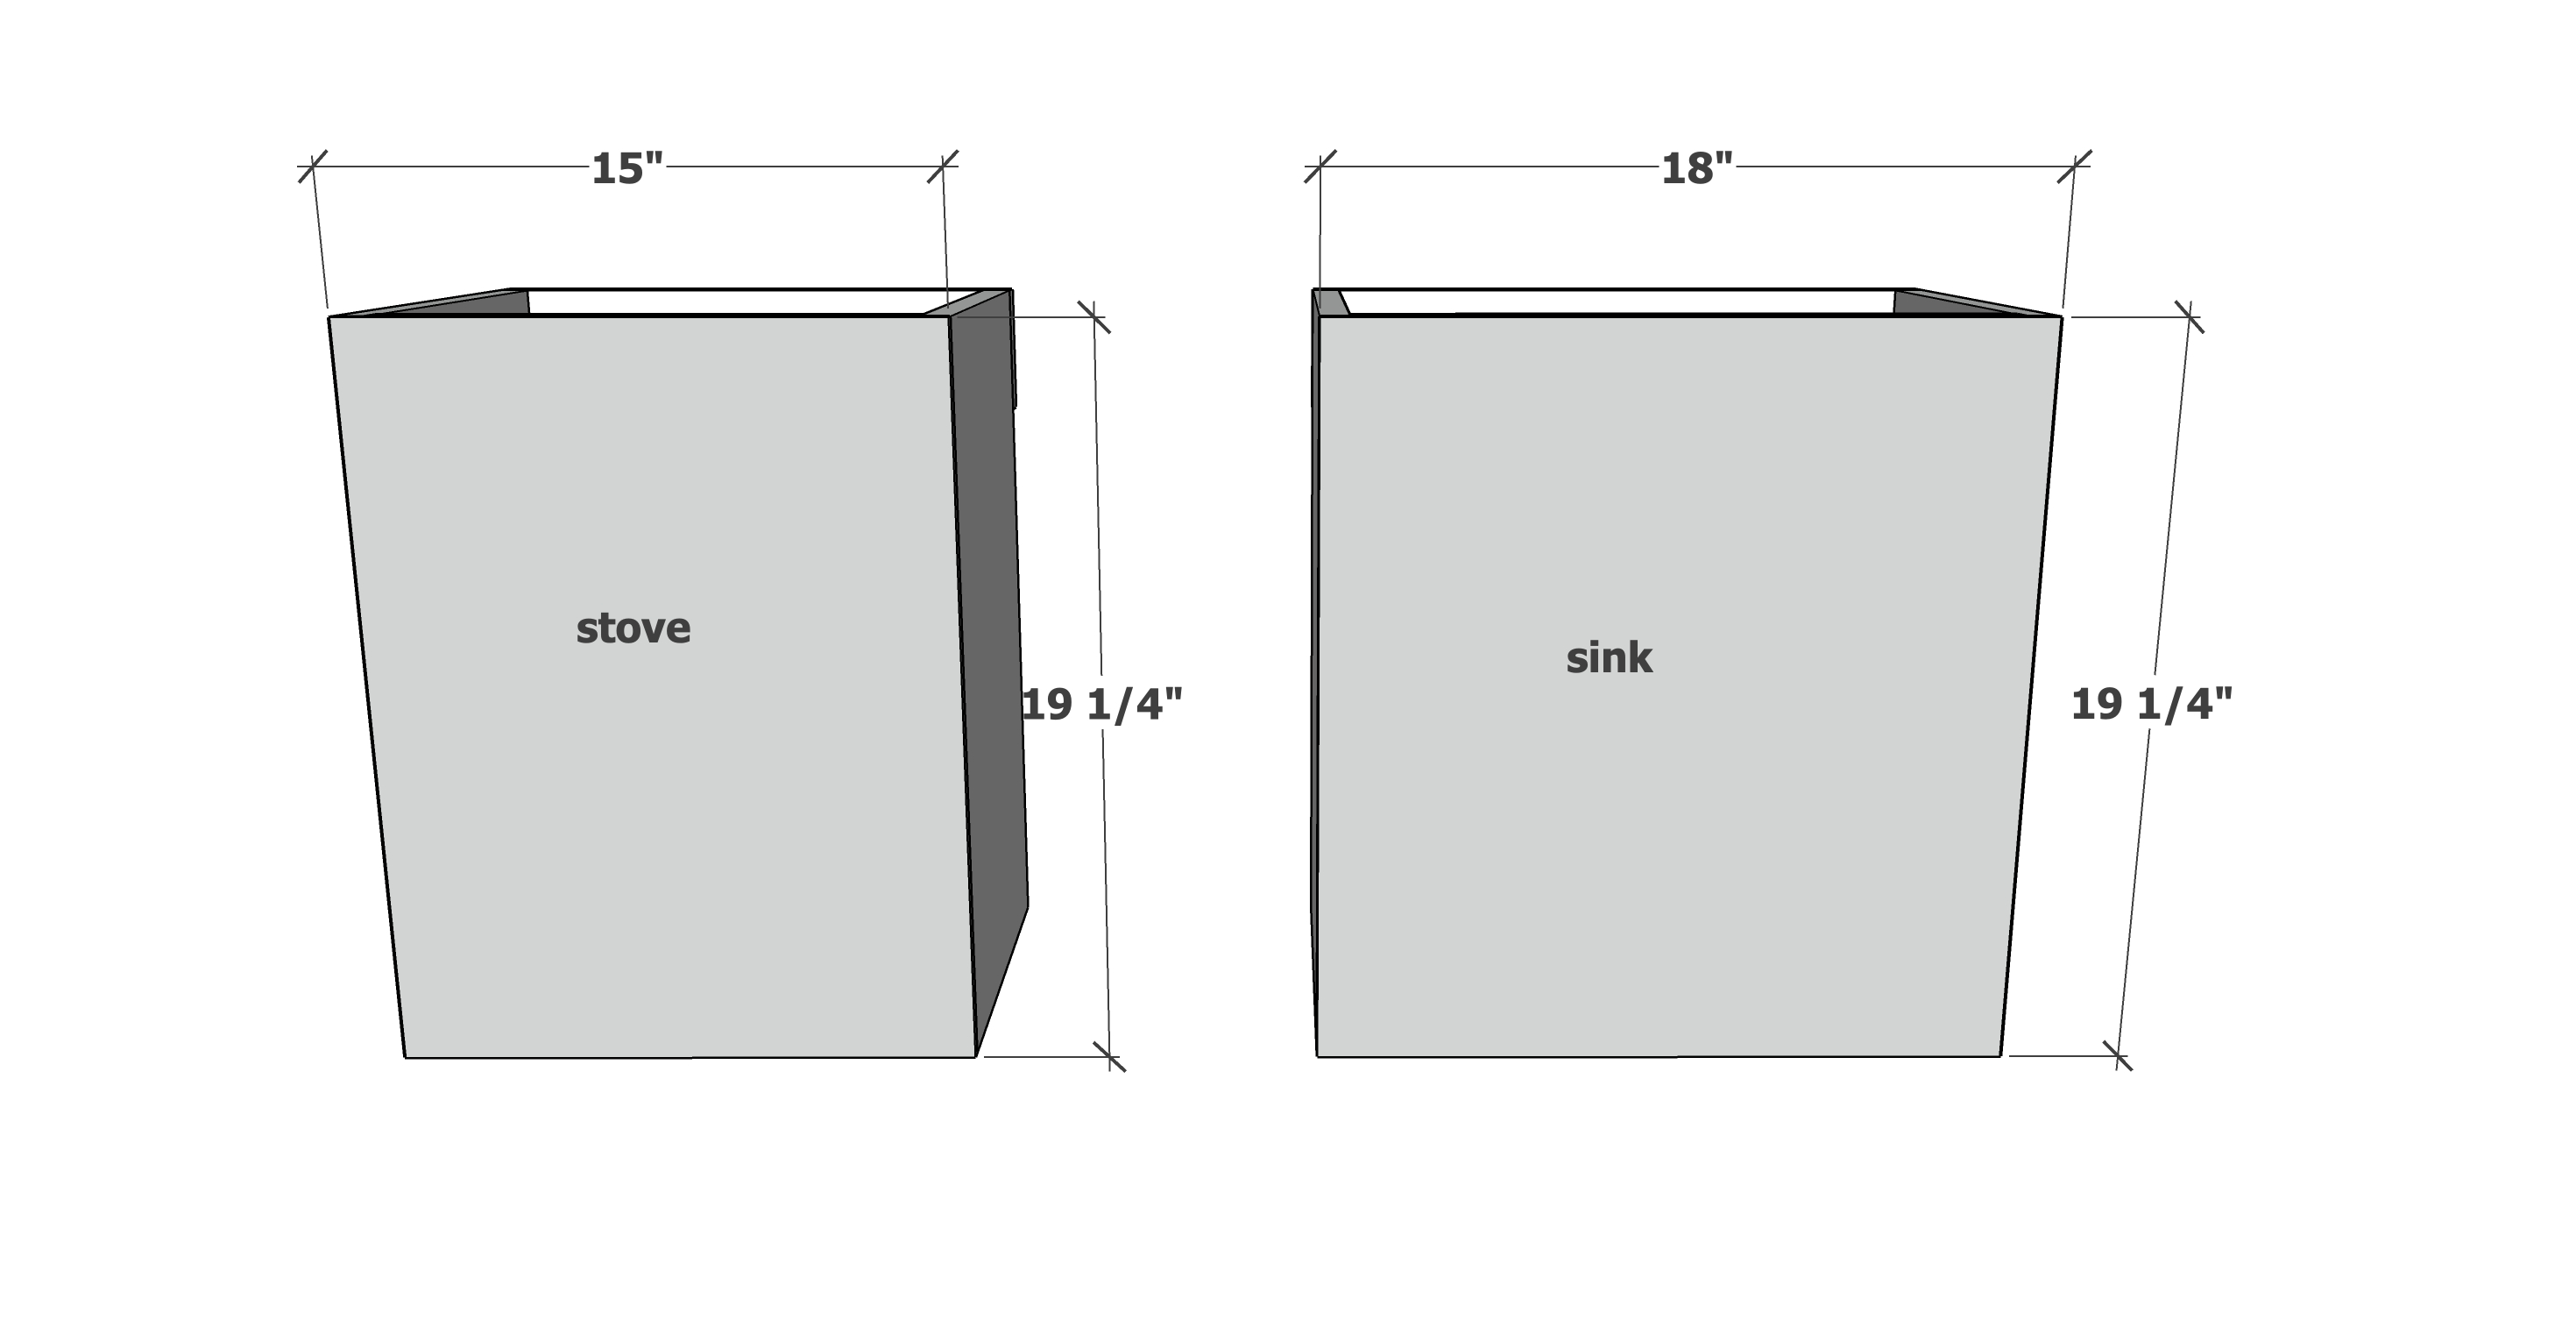
SINK CUT LIST - Measure the sink dimensions first and adjust plans as needed to fit 

  • 2 - 1x12 @ 19-1/4" - sides
  • 1 - 1x12 @ 16-1/2" - bottom
  • 2 - 1x3 @ 16-1/2" - toekick and back top support
  • 1 - 1x4 @ 18" - front
  • 1 - 1x10 @ 16-1/2" - shelf
  • 1 - 1/4" plywood  @ 19-1/4" x 18" - back
  • 2 - 1x2 @ 18" - top front and back
  • 2 - 1x2 @ 9-3/4" - top sides

STOVE CUT LIST

  • 2 - 1x12 @ 19-1/4" - sides
  • 1 - 1x12 @ 13-1/2" - bottom
  • 2 - 1x3 @ 13-1/2" - toekick and back top support
  • 1 - 1x4 @ 15" - front
  • 1 - 1x10 @ 13-1/2" - shelf
  • 1 - 1/4" plywood  @ 19-1/4" x 15" - back
  • 1 - 1x2 @ 15" - top back
  • 1 - 1x12 @ 15" - top main
Cutting Instructions

Cut boards according to the cut list.

Use a compound miter saw for professional looking cuts.

For cutting the 1/4" plywood, a table saw is best but a circular saw can be used, with the plywood elevated up on foam or scrap wood blocks to prevent the circular saw from cutting the table - also make sure the wood is fully supported, even after the wood has been cut to prevent the saw blade from being pinched.

Tools
Tape Measure
Speed Square
Pencil
Safety Glasses
Kreg Jig
Drill
Miter Saw
Brad Nailer
Power Sander

Instructions

Step 1

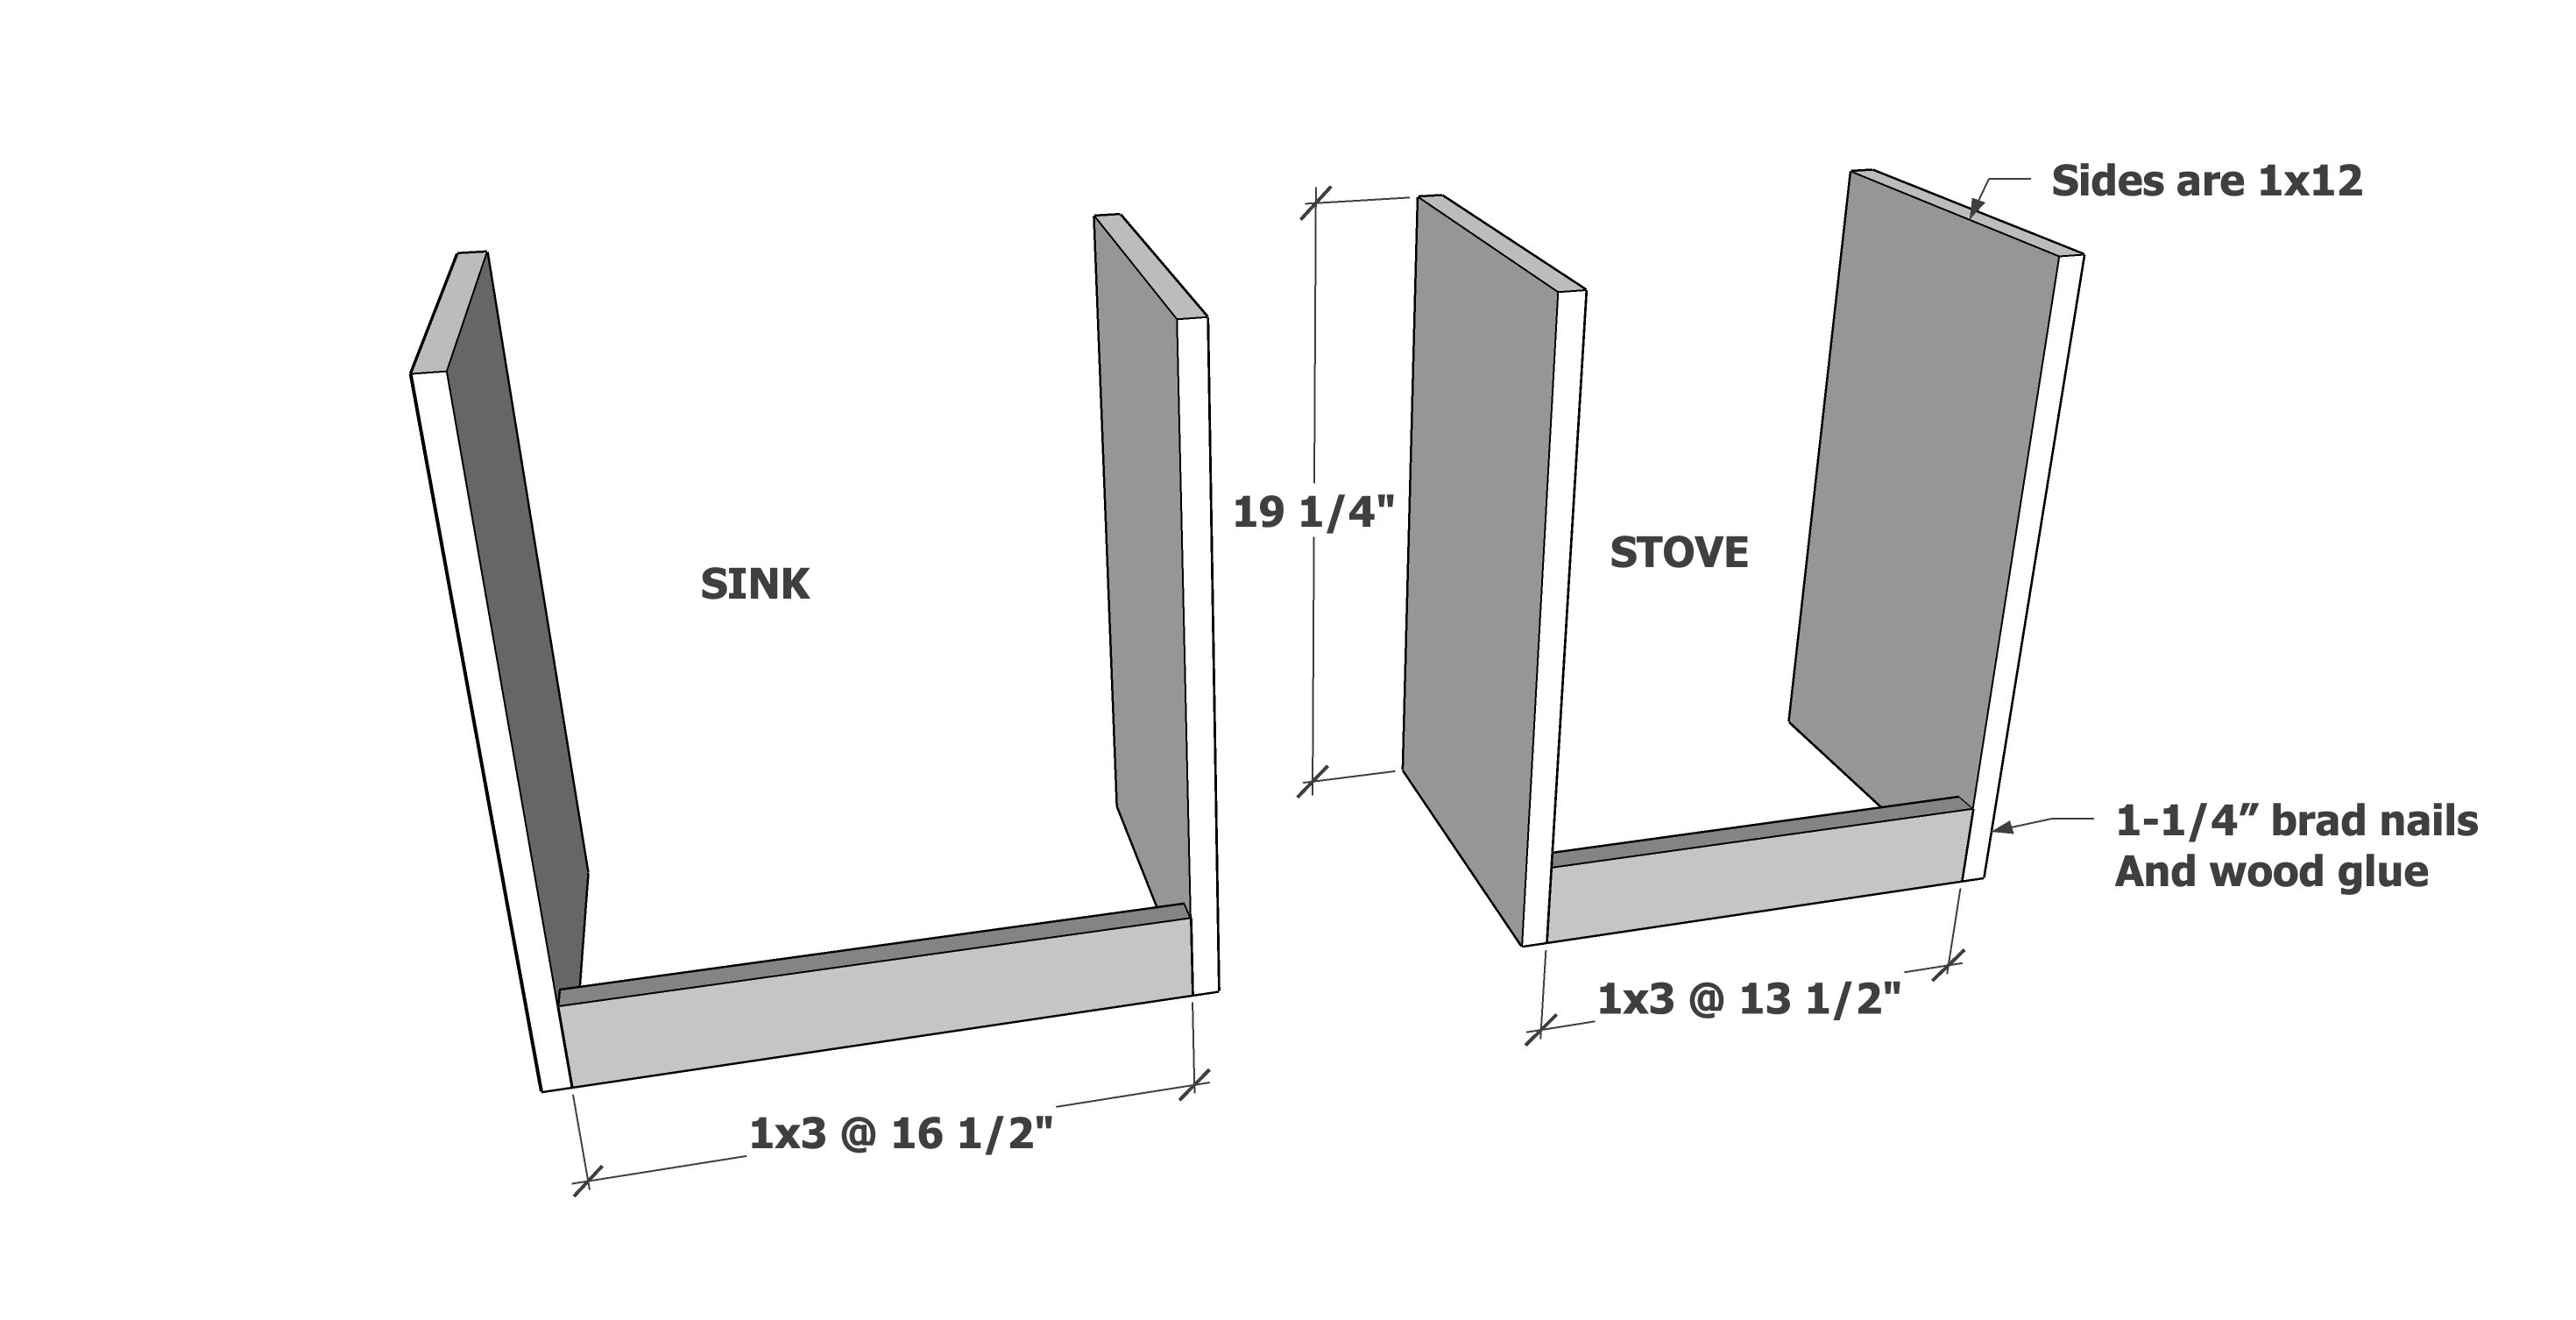
Attach the sides to the toekick with 1-1/4" brad nails and wood glue.

Step 2

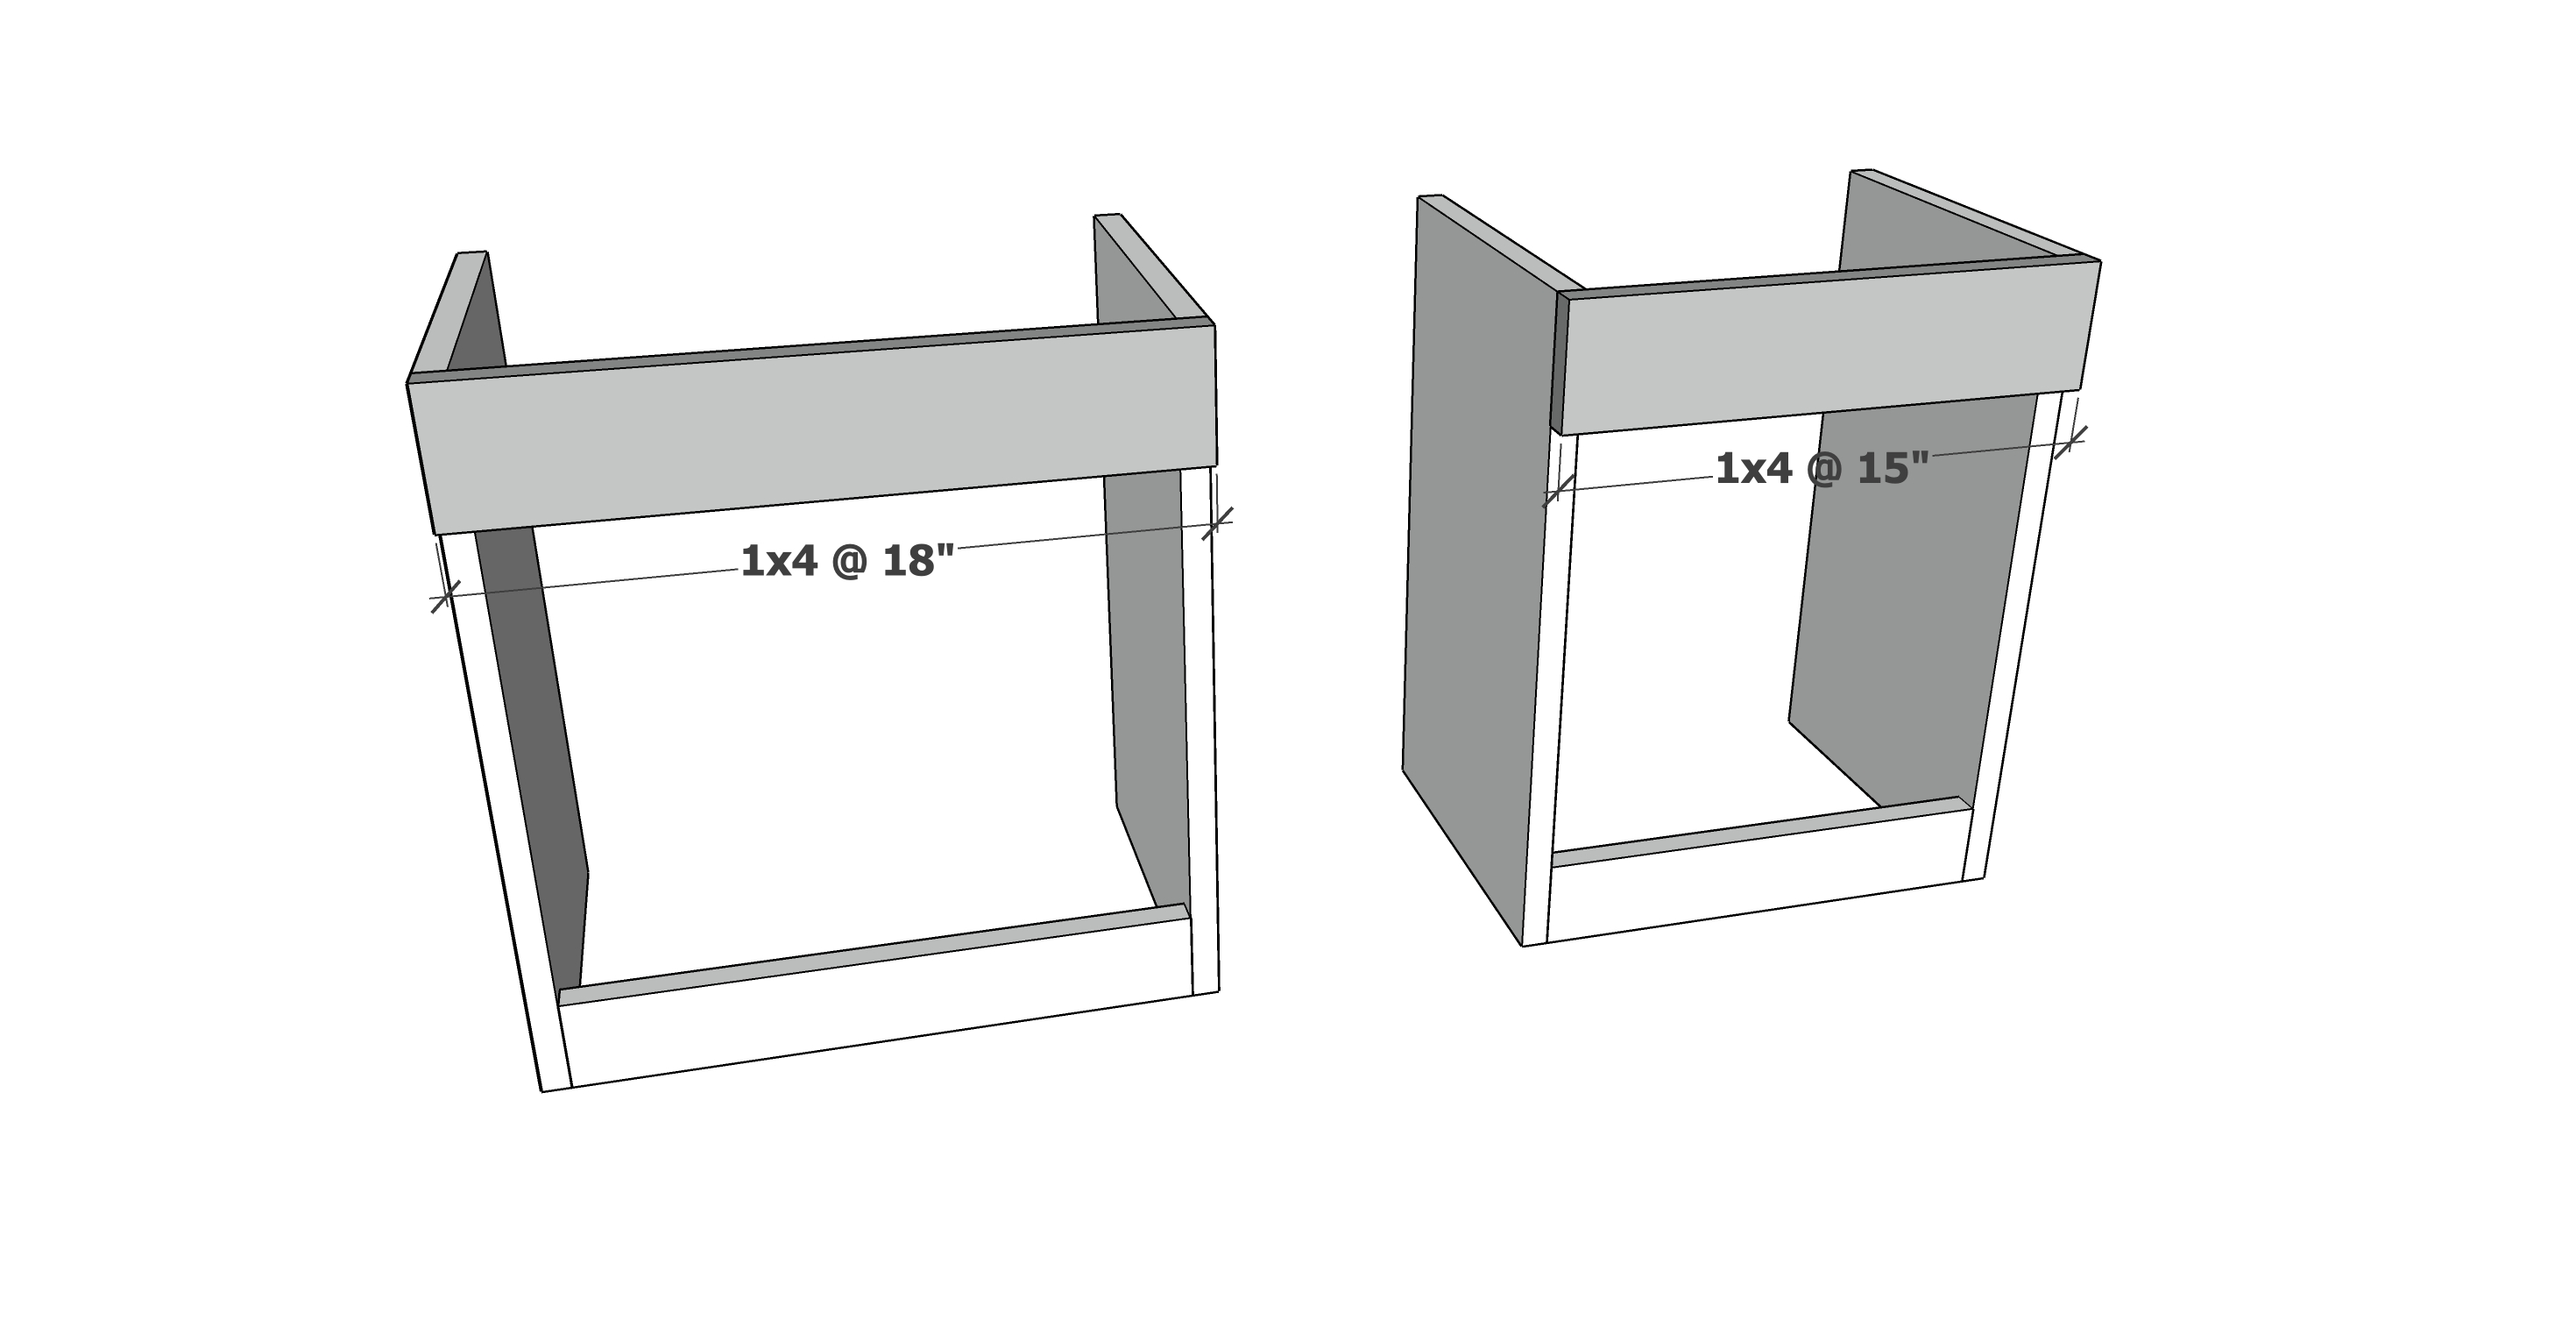
Attach the front to the sides, flush on top and sides, with 1-1/4" brad nails and wood glue.

Step 3

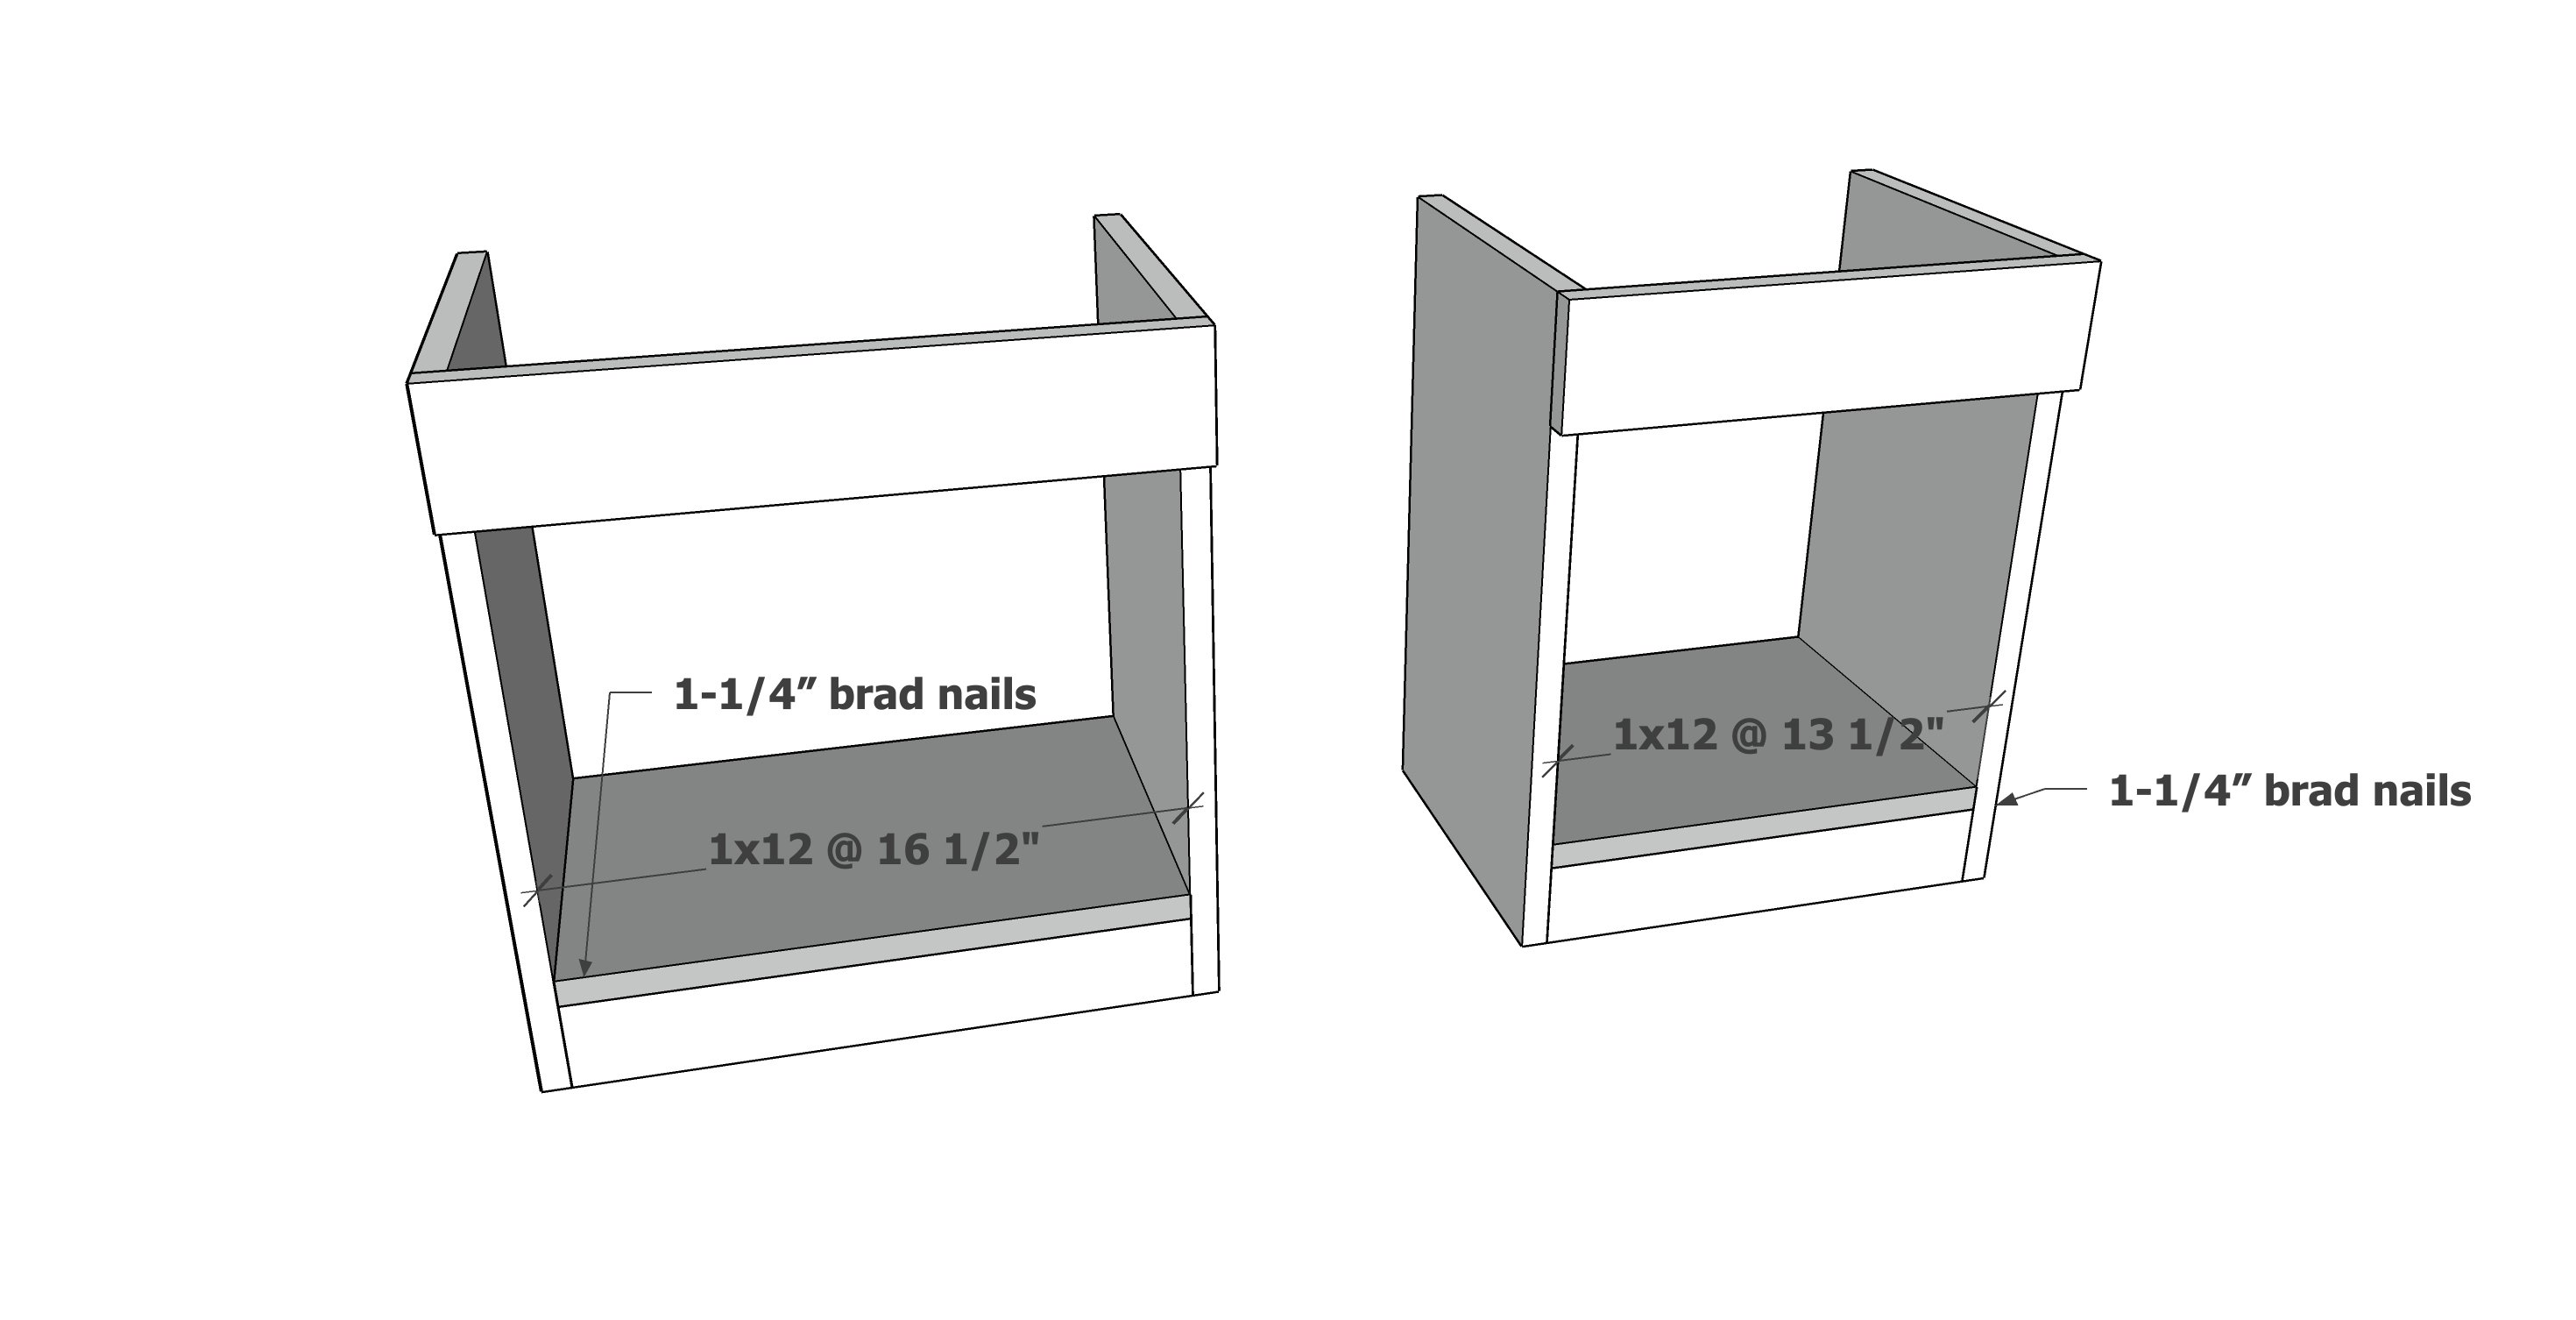
Attach the bottom shelf to the sides and the toekick with 1-1/4" brad nails and wood glue.

Step 4

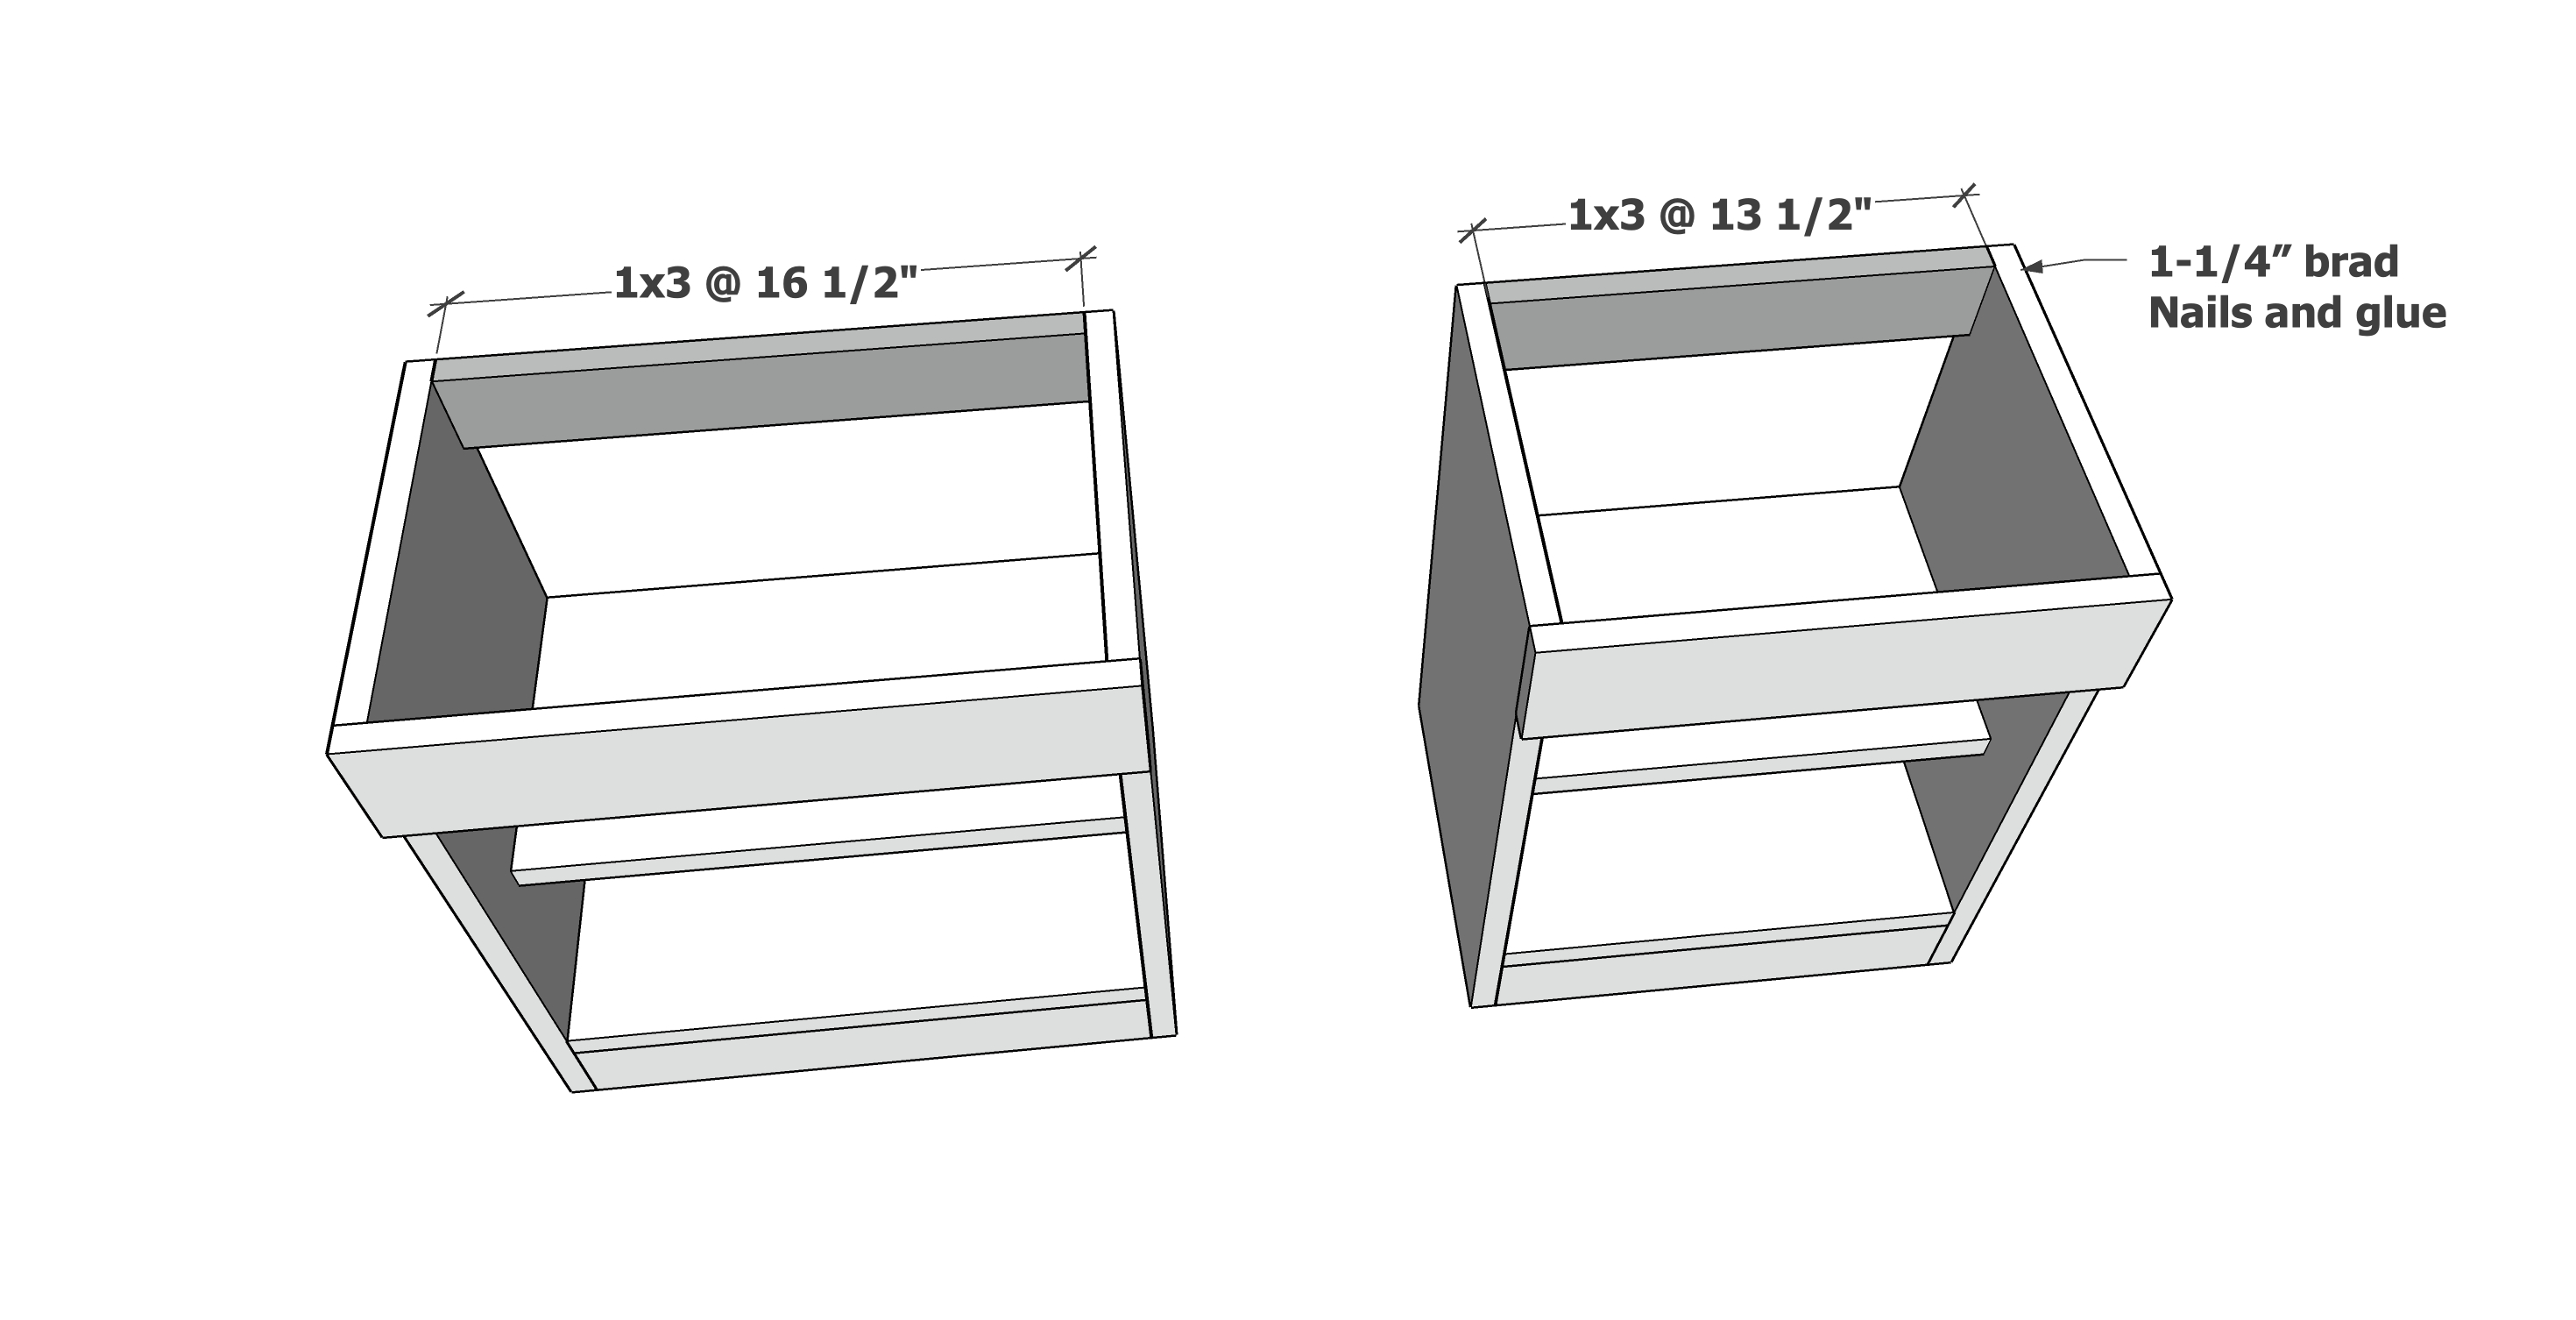
Attach the back top support to the back top corner with 1-1/4" brad nails and wood glue.

Also attach the 1x10 shelves inside, flush to the back, with 1-1/4" brad nails and wood glue.  I left about 6" space under the bottom shelf.

Step 5

Attach the back panel pieces with 5/8" brad nails and wood glue.

Step 6

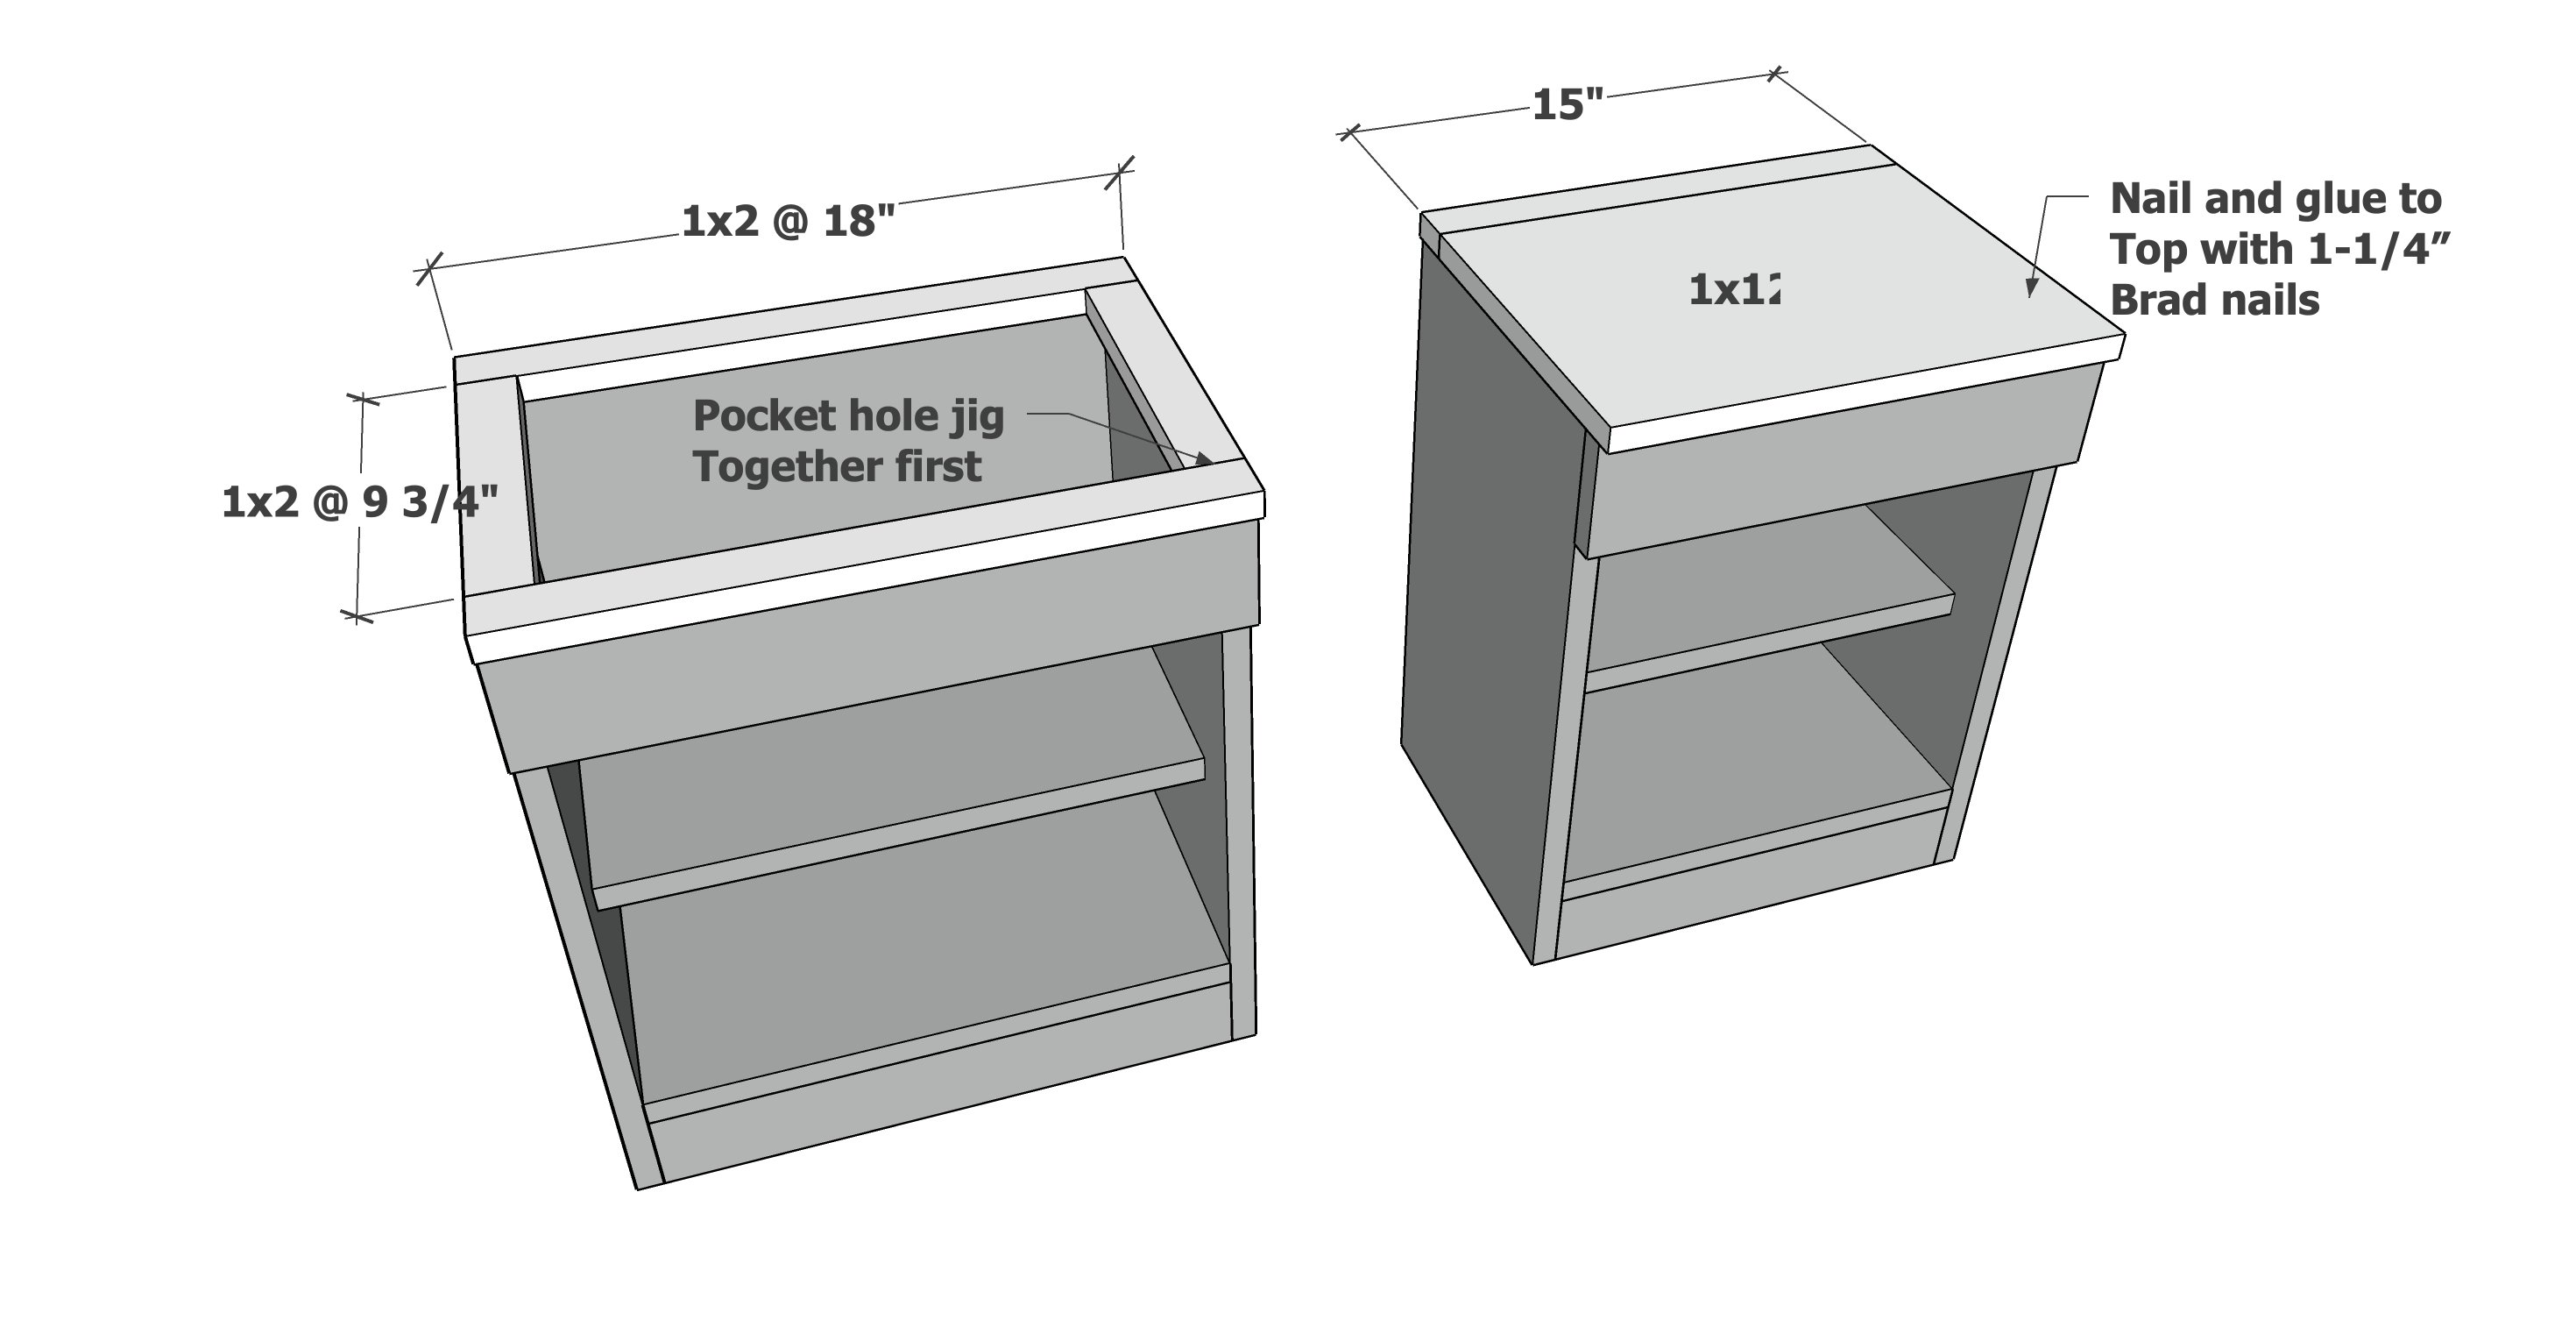
For the sink, attach the frame with 3/4" pocket holes and 1-1/4" pocket hole screws.

Then attach the top pieces to the tops of the stove and sink with 1-1/4" brad nails and glue.

Step 7

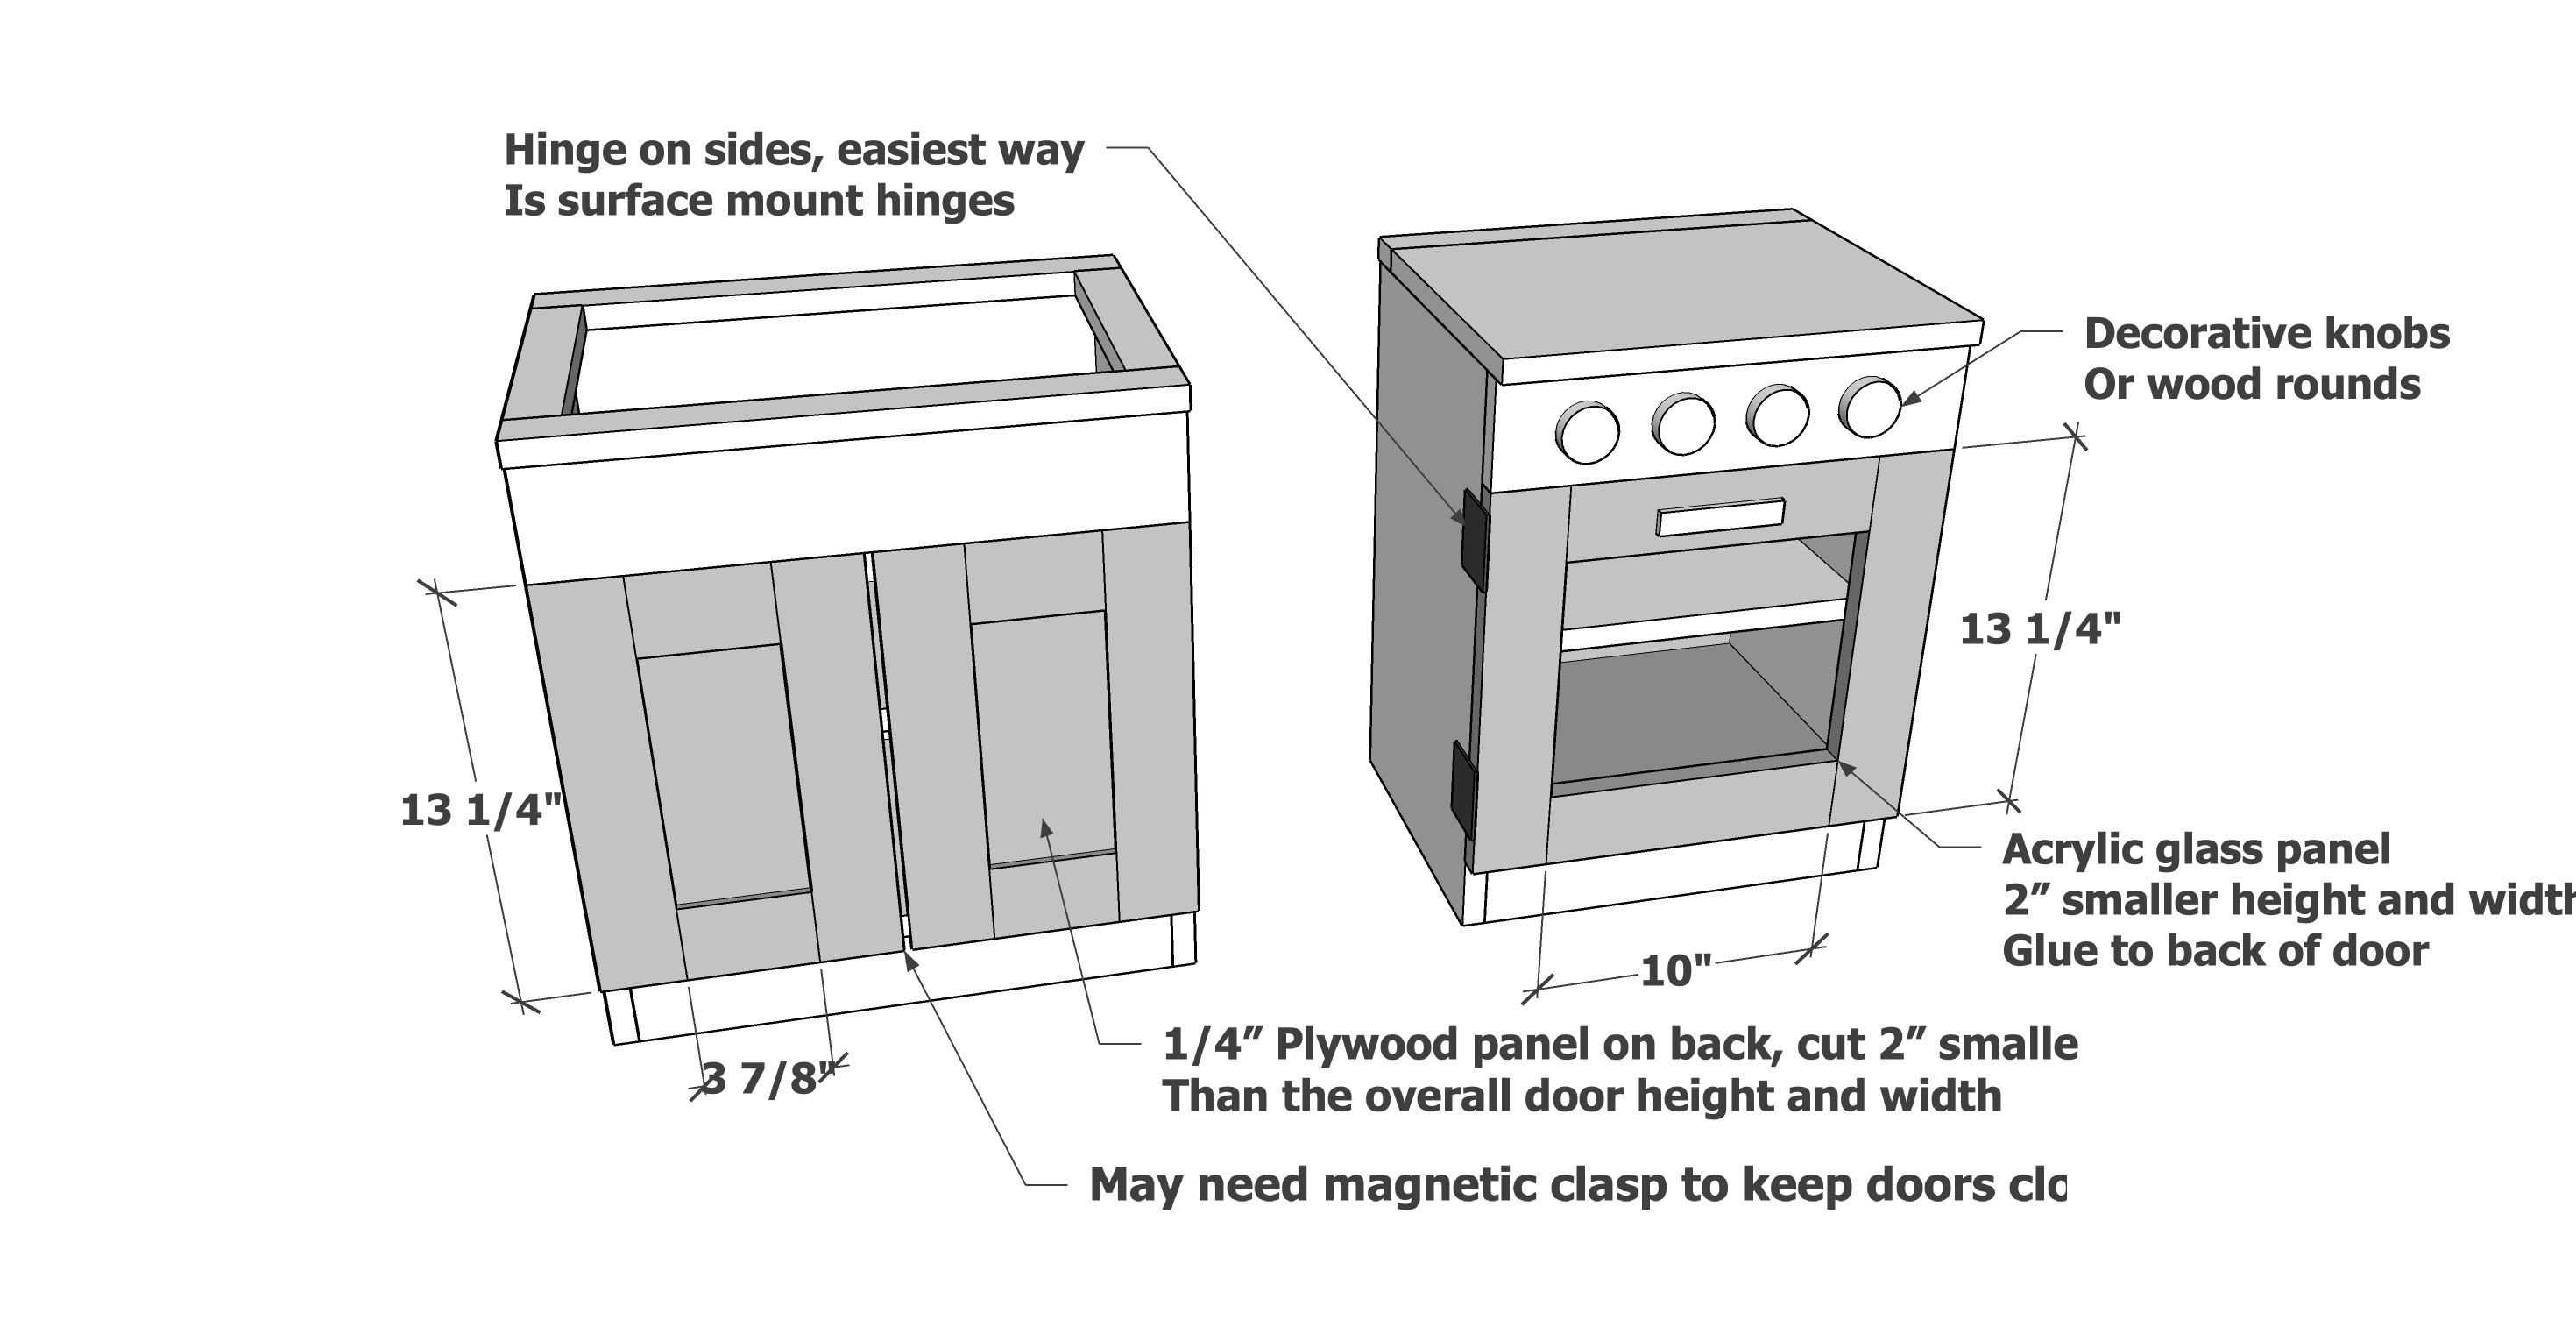
For the doors, use 1x3s to make the frames.  Attach frames together with 3/4" pocket holes and 1-1/4" pocket hole screws (two per joint).  

Then attach 1/4" plywood to the back with 5/8" brad nails and wood glue. Plywood panels should be about 1" larger than the center opening, not the full size of the door back.

Attach the acrylic glass to the stove with suitable glue or predrill and use small hardware screws.

Attach with hinges on the sides and use magnetic clasps to keep closed.

Advanced users can use Concealed Hinges for Frameless Cabinets.

Add knobs and handles.  

The stove knobs are spaced 3" apart, starting from the center working outward.

Frequently Asked Questions

Wood Questions

What kind of wood should I use?
Most of our plans use standard construction lumber like pine or fir. It's affordable, easy to work with, and easy to find. It's also rapidly renewing and biodegradable, so a great eco friendly choice!

Can I use hardwoods instead?
Yes—just keep in mind they're heavier, cost more, and can be tougher on tools and harder to join together and finish. I recommend not tackling a hardwood project until after you have built several softwood projects.

What if my boards are warped?
Choose the straightest boards at the store. You can often work around slight warps by cutting them into shorter pieces.

What wood should I use for outdoor furniture?
Use red-toned or pressure-treated 2x lumber for framing, and cedar or cedar fence pickets for the decking. Outdoor furniture should be built like a deck—your local home center can help recommend the right wood for your climate.

Will my wood move or warp after I build?
Potentially, especially in humid climates. Let your wood acclimate indoors before building. Once acclimated and kept in a stable environment, movement should be minimal. Remember, most houses are built using framing lumber - it's all about keeping moisture down indoors.

Cutting Questions

Do I need a miter saw?
A miter saw is great, creating fast, safe, and precise cuts, even for beginners. But most plans can be built with a circular saw and a straight edge. If using a circular saw to cut, take time to practice, and get good at making cuts, before cutting your project boards.

How do I get clean cuts with a circular saw?
Clamp your board, measure twice, cut slow, and use a sharp blade. This takes practice, so spend some time making cuts. I go through becoming proficient at freehand cutting in my course, it is worth taking if you want to master this skill.

Will the store cut my wood?
Yes—most stores will do rough cuts to help you transport your materials home. But from store to store, the quality of cuts could greatly vary.

Joinery Questions

What screws should I use?
We recommend star-head self tapping screws for framing, most common sizes are 2-1/2", 1-3/4". Pre-drill if close to the edge or you find your wood is splitting.

Do I have to use pocket holes?
Pocket holes are the cheapest, easiest and fastest way to do some joints - like edge to edge or a hidden fastener joint. There are other methods, but these can be time consuming and expensive. We recommend using pocket holes as indicated in plans for best results.

How do I keep things square?
Use a speed square and measure diagonals after each step. Always clamp joints before screwing to keep them tight and flush.

Finishing Questions

Stain or paint before or after building?
A quick sand before and a full finish after gives the best results. Pre-finish if you're doing two-tone or detailed finishes.

What type of finish?
Use oil-based or water-based stain. For paint, cabinet-grade latex or enamel works great. High use surfaces on indoor projects should get a coat of polyurethane, I recommend a Helsman or Spar or other flexible poly that won't crack or peel with wood movement. For exterior projects, use a finish suitable for exterior fences.

How to get a smooth finish?
Start with a well sanded project. Sand between coats (220 grit), wipe clean, and apply light coats with a foam brush or roller.

Plan Questions

Can I change the size?
Many people do, and that's the great thing about building your own furniture! But do keep in mind going bigger might mean more supports are required, and often plans are optimized for minimal material waste.

Are these beginner-friendly?
Yes—plans are written with simple tools and clear steps in mind, with every effort to make plans as simple as possible.

Can I sell what I build?
Absolutely! Just don’t resell or repost the plans themselves.

General Questions

What tools do I really need?
A drill, circular saw, tape measure, square, and a few clamps will get you through most projects.

Do I need a workshop?
Nope! A driveway or small patio is plenty to get started, just make sure you have a level place to work. If you find you are building several projects a year, creating a small workbench is a great way to store tools and have a dedicated workspace.

What if I mess up?
Wood filler, sanding, or flipping boards goes a long way. Mistakes are part of the process!

What can I do to make my projects look more professional?
Start with straight boards, make accurate cuts, clamp all joints, and line up everything neatly. Sand thoroughly, use a neutral finish, and apply it in light coats for a clean look.

I've never built anything before. Where should I start?
Start with a few smaller softwood projects to get hands-on experience. Or if you're tackling a big project, buy a little extra lumber and practice your cuts and joints first. If possible, work with someone who has a bit of experience.

Care & Maintenance

How long will my furniture last?
With good joinery and regular care, your DIY furniture can last for decades. I have pieces in my own home that are over 20 years old and still going strong! One of the best parts about DIY furniture is that it’s easy to repaint, refinish, or repair—so your projects can grow and adapt with you.

How should I care for outdoor furniture?
Lightly pressure wash or hose it down once or twice a year. Tighten screws and reapply finish as needed to protect it—just like a deck or fence. A little upkeep goes a long way in extending the life of your furniture.

How about indoor furniture?
Regularly dust or wipe with a damp cloth. If it starts to look worn, a light sanding and touch-up paint or stain can refresh it in no time. DIY pieces are meant to be durable and fixable—so don’t be afraid to give them some love now and then.

Want to Build with Confidence?

Check out my ebook: 12 Skills to Build Your Own Furniture
It walks you through the core skills every builder needs—measuring, cutting, joinery, and finishing—so you can build beautiful furniture that lasts.

Still Have Questions?

Email us anytime at [email protected] and we’ll be happy to help!