
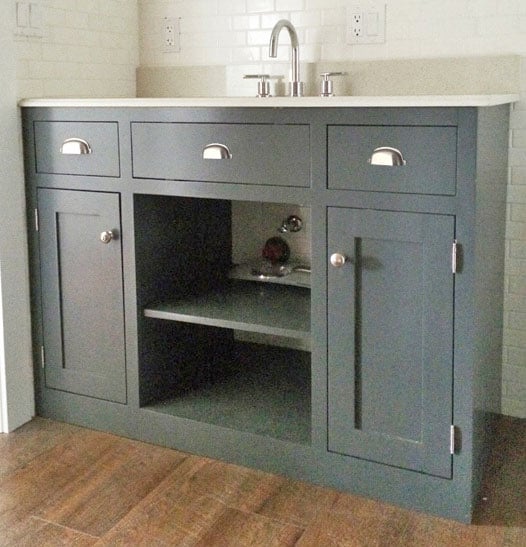

Free bathroom vanity plans features two large cabinet doors, two drawers, and an open storage area under the sink. We love the simple exterior that is easy to wipe down and keep clean. This vanity works with a standard off the shelf vanity top.
The free plans include step by step diagrams, cut list and materials list.
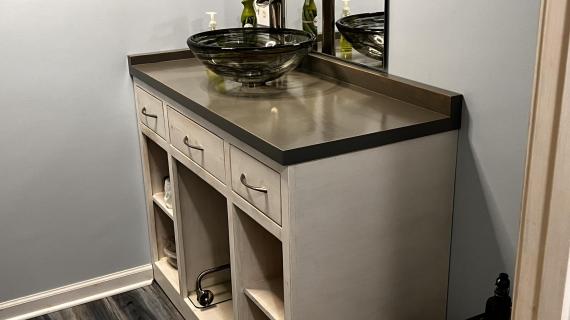
This is one of my favorite bathroom vanities I've ever designed and built. I love it so much because it is great for storage, and the simple clean exterior lines are easy to wipe down and keep clean.
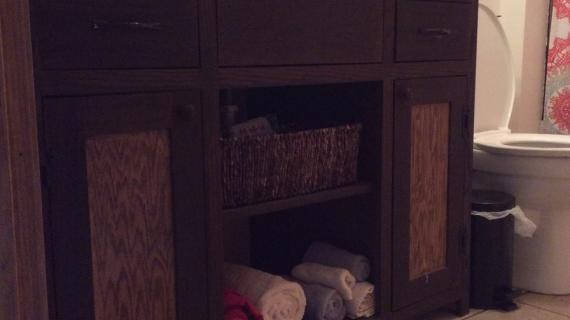
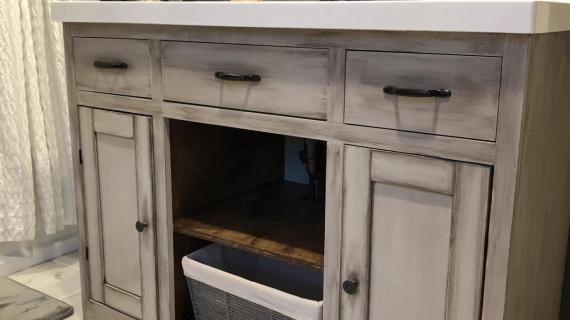
With the plumbing in the center cavity, you can add towels or baskets in front and around.
For the doors, we used this simple plan. I attached the hinges with Non-Mortise Hinges -

Image from Amazon
The hinge is designed for inset doors and are super easy to install. One thing though - with these hinges you must use a clasp or hasp to keep the door closed.
We love how this vanity turned out! It will store towels nicely in the center open shelving (I'm envisioning a large basket for wash cloths and hand towels or guest towels), and less attractive bathroom necessities can be hidden behind the doors.
Of course, always happy to serve you free plans! Check them out following!
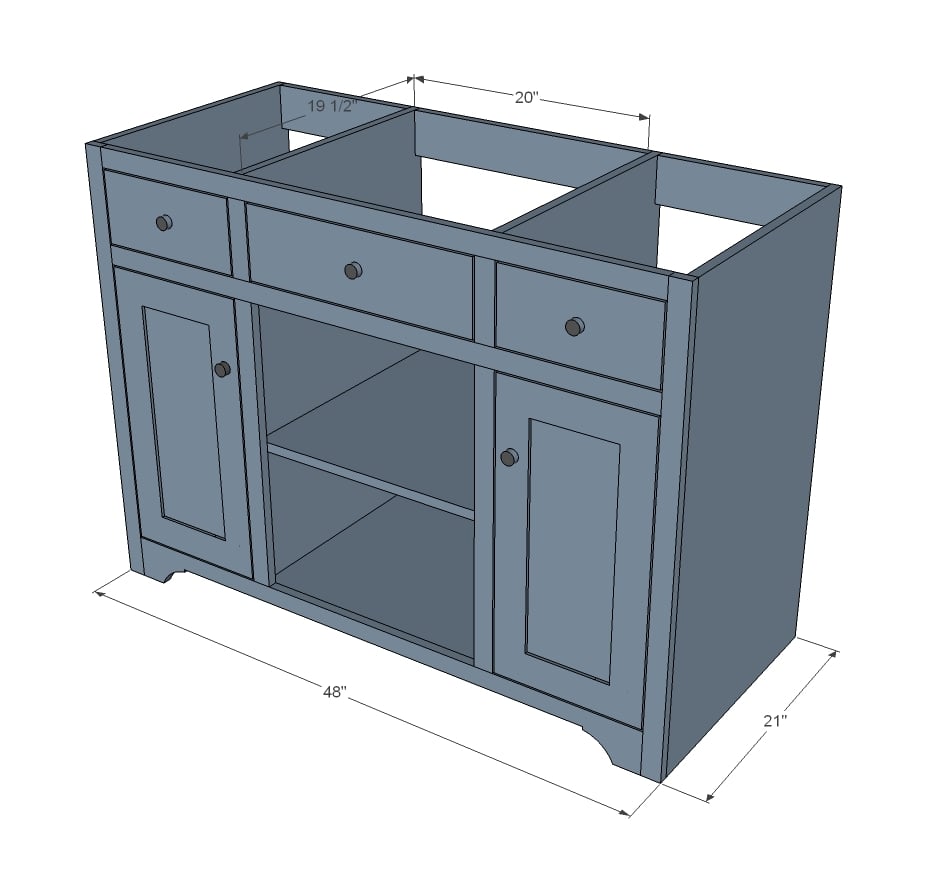
Preparation
1 - sheet 3/4" plywood ripped into 20-1/4" wide strips
1 - 1x4 @ 8 feet long
3 - 1x2 @ 8 feet long
1 - 1x6 @ 4 feet long
1 - 1x3 @ 12 feet long (for doors)
1/4 sheet of 1/2" thick plywood (for centers of doors)
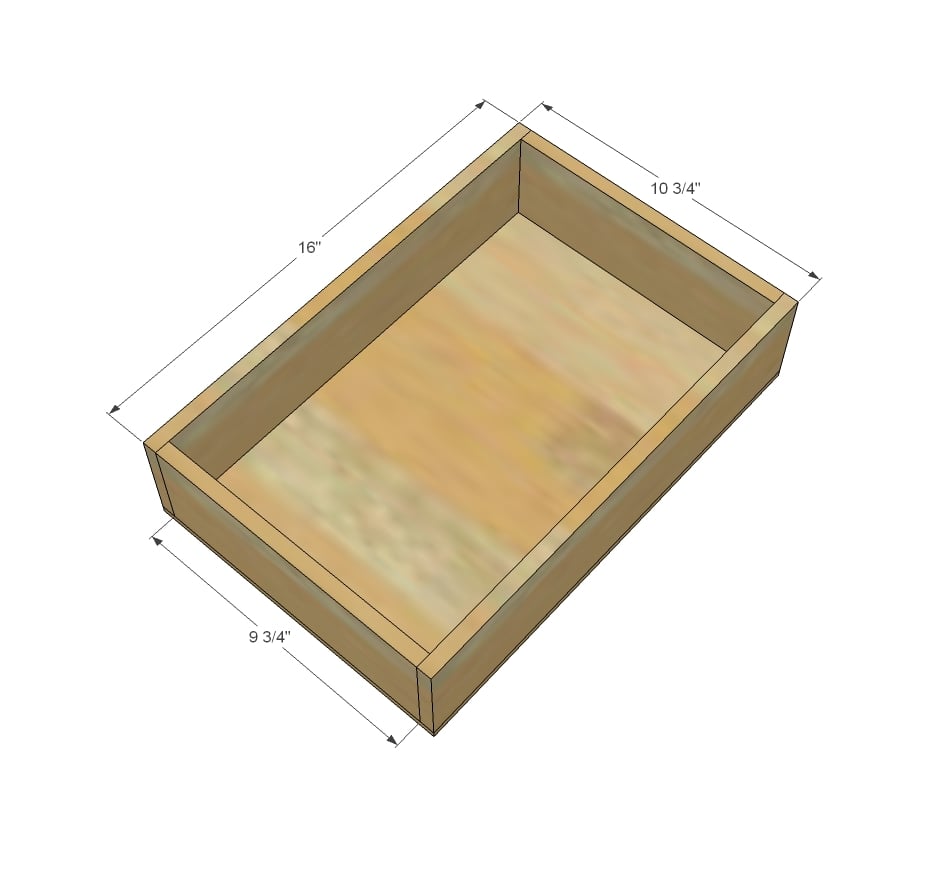
9 feet of 1/2" thick x 3-1/2" tall boards (for drawer boxes)
1/4 sheet of 1/4" plywood for drawer bottoms
4 - Non Mortise Hinges
1-1/4" and 1" pocket hole screws
1-1/4" brad nails
knobs and pulls
2 - 16" euro drawer slides
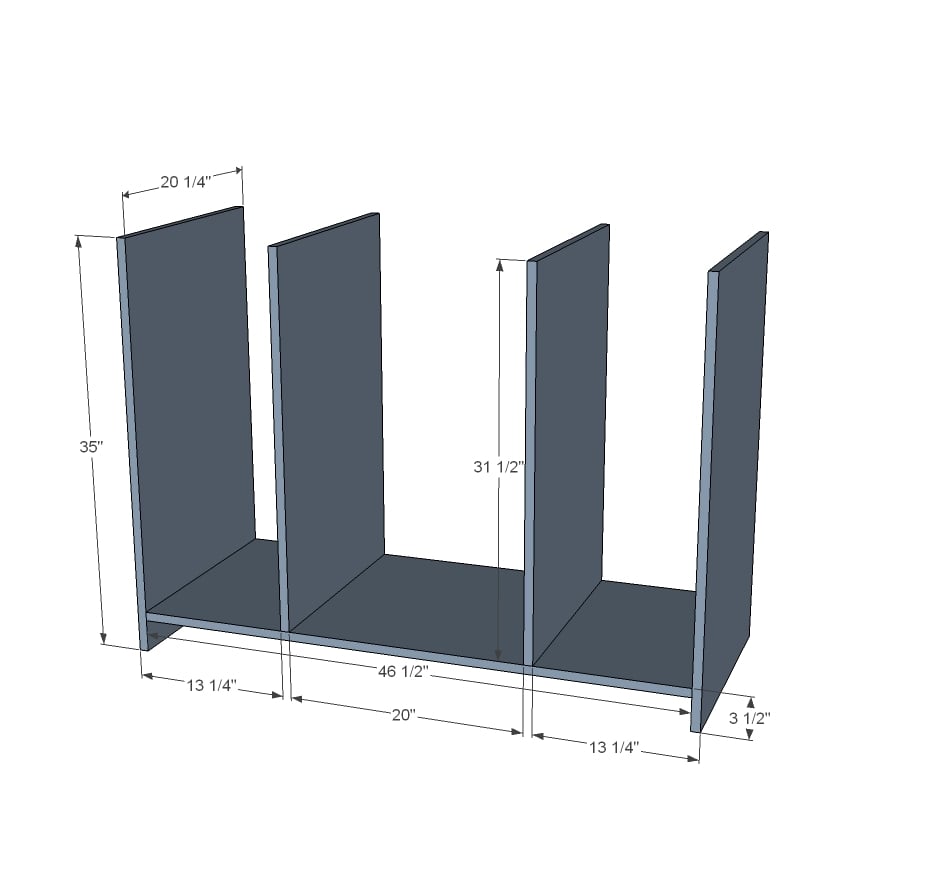
CARCASS
2 - 3/4" plywood @ 20-1/4" x 35"
1 - 3/4" plywood @ 20-1/4" x 46-1/2"
2 - 3/4" plywood @ 20-1/4" x 31-1/2"
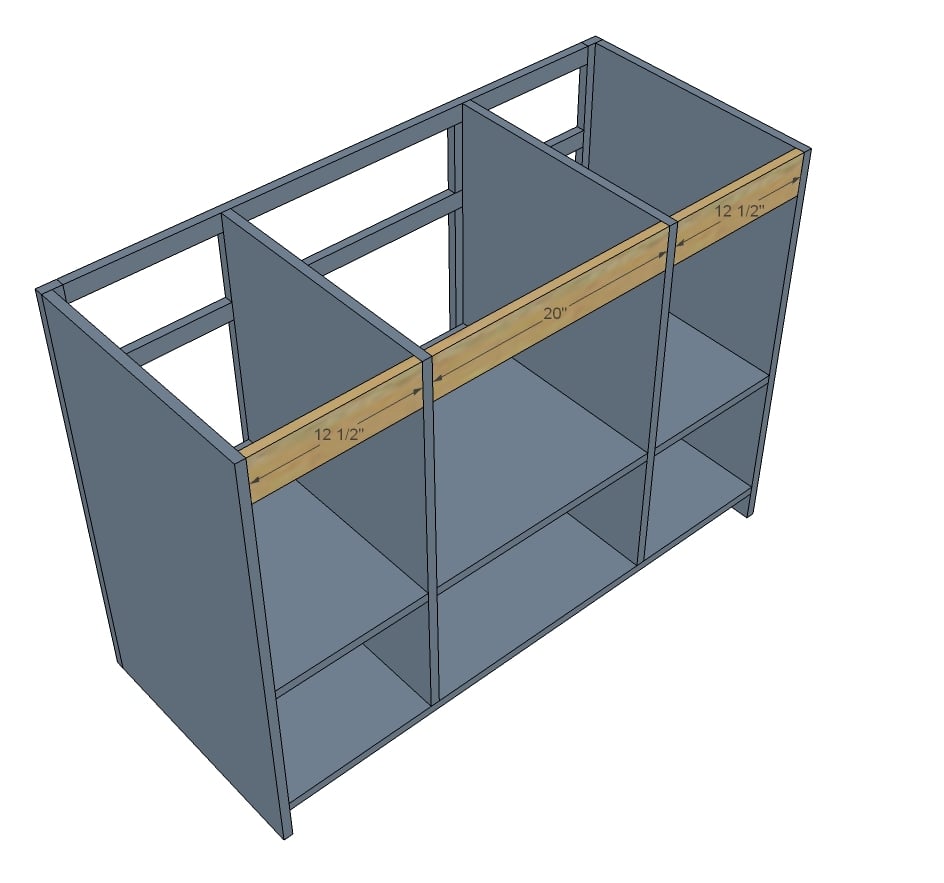
2 - 3/4" plywood @ 20-1/4" x 12-1/2"
1 - 3/4" plywood @ 20-1/4" x 20"
2 - 1x4 @ 12-1/2"
1 - 1x4 @ 20"
2 - 1x2 @ 20-1/4"
FACE FRAME
2 - 1x2 @ 35"
2 - 1x2 @ 45"
2 - 1x2 @ 5-3/4"
2 - 1x2 @ 22-3/4"
1 - 1x4 @ 45"
DOORS/DRAWERS
2 - 1x6 @ 5-1/2"
1 - 1x6 @ 18-1/4"
DOORS -
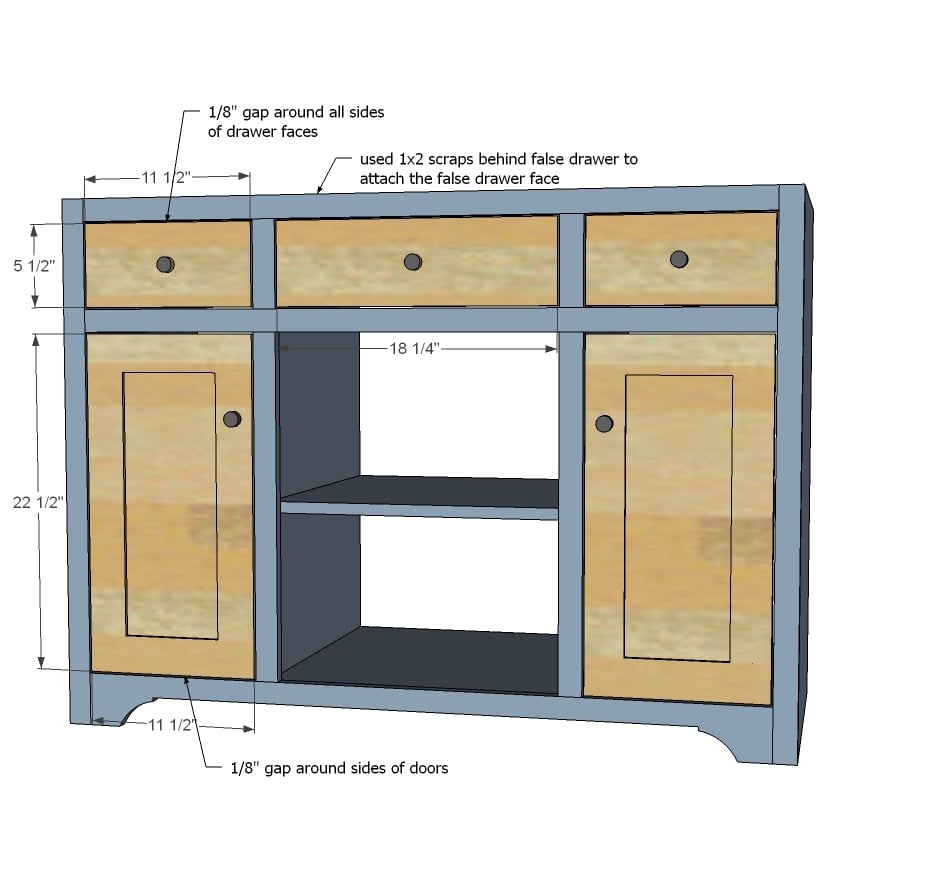
22-1/2" x 11-1/2"
DOORS - 1/2" THICK BOARDS
4 @ 16"
4 @ 9-3/4"
2 - 1/4" plywood @ 10-3/4" x 16"


Please read through the entire plan and all comments before beginning this project. It is also advisable to review the Getting Started Section. Take all necessary precautions to build safely and smartly. Work on a clean level surface, free of imperfections or debris. Always use straight boards. Check for square after each step. Always predrill holes before attaching with screws. Use glue with finish nails for a stronger hold. Wipe excess glue off bare wood for stained projects, as dried glue will not take stain. Be safe, have fun, and ask for help if you need it. Good luck!
Instructions
Step 1
Start by building the basic box for the vanity. We used 3/4" pocket holes and 1-1/4" pocket hole screws.
Step 2

We attached the shelves fixed but you could also make them adjustable with shelf pin holes.
TIP: If you are applying edge banding to front, cut this shelf smaller by 1/8" at front.
Step 3
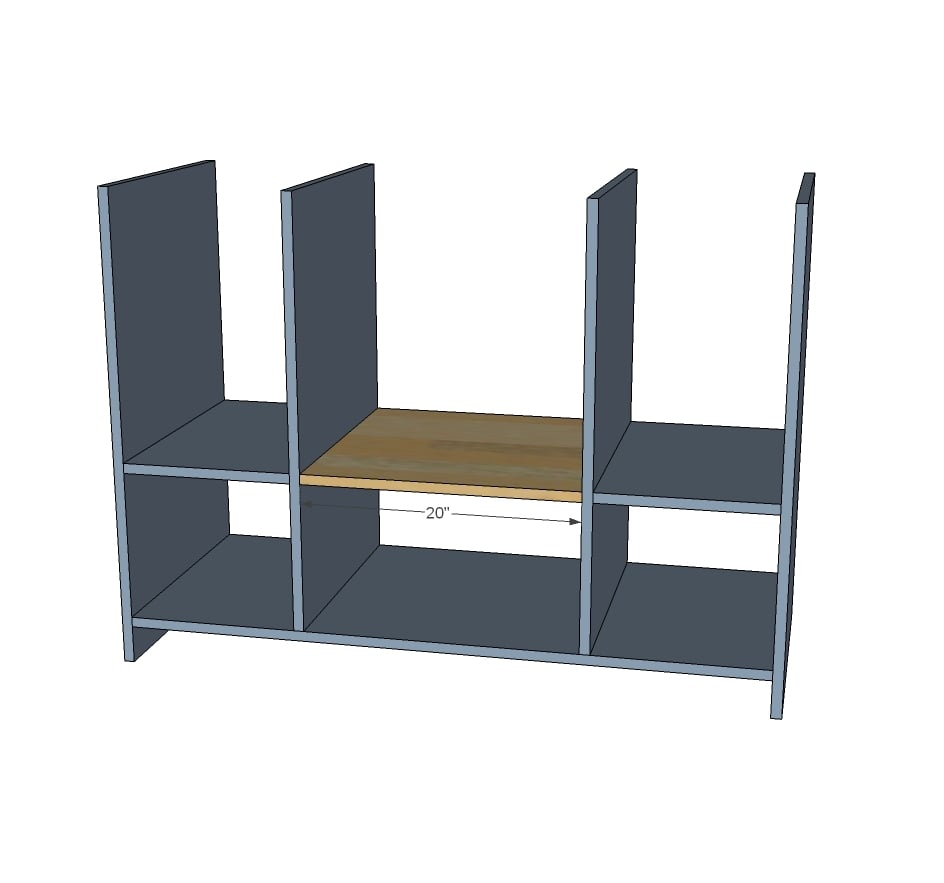
We made the middle shelf adjustable, cutting it down in size. We will have to cut out the center to allow for plumbing.
Step 4
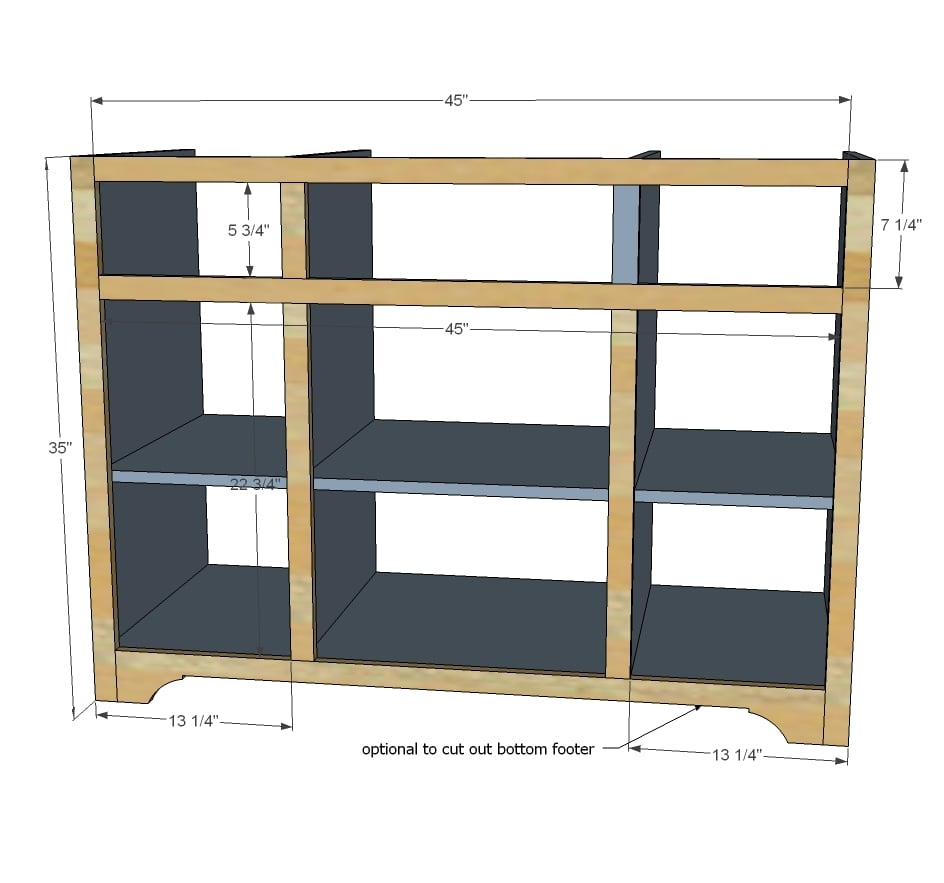
We built the face frame separately with 3/4" pocket holes and 1-1/4" pocket hole screws. Then we attached the face frame with 1-1/4" finish nails and glue.
Step 5
Step 6

These are for the drawer slides. Attach with nails and glue.
Step 7
BUILD YOUR DRAWERS TO YOUR OPENINGS AND SLIDES
We built drawers out of 1/2" thick stock using 1/2" pocket holes and 1" pocket hole screws. We attached 1/4' plywood to bottom with finish nails glue.
Step 8
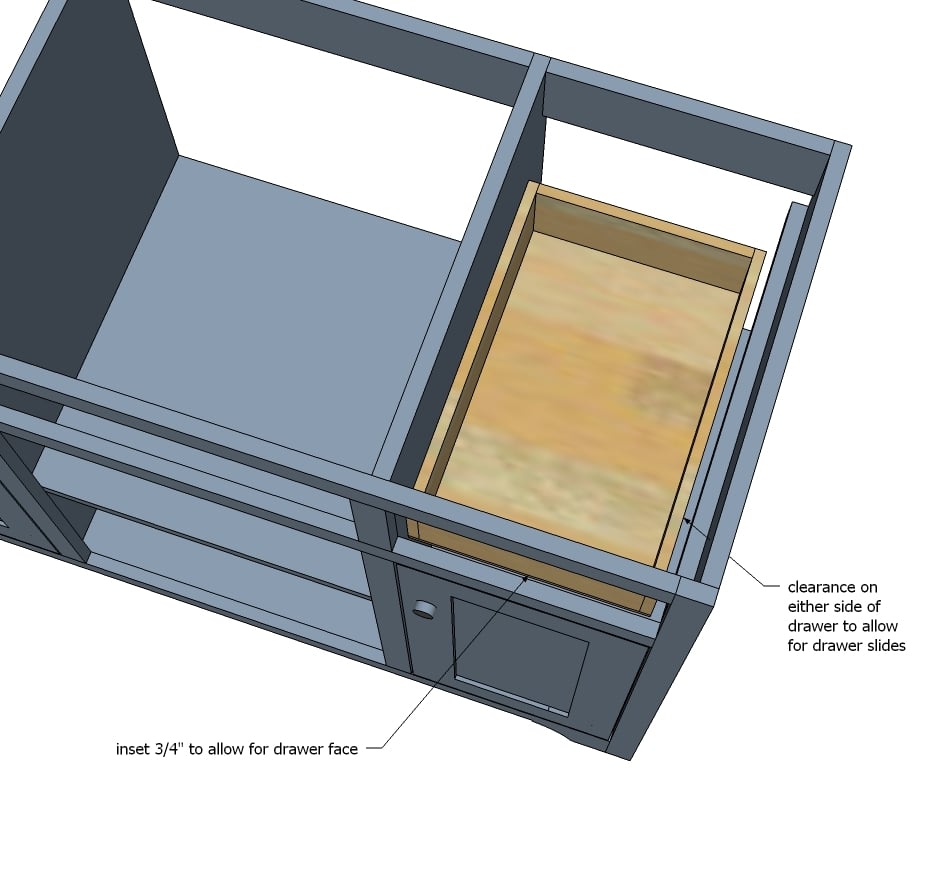
The drawer boxes are installed inset 3/4" to allow for the drawer face.
Step 9
Cut and build our doors/drawer faces to fit your openings. We used this plan for the doors.
It is always recommended to apply a test coat on a hidden area or scrap piece to ensure color evenness and adhesion. Use primer or wood conditioner as needed.

Comments
Mrsmike
Sun, 06/08/2014 - 08:40
Broken Link
Love the vanity, it's EXACTLY what I've been looking for in our bathroom, but the PDF link is broken. Can it be updated?!
shannonroe
Sun, 06/15/2014 - 10:19
board ?
what are tall boards. I'm not familiar with them
In reply to board ? by shannonroe
MontanaJen
Sun, 08/03/2014 - 07:29
"Tall" board
She is actually talking about width here...the board she is referring to can come in various lengths, at home depot they are sold by the linear foot. The board spoken of here is 1/2" thick by 3 1/2" wide (at home depot this is sold as a 1/2 x 4). Then get 9 feet worth, or more if you think you might mess one up :)
leslieormond
Sun, 06/22/2014 - 14:21
I think the paint color is...
...Behr "Intellectual" Gray available at the Home Depot. I recently painted all of our builder grade cabinets this color, then got a sample size of pure black for $2 (I used all latex), mixing 4 parts water to 1 part black to create a very cheap glaze and used a rag to wipe it on --- and then right off. This helped fill the little crannies in the grain and gave a subtle but rich definition. Not necessary to do the black glaze, it turned out great!
e9johnny
Sat, 08/30/2014 - 21:52
simple grey vanity
Pdf. Isn't working says there is an error can you send it to me.
Rugby girl87
Sun, 10/11/2015 - 06:21
What type of plywood?
Any assistance would be greatly appreciated! I am planning to use this plan to redo my parents bathroom vanity. The list mentions plywood. I did some research, but I am not sure which plywood I should get? According to the budget, it was within 50-100$. So is it oak, knotted pine, pine, etc. I am trying to save as much money as possible. As for the 1x2, 1x3, 1x4,1x6, I presume I can use framing wood such as spruce or kiln dried spruce?
Thanks in advance,
Jen
j_w_kramer
Fri, 01/08/2016 - 20:04
Professional-quality paint job
Impressive vanity! The finish is incredible. Was the paint sprayed or brushed on? Did you paint before or after assembly? Many thanks for your response!
hewi17
Sat, 08/13/2016 - 12:53
I want to build this!
My only issue is its too big! I am in the process if ripping apart my half bath and re-doing it, but my bathroom vanity is only 30". Yours is 48". Is there any way you could tell me how to modify the plans to make it become a 30" vanity? Thanks!
hewi17
Sat, 08/13/2016 - 12:55
I want to build this!
My only issue is its too big! I am in the process if ripping apart my half bath and re-doing it, but my bathroom vanity is only 30". Yours is 48". Is there any way you could tell me how to modify the plans to make it become a 30" vanity? Thanks!
gray2003
Mon, 03/11/2019 - 14:36
Simple Gray Bath Vanity Measuremens for a Smaller Size
I love this vanity:) Could you give me measurement adjustments for a 30-inch and 38-inch vanity. This one is too big for our bathroom. Thank you so much :)
thick29
Tue, 10/29/2019 - 12:11
Could you give me the…
Could you give me the measurement for a 30" 36" and 38"?
Thanks
jodonnell
Thu, 06/11/2020 - 15:11
pdf of plans?
Is there a pdf of the plans and cut list for me to download? I seem to be unable to find its location. Thank you!
jodonnell
Mon, 06/15/2020 - 16:47
Disregard the above :)
Disregard the above :)
jburgos
Thu, 03/11/2021 - 09:33
Hi, I’m currently getting…
Hi, I’m currently getting ready to remodel our bathroom and would love to make this vanity. My question is on the shopping list, is it one or two sheets of 3/4” plywoood that are needed?