
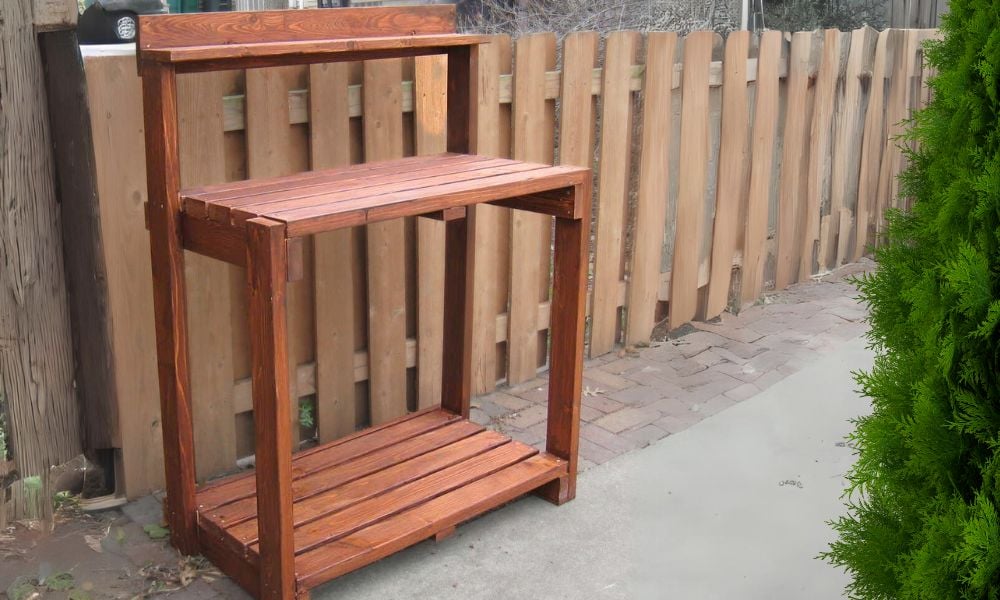

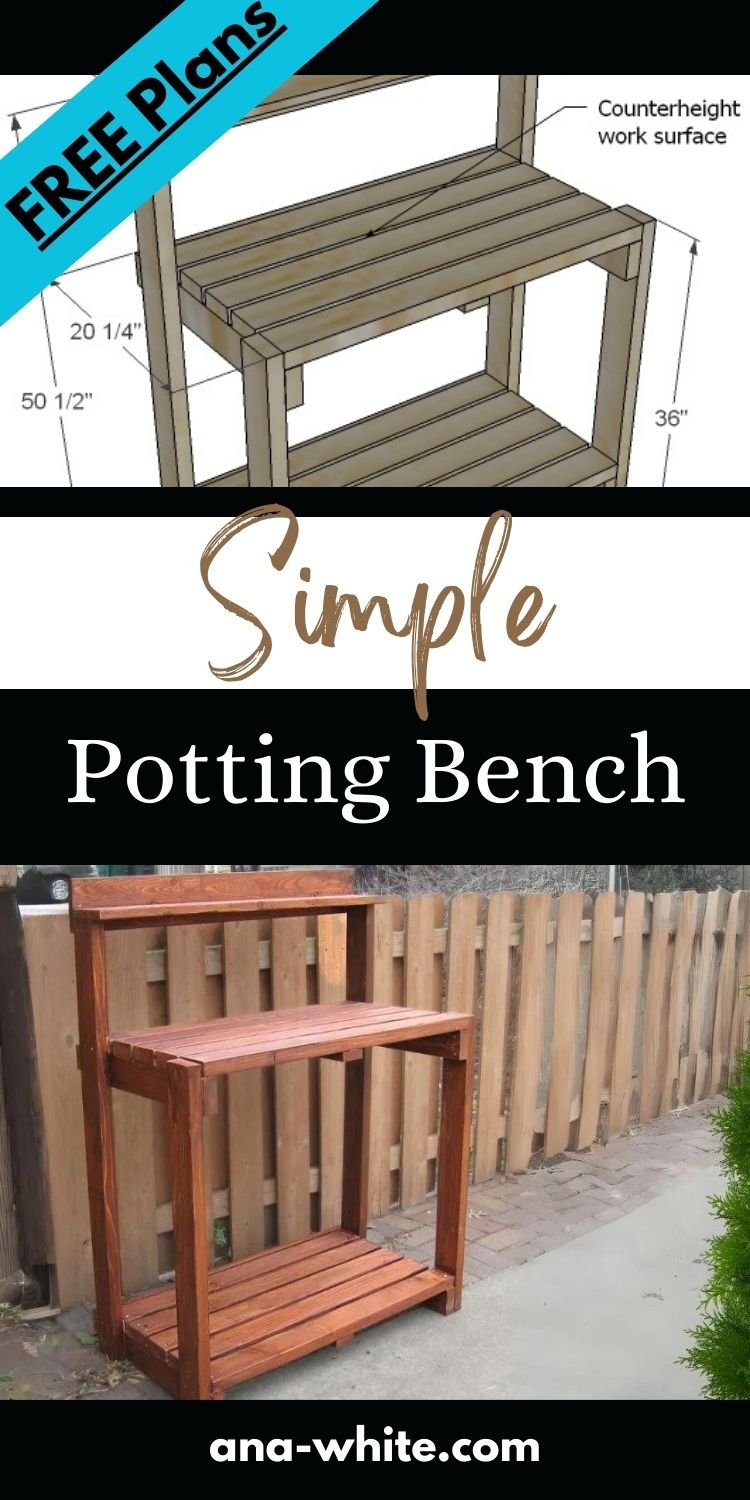
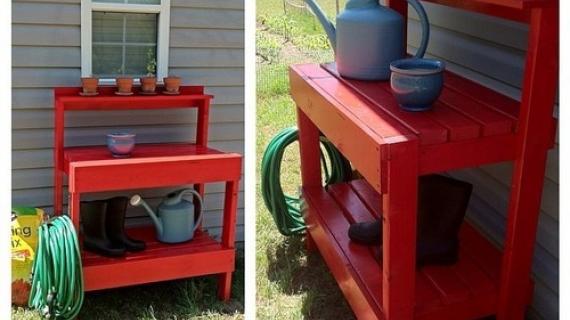
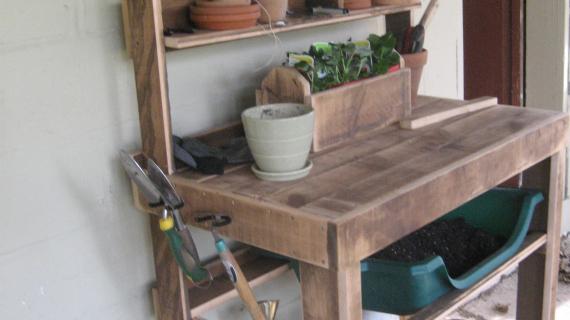
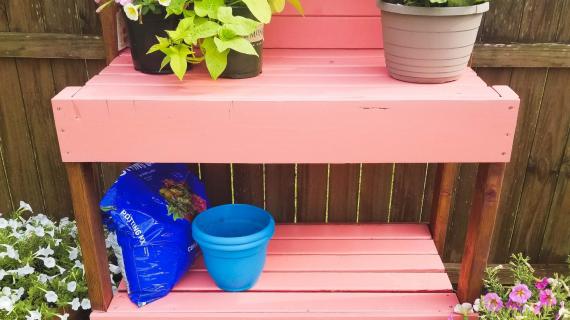
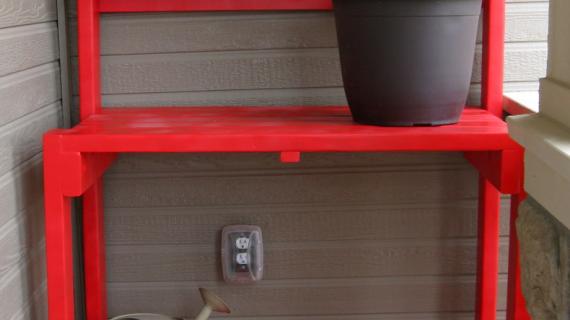
DIY Potting bench plans - very easy to build basic potting bench made out of 2x4s. Free step by step plans from Ana-White.com
Pin For Later!
Preparation
- 7 - 2x4 @ 8 feet long (Cedar or exterior treated works best for exterior applications, but painted or stained standard lumber can also work if properly treated and maintained)
- 1 - 1x6 @ 8 feet long
- 1 - 1x3 @ 8 feet long
- 1 - 1x2 @ 4 feet long
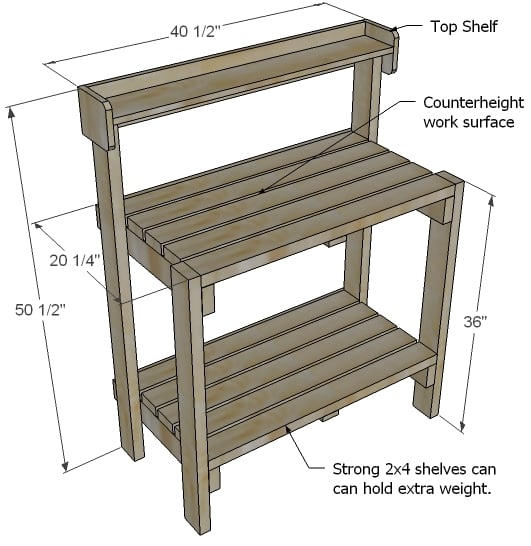
- 10 - 2x4 @ 36" (Shelf Boards)
- 4 - 2x4 @ 19 1/2" (Shelf Supports)
- 2 - 1x2 @ 19 1/2" (Center Shelf Support)
- 2 - 2x4 @ 36" (Front Legs)
- 2 - 2x4 @ 48" (Back Legs)
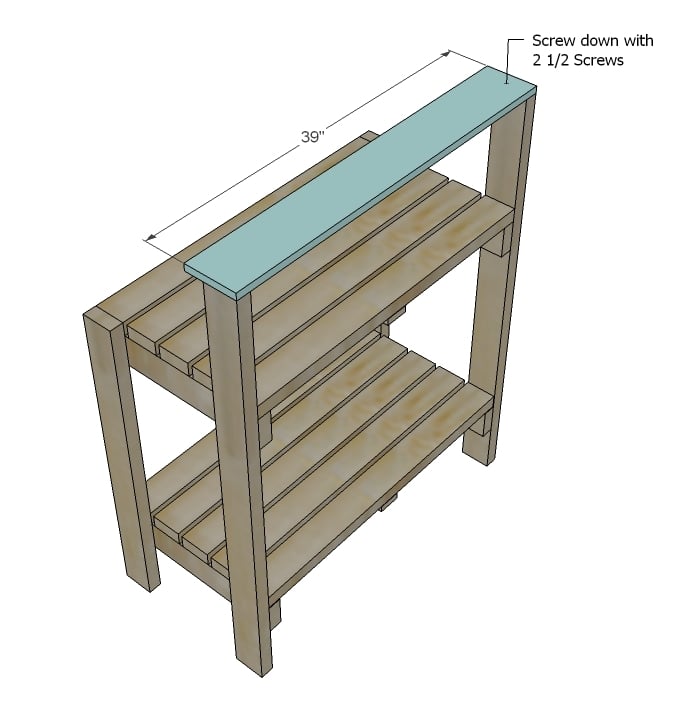
- 2 - 1x6 @ 39" (Top Shelf)
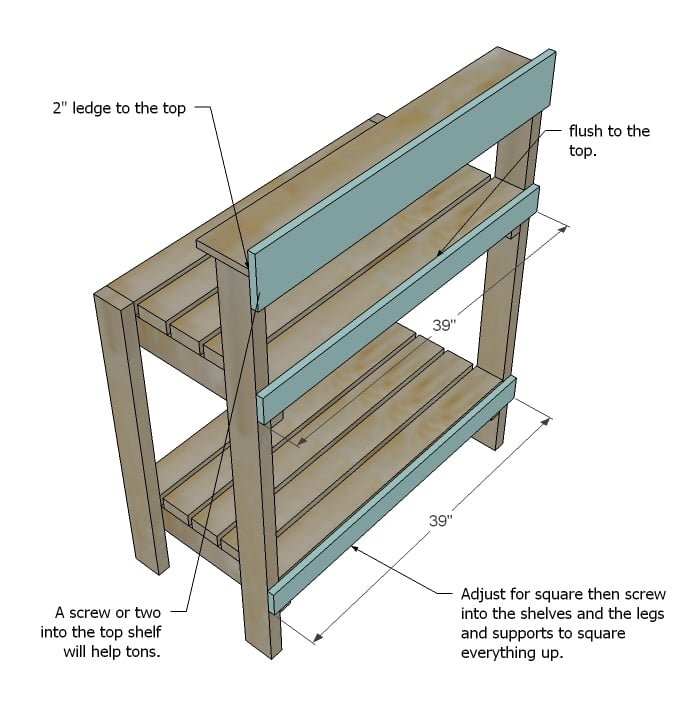
- 2 - 1x3 @ 39" (Back Supports)
Cut largest boards first to minimize waste.


Instructions
Step 1
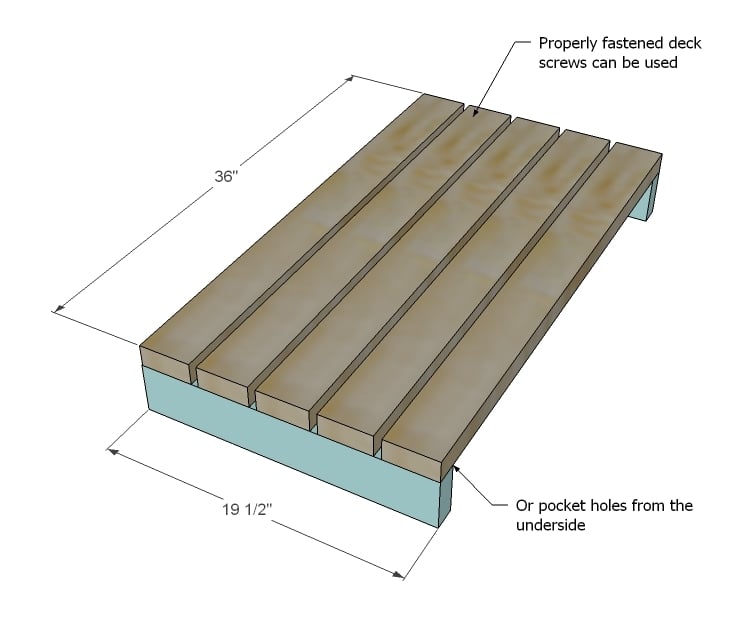
Begin by attaching the shelf boards to the side supports as shown above. Choose exterior decking screws installed correctly (see packaging) to prevent water damage. If you have a Kreg Jig™, you could also fasten from the underside and completely hide all screw holes. Take care to ensure that both (Yes, make two) shelves are square. Glue is advisable.
Step 2
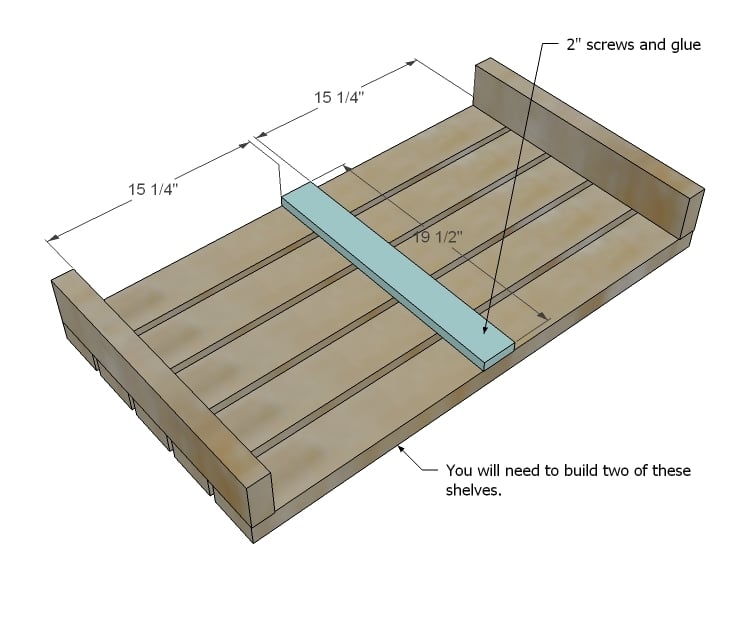
Mark the center underside of the shelves as shown above. Attach the center support with 2" screws.
Step 3
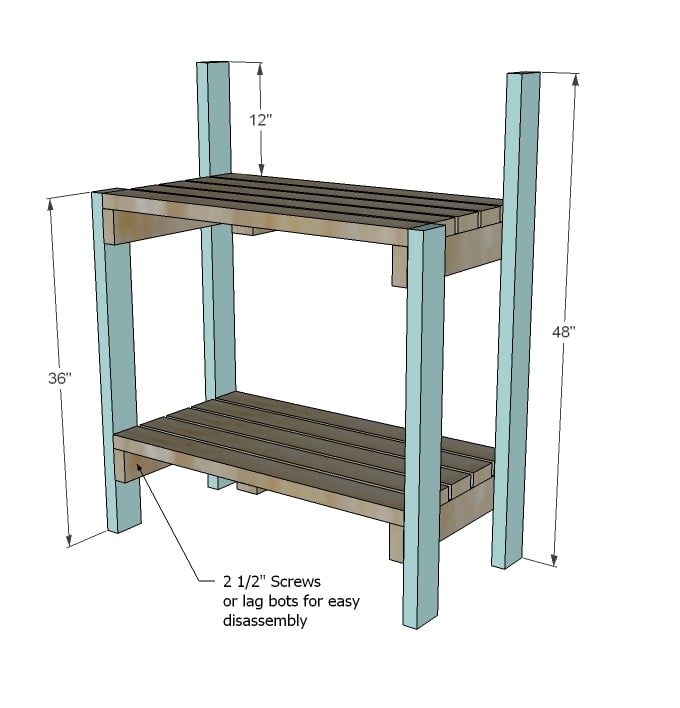
Mark the back legs 36" from the bottoms. Then to hide your screw holes, attach the shelves to the legs as shown above from the insides. Predrill and countersink all screws.
Step 4
First things first, make sure that you potting bench is square by measuring diagonally accross the back and leveling the legs with a level. You should do this at every step.
Step 5
Step 6
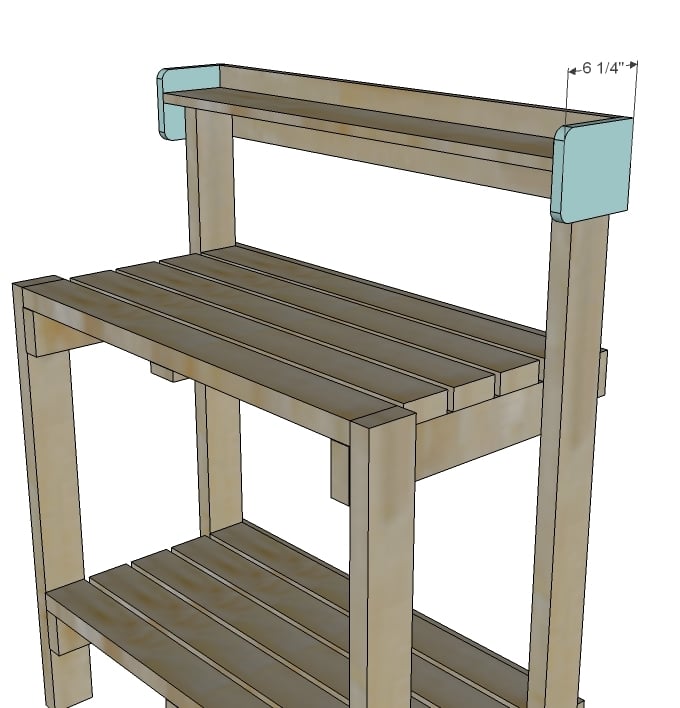
Attach the top shelf side supports to the top shelf as shown above. Trim corners off to avoid a sharp outside edge. And your potting bench or gardening station is done!
It is always recommended to apply a test coat on a hidden area or scrap piece to ensure color evenness and adhesion. Use primer or wood conditioner as needed.
Because this project is likely to be used outdoor, treat with an exterior finish for added durability, and refinish as needed to protect the wood.


Comments
mamma_joy
Thu, 03/10/2011 - 01:09
Cute and could be helpful for
Cute and could be helpful for lots of outdoor uses!
whitney_smith
Thu, 03/10/2011 - 05:20
I love it! I could make a
I love it! It could make a great grilling bar on my deck!
And I LOVE the way new posts are laid out!!! So simple to read!
ACraftyCauldron
Thu, 03/10/2011 - 05:30
You are SO reading my mind!
I was just looking yesterday for plans for a cute potting bench. This is PERFECTO - and BEAUTIFUL. Thank you SO much!!!
thundermomma
Thu, 03/10/2011 - 07:38
I see it in my future
I will definetly be adding this to my list. I see it with bin attached to the side to hold small gardening tools and gloves, or a shelf off of one side with notches for holding tools. Great plan!!
natsmom
Thu, 03/10/2011 - 07:51
You had me at bar
I can definitely see this holding an ice chest and some snacks and cups out by the pool! Now I have to decide whether to build this or Nat's loft bed next. Decisions, decisions! :)
ferbit
Thu, 03/10/2011 - 08:18
You read my mind!!!!!
Yay!!! A potting bench is my next project, so I've been hoping you'd post plans for one! Woo hoo! Thank you Ana!
DawnJoy (not verified)
Thu, 03/10/2011 - 09:20
Love the new format
This is awesome. So, so easy to follow. I really have no more excuses for not digging in and building. That's a YAY!!
kindlekat
Thu, 03/10/2011 - 11:35
THANKS!
I remember requesting these plans over on the old forum. What an absolute delight to see them posted now!! THANK YOU ANA for what I'm sure will be a fantastic project! I look forward to building it, as well as modifying it to include an outdoor sink. See, THESE are the plans I knew could exist, not these complicated, difficult-to-read plans you see all over the rest of the internet.
Yay spring!
Ana White
Thu, 03/10/2011 - 17:56
Thanks Everyone!
I know this is such a simple humble plan, but wanted to get it up before the season is over! Please, I can't wait to see brag photos! I have intentions to create a longer potting station which will become a bar/bbq area in the summer but the way Alaska seasons go, it'll be too late for some of you!
In reply to Thanks Everyone! by Ana White
ferbit
Fri, 03/11/2011 - 17:41
hmmmm....
Oooooooooooooh! I may hold off on building this then! :) We're knee-deep in the middle of a kitchen remodel (hubby and I are ripping out cabinets as we speak) at the moment so I wasn't going to build this potting bench for about a month. Any idea when your "longer" potting station will be available? :) :) :)
Tsu Dho Nimh
Thu, 03/24/2011 - 09:43
Summer? Which week?
but the way Alaska seasons go, it'll be too late for some of you!
What week have they scheduled summer for? I forget if it's the second or third week of July.
Love the bench, and will be making one of cedar for my BBQ area.
Emma (not verified)
Thu, 03/24/2011 - 05:27
Window Pane Potting Bench
Hi Ana, I am in love with your site - and very excited to start projects.
I have an old window pane (white shabby chic) 3 foot by 2 foot and would love to use it as the back-plate of the potting bench. Do you think the design of the potting bench above could work to accommodate this adjustment.
I got the idea from the pottery barn magazine - http://www.potterybarn.com/products/potting-shed-bar/popup/more-views.h…
This will be my first project - so not sure if I am being too adventurous.
Tsu Dho Nimh
Thu, 03/24/2011 - 07:58
See Step 5
Where the boards are attached to the back, in step 5, replace the top two boards with your window.
Make the bench narrower, if necessary, so your window is wide enough to cover the back.
Cidzz (not verified)
Thu, 08/30/2012 - 22:01
did you ever get to use the window pane in this plan
Hi, I really liked the pottery barn potting bench link that you had shared and also liked your idea of incorporating an old window pane in this potting bench plan. Can you please share pictures if you have implemented your idea.
Thanks
shaunfitz13
Tue, 04/19/2011 - 10:53
(No subject)
Crooked Carpenter (not verified)
Tue, 06/07/2011 - 10:26
Missing from cut list
Hi,
I just started this project today and noticed that the 2 - 1x6 @ 6 1/4" top shelf side supports are missing from the cut list. No big deal, but thought you'd want to add them for completeness.
Crooked Carpenter (not verified)
Tue, 06/07/2011 - 10:31
Missing from cut list
Hi,
I just started this project today and noticed that the 2 - 1x6 @ 6 1/4" top shelf side supports are missing from the cut list. No big deal, but thought you'd want to add them for completeness.
[apologies for the dup - typo in original email address]
LAUGHINGSHARK (not verified)
Sat, 07/09/2011 - 08:42
Thanks
I attempted this project (my first wood project :) and it turned out great. Although I measured funny in some places and the skill saw did not seem to cut straight (not my fault right? :)it turned out great. All the pieces were a little off but they were off to together so it all fit perfectly. Couple of things I noted. Because I wanted a simple bench I did not use the wood glue, wood filler, primer, paint, or sand paper. And for newbies wanting to know you use way more 2 1/2 screws than 2. My mistake was in buying equal amounts of them. I love the bench and it's perfect. Thank You.
Quintin79
Wed, 08/22/2012 - 18:36
Beautifully simple
Love the bench. It's beautifully simple. I'm going to make it for my mother in law. But have th idea of making supports under the table top for a small plastic bin to silde in like a drawer to catch all the dirt thats spilled.
Klschultz
Sun, 03/04/2018 - 14:40
Top shelf supports?
The top shelf supports of the potting shelf are not listed on the cutting list. Can anyone provide some direction??