

A sofa that you can build with a fold out seat perfect for storing extra pillows and blankets. Based off a sleeping pad foam cushion, so seating surface doubles as a guest bed.

If you would have asked me even a few months ago about building your own sofa, I would have said, it's not worth it. Considering the high cost of foam (upwards of $50 a yard) and the cost of fabric (at least $10 a yard for an upholstery weight) I just couldn't see the economics of building your own sofa.
But then I walked past a pile of foam camping pads at a store we have in Alaska called Fred Meyer (owned by Kroger and is kind of a superstore) that were 30" wide, 72" long, and 3 1/2" deep. And the foam came in soft, medium and firm weights . . . for just $20! Instantly, the wheels were turning in my head.
Then when my sister Esther mentioned that she didn't have a sofa, and she couldn't find one that was inexpensive, square, and with storage, I was drawing up plans within minutes. My sister Lydia (we've reupholstered quite a few sofa's together, but never actually built one from scratch) was visiting, and she was just as excited as me. So we got to work.
And you all know how much I love using paint drop cloths for fabric. So with some 2x4s, 2x6s, some 2x10s, some 1/4" plywood and alot of worn out pillows and stuffed animals, my sister Lydia and I built a couch in less than 24 hours for about $120.

And by the time we were done, both Lydia and I were making plans to build our own sofas. Also pictured reclaimed wood carts.

And I just might . . .

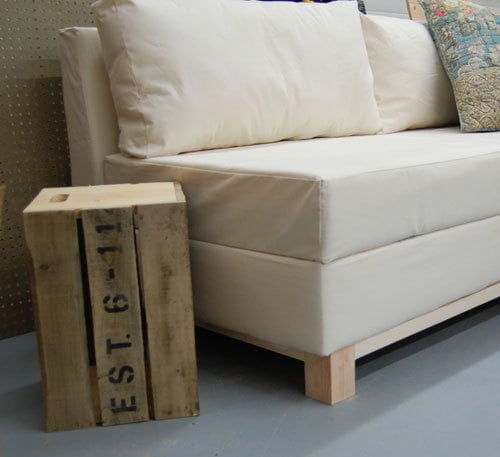
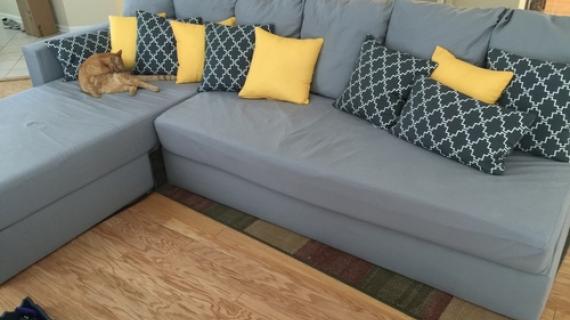
Nice clean square design that is so popular right now. Notice the 2x4 feet. Please don't notice my messy garage, I was afraid to bring this one inside . . . my sister might not every get her sofa back! Also, the deep cushions are perfect for sleeping on.
It is after all made from a standard camping pad. And did anyone notice the little hinges on the front seams?

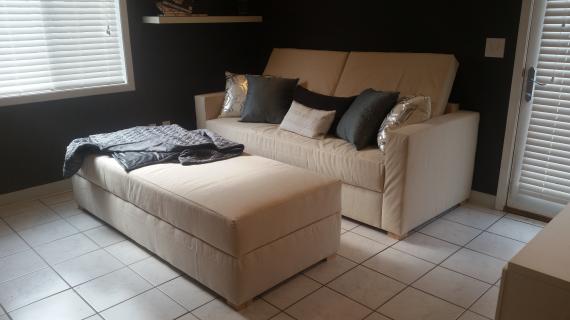
Big enough to sleep on and with built in storage for the bedding too! This is my favorite part of this sofa. You could build it for your office and use it as a reading sofa, then when guests are over, flip open the seat and get your bedding out. Not shown here, but I did add straps to keep the seat from hinging all the way open and also straps that tuck in the seam behind the seat for easily pulling the seat up. Just used an old dog leash.

Ready to build your own? You can do this.
Preparation
1 – 30″ x 72″ x 3 1/2″ Foam Camping Pad or Cushion
1 – 9×12 Paint Drop Cloth
6 yards upholstery batting
2 20 oz bags of pillow stuffing
2 1/2 yards of burlap
staples
3″ screws or 2″ pocket hole screws
1 1/4″ screws
wood glue
spray adhesive
2 – 2×4
2 – 2×6
2 – 2×2
4×4 (You only need about 2 feet for the sofa legs)
1 – 12′ AND 1-8′ 2×10
2 – sheets of 1/4″ plywood
1 – 2×4 @ 72″
1 – 2×6 @ 72″
4 – 2×6 @ 24″ (Tapered as shown in step 1)
3 – 2×4 @ 22″
1 – 1/4″ Plywood @ 17 5/8″ x 72″
2 – 1/4″ Plywood @ 72″ x 30″ (Top and Bottom of Seat)
2 – 2×10 @ 72″
3 – 2×10 @ 27″
2 – 2×2 @ 65″
2 – 2×2 @ 28 1/2″
4 – 4×4 @ 5″ (Sofa Feet)


Instructions
Step 1
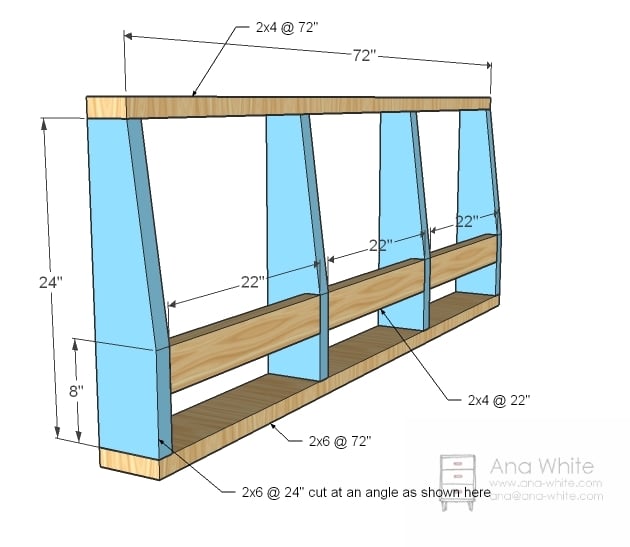
Back
Screw the back together with 3″ screws or 2″ pocket hole screws as shown above. Use glue and adjust for square.
Step 2
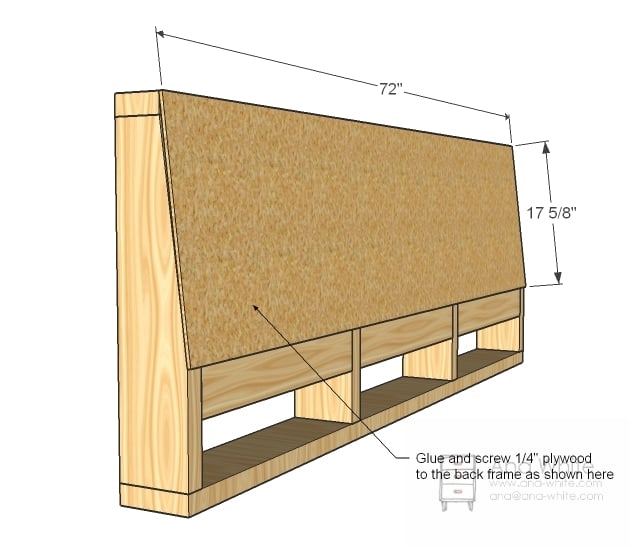
Back
Now attach the 1/4″ plywood to the back with 1 1/4″ screws and glue as shown above.
Step 3
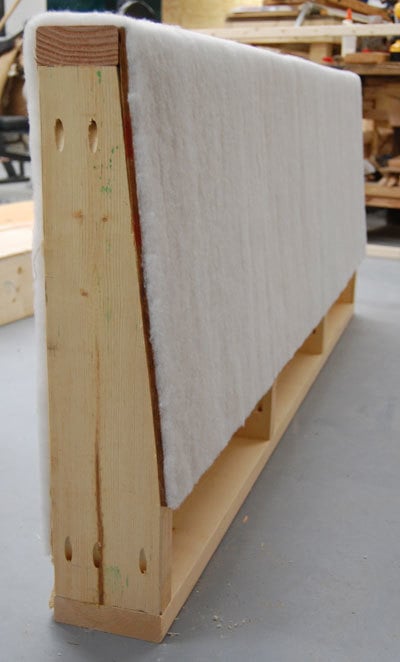
Back Batting
Now wrap the back that is not covered in plywood with the burlap and staple in place on the bottom edge. The burlap should be tight. Then use spray adhesive to glue the batting to the back as shown above. Read the direction on the can of the spray adhesive for the best adhesion.
Step 4
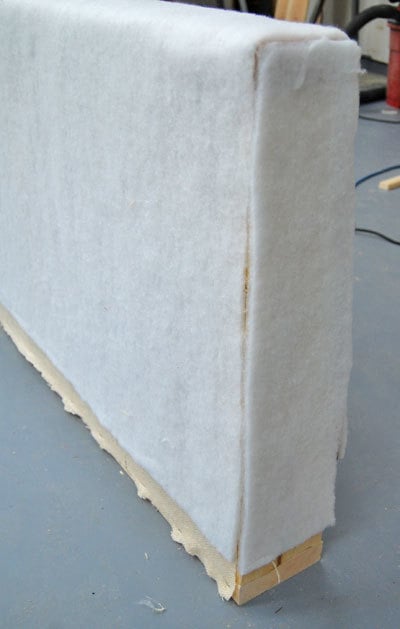
Side Batting
Now glue pieces to the ends with the spray adhesive and then trim to fit as shown above. Set the back aside.
Step 5
Step 6
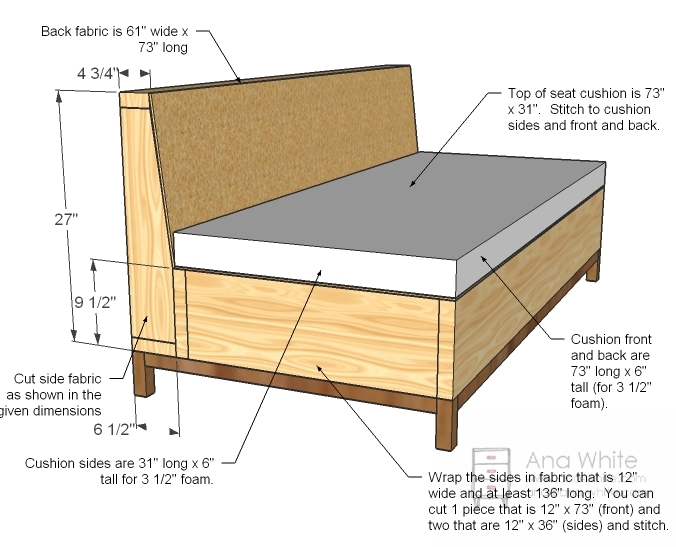
Slipcover
Use the spray adhesive to attach the foam pad to the remaining piece of plywood. Then use the spray adhesive to attach batting to the foam on the top, front and sides. Cut a piece of fabric 73″ long x 31″ wide. Cut two pieces 31″ long x 6″ wide, and two at 73″ long and 6″ wide. Sew together to create a box cushion (see this post for details on sewing). Place the cushion slipcover over top of the foam and staple the slip cover raw edges to the underside of the plywood, hiding edges. This is shown below.
Step 7

That one should be easy. Now cut strips of fabric as shown in the diagram above (step 6) and sew together and staple in place around the sides and front of the sofa. Should be easy to do. Turn edges under to hide raw seams.
Now the back was the most difficult part – certainly not impossible, but I thought was the most difficult part of sewing. To make this part easier, you could simply not put a taper in the back side of the sofa, and all your cuts are square. Anyway, cut out the side and back pieces and stitch together, and fit over the back. Turn under and staple to the underside of the legs. Reference the diagram in step 6 for exact measurements.
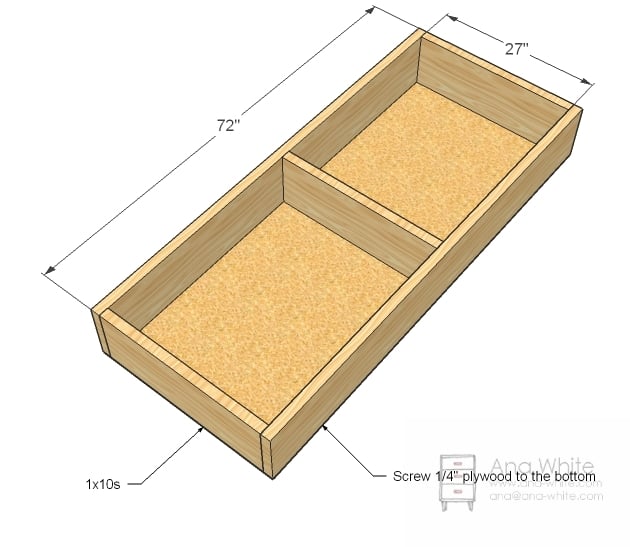
Step 8
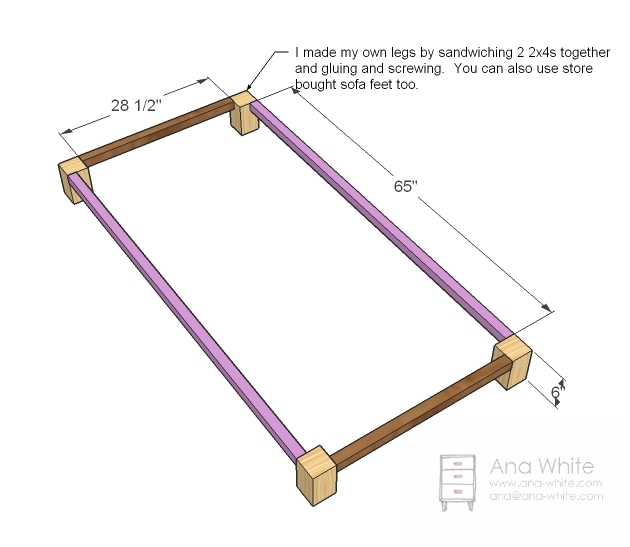
Base
Build the base as shown above. Don’t worry about the 2x2s not being strong enough – their is no support required here (it’s all in the 2x10s). The 2×2 aprons are to keep the fabric tucked under and to give you something to screw your feet too. Paint or stain your base. If you choose to use 2x4s for the legs, remember, this does change the dimensions of the legs, and adjust the 2×2 cuts accordingly.
Step 9
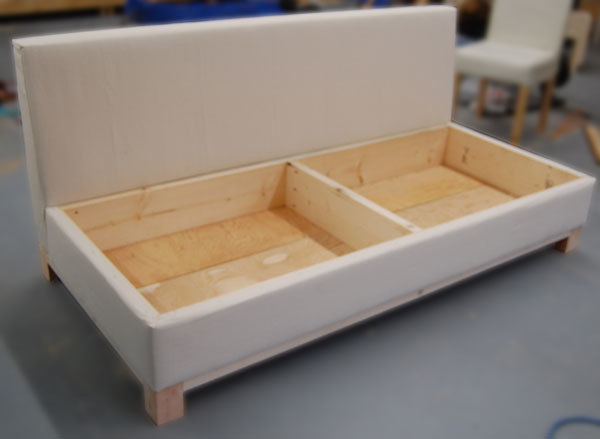
Assembly
Assembly will be easy. Start by screwing the storage box to the back, through the 2×10 back boards into the supports in the back of the sofa. Use the 3″ screws. Then flip over and screw the base to the sofa underside with 3″ screws. Flip it back over and attach the cushion with hinges. Support the hinges with a strap to keep the cushion from collapsing all the way forward.
Step 10
Pillows
The pillows I sewed for this sofa are square box cushions measuring 36″ wide x 4″ deep x 18″ tall. Cut four pieces of fabric 37″ wide x 19″, four pieces 19″ x 5″ and four pieces 37″ x 5″. Stitch with right sides together, creating a box, but leaving an opening to insert foam. Stuff with loose stuffing. Hand stitch open seam closed.

Comments
Crystal (not verified)
Mon, 11/15/2010 - 17:04
I make foam headboards and
I make foam headboards and things, but to cut down on the cost of batting, I buy used or cheap rolls of egg carton mattress pads...it works beautifully and is cheaper and more cushioned than batting. Great plan, thanks!
Elaine Adolfo (not verified)
Mon, 11/15/2010 - 17:15
Seriously. The fact that
Seriously. The fact that you've detailed these plans proves to me I can do it. I built bookshelves from your plans and now I think I can actually make a couch!
Tombi (not verified)
Mon, 11/15/2010 - 22:02
Hi Anna, Thank you for the
Hi Anna,
Thank you for the sofa bed MUCH APPRECIATED, making my own sofa this is indeed a dream come true.
love,
Tombi
Becca (not verified)
Tue, 11/16/2010 - 06:38
We have tried many sofa
We have tried many sofa options over the last 4 years. Our problem is that our living room is rather small, our kids aren't nice to furniture, and I have home decor ADD! Next time I tell DH we need a new sofa, we will skip the hours sitting on tons of sofas at the furniture store only to compromise one one we both dislike, and make our own! My only concern would be that the camping cushion would squish down a lot and leave you sitting on plywood.
Becca (not verified)
Tue, 11/16/2010 - 06:42
Koolaid and vinegar is great
Koolaid and vinegar is great for dying cotton! Also, Wilton's icing dyes work pretty well for dying as well. ANd of course you can always buy the dyes at the craft store.
Mark (not verified)
Tue, 11/16/2010 - 08:16
There are several plans that
There are several plans that use a twin, have you looked for daybed plans? Here's two:
http://ana-white.com/2010/10/jrsmrss-50-daybed.html
http://ana-white.com/2009/12/plan-stratton-daybed-as-request-by-you.html
Lavina D. (not verified)
Tue, 11/16/2010 - 08:30
What would need to be done to
What would need to be done to be able to use a twin mattress? I too have a spare mattress laying around. Would it just be a matter of adjusting the base/box dimensions? I LOVE LOVE your site! Thanks.
michelle (not verified)
Tue, 11/16/2010 - 08:31
http://www.foamorder.com/inde
http://www.foamorder.com/index.html
This website will let you get the foam you want to the thickness and demensions you want. Its so cool. A little bit more than Fred Meyer but its cheaper than a couch. :) Cant wait to make mine. :) And the material......ah I cant wait to have a couch with the material I want and not what the stores want me to have. LOL!!! YAY!!!!
Ana White (not verified)
Tue, 11/16/2010 - 09:05
A standard twin measures 75"
A standard twin measures 75" x 39". If you were to build the base to those dimensions instead of 72" x 30" and add three inches to the length of the back, it would work for you.
Jessica (not verified)
Tue, 11/16/2010 - 12:35
Well... that first section of
Well... that first section of your comment was rude. It's her website, she can do what she wants with it, and if you're getting free furniture plans from it, who are you to complain about the way the website is designed? It's functional & it makes finding things a lot easier, in my opinion. It's also pretty with a hint of girly to it, and maybe that's exactly what she wanted?
Amber @ Classi… (not verified)
Wed, 11/17/2010 - 09:38
How cool! I think if I did
How cool! I think if I did this, I'd cut the foam and the plywood in half and make two squares that could be lifted off instead of hinging the one big piece to open (with a little lip that fit down inside the storage compartment so they didn't slide.) What a really great couch!
Farm Marm (not verified)
Wed, 11/17/2010 - 09:40
I agree with Jessica. This is
I agree with Jessica. This is Ana's site and she can do whatever she darn well pleases with it! I personally love it! I've been visiting it frequently for weeks and have many projects earmarked for building. I think it's easy to navigate and find the plans I need without having to weed through ALL of them. As for the girly-ness of the site..LOVE it! I think it gives some of the women who visit the feeling that they can do this! They, too, can be home "makers". I feel more comfortable here on this site than at some of the other diy sites that feel more like a "New Yankee Workshop" episode. I have several teen-agers at home who are taking a "woodworking" class now! We homeschool and these projects fit the bill for them as well.
Thanks Ana! Love your site! Love all the projects! Keep them coming!
Now off to build a couch....and some ledges....got a pallet to pull apart!!!
Ana White (not verified)
Wed, 11/17/2010 - 12:28
Thank you!
Thank you!
HammerTime (not verified)
Wed, 11/17/2010 - 12:35
HUH?? It's girly for a
HUH?? It's girly for a purpose. And that purpose is to show that building is something that girls and women can do. Ana's mission to inspire and empower women to pick up tools and reach beyond their traditional comfort zones has worked for countless followers, myself included.
ginny (not verified)
Wed, 11/17/2010 - 14:16
I love this.. now to
I love this.. now to decidewether to build or wait for a plan for a fold out to double couch ( as this is where my mother in law sleeps when she visits and our toddler likes to "camp out" with her)
Heidi (not verified)
Thu, 11/18/2010 - 04:58
This is just what I needed!
This is just what I needed! I'm so happy I found your site! My guest room needs something like this, I think I might be trying this in a few days! I'll let you know how it goes!
Karla (not verified)
Thu, 11/18/2010 - 07:07
Pssssssst.....a suggested
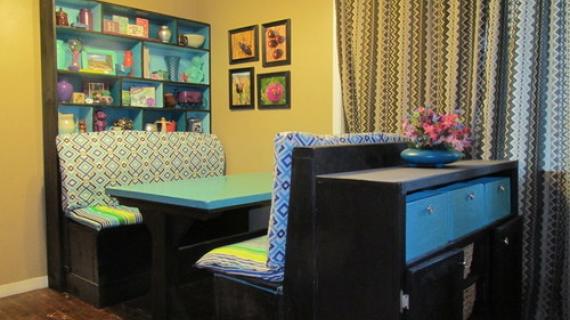
Pssssssst.....a suggested variation. If the flat platform is reduced in depth (front to back), it becomes the perfect, hard-to-find plan for a breakfast room banquette. So, thank you!
Kellie (not verified)
Thu, 11/18/2010 - 09:59
Thank you so much for posting
Thank you so much for posting this! My husband I have a very small family room and now we have a 20 month old. With that comes a lot of extra things you're just not sure what to do with. We have been considering buying a sectional for our family room, but can't find one to fit. This is great....we can modify the length and 3 of these will make a perfect sectional with a little modification. Plus the bonus of much needed storage! We thought we would use crib mattresses as our base cushion. These can be picked up for under $100 each. I am so excited. Thank you! Thank you! Thank you! You rock!
Petula (not verified)
Thu, 11/18/2010 - 16:46
This is fabulous! I've been
This is fabulous! I've been looking at daybeds for the room my three girls share. My two youngest (5 and 3), and their 19-year-old sister. It was her room, but since I only have one son I gave him the room alone. I want my 19 year old to have somewhere comfortable when she comes homes that's still somewhat spacious and personalized.
I'm hoping a girlfriend of mine will help me with this 'cause I really don't like to do stuff like this... LOL... love the idea of it, but not the execution.
Thanks for passing on such a great idea.
Farm Marm (not verified)
Thu, 11/18/2010 - 18:18
I think I can make the
I think I can make the sofa...it's the upholstering I'm not sure of. Does one 9x12 drop cloth really cover the whole thing? I wish you had a layout plan for that. Also, do you think scotchguard would be helpful? I love the off white look...but I have small kids and live in the country, so lots of dirt.
Tiffani (not verified)
Fri, 11/19/2010 - 15:32
Karla - I was thinking
Karla - I was thinking EXACTLY the same thing! Yep, we are adding this to the list of things we "need" to build ;)
Thanks Ana...you rock!
Adair (not verified)
Sat, 11/20/2010 - 10:20
Kellie- I would love to
Kellie-
I would love to see your final product and how you modified Ana's plans to accommodate the different dimensions. Using three crib mattresses to make three-piece sectional sofa would fit perfectly into my living room. Ana, thank you for the awesome design!
Adair
Lindsay Lopez (not verified)
Tue, 11/23/2010 - 06:17
Hi! I LOVE the look of the
Hi! I LOVE the look of the sofa and the whole idea of using affordably priced linen-look (well at least in my mind) drop cloths for fabric... Only thing is, I bought two drop cloths at Fred Meyer's here in Oregon and I ran them through the washing machine (twice actually) and now they're drying.... I'm noticing such a strong chemical smell it's making me wonder if this fabric has been treated by some nasty chemicals, etc? Have you or anyone ever looked into that (or perhaps the kind you buy doesn't have that and if so, please I'd love to know what you buy since they look soooo beautiful)!!!! We are a family on a tight budget so "normal" fabric is not an option for us but I love the idea of using drop cloth if it's not toxic. Please advise thoughts/experience?
Thank you so much in advance and THANK YOU for all the wonderful plans you've put out here, I am in the process of setting up my own mini woodshop in my garage (things I'm asking for from Santa are NOT pedicures but instead POWERTOOLS)!!!!!!!! :) I think I speak for the masses when I say we adore you Ana!!!! :)
Farm Marm (not verified)
Sun, 11/28/2010 - 17:31
I once saw a plan for a
I once saw a plan for a futon-esque bed that used the coffee table as the extra support. the mattress folded out over it.
Farm Marm (not verified)
Sun, 11/28/2010 - 17:33
Kudos H.T.!!
Kudos H.T.!!
Lisa (not verified)
Fri, 12/03/2010 - 10:47
Thanks Mark! I didn't
Thanks Mark! I didn't search the site for daybeds. Hmmmm, now I have some ideas!
Lisa (not verified)
Fri, 12/03/2010 - 10:49
Whoo! That's all it takes?
Whoo! That's all it takes? I might just be brave enough to take this on.
Angela Bird (not verified)
Mon, 12/06/2010 - 17:56
Hi, I was wondering if you
Hi, I was wondering if you could tell me any specifications for the foam mattress, like say a brand. We don't have a Fred Meyers here, so I'd have them ship it here if they would allow for it. Otherwise I would try doing some shopping with the reference of the brand name online. I hope I can make this couch, looks cool!
Pam Sheppard (not verified)
Sun, 12/26/2010 - 06:29
I find that if you wash the
I find that if you wash the fabric a few times with a half cup of baking soda in each wash, almost any smell will come out. Give it a try. Might work on that nasty chemical smell. Good luck.
teri (not verified)
Sun, 01/02/2011 - 00:11
what about Rit dye for a
what about Rit dye for a color variation...just a minor thought...
Eric (not verified)
Mon, 01/17/2011 - 20:40
I've mentioned this before on
I've mentioned this before on another piece, but I find that you can find some very good foam on thrift store couches. My local Goodwill has couches all the time for under $50 with really good usable foam under the dated fabric covers. You can buy the couch and really just toss it unless you can reuse any of the other pieces. But $50 for three nice couch cushions is a bargain.
I've also bought several beat-up tables for their legs. Again...4 good legs for $15 is something that you just can't beat!
Leah (not verified)
Thu, 01/20/2011 - 02:34
Lindsay-for the "chemical"
Lindsay-for the "chemical" smell-If you wash any fabric with 1 1/2 cups of vinegar it will help...I do it with everything. It basically strips away any chemicals in the fabric and won't harm the fabric. I like organic and natural materials, and using vinegar, just for the first wash, basically makes the fabric organic. Won't discolor the fabric or anything, even if you're washing dyed fabric. Everything comes out looking the same, just healthier and chemical free. All it takes is one wash, then after that you just wash with your regular detergent. Easy, simple, and it works!
Kelly Kohlhaas (not verified)
Thu, 01/27/2011 - 14:18
I have been searching for a
I have been searching for a loveseat exactly like this(but shorter)!!! Thank you so much Ana for sharing your plans! You have made many very happy. :)
Charlie Elize (not verified)
Thu, 02/10/2011 - 16:59
I love your site! And this
I love your site! And this couch is to die for!!! I want to try it but here in Kansas we don't have any Fred Meyer's. Is there any way that you could give me the brand of the camping foam pad? I would greatly appreciate it! Thanks so much for all of the great ideas!
Lene (not verified)
Sun, 02/20/2011 - 12:40
I love it!!! I have wanted
I love it!!! I have wanted to make a couch for along time, but didn't know if I could make one that didn't look homemade! Guess what I will make one this week thanks to your awesome plans!!! I'm also so excited that I am not the only wife and mother that has the desire to build things!!
Tees (not verified)
Wed, 02/23/2011 - 10:59
This is a fantastic idea. I
This is a fantastic idea. I have been looking for something unique for storage for my small studio. I wonder if it would work as well with more padding and a different material...
Angie (not verified)
Sat, 02/26/2011 - 10:16
Any way to advise to put arms
Any way to advise to put arms on this couch? If so it would be perfect!
Mary (not verified)
Sun, 02/27/2011 - 23:45
Thank you. I need 2 of these
Thank you. I need 2 of these for the living room. I only have $30 to use. Can I use a bookcase for the base.
Chrissy (not verified)
Thu, 03/03/2011 - 12:47
that's a good question... I
that's a good question... I was wondering the same thing
Guest (not verified)
Thu, 03/24/2011 - 01:18
Perfect!
I have been looking at cute little kid's sofas just like this with storage under on ebay for my daughter's playhouse, but they're so expensive. Once I've finished the playhouse (currently under construction) and then the gorgeous kitchen furniture you've won me over with, then I am going to try to make a child size version of this sofa. Ana you are so inspiring!
guest (not verified)
Mon, 04/11/2011 - 17:23
How much upholstery fabric?
I want to build this, but I don't want to use paint drop cloths. If I don't how much upholstery fabric would I want to use?
P.s. I think your site is awesome. Thank you for inspireing me to build for myself.
In reply to How much upholstery fabric? by guest (not verified)
heysammycat
Mon, 10/24/2011 - 16:28
upholstry fabric
You need at least 12 yards of fabric. I got mine for $3-5/yd from the bargain bin at Fabricville. Depends on matress thickness + if you want to cover the cushion and whole back of the sofa. I got an extra 5m in a coordinating solid color for the underside of my cushion and to hide the lid since I made a removeable cushion.
Milca (not verified)
Fri, 04/15/2011 - 21:03
I'm thinking kids room!
Wanted a kid-sized sofa for the play room for my girls. Thinking this would be easy to 'downsize' to little ones sizing! Thanks Ana.
Willyb (not verified)
Sat, 04/16/2011 - 09:00
Lots of very positive
CraftyLibra (not verified)
Sun, 04/24/2011 - 19:44
ThankYouThankYouThankYou
I'm come from the school of DIY. Why pay for something you kind of like when you can custom make something you love? Ever since I had to break the legs off my last sofa to get it into apartment, I decided to custom make my furniture. This is amazing. Thank you so much.
aria_dia
Thu, 05/12/2011 - 00:12
what grade of drop cloth?
there are many different grades and weights that are available. whats good for a house with 3 very rambunctious children who spill a lot?
Tsu Dho Nimh
Thu, 05/12/2011 - 05:45
The heaviest one your sewing
The heaviest one your sewing machine can handle.
Collie (not verified)
Thu, 06/16/2011 - 17:04
Perfect for a small home
I've been looking for cheap furniture and recently became interested in the economics of building my own... This plan is perfect for what I want to do, but I'd also love to see it with arms on it. I was thinking perhaps the arms could incorporate that same tapered look that is on the back. I think that even with the high price of foam, building your own sofa or couch is much cheaper (and possibly more beautiful) than buying one any day.
If anyone did end up building this and modifying it to include arm rests, I'd be really interested in seeing it!
Daniele / Brasil (not verified)
Sun, 08/14/2011 - 21:22
Amei!!!
Achei incrível seu site e também este sofá. Venho procurando um projeto de sofá a tempo, queria algo funcional e este é perfeito!!!
Obrigada!
heysammycat
Mon, 10/24/2011 - 16:07
My first project! :-D
I just built this and it was easier than I thought!!! I have never even made a bookshelf before! So happy with my new sofa! :-)
Took a little longer since I covered the cushion so I could remove the fabric and wash it. We used an 8" thick memory foam mattress so it could be a spare single bed if needed. Due to the mattress height, we built the back of the sofa 3" higher.
My friends and family thought that I was crazy to want to build my own sofa - especially when I started @ 8 months pregnant...
This one is solid with the 2x6's and we love it! My husband helped me with the wood cutting and my best friend helped me with the sewing. It is good to get a buddy to help you for at least assembling the frame. We built it on our back deck (also good to be outside working with the glue).
Posted it in your brag book today.
Sammycat