
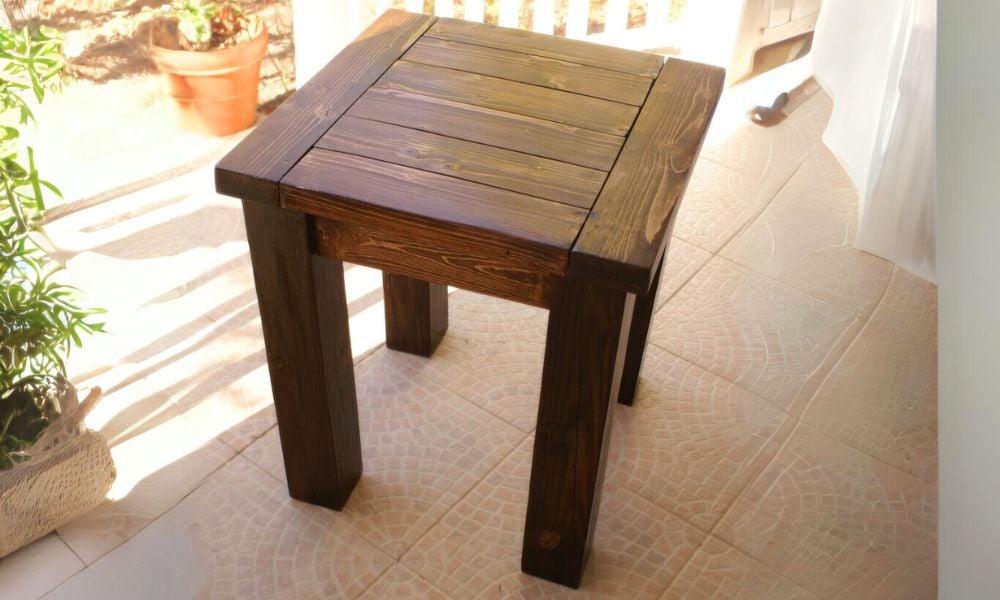

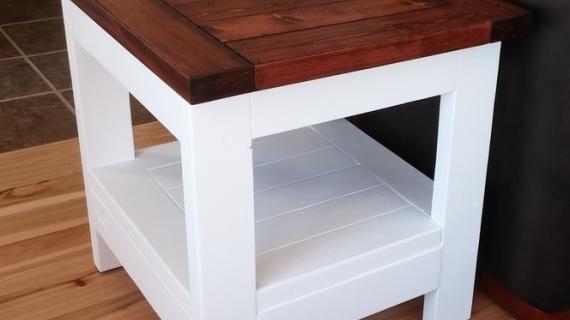
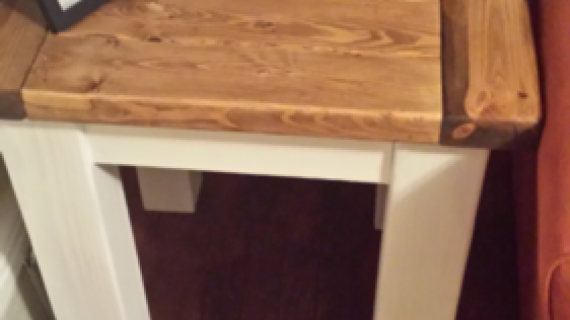
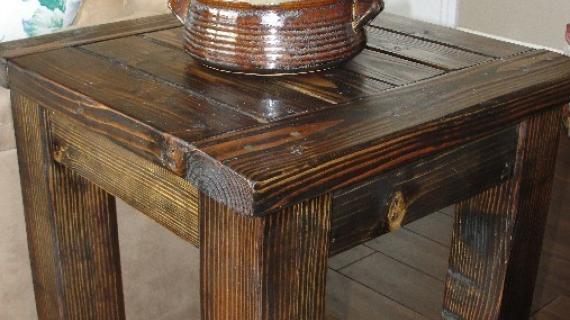
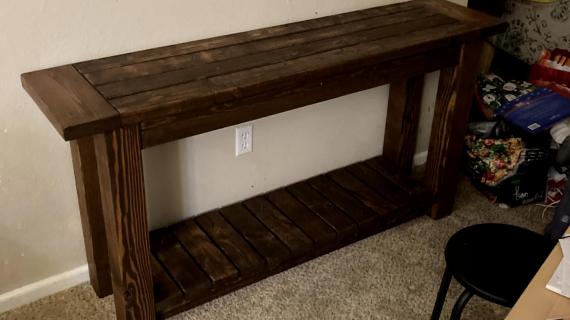
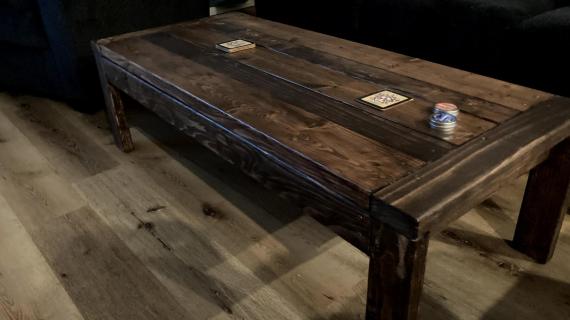
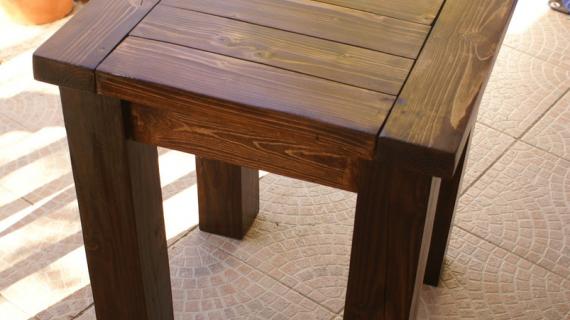
Made of solid wood in a rustic planked design, you will be shocked at just how beautiful 2x4s can be. This sturdy easy to build end table will add character and a natural aspect to your living space. Also can be used as a nightstand. Features sturdy solid wood legs and a large top with breadboard ends.
This is a free step by step project plan, with detailed diagrams, shopping and cut list from Ana-White.com
Preparation
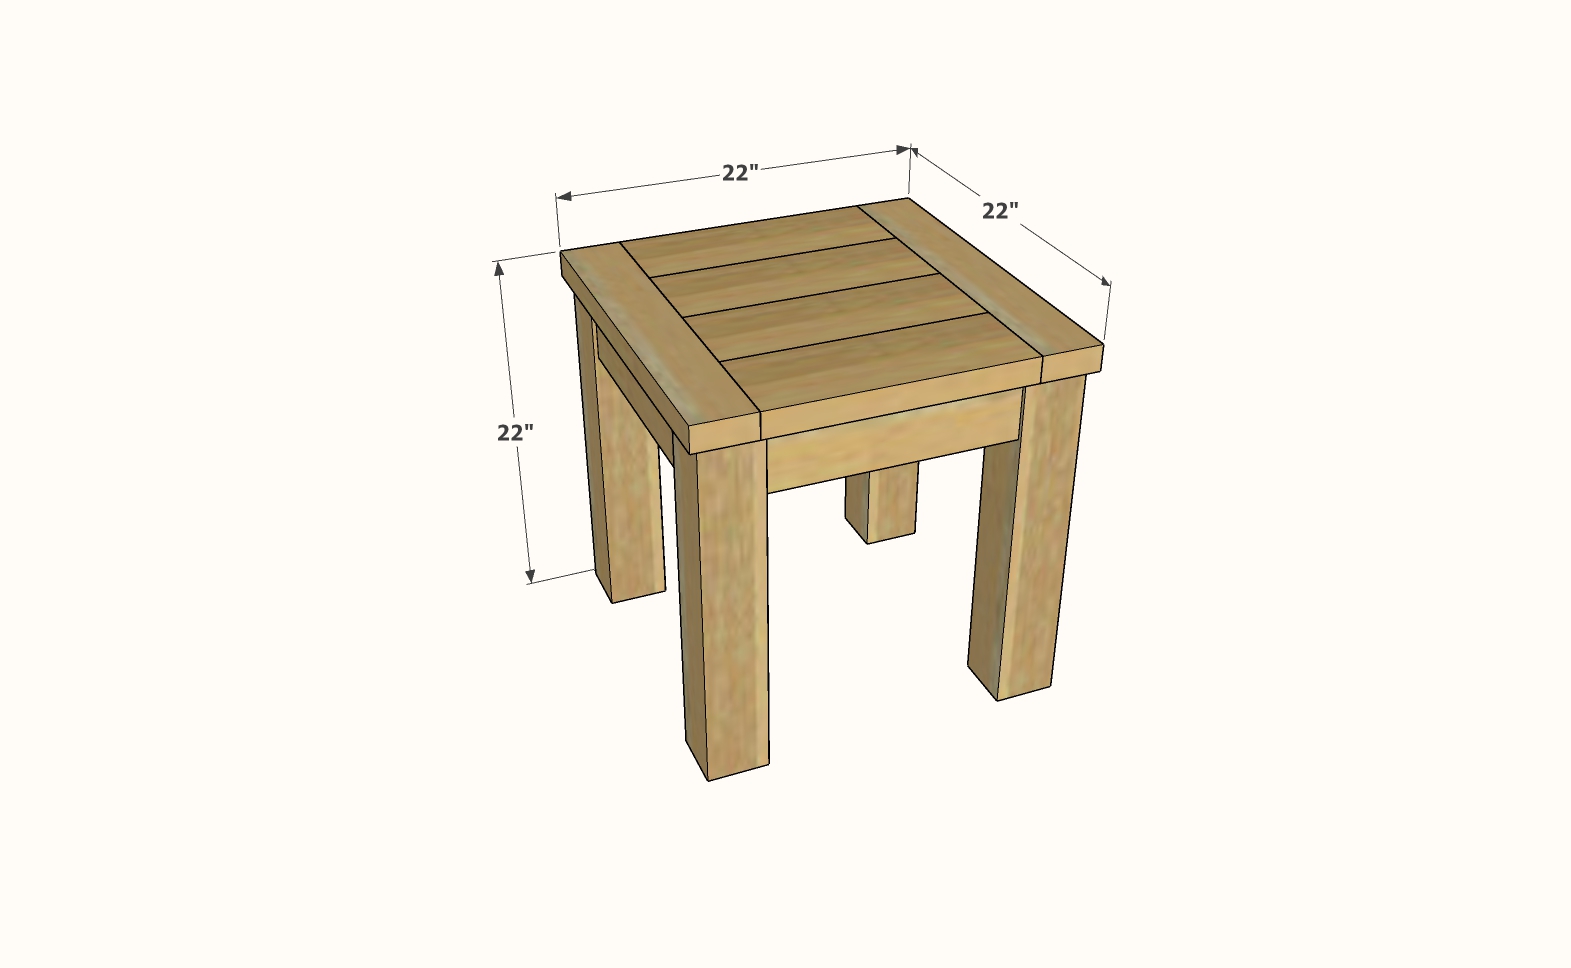
- 1 – 4×4 Post, 8 feet long
- 1 - 2x6 @ 6 feet long
- 1 - 2x4 @ 9 feet long
- 2-1/2" pocket hole screws (about 35 per table)
- 120 grit sandpaper
- wood glue
- stain and topcoat
- 4 – 4×4 Posts @ 20-1/2” (Legs)
- 4 - 2x6 @ 15" - tabletop center pieces
- 2 - 2x4 @ about 22" - tabletop breadboard ends
- 4 - 2x4 @ 14" - aprons


Cut all your boards, except you may wish to cut the tabletop boards after taking an exact measurment of your table in step 7. Make sure you get nice straight cuts. Either use a miter saw, chop saw, or mark your boards with a square and cut with a handheld saw. Predrill all of your screw holes with a countersink bit. Before attaching any boards, mark where the attaching board will fit. Always use glue. Use 2 1/2″ screws unless otherwise directed. Take a square of the project after each step (see HOW-TO section). Work on a clean level surface.
Instructions
Step 1
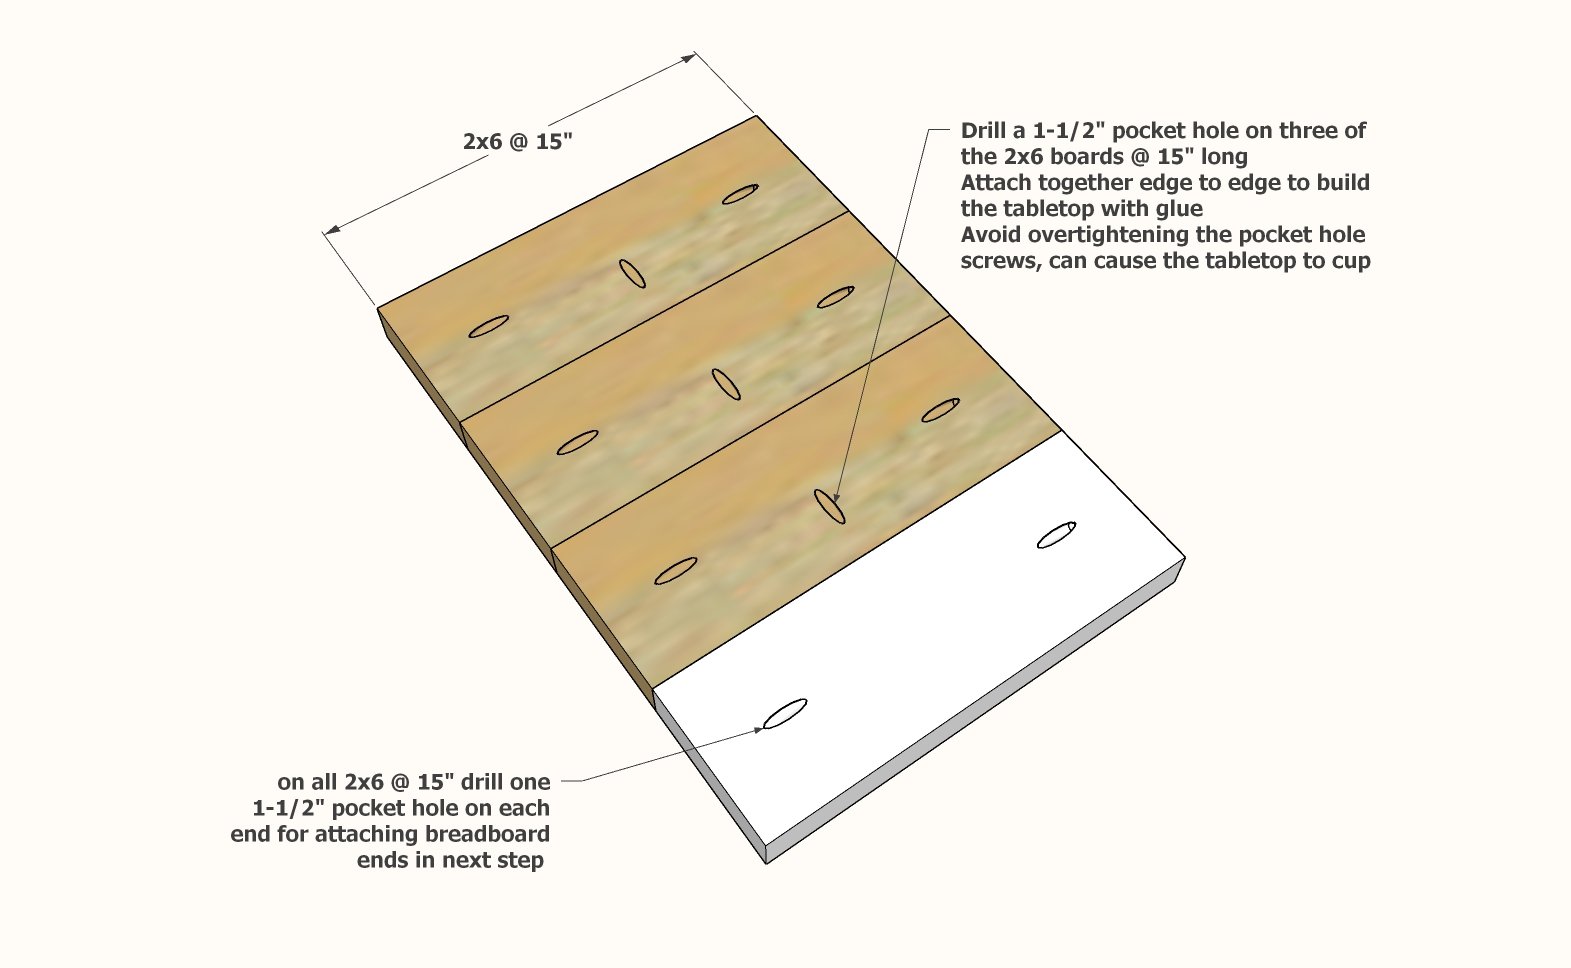
Prepare the 2x6 boards first.
Then attach together with 2-1/2" pocket hole screws.
Step 2
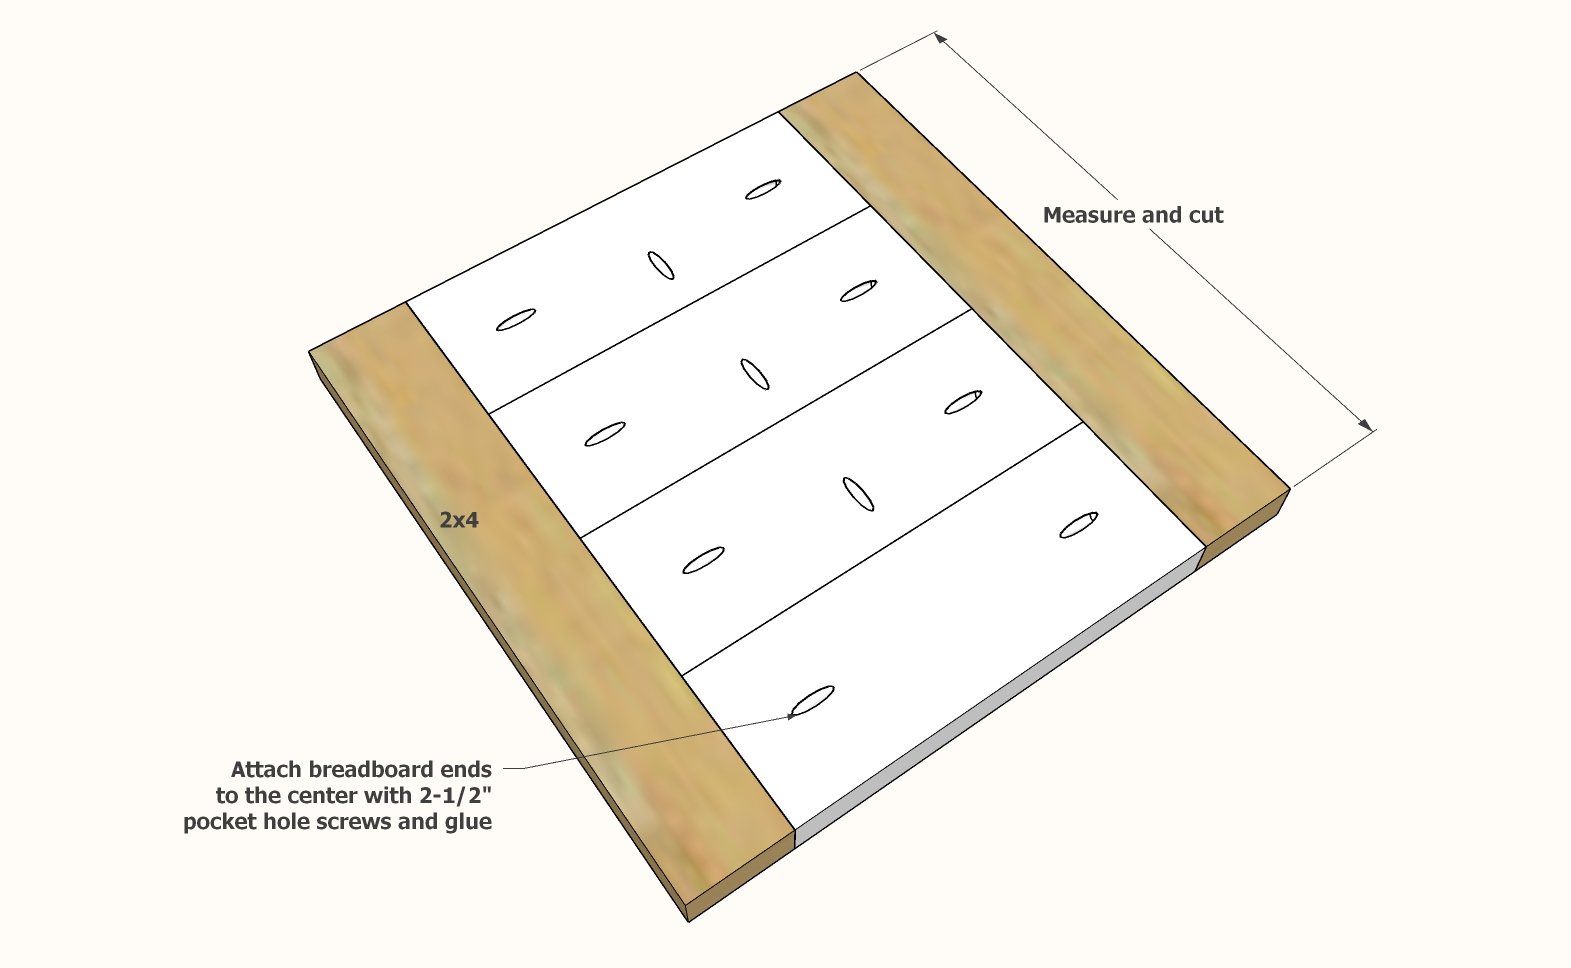
Measure and cut breadboard ends from 2x4.
Attach to 2x6 center pieces with 2-1/2" pocket hole screws.
Step 3
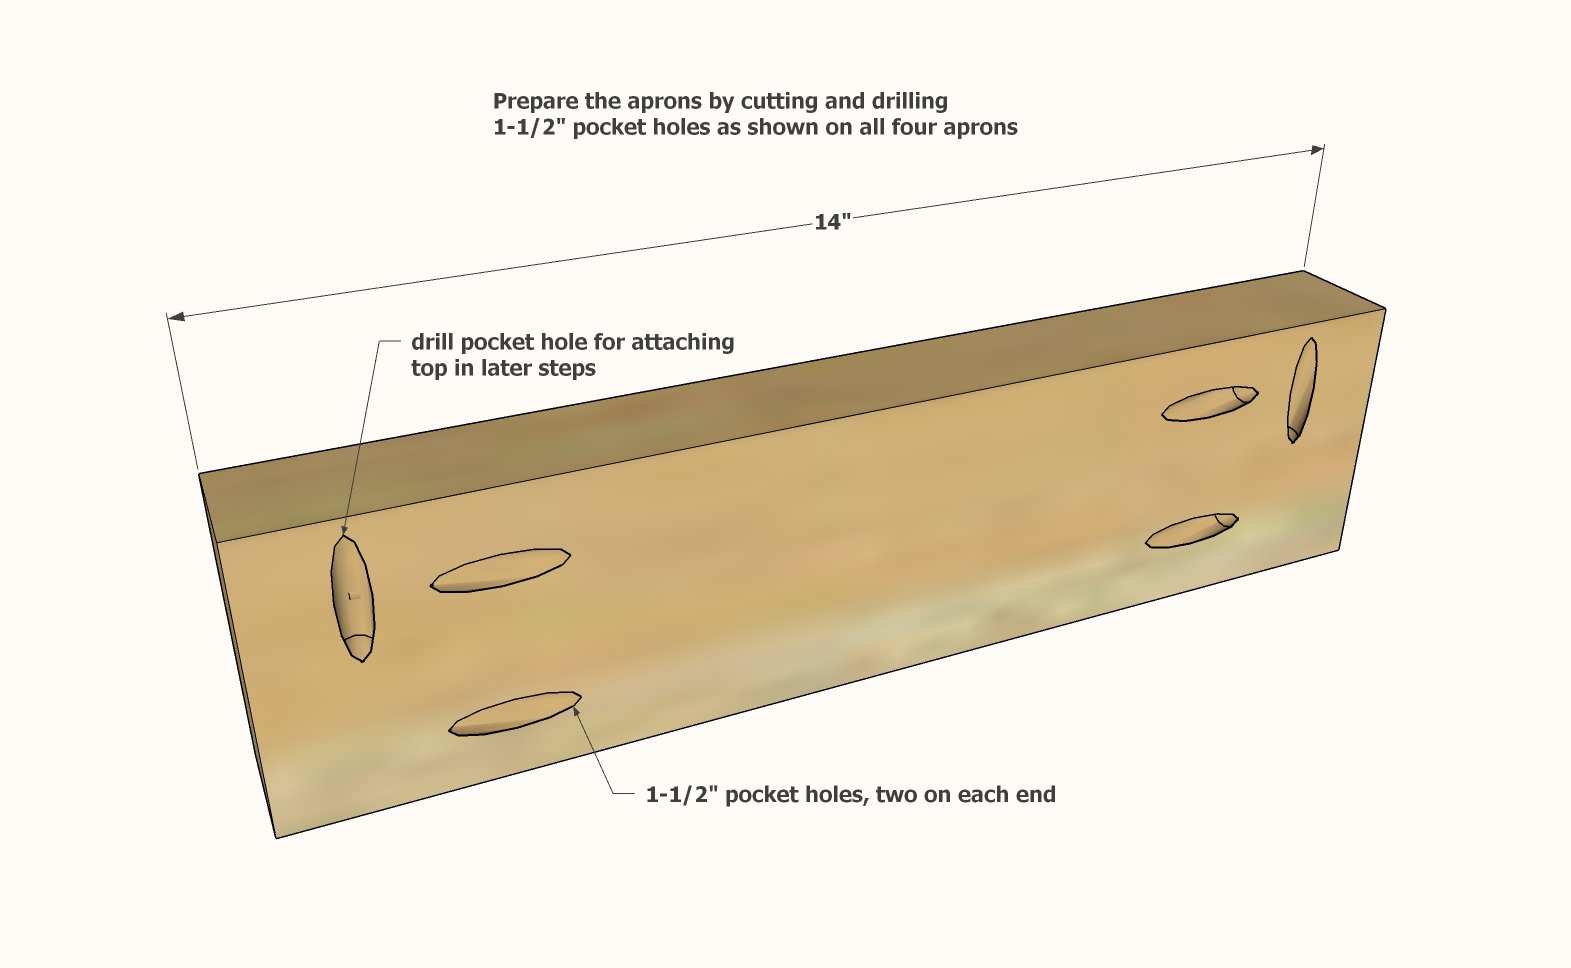
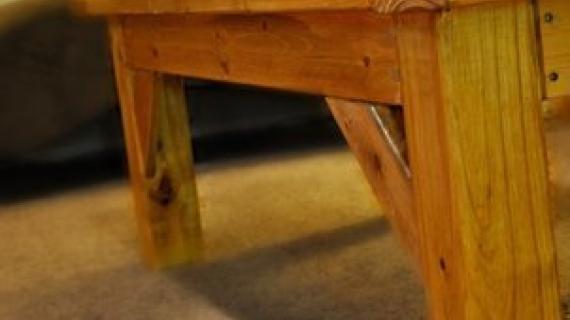
Prepare the aprons as shown by cutting and drilling 1-1/2" pocket holes.
Step 4

Attach the aprons to the legs as shown, making sure the pocket holes to attach the top are orientated correctly.
Use 2-1/2" pocket hole screws.
Step 5
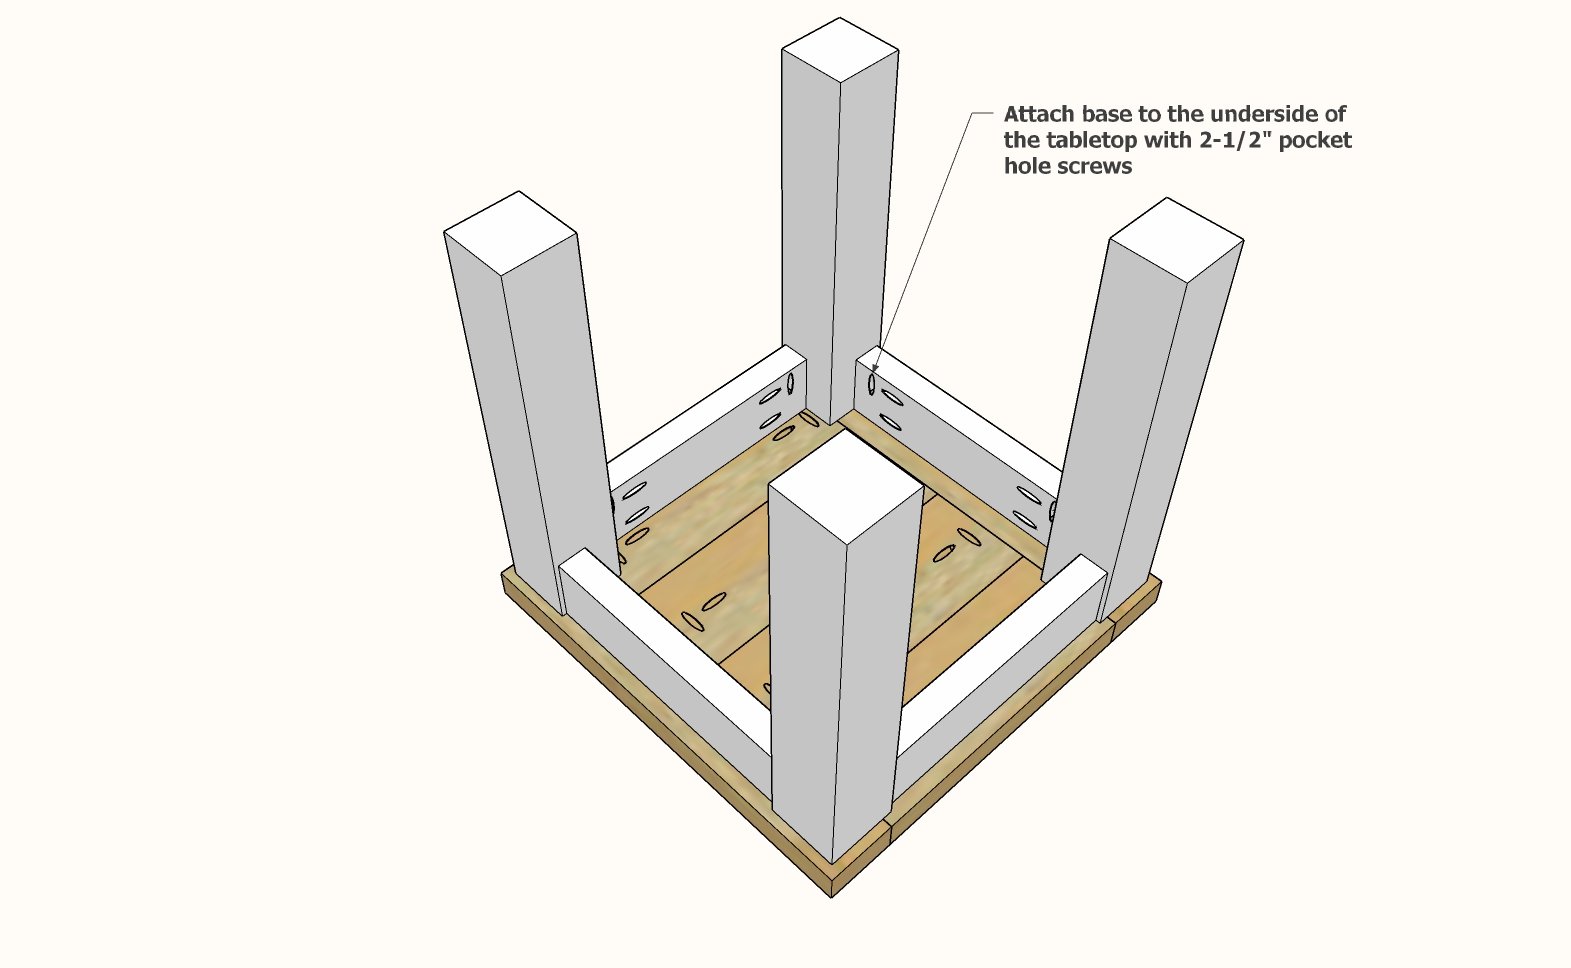
Attach the base to the tabletop with 2-1/2" pocket hole screws.
Remove all sanding residue.
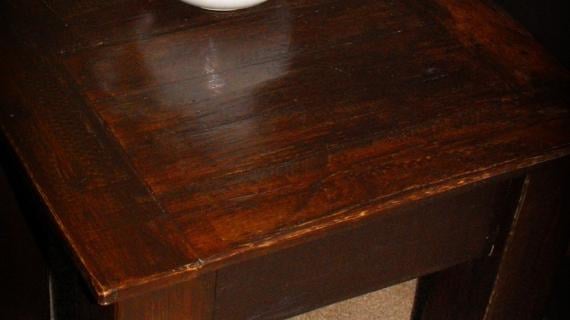
Protect the top with a clear poly topcoat.


Comments
OweEng2 (not verified)
Tue, 01/05/2010 - 03:57
I really enjoy your articles,
I really enjoy your articles, learned many things about this stuff. I hope other writers can step in and help out more by making informative articles like this. Keep uo the good work!
lexiis (not verified)
Tue, 01/05/2010 - 05:49
I have to say, I am sooo
I have to say, I am sooo happy I came across your blog! Your plans look amazing and I have always love pottery barn furniture but never their prices! I can't wait to start on one of these projects!
laugh like a s… (not verified)
Sat, 01/16/2010 - 04:42
Ana, if your legs need to be
Ana, if your legs need to be cut from the 8' long 4"x4", but they need to be 28 1/2", wouldn't you need more than 8'? 8' will get you 4x24" pieces. Or am I missing something?
Ana White (not verified)
Sat, 01/16/2010 - 20:16
Hi Laugh Like a Serenade, The
Hi Laugh Like a Serenade,
The correct cut should be 22 1/2". I made a typo that I have corrected. I am so sorry. You should definetly be able to get 4 out of a 4x4 8' Post.
Thank you so much for catching this.
Ana
Jennifer (not verified)
Tue, 01/26/2010 - 12:20
Ana, we are trying to build
Ana, we are trying to build this table... but have run into a huge snag. The breadboard ends are cut at an exact 21 inches, but when we laid the table top pieces in... no gaps whatsoever, they stick out farther than the breadboards ends are long. Hubby says that its because our 2x4s are just slightly bigger than the actual 3.5 inches wide. Is this common? I am not sure how I would have prevented this from the start...
Bananas4Bargains (not verified)
Mon, 03/08/2010 - 10:14
My husband and I found your
My husband and I found your blog a few weeks ago and I fell in love. We made the Hyde side table yesterday as our first project, now I just have to decide what color/stain I want it to be. I am always looking for a new way to save money and this is just so unique, attainable, and easy that it's changed our whole way of thinking about paying someone else to do the work. You are helping so many people with this!
Pygmy Princess (not verified)
Sat, 03/13/2010 - 04:29
Hi Ana,This site is
Hi Ana,
This site is amazing... been addicted since stumbling on it a few weeks ago! I HATE to be the spelling police but thought that I should point out that its "Tried" in "Tried and True" as opposed to "Tryed"... thought that might help. Keep up the incredible work... you're raising an army of builders out there!
Jessica M (not verified)
Wed, 03/17/2010 - 10:38
I went to Lowes today and got
I went to Lowes today and got the wood for this project. I showed a print-out of your websit to the men working there, and you wouldn't believe how excited a group of tough men were about your site. Honestly, they made copies of my print out and were calling their wives already. LOL.
I am going to my father in laws house tonight and he is going to help me make this. :) I am so excited, thank you for doing what you do!
hide those holes (not verified)
Fri, 03/26/2010 - 09:31
are you screwing in from the
are you screwing in from the top on all the boards? if so, how are the screw holes hidden so well on stained pieces? I know there is so-called "stainable" wood putty out there, but have not heard anyone haivng much sucess with it . . . thanks.
Bananas4Bargains (not verified)
Sat, 03/27/2010 - 03:24
I can only speak from our
I can only speak from our experience but we drilled through the top on both the breadboard ends and the middle pieces. I knew the stainable putty would create little screwhead-sized circles after the holes were filled and stained but I kind of like that look. We use the Elmer's stainable putty and have done two projects with it now and I like it. It does take on a little bit of the color of the stain. The filled holes are only noticeable close up, not really from a distance. Seems like the lighter we've stained things the more they show.
Michael (not verified)
Sun, 03/28/2010 - 04:33
Ah, sweet irony. Pygmy
Ah, sweet irony. Pygmy Princess pointed out your spelling error but made one herself in the process. "Hi Ana,
This site is amazing... been addicted since stumbling on it a few weeks ago! I HATE to be the spelling police but thought that I should point out that its "Tried" in "Tried and True" as opposed to "Tryed"... thought that might help...."
She used "its" in its possessive form, when she intended to use it as a contraction: "it's".
Besides being a great website to get up to speed on one's grammar and spelling, we shouldn't lose sight if it's loose flattery of PB's over-priced originals. You're doing a great job, Anna!
Derek (not verified)
Mon, 01/02/2012 - 16:10
.....and then you spelled
.....and then you spelled Ana's name with two n's.
Michael (not verified)
Sun, 03/28/2010 - 04:37
Umm.... "we shouldn't lose
Umm.... "we shouldn't lose sight OF ITS loose flattery...".
This spelling police business is tough work.
Heather - Hope… (not verified)
Mon, 04/19/2010 - 05:40
Just blogged about our
Just blogged about our experience with this table.
http://www.hopelesslyflawed.com/2010/04/makeover-monday-side-table/
It was awesome, and so easy my kids did it, almost all by themselves (with guidance, of course). Thank you Ana!!!
sky (not verified)
Thu, 07/15/2010 - 05:10
I've just found your blog,
I've just found your blog, and i love the desings, the explanations, the simple way you have to show something taht useful, thaks ana... hi from mexico!!!
natenapril (not verified)
Fri, 07/30/2010 - 17:21
Thanks Ana for the great
Thanks Ana for the great site. We are also Alaskans and we struggle with the lack of options in stores to buy furniture. And you know the issue with shipping up here!! Thanks to your site we have completed the Tryde console Table and are tackling 2 of the end stands this weekend!
Sheri (not verified)
Tue, 08/10/2010 - 19:31
I just saw on another blog I
I just saw on another blog I follow - a fellow blogger got a table made from your plans as a gift from her sister!!! Check it out here! It's fantastic!! You rock!!
http://iammommahearmeroar.blogspot.com/2010/08/feature-friday-quote-end…
Danielle Bennett (not verified)
Wed, 08/18/2010 - 10:02
Hi Ana,I love your blog and
Hi Ana,
I love your blog and have just now got up enough courage to build something! My first project will be this side table. My problem is, I can not find 4*4's in un-pressure treated wood ANYWHERE. I have checked every home depot and lowes as well as every Lumber store. Is this weird? Do you or anyone else have any suggestions? I live in Nashville, TN.
Guest (not verified)
Sun, 02/19/2012 - 16:21
un-treated pine
We ran accross the same problem. We ended up using a Fir 4X4 and it worked great. We used a red mahogany stain. Not sure how lighter stains would look. I was afraid the red look of the Fir would show but other than the grain difference no one would notice.
jordanriver27 (not verified)
Sat, 09/11/2010 - 21:18
Thanks for the plans. This
Thanks for the plans. This was my first project and with the use of the plans and some help from my brother who worked as a carpenter I was able to make a great side table for a fraction of the actual cost!
Nicole (not verified)
Fri, 10/01/2010 - 06:49
Thank you! Your website is
Thank you! Your website is A-MAZING! I have wanted to build some of the items you have on here, and was just going to do it on a whim...not now! I've got actual plans. Will send pics as we do some of these projects (we are first-timers), but are confident we will be able to get a similar pottery-barn look! Thank you. I can't thank you enough! Thanks!
Shari (not verified)
Mon, 10/04/2010 - 11:56
I am wanting to make this
I am wanting to make this table, but I would like to make it about 24" square at the top instead of the 21". I was trying to figure how to make the adjustments on my own, and I am just not that savvy or something! Could you maybe just tell me what wood needs to be cut longer etc. Thanks!
Guest (not verified)
Mon, 05/30/2011 - 09:37
Larger side table (24” H x
Larger side table (24” H x 24.5” W x 24.5” L)
4 – 4x4 @ 22.5” (Legs)
4 – 1x4 @ 2.25” (Spacers)
2 – 1x4 @ 20” (Top Leg Supports)
4 – 1x4 @ 15.5” (Apron)
2 – 2x4 @ 24.5” (Breadboard Ends)
7 – 2x4 @ 17.5” (Tabletop Pieces)
Follow the original directions, but with these new cuts of wood (legs and spacers are the unchanged). You'll need another board of 1x4 wood than the original plan calls for. Note you have 7 tabletop pieces instead of the original 6 pieces called for.
Rebecca (not verified)
Tue, 11/02/2010 - 08:14
We are moving into a new
We are moving into a new house soon and I just love the idea of building our own furniture for it! I, however, am having a hard time finding non-treated wood. I noticed someone else above was having this problem too. I thought about just getting the pressure treated but since it's green tinted I am worried it will take the stain differently than the other wood. I am in Tulsa, Oklahoma so if anyone knows where I can get non-treated 4x4's that would be so helpful! Thanks <3
Missy (not verified)
Mon, 11/15/2010 - 18:03
I LOVE this site! Haven't
I LOVE this site! Haven't made anything yet, but hoping to soon! The last table image,,,what is the brand of stain, and color?? Also, stupid question, how is it applied?
Can it be spri… (not verified)
Mon, 11/22/2010 - 16:10
[...] Project #5: Tryde Side
[...] Project #5: Tryde Side Table [...]
A Side Table. … (not verified)
Thu, 01/06/2011 - 11:57
[...] So I was browsing
[...] So I was browsing facebook and stumbled across a link to Ana White’s website for DIYing your own furniture. {Found on the owner of Organicmamas.etsy.com page}. Well, after browsing I was hooked. I looked at my husband, and said, “Babe, I wanna build something…this…” And, to my pleasant surprise {well not really a surprise, he really is just that nice…} he replied…”Okay, what do you need? Let’s head to Lowes.” So, we did just that. That next day I had built my first piece of furniture a “guinea pig” sewing table for my sister that is way too wobbly, has a broken leg, LOTS of wood filler in the areas where I split the plywood, and somewhere a countersink drill bit is stuck in it {for added support of course}. But, my sister still loved it…she stained the top and painted the cart area a sweet purple and figured if we needed to build a new one {this time with the correct plywood} then we would do just that and my sweet little niece would get a new table for her room. Well, I didn’t take pictures of that project, but to get the idea of what it looked like, or to build your own sewing cart/table…here are the plans. { http://ana-white.com/2010/10/a-sewing-table-for-small-spaces.html } Okay, so on to what I actually am showing you…my “Tryde” Side table, built with plans from the amazing Ana White…free plans might I add. It’s modeled after the “Hyde” side table from Pottery Barn…except with a few modifications making it easier to build…no need to rip down the legs or sides…it’s just slightly larger…a surface of 21″ x 21″ vs. PB’s 18″ x 18″. And Yes, I built this…with NO help from my husband, no high school shop classes, and no magic wand. {Though I would be lying if I said I’ve never worked with power tools…my good friend John M. has a beautiful wood shop and a few days in there with him was better than four years of high school shop class I’m sure…and yes I did make a phone call to him after the sewing cart, prior to the side table…a little pep talk you could say.} So, why am I showing you this…well I’m proud…and I want other’s to know they TOO can DIY their home, if I can do it, YOU can! Because like most, I have expensive taste without the budget. I’m a stay-at-home Mom married to a conservative cop who does what he does for a bargain salary. But I thank the Lord everyday that he has a job and a roof over our heads and skills and motivation to make things like an $18 side table to store things like Matthew’s “trickle up poverty” book…he claims everyone should read it, so…there’s his plug in my blog. So! Visit Ana’s site, find some plans {because who knows maybe you hate this table}, buy some wood, put on your safety glasses {Norm Abram style}, and send the wood dust flying! {One word of advice…don’t turn your shelf and picture frame covered office into your wood shop…you WILL spend 2 hours vacuuming, dusting, and then dusting more dust that settled after the vacuuming…put on a coat, suck it up, and head to the garage…that’s what its there for.} http://ana-white.com/2010/01/plan-hyde-side-table.html [...]
MirandaJane (not verified)
Thu, 01/06/2011 - 12:20
Love this! Just made it 2
Love this! Just made it 2 days ago and I'm SOOO happy with how it turned out. Thanks Ana! Here are some pics! http://mbatchelderphotography.wordpress.com/2011/01/06/a-side-table/
Tryde End Tabl… (not verified)
Wed, 01/19/2011 - 11:44
[...] in Brag Blog Put on
[...] in Brag Blog Put on my TO-DO List Save as PDF Print this PostShare/Bookmark Builder: marla Blog or Website:http://www.williamandmarla.com Experience Level: Some Experience Estimated Cost: $50 Estimated Time Investment: we finished building in one night, just took us forever to get around to staining From Plan: http://ana-white.com/2010/01/plan-hyde-side-table.html [...]
Kati (not verified)
Sat, 02/05/2011 - 09:23
I love your website. It has
I love your website. It has gotten my creative juices flowing again! I used the plans for this table but altered them a little to make a little table for my son. It is perfect and so easy to do. I blogged about it here: http://housefulofhandmade.blogspot.com/2011/02/look-what-i-made-little-….
Thank you so much for being AMAZING!
Dee22
Tue, 12/27/2011 - 17:28
tryed side table
Thanks for this plan. We made these for my daughter & son-in-law for xmas. They loved them.
Aubrey (not verified)
Thu, 07/26/2012 - 19:02
What did you use to finish
What did you use to finish this table? I love the look of it
Amberwms (not verified)
Sun, 10/14/2012 - 07:07
Building plans
Does anybody have instructions on adding the shelf on the bottom?
TallPaul6533 (not verified)
Sun, 11/18/2012 - 15:21
Question: top of the table
As I'm building this table, I keep thinking about the top of it. When I get to that point, where on the wood should I place the screws? I don't want the screw heads to be on the top of the table (because that would look odd). How can I attach the pieces without the screws being on the top? Thanks!
billp0315
Fri, 09/04/2015 - 11:37
farmhouse
farmhouse
camgauthier
Fri, 01/12/2018 - 17:08
4x4 Pressure Treated?
I have read that it is not reccommened to use PT wood inside but so many projects I have turned my head from because they require 4x4's. Just wondering if there is a place where you can even find these or a way to make 4x4 from 2x2 without proper tools for jointing and planeing (I dont have these in my tools as of yet). Thansk so much
BigDaddyKane
Wed, 12/30/2020 - 13:12
Where does Kreg Jig come into play?
I am confused which boards require the Kreg Jig???
BigDaddyKane
Wed, 12/30/2020 - 13:13
Kreg Jig required??
Which boards require the use of the Kreg Jig??