
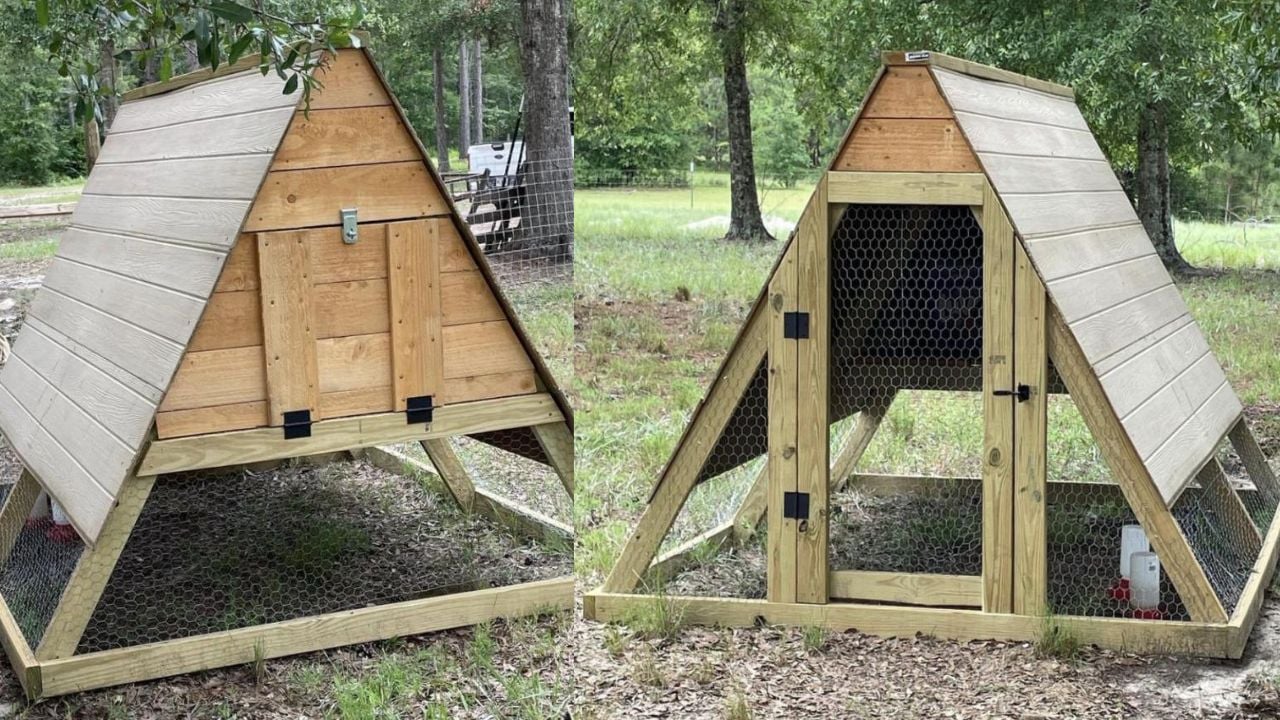

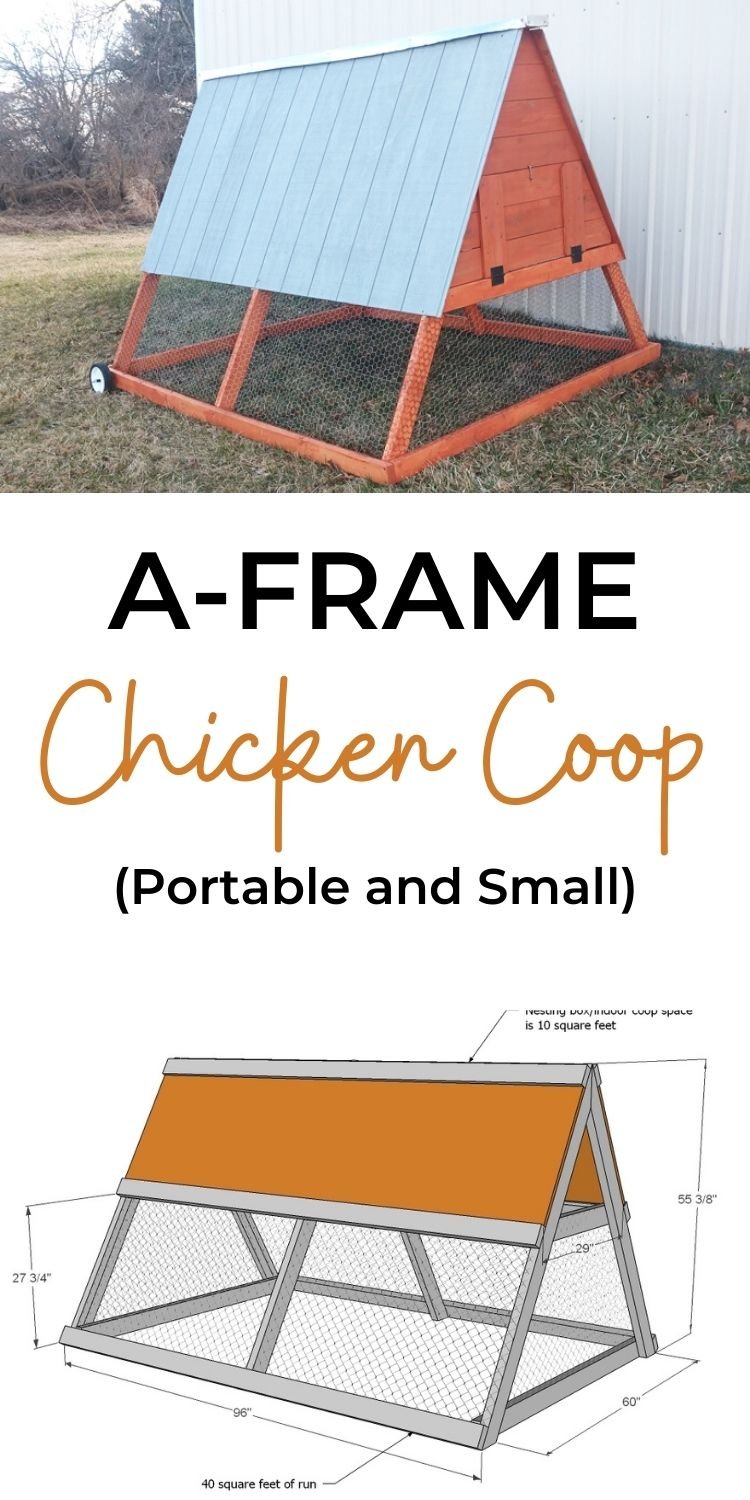
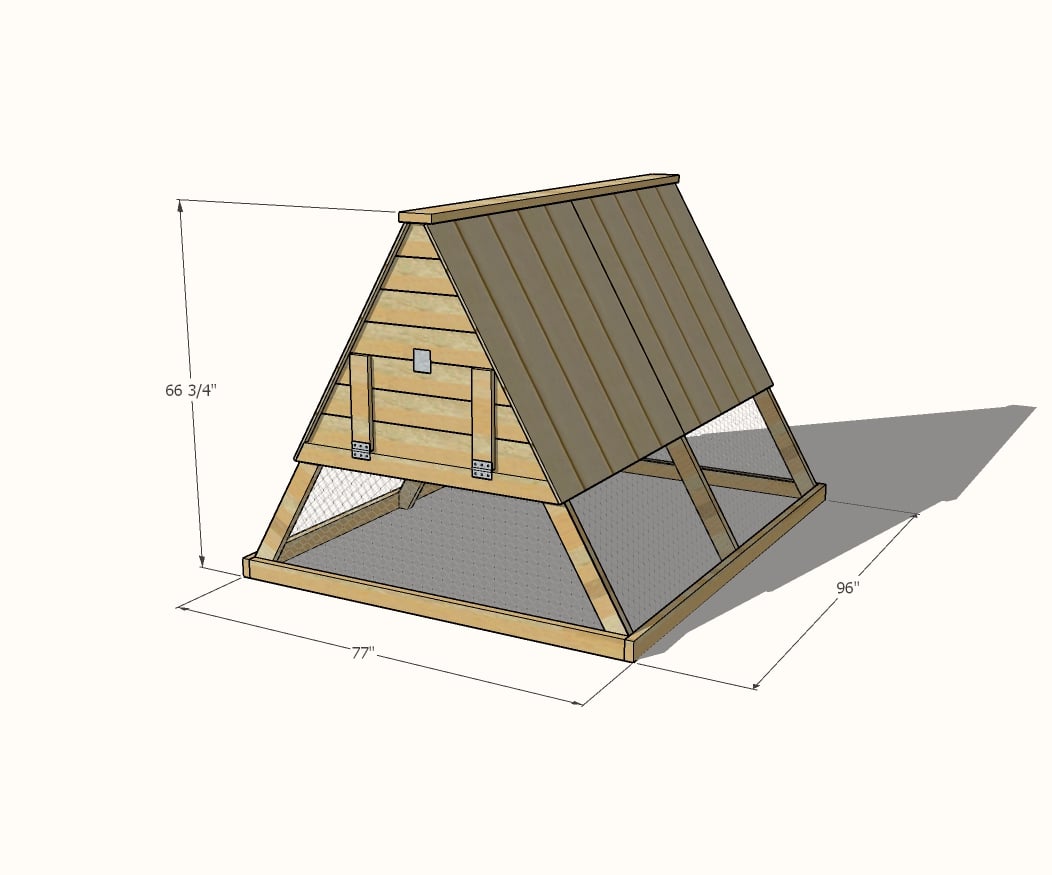
Free A Frame chicken coop plans designed by Ana White. This design is water tight at the top with fixed sides.
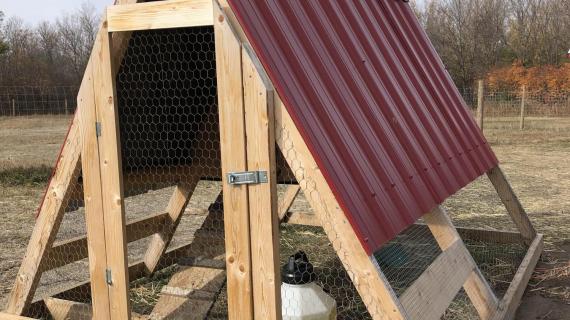
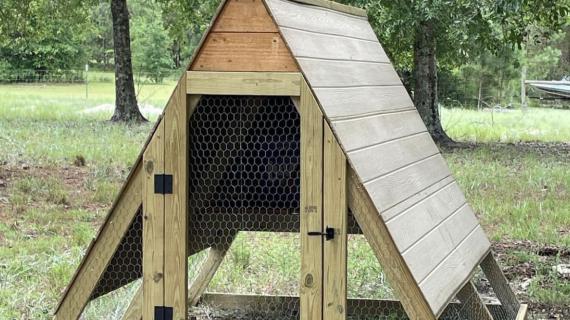
Main photo by Fruit of Refuge features some modifications and upgrades
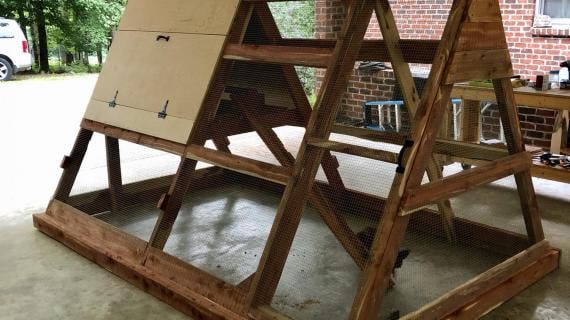
Almost a decade ago, I built my first A Frame Chicken Coop. And while that coop is still being used today, over the years of using it, I've found ways to improve it.
Updated A Frame Chicken Coop Plans
- Suitable for 3-5 chickens (perfect for most families)
- Easy to build design with off the shelf materials
- Designed to shed water and provide plenty of shelter for the chickens
- Built in nesting box
- Doors on each side for easy access and allowing chickens out to free range
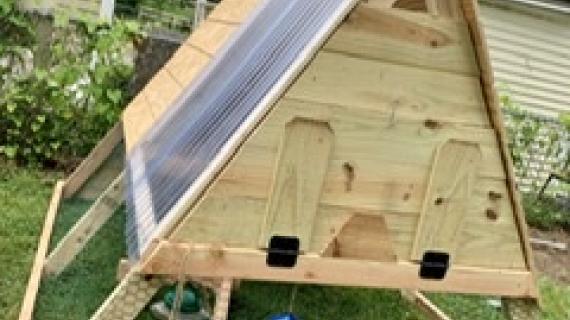
One of our generous readers, Doug Livingston, built this project and provided the following photos and suggestions:
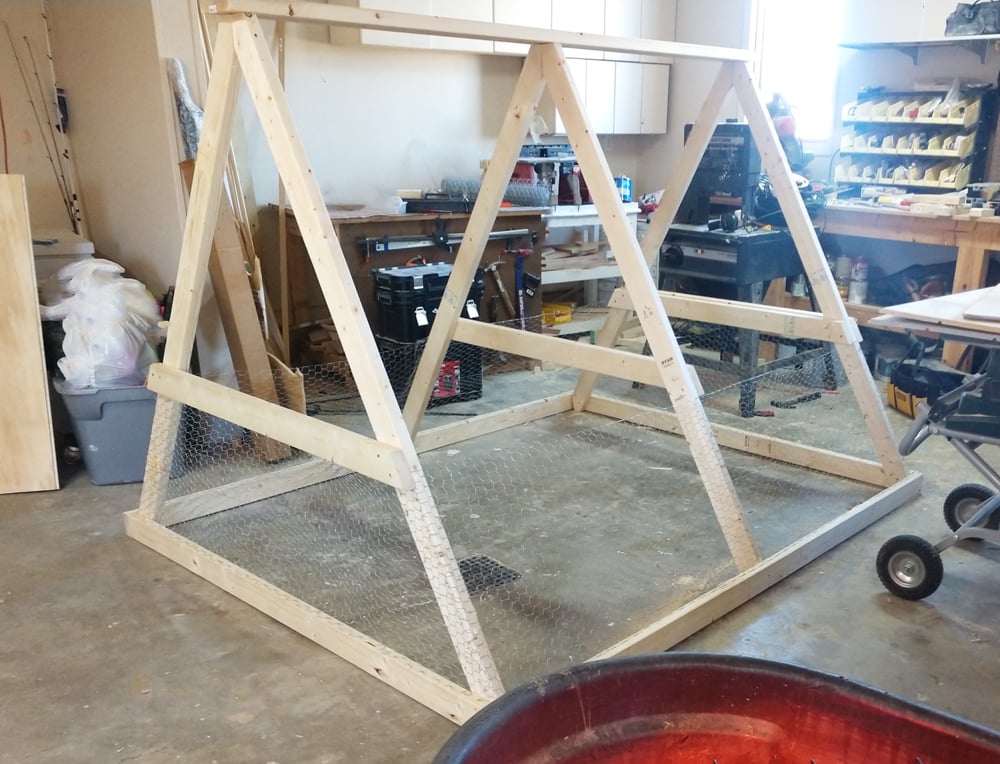
The hardest part was getting the A Frame angles to match at the top and bottom, but it all worked out just fine.
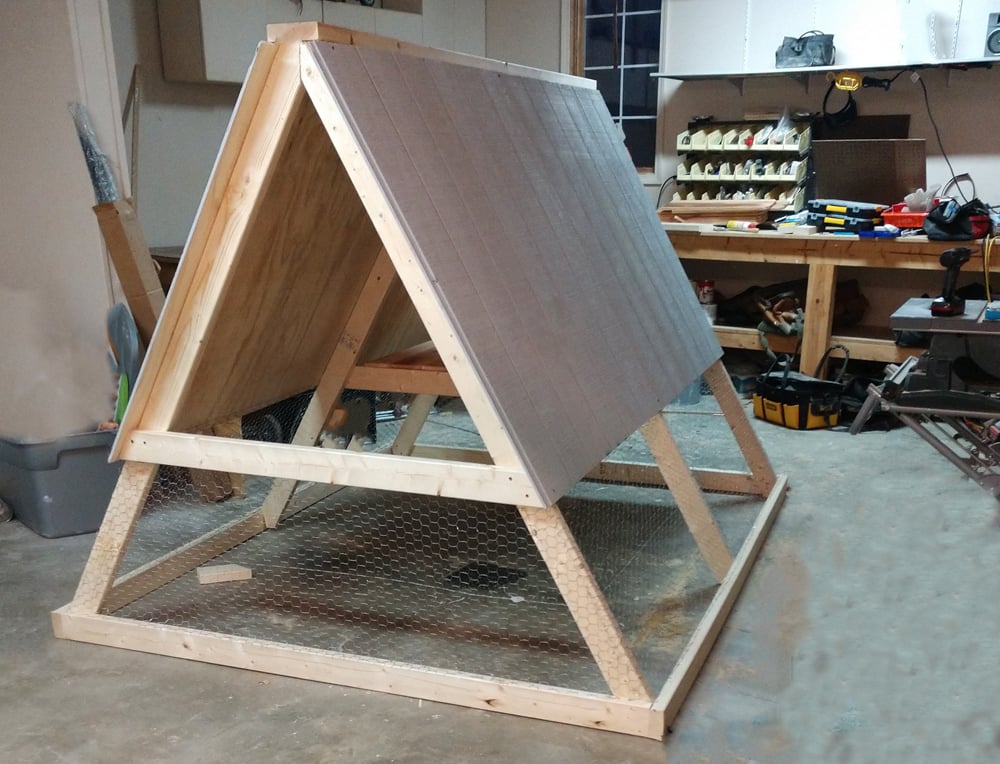


On the top, Doug added waterproof flashing.
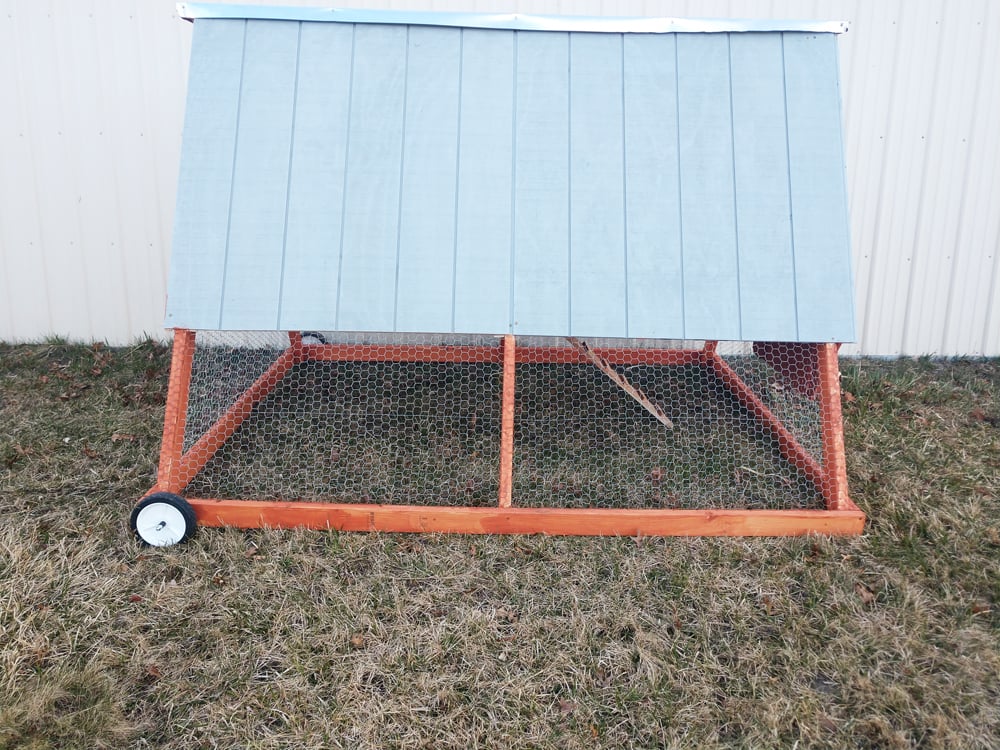
Doug added temporary wheels to move it because it got quite heavy.
Pin For Later!
Preparation
- 2 - 2x4 @ 8 feet long (DO NOT CUT)
- 2 - 2x4 @ 104-5/8" - cut the 51" pieces from these boards
- 8 - 2x4 @ 8' or 8' stud length (cut everything else from these boards)
- 1 - 2x6 @ 8 feet long (prefer cedar or treated as it is rot resistant - this is the peak of the A Frame)
- 12 - 6' x 5-1/2" wide cedar fence pickets
- 2 - 4x8 sheets of 3/8" thick T1-11 siding or exterior plywood
- 2 sets of 3" exterior hinges
- 2 exterior gate locks (small) or hook and eye closure
- 25 foot bundle of 2 foot wide chicken wire
- 1/2" staples for attaching chicken wire to wood frame and staple gun
- 60 - 3" exterior self tapping construction screws like these
- 100 - 1" self tapping screws like these
2 - 2x4 @ 96" - base sides
2 - 2x4 @ 74" - base ends
6 - 2x4 @ 75-1/4" - both ends cut at 30 degrees off square, long point to short point, ends ARE parallel
1 - 2x6 @ 96" - top
4 - 2x4 @ 51" - both ends are cut at 30 degrees off square, long point to long point, ends are NOT parallel
7 - cedar fence pickets @ 44" long - nesting box bottom
4 - 3/8" thick T1-11 wood siding @ 48" x 48" (cut each sheet in half)
Ends should be cut to fit for the best finish - see in plans
Cut boards with a compound miter saw (recommended) or circular saw using a guide as an alternative.
Cut T1-11 siding panels in half with a circular saw to create four panels each 48" x 48".


Instructions
Step 1
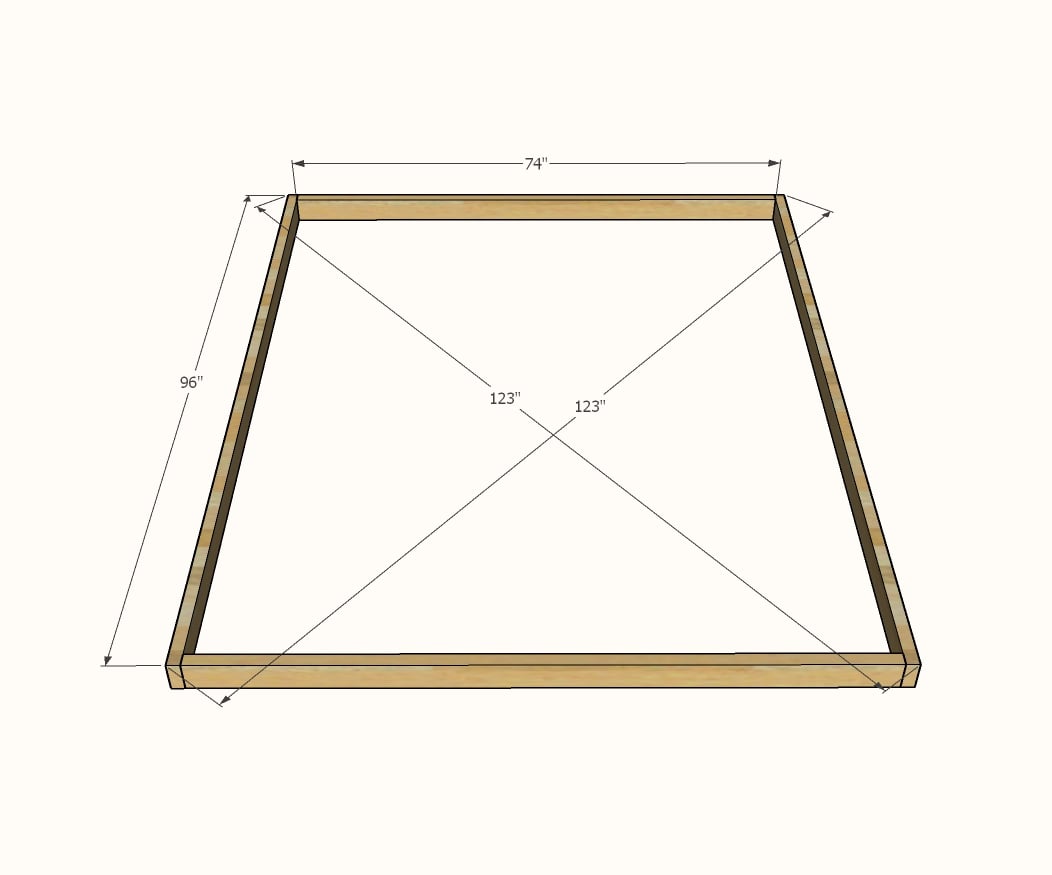
Build the frame for the chicken coop near it's final location on a flat, level surface. You can move the final coop - we designed it as lightweight as possible - if need be.
Use two 3" screws at each corner.
Take diagonal measurements as shown and make sure the measurements match. If not, push the longer diagonal corners together and check again for square.
Step 2
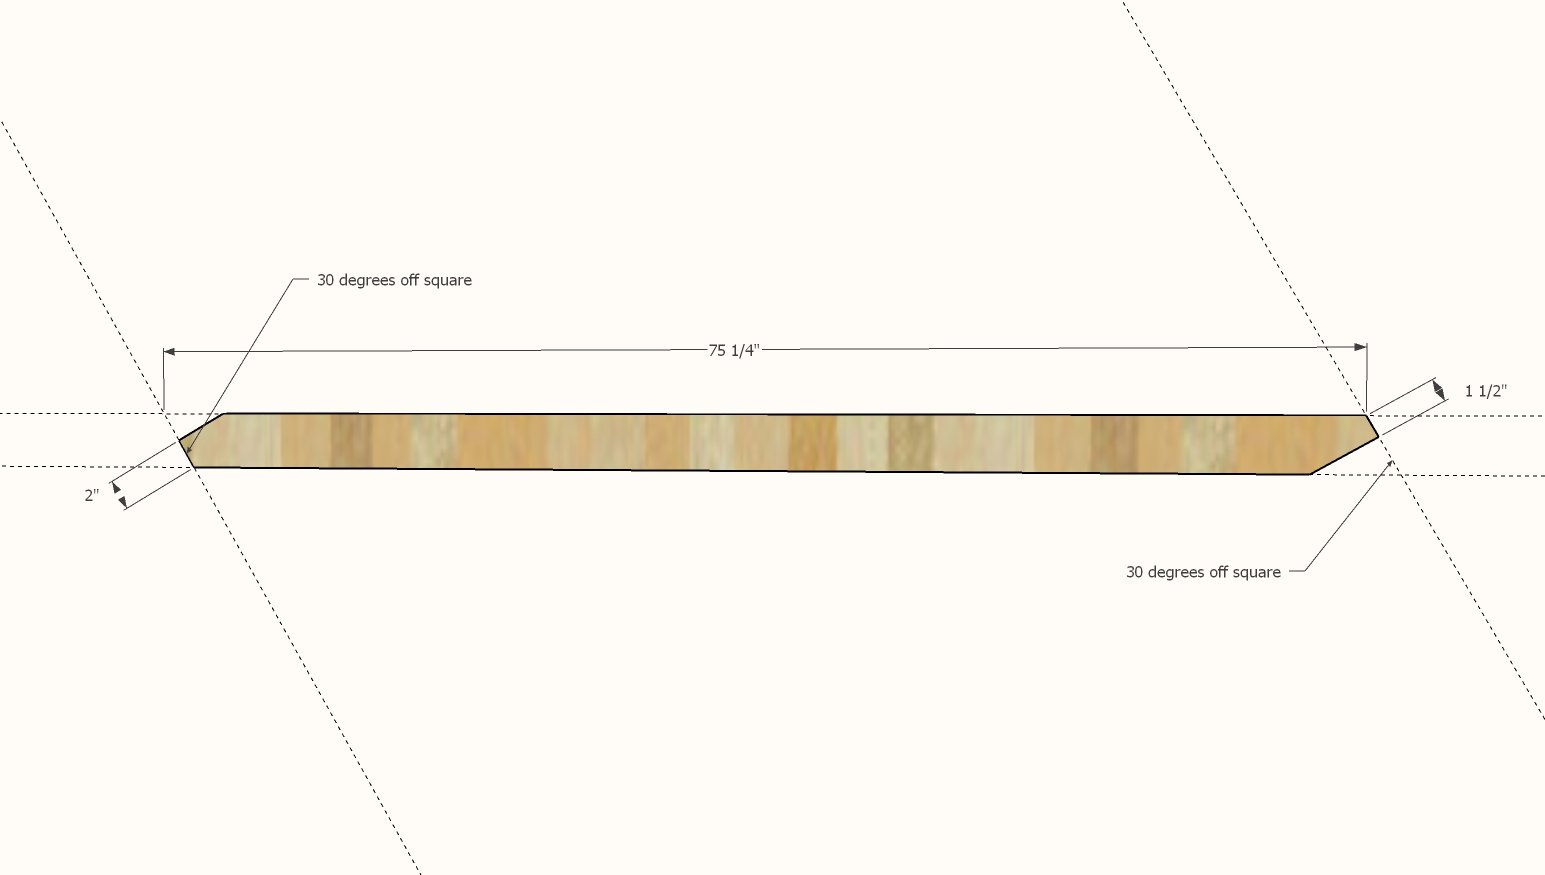
For the a frame wall boards, use a speed square to mark the ends at a 90 degree angle to your cut ends as shown in the diagram.
Cut with a circular saw.
Repeat for all six of the a frame wall boards.
Step 3
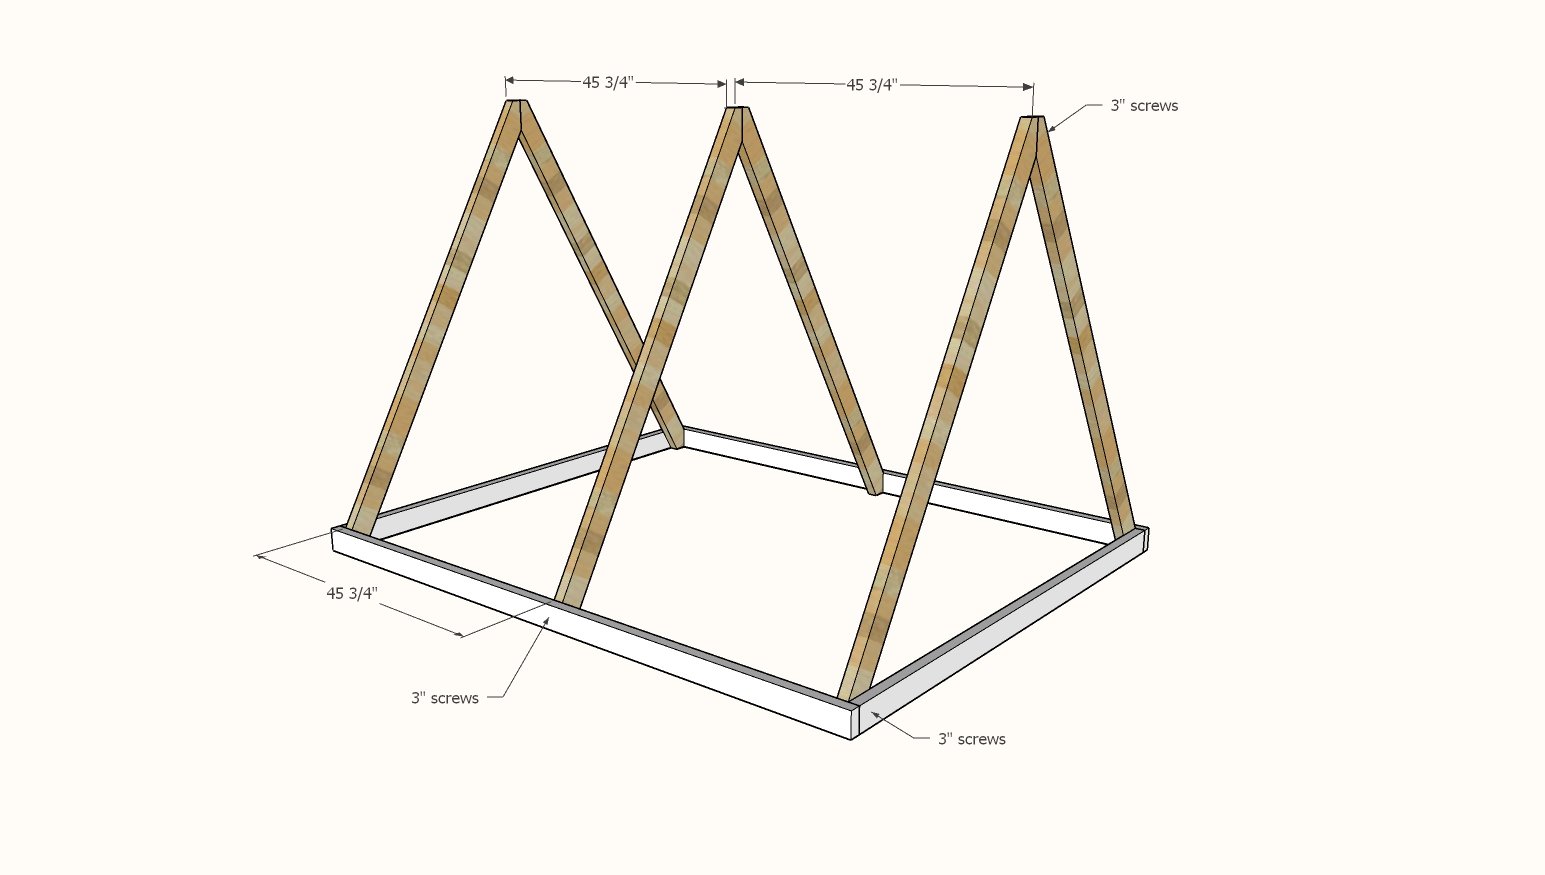
Attach the outside a frame wall boards first inside your base frame with 3" screws.
Then add the remaining center a frame wall boards, centered on the base.
Step 4
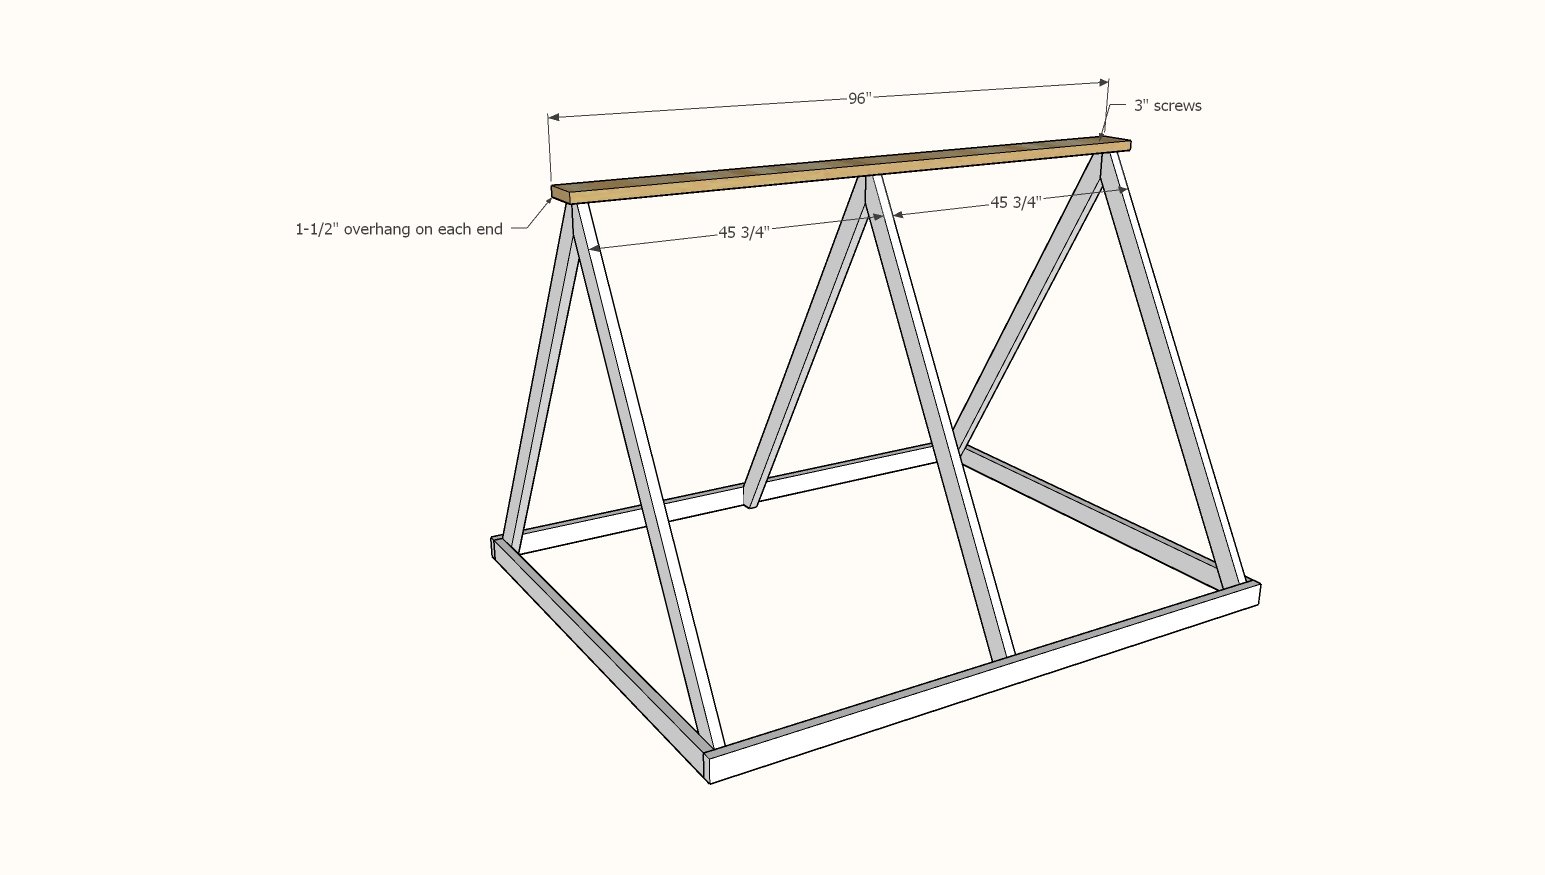
Attach the 2x6 on top of the a frame wall boards to create the ridge with 3" screws.
Step 5
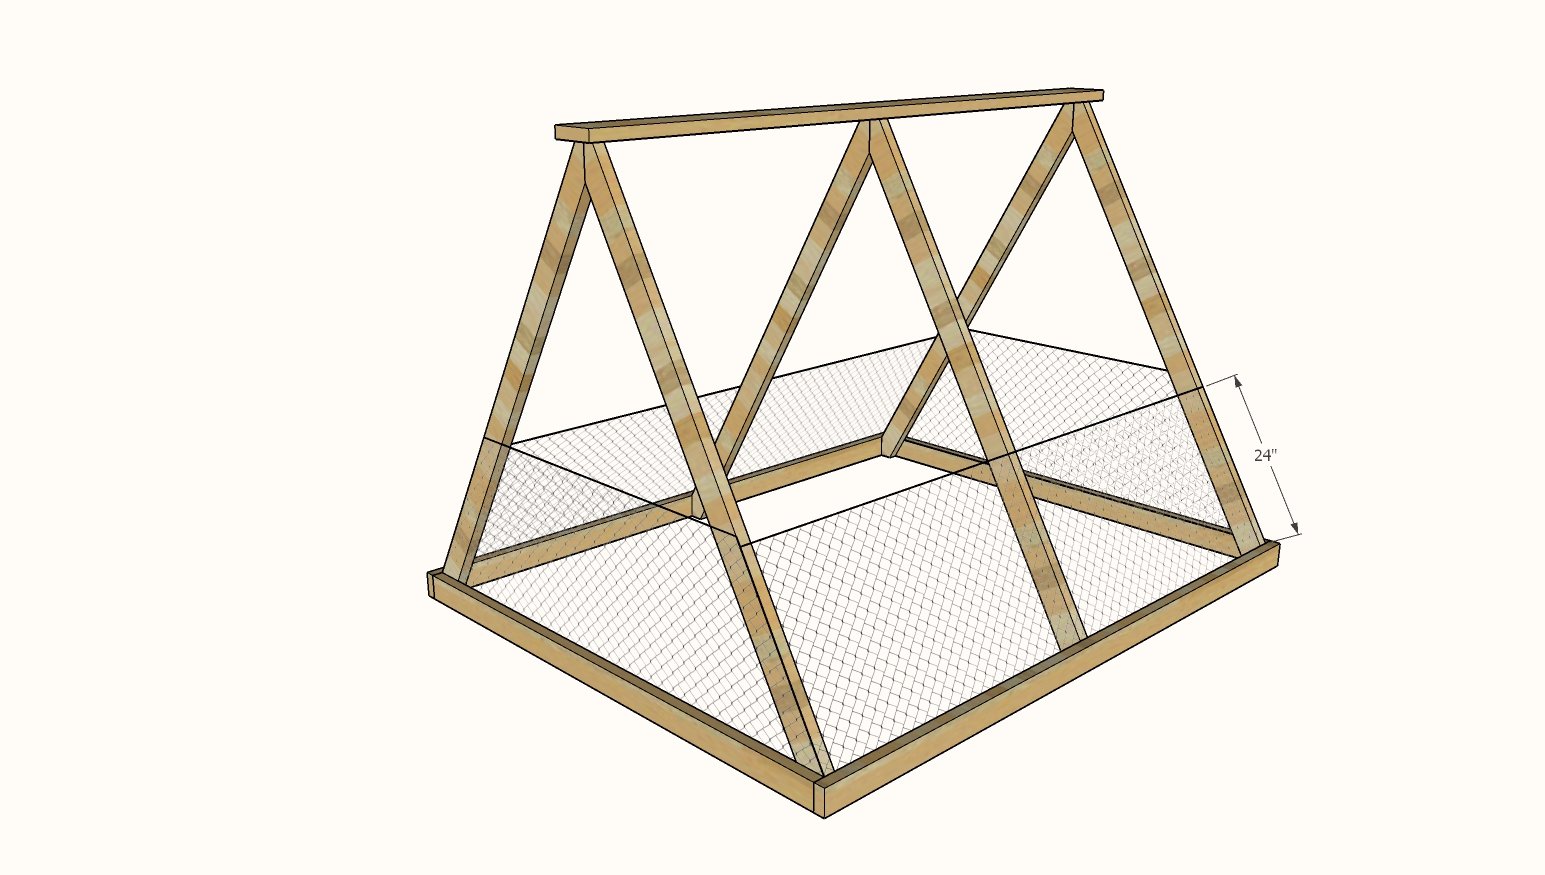
Now is a good time to add the chicken wire.
Attach with staples all the way around the base.
Step 6
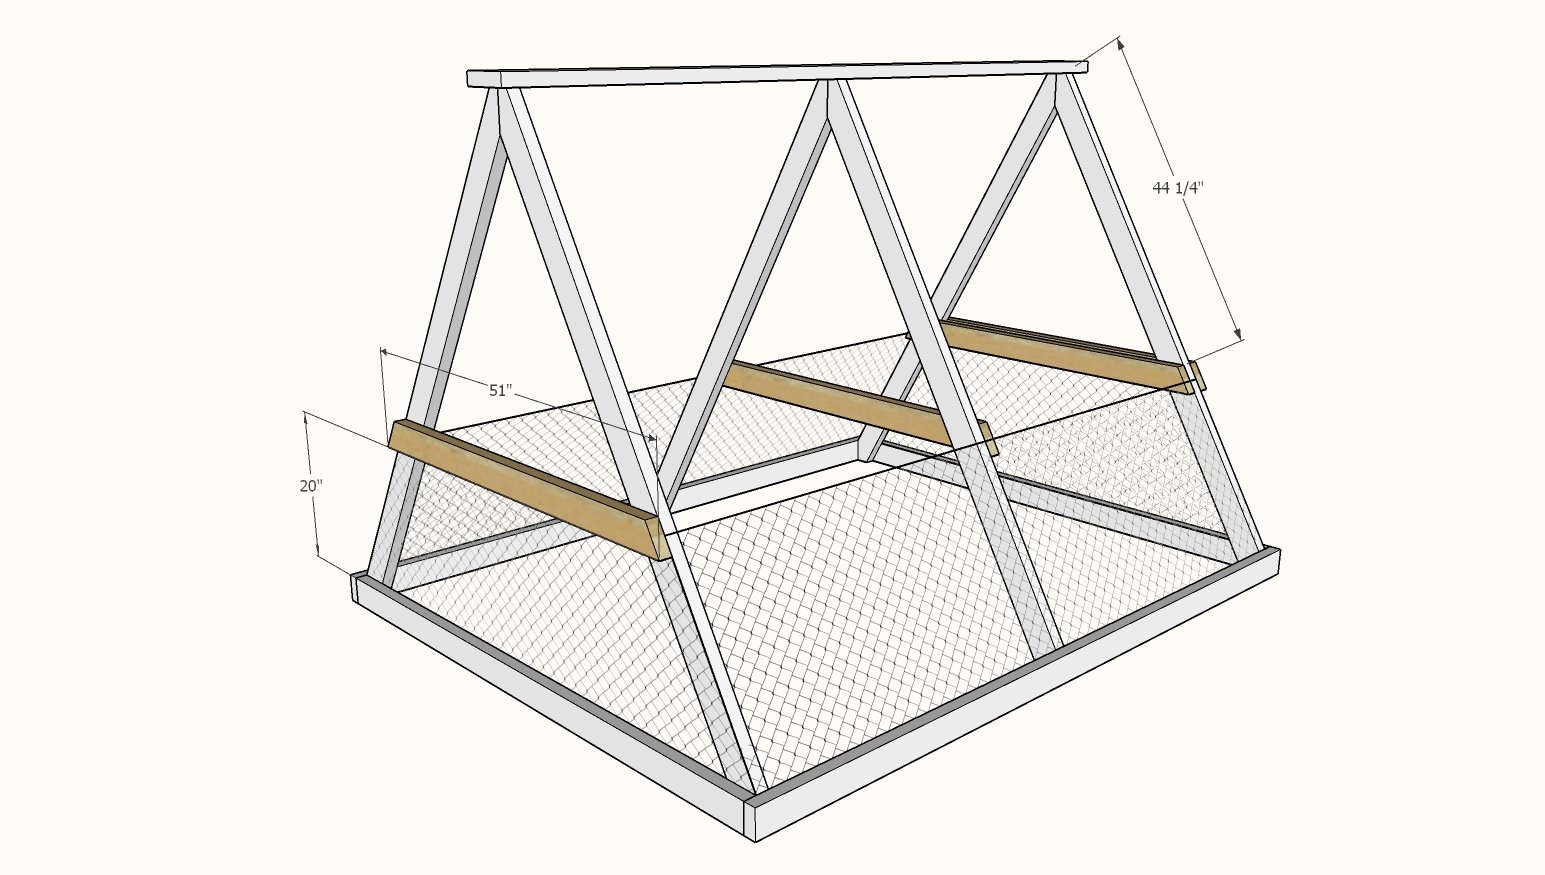
Mark the a frame wall boards down from the top edge 44-1/4".
Attach with 3" screws the built in floor joist to the a frame wall boards. Notice there are two on the end that will have the nesting box (it's hard to see in the diagram, all the way at the back of the coop).
Step 7
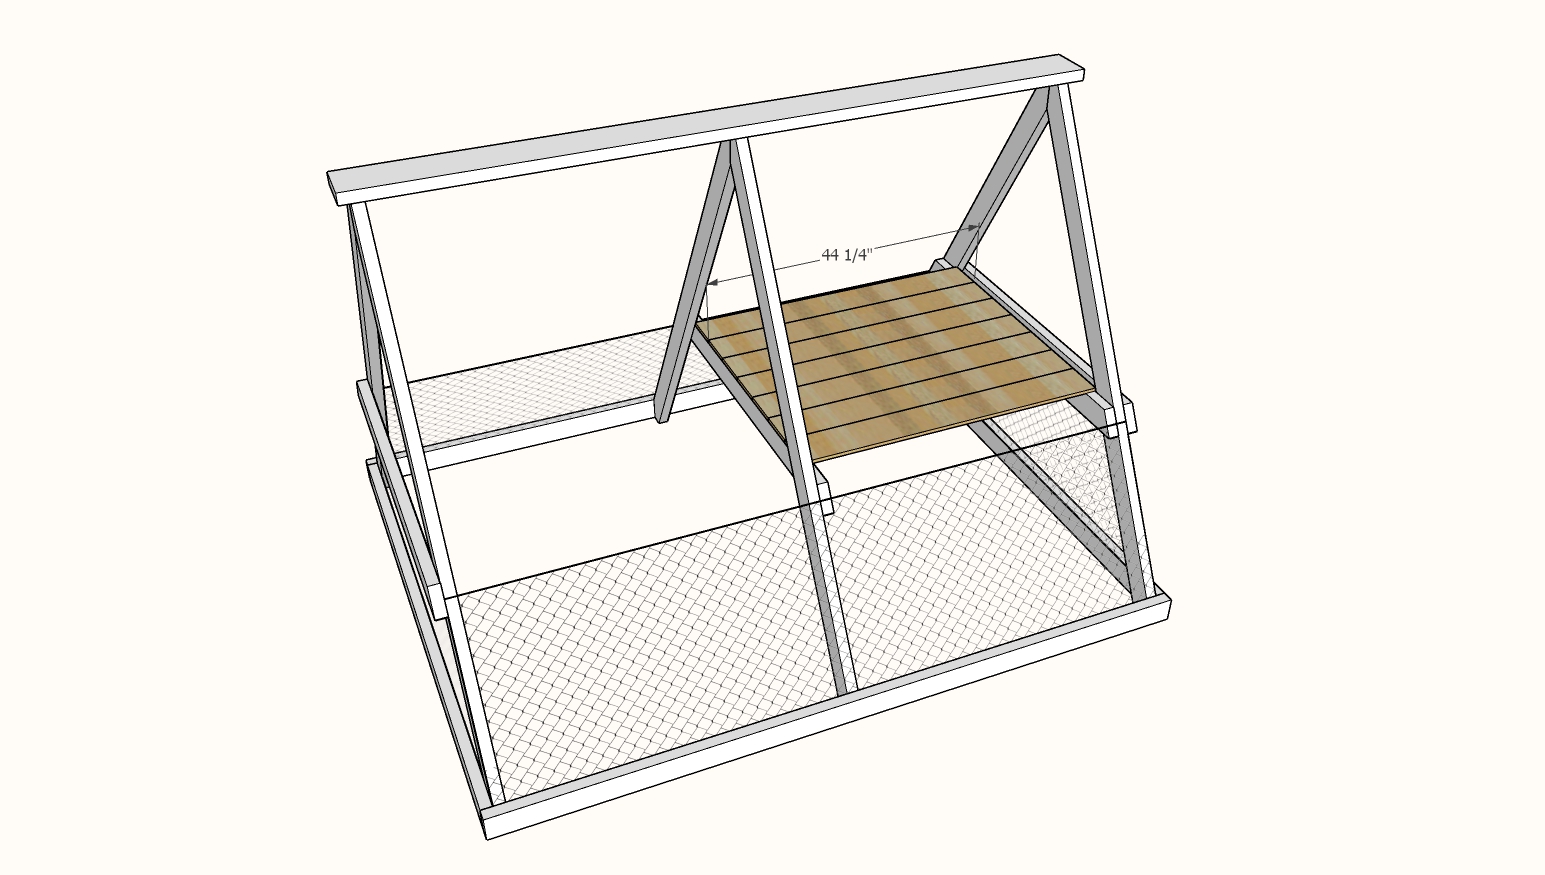
Place the cedar fence pickets at 44" inside the coop. Screw down with 1" screws - one per end - don't go crazy here, you want these boards to be removeable if needed for cleaning.
Another option is to use scrap 2x4s inside the floor joists, parallel to the floor joist, right along side, and attach the cedar fence pickets to the scrap pieces but NOT the floor joists. Then you can remove the entire floor.
Step 8

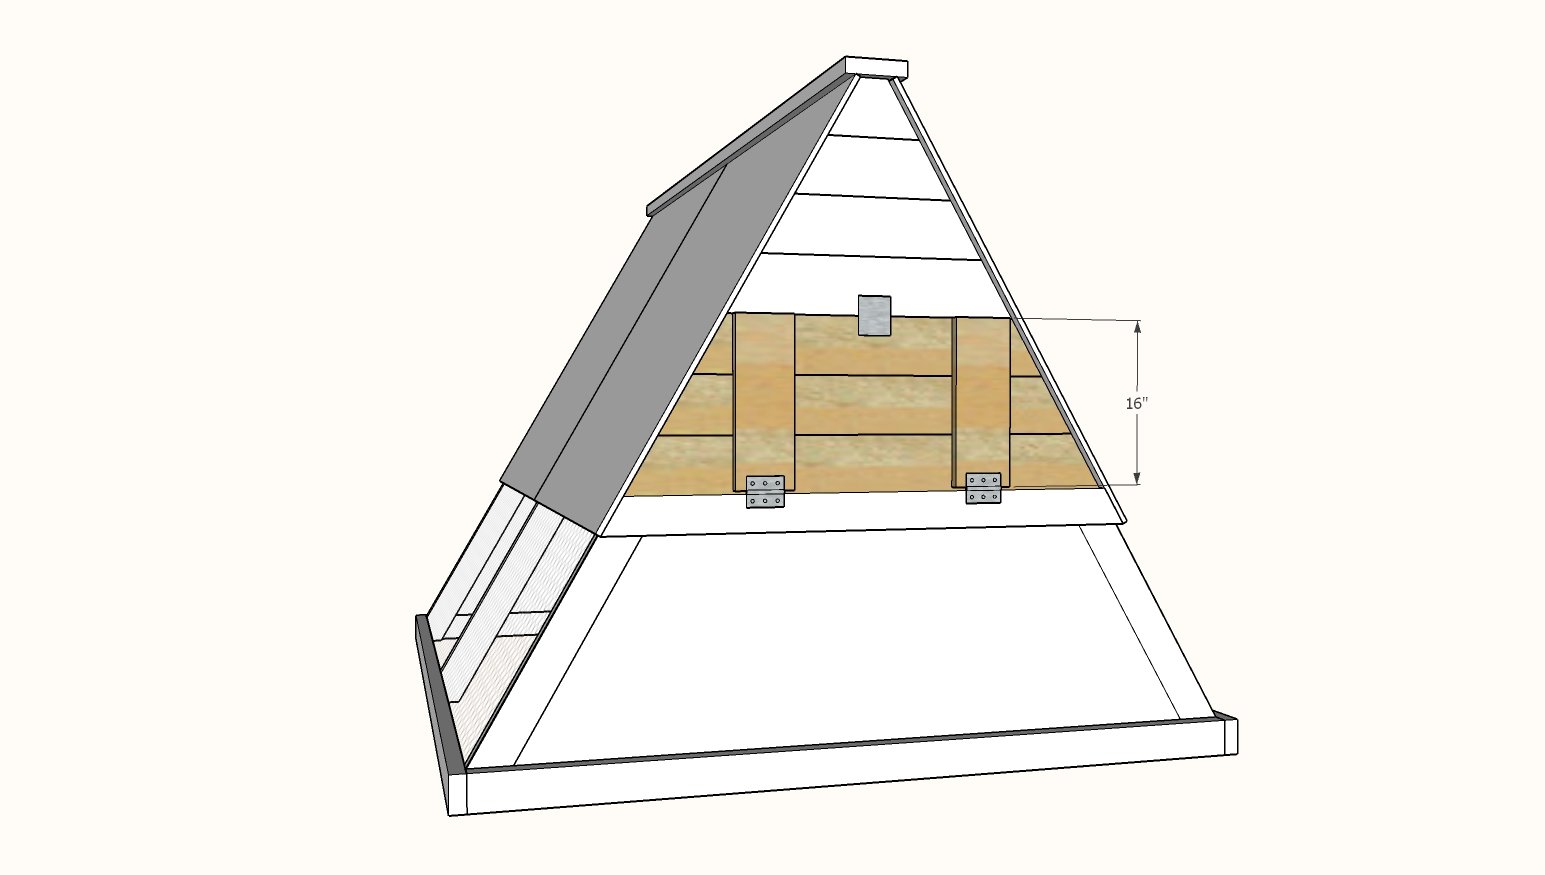
Attach the T1-11 siding under the ridge with the 1" screws, about four screws per joist.
Step 9

Start at the top and measure and cut the gable boards from cedar fence pickets. The cut angle is 30 degrees.
Attach with either nails or the 1" screws.
Step 10
Cut the remaining cedar fence picket pieces to cover the ends but don't attach. Cut these a little smaller, so there is a gap on the ends so it is easy to open and close.
Cut four cedar fence pickets to 16" long.
Attach on top of the angled fence pickets to create the door.
Hinge in the opening with hinges.
Install the latch to secure.


Comments
jennfarese
Fri, 03/27/2020 - 17:54
Consider Cedar
Hi Ana - i'm headed to the store tomorrow to get started on this new coop plan. I noticed that you called for cedar planking for the floor of the nest box. I've kept chickens in the past & recall reading about not using cedar in a chicken coop, as it can aide in chicken sickness. Something to consider!
Thanks for all you do -
Jenn
Bannat77
Thu, 04/02/2020 - 18:10
So I've started building…
So I've started building this, but I realized a major flaw (at least for me). There is no ground-level gate or door for the chickens to walk in and out of. I'd like them to be able to free range in the yard at times and then "go home" at night. I may have to modify, but was curious why this was not included in your design...probably a good reason.
rebuild51
Mon, 04/06/2020 - 19:39
Frame wall boards??
You do very well thought out instructions for your builds and this is no exception to that but.... regarding the frame wall boards, which end goes up???? I am modifying the exterior to match our needs but the framework I will not touch.
GRD
cbittler
Sat, 05/09/2020 - 18:38
What would I need to do to…
What would I need to do to make this suitable for 6+ chickens? Just increase the length?
louie82
Sun, 05/24/2020 - 11:32
I need the same..im thinking…
I need the same..im thinking build the wntire A-frame as a coop and im going to make a chicken door on one side (or on one end) for an 8x8 run. I also am thinking i will make one side an entire "lift-up"door on hinges for clean out. Did you figure something out? Im not using cedar, but plywood and probably tar paper and shingles for weatherproofing. I need to cut a few "vents" for fresh air as well
tanna86
Tue, 05/12/2020 - 11:28
Help with materials
Can we use something other than cedar fence pickets? The only place we have around here does not carry this at all.
RevRunned_Jon
Wed, 05/13/2020 - 15:44
Step Two Measurments Wrong?
I see a lot of comments here about how cool this looks, but see no one who has actually built this.
Has anyone built this following these exact plans?
I just cut my boards according to step 2 (30 degrees off square at 75 1/4" inches) and they do not meet up in the middle, the base is 74" at the bottom..... i believe either the angle, the board length, or both are wrong.
Anyone know what they should be?
RevRunned_Jon
Thu, 05/14/2020 - 07:00
Never mind.... I pivoted my…
Never mind.... I pivoted my square (in a hurry) the wrong way, threw the whole thing off about ten degrees.
The Plans are correct. (It will not let me delete my statement above, hopefully a moderator can) so i am trying to correct it here. ;-)
kwatts
Thu, 05/28/2020 - 13:00
I'm considering building…
I'm considering building this coop - is there an interior door that closes? We don't have chickens yet - but I'm trying to figure out how you close them up and protect them at night. Also - to let them roam the grass do you just open the door and let them out? And has anyone done anything around the bottom to help prevent digging by other animals?
rgenck
Mon, 07/27/2020 - 09:29
Would it be possible to…
Would it be possible to build this so the whole long side comes up? That would make it WAY easier to clean.
60buckscash
Sat, 08/01/2020 - 07:33
Build Upgrades
I recently completed this. It is a good coop and quick to build. Changes I made are the following:
-I added small blocks to the side of the middle frame to aid in securing the roof panels.
- My lumber store didn't have 5 1/2" pickets so I went with 4". It worked great. Just needed a couple extras.
-I used a heavier hardware cloth on the sides. Additionally, I ended up wrapping it around to the bottom of the coop to secure it. With a dog and racoons around we wanted this to be a little stronger.
-I put an extra 2x4 at the top of the hardware cloth to prevent the panels from being popped in. This also served as a handy place to secure a waterer for the birds.
- I also added a smaller access door under the main one. As there will be a 12'x12' run that this is a bigger part of I wanted to be able to have a clean out and access for them. I used 3 2x4s that were cut to 27" long and secured vertically. They were placed as far as possible to the sides and the edge of the middle one at center. This way the door will be able to swing open and take up a minimal area.
belovedfarms
Sat, 08/15/2020 - 18:23
Don't use chicken wire!
Great design! However, chicken wire should NEVER be used for these, as raccoons can easily pry the wire apart to get inside and kill your chooks. Use hardware cloth - more expensive but sturdier and much safer for the precious chickens. Also, you don't have to use cedar if it's cost prohibitive - you can always use a softwood and seal it. Make sure the tractor is on a level surface otherwise rodents will be able to squeeze under the base.
arodenburg
Tue, 09/08/2020 - 18:03
Is this ok for winter weather?
Is this plan sufficient for winter weather? If I’m not mistaken the chickens would be wide open to the weather on the one end that opens up for feeding and such. Please advise if you are using this chicken coop in winter climates and whether the chicken weather through it. Thanks!