Crooked dog house

Thanks for the plan!

Built from Plan(s)
Estimated Time Investment
Week Long Project (20 Hours or More)
Recommended Skill Level
Intermediate
Thanks for the plan!

This past weekend I build Ana's Narrow Console table. I went Saturday evening to pick up the boards and cut them. I completed the whole project late Sunday afternoon. I don't have a nailer so in-between the project I switched to self-tapping screws and it became even quicker because using the ol' fashioned hammer and nails was difficult and time consuming. Cutting the angles was a first for me, and it is not bad at all! I was very intimidated first but so glad I took that first step! Also, I just watched her video countless times to ensure I was doing it correctly, and that helped the most ;). It is very lightweight and I did not need any assistance in carrying the table. I truly, truly believe anyone can do this!


Outdoor couch is a delight.
Damian

This is my very first project. I have no other tools yet besides the drill, so I had to make all the cuts with the hand saw, but it worked out well :) As I am in Europe, the imperial metrics mean nothing to me. The wood they sell here is of different sizes. That is overall not an issue, although I had a tough time calculating the holes for the legs. Luckily, only one error hole, and all came out level on the first try. No waste of wood! I also had a good helper.
Thank you, Ana
Ventsi


Didn't know what to do with the center open square. I didn't want to use plywood, so I used 1x3 slats for a Mission style bed look.
I am not a fan of the unfinished, raw look of the two boards meeting on the sides of the headboard in this plan. So I filled with wood putty and sanded (a lot).
This headboard is very top heavy. I wish I would have tried using 1X4's instead of the 2X4's like I read someone else did.


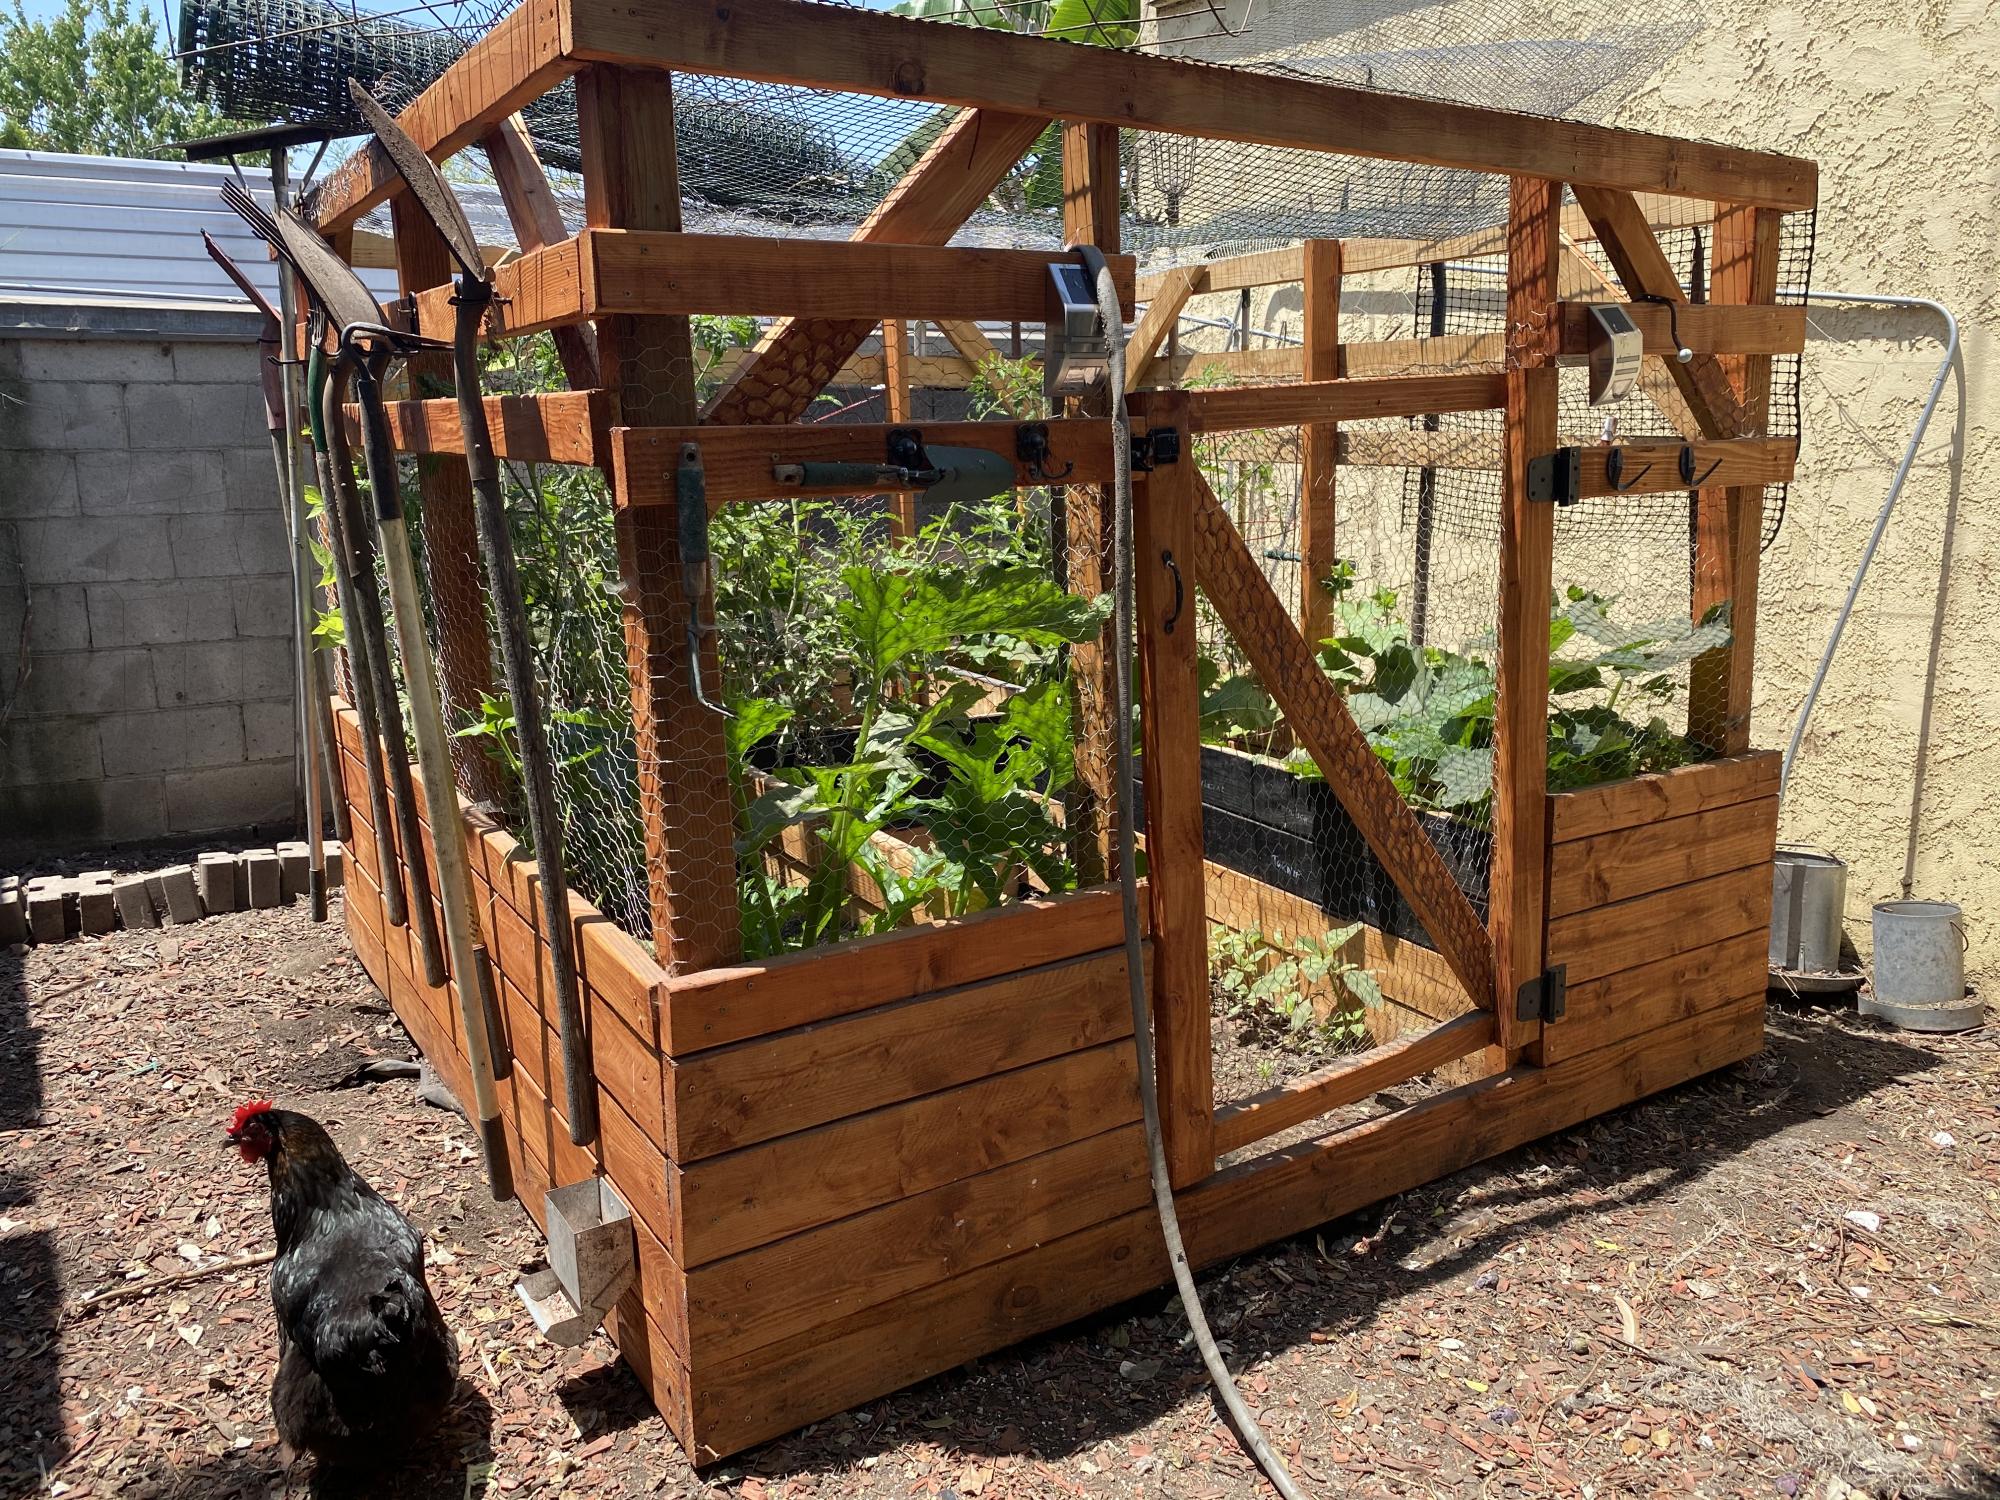
My chickens took over my garden area and being the voracious raptors they are, I needed to build a garden enclosure to keep my veggies safe. I modified a little, making my beds deeper. I also had to stretch chicken wire over the top to keep the great flyers out. I also used it as a way to organize my garden tools (which is possible because I live in Southern California with moderate temperatures and little rain. Thanks for the plans! Yvonne


Almost 5 years after we moved into the country onto our Hamstead of 3 acres, I finally committed to building our chicken coop. Last year, my husband brought home a ton of lumber used for shipping. I started tearing it down and slowly, over the past few months, I built this perfect coop for our 6 little chicks. It required a ton of sketching and planning, adjustments, and do overs, but it has come together so well. Thanks and shout out to the plan from Ana White and the brag post by @blackgirlbythesea

I honestly think Ana is a mind reader. Whenever I need plans for a particular piece of furniture, they magically appear on her site. Of course if she was a true mind reader, everything will be exactly as I need it requiring no modifications. That's what makes her plans so amazing. I can build bigger and better because I've learned to modify her plans to fit my current needs.
This Cart was no exception. I had to make mine a few inches deeper and change the height of the legs and it was a piece of cake. I put this together in less than 2 hours and finishing was easy too.
I did a blog post all about what I did differently including how I constructed a towel bar instead of the pipe. Check it out at www.thepursuitofhandyness.com


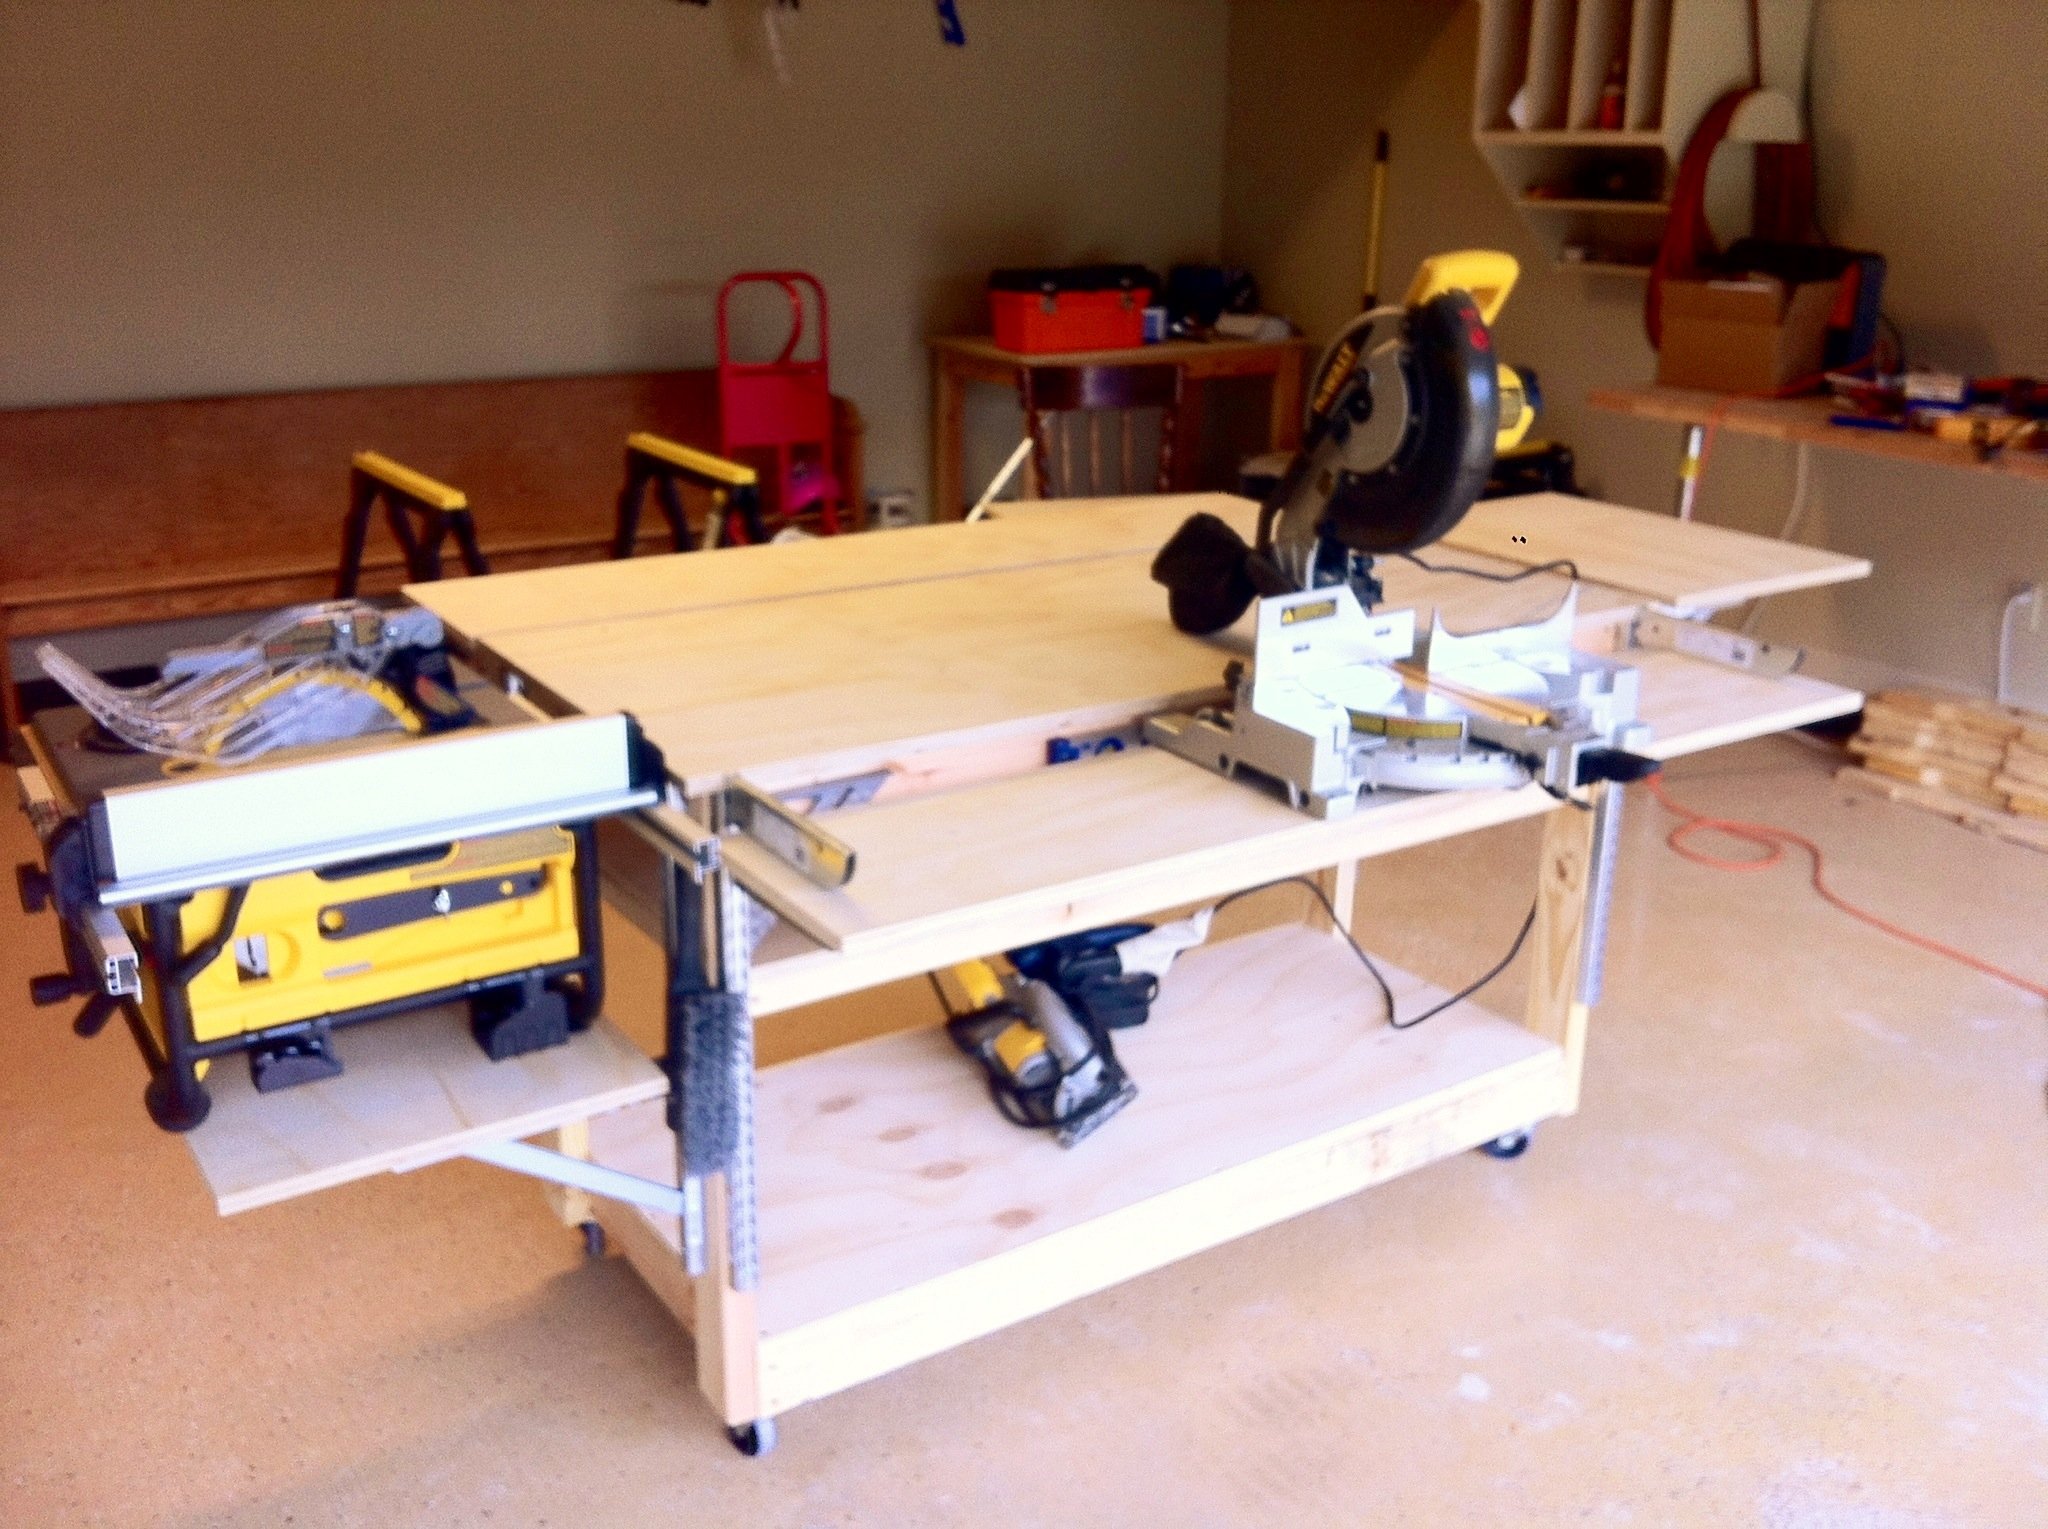
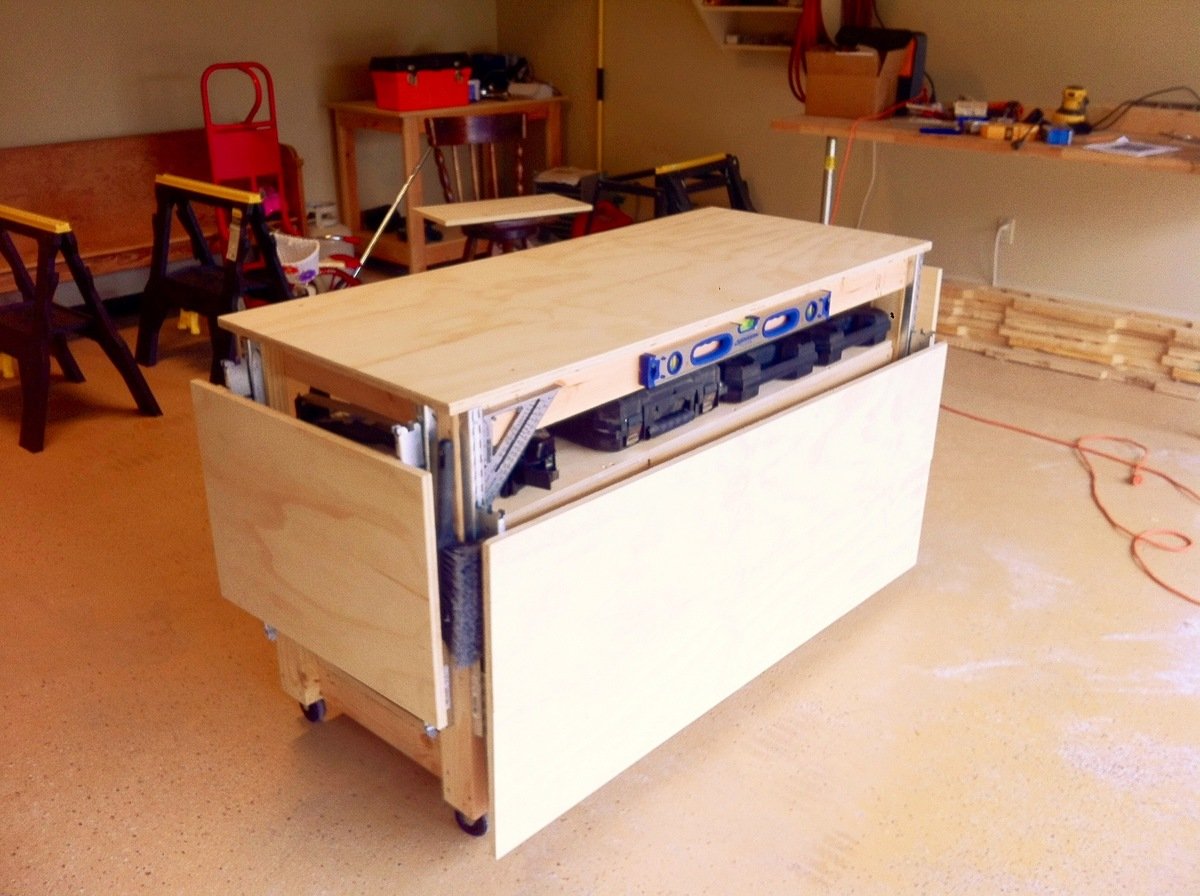
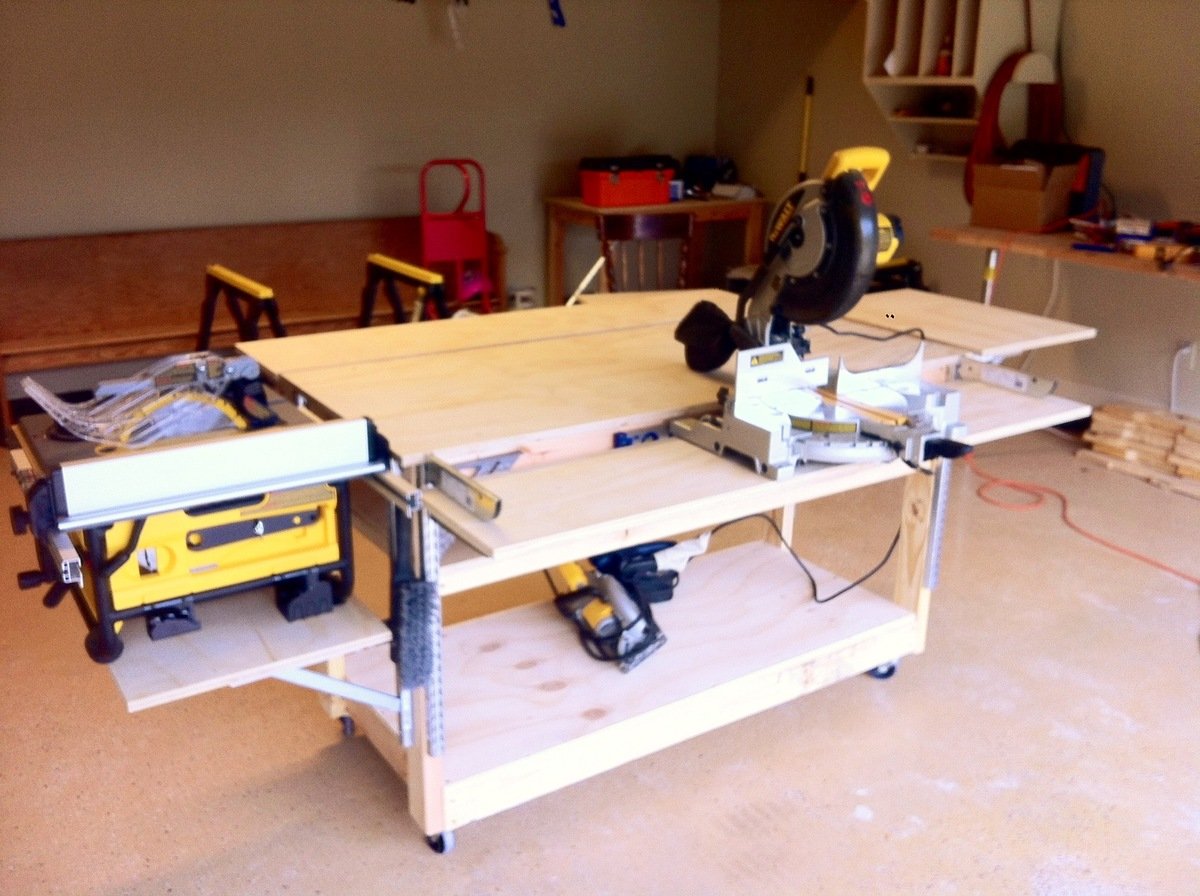
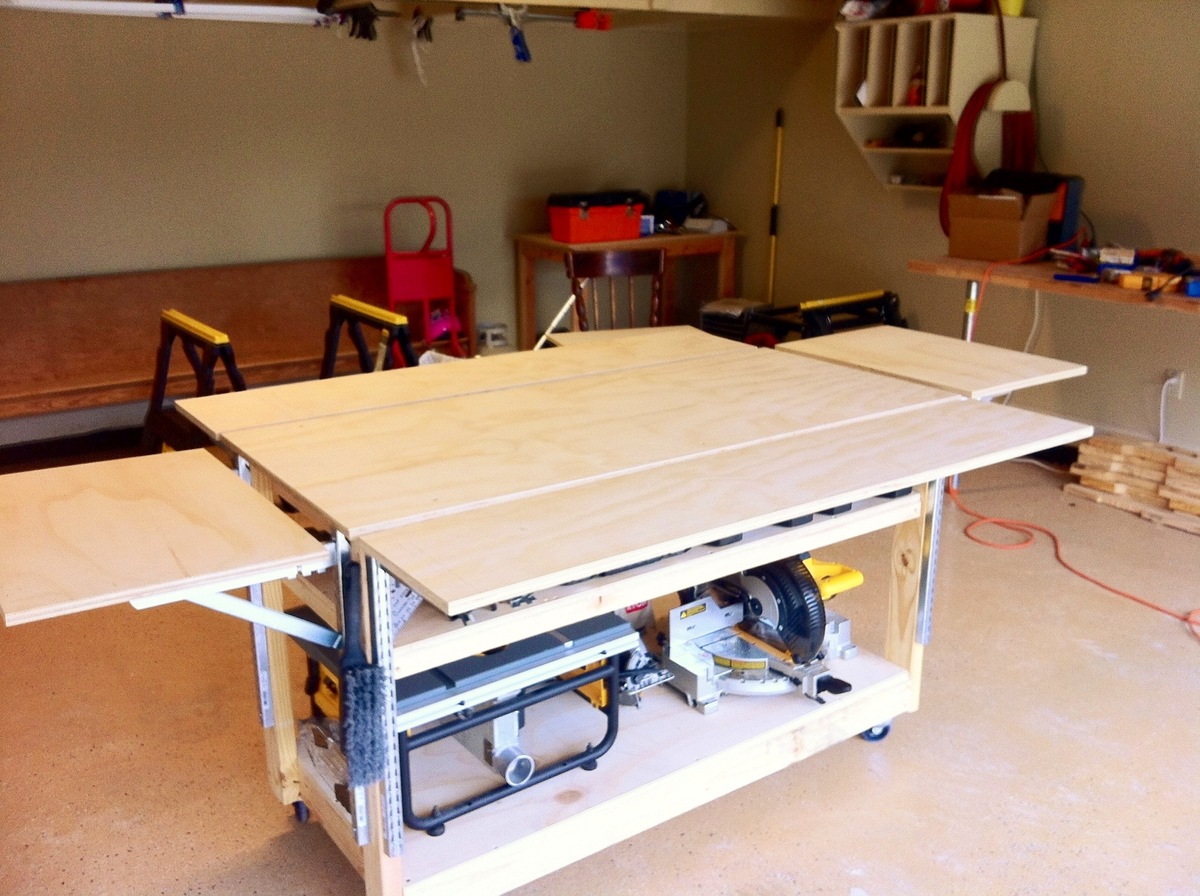
The need for a proper workbench in my garage/shop is a must, but. So is space! I already have a fold down workbench I’ve made with ¾ inch pipe & a door, but. I just need something that can handle all my tools. So, I stumbled upon these plans from the Family Handyman & couldn’t find a reason why this wouldn’t work in my shop. It has room for storage, can easily accommodate my tools & most importantly fold up to store. Easy to build too! Make sure you read all the plans first as some of the materials could be pricey, but well worth it. Technically it’s taken 2 months to build this bench, as I operate on a firefighter/teacher’s budget & during the holiday season no doubt. I ordered all the shelf standards & brackets through Amazon, $210.00 for those alone, but they hold so much weight to support your tools I figure it’s worth it. The rest materials (wood, screws) were purchased at Home Depot for around $150.00. The plans called for ¾ inch ply & it was $45.00 per sheet. However they did have a smaller thickness for $22.00 per sheet & was only a 1/32 inch thinner. I plan on topping all my surfaces with some ¼ inch tempered hardboard later on so I knew it would work. That also left me adjusting my screw size to mount my brackets. Due to the reduction in thickness of the plywood all my #8-1 inch screws needed to be adjusted to ¾ inch so to not screw through the ply. I also hit the molding isle to nab some pieces to use as furring strips to use under the shelves before attaching the brackets. This way I can sand each strip to match before mounting to make sure it lined up flat with the center top. One more thing; where it says “drill 1/8 inch hole in brackets make sure you use 1/8 inch pop rivets. I barrowed a pop rivet gun & was handed some rivets as well. Popped two & they had to be trashed because the rivet size turned out to be 5/32. So I stepped up in drill bit size & it all worked out. As I said, I’ll be topping it with some ¼ inch hardboard. I also plan to run it’s own electrical with an outlet on each post. I hope you all enjoy & this can help!
Thu, 11/29/2012 - 07:03
This is by far the best workbench I have ever seen!!! Thanks for sharing. And excellent choice of table saw and miter saw.
In reply to That is awesome! by Rusty Cottage
Thu, 11/29/2012 - 14:59
If I had it to do over I'd had gotten the contractor grade portable saw from Dewalt. The smaller version I have is the same 10" saw, but. It's maximum rip capasity is only 16. The other will at least rip a sheet of ply in 1/2.
Thanks for the kind words on the bench! I hope everyone that may find this valuable will. The plans came out of a 2005 issue & were hard to find on the internet.
Thu, 07/04/2013 - 18:28
I love this work bench and would love to build it but i cant find them. Could you post them or email them to me please. uniquetrio2000 [at] gmail [dot] com
Thu, 10/23/2014 - 09:04
After some searching, found the plans at http://us.readersdigest.com/images/offer/fh/project_plans/pdf/FH05DJA_W…. Hope that helps. This is on my list of things to make very soon.
Wed, 10/22/2014 - 13:31
I bought all the standards and brackets at Menards for $87.58 and this price included tax and shipping.
Mon, 12/10/2018 - 16:55
Thanks for sharing! Good job! Any chance you'd share palns? No luck on inet or with provided link. Thanks!
Wed, 08/07/2019 - 12:48
This is the perfect workbench that I’d like to build. Could I get the plans for it?
Thu, 03/12/2020 - 12:46
Were you able to locate the plans?
The link in this thread doesn’t seem to be active.
Sun, 07/12/2020 - 17:59
I found the PDF download for these plans, here is the link:
https://docplayer.net/28130746-Do-it-all-mobile-workbench.html
The only place where I could find them, FH doesn't have them online any more.

Tue, 12/08/2020 - 17:57
Great build. I would love to see an instructable on this. :) Thank you for sharing..

My husband and I built this table as our first project. We followed all of the dimensions from Ana's "Small Sewing Table" project here: http://ana-white.com/2010/10/plans/sewing-table-small-spaces?page=1 The only thing we changed was the size of the table top and the legs. We were worried about putting my heavy sewing machine on top of the leaf called for in the plan, so we created gate legs to support the leaves. Since the legs were going to be folded up in between the base and each leaf, we extended the center portion of the table top to accommodate the change. After it was assembled and stained, I decided that I didn't like the solid color, so I stenciled on a pattern with white latex enamel paint (what I had on hand) and continued to paint the base. After lightly scuffing it up with the sander, I layered 3 coats of poly on top. It has held up well, even after many large quilt projects! I just LOVE my sewing table!


Fri, 08/05/2016 - 13:41
Hi there. Could you please tell me what the brackets are you used with the gateleg? Do you remember where you got them? Thank you!!!
Fri, 05/26/2023 - 16:59
Hello I was wanting to know how to make the Gate-Legs for this project? Like the measurements and such. Thank you.
Sun, 05/12/2024 - 08:40
How heavy of sewing machine can this hold? My machine is 32 lbs. Would it be able to sit and be used on the “leaf” side of the table ?

We have wanted nice deck furniture since we moved into our house 22 years ago but just couldn’t justify the cost. I have made several projects from Ana’s website and I love her easy to follow and FREE plans! But this project was my favorite as you can see by the pics. I used cedar and my wife finished the furniture with stain. Thanks to Ana for providing these plans and helping a DIYer to feel proud!

Sat, 01/01/2022 - 12:57
WOW, that is stunning and so inviting, love the outcome! Thank you so much for sharing!

This was the first time I made a piece of furniture since I was in grade 8 shop class and it won't be the last. It was so kuch fun. I modified the plans slightly to have the back a bit higher. Love it!


I slightly modified the Rustic X Desk plan to make my L shaped computer desk with a monitor platform! The desk surface is Shou Sugi Ban with an epoxy finish. All made from stock lumber and a lot of pocket hole screws. Thanks for posting your plan Ana to give me the idea! Construct for around $200.
Tue, 03/14/2023 - 18:34
Love your modifications, additions and finish! Thank you for sharing.

After a whole year I finally made a second chair! The first one was made a year ago and now my wife can sit outside with me too 😊. Next for the couch!

Made the outdoor sectional. The coffee table was made out of left over pieces!

Wed, 10/02/2019 - 09:54
So smart to make the coffee table out of the spare pieces.
Looks amazing!

I am a beginner diy'er and this was one of my first projects. Also it was my first time using the Kreg jig and I loved it! My shelving system was around 8 feet tall, 12 feet wide and 30 inches deep. I added some extra cleats to support my deeper shelves (30") and also used thicker (5/8") plywood. This was a fun and easy project to do! Thanks so much!


Easy build. Great and sturdy results.
Great build for beginners and for some learning experience with a Kreg Jig. Table looks great and bulky.


Sun, 08/11/2013 - 21:15
I was wondering the same thing myself about the 4x4's. Where I live the treated ones are about $7 and the untreated about $30. Also I have heard that you may have trouble staining or painting your treated 4x4's. I want to make a coffee table from one of your plans but I do not want to spend that much just on a 4x4. :/ Beautiful table though!

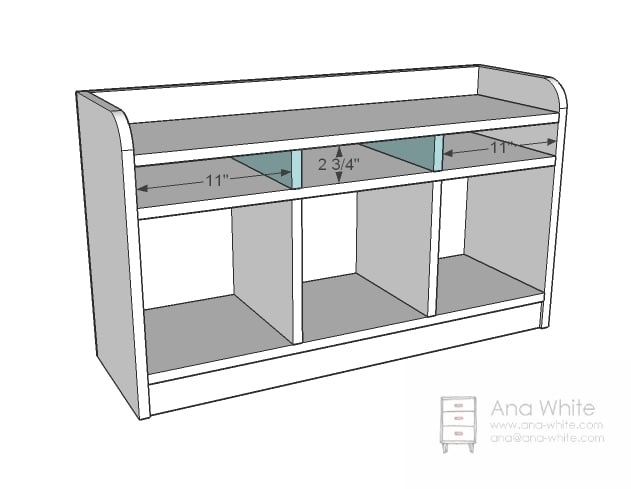
We followed the Essential Entryway Bench plan and modified it slightly to fit our home. We used a 35 degree miter cut at the corners of the trim, and finished the top with a dark walnut wood stain. The accent between the two colors is our favorite part!

I had been searching for a loft bed for my son for some time but couldn’t find anything affordable until I stumbled across these great plans! I found the instructions to be very easy to follow (though I did spend a lot of time going over them first) and the cut diagrams were great to prevent waste. I also fell in love with hmkeith11 paint job which I copied as well. I used Behr paint in pencil sketch and just a large grout sponge to make the bricks. Super easy and turned out great.
I made a few modifications to the plans. First I made the towers 6ft tall but did not change the height of the mattress platform. I also made the towers one piece and just cut the tops of them to get the “castle look”. I made the towers taller so the rail on the front would be bigger and allow for a more “secure” feeling when sleeping (and to ease my fears of two fearless boys jumping on the bed). I also eliminated the small front piece that connects the slide to the tower. I just made the front door panel longer and attached the slide right to the tower with a few screws. I like the look better and it eliminates a small rail at the top of this small panel giving it clean look (in my opinion). I also added a small door under the stairs since the wall was long enough in my son’s room. Its fun and adds a second exit point. Lastly, I modified the supports for the mattress based on some other brag posts feedback. I rested the support beams on the plywood sides and added a third beam and 2 beams going across tied into the wall studs and the front door panel. I wanted to feel 100% sure my very active kids couldn’t bring this bed down. I also added a piece of plywood on top of the bed supports since we have memory foam mattress, this gave the mattress the correct support it needs.
This was by far the biggest woodworking project I have ever taken on. It took me 2 months of working just weekends for only a few hours a day and some evenings after my kids went to sleep. Perfect size project for me. I’m also a short female, so go for it moms! You can do it!
I had also never cut such large pieces of plywood and didn’t know how to get my cuts straight. I found out how to make a skill saw guide and boom! Problem solved. Just buy a piece of Masonite, rip a 4 inch piece then glue it down on the other piece with the manufacture straight edge pointing in and you got yourself a guide for straight cuts! Here is a link: http://www.provenwoodworking.com/woodworking-saw.html
My son is thrilled with his bed and it was a great challenge to build!


This was such a great project and not too complicated for my first large one. I loved using the milk paint to create the old world distressed charm.

This was something I build a couple years ago, it's not the same as this plan, but very similar. When we moved in to the house, the slab was already poured, with 4x4s already in place, I just used what was there and my imagination for the rest.