Community Brag Posts

Outdoor Sectional and Pallet Coffee Table

Submitted by Anonymous (not verified) on Sun, 11/20/2016 - 17:56

Hi Ana! 

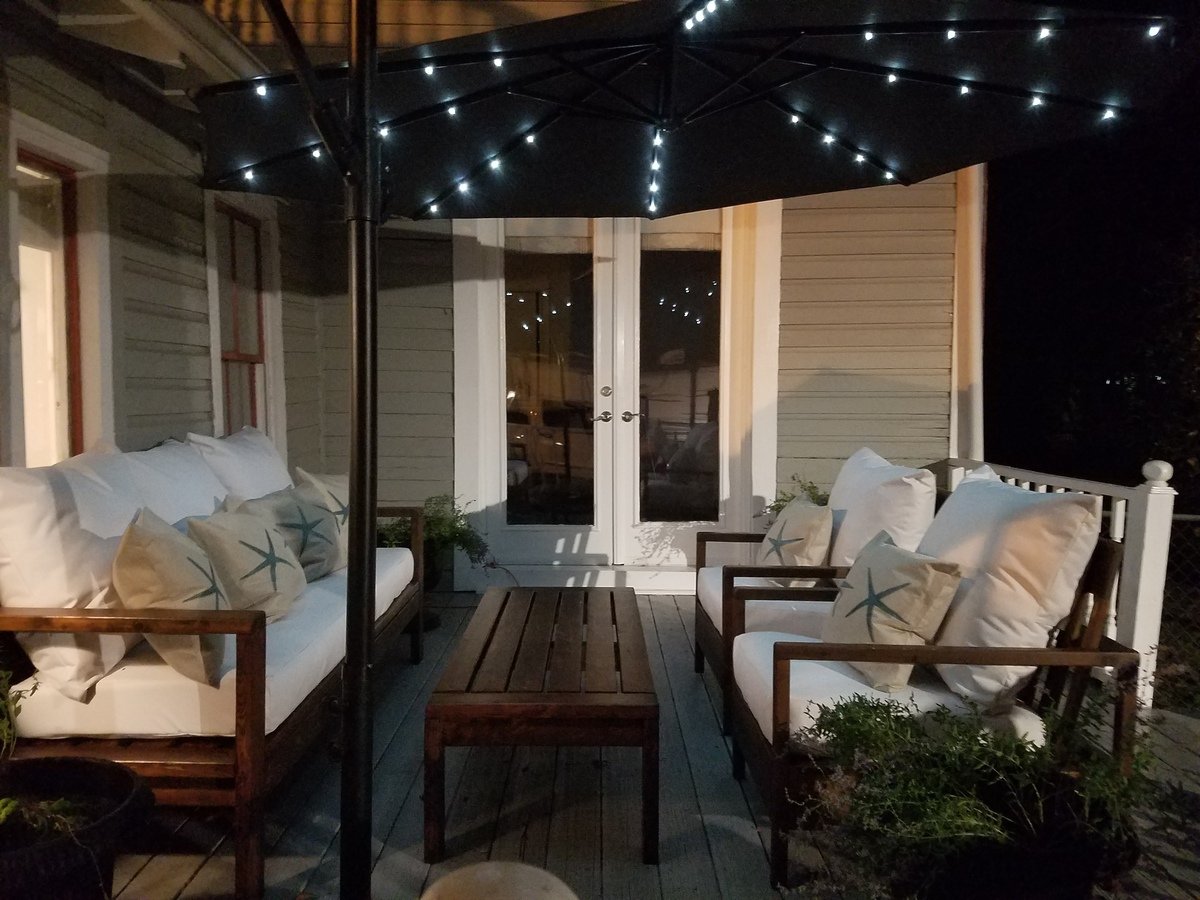
My husband used your plans to build the 2x4 outdoor cedar sectional :) He did it in 1 day and it couldn't have been easier! He even tried first time working with pallets to make a small table and it came out perfectly too! Can't wait to enjoy family time on our new back porch.

Thanks Again & Love From Austin ❤️

Kathleen 

Estimated Cost
$350
Estimated Time Investment
Day Project (6-9 Hours)
Finish Used
Stain
Recommended Skill Level
Beginner

Comments

meredithl

Thu, 10/24/2019 - 16:35

Hi, your furniture is beautiful.  May I ask:   Where did you find your cushions?  And what color/ brand stain did you use?  Lovely job.

Seasonal And Holiday

Vinyl Record Storage

I've made another record cabinet, this time with a nice dark walnut stain.  To see more details and plans visit my blog.

http://www.woodworkingfourdummies.com/


Cheers,

Ian

Estimated Cost
400
Estimated Time Investment
Week Long Project (20 Hours or More)
Finish Used
Minwax Dark Walnut
Recommended Skill Level
Intermediate

Comments

Cedar Chest

We have considered buying a cedar-lined chest to store blankets, towels, etc. for many years.  However, we couldn’t find one that came close to matching the Knotty Pine bedroom set that we had in our master suite. 

Hence, our design criteria was quite simple; match the bedroom set and have a chest sturdy enough to support our Beagles as they peer at the squirrels outside the window.

We used plans / ideas from several different chest designs which were readily available on the internet.  Most of those plans were using hard woods such as oak.  Those plans called for a hard wood framing with ¼” oak plywood for the panels.  Since we needed to use Knotty Pine to match the bedroom set, we used 1” Knotty Pine for framing and Knotty Pine ¾ ply w/ Kreg Screws and copious glue to strengthen the construct.  We finished it off with locally available 3/8” cedar T.G. planks.  It is very heavy and very strong!  This project was done entirely w/ Kreg Screws and no router rabbeting for the panels.

We learned the following while doing this project:

·      When using soft woods, always put the power sander on the wood before you start the sander.  Otherwise, you can get scratching / sander burns that don’t present themselves until staining begins.

·      While very strong, ¾” plywood is very heavy!

·      When using plywood, it is recommended that you stain both the visible and non-visible sides of each piece where glue is not to be applied.  Otherwise the chance for delaminating increases dramatically.

60 hours work and $350 to build.   

Estimated Cost
$350.00
Estimated Time Investment
Week Long Project (20 Hours or More)
Finish Used
Minwax stain and hand-rubbed varnish.
Recommended Skill Level
Intermediate

Comments

Four station desk (PB inspired)

Submitted by monty742 on Sun, 03/15/2015 - 08:58

I really liked the PB mega desk, but I didn't want to spend $1600 on it.  After seeing someone's post here (a couple years ago...) asking for plans on that desk, I decided to do it myself.  I took these two plans and made 4 base units.  They are 18" square at the top and 34" tall.  I used 2 IKEA table tops connected underneath for the top, to make a total height of 36" - counter stool height.  I constructed them a little differently than the plans, but no matter how you make them, the idea is the same.  The plan is to take them apart and make 2 desks once everyone is too old and cool to do homework/artwork together.

Estimated Cost
$500
Estimated Time Investment
Week Long Project (20 Hours or More)
Finish Used
Kitchen and Bath finish paint (2 coats) - it's a little shinier than eggshell (I only used it because I had 2 or 3 gallons extra at home :) then 2 coats acrylic top coat matte finish.
Recommended Skill Level
Intermediate

Comments

monty742

Sat, 08/15/2015 - 04:33

Just seeing your comment...sorry for the delay!  I got the stools and the light fixture at a Ballard Backroom (outlet) store near me.  3 of the stools ended up being about $40 each with the sale they had at the time, and the 4th was $60? - bought at a later time than the first 3.

AlisaH

Wed, 11/04/2015 - 07:40

How did you connect the table tops from the bottom so that the tables were secure together? I'm curious what's the best way to do this. Since two of the four seats will be where the seam is, I want to make sure I secure it properly so it's not wobbly. Thanks so much.


monty742

Sat, 01/09/2016 - 05:06

I'm just seeing these latest comments for the first time, so you may have long finished this project already!  The tops were surprisingly sturdy but I did reinforce them.  I placed the tops on the floor upside down and screwed some metal brackets (about 12" long each) across the joint in four places.  I just screwed them in through holes already in the brackets.  This wasn't the most stable because those tops are particle board and don't hold screws very well...  But since it was already pretty sturdy, I figured it would do.  It has been fine, even with standing on the top (kids who get up there and me hanging the light fixture above).

Once the tops were joined, I placed the bases so there was about a 1" overhang on the top.  To hold the top in place, I used small pieces of wood screwed to the underside of the top at the inside corner to act as a placement stop.  The top is pretty big and heavy even though they are IKEA tops, so they don't have a tendency to move or slide at all anyway.  I'm going to try to figure out how to post another picture of the braces and corner stops...we'll see if I can do it!  Let me know if you have any more questions...again, sorry I didn't see this in a more timely manner!

Pmprdwife

Sat, 01/02/2016 - 05:55

Is the photo above the Pottery Barn version or your product result?  I'm trying to figure out the dimensions for the drawer and shelf configurations.  Thanks!  BTW, I'm totally addicted to your style and personality...my husband loves the productivity inspiration I've received. :-)


monty742

Sat, 01/09/2016 - 10:17

Hi!

I'm glad you like the desk!  The one in the picture is the one I built, not the pottery barn one!  My dimensions were a good bit different than the PB desk - square bases instead of rectangular and counter stool height instead of desk/table height.  So, I have no idea if I have my plans for this anymore, so I went and measured it again for you!  

So each base is 18" x 18" square and 34" high so that with the 2" top the total height is 36".


Each base was made of oak plywood that made with 3 sides, a top and a bottom.  All edges were rabbit joints (3/8" deep in thickness of boards and probably 3/8" wide - not 100% on width of rabbits).  It's kind of a pain to do rabbit joints if you don't have a dado blade for your table saw, so you could use pocket hole screws instead.  I glued and nailed these joints with a finish nailer, I believe.  

I figured a diagram with measurements would be easier than trying to write descriptions...so I'm adding another pic with the dimensions outlined.  Drawing is NOT to scale, so sorry about that!  I really need to learn to use SketchUp.  Let me know if you have any questions!  

Monty742

monty742

Sat, 01/09/2016 - 07:57

Hi!

I'm glad you like the desk!  The one in the picture is the one I built, not the pottery barn one!  My dimensions were a good bit different than the PB desk - square bases instead of rectangular and counter stool height instead of desk/table height.  So, I have no idea if I have my plans for this anymore, so I went and measured it again for you!  

So each base is 18" x 18" square and 34" high so that with the 2" top the total height is 36".


Each base was made of oak plywood that made with 3 sides, a top and a bottom.  All edges were rabbit joints (3/8" deep in thickness of boards and probably 3/8" wide - not 100% on width of rabbits).  It's kind of a pain to do rabbit joints if you don't have a dado blade for your table saw, so you could use pocket hole screws instead.  I glued and nailed these joints with a finish nailer, I believe.  

I figured a diagram with measurements would be easier than trying to write descriptions...so I'm adding another pic with the dimensions outlined.  Drawing is NOT to scale, so sorry about that!  I really need to learn to use SketchUp.  Let me know if you have any questions!  

monty742

Thu, 07/28/2016 - 14:13

No you can't buy them from Ikea.  I bought the table tops from Ikea, but I built the bases.  The dimensions for the bases are in one of the additional pictures with the post if you want to see them!

treverandamber

Mon, 10/10/2016 - 07:41

What are the total dimensions of the table top? Thinking of building something like this, but want to make sure it will fit in my space.

Simgre81

Thu, 12/28/2017 - 07:00

Are these just slide in drawers, or did you use some sort of hardware to have them slide in and out?

wooden cooler stand

Submitted by stealth517 on Sat, 04/18/2015 - 20:48

This is the cooler stand presented by Jenny from Birdsandsaoap. Very easy to build and always ends up with someone asking to buy it or have you make them one.

Built from Plan(s)
Estimated Cost
$120.00
Estimated Time Investment
Week Long Project (20 Hours or More)
Finish Used
Minwax gloss polyurethane.
Recommended Skill Level
Intermediate

Comments

Radio Flyer Garden Sink

Submitted by mji0707 on Tue, 05/12/2015 - 19:54

Was looking for something to do with an old Radio Flyer wagon.. Saw some great pics on Ana's site for garden ideas and thought this might have the right shape to make a water feature.. beats making a flower potter out of it. -And it does in fact work.. The original plan was to use a simple chrome hook-style faucet but found a great brass antique on ebay for under $10 which really set the tone for its look.

The inside of the wagon is double-coated with Rustoleum clear sealant, over-layed with a red top coat. The wheels and handle are original and the hanging bar across the front is from conduit. The wagon is attached to the stand only around the drain by 2 1/2"x 1/4" machine screws. The brass handle on the right end is so the wagon can be tilted to drain settling water. The drain is a standard 1 1/4" sink kit that connects to a compression coupler. Both the feeder and drain line have hose connections.

Built from Plan(s)
Estimated Time Investment
Week Long Project (20 Hours or More)
Finish Used
The wagon was rusted when I found it. I sanded the inside just enough to remove the loose rust debris. To get the tub water-tight I gave it two coats of Rustoleum clear sealant spray. That left it foggy-loooking so I sprayed it over again with rustoleum red paint. The wood frame has two coats of antique white with a light covering of parafin. I used a grinder to scuff up the paint and then used a buffing wheel on the power drill to smooth out the wax. The pallet wood is untreated other than removing the old nails.

For advice, I would definitely say to be cautious of the amount of weight that hangs off the back of the cart. I used the extra pieces of 2x4 to build a frame to tie the pallet wood into. Combined with the feeder-line plumbing It added so much weight that i had to move the back wheels out to give it stability.

Much thanks to Ana's site and community for ideas. And I gotta give credit to the crew in the H/D paint dept in Alpharetta, GA for the sealant paint recommendation.

enjoy the pics!
Recommended Skill Level
Beginner

Daybed with Storage Trundle

Submitted by Crafty-Mom on Sat, 01/27/2018 - 10:38

This was my first project from Ana's website and I'm hooked! I'm a beginner, but thank goodness for my Dad's help because I have a lot of learning to do!

I wanted the drawer to be 1 drawer instead of 3. I feel like it looks cleaner (without having to adjust 3 drawers constantly to make it look good when you push them in). I was thinking the bed could actually be used as a trundle bed in the future too! I use this to store toys right now and it is Awesome!

I increased the bed size to fit a twin mattress and increased the height of the bed slightly so that the drawer would be a little bit deeper. We also added a back to the bed and carried around the trim to make all sides look the same. We added a bumper to the back and sides of the inside of the bed so the drawer is easy to push in and fits in snug. Finally we reinforced the bottom of the drawer with more 1x4 boards so that if a child does sleep in it, it would be more sturdy. I now have kids come over and jump into the drawer (literally) and I'm glad we reinforced it.

The changes we made did add to the cost and our time (as well as being newbies), but I think it's worth it and the bed turned out beautiful!

Estimated Cost
$180
Estimated Time Investment
Weekend Project (10-20 Hours)
Finish Used
Behr Marquee (I'll have to find the name of the white color we used). We almost went with chalk paint, but after talking to the HD guy, he talked me into this paint and I'm glad we used it! So much cheaper and turned out beautiful.
Recommended Skill Level
Beginner

Comments

Nisssc

Mon, 10/12/2020 - 07:51

This looks great! Any suggestion if I want cubbies instead of a trundle? Also, cubbies only on side as bed would be against the wall. Thanks for the inspiration!
Sandy

I used the corrugated polycarbonate to cover the greenhouse I made from a chalet style Sun Country Greenhouse Plans. Thanks for the idea.

Submitted by Anonymous (not verified) on Sat, 03/09/2019 - 06:34

I saw the barn shaped greenhouse plan but preferred a regular roof pitch. I did however incorporate the corrugated polycarbionate as a covering. I find it odd that you guys installed the polycarbonate horizonitally instead of vertically.

Anyway thanks for the info on polycarbonate.

Built from Plan(s)
Estimated Cost
Using cedar framing... 9 x 16' @ $3000 +/-
Estimated Time Investment
Week Long Project (20 Hours or More)
Finish Used
Behr
Recommended Skill Level
Intermediate

Comments

hauxy

Tue, 09/01/2020 - 17:47

Love this! I really prefer the roofline on your greenhouse. Did you modify Ana's design, or did you get plans from another site? Would love to replicate your design if possible-very elegant.

Seasonal And Holiday

twin over full bunkbed

Submitted by sjknecht on Sun, 02/26/2012 - 14:38

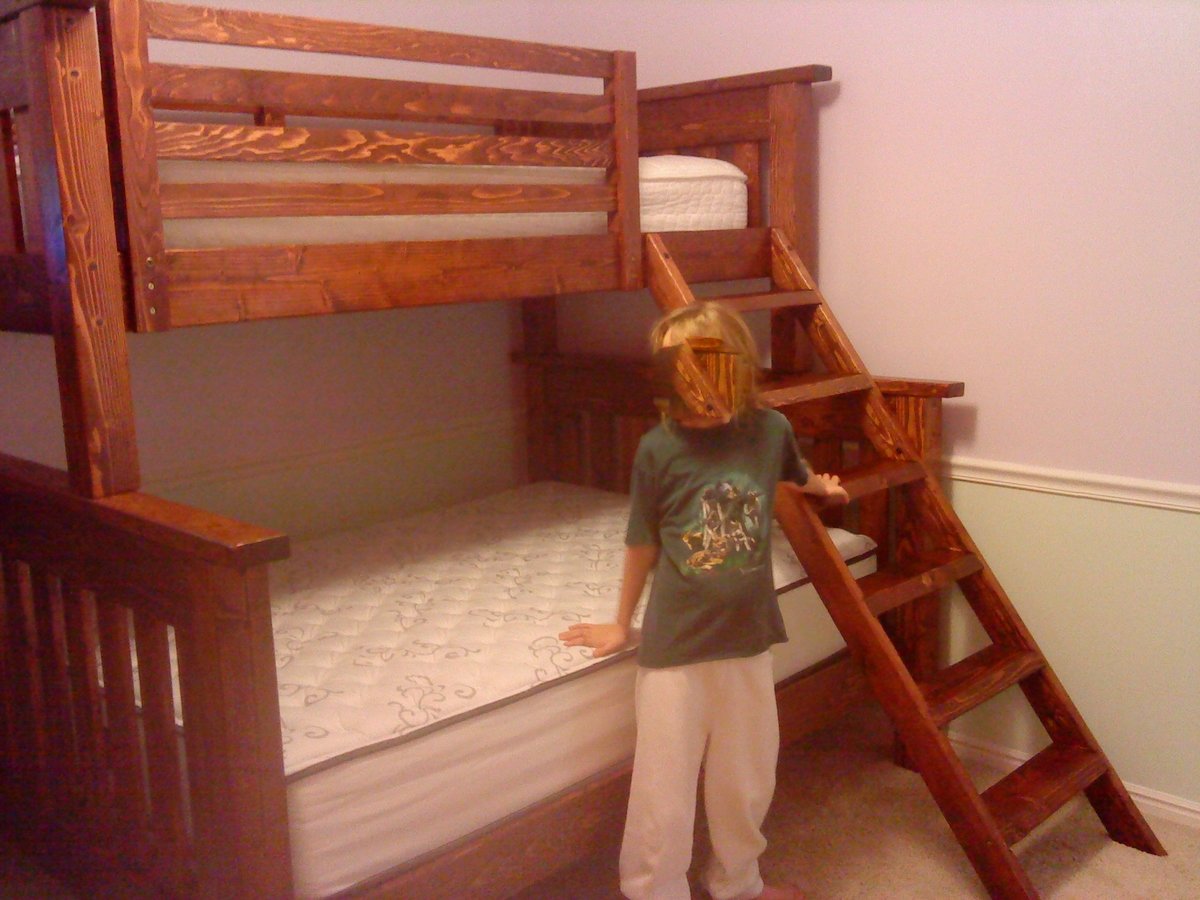
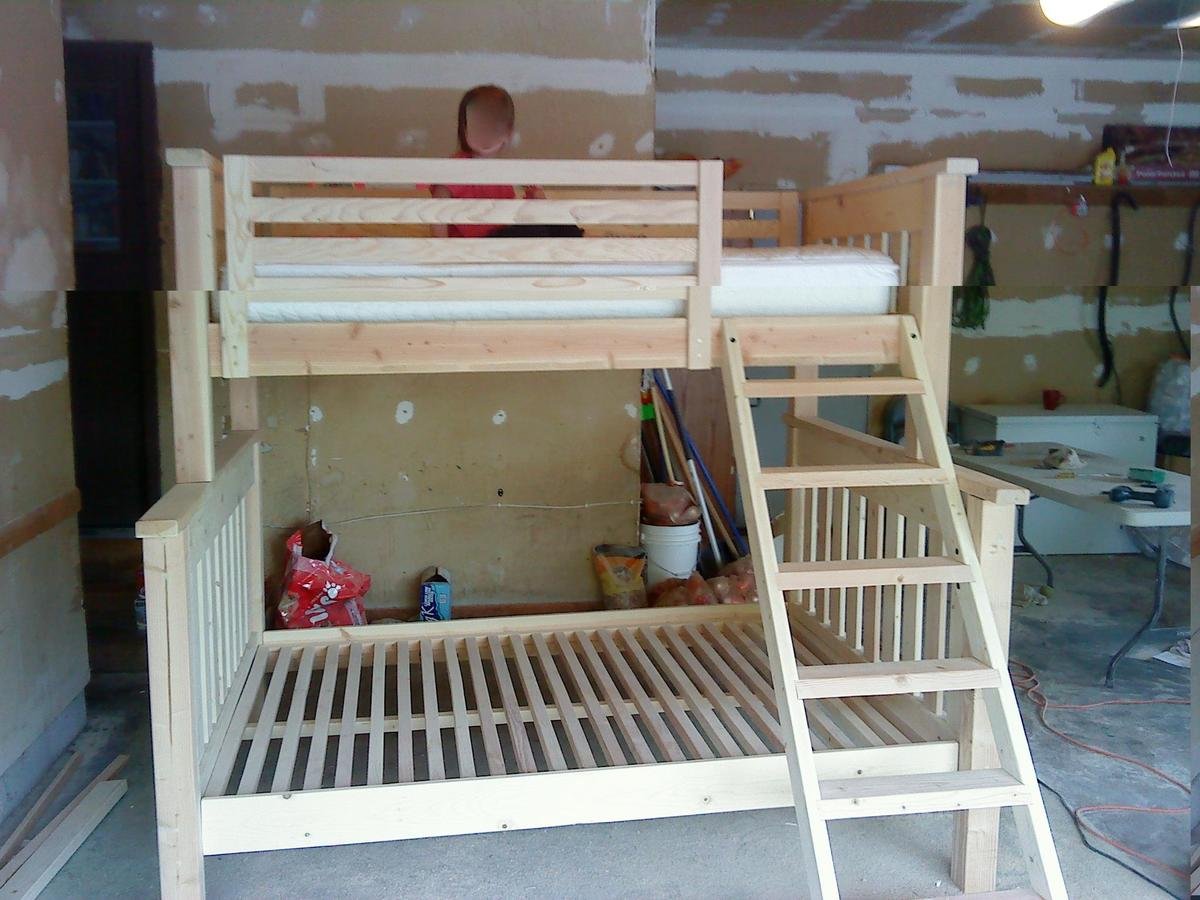
This project was so much easier than I thought it would be when we started. If you follow ana's plans your bunkbed will be much stronger than anything you can buy for a fraction of the price. I would never do it but I honestly think I could park my truck on these beds. The finish is red mahogany stain with a couple coats of polyurethane over it. They say not to use dark stain over pine because of the uneven coat but i like the way it striped the grain. Not everyone's cup of tea but we love it.
We've all heard the saying "give a man a fish and you feed him for a day, teach a man to fish and you feed him for life. Thank You Ana for teaching me to fish. This was the first, but will not be the last project i do from your site.

Estimated Cost
about 200
Estimated Time Investment
Week Long Project (20 Hours or More)
Finish Used
minwax red mahogany stain, and 3 coats of minwax polyurethane
Recommended Skill Level
Beginner

Comments

Toddler Bunk Beds

Submitted by Anonymous (not verified) on Sat, 07/16/2016 - 22:13

Modified the classic bunk bed plans to fit crib size matresses for our 1.5 & 2 year old girls, loved how my toddler bunk beds turned out! 


Estimated Cost
$200
Estimated Time Investment
Day Project (6-9 Hours)
Finish Used
Behr 'Rainwater' paint in satin
Recommended Skill Level
Intermediate

Comments

em01024

Mon, 08/01/2016 - 17:27

Hi,

Could you email me the change in measurements you used for the crib mattress? 

It would help me out so much. I want to build a similar one for my boys. 

Thank you.

Danielle S. 

Essential Adirondack chair

Submitted by str1523 on Mon, 05/25/2020 - 10:23

Like this chair! Changed the 3 1x10's on the back to 4 1x8's ripped down to 6 ¹⁵/¹⁶

Estimated Cost
40
Estimated Time Investment
An Hour or Two (0-2 Hours)

Comments

Donna's reclaimed bed

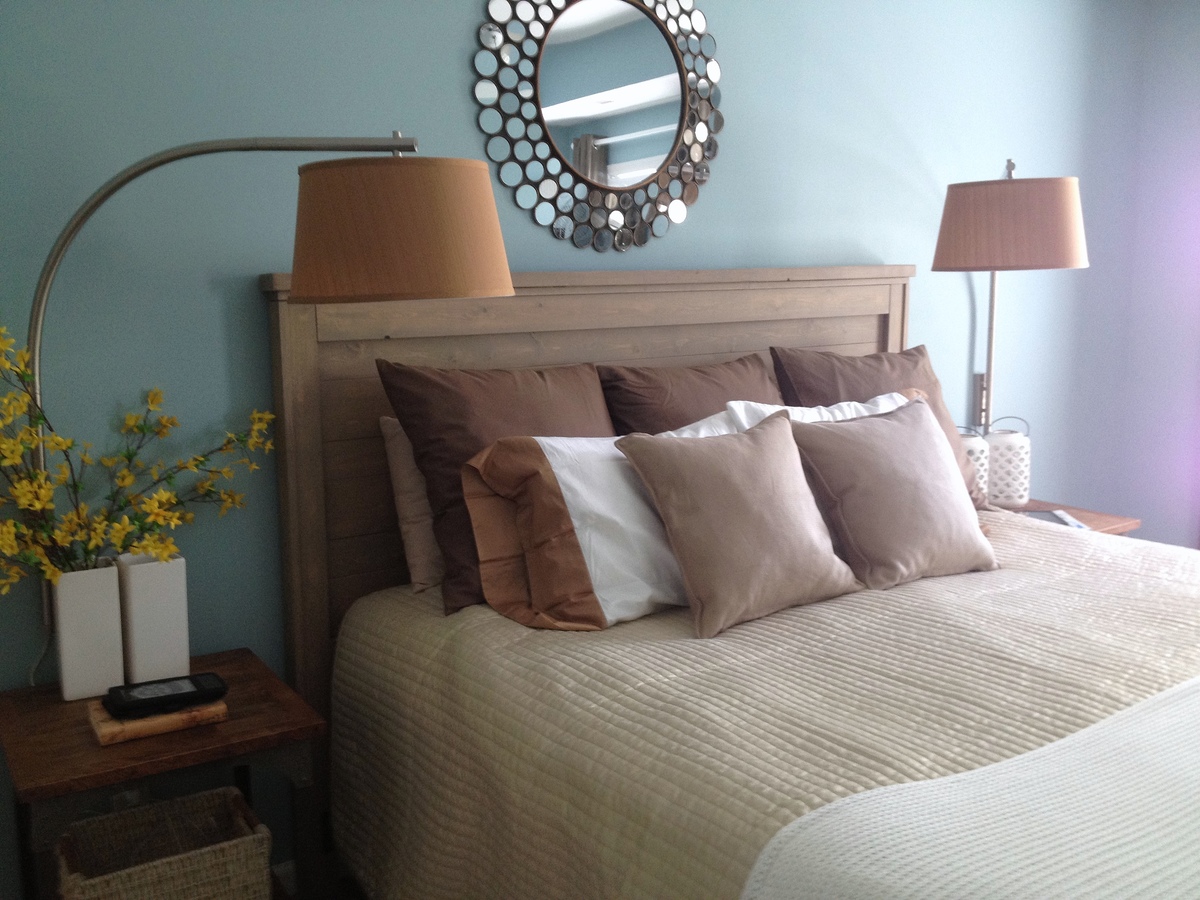
My Awesome husband made this great bed from one of Ana's plan and I stained it!!

Built from Plan(s)
Recommended Skill Level
Starter Project

Comments

birdsandsoap

Wed, 08/29/2012 - 21:41

I just want to sleep in your bedroom. I love the colors and I L-O-V-E those lamps!

mainelygirl84

Sun, 09/09/2012 - 17:18

Thank you both for the nice comments!!!! I got the lamps at home decorators outlet online for a ridiculously great price some months ago!!! At first they seemed so huge, but grew on me!!! Ha!

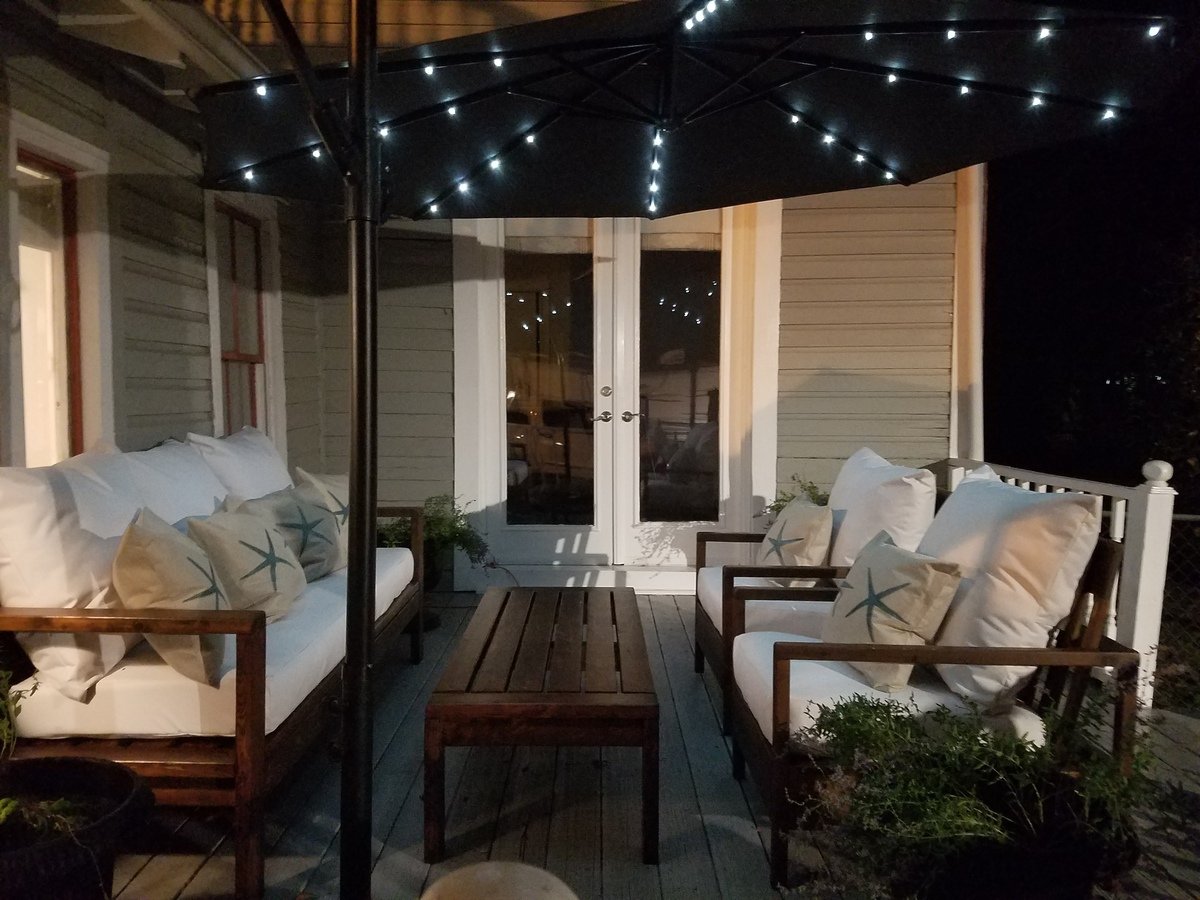
Needed a new Patio set after Hurricane Matthew destroyed mine.

Submitted by Anonymous (not verified) on Tue, 03/03/2020 - 18:00

Between my day job and daily chores I somehow managed to build this, make the stain with the vinegar/steel wool, and sew all the cushions in about a week and a half.  The hardest part for me was lifting the sofa onto the deck by myself after I built it.

I also made the chairs from this site (simple white outdoor chair) and the coffee table.

Thanks Ana and everyone for contributing your plans and for everyone posting their projects.  It helps me do it to.


Estimated Cost
for foam, wood, screws, sand paper pillow stuffing, waterproof fabric 400 bucks
Estimated Time Investment
Week Long Project (20 Hours or More)
Finish Used
steel wool/vinegar/coffee grounds and then UV flood protector
Recommended Skill Level
Beginner
Seasonal And Holiday

Screen door with built in dog door

Our old screen door wasn't cutting it anymore, so I built a new one, and to kill two birds with one stone, I included a built-in dog door. Now I just need to find the motivation to close off the old dog door.

I have the plans to build this screen door with a built-in dog door posted via the blog link below for anyone interested.

Estimated Cost
80
Estimated Time Investment
Afternoon Project (3-6 Hours)
Finish Used
white exterior paint
Recommended Skill Level
Intermediate

Drop down murphy bar

Submitted by nick_h on Tue, 12/06/2016 - 10:54

My attempt at the murphy bar featured on this site. Still have to add the sash locks. Added pallet crossmembers at the back, an x in the leg, and a french cleat to mount to the wall. 

Estimated Cost
$45
Estimated Time Investment
Day Project (6-9 Hours)
Finish Used
Special Walnut Minwax on the bar top and shelves, crisp linen matte latex and dry brushed casual gray for accents/aging. 2 coats of polycrylic for protection. If built again would pre stain and base coat all the wood before build time, then assemble, add accent brushing and spray the polycrylic.
Recommended Skill Level
Beginner

Comments

zannej

Tue, 12/31/2019 - 11:49

This looks awesome! I want to help my friend build this for his kitchen. I've looked at the plans in the link & I'm wondering what modifications you made for the X pattern-- how much did it alter the material & cut list?

Would you please share your material & cut list for this?

Round X Base Pedestal Dining Table

Submitted by bRick on Thu, 12/18/2014 - 18:05

We wanted a round table that would seat a full Monopoly game. To do this we needed about a 5' diameter tabletop.  The base was made consistent with the plans.  

A few tips on the base:

  1. Get your angles as close to 45° as you can.  Otherwise, there will be much sanding and puttying in your future.  
  2. If you want to hide your lag screw like I did, I used a spade bit to recess an area for the screw head.  Then I glued in a plug made from dowel and sanded flush.  

If you want to make a round tabletop, here is what I did (there may be better methods).  Keep in mind this was for a ~60" diameter table, I was assuming that the perimeter arc pieces would be about 4.5" wide and that I would cut the inner circle at a 50" diameter.

  1. Picture 1 - I built two 5' slabs of (7) 2x4s pocket-holed together.  
  2. Picture 2 - Then I cut two pieces from each slab that would later make up the 90° "pie slice" pieces.  Make sure to remove the screws that will be in the way your saw blade. Also, you just have to concern yourself with the angle since the radius will be dealt with later.  There is a lot of wood waste with this method, but I think it avoided headaches. 
  3. Picture 3 - I assembled (screwed and glued) the "pie pieces"to the cross pieces. The length of the cross pieces don't matter much since they will also be to cut to a specified radius.  Since I would be cutting a 50" diameter circle, the large cross piece had to be at least 50" and the two small pieces had to be at least 22.25" (subtracting the 2x6 width).  
    1. Picture 3 - I mounted my router to a piece of MDF and drilled a hole at the necessary distance to cut a 50" diameter circle. This distance is 25" + half of the bit diameter.  Since I used a 1/2" straight bit, my point was 25.25" from the center of the router bit.  I screwed this jig to the center of the tabletop assembly so the router could pivot and cut a circle.  As for logistics, I rested this assembly on some scrap wood and kneeled on the tabletop as I was cutting it.  It took a large number of passes with the router since I was cutting through 1.5" of material. 
  4. Picture 4 - The perimeter pieces required some time and geometry. I found that I would need (8) 23" 2x8 pieces (the 23" is approximate because I was a little off for some reason, though I can't recall why).  From those pieces, I used the same router jig to cut the perimeter arc pieces. You will need to make two new radius holes in teh jig to accomplish what you need.  To cut the inner arc you need a hole set at 25" - half of the bit diameter (24.75" for me).  To cut the outer arc, I used a hole that was 29 5/8" from the center of the router bit.  You may need to do some fine tuning to these pieces to get them to fit correctly, but for me it pretty minor.  I trimmed a couple pieces with a miter saw but that was it. 
  5. The rest is screws and glue. 
Estimated Time Investment
Week Long Project (20 Hours or More)
Finish Used
Sanded using 60, then 120 grit. The stain was Rust-Oleum's Ultimate Wood Stain in Dark Walnut. The top coat was General Finishes water-based polyurethane in flat. One coat of stain, six coats of poly, while sanding with grade #0000 steel wool after every other coat.
Recommended Skill Level
Intermediate

Comments

ILoveDIYing

Sun, 03/08/2015 - 10:23

Hi, your table is beautiful! I was wondering if you had to increase the size of your base since your table top is 60". I'm going to be building a round one the same size and wanted to make sure it would be stable at the current size.

bRick

Fri, 03/13/2015 - 20:36

The only modification I made to the base was the to the lengths of the 2x4 pieces that make up the "X" that sits between the base and the tabletop. In the plans, this "X" is made of (1) 32" piece and (2) 14.5" pieces. I believe I increased these to 36" and 16.5", respectively. Truthfully, I don't think this modification added much value.

I did some calculations and at a 60" diameter, it would've taken over 100 lbs placed at the edge of the table. This was also a function of the weight of the table. The heavier the table, the more stable it will be.

Momma Gladden

Sun, 04/05/2015 - 19:21

I want to put a concrete top on this base and increase the diameter to 72". Would I need to increase the size of the base to accommodate the larger and heavier top? Thank you

bRick

Tue, 04/14/2015 - 20:20

It all depends on how much your tabletop weighs. I'm going to take a wild guess that your tabletop will weigh around 500 lbs (~28 sq. ft. at ~18 lbs/sq. ft.). For reference, I think my wood top weighed about 80 lbs. I will also assume the wood base weighs 50 lbs. Using these assumptions, the result is a worst-case scenario (weight placed at edge of table, tipping between two table legs) of tipping at 300 lbs. The lighter the tabletop, the less stable it will be. Since your concrete table is likely to weigh a lot more than my wood top, it will be a lot more stable.

That addresses the design and assumes none of the wood or connections (screws) fail under the increased load (weight of concrete). I can't speak very confident to this aspect. Though I can venture a guess. I will guess that it will be stable under no load, but there will increased loads when under uneven stress (i.e. somebody leaning on one side of the table). Honestly, I don't know how valuable any further speculation would be.

X3cougsp

Tue, 09/06/2016 - 08:14

Can the pedestal hold a 66"- 72" top?  I've been searching for a table that seats 6 comfortably with an occasional squeeze for 8.  I think a 60" would work but my husband thinks 72".  We are struggling to find exactly what we want and are now investigating DIYs .  This is a beautiful table!!  

In reply to by X3cougsp

bRick

Wed, 10/05/2016 - 17:16

This is a conversation that we had in our house as well. My personal opinion is that 60" is big enough for 6 people and good enough for 8 people. What we did to "dry run" it was I cut a board to 72" and set it up at table height and we sat at oppposite ends of the board. I asked my wife if it was too big and we both agreed that not only would really shrink the room, but it also was too big for regular use. We currently have 6 chairs around this on a regular basis. As for the stability of the table itself, you may want to increase the width of the base. I say this because 74 lbs at the edge of the table (in between legs) will cause the table to tip, which is probably a force that will be exceeded by someone leaning on it. 

bRick

Thu, 12/22/2016 - 20:58

I used the jig that I made the large circle but made a couple new radii. The inner edge was the round piece radius minus half of the bit diameter. The other radius is as wide as you want to make it. 


I fixed this jig to my work bench and set it up so that I would be cutting each piece identically. I have a picture that I'll add that shows it better than I can explain it. 

In reply to by Omally83

bRick

Sat, 01/21/2017 - 07:46

I believe my approach was that I cut the 2x8s to the length that would produce the arc length I was looking for. So basically the outer edge was going to (if my jig did its job) be exactly as long as I needed it to be. With that in mind, I used a piece of yarn tied to the pivot point on the jig that I was using and used that to tell me where I needed to make the cut. 

Otherwise, I could've used trig to figure it out but I was all angled out by that point. With 8 border pieces they should each cover 45 degrees (360/8) and the other two angles should be equal ((180 - 45))/2=67.5) resulting in a 67.5 degree angle. The trouble in using that method is it doesn't account for all the little screw-ups that may have thrown off certain measurements. Plus, the yarn-thing was pretty easy. 

SueInVA

Sat, 01/23/2021 - 14:17

We made the table base for a 60" solid walnut top (used the wider measurements). When people get up from the table, my husband thinks the base twists when they push off. Has anyone else noticed this or have a suggestion on how to make the table not twist? Thanks, Sue

Simple 2x4 Potting Bench modified with inset tote for potting soil or water

Submitted by SusanStory on Thu, 04/15/2021 - 10:10

Made this for a friend who does cuttings of her plants for others. I used the Simple 2x4 potting bench plan and modified it to hold an inset 7 gal. Commander tote box with snapping lid with two 2x4 @ 22" braces to support the tote on each side attached to the front and back aprons. She wanted something that would hold a medium size bag of potting soil with a lid to keep snakes and other critters out since she lives in the country. There are plenty of hooks to hang tools and other items.

Estimated Cost
$224.00
Estimated Time Investment
Afternoon Project (3-6 Hours)
Finish Used
Thompson Water sealer
Recommended Skill Level
Beginner

Comments

Back