Community Brag Posts

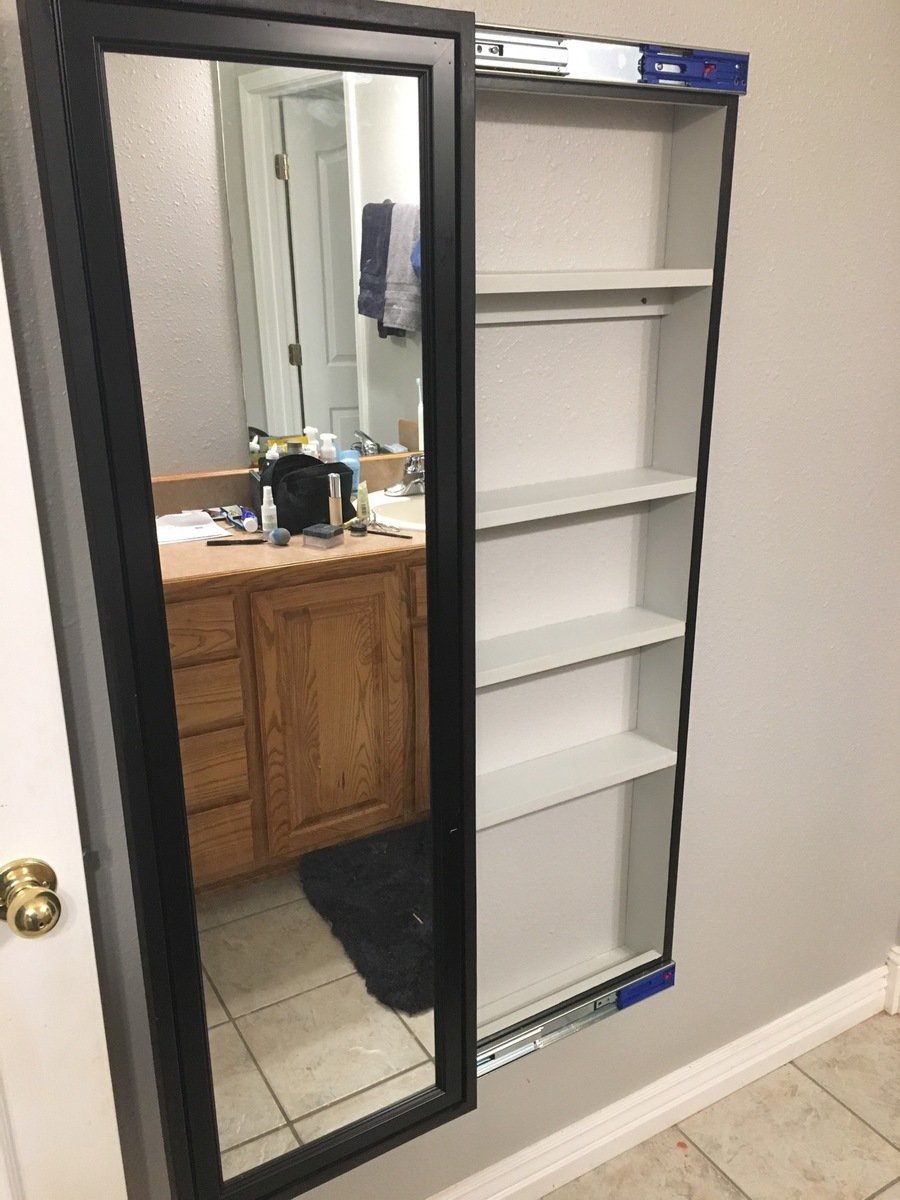
Full length sliding mirror cabinet

Submitted by mltdblack on Tue, 10/16/2018 - 19:25

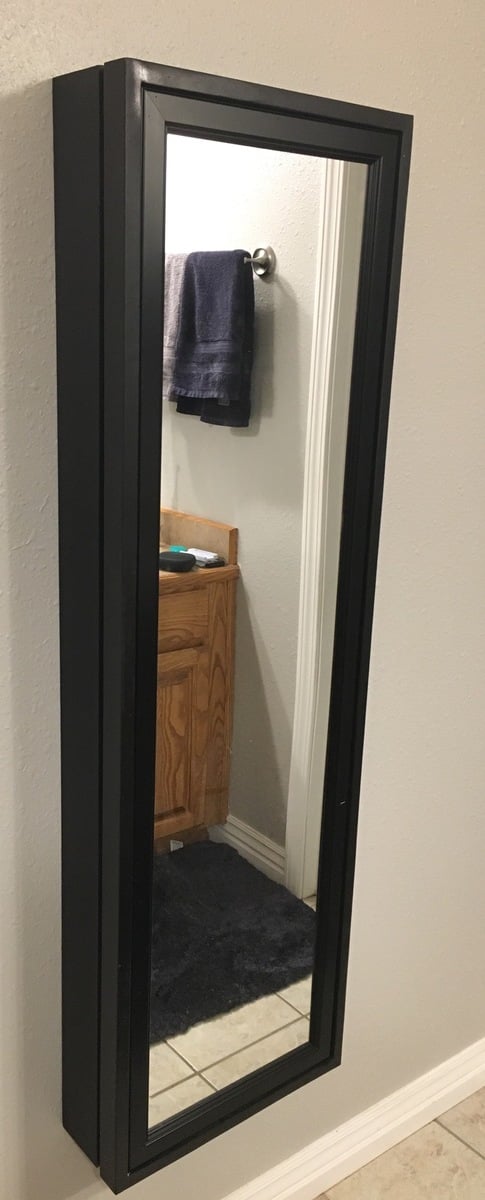
I built this for my daughter after building a ladder shelf for my kids bathroom. It took more time to install and adjust the drawer slides and paint the project.  

Estimated Cost
$65.00 - I used a slightly larger mirror.
Estimated Time Investment
Day Project (6-9 Hours)
Finish Used
Exterior - Valspar Black Flat Latex
Interior - Valspar Filtered Shade Flat Latex
Top Coat - Minwax Gloss Spray Polyurethane
Recommended Skill Level
Beginner

Comments

akagracegallag…

Sat, 09/07/2019 - 03:32

Hi mltdblack

Really nice finish on the cabinet.  

It looks like there’s molding on top of your mirror.  

Did you buy a mirror with a frame or buy molding and put it on over the mirror?  

What molding did you use an how did you secure it?  

What size mirror did you use?  Thanks

mltdblack

Fri, 01/07/2022 - 14:14

I am so sorry. This is the first I am seeing your question. The mirror came with a frame and I carefully nailed thru the frame to attach with my 18 gauge nailer. I bought the mirror at Lowe’s and I believe it was 15.5” x 50”. Also, I used full extension soft close drawer slides.

Best Chairs Ever!

Submitted by Anonymous (not verified) on Tue, 06/09/2020 - 18:16

I made these modern Adirondack chairs for our business in Anchorage. GREAT and easy to build design by Ana - we upgraded the arms to tapered 2x6 and they're awesome!

Ana's ultimate workbench (Ryobi)

Submitted by CABANE on Fri, 01/12/2018 - 13:38

This is the perfect workbench for my needs.

I upgraded the casters to bigger ones as my shop's floor is in rough shape.

I also added storage under the two work surface next to the miter saw. This was just a matter of closing under the 2X4 frame and making the two sections on casters a little shorter. The only downside for that mod is that the plywood can bend a bit since it is not screwed to the frame. I don't mind since it falls flat as soon as there is weight on it. Also, this mod makes it hard to include fence system (it would need to be removable, like fixed with dowels only, no glue) and almost impossible to include a precise fence system since it would need to be removable. In my case, I do rough, non-repetitive cuts, so there is no need. 

TIP : Pay a little extra for smooth plywood. I lost a lot of time sanding mine :(

Estimated Cost
$150 CAD
Estimated Time Investment
Weekend Project (10-20 Hours)
Finish Used
Linseed oil
Recommended Skill Level
Beginner

Comments

groche

Tue, 02/04/2020 - 08:21

Awesome! Do you have pictures/info for the cart that has the Dewalt table saw? I have the same one and would love to build the cart for it.

Modern Farmhouse Bed Frame

Submitted by SofiaTaz on Thu, 01/06/2022 - 23:15

I love how this bed frame turned out! Everywhere that has stain is cedar and the rest is all scrap spruce. Thanks for another great plan Ana!

Built from Plan(s)

Comments

Pizza Oven Cart

Not quite big enough for Pizza Oven, but love the plans!

Comments

Mailbox Stand

Submitted by Anonymous (not verified) on Mon, 02/12/2024 - 08:33

I didn't like the standard mailbox we had at my house so I designed this with my CAD program and mage it happen. thanks for this opportunity to post this.

Rich Hebert

4x4 Truss Beam Table -Modified Size

My husband and I moved in to our new house last fall and we needed a dining table that would seat at least 8. We picked this plan from Ana's site because I love the look of the 4x4 beams. I used Adobe Illustrator and my math skills to modify the size and scale to fit our dining room with exact spacing all the way around. We had difficulty finding untreated 4x4 beams but were able to special order some for a reasonable price from a local lumber company. It is more expensive than combing 2x4s but I did not like the pieced together look of the 2x4s. We stained with Rustoleum Dark Walnut and Matte Poly just like the blog post from Ana's site. We also used the Kreg Jig HD which is SO AWESOME! We love the table. Now we just need to decide: chairs vs. benches. I hate to block the beautiful truss design of the base. Its so gorgeous!

Built from Plan(s)
Estimated Cost
Around $200 including the Kreg Jig HD, screws, sandpaper, and glue.
Estimated Time Investment
Weekend Project (10-20 Hours)
Finish Used
Rustoleum Dark Walnut
Rustoleum Matte Polyurethane
Recommended Skill Level
Beginner

Comments

MrCoffee

Mon, 08/31/2015 - 14:18

I love this table.  The finish came out great by the looks.  My wife and I are moving into a house soon and I think this is going to be the design for our table as well.

jlandttc

Mon, 09/07/2015 - 06:21

What a beautiful table!  Is this table square?  We are also looking to build a table to sit 8 and love the look of yours.  Could you share your cut list or dimensions?  

Spayton821

Thu, 12/10/2015 - 06:59

I am so in love with his table. We have a family

of 7 and are looking to replace our current dining room table and this would be perfect.  Is there any way you could share your measurements. 

Jake'n'Leelo

Mon, 08/29/2016 - 06:08

Thank you for all the kind comments! I did not know that I had gotten any and had not checked back over the past year. The jump drive with my dimensions on it got damaged last year shortly after the build and I lost all of my home decor files including the AI with my cut list and dimensions. I know it had been a while since several of your comments but I will see if my husband can help me measure the table and figure out what the dimensions are and post them on here for you. Happy Woodworking!

topdowndoorsoff

Tue, 11/15/2016 - 18:01

This table really looks great!  I'm about to start making one and would love to know the dimensions you used. I also noticed that you didnt use the bread boards on either end.  How many people does this table fit?

Thanks!


Tall Rustic X Bookshelves

I followed the Rustic X Tall Bookshelf plan to make a set of bookshelves for my husband for Christmas! It was my second ever woodworking project. The plan was really easy to follow and so fun to make! I ended up using an additional shelf piece on the very top for a more modern spin on it. I also bought a pocket hole jig to use on this project. I'm happy with how it turned out!

Built from Plan(s)
Estimated Cost
$75 per shelf
Estimated Time Investment
Weekend Project (10-20 Hours)
Finish Used
MinWax English Chesnut Wood Finish and Paste Wax
Recommended Skill Level
Intermediate

Modified for double hanging

Submitted by Anonymous (not verified) on Tue, 04/04/2017 - 14:50

I used 8 ft precut boards for shelves and modified the design so there was enough room for two racks on each side. In addition I screwed 1x4 to the studs to secure the shelving to the wall.  I have a 5 year old climber so it was best to be proactive and secure it. It was easy project took about 4 hours to complete.  I plan to paint the vertical boards a medium gray and stain the shelves a dark coffee color. 

Built from Plan(s)
Estimated Cost
$350
Estimated Time Investment
Afternoon Project (3-6 Hours)
Recommended Skill Level
Beginner

Chair Build with Loveseat Modification

Submitted by Joshh81 on Sat, 09/02/2017 - 12:26

Built the 2 chairs according to the plans, and then modified it for a bench that's 48" (our cushions are 23.5 x 23.5). Worked really well!

Estimated Time Investment
Weekend Project (10-20 Hours)
Recommended Skill Level
Beginner

Comments

Seasonal And Holiday

Harriet Chairs (by me)

Submitted by Medickep on Fri, 05/01/2015 - 09:01


I'm pretty happy with the way these chairs turned out.  It was a fun project as I did a few first, which included going to the fabric store (long waits) and got to tackle some upolstery for the first time!  I did end up with a few glue drops that did not take the stain, so I'll be researching tips and tricks to prevant that in the future!  


Also, I made these out of Popular, which pre stain was a must for cherry stain.  Next time, I would use Cherry!

Thanks to Joanne S for the original post and consults regarding the upolserty!!

Built from Plan(s)
Estimated Cost
80-100/chair (depends on materials used)
Estimated Time Investment
Weekend Project (10-20 Hours)
Finish Used
Golden Oak Wood Classics stain from Sherwin Williams. Tinted to match my existing chairs.
Recommended Skill Level
Intermediate

Comments

JoanneS

Fri, 05/01/2015 - 13:29

These are spectacular! Beautiful build! Love the finish and the upholstery. Also I'm super impressed that you can't see any of the filled screw holes. Would love to know the technique you used to hide them so well - I'm going to copy that! :)
JoanneS

Medickep

Fri, 05/08/2015 - 12:48

Thank you both for the nice comments. I was please with the way these turned out too, despite some glue spots not taking up the stain. I plan on getting more disciplined in this area. For hiding the screws, I finally upgraded to a real countersink like this one: http://www.rockler.com/8-pro-tapered-countersink-bit at Rockler.

Instead of always forcing a dull one in and getting a crooked openings, this razor sharp one cuts beautiful holes with no effort! But watch out, I cut myself just adjusting the depth of the drill bit. I discovered these the last time I made some wine oak barrel chairs!

Medickep

Fri, 05/08/2015 - 12:53

Since I use Kreg screws for almost everything, (even non-pocket hole stuff)because they are self tapping and won't crack the would I sure my countersink matched the head of the Kreg screws and than purchased a plug hole bit. Can be used on a drill, but better on a drill press. You have to keep the drill perfectly straight or the plug can break and get stuck in the bit!

Queen size storage bed with headboard storage

Submitted by Cranky on Mon, 01/29/2018 - 12:49

There was some deviation from the original plans..  We made the storage boxes a bit taller and the headboard has several new features.

First off, the under-bed storage takes up the whole size of the bed.  So the drawers (six of them) are nice and deep.  One of the drawers is actually the dog's bed now.

The picture doesn't show it but behind the headboard there are cubbies for storing books, tablets, phones, glasses, etc.

On both sides of the headboard there are four electrical outlets plus two USB charging outlets for charging tablets, phones, etc.

There are two reading lamps on the headboard as well.

I did the construction portion while my talented wife did the amazing paint job.


Estimated Time Investment
Week Long Project (20 Hours or More)
Finish Used
FAT paint, charcoal colour.
Recommended Skill Level
Advanced

Comments

Axel

Sun, 06/09/2019 - 04:28

That's awesome! Do you have notes on how you did the modifications and the additional features?

Dining Table and Chairs

This was my first table - I added extensions by notching out the end 2x4's and making extensions that slide into the pockets. There were a few mistakes I made that will be corrected when I build my next.
I modified the length of the table down to 5 feet long, but with the extensions in it goes up to 8'. The table is also 34" tall due to a giant husband and Great Dane. The chairs were likewise modified in height and I made the backs a bit fancier using 1x2's and a nail gun.

Estimated Time Investment
Week Long Project (20 Hours or More)
Finish Used
Chairs are painted and waxed, table is stained and polyurethaned. When I do my next table it will be waxed.
Recommended Skill Level
Beginner

Dining room set (with Classic Chairs made Simple)

Submitted by Anonymous (not verified) on Mon, 07/18/2016 - 10:16

This was my first attempt at making furniture...but it turned out GREAT!  My fiance was about to buy a VERY similar dining room set for $1300 before I stopped her and insisted that I could build it myself, finish it to match our kitchen/dining room, and save a TON of money!

Built from Plan(s)
Estimated Cost
$350 total
Estimated Time Investment
Week Long Project (20 Hours or More)
Finish Used
Minwax Expresso Stain plus 2 coats of Minwax Polycrylic on table top and seats
Minwax Classic Black Polyshades on frame
Recommended Skill Level
Beginner

Comments

Outdoor rolling bar top

Submitted by Anonymous (not verified) on Wed, 07/08/2020 - 19:43

We had some leftover granite from an outdoor kitchen build and wanted to maximize the use of it. We loved the look of a rustic table from Pottery Barn and set out to find something that was asking the same aesthetic. I came across the Jilly and Mia workbench console and thought it would work great with some minor modifications. I shortened the overall length and height, went with some heavy duty casters to support the weight of the granite, and reinforced the cross beams that would support the 3/4" plywood sheet and granite. I went with cedar for this build since it was outdoors and I'll finish it with a clear sealant.

Built from Plan(s)
Estimated Cost
$300
Estimated Time Investment
Day Project (6-9 Hours)
Recommended Skill Level
Intermediate

Comments

Rolling grill cart table

Submitted by kmatt55 on Sat, 10/18/2014 - 19:13

I made the countertop with 2 plywood boards screwed together and topped the stainless steel with heavy duty adhesive.  I adjusted the plans a little to accommodate my space.  Thanks for the plans!  It was a fun build!

Built from Plan(s)
Estimated Cost
$100
Estimated Time Investment
Day Project (6-9 Hours)
Finish Used
Glossy black exterior paint
Recommended Skill Level
Beginner

Modern Dorm Mini Refrigerator Microwave Cabinet

Submitted by rachelcb on Sat, 07/31/2021 - 12:35

I changed plan to make deeper. I also modified the bottom trim and top. I put a ball bearing soft door drawer guide on modern door so it can slide back and forth. I feel we need more modern plans on here but with a bit of creativity and using plans you can make anything. I have never built anything before. I love General Finishes Milk Paint in Snow White and I brushed rolled it on (sanded between 3 coats). It’s basically self leveling and leaves a nice matte finish. Used door glide in picture bought from homedepot in the 24 inch and that’s how wide door was and it was 36” tall. Door glide I only used one on top of the door not on bottom as well. Door piece of fiberboard with just strips glued on and quarters spacing them correct.

Estimated Cost
$200
Estimated Time Investment
Weekend Project (10-20 Hours)
Finish Used
Dorm mini refrigerator microwave cabinet
Recommended Skill Level
Starter Project

Comments

Ultimate work bench

Submitted by markmart74 on Fri, 06/16/2017 - 18:44

Tablesaw, router, fliptop mitersaw, and dust collection workbench. 

Recommended Skill Level
Intermediate

Comments

Back