Community Brag Posts

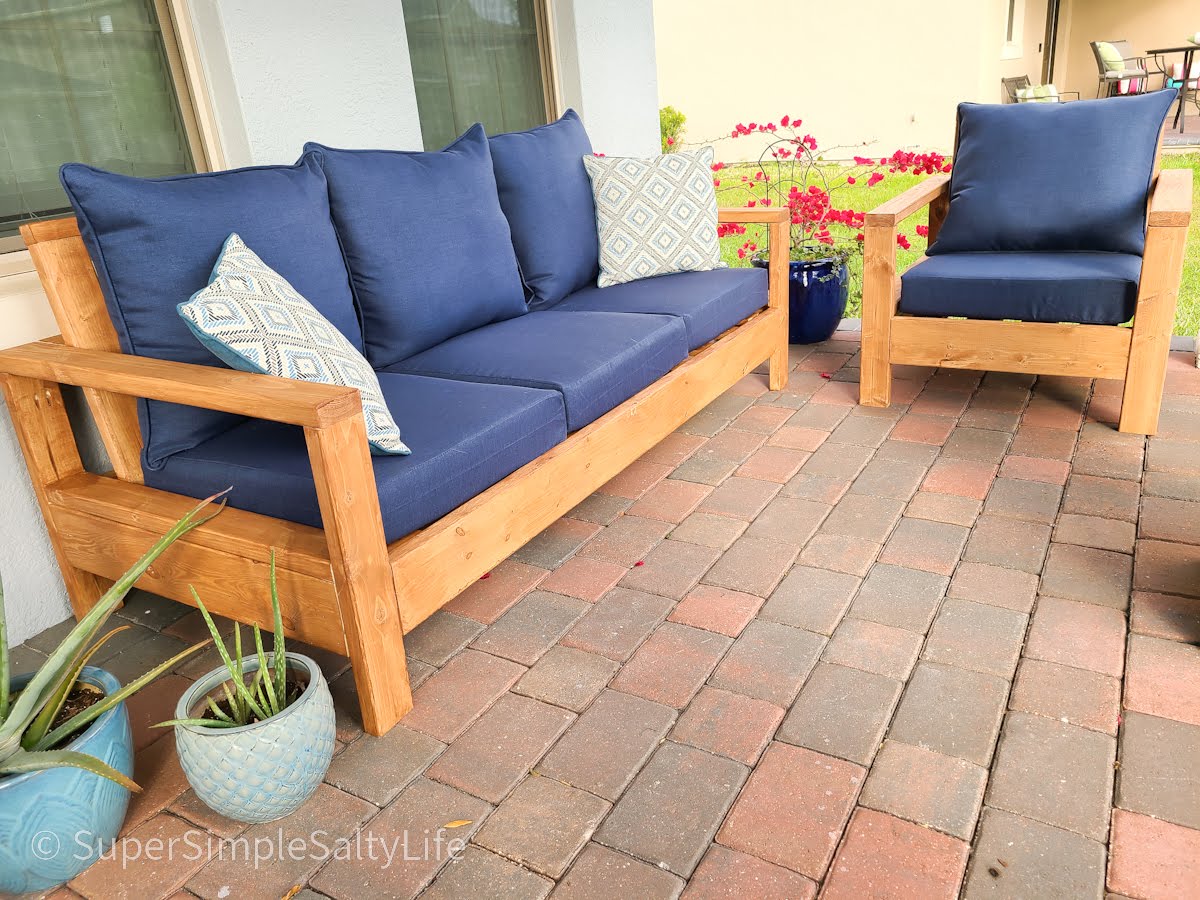
Modern Outdoor Chair with Backrest

Submitted by PoppaZotch on Mon, 08/17/2020 - 11:53

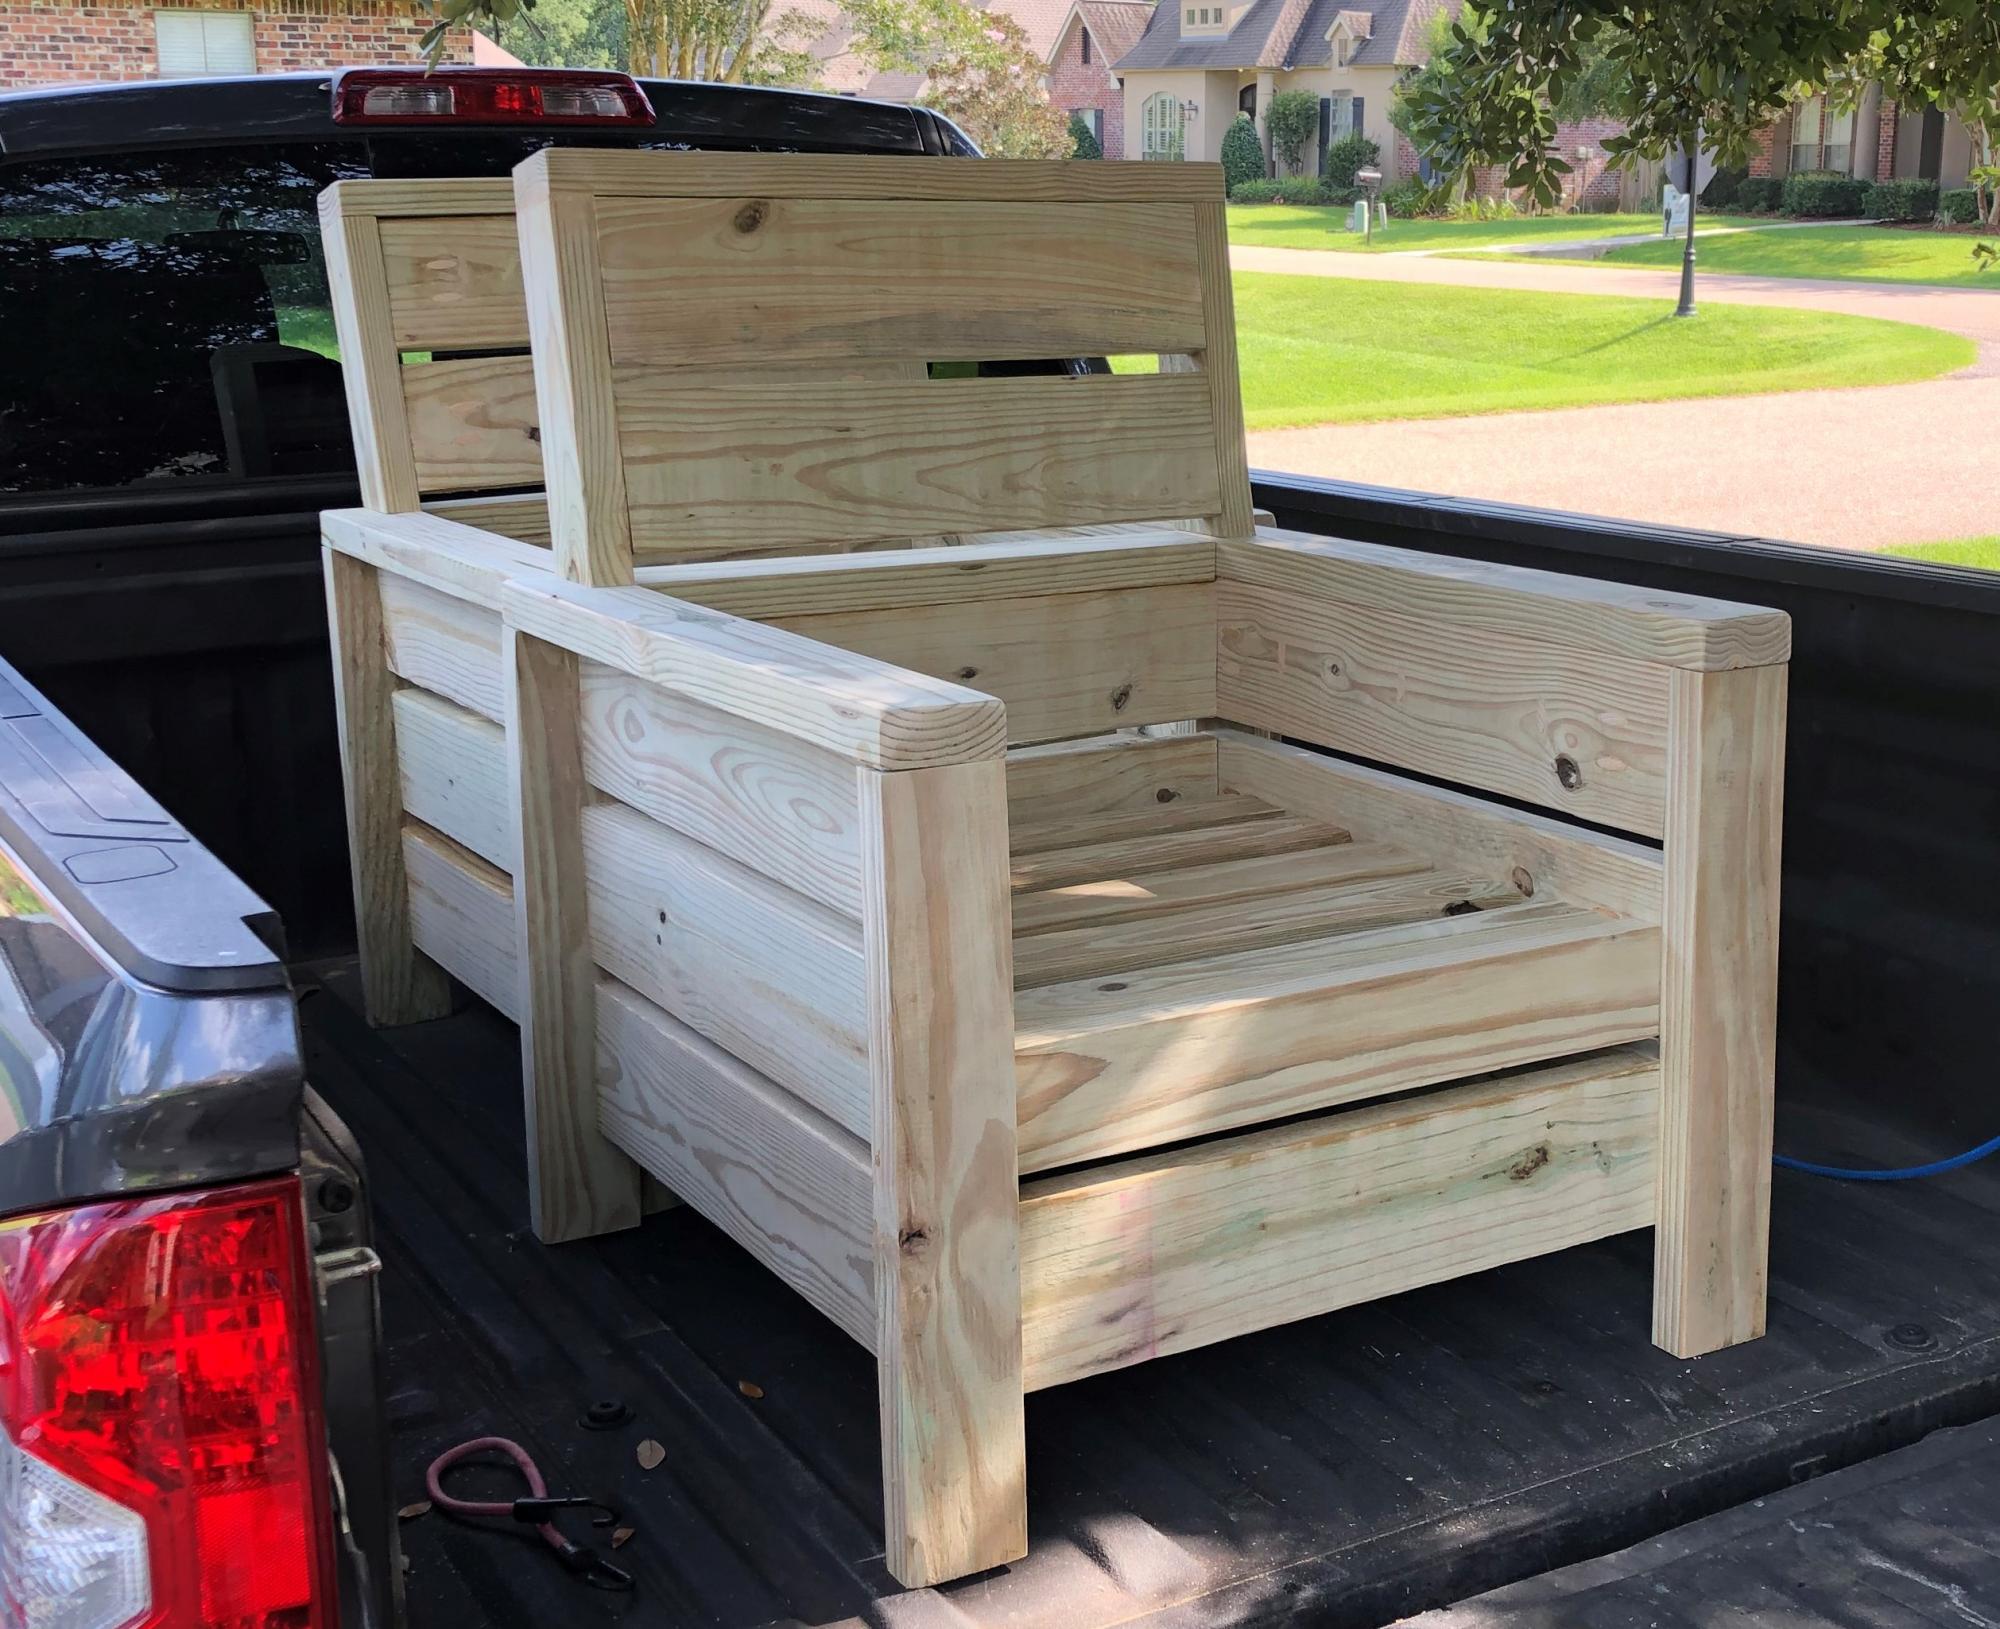
Per request of my wife, I opted to add a backrest to the chair. I feel as though my backrest design keeps with the style of the original build. I accomplished this by cutting the 2x4 vertical arms of the backrest at 13 inches with a 10 deg miter cut at the base. This allows you to keep with the 3/4" on the 2x6 backrest slats. I finished it off with a 2x4 top plate. I'd also note that I made slight modifications to the plans to accommodate 24" cushions.

Estimated Cost
$100
Estimated Time Investment
Afternoon Project (3-6 Hours)
Finish Used
sanded to a 220 grit
Recommended Skill Level
Intermediate

Reclined Back Outdoor Sofa and Chair DIY

Submitted by Anonymous (not verified) on Sat, 04/09/2022 - 07:12

OK, I think this build may be my biggest project yet! It is definitely the heaviest. With the strong winds we can get here in Florida we needed substantial outdoor furniture.
I did make some modifications along the way measurement-wise so the sofa would fit my front porch better. All in all, this took 2 full days. I built the sofa first, stained it the next day and then decided (due to trying to get stain in all the nooks and crannies) to stain the chair pieces first before putting it together.
I am so happy with the results and so far, almost a year later, this furniture looks great and hasn't moved an inch in any of the thunderstorms we've had! Thank you Ana!!

Comments

Fire Pit Swings

My wife saw something like this on Pinterest and desperately wanted one. The one she saw was hexagonal in shape. We didn't need as many swings so we went with just a plain square shape. We used 6x6s for the legs and posts across the top and used 4x4s for the angled support pieces. We built the swings using the plan from this website. All the materials can be picked up at the blue and orange stores. However when it came to the springs for the swings, the blue store was 1/3 of the price of HD. The legs are 12' long and buried 4' under the ground and cemented in for strength. Luckily I am retired military and was able to rent an auger for 1/2 the price of HD or the blue store. You could do it by hand but it saved us hours and lots of back pain. We found our dimensions for the size we wanted and spray painted dots on the ground where the posts were going to go. We dug the holes and stuffed the 6x6s in them. Using a post level we made sure they were plum. We braced them and added the quickrete and left them to setup over night. The next day we had to make sure all the tops were level with each other. This is where having some knowledge of physics paid off. I took clear tubing and screwed it above the height that I wanted on one post and then screwed the other end to another post. Fill it with water until the water level on the first post is where I wanted it (8 feet high) and it will automatically fill it level on the other end. There is a picture of this above. Water will always level itself out. I had to do this because my yard is at a slight down hill grade. We marked it and cut the tops off to make it level. After attaching the 6x6s on the top with 8" lag bolts it was time to paint. After painting was done we built 3 swings from Ana's plans. We shortened them by 6" to give room to walk between the legs and the swings. All in all it was a great project that only took two dedicated weekends. My wife still has to paint the swings though.

Built from Plan(s)
Estimated Cost
$600ish
Estimated Time Investment
Week Long Project (20 Hours or More)
Finish Used
We used an oil base Black Barn Paint from the blue store.
Recommended Skill Level
Intermediate

Comments

jkread

Wed, 05/27/2015 - 22:38

It sounds and looks like the top 6x6s are mitered and sit on top of the end of the vertical posts. I'd say at least one lag bolt each way to hold the mitered corner together and then at least one in each piece down into the vertical to hold it in place.

carewarner

Mon, 04/27/2020 - 10:24

WOW, LOVE!!! This is simply gorgeous! What a warm and welcoming addition to your yard. And thanks for sharing your method of finding level for your posts on your sloped yard. I absolutely love it!

Seasonal And Holiday

Chicken Coop

Submitted by Anonymous (not verified) on Sun, 07/10/2022 - 12:26

Great for a small flock of 5 or less.  

Comments

Seasonal And Holiday

Best Chairs Ever!

Submitted by Anonymous (not verified) on Tue, 06/09/2020 - 18:16

I made these modern Adirondack chairs for our business in Anchorage. GREAT and easy to build design by Ana - we upgraded the arms to tapered 2x6 and they're awesome!

Night Stands custom sized and finished

Submitted by pondrider on Thu, 01/15/2015 - 07:50

Night Stands custom sized and finished per customer building new home based Ana White's Farm House collection  #‎anawhite‬  

Intentional distressing per customer request with guidance from Ana White plans.   Finish contains a mix of paint, removing of paint, staining and restraining.   Now to move to a purposeful Mud Room Locker for a new home suited for family. 

http://ana-white.com/users/pondrider/
#anawhite   #Stain   #CustomFurniture   #Paint 

Estimated Time Investment
Weekend Project (10-20 Hours)
Finish Used
Finish contains a mix of paint, removing of paint, staining and restraining.
Recommended Skill Level
Intermediate

Mailbox Stand

Submitted by Anonymous (not verified) on Mon, 02/12/2024 - 08:33

I didn't like the standard mailbox we had at my house so I designed this with my CAD program and mage it happen. thanks for this opportunity to post this.

Rich Hebert

Farmhouse Table

My husband and I love entertaining, but our small kitchen table was just not cutting it for both our space and our hosting abilities. We decided that instead of searching for the perfect table and spending a ton of money, we would just build our own table. We found that Ana's Rustic Table plans best matched what we were looking for, but my husband being the detailed person that he is didn’t just want to take her measurements and run with them. So we taped off the floor around our old table to decide how large we wanted our own table to be.

We basically followed Ana White’s plans to a T. Until it got to the legs. Ana White used 2×4′s for her legs, but we decided we liked the look of chunkier 4×4 legs instead. We also did things in a different order, like attaching the legs to the apron before attaching the table top. This did make everything way easier when it came to painting, no tape needed. We also stained the bottoms and sides of the tabletop boards before attaching them to the apron. After the top was attached I stained the top side and applied about 3-4 coats of Matte polyurethane. I like the matte finish because it doesn’t add any sheen and makes things look even more rustic; however, we’ll have to add a regular coat of poly as well because the matte is too soft for something that will see such rough use over the years. And now for what you’re all wondering about, how much did this project cost us?

  • Wood – $86
  • Stain (Dark Walnut) – $7.77
  • Paint (Olympic Snow Storm) – $11.97
  • Polyurethane (Rustoleum Matte finish) – $11.93
  • If that is all we needed to buy then our total would have been: $117.67.
Built from Plan(s)
Estimated Cost
$300
Estimated Time Investment
Weekend Project (10-20 Hours)
Finish Used
Dark Walnut
Recommended Skill Level
Beginner

Comments

mistyclinton

Mon, 12/31/2012 - 09:43

Your table is gorgeous! You did an amazing job.

I am getting ready to attempt my first two projects, bookshelves and a buffet table. I had a couple of questions about how you got such a consistent stain.

1) The Stain - What kind of stain did you use? How many coats did it take? Did you use a conditioner first?

2) Wood filler - How did you get the wood filler to match the stained areas so well? What kind did you use?

Thanks for the advice! I was thinking I would have to paint the buffet but after seeing your table I think I may actually attempt the stain.

Barstools

Submitted by lazyLiz on Sat, 06/09/2012 - 21:22

A 30" tall bar stools inspired by the plan simplest stool.

Built from Plan(s)
Estimated Cost
$ 40- $60
Estimated Time Investment
Afternoon Project (3-6 Hours)
Finish Used
valspar white paint
Recommended Skill Level
Beginner

Comments

Handygirl

Sat, 07/07/2012 - 18:47

I love these stools! I love the curve in the top. Are yours square on top or rectangle?
Also, what size of board is the top (seat)?

Rusty Cottage

Fri, 07/20/2012 - 05:32

I like your design. Finally made an account and will be making matching ones. Thanks for the inspiration. If the better half doesn't like the first one I will have a new stool for my workbench

MrsPowers

Fri, 08/31/2012 - 20:27

Hi! You're stools came out wonderful. I was wondering how you got the seat to be curved that way.
Thanks!

Outdoor sectional

Submitted by Anonymous (not verified) on Wed, 10/02/2019 - 04:17

Made the outdoor sectional. The coffee table was made out of left over pieces!

Estimated Cost
$260
Estimated Time Investment
Weekend Project (10-20 Hours)
Finish Used
We used a semi transparent stain applied with brush. We would recommend a hand sprayer instead.
Recommended Skill Level
Beginner

Comments

Porch Swing Glider

Submitted by Anonymous (not verified) on Fri, 05/19/2017 - 09:25

Built the porch swing and was inspired to build the glider frame by another "Brag Post" Looks great and fits perfectly in my back yard!

Built from Plan(s)
Estimated Cost
$200
Estimated Time Investment
Weekend Project (10-20 Hours)
Finish Used
Transparent deck sealant for frame, white exterior paint for seat panels
Recommended Skill Level
Beginner

Comments

Rachael Brown

Fri, 02/18/2022 - 08:20

Are there any dimensions for the glider part? I have first year agriculture students building this, but we are unsure of the cut list for this. I am sure I can figure it out as the teacher, but with 20 students in the class, it would be better to be able to give them instructions to follow on paper. Thank you!!!

Pretty Wood Boxes!

Submitted by cassiet717 on Fri, 08/02/2013 - 18:42

My brother and his fiancee just bought their first house, and these sweet little boxes were the perfect housewarming gift! I used the recommended cedar picket, and found some old reins at a flea market for the handles. Piece of cake to build, super inexpensive, but absolutely adorable!

Estimated Cost
$3 per box (including handles)
Estimated Time Investment
An Hour or Two (0-2 Hours)
Finish Used
Minwax Pre-Stain Wood Conditioner, Minwax Stain in Walnut
Recommended Skill Level
Starter Project

Simple 2x4 Bench

Submitted by jennibee on Sun, 09/14/2014 - 17:03

I made this in an afternoon. Loved this project. It is made with 2x4's using a Kregs Jig and mitre saw (plus additional tools like a drill and square).  This was my frist time using the Kregs Jig and I am sold!!

The free plans were taken from another website. They are very detailed and there is even a video (I recommend it as he gives a great tip for making sure the back stays equal/level to each other before putting the back on). Even though you can build this by yourself, I did have help for the heavier sides once they were assembled.  I plan to build the additional side table soon and finish them both with sanding and staining when the weather seems less iffy for rain.

If you are looking for a good beginner project that doesn't take forever or have complicated steps, this is your project.

Built from Plan(s)
Estimated Cost
Around $50
Estimated Time Investment
Afternoon Project (3-6 Hours)
Recommended Skill Level
Beginner

Modified Octagon Picnic Table

I built the octagon picnic table, and modified in a couple of ways.

1) Due to project deadline (Christmas) (and cost) I opted for composite decking for a finished top and bench, and pressure-treated 2x framing stock. Builder beware! Composite decking can be 5 1/4" wide, which impacts the spacing between the pieces, which means re-calculating most of the table-top pieces. Also, I added lateral structure underneath the benches (more weight!)

2) I really wanted that hole in the center, and hope that my solution (which slightly weakens the overall structural integrity) withstands the test of time.

Built from Plan(s)
Estimated Cost
350
Estimated Time Investment
Weekend Project (10-20 Hours)
Recommended Skill Level
Advanced

Tool Caddy

Submitted by docbromo on Thu, 01/20/2022 - 15:21

I repurpose furniture as a hobby and I got tired of having my tools hanging on a wall on the other side of the garage so I bult this rolling tool caddy. It is made out of 3/4" plywood, a couple of 2x4's and some heavy-duty casters. I built one about 3 years ago and realized that there were some things I wanted to do differently so I sold it and bult this one. My wife gave me a subscription to SketchUp and I had fun drawing it up and tweaking it. I left an over hang of 3" on both sides so I could store my clamps. I also attached an electrical cord reel on the right side and reversed the ends so the male end can plug into the wall and I can roll the unit across the room allowing me to be able to charge my batteries. The back side has a 44 drawer storage organizer and also a few shelves for additional tools like a router and a multi-tool. I'm not nearly the craftsman many of you are and I'm sure you could do a much better job. I didn't build it to look pretty but to be functional and it works for me.

Comments

Jayp413

Fri, 01/21/2022 - 09:16

I really like this idea. I have my tools hung up neat all around the garage, but I keep walking back and forth for tools and batteries. It would be great to roll this over to a project and have everything you need right there. Nice work. I will modify one for my needs.

BigMacQue

Fri, 01/21/2022 - 10:06

there are some very thoughtful features on this, notably the wings at the top and the bottom for clamps and extra tools and the different shelf heights. Well done! I'm going to build one just like it and a power strip for battery storage.

Ten Dollar Cedar Raised Garden Beds

Submitted by kelli224 on Wed, 06/29/2011 - 19:19

Since moving and finding Knock Off Wood, we decided now would be a good idea to try some gardening (again...after failed attempts!) These beds are so simple but beautiful out in the yard and for the first time I actually have vegetables growing. We used the cedar fence posts just as Ana suggested.

Estimated Cost
$40
Estimated Time Investment
An Hour or Two (0-2 Hours)
Finish Used
None
Recommended Skill Level
Beginner

Comments

Seasonal And Holiday

2x4 outdoor cedar couch with ottoman

Submitted by Anonymous (not verified) on Thu, 05/04/2023 - 11:51

I used pocket holes to hide the screws. I made an ottoman out of the outdoor coffee table plans to my dimensions that can be used as a coffee table when we need it.

Comments

Back