DIY Greenhouse

DIY Greenhouse by Trenton Kirby on Facebook!
Built from Plan(s)
DIY Greenhouse by Trenton Kirby on Facebook!

The cover is a tonneau cover for a pickup truck. It's for a 6.5' truck bed so if you notice, I had to ad a 2x4 and one more picket on top to accommodate the extra length.
The cover would add a ridiculous amount of money to the project but it was repurposed. I found it on a truck that was in an accident and going to the scrap yard. I think it it came out great and my grandson loves it.
John


Expecting our second child, my wife and I decided to do away with our guest bedroom and combine it with our office. The only problem was our queen bed took up way too much space and it didn't get enough use to justify the sacrifice. We looked at the wall bed options available for purchase and decided they were way too blah and very expensive. I then found the "A MURPHY BED YOU CAN BUILD, AND AFFORD TO BUILD" post on Ana's website (thanks for the inspiration)!
Using cheap pine boards, plywood, door hinges, vinyl upholstery and stain I constructed the wall bed you see here. It really wasn't that difficult but facing it took the most time. To give the boards a more rustic look I used a utility knife to shave off the edges/corners and stained them with the Minwax American Walnut water based stain and the Minwax White Wash Pickling. When this started we thought we were going to have to settle for something unattractive and less than desirable. Seeing it in our office now, we love our new bed and actually think it makes the room look much better! I didn't keep track of costs, but it couldn't have been more than $150.


Tue, 07/08/2014 - 08:08
Looks great! May I ask what the final outside dimensions were? Curious to see if this would work for me.
Thanks!
Wed, 08/06/2014 - 09:23
I would have to measure it when I get home... at work currently. Looking back, I think the best approach is to take the measurements from the plan, find the difference between standard mattress and queen mattress dimensions (check wikipedia for standard sizes), then add that difference back to the plan. I cut it real close on mine and could use a little more space. It would be nice to make it a bit deeper and with some head room to store comforters and pillows.
Sat, 03/21/2015 - 08:32
To fasten the facing I used wood glue then a Ryobi 18ga nail gun. It's part of their 18v One+ line and works great!
Sun, 12/28/2014 - 12:59
I am dying to get started on this wall bed project. I keep getting this message when trying to open the Plans.
The page you are looking for is temporarily unavailable.
Please try again later.
can someone help me find them.
Sun, 12/28/2014 - 12:59
I am dying to get started on this wall bed project. I keep getting this message when trying to open the Plans.
The page you are looking for is temporarily unavailable.
Please try again later.
can someone help me find them.
Sat, 08/15/2015 - 12:05
did you ever find the plans?
I'm having thee same problems

Tue, 08/09/2016 - 15:24
Hi. I would love to try this. Looking to build in the next month before parents in law come over. Is there any working links to the plans??
Wed, 01/24/2018 - 21:42
WHERE CAN I FIND THE PLANS, MATERIALS LIST AND DIMENSIONS? THE ATTACHED LINK TO YOUR ARTICLE LEADS TO A TWIN SIZE BED. THANK YOU
Thu, 01/25/2018 - 06:30
is there a link to the plans? I can't find them and I really want to make this
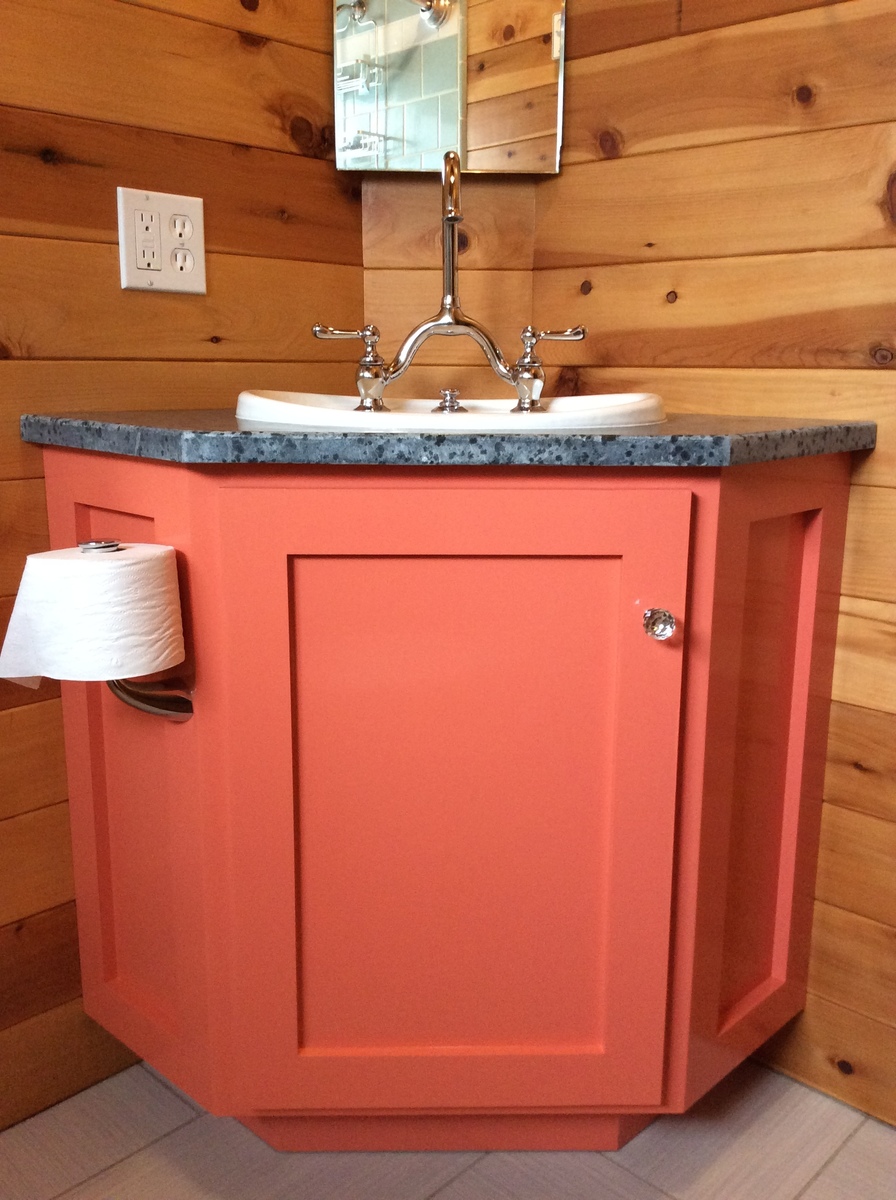
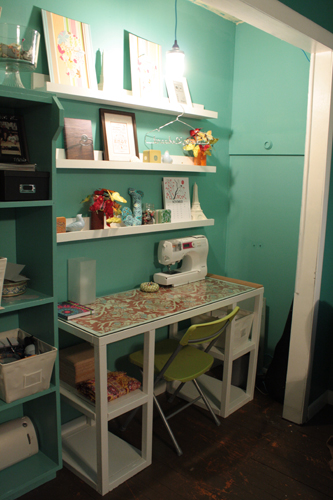
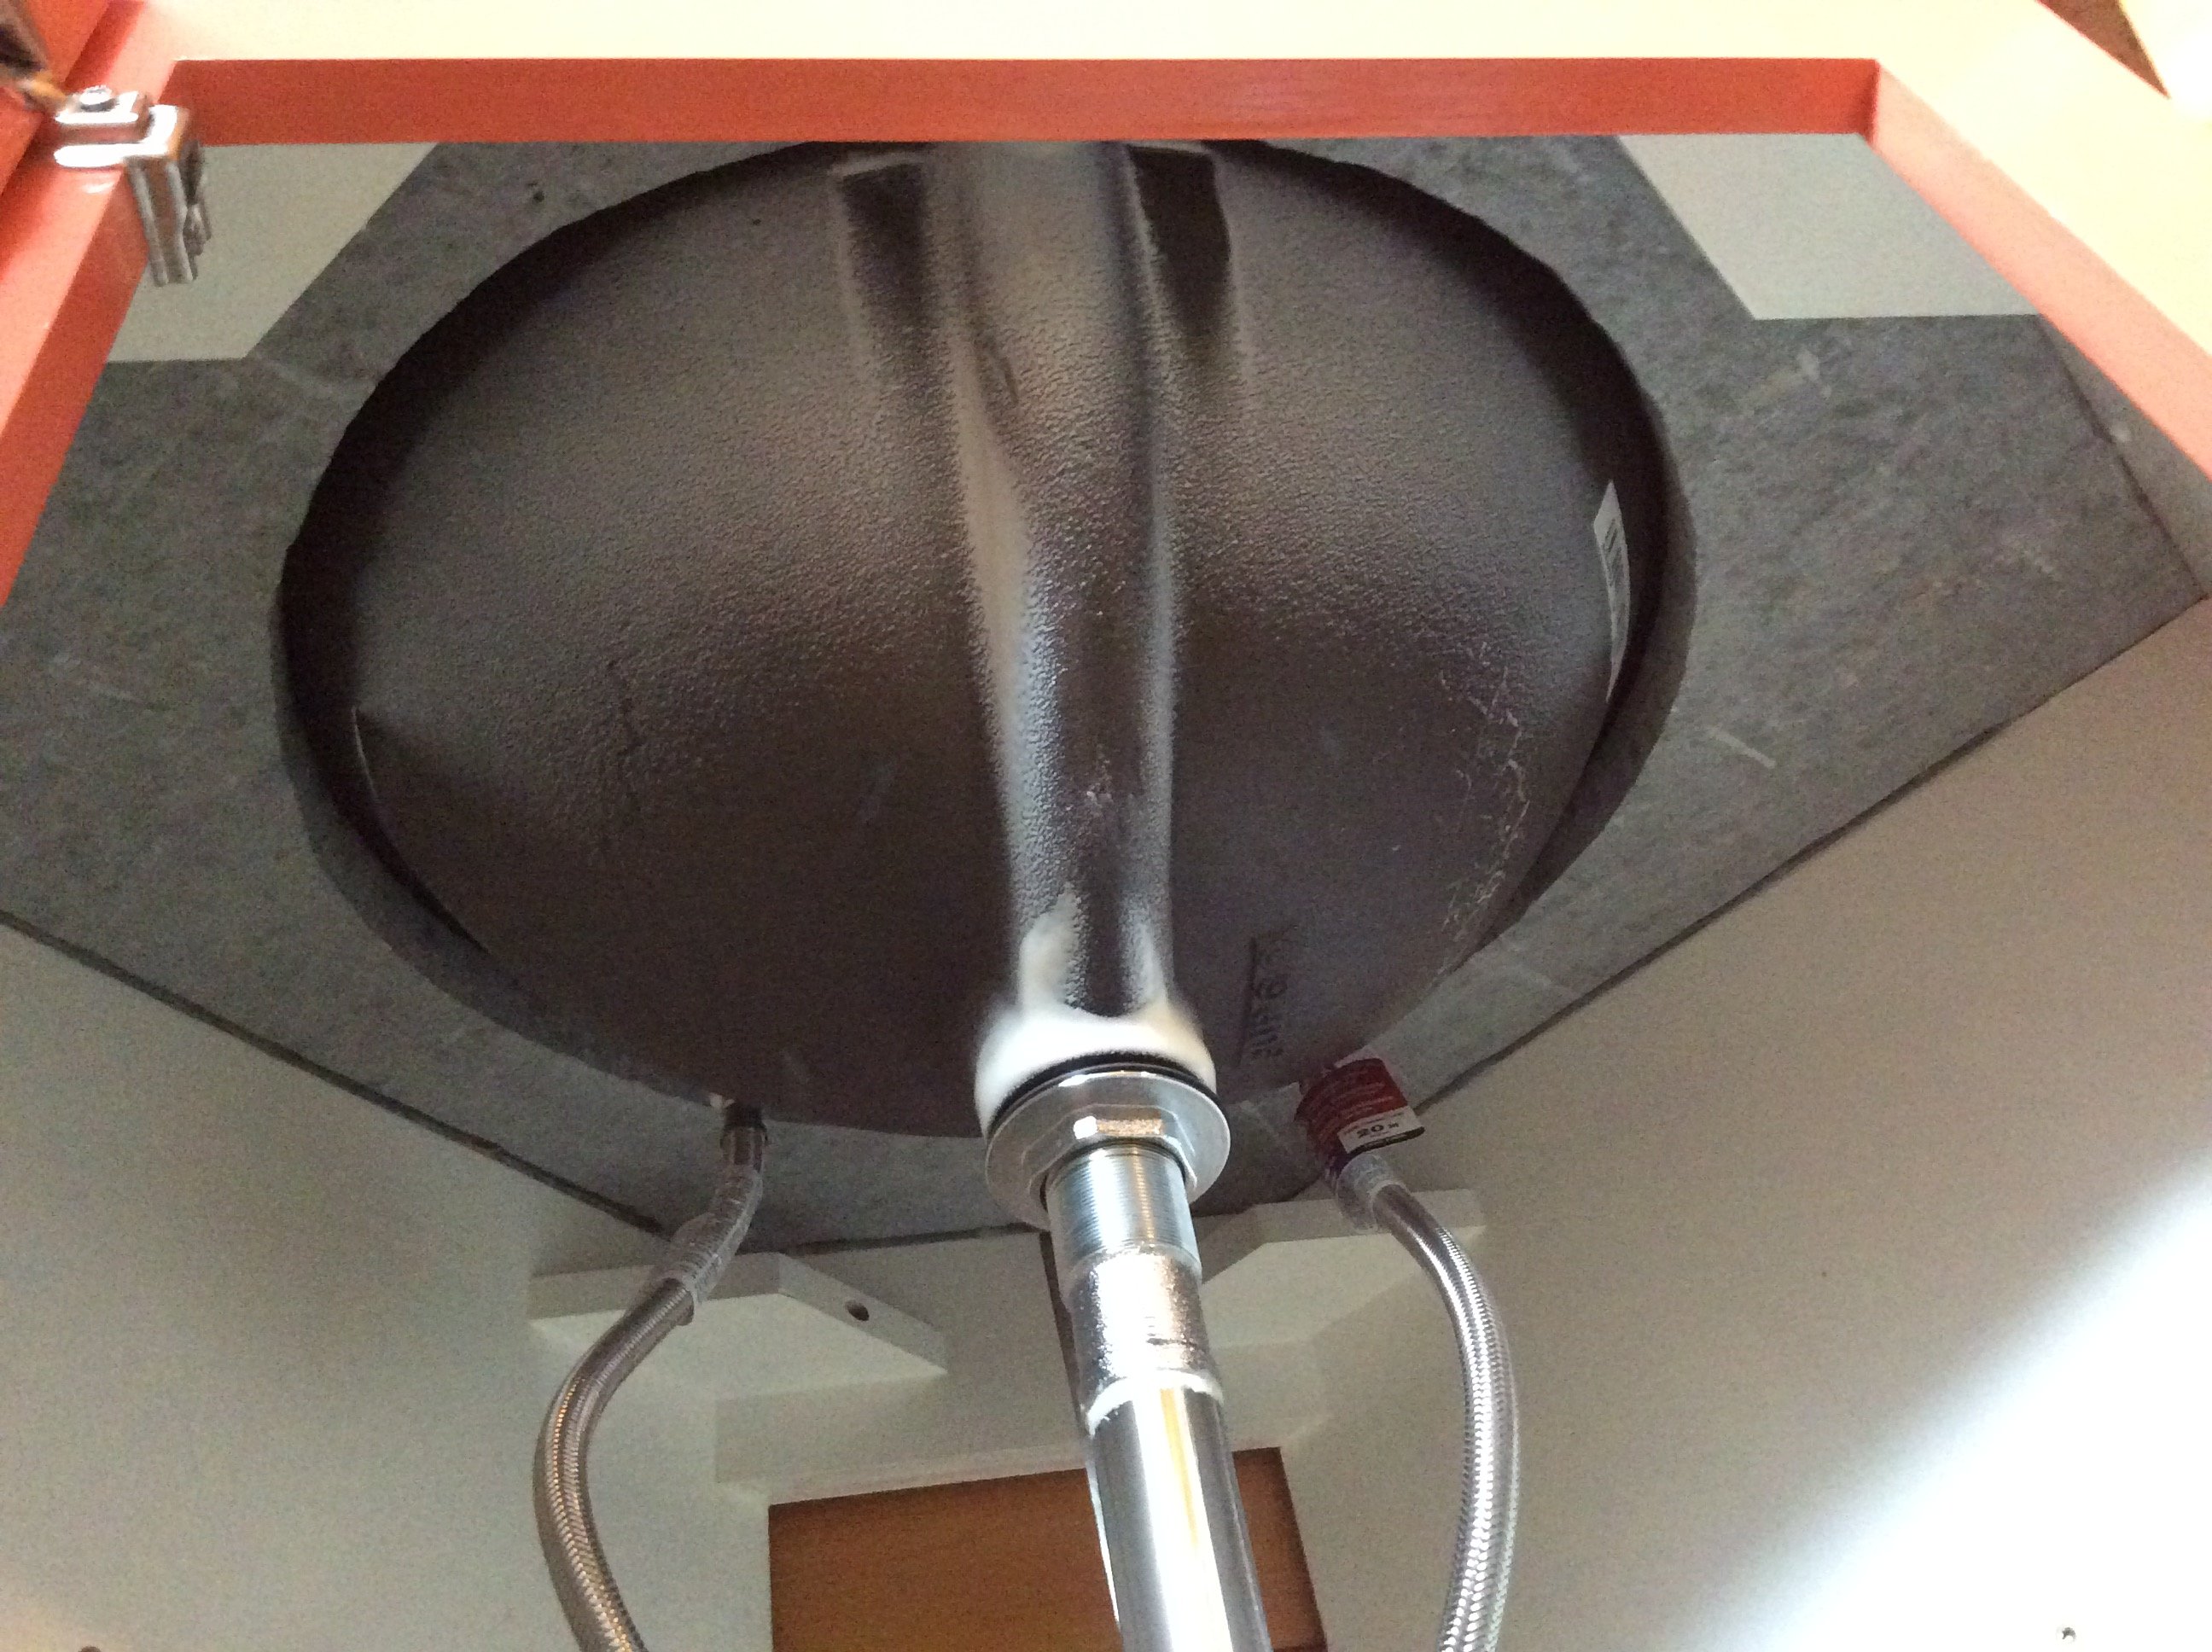
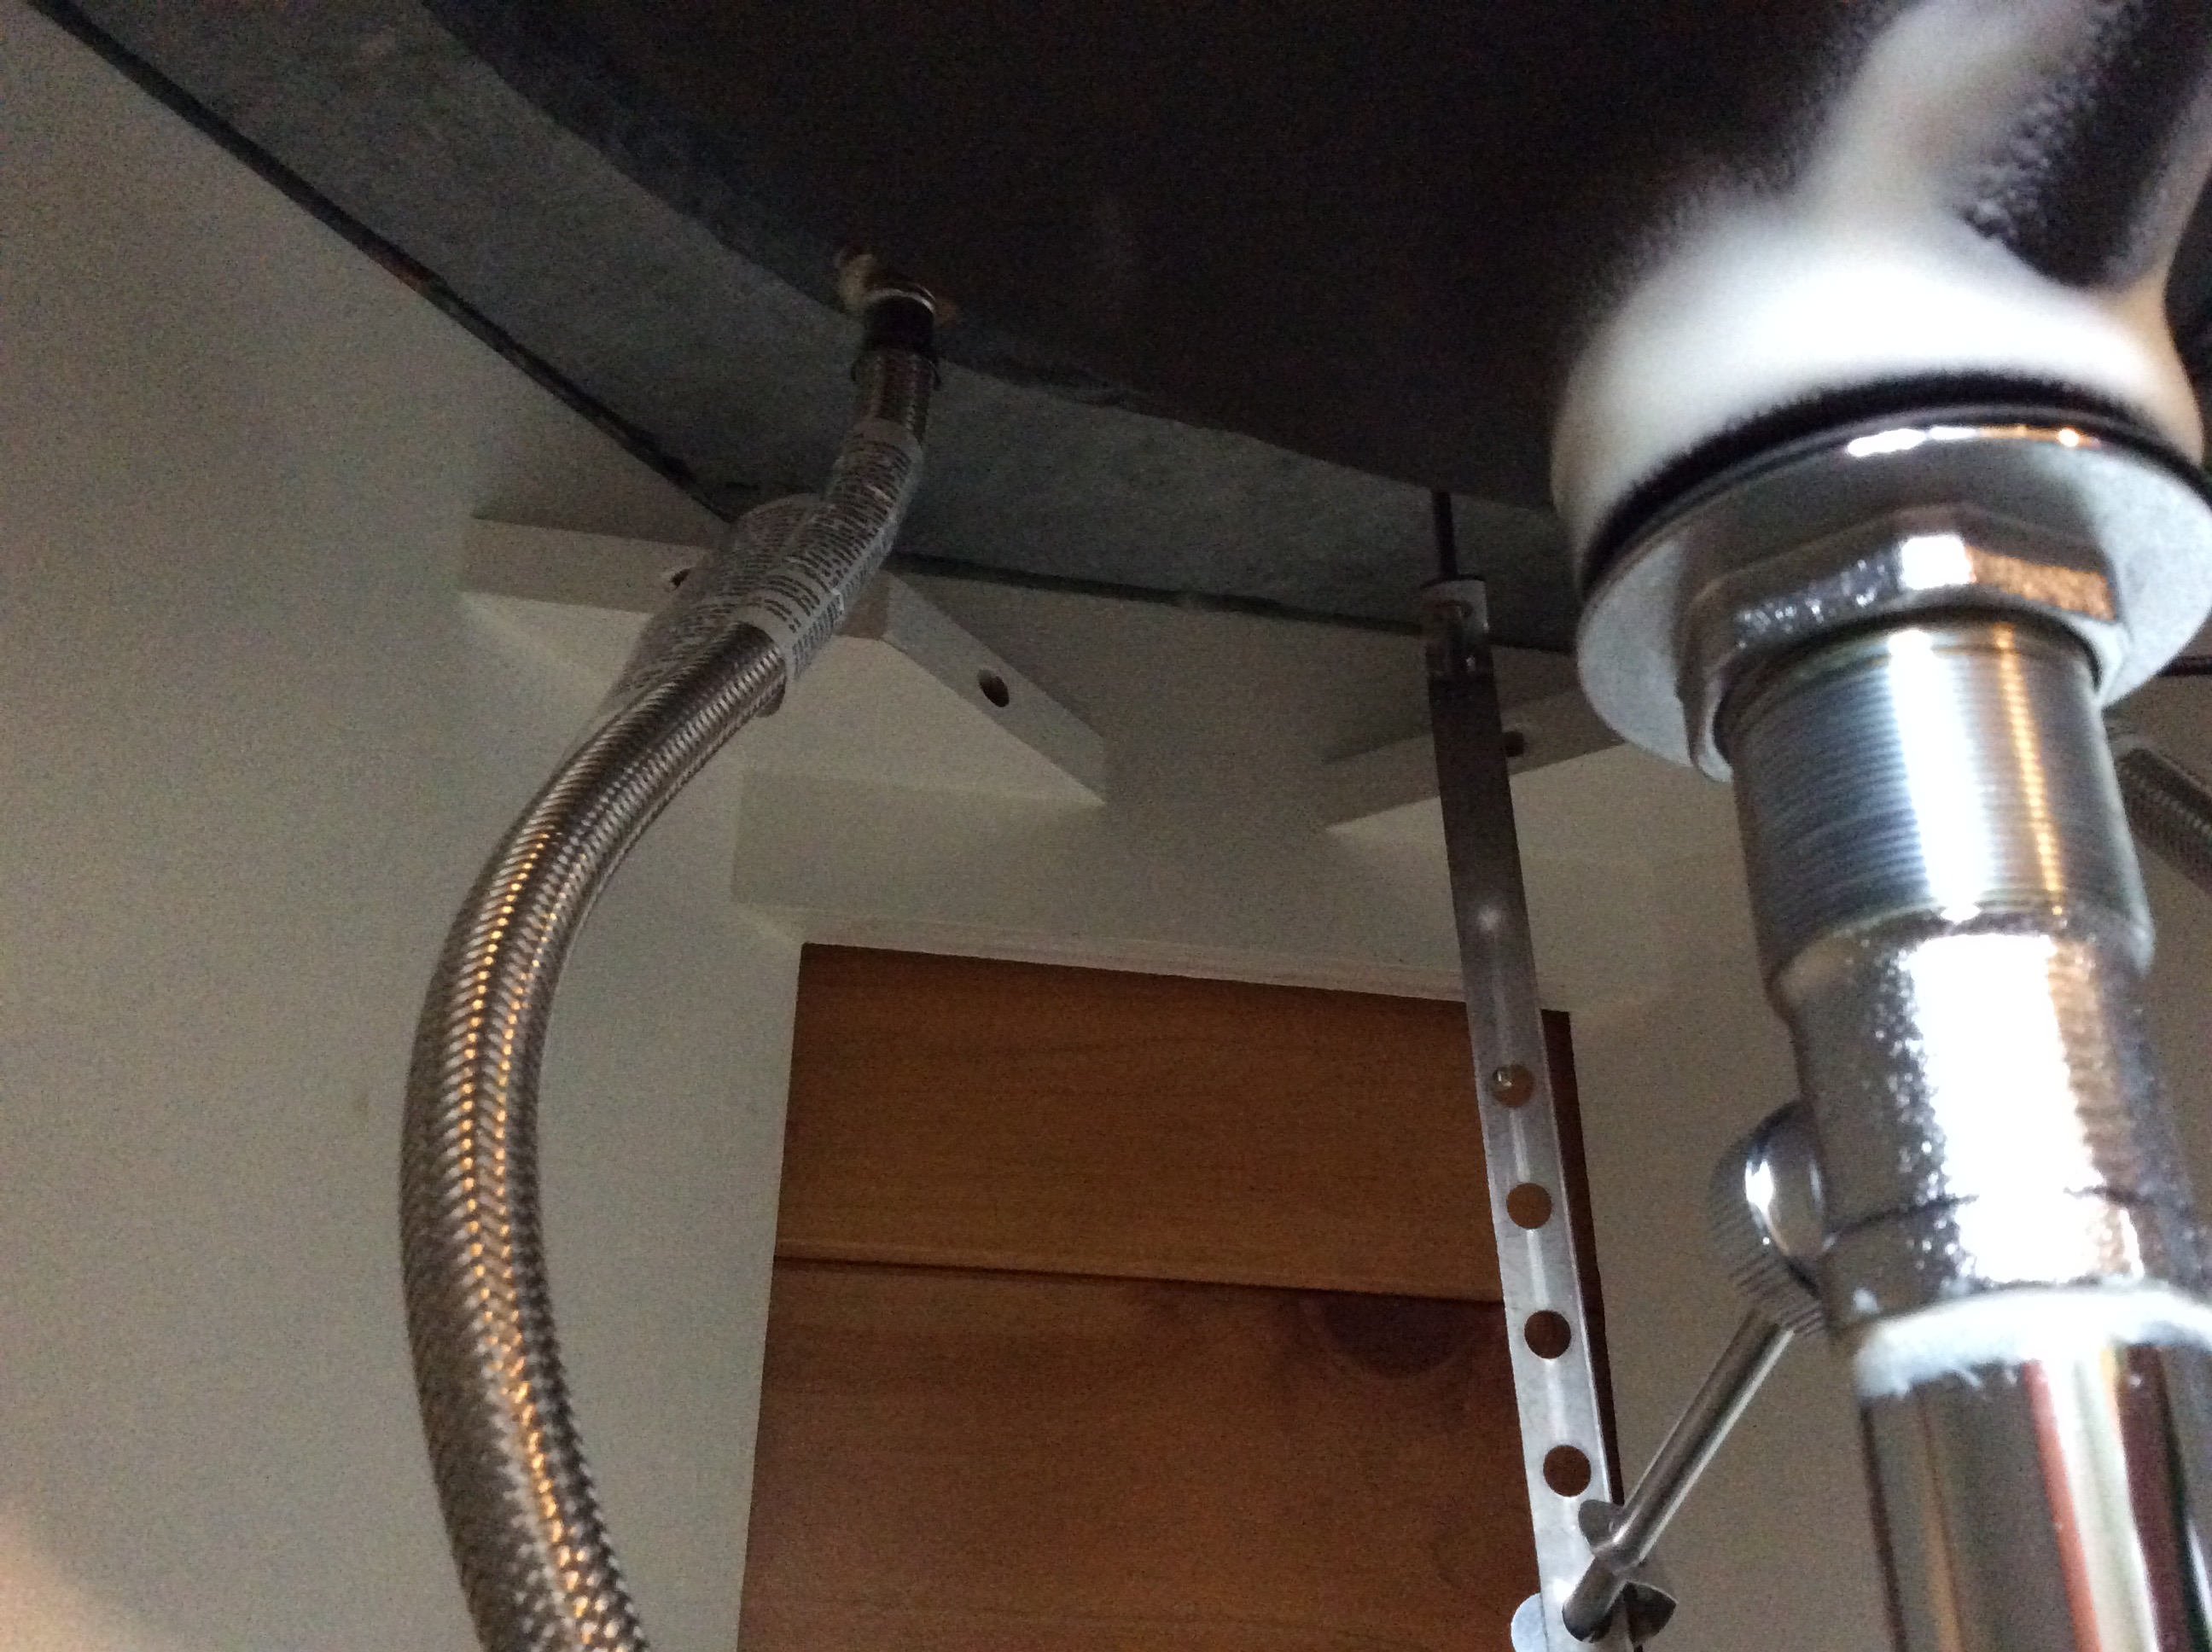
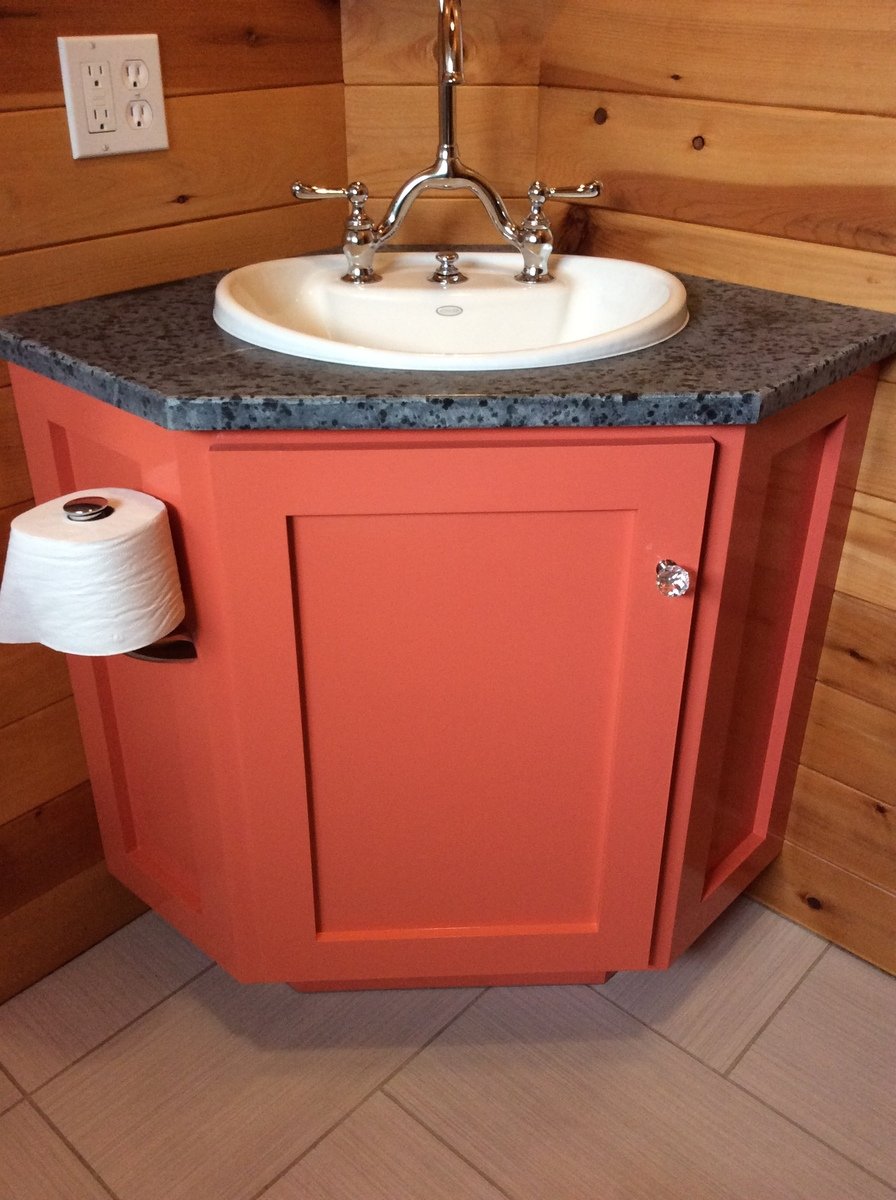
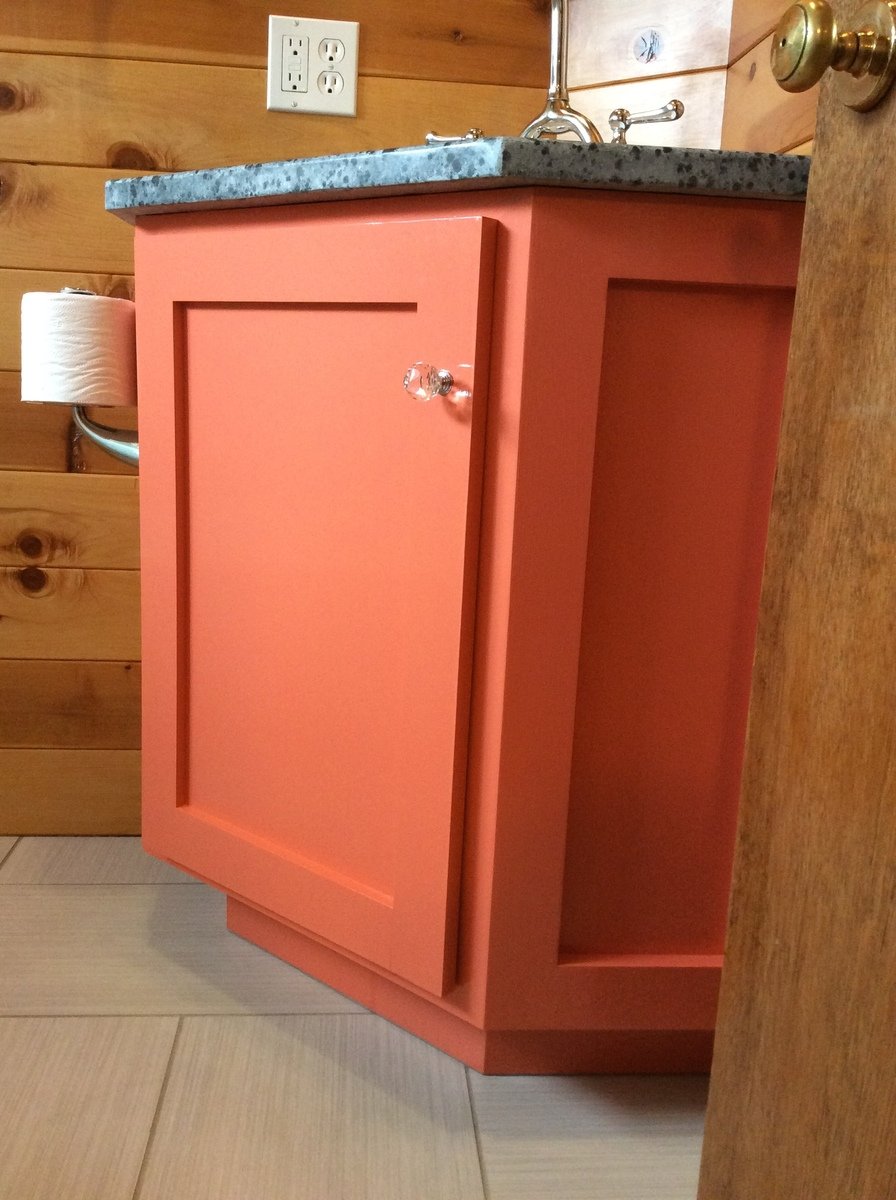
This project started because a corner bathroom vanity that fit my space requirements and budget did not exist. A plan specific to what I exactly needed also did not exist. After combing through what plans I found online, the Wall Kitchen Corner Cabinet best matched what I wanted. I modified it with the Momplex Sink Base Kitchen Cabinet in order to turn it into a sink base.
But, there was a problem. I hadn't actually built anything before. In order to get at least one project under my belt, I built the Vintage Step Stool. It turned out great, so I figured I was ready to go! Strangely enough, after spending about $100 and several weekends picking away at this project, it was done! It looked great, even. Then, I moved the vanity into the bathroom and realized that, while it may have looked great, it wasn't very square. Lesson learned was that this is a two person project. It is too difficult to keep things square and screw at the same time when there is only one person.
At this point, everyone was tired of having to use the kitchen sink to brush their teeth and wash their hands, so we needed to get this project done. $100 later, we had more material. Since I had figured out what needed to be done with the first vanity, let's call it our prototype, the second vanity went together REALLY quickly.
Within a few hours, it was pieced together. Since it was going to be painted, we used Bondo to cover up our imperfections. Yes, of course there were imperfections. While much better than the prototype, it still was only my third woodworking project. Sanding, caulking, and priming took another hour or so. A few coats of the finish paint went on, followed by a couple more coats of a clear sealer, and it was done.
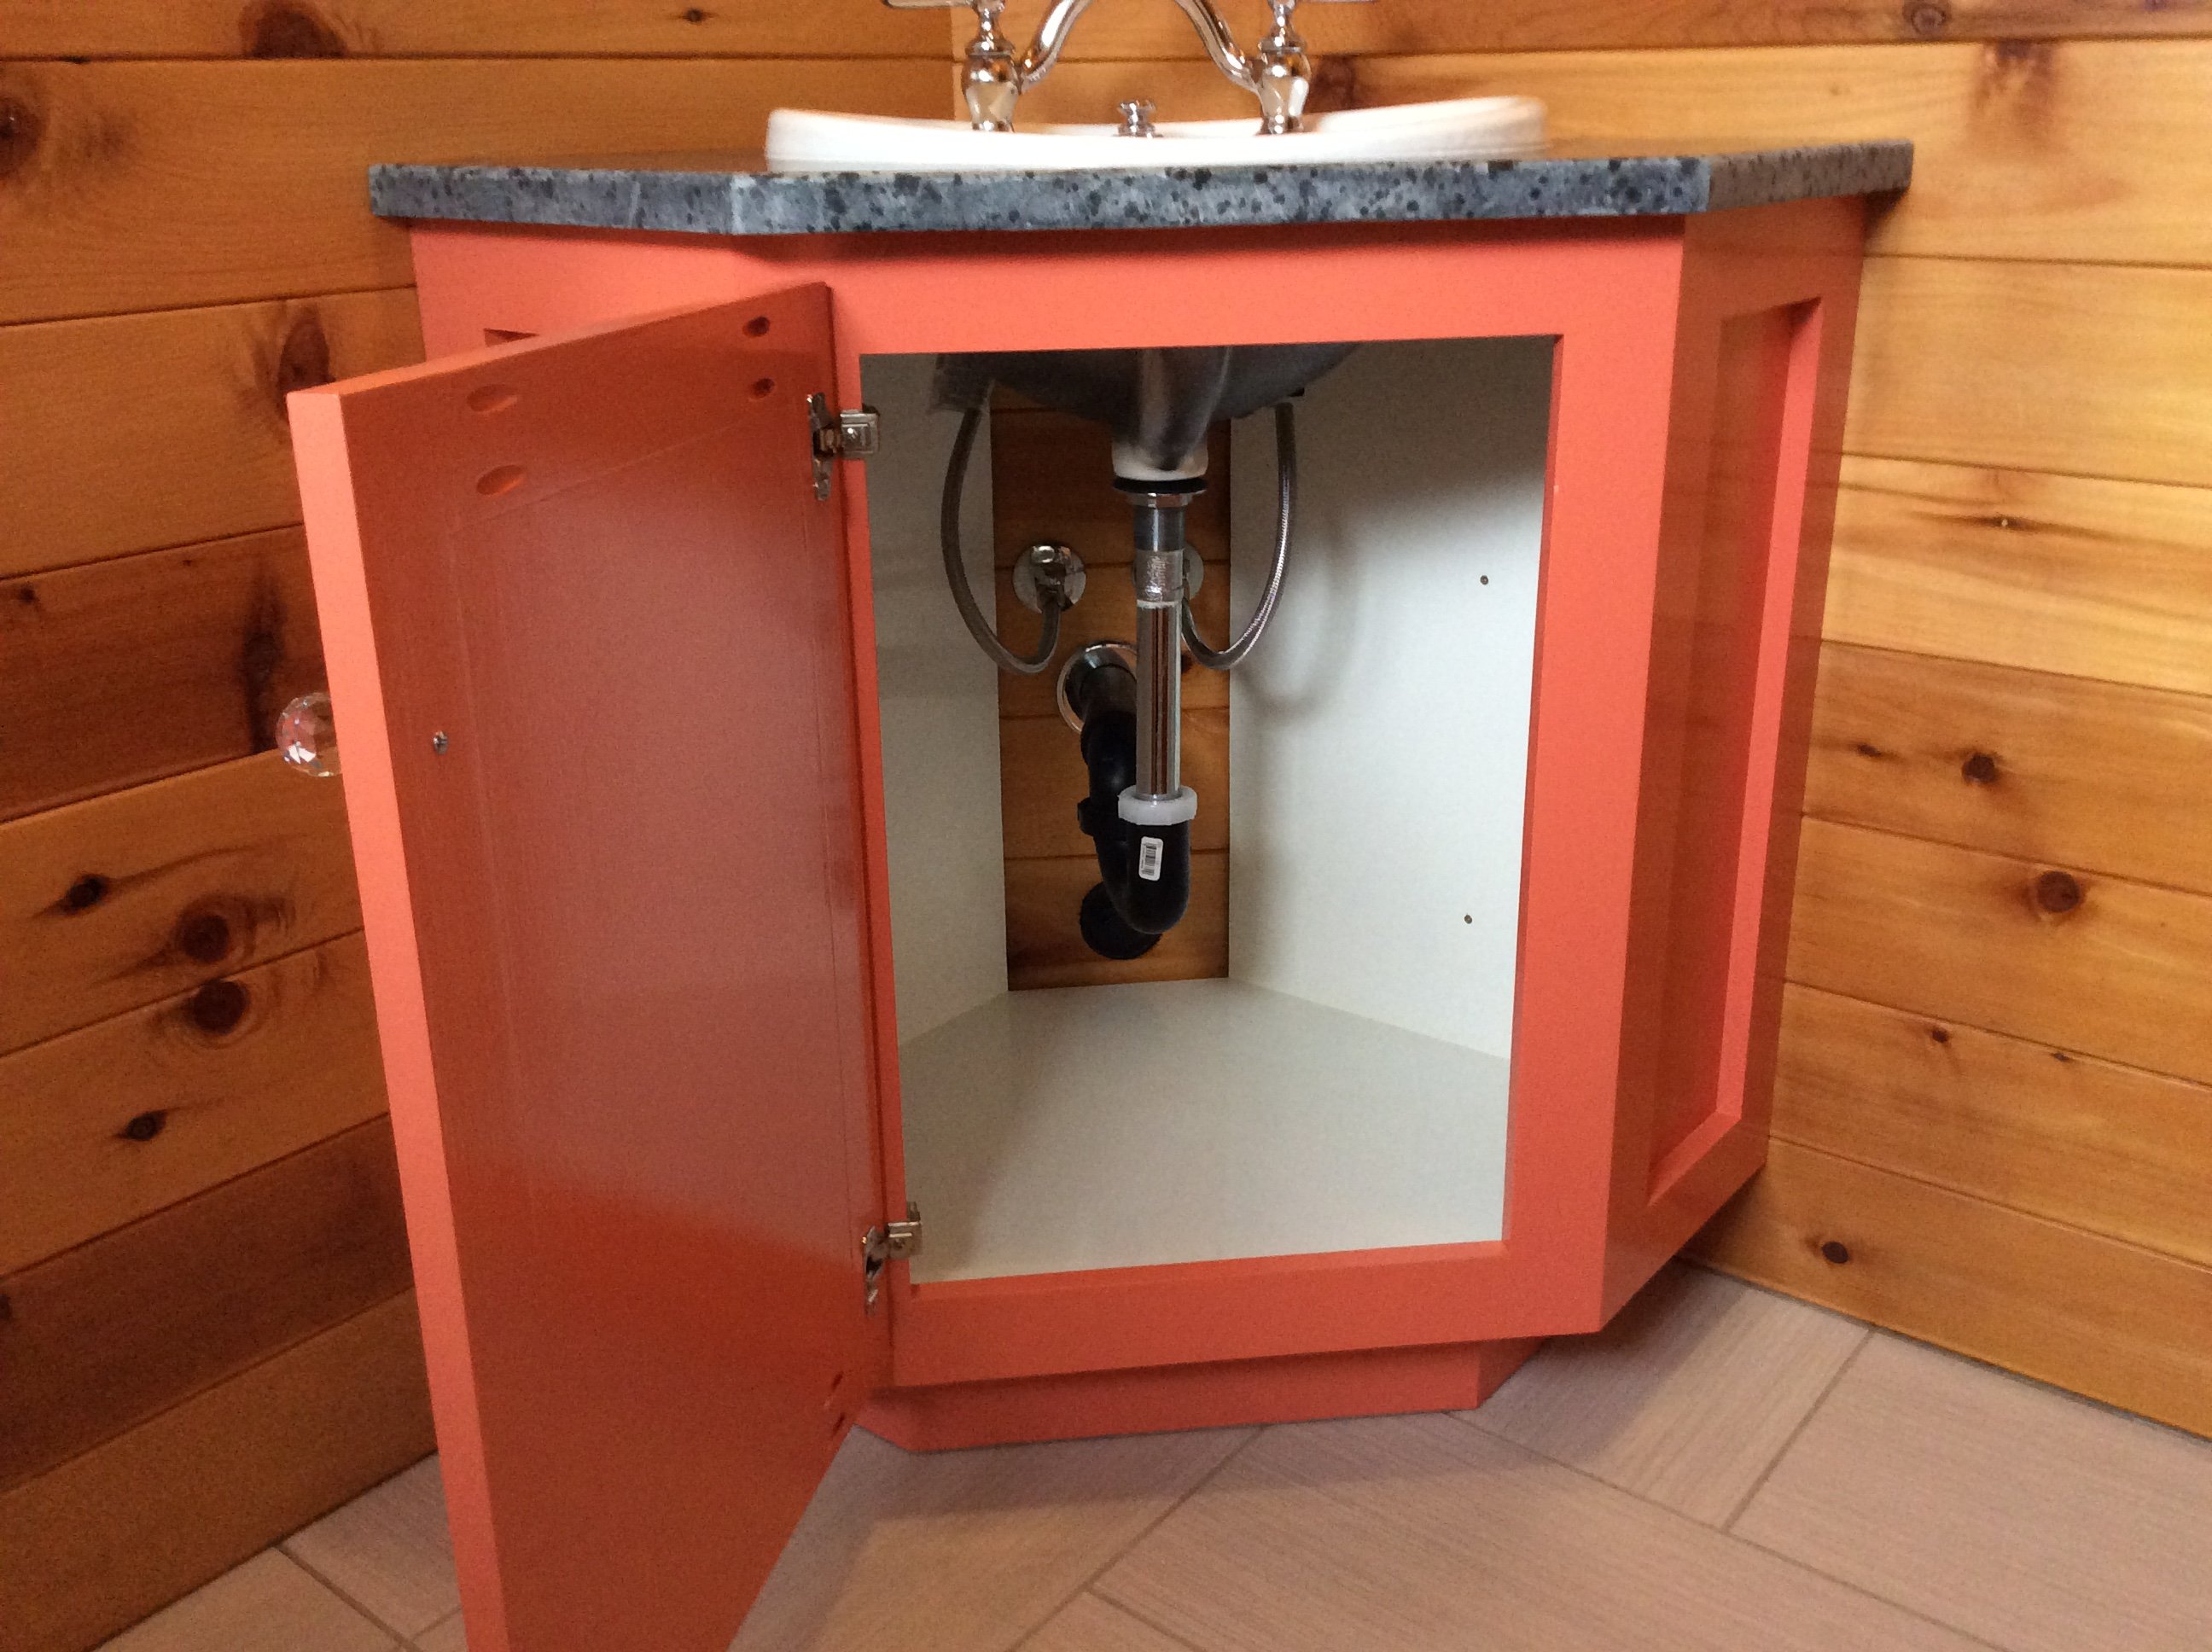
We moved it into place, screwed it to the wall, put the soapstone countertop on along with the sink and faucet, and it truly was complete. Sink is Kohler, faucet came from our local Habitat for Humanity store and I'm not sure what brand it is, and the soapstone came from soapstones.com. If we had oiled the soapstone with mineral oil, it would be a very dark gray.
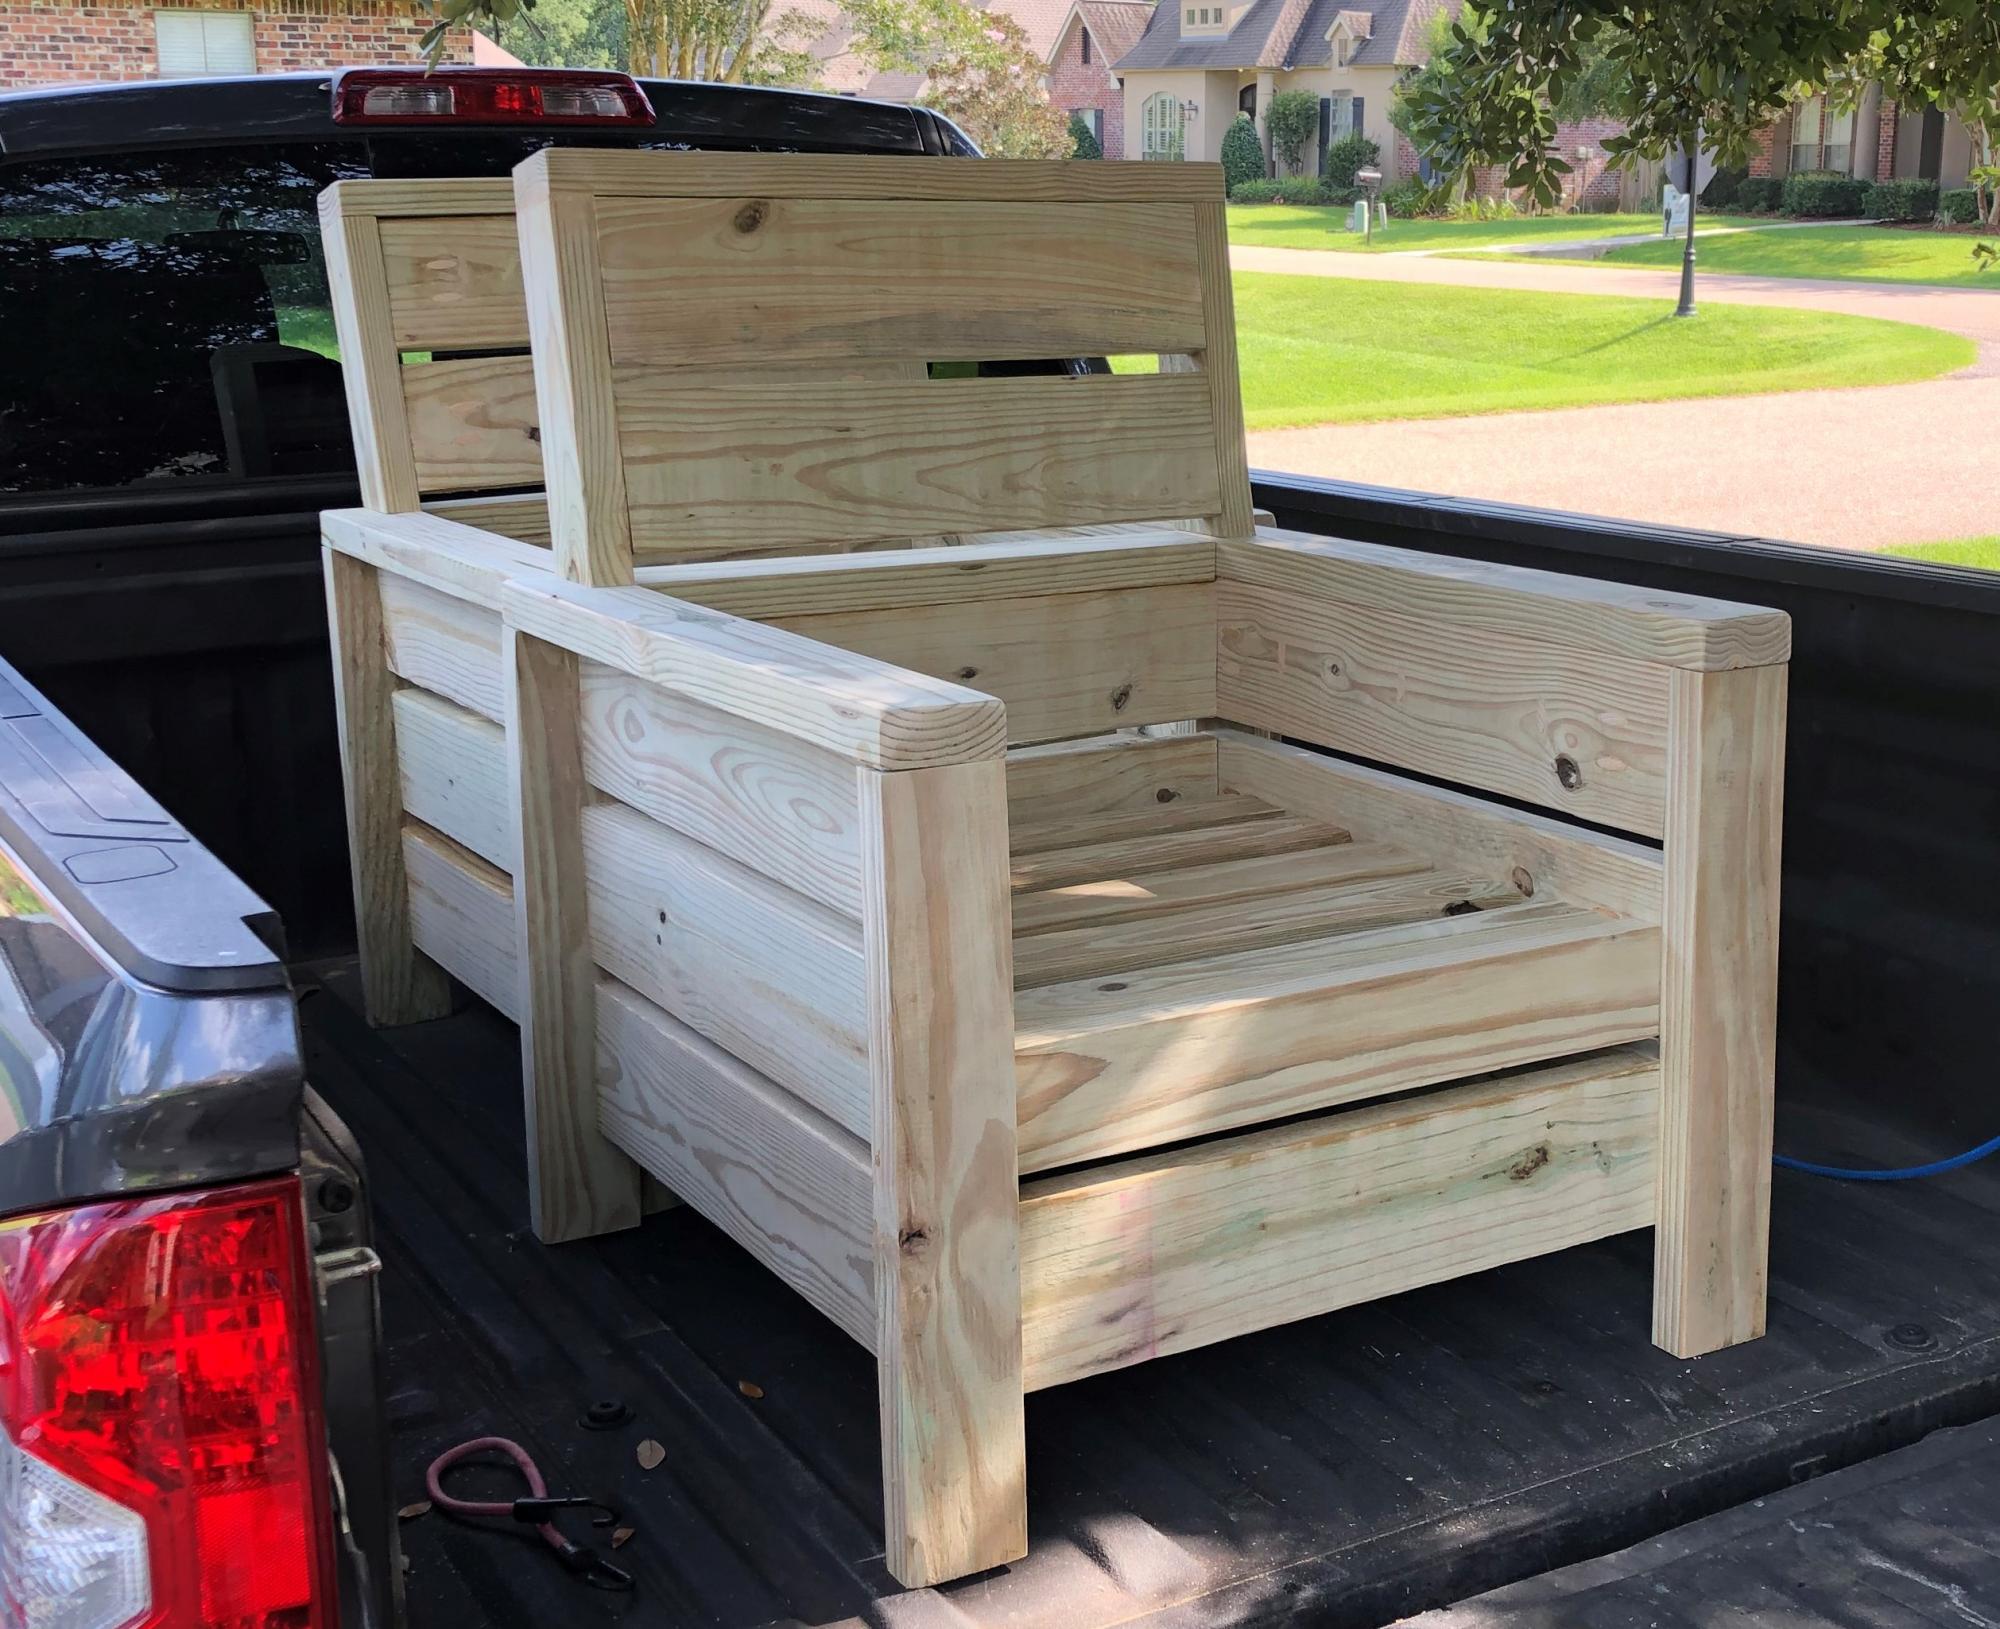
Per request of my wife, I opted to add a backrest to the chair. I feel as though my backrest design keeps with the style of the original build. I accomplished this by cutting the 2x4 vertical arms of the backrest at 13 inches with a 10 deg miter cut at the base. This allows you to keep with the 3/4" on the 2x6 backrest slats. I finished it off with a 2x4 top plate. I'd also note that I made slight modifications to the plans to accommodate 24" cushions.

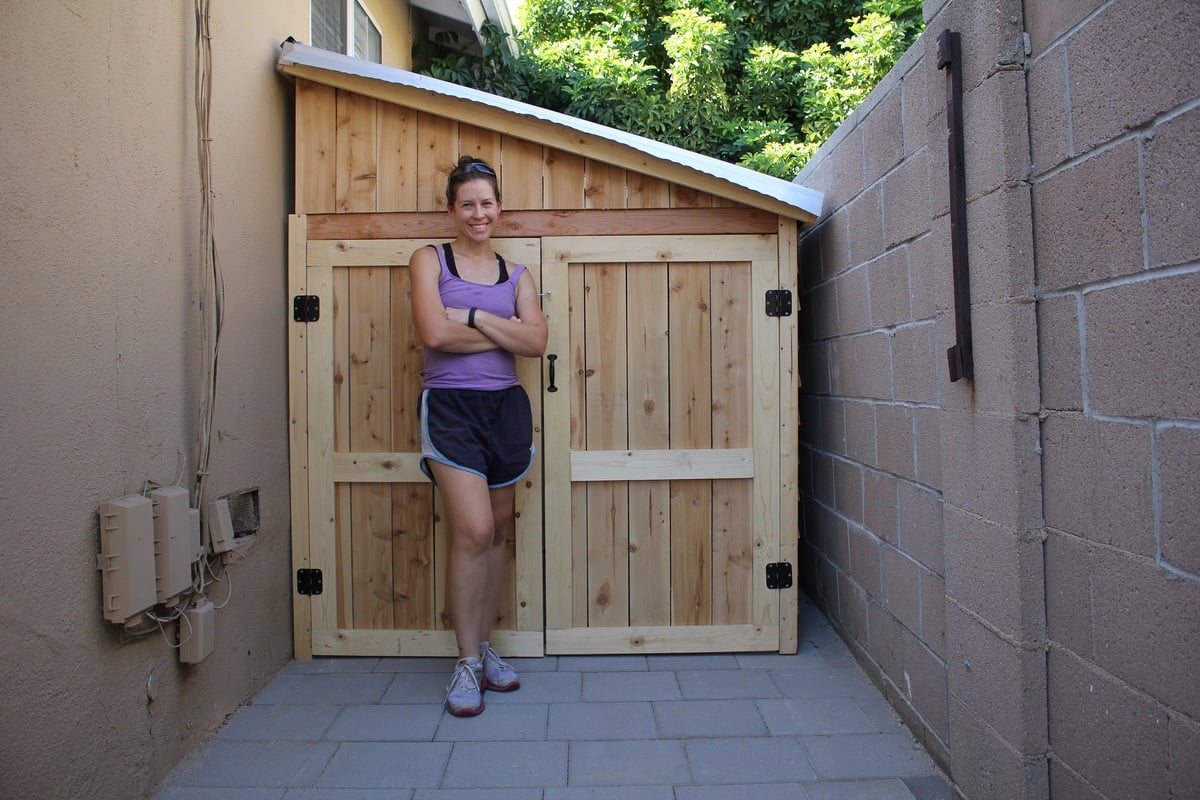
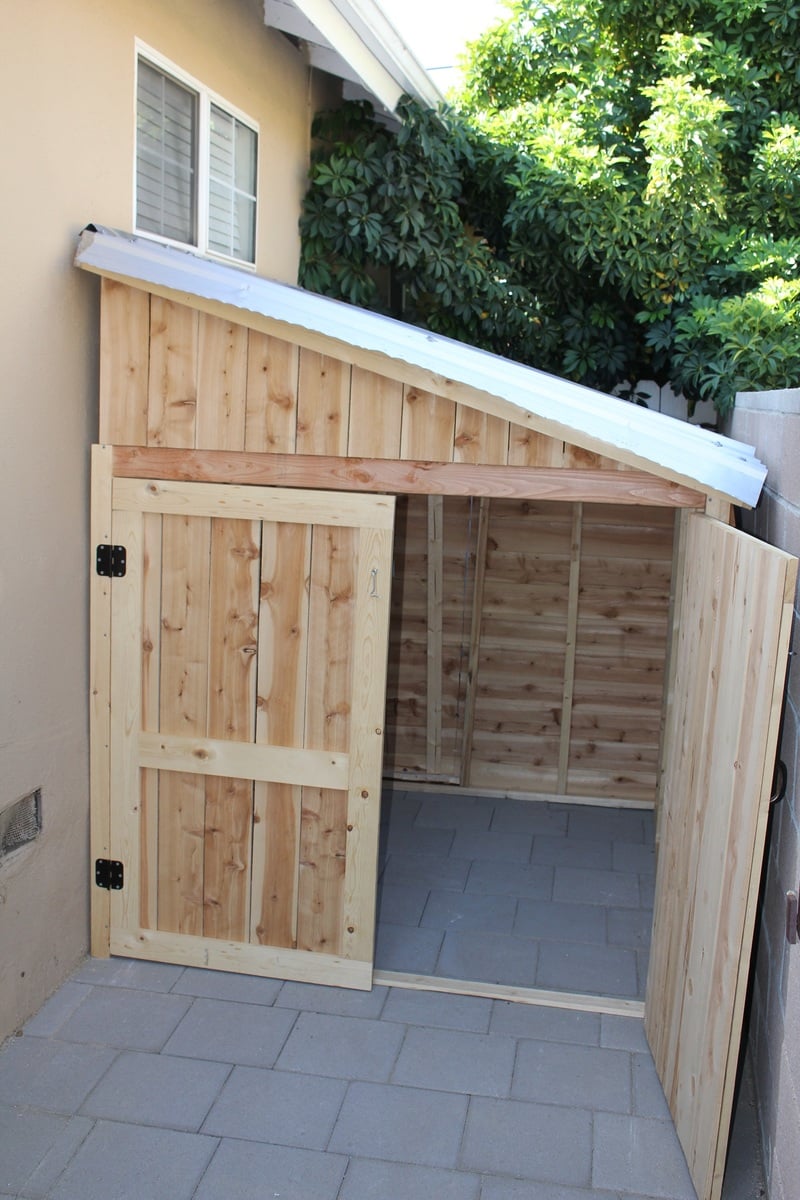
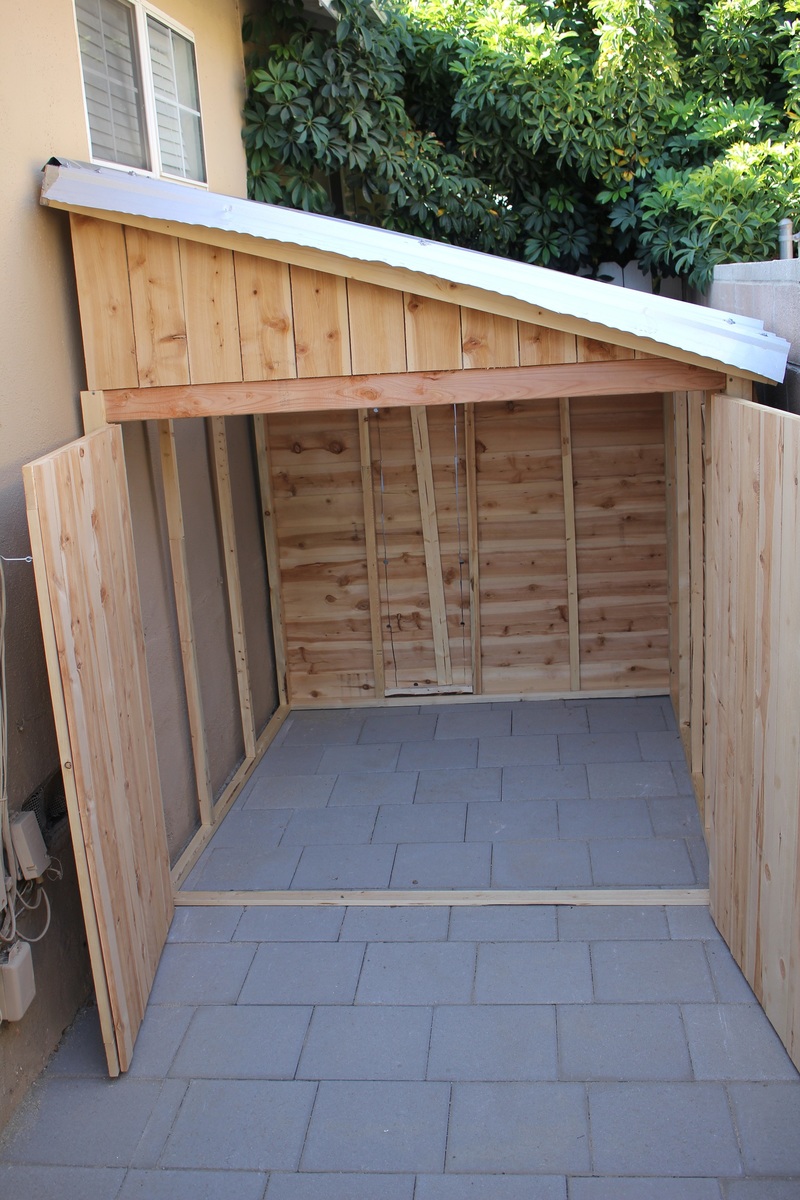
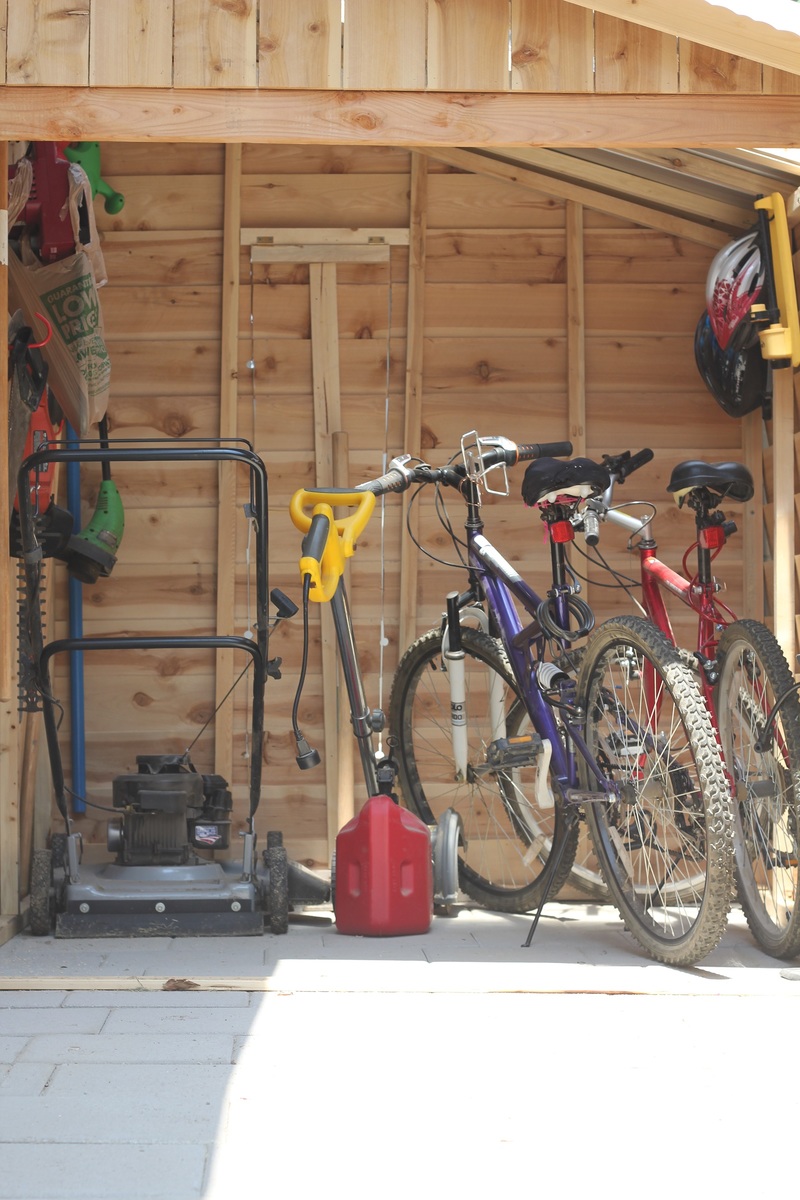
Needed a shed to store bikes and mowers, etc, so I'd have more room in the woodshop : ) I made a lot of modifications to the plan to fit my space and make it much larger. The completed size is 7 foot tall at the peak, 6 feet deep and 5.5 feet wide. I made it as a 3 sided shed, using the wall as the 4th to save on cost, increase air flow, and make the exterior house wall accessible. I also made an egress in the back of the shed in order to get behind the shed if needed.
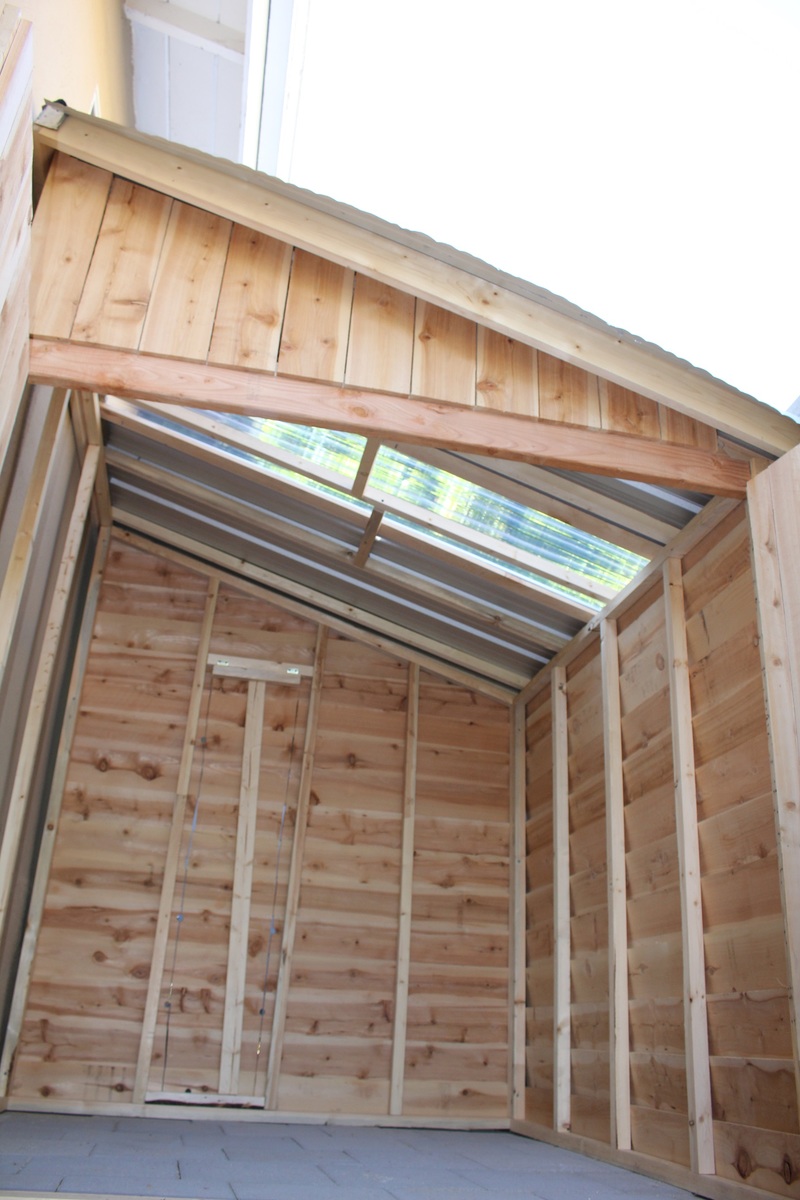
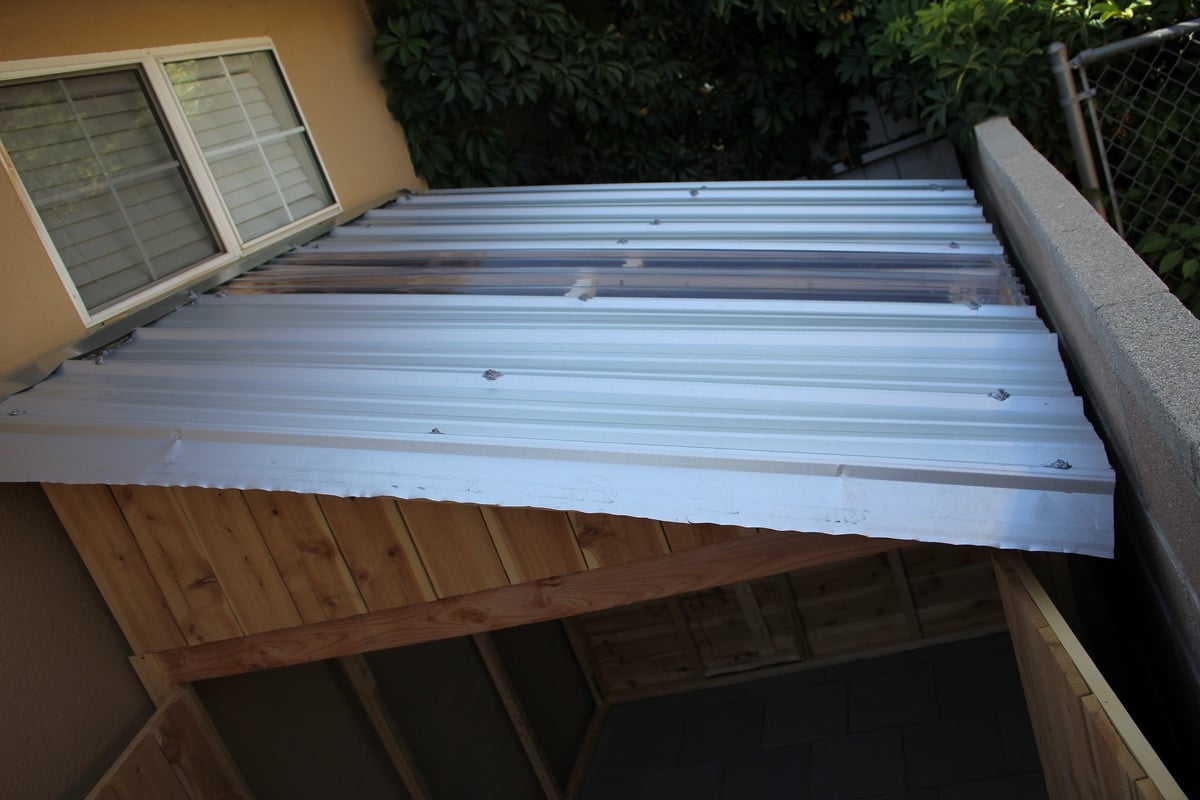
Instead of roofing shingles, I opted for ribbed metal sheets and one clear sheet in the middle to make a skylight, so there would be light in the shed. This is my favorite part of the project. It was a huge pain to attach the roofing from a ladder with very limited access, but it looks great and I love the light coming in. We have very little rain in CA, so I'll have to wait until winter/rainy season in order to test out its waterproofing.
Since the shed sits between the house and the neighbors block wall fence, and I wanted to use as much of the space as I could, I decided to design the shed to have the side wall against the house rather than the back wall, as shown in the plan. This took a large amount of modifications, but with careful planning and measuring, it can be done. This also meant blocking off access to behind the shed, so I cut an egress in the back wall and added hinges so you can lift the back cut out panel, and rest it on a stop block attached to the fence behind it in order to have access. That's what woodworking is about- problem solving. Love it.
As you can see by the full shed picture, it fits a large amount of stuff- 2 adult bikes, mower, edger, trimmer, chainsaw, hedge trimmer, garden tools, shovels, etc, with plenty of room for more. I now have a free corner in my garage that I've already filled with a DIY rolling workbench and more pegboard space for tool hanging. Woodshop increased space= happy Brittany.
I should also mention that building the frame and adding the pickets was quite a quick and easy job. The hardest and most time consuming part was the roof (I didn't have metal cutting tools), rolling each very heavy wall to the site (I was alone) and the previous 2 weeks in which I built the paver patio the shed sits on. Hard work, but worth it. I love it!
Thu, 08/20/2015 - 05:56
And for under $300! Nice touch with the skylight also. Two thumbs up.

In reply to This is awesome! by Cross35
Thu, 08/20/2015 - 09:42
Thank you! I'm very pleased with how it turned out!
Mon, 04/27/2020 - 10:28
SWEET!!! What a great use of space! That skylight was a brilliant idea. No lights needed to see what you need to get at in there. Well done!
In reply to SWEET!!! What a great use… by carewarner
Mon, 01/25/2021 - 13:15
It has been incredibly useful for storing! One thing about the skylight- Over time the sun has warped it and there is now a hole and crack there. So I wouldn't plan on the clear roofing being a long term solution- I will be replacing it with either thicker clear roofing or 2 layers.
Wed, 05/06/2020 - 13:15
Love the design and space saver idea, brilliant! How can I get the dimensions? Tks
In reply to Love the design and space… by shed man
Mon, 01/25/2021 - 13:25
I just went out and measured- 6' wide and deep, 7' tall at its tallest point, tapering down to about 5' tall. Hope this helps!
In reply to Love this! by V2theicki
Mon, 01/25/2021 - 13:14
I based it off of this plan, but heavily modded it to fit our space. https://www.ana-white.com/woodworking-projects/small-cedar-shed
Hope that helps!
Tue, 06/23/2020 - 20:26
This is exactly what I want to do for the side of my home , I also would love to get the plans for this .
In reply to This is exactly what I want… by ajg1972
Mon, 01/25/2021 - 13:16
I used Ana's plans here, but heavily modded it to fit my space: https://www.ana-white.com/woodworking-projects/small-cedar-shed
Sun, 02/21/2021 - 09:39
Did you use cedar pickets?
And what did you use for the roofing material?
Great for a small flock of 5 or less.


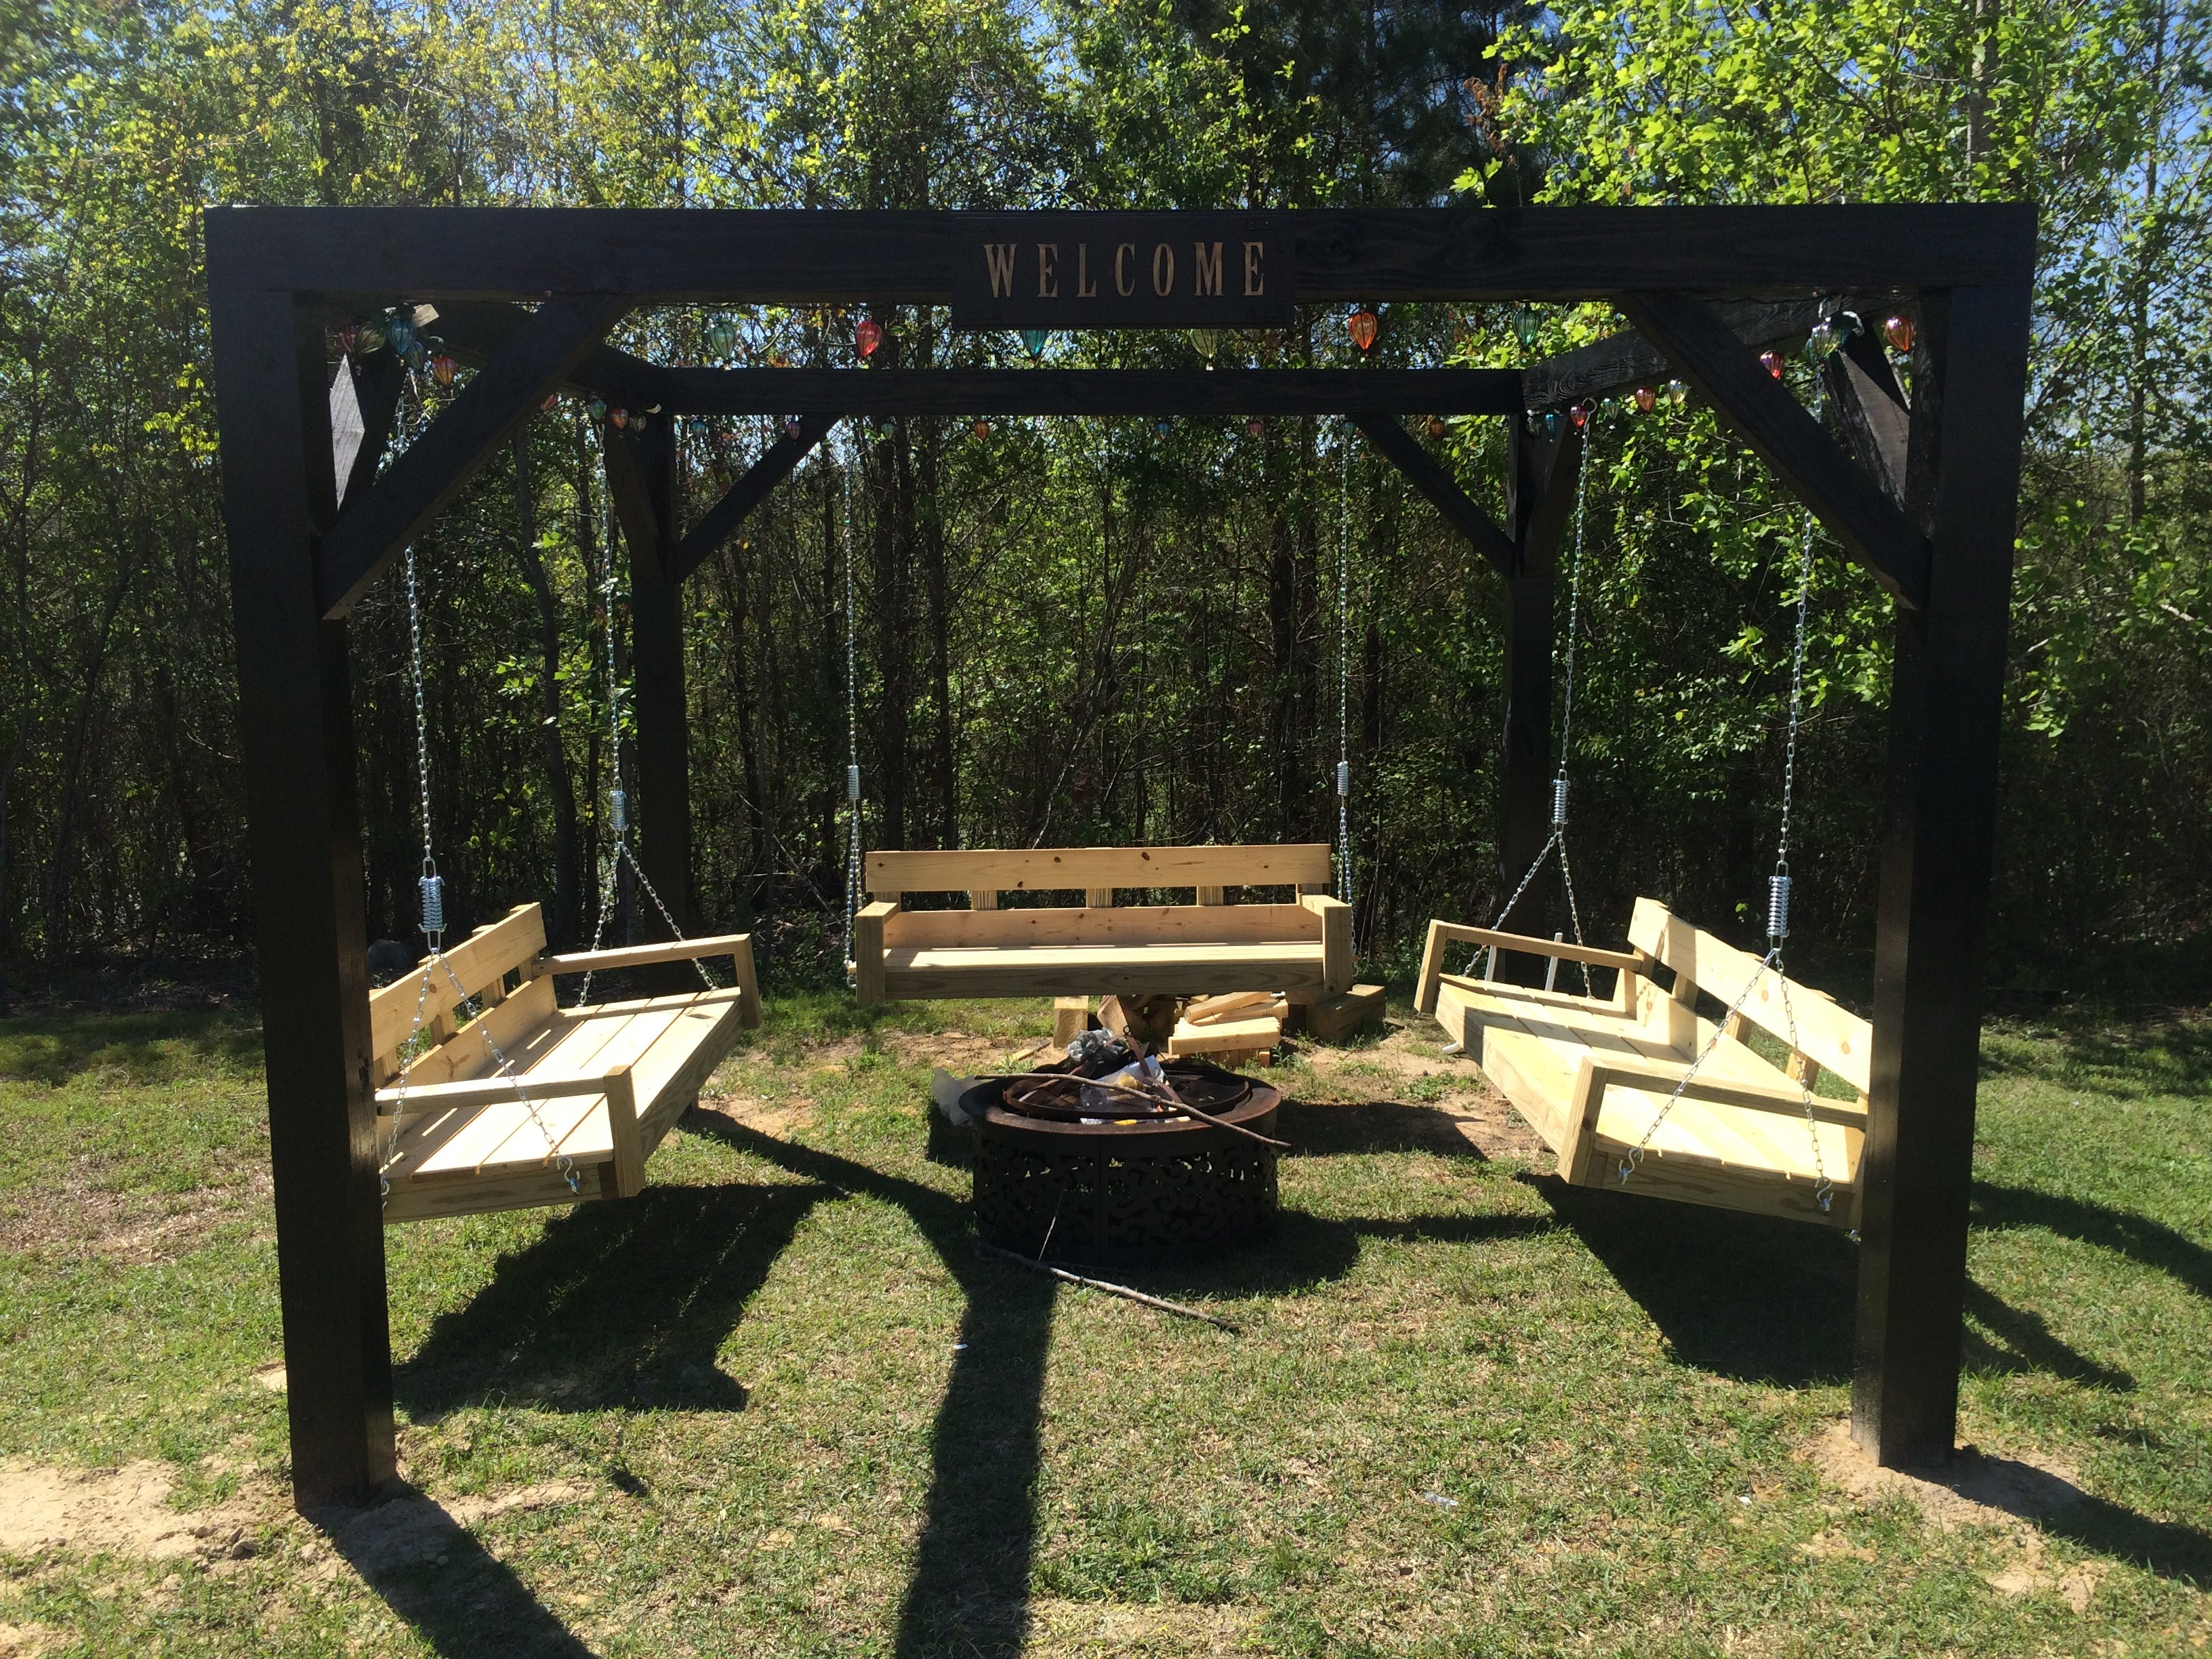
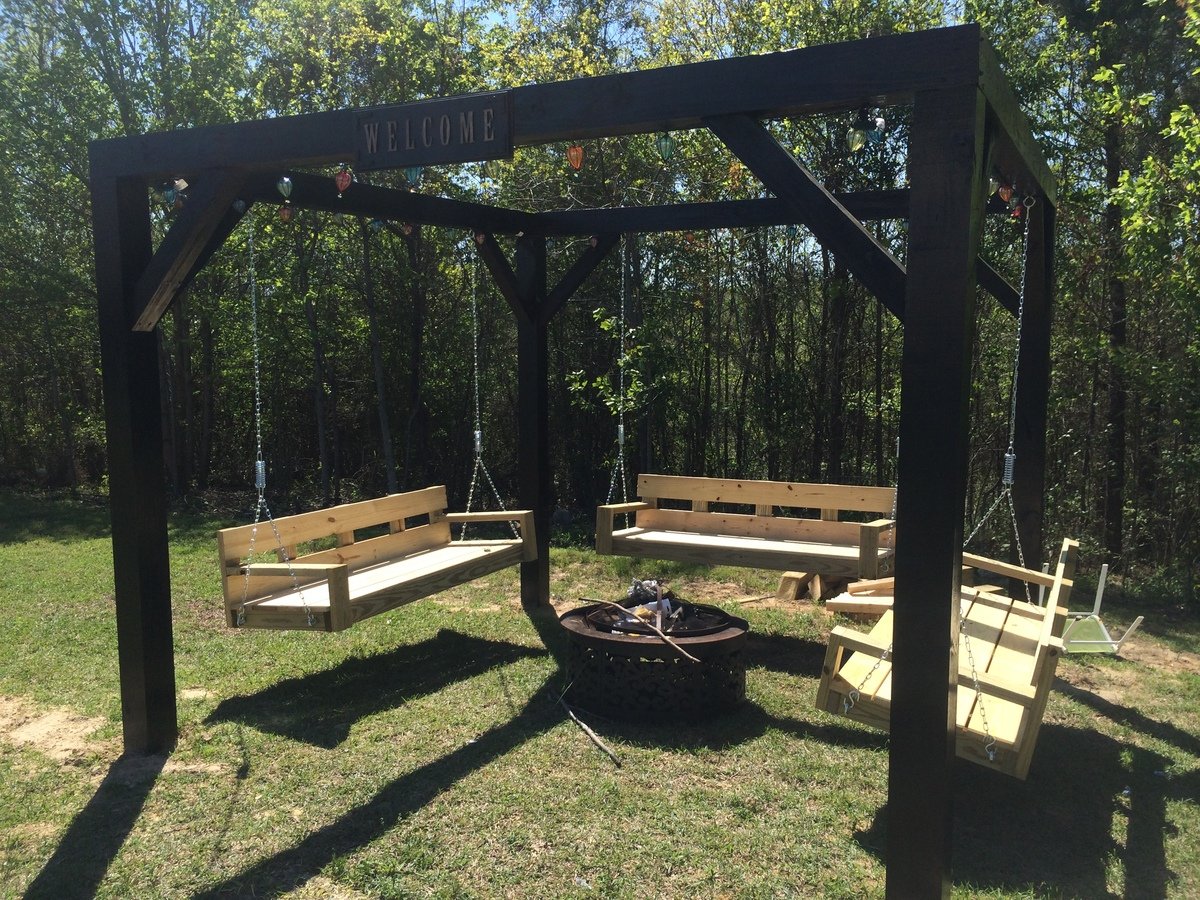
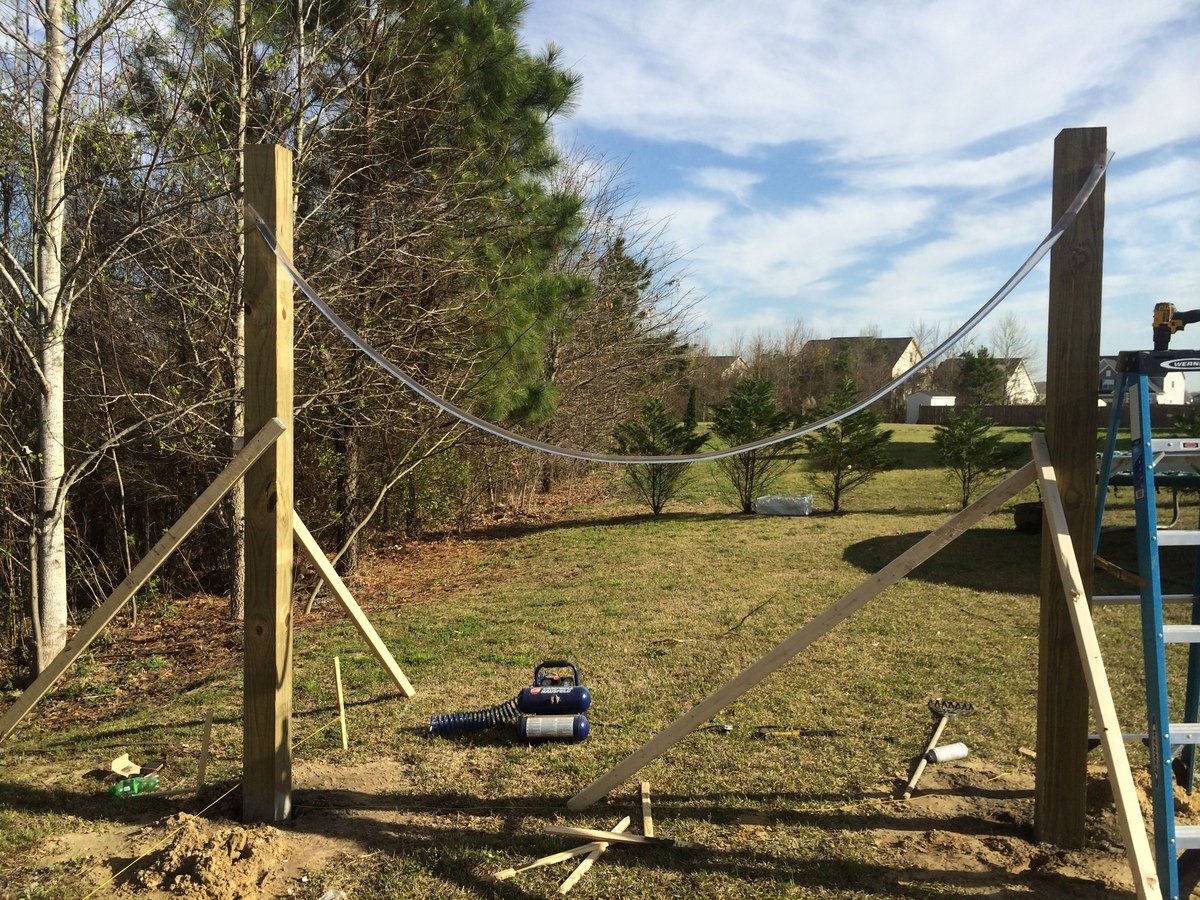
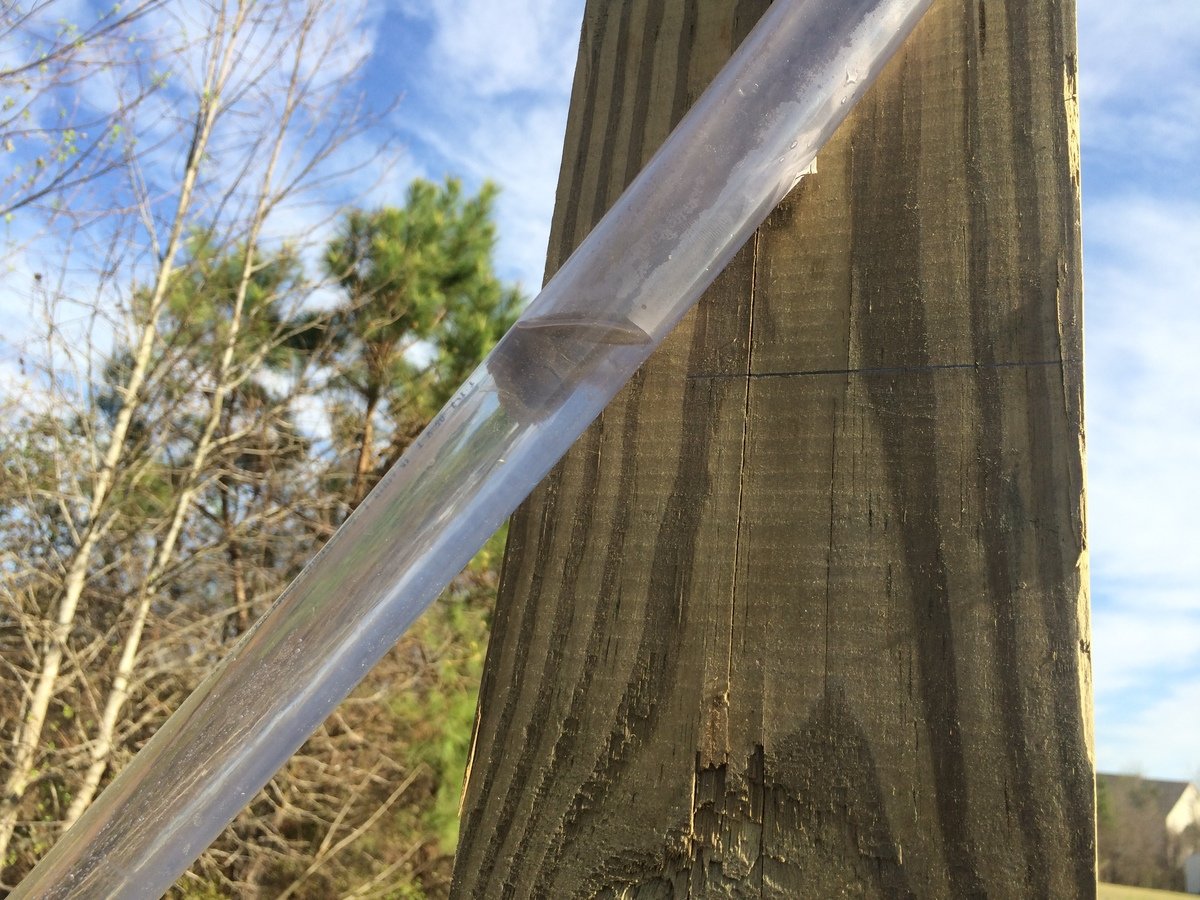
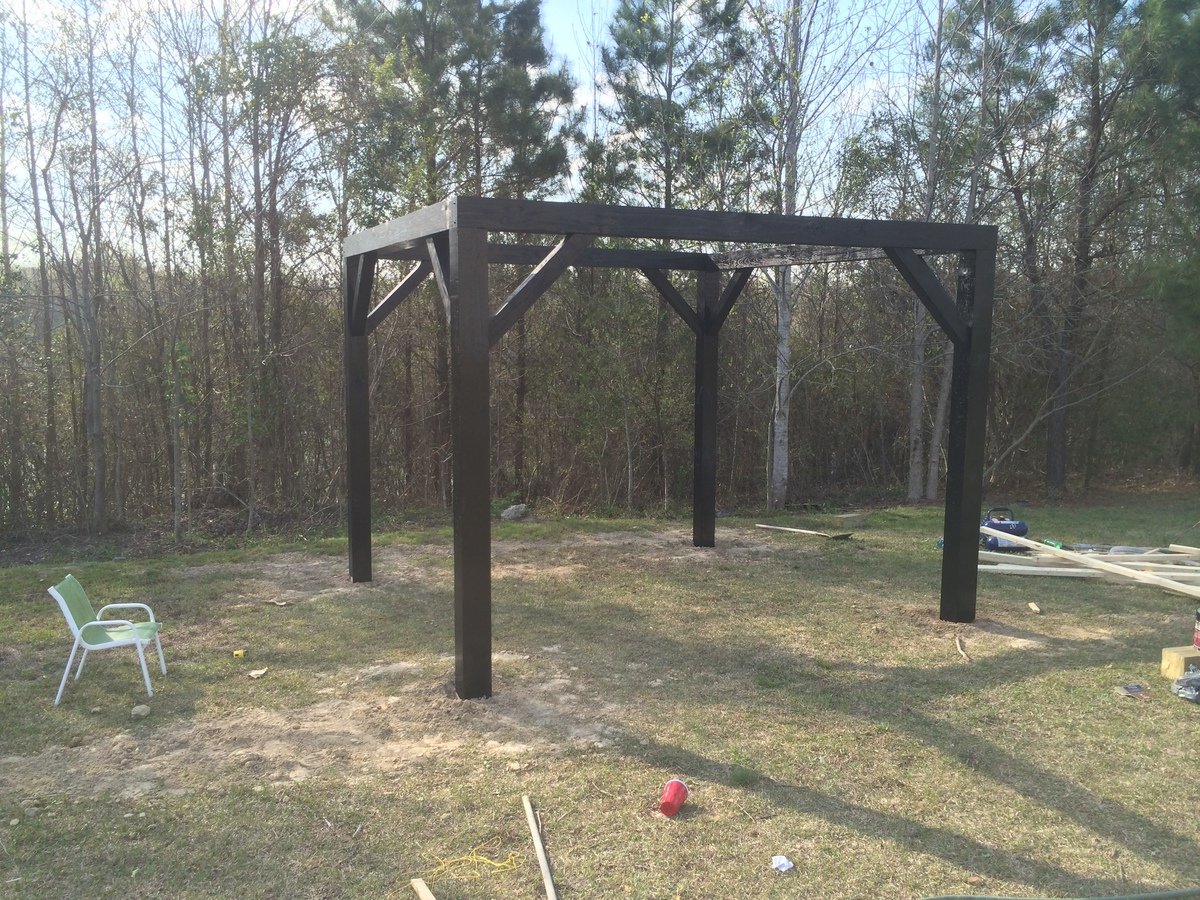
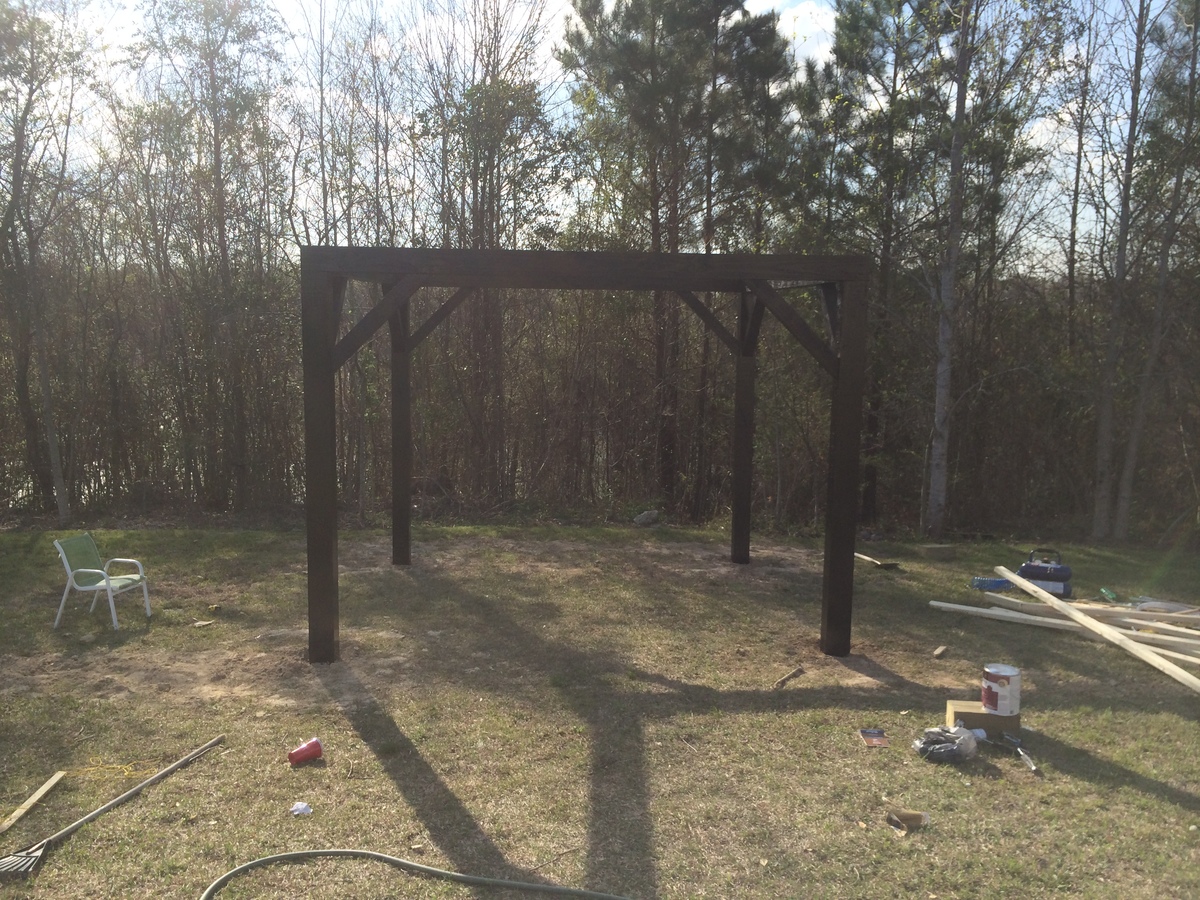
My wife saw something like this on Pinterest and desperately wanted one. The one she saw was hexagonal in shape. We didn't need as many swings so we went with just a plain square shape. We used 6x6s for the legs and posts across the top and used 4x4s for the angled support pieces. We built the swings using the plan from this website. All the materials can be picked up at the blue and orange stores. However when it came to the springs for the swings, the blue store was 1/3 of the price of HD. The legs are 12' long and buried 4' under the ground and cemented in for strength. Luckily I am retired military and was able to rent an auger for 1/2 the price of HD or the blue store. You could do it by hand but it saved us hours and lots of back pain. We found our dimensions for the size we wanted and spray painted dots on the ground where the posts were going to go. We dug the holes and stuffed the 6x6s in them. Using a post level we made sure they were plum. We braced them and added the quickrete and left them to setup over night. The next day we had to make sure all the tops were level with each other. This is where having some knowledge of physics paid off. I took clear tubing and screwed it above the height that I wanted on one post and then screwed the other end to another post. Fill it with water until the water level on the first post is where I wanted it (8 feet high) and it will automatically fill it level on the other end. There is a picture of this above. Water will always level itself out. I had to do this because my yard is at a slight down hill grade. We marked it and cut the tops off to make it level. After attaching the 6x6s on the top with 8" lag bolts it was time to paint. After painting was done we built 3 swings from Ana's plans. We shortened them by 6" to give room to walk between the legs and the swings. All in all it was a great project that only took two dedicated weekends. My wife still has to paint the swings though.
Wed, 05/27/2015 - 07:42
How did you attach the 6x6's to the top? Is it a miter cut at 45 degrees and then put together with the lag bolts. I'm kinda confused. Thanks.
Wed, 05/27/2015 - 22:38
It sounds and looks like the top 6x6s are mitered and sit on top of the end of the vertical posts. I'd say at least one lag bolt each way to hold the mitered corner together and then at least one in each piece down into the vertical to hold it in place.
Sun, 07/19/2015 - 16:26
I have looked at several versions including the hexagon pergola's, but this is exactly what we want. Do you have plans that you can email me? [email protected]
Sun, 04/19/2020 - 12:33
If you recurved plans can you please send to me?
[email protected]
Sun, 04/19/2020 - 12:33
If you recurved plans can you please send to me?
[email protected]
Wed, 04/29/2020 - 16:18
I was looking for material list and plans if you have any please send to [email protected] thanks
Mon, 04/27/2020 - 10:24
WOW, LOVE!!! This is simply gorgeous! What a warm and welcoming addition to your yard. And thanks for sharing your method of finding level for your posts on your sloped yard. I absolutely love it!
Thu, 10/22/2020 - 06:53
Love this, can you please email me the plans @ [email protected]
Fri, 03/26/2021 - 05:58
This is beautiful. Would love to see the plans for this. How small can it be made?
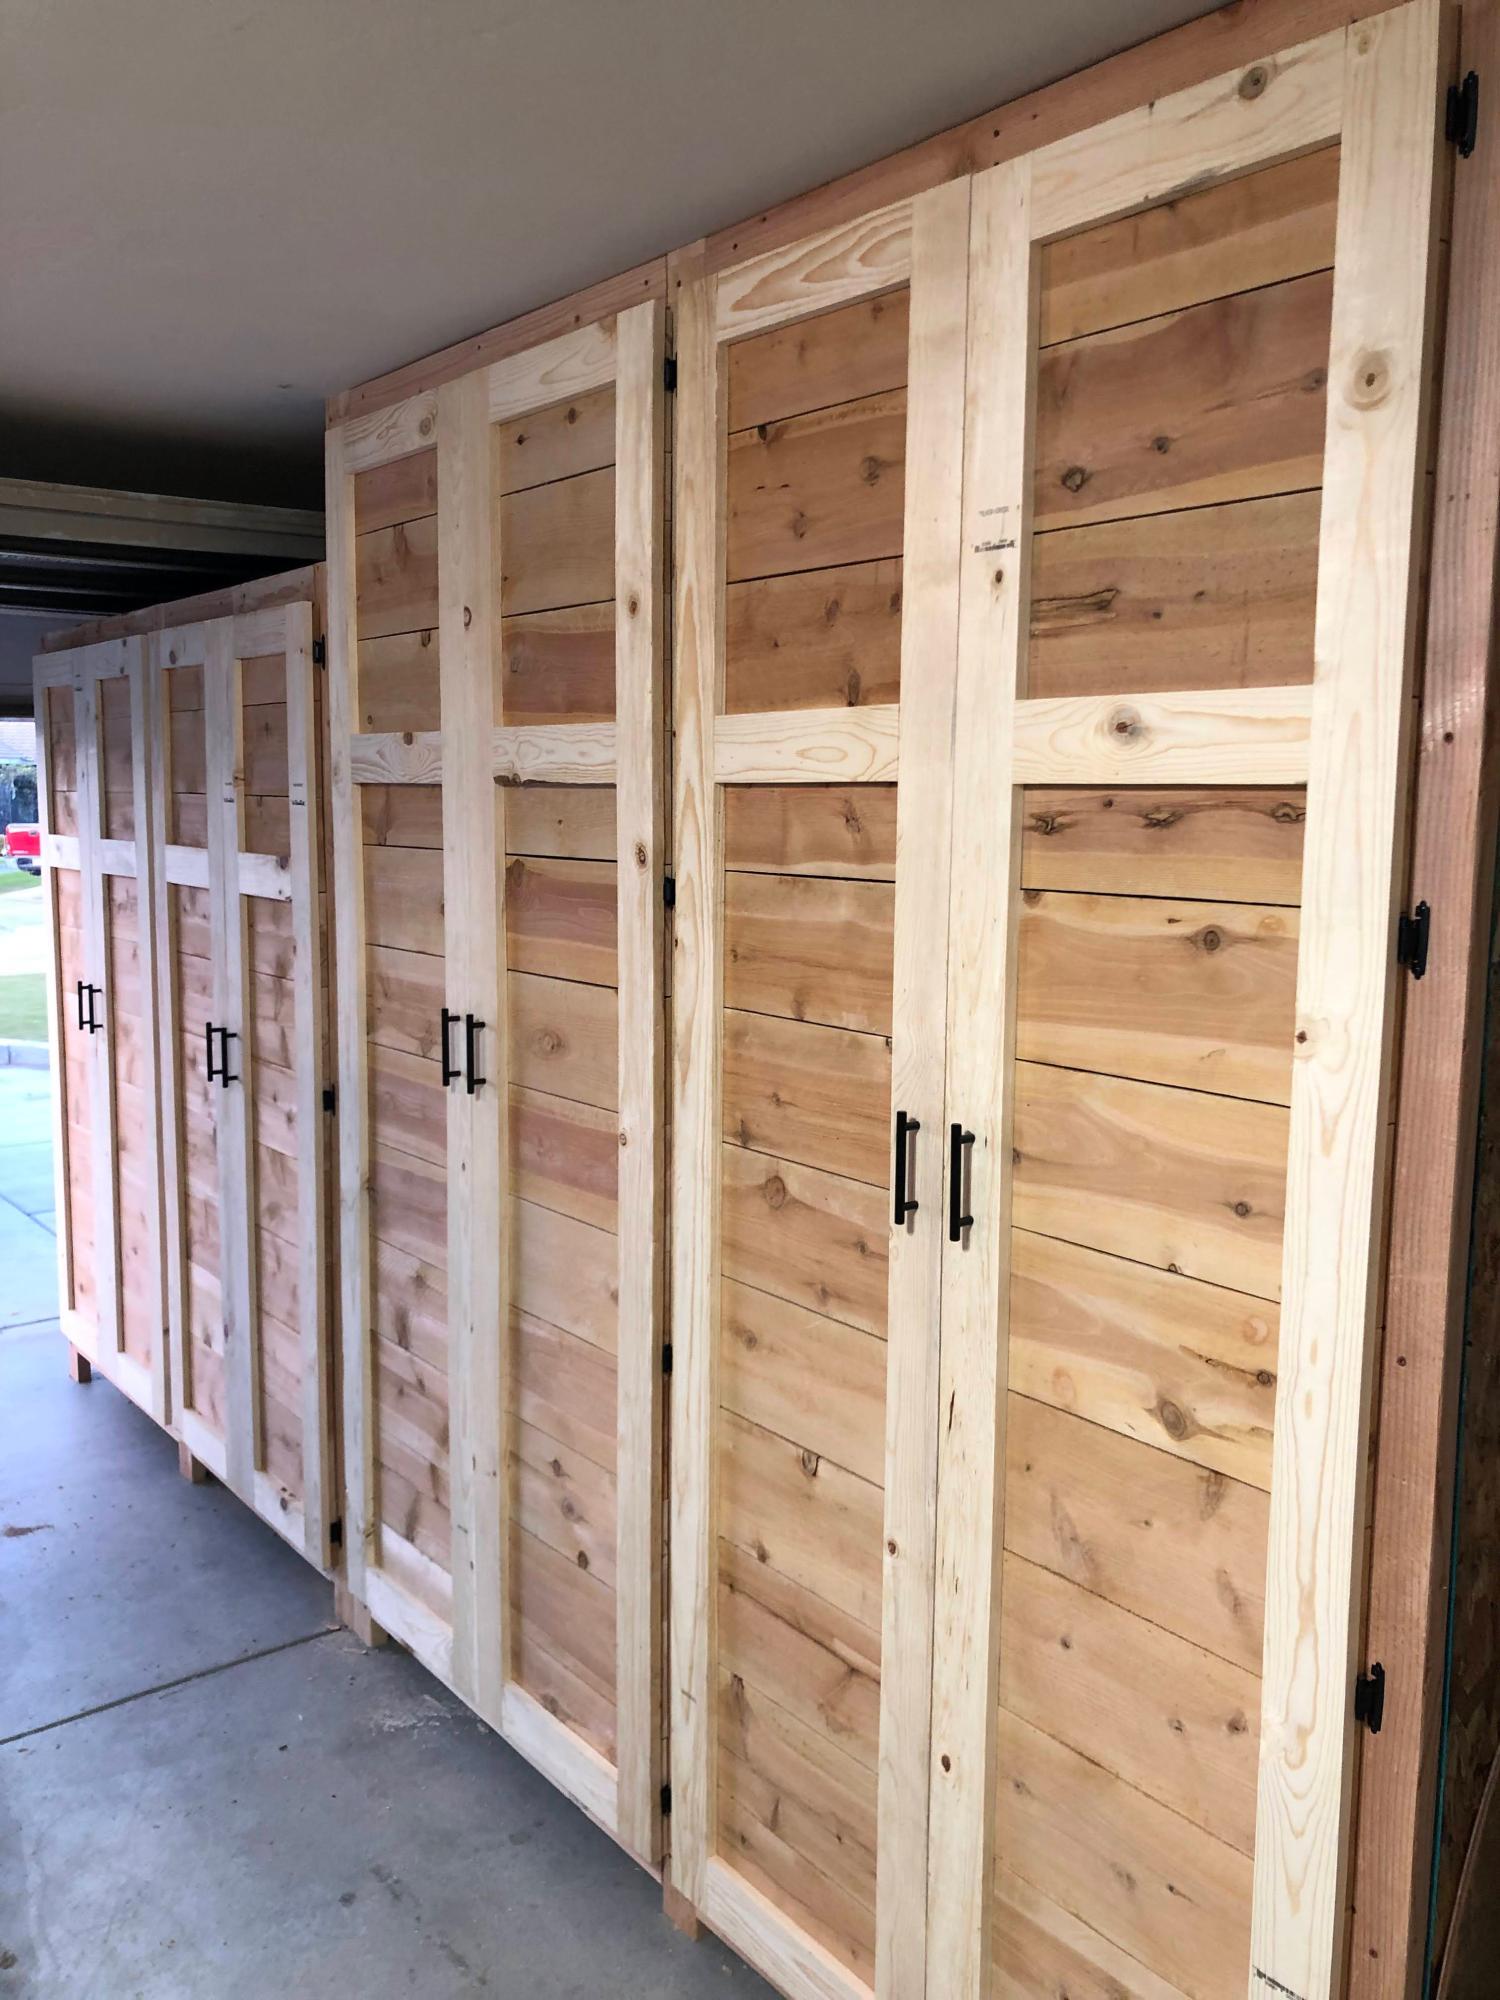
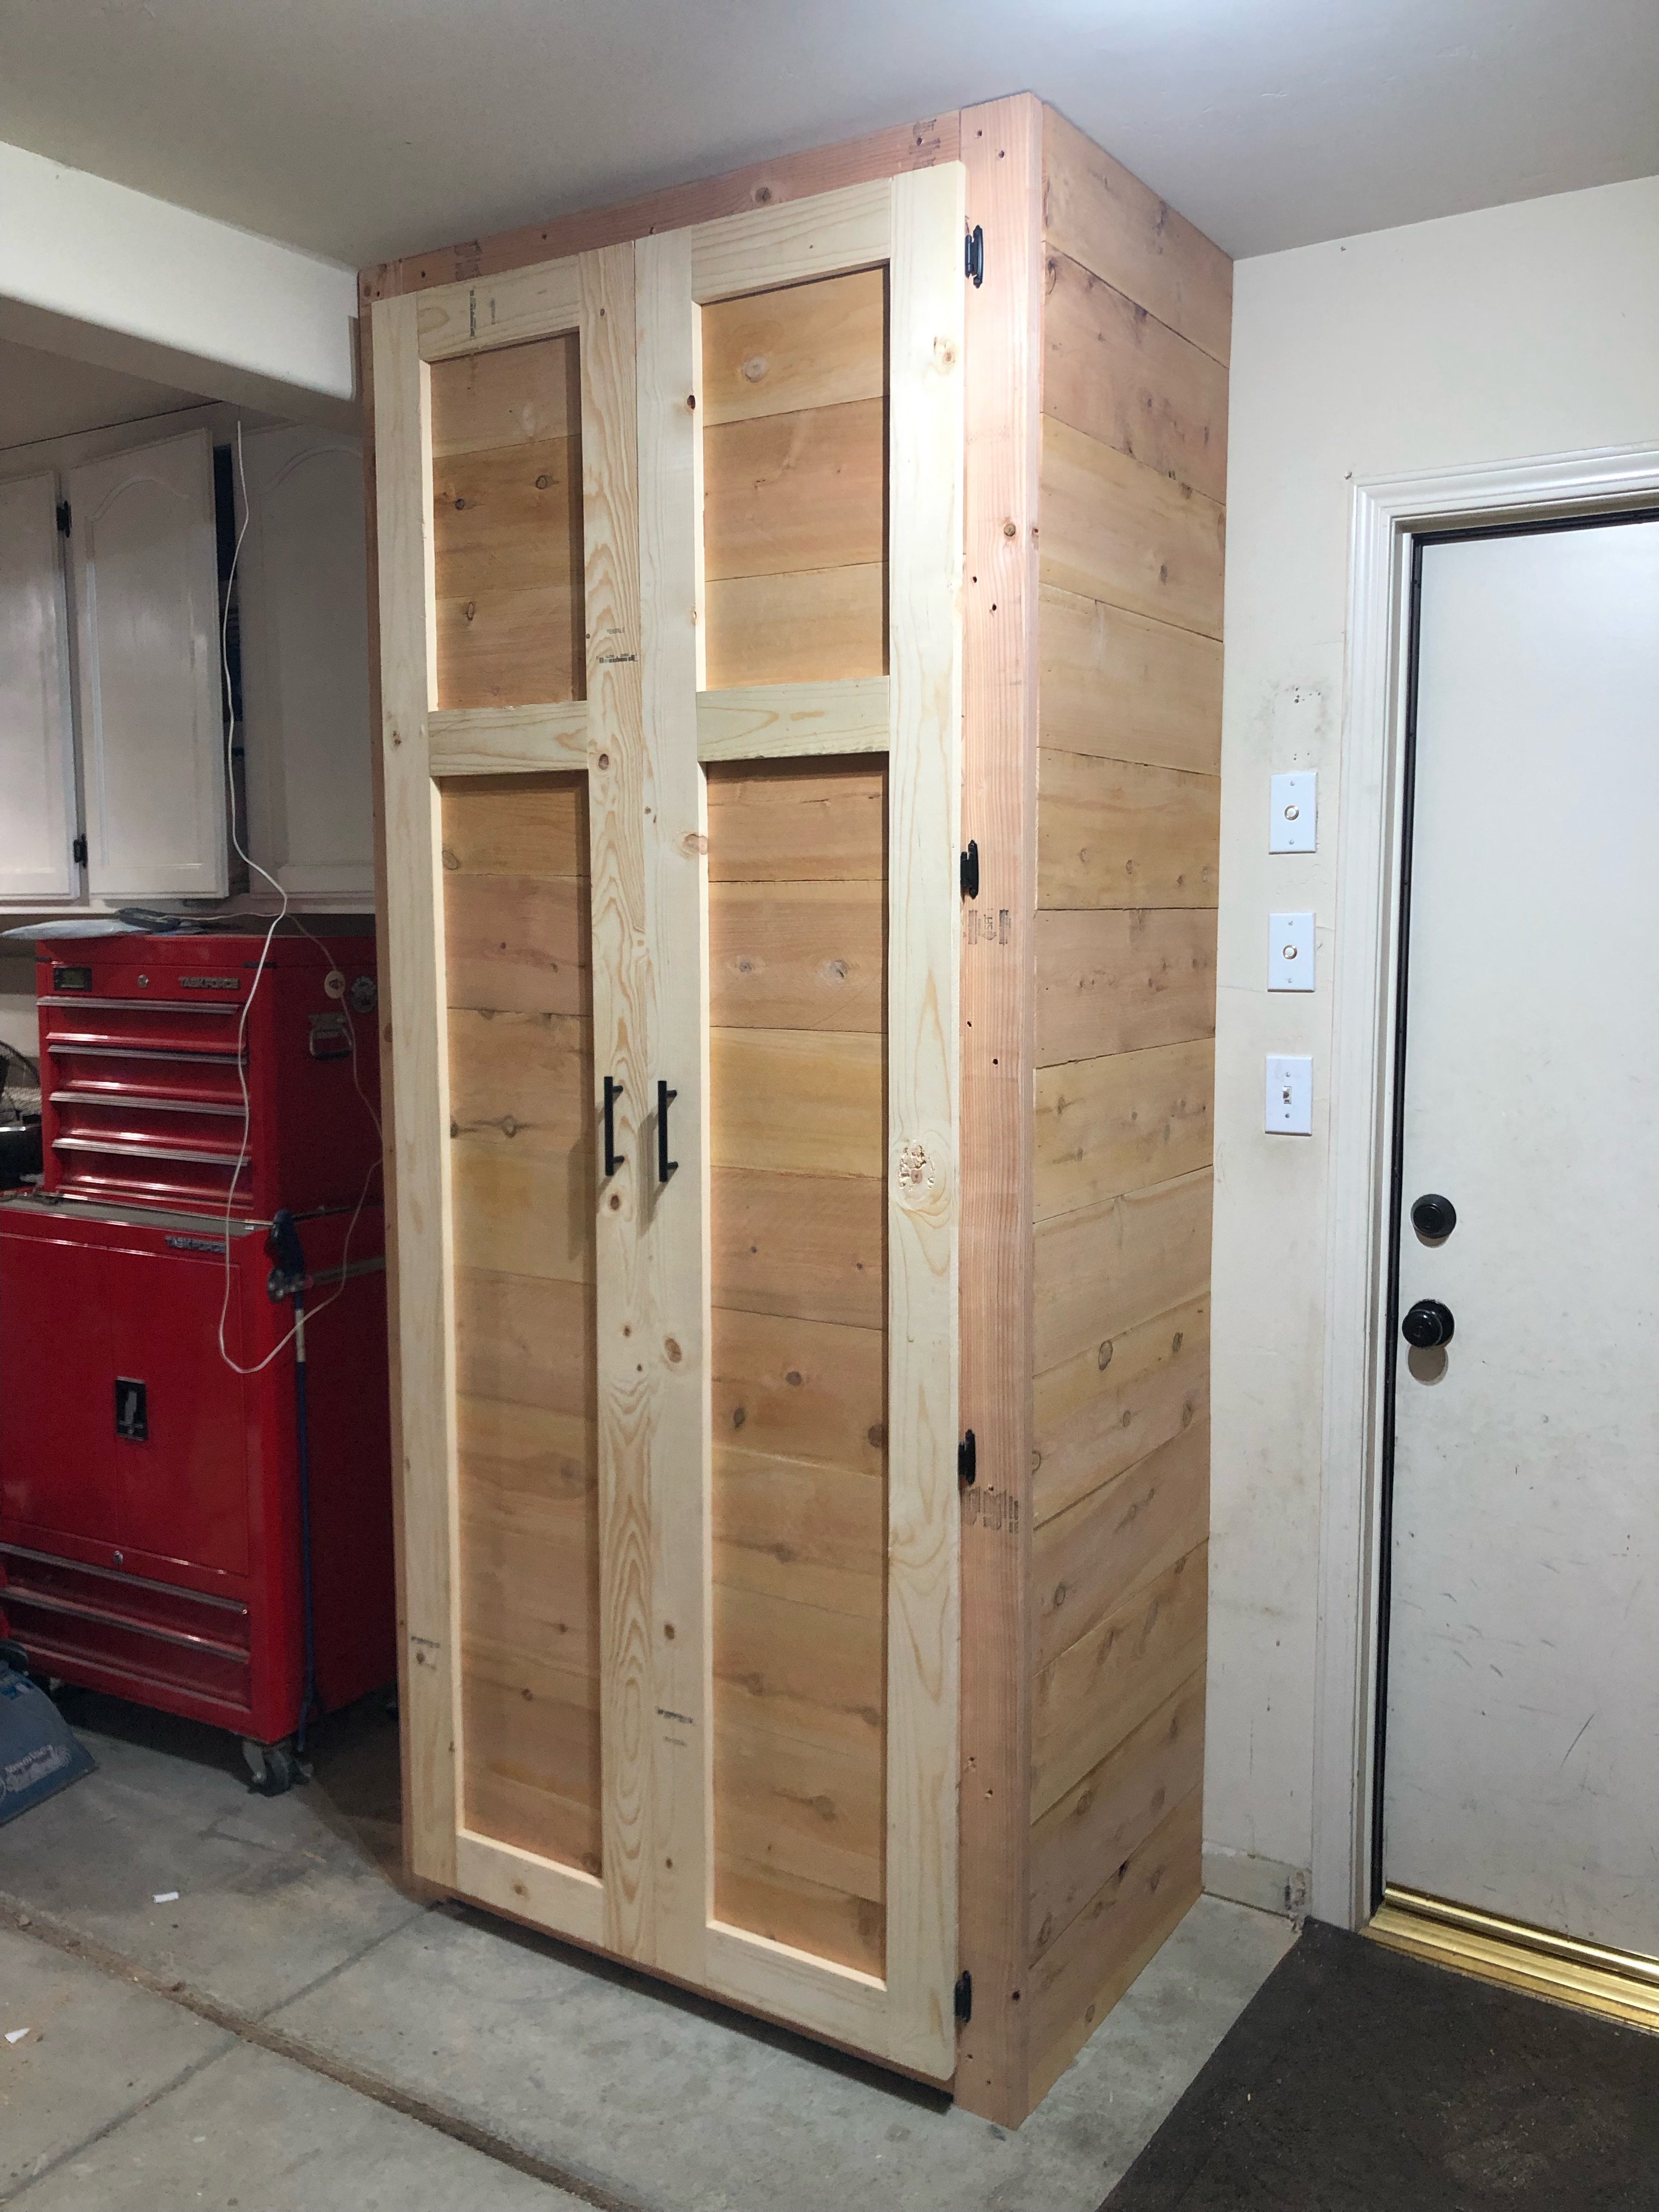
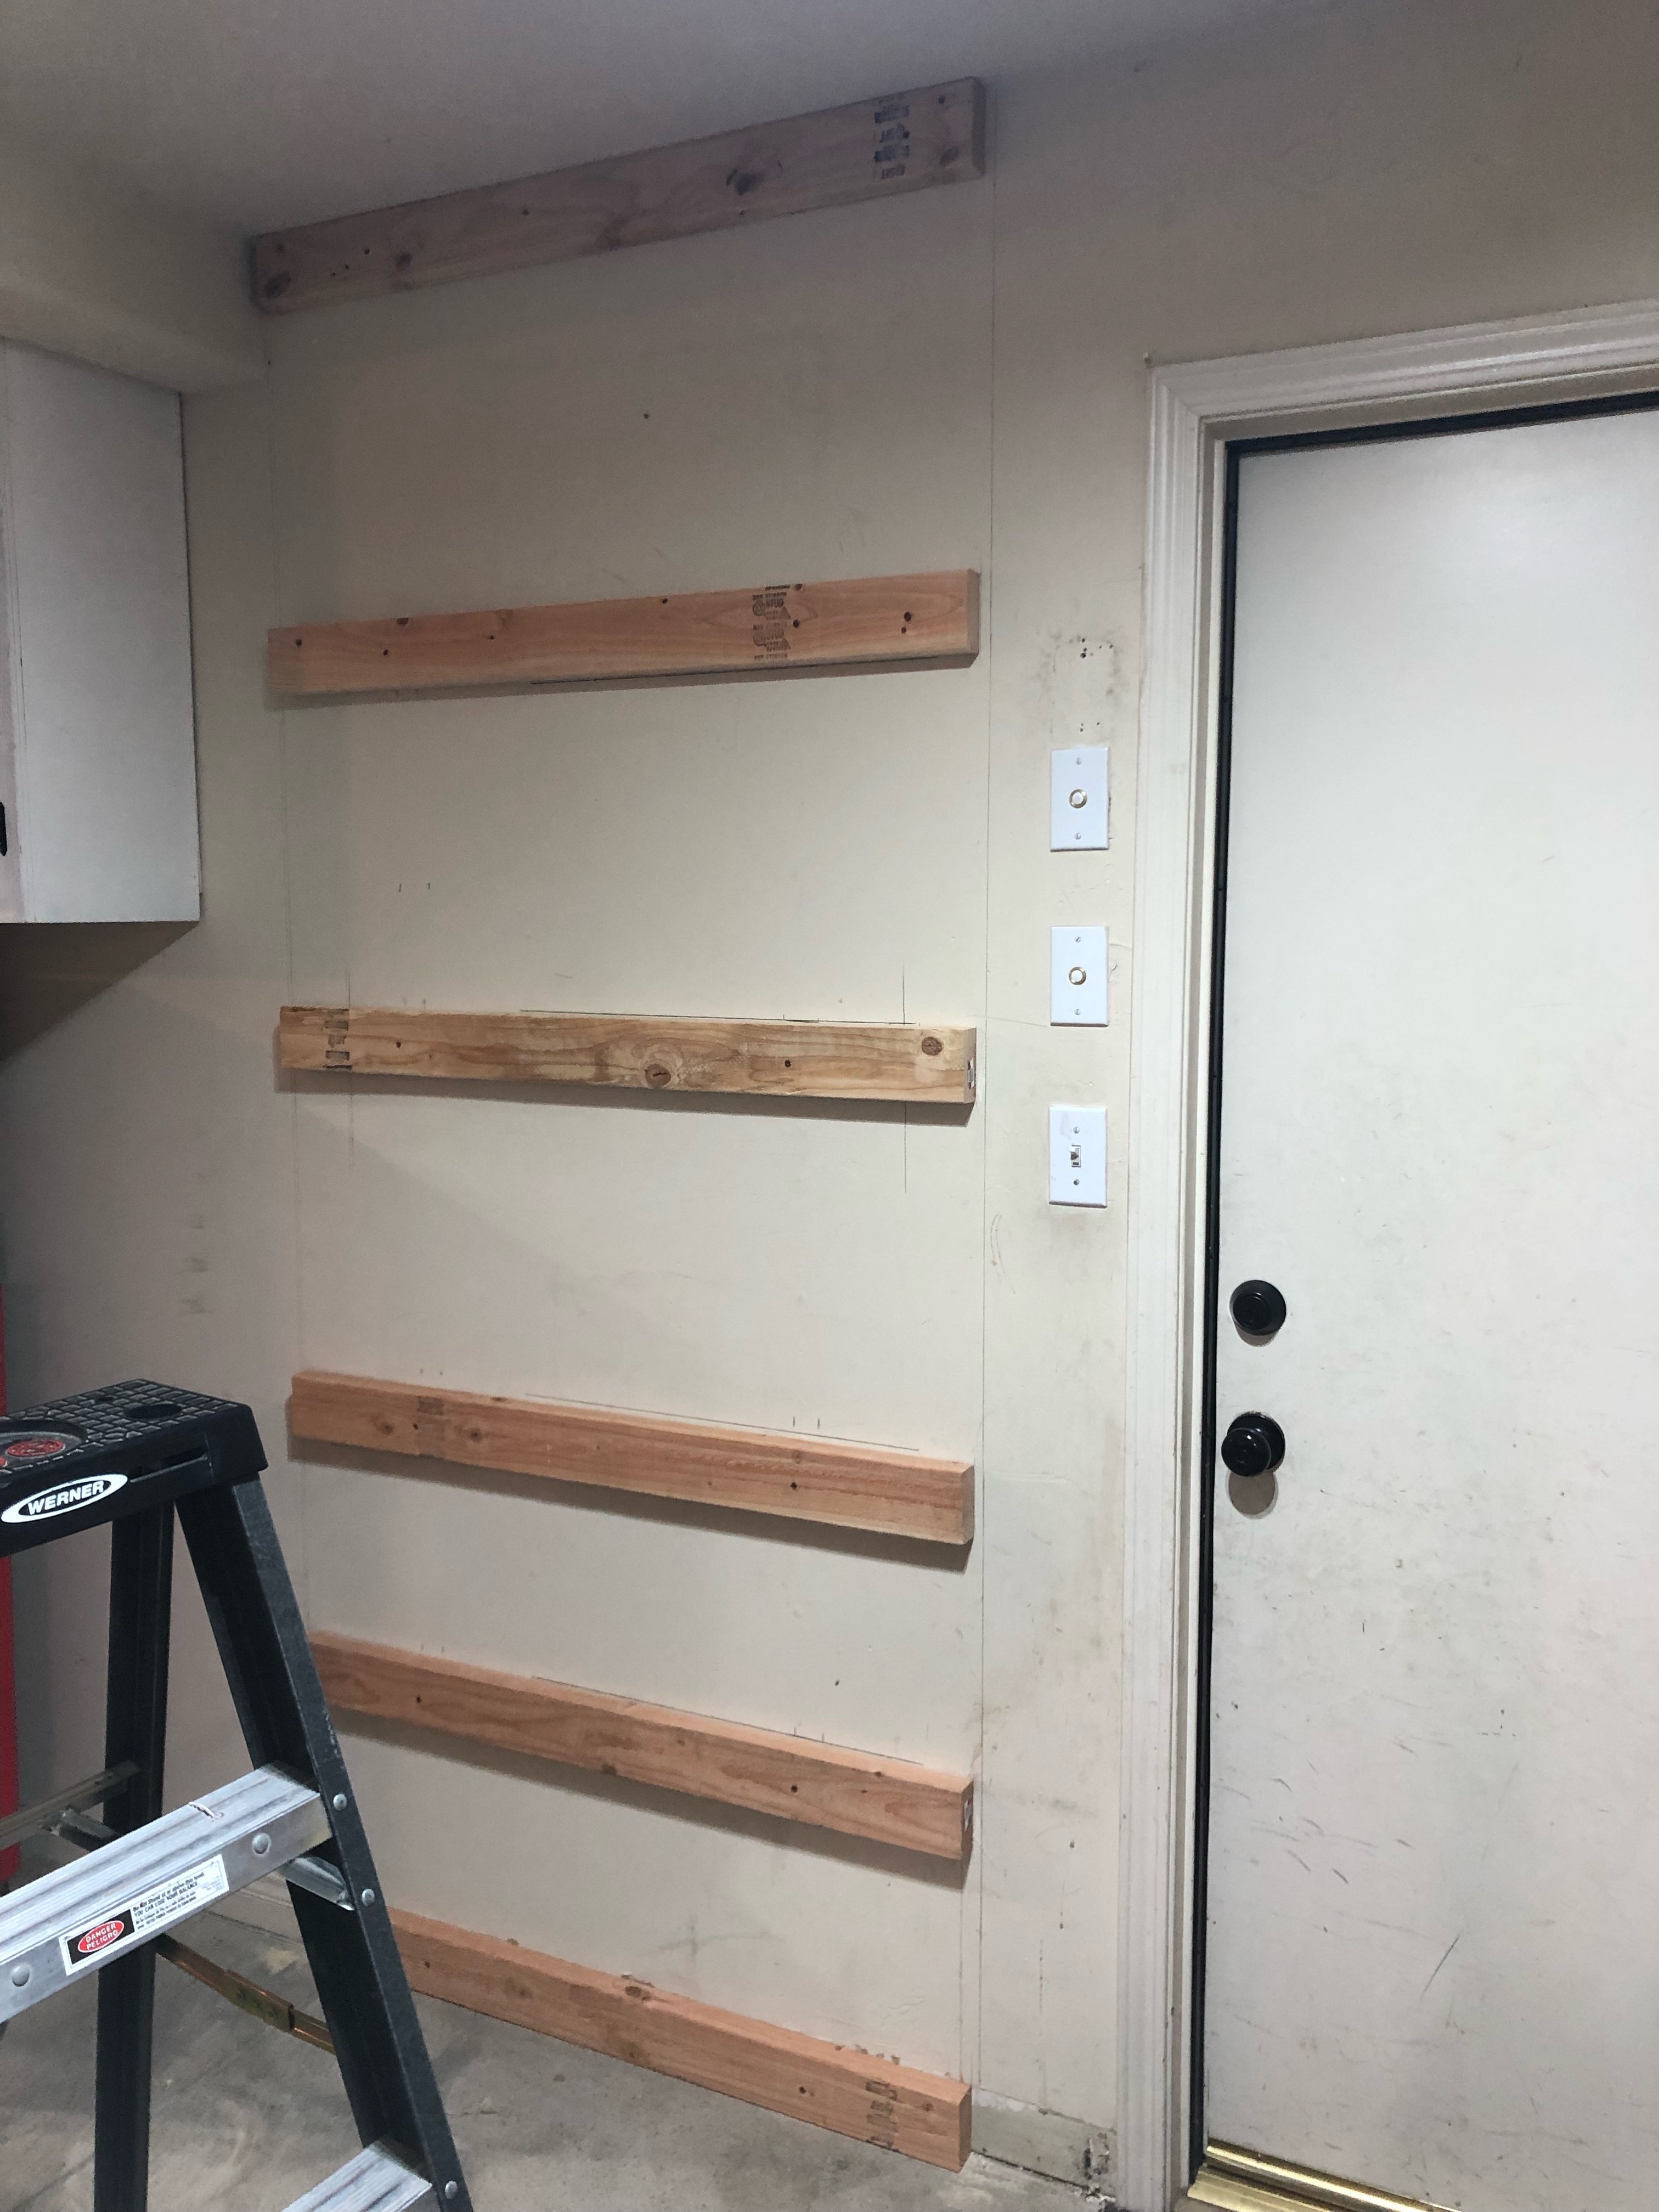
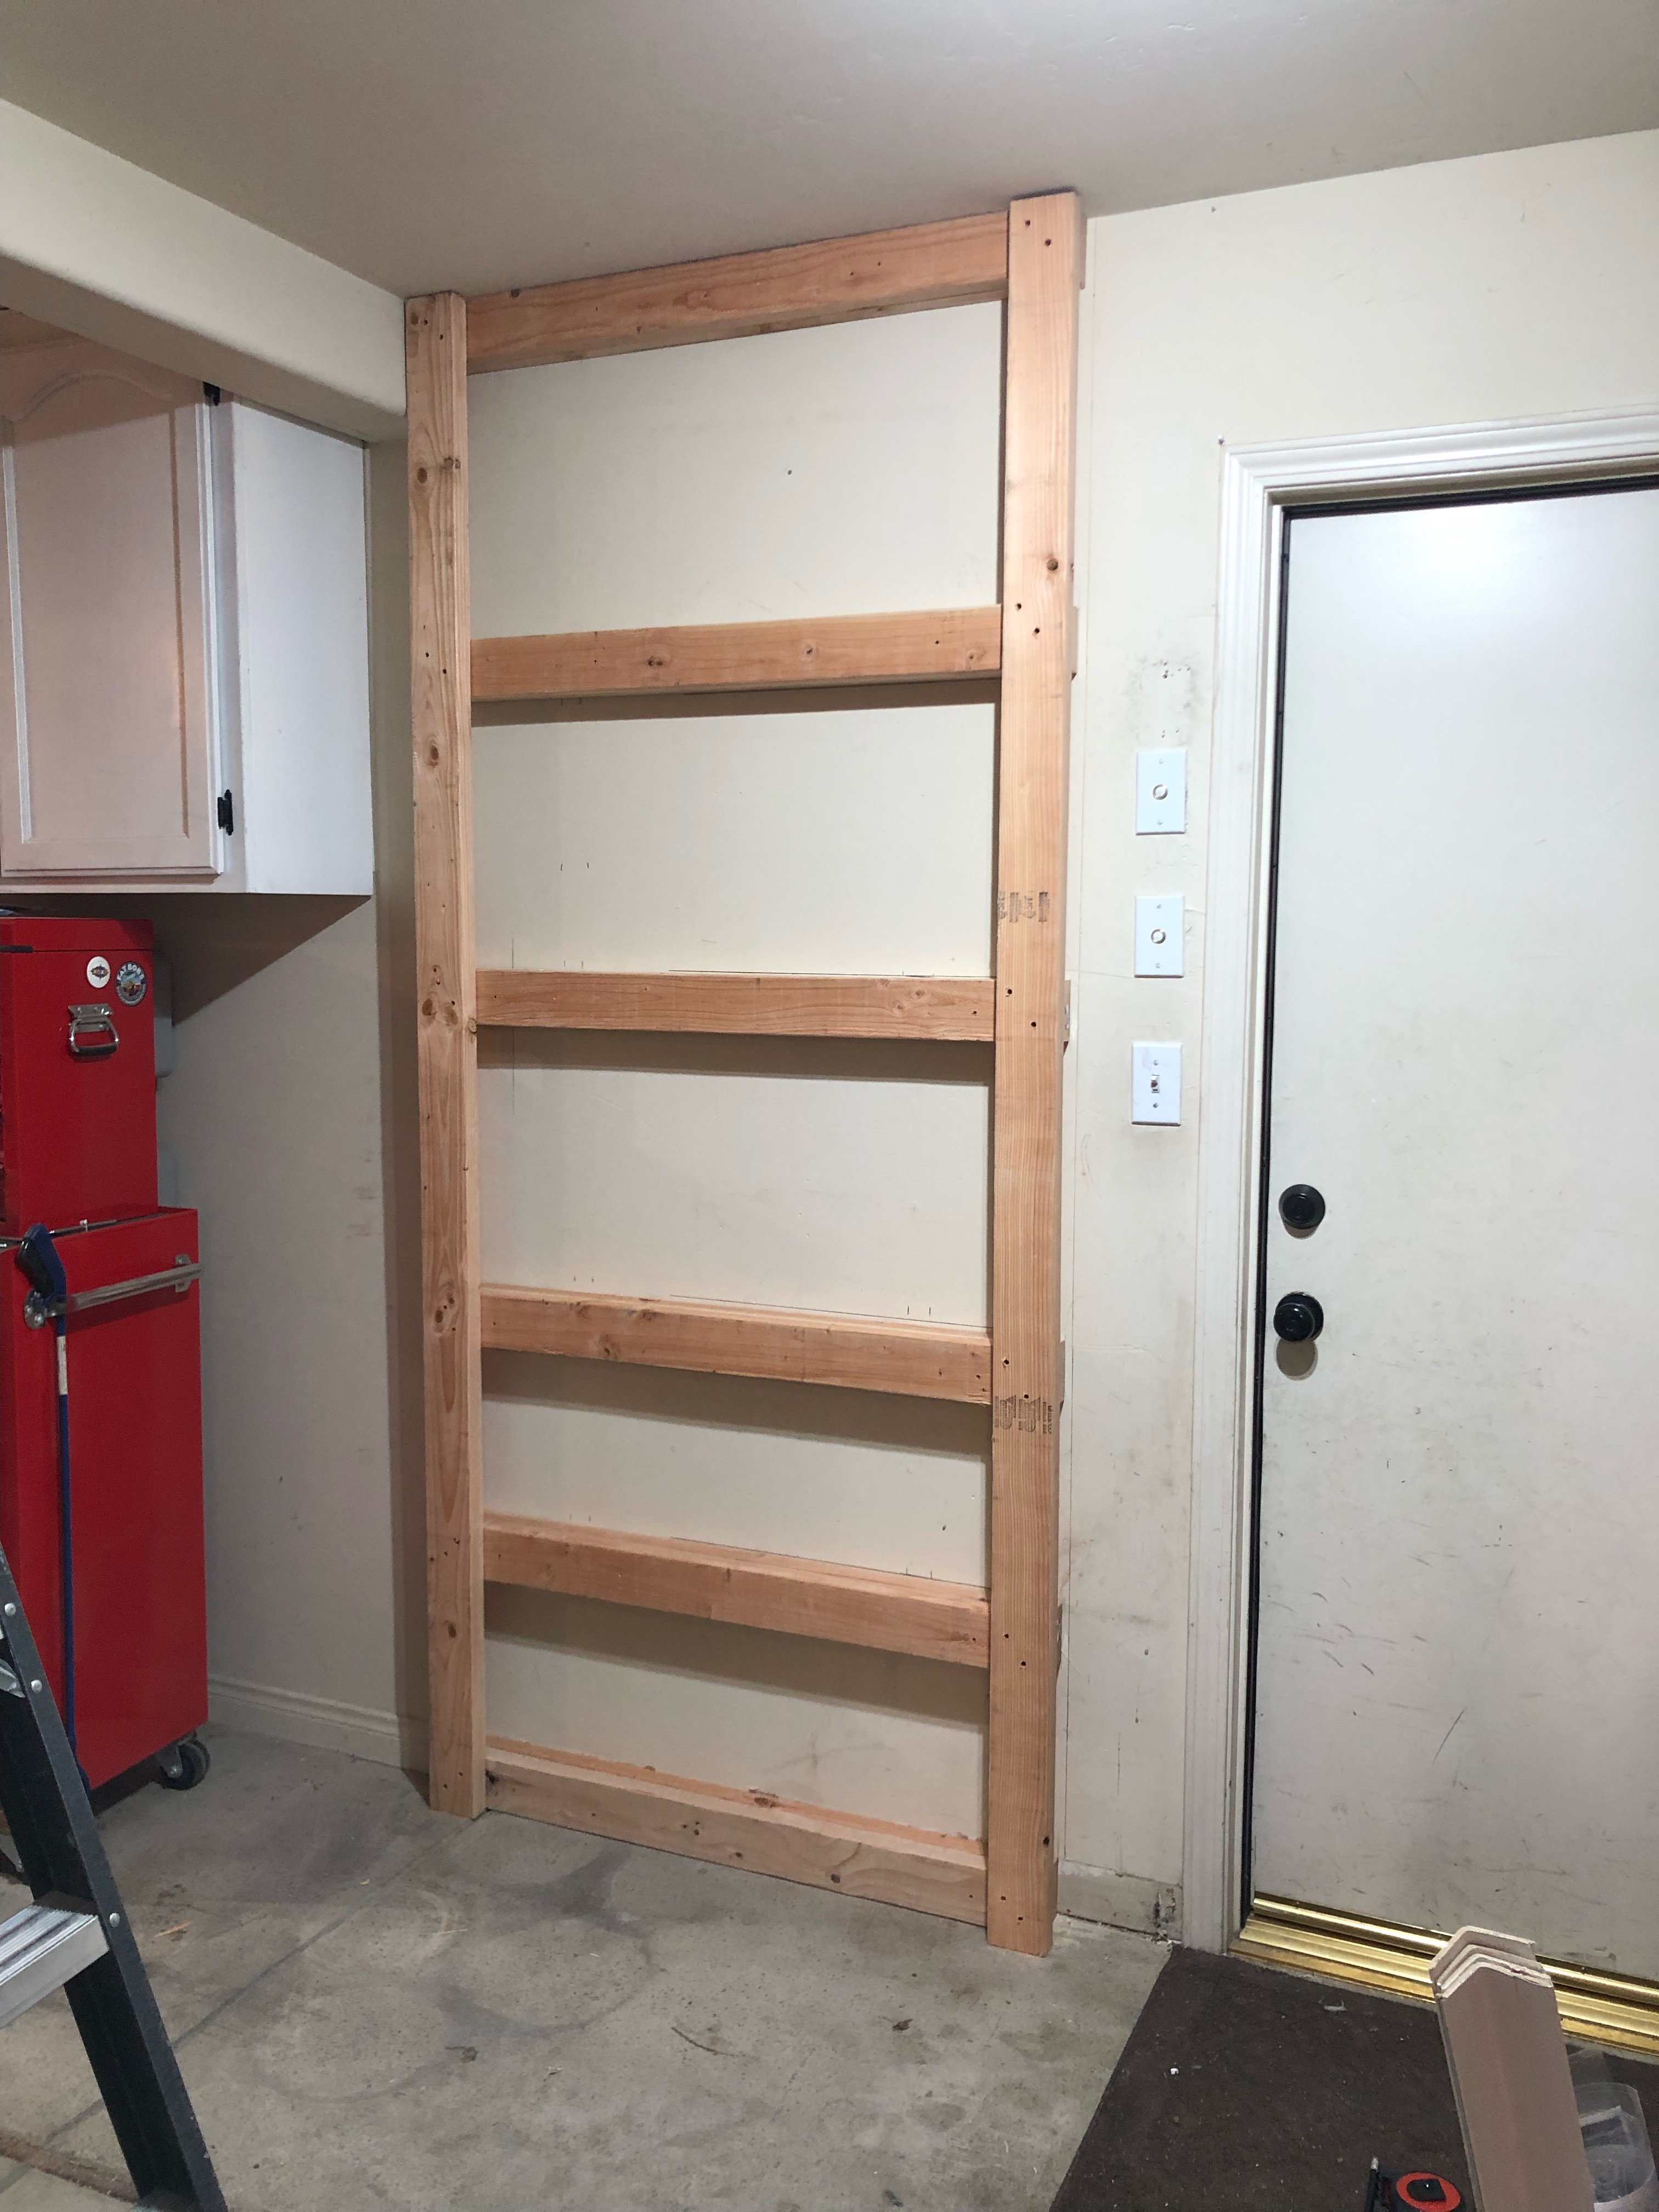
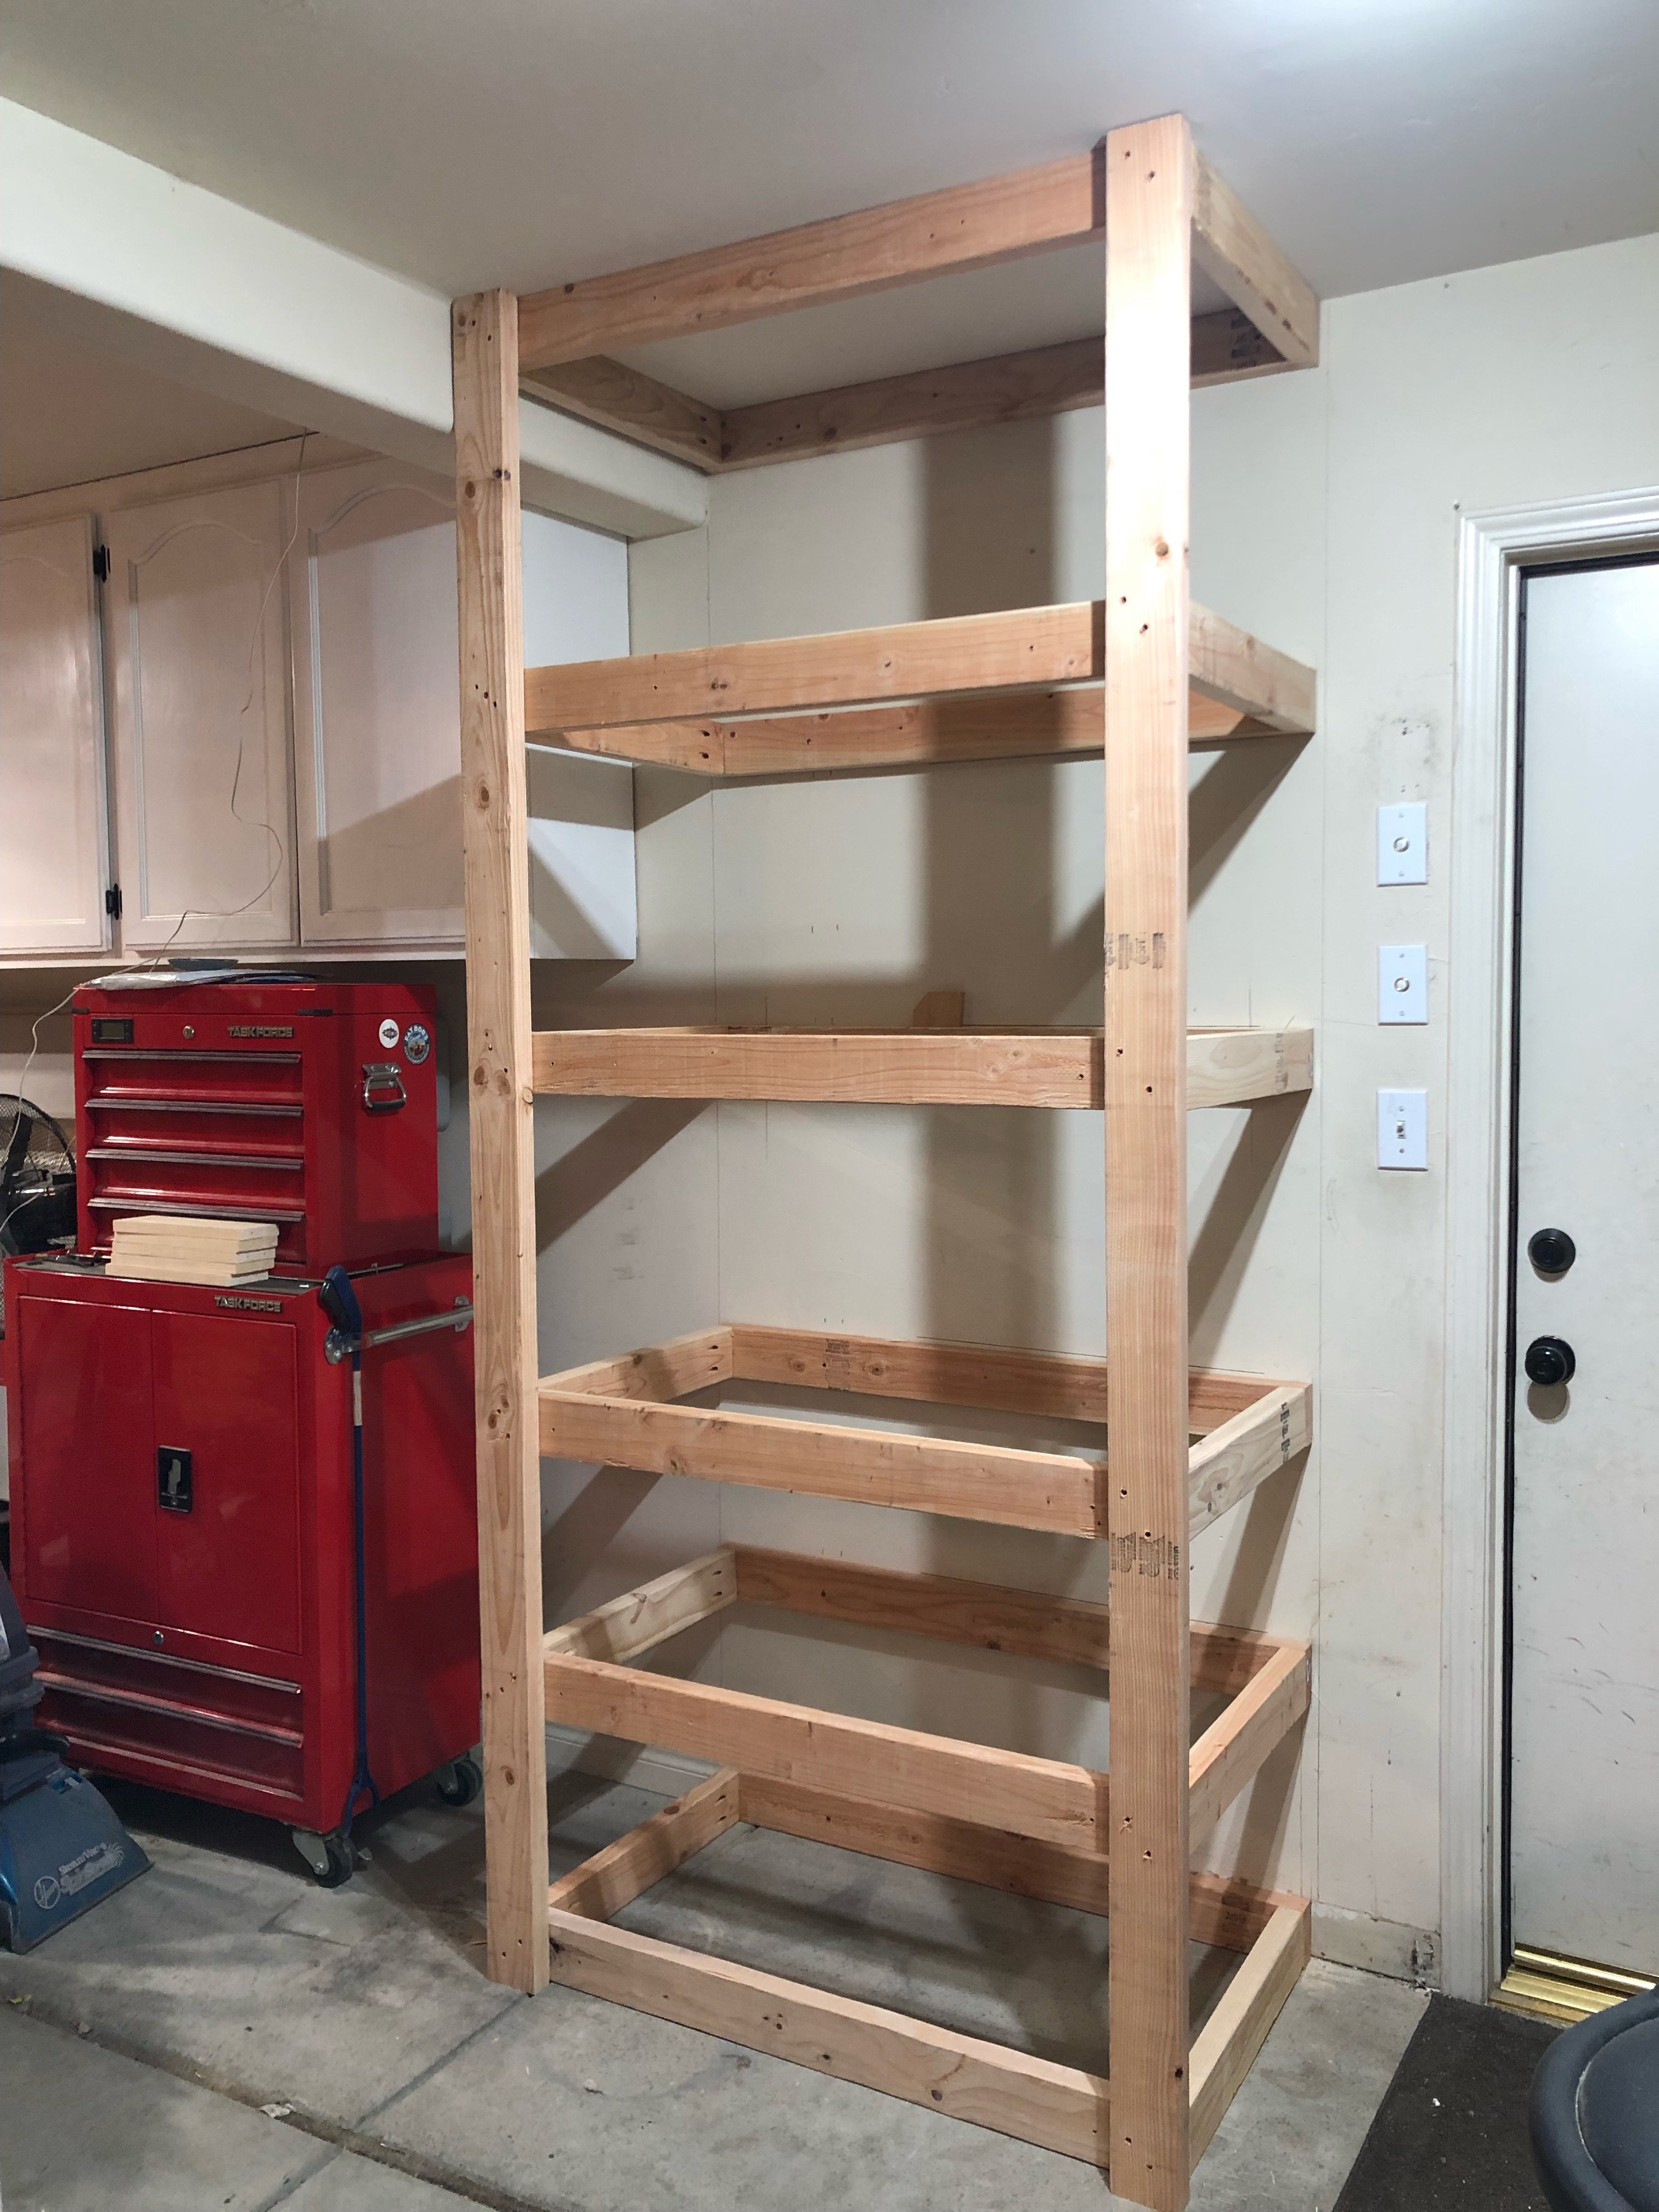
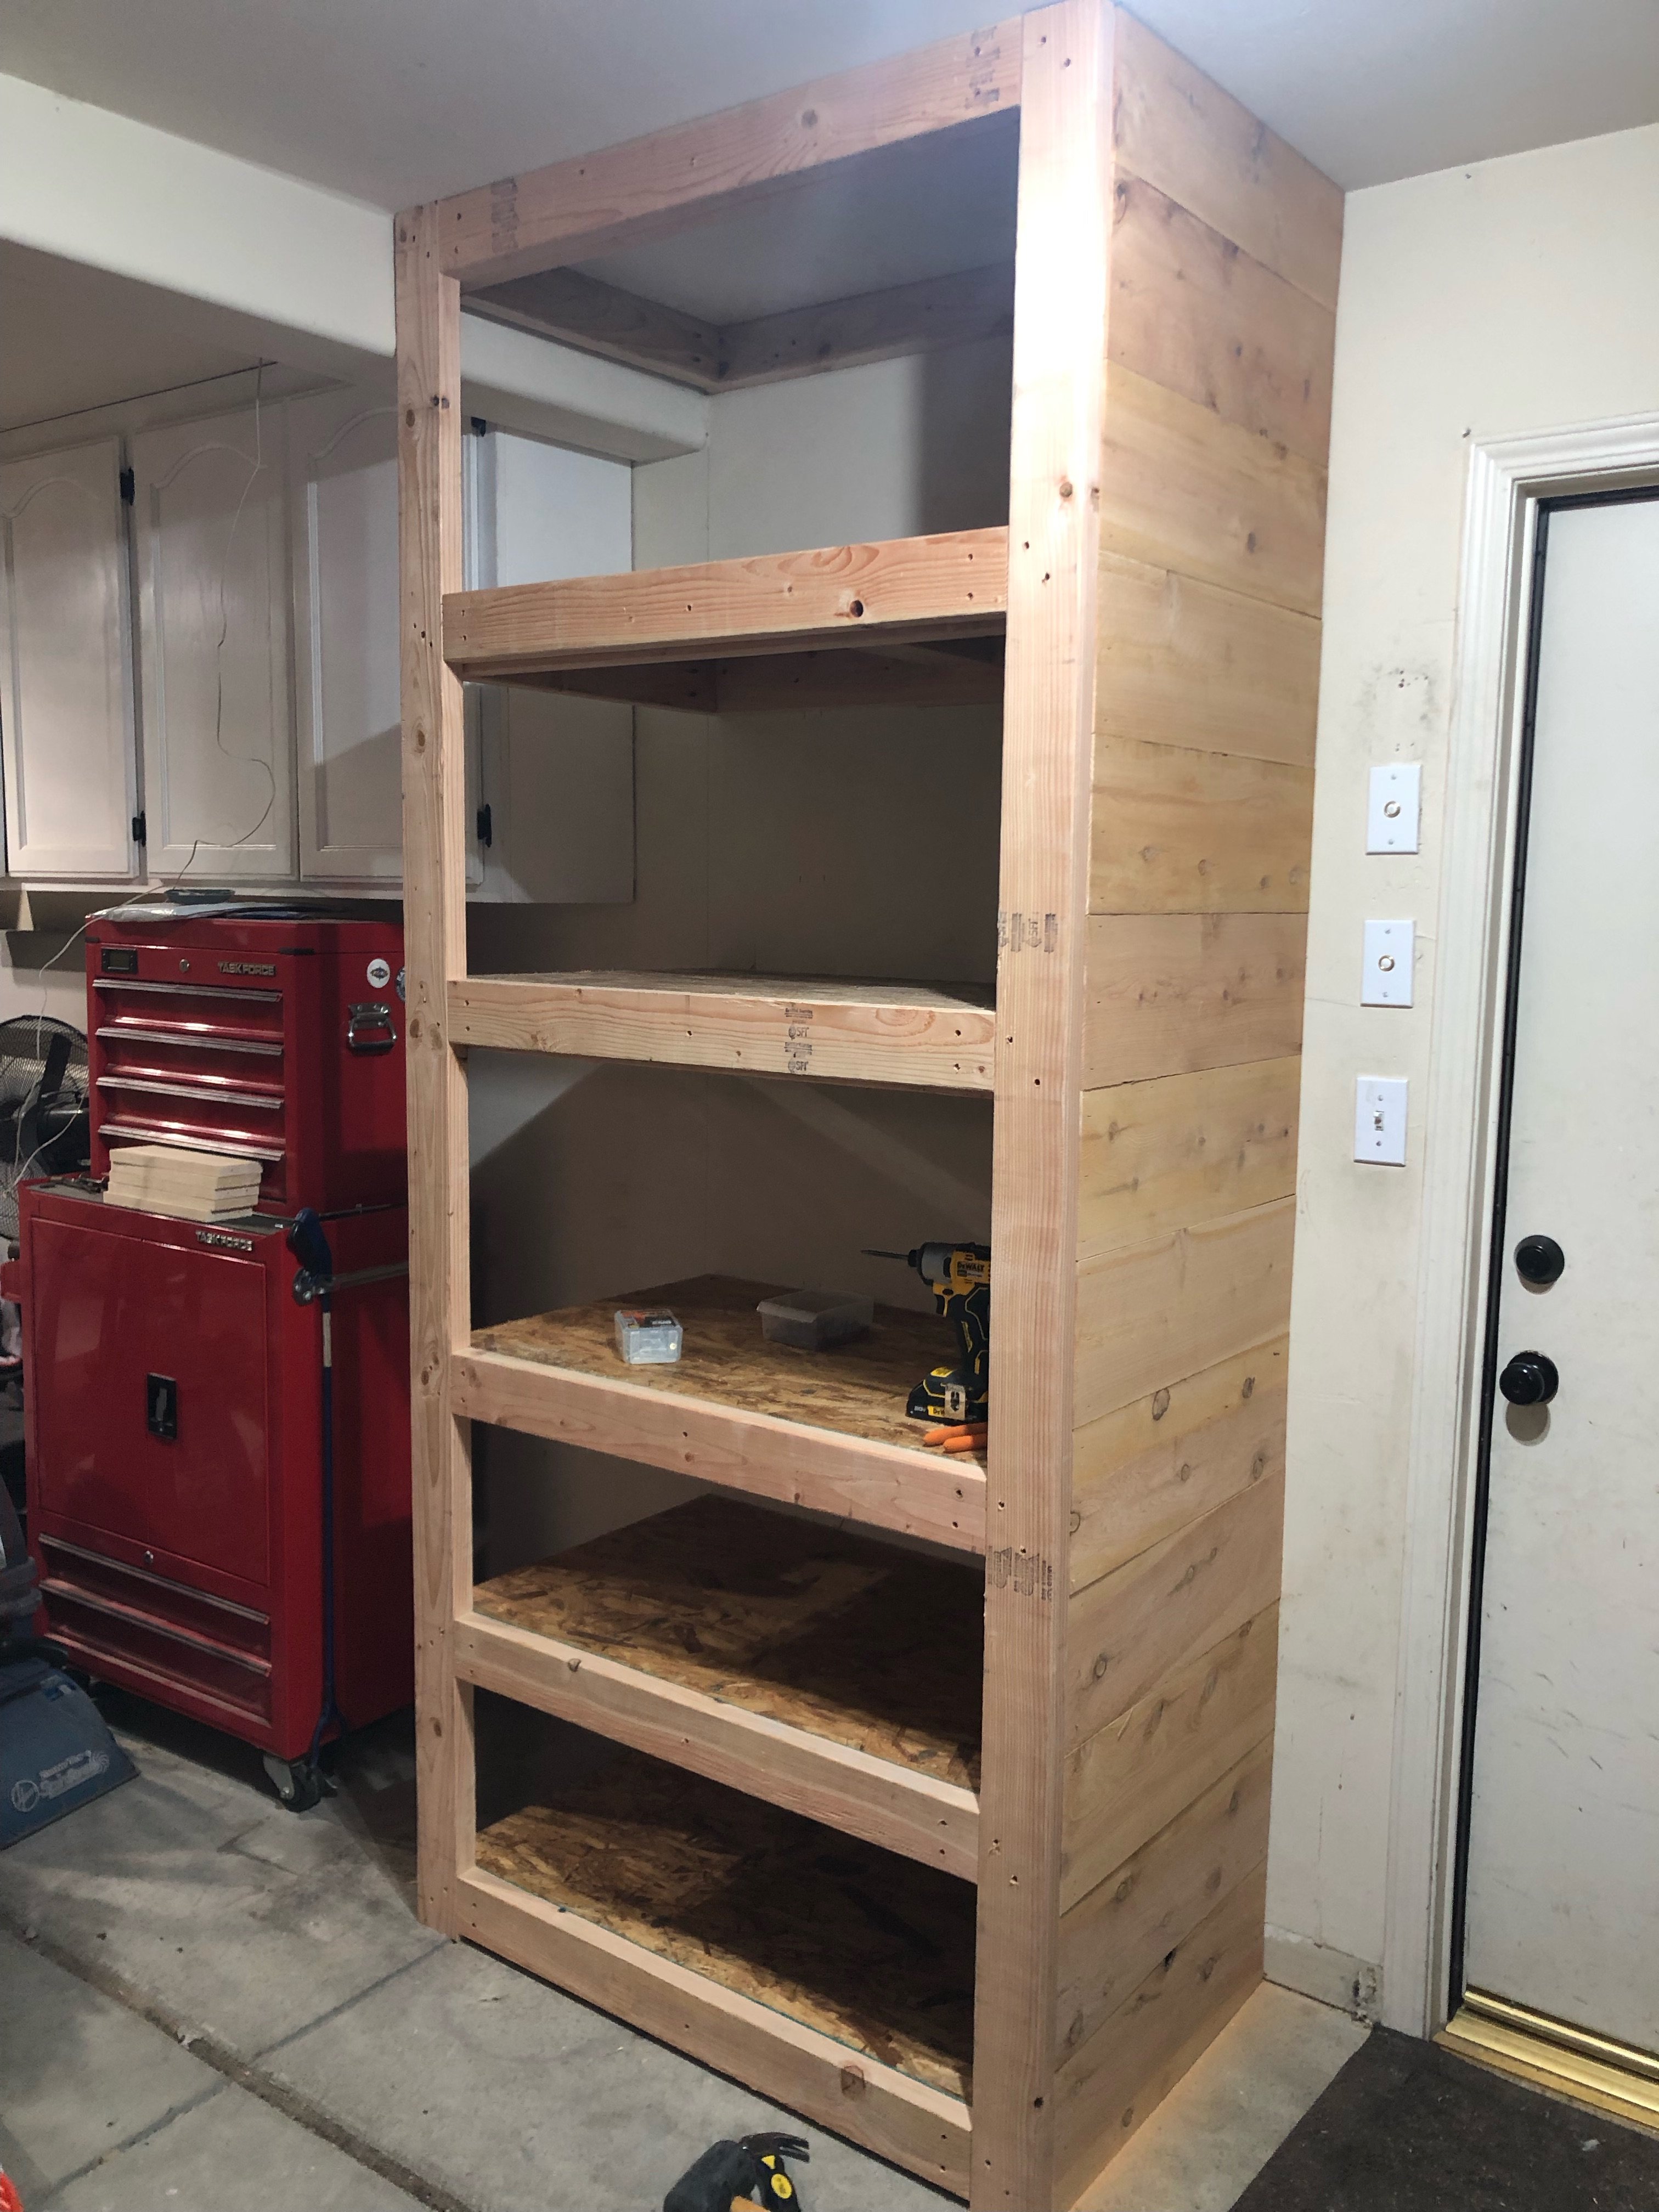
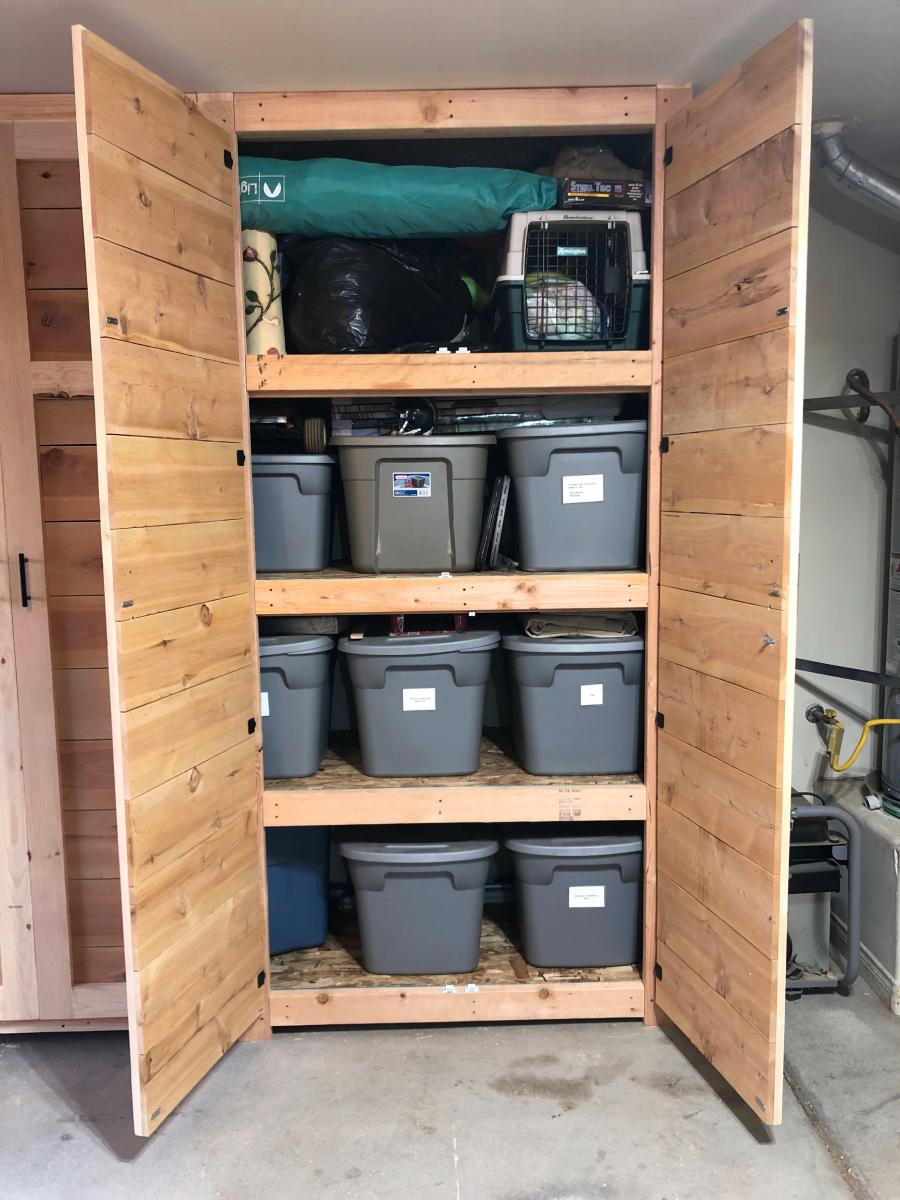
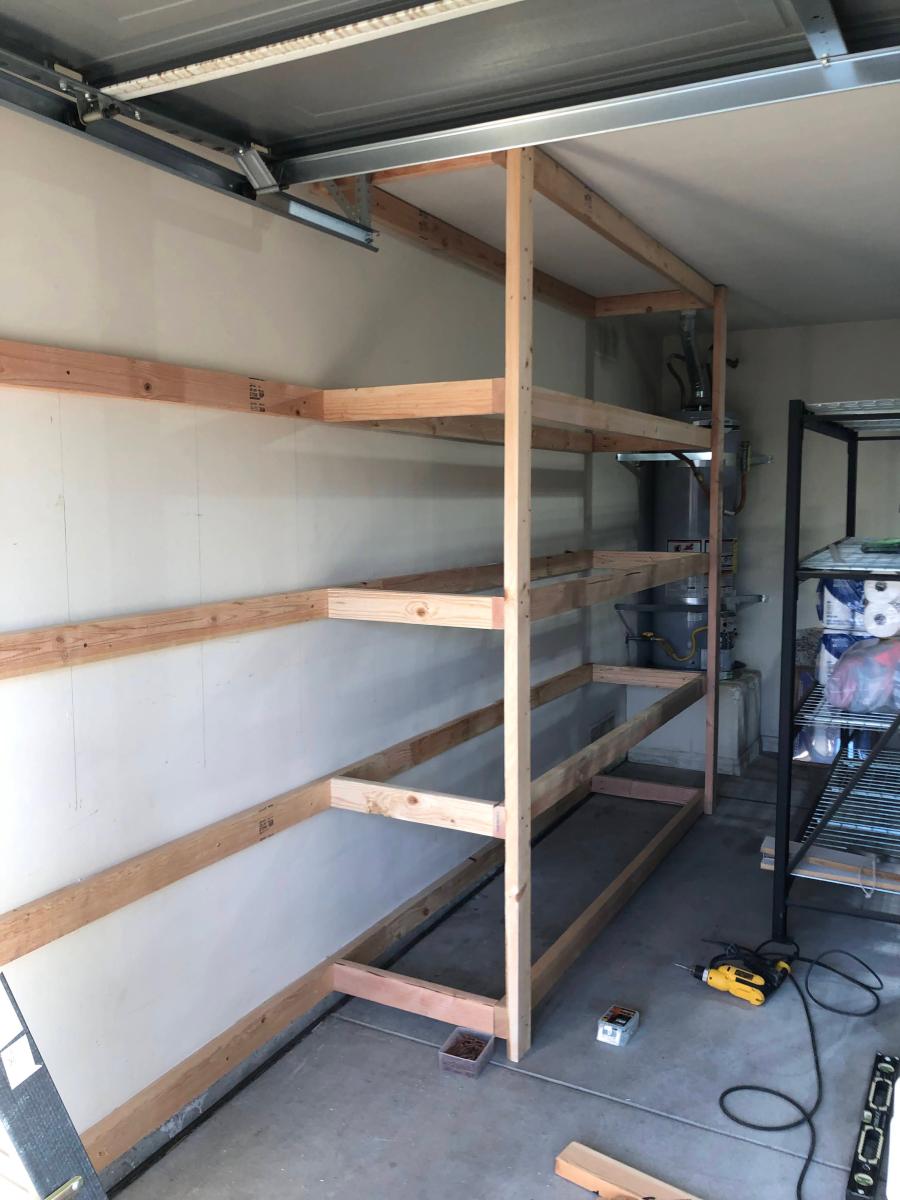
Garage Shelves Plan with Added Doors - Built and shared by Jeremy Doyle


I made these modern Adirondack chairs for our business in Anchorage. GREAT and easy to build design by Ana - we upgraded the arms to tapered 2x6 and they're awesome!


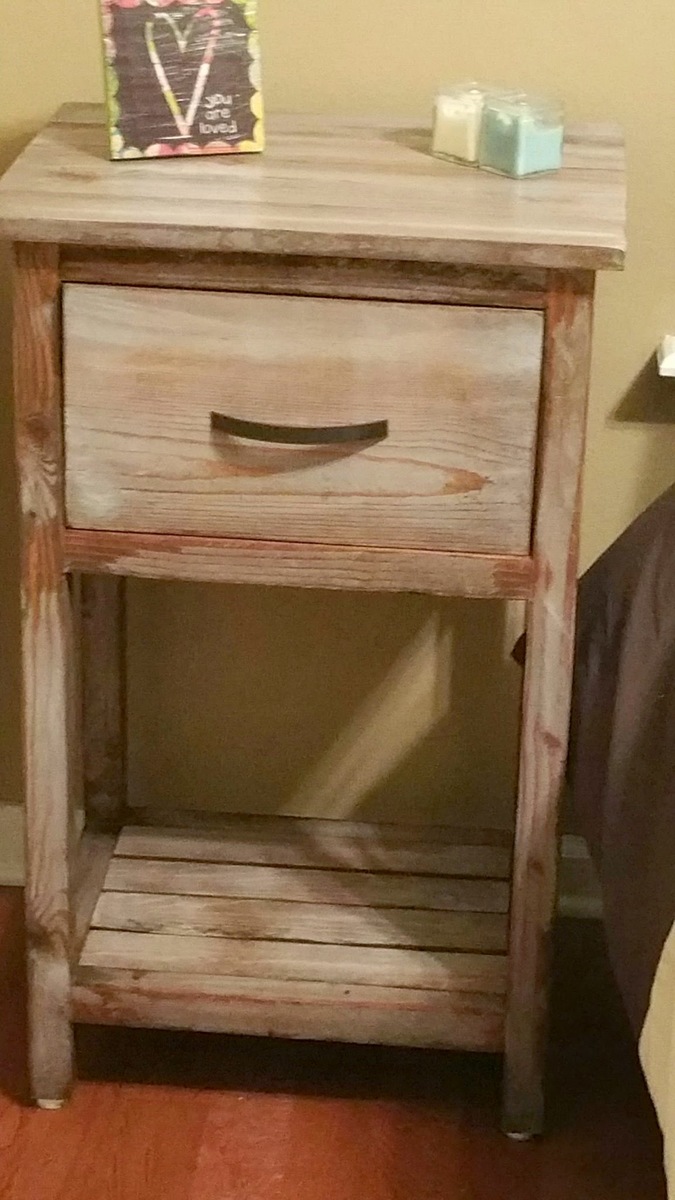
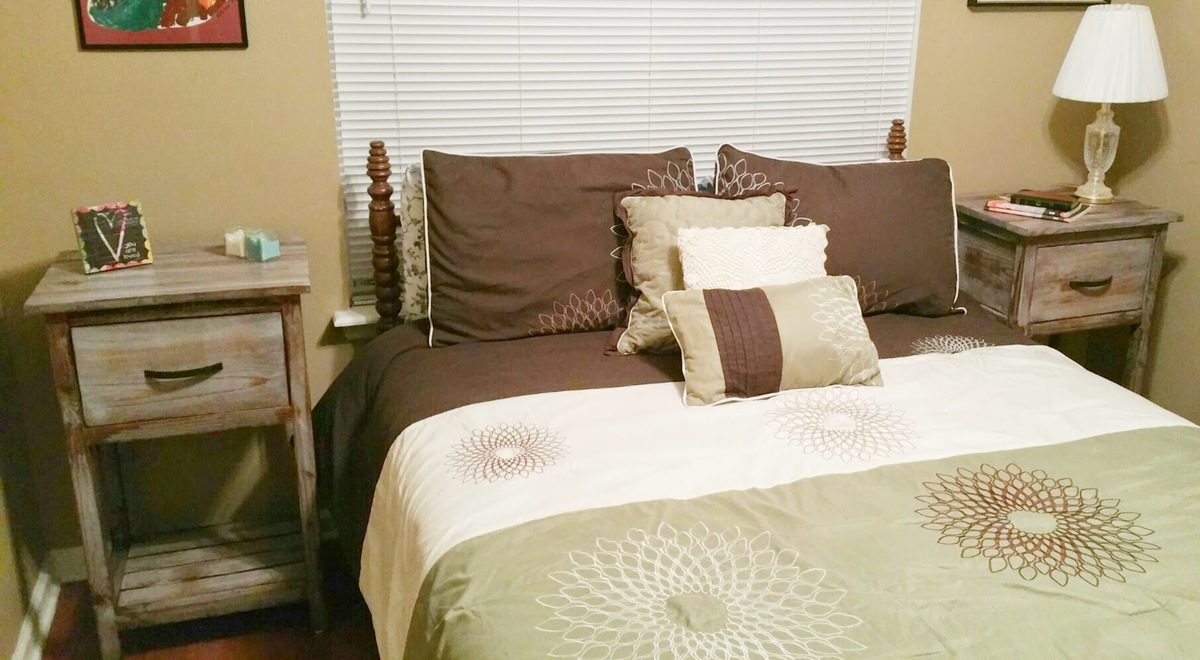
Night Stands custom sized and finished per customer building new home based Ana White's Farm House collection #anawhite
Intentional distressing per customer request with guidance from Ana White plans. Finish contains a mix of paint, removing of paint, staining and restraining. Now to move to a purposeful Mud Room Locker for a new home suited for family.
http://ana-white.com/users/pondrider/
#anawhite #Stain #CustomFurniture #Paint


We made the grilling station to keep at our seasonal campsite and it's absolutely fantastic! We have since added some L brackets and 2 shelves, and this is where we store our extra cases of water, soft drinks, outdoor cooking utensils plus an air fryer! Super easy plans, with well written instructions for even the novice (me and hubs) diy builders!
Ali W.
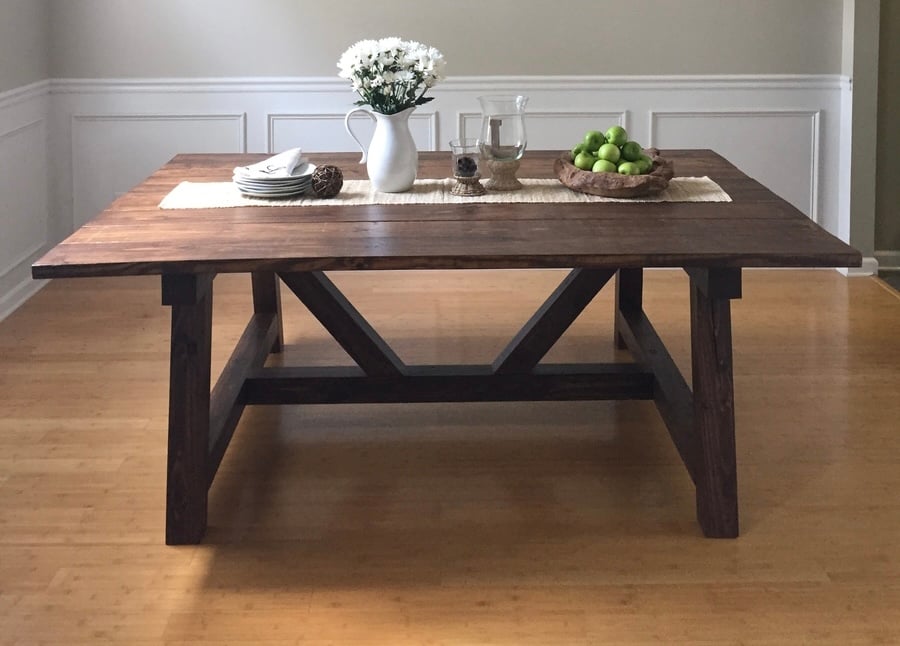
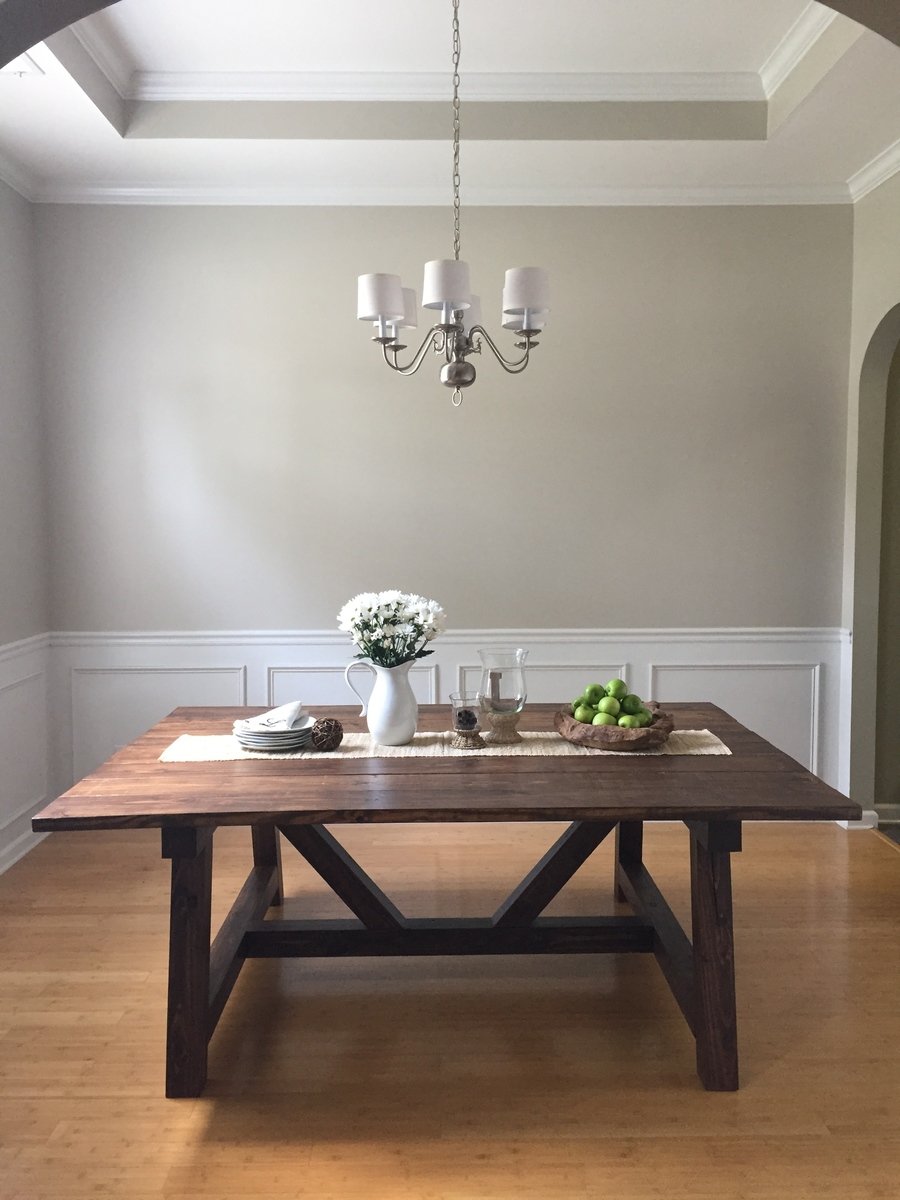
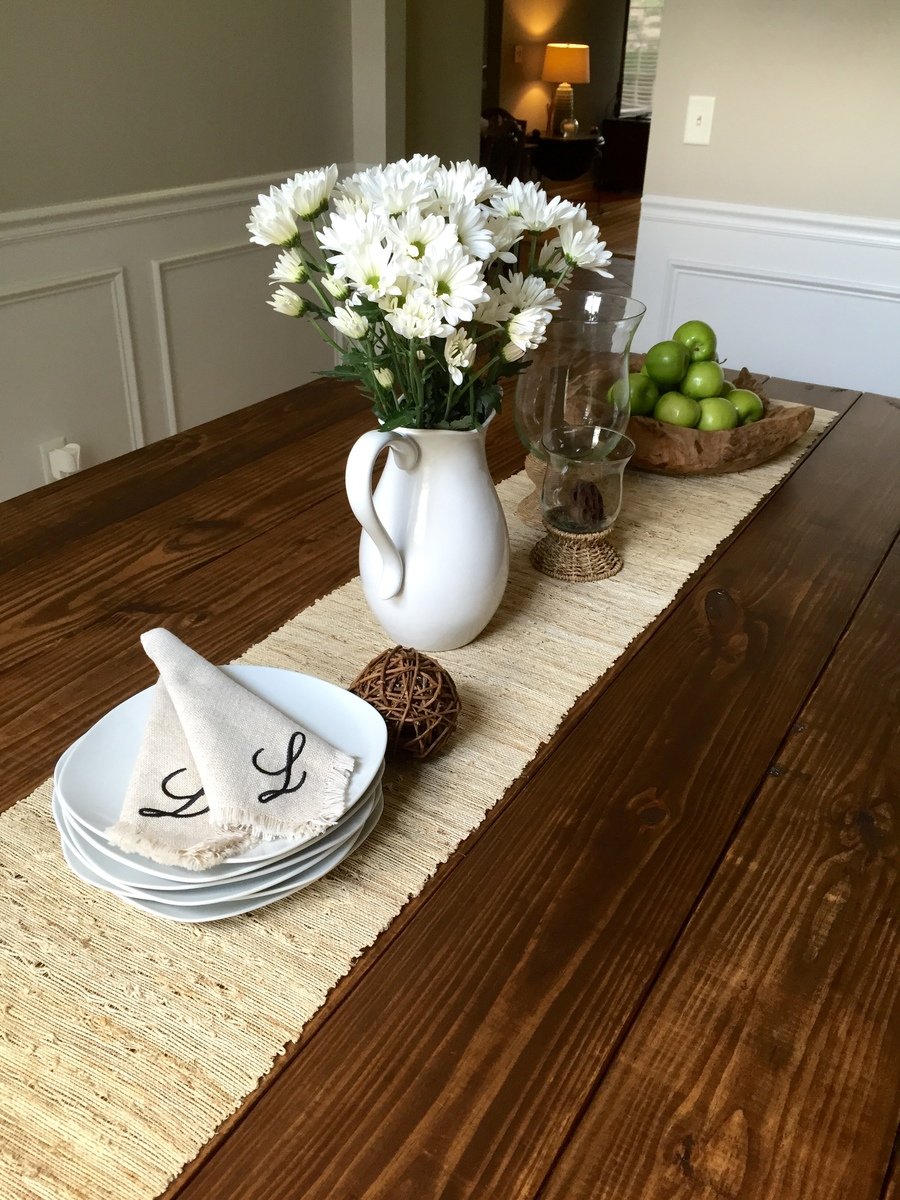
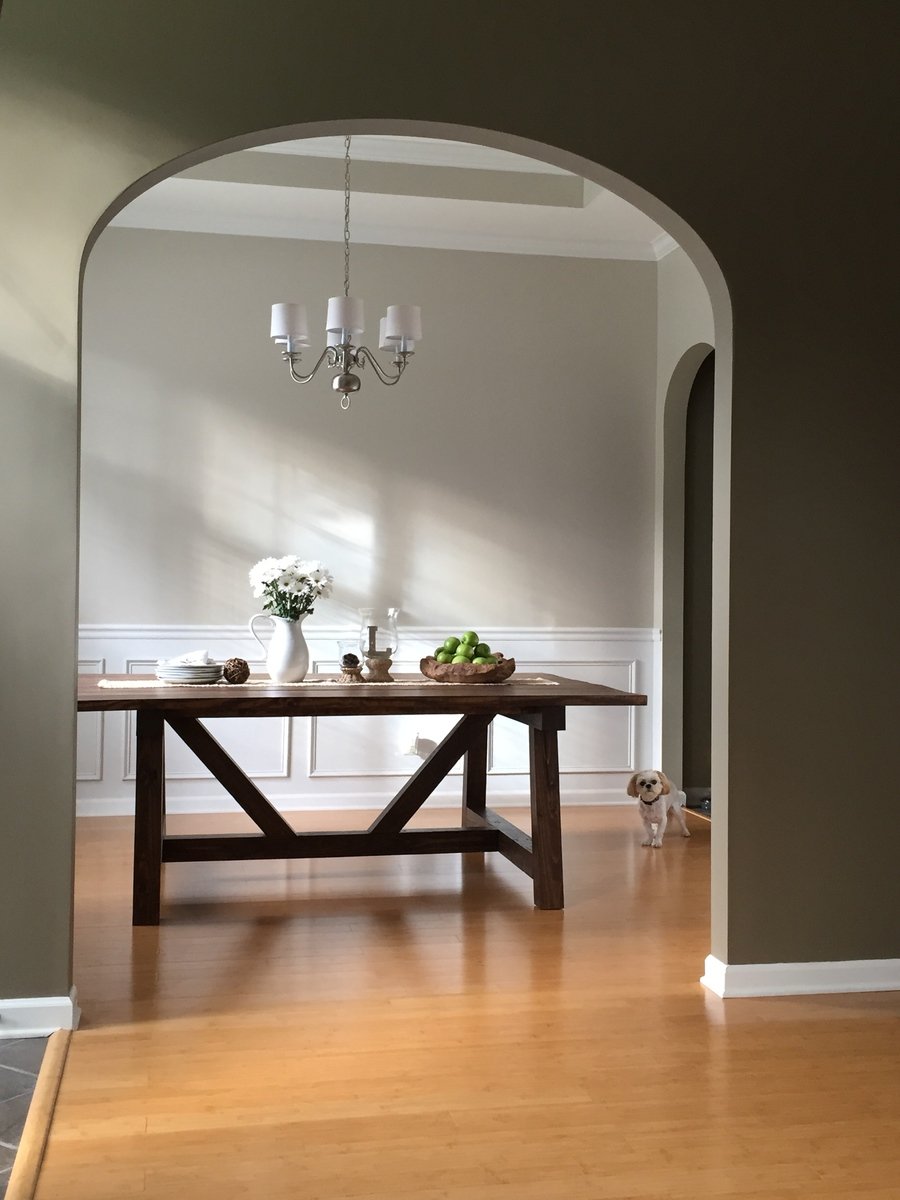
My husband and I moved in to our new house last fall and we needed a dining table that would seat at least 8. We picked this plan from Ana's site because I love the look of the 4x4 beams. I used Adobe Illustrator and my math skills to modify the size and scale to fit our dining room with exact spacing all the way around. We had difficulty finding untreated 4x4 beams but were able to special order some for a reasonable price from a local lumber company. It is more expensive than combing 2x4s but I did not like the pieced together look of the 2x4s. We stained with Rustoleum Dark Walnut and Matte Poly just like the blog post from Ana's site. We also used the Kreg Jig HD which is SO AWESOME! We love the table. Now we just need to decide: chairs vs. benches. I hate to block the beautiful truss design of the base. Its so gorgeous!
Mon, 08/31/2015 - 14:18
I love this table. The finish came out great by the looks. My wife and I are moving into a house soon and I think this is going to be the design for our table as well.
Mon, 09/07/2015 - 06:21
What a beautiful table! Is this table square? We are also looking to build a table to sit 8 and love the look of yours. Could you share your cut list or dimensions?
Mon, 08/29/2016 - 06:08
Thank you for all the kind comments! I did not know that I had gotten any and had not checked back over the past year. The jump drive with my dimensions on it got damaged last year shortly after the build and I lost all of my home decor files including the AI with my cut list and dimensions. I know it had been a while since several of your comments but I will see if my husband can help me measure the table and figure out what the dimensions are and post them on here for you. Happy Woodworking!
Tue, 11/15/2016 - 18:01
This table really looks great! I'm about to start making one and would love to know the dimensions you used. I also noticed that you didnt use the bread boards on either end. How many people does this table fit?
Thanks!
Mon, 02/27/2017 - 08:51
No, we did not use bread boards. It seats 8 with plenty of room.

My husband and I love entertaining, but our small kitchen table was just not cutting it for both our space and our hosting abilities. We decided that instead of searching for the perfect table and spending a ton of money, we would just build our own table. We found that Ana's Rustic Table plans best matched what we were looking for, but my husband being the detailed person that he is didn’t just want to take her measurements and run with them. So we taped off the floor around our old table to decide how large we wanted our own table to be.
 We basically followed Ana White’s plans to a T.
  Until it got to the legs. Ana White used 2×4′s for her legs, but we decided we liked the look of chunkier 4×4 legs instead.
  We also did things in a different order, like attaching the legs to the apron before attaching the table top. This did make everything way easier when it came to painting, no tape needed.
  We also stained the bottoms and sides of the tabletop boards before attaching them to the apron. After the top was attached I stained the top side and applied about 3-4 coats of Matte polyurethane. I like the matte finish because it doesn’t add any sheen and makes things look even more rustic; however, we’ll have to add a regular coat of poly as well because the matte is too soft for something that will see such rough use over the years.
  And now for what you’re all wondering about, how much did this project cost us?


Mon, 12/31/2012 - 09:43
Your table is gorgeous! You did an amazing job.
I am getting ready to attempt my first two projects, bookshelves and a buffet table. I had a couple of questions about how you got such a consistent stain.
1) The Stain - What kind of stain did you use? How many coats did it take? Did you use a conditioner first?
2) Wood filler - How did you get the wood filler to match the stained areas so well? What kind did you use?
Thanks for the advice! I was thinking I would have to paint the buffet but after seeing your table I think I may actually attempt the stain.

I recently built this for a fundraiser for a friend, who suffered from a stroke, people loved it.
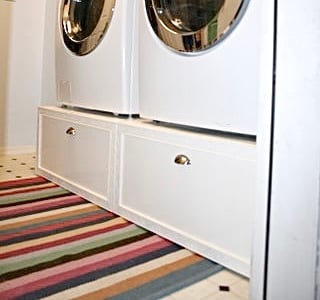
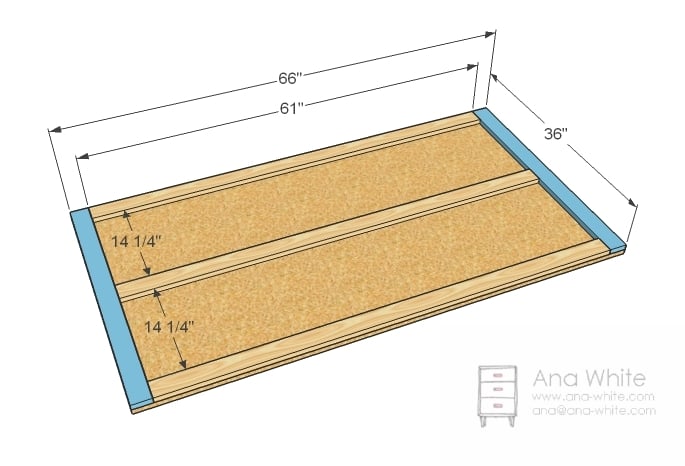
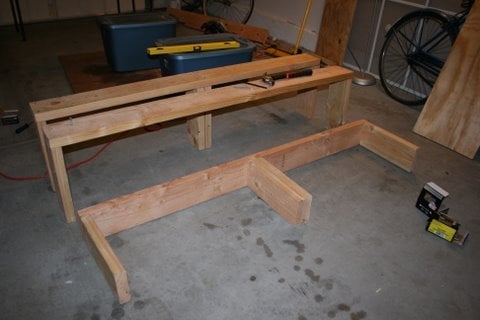
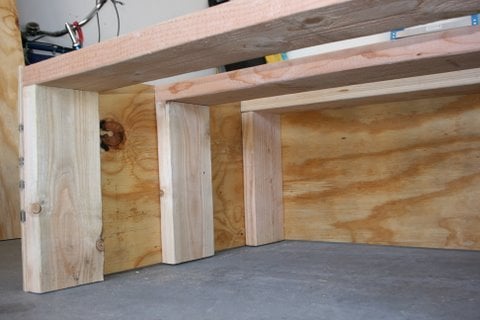
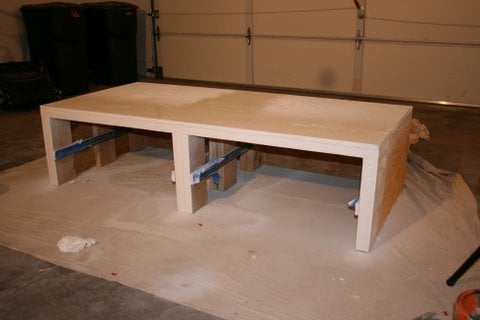
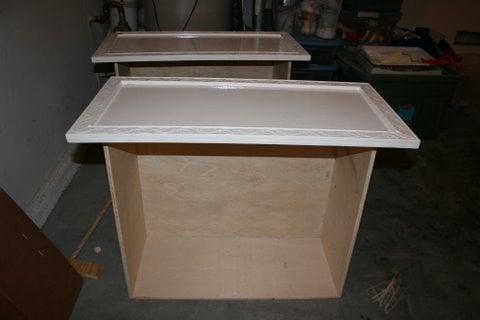
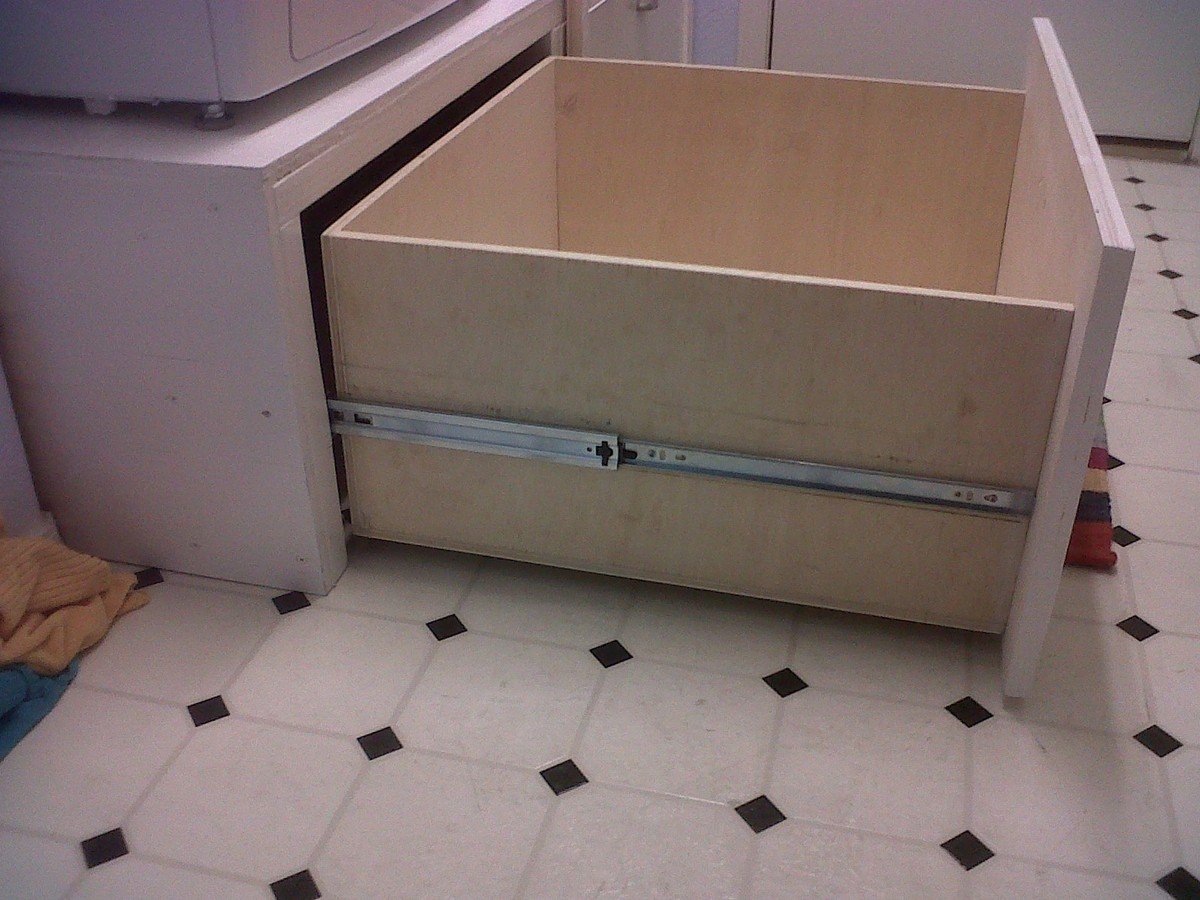
Platform (Pedestal) with Drawers for front-loader Washer & Dryer. Cheaper than buying the manufacturer's plastic pedestals and more fun to build anyway! The drawers are also much wider and deeper than the manufacturer's pedestals. We can usually fit about 3 full loads of laundry in each drawer. (That's 6 loads of laundry before we have to start folding!) It's a very easy and basic DIY project. I made a 2nd one for my brother using these plans (sans the drawers). I gotta say, the drawers are SO nice to have though. But you could just leave the front open, without drawers, and slide some laundry baskets underneath for an even quicker project. We've been using this platform now for over 2 years and there is still no squeaking or rattling. The washer & dryer haven't moved from the vibration even in the slightest. They're exactly where I placed them on the pedestal 2 years ago. There's also zero problem with the weight of the washer either...it really is a strong frame. (After finishing, I jumped up and down on it!) A couple small tweaks I would make doing it over is raising the drawers a 1/2" in. off the floor to tuck a rug underneath (as is, they sit about 1/8" in. off the floor). Also, I would cut out a couple of square holes in the back panel to access those socks that fall behind (I can't access the sides of my W&D in our particular laundry room). Lastly, I would have painted with a quality paint (I just used a few cans of white spray paint to be quicker). Step-by-Step Plans and Materials List (PDF) and many more photos found at the Blog Link below...I'm certainly no professional "Plans Writer" so email if you have questions! Happy DIY-ing! Estimated Cost: ~$200 (2x6 lumber, plywood, drawer trim, nails, screws, paint)
Wed, 03/13/2013 - 10:12
I have wanted to do the pedestal project for quite a while. I am so glad I held off though. Yours are fantastic! I would never have thought of drawers to hide the dirty laundry! Love it!
Fri, 02/07/2014 - 17:05
Hello this looks great and for the amateur carpenter I am but one item I need clarified "the top measurement at 64" is .25" greater than the bottom at 63.75"
Please explain if I am missing something
Thanks
Mon, 02/10/2014 - 15:33
Not sure what measurement you mean that's 63.75" since there's no "bottom" to the pedestals. Or do you mean 1/4" wider than the sides? The top panel should overhang both sides by 1/4" each so that when the side plywood is attached, it will be flush. Hopefully that helps? (If I'm understanding the question correctly)
Mon, 02/24/2014 - 10:29
Could leave the back panel of plywood out so you could reach what may fall behind? Then you would just have to pull the drawers out?
Thu, 12/03/2015 - 06:11
Did you ever find out if you can leave off the back panel?
Wed, 06/22/2016 - 16:35
Back panel is very very structural and provides lot of strength. If i wanted more access than the 5-7 inch of duct space behind the pedestal gives me, then i would replace the back panel with a long 2x6, that holds the three legs from going in different directions due to all that weight.
Mon, 12/12/2016 - 14:58
This is the one modification I could make if i could redo these plans...I would still put on the back panel of plywood as it stabilizes the pedestal, I would just have cut out a rectangle (behind each drawer) so that I could remove the drawers and stick my hand/arm through to grab fallen clothes or vacuum the lint.
Mon, 12/18/2017 - 19:17
Rather than cut holes in the back, I just cut the back and side boards a little small and left a gap around the bottom the whole way around. That way I can get a vaccuum hose in there or reach through and get lost items. Because my washer and dryer seem to be deeper than yours (I needed at least 33" depth, so I went with 3'), that also worked out well in getting the most out of the boards. I could do the top, back, and sides out of one single sheet of good 3/4" plywood just leaving those small gaps at the bottom for clean-up and retreival.
Fri, 11/20/2015 - 05:23
Hello,
I downloaded the pdf but have exactly the same information that the website html, where can I find a solution step by step guide?
Thank you for all the interesting posts.
Mon, 12/12/2016 - 14:55
The original step-by-step plans are found on Ana-White:
http://www.ana-white.com/2011/01/sausha%E2%80%99s-washerdryer-pedestals

A 30" tall bar stools inspired by the plan simplest stool.
Fri, 07/20/2012 - 05:32
I like your design. Finally made an account and will be making matching ones. Thanks for the inspiration. If the better half doesn't like the first one I will have a new stool for my workbench
Tue, 09/04/2012 - 15:20
by adjusting circular saw depth and using chisel and hammer and lots of sanding :)

Great Plan! Loved how easy it was to build and how little the cost was.
Tue, 07/28/2020 - 09:52
Did you use decking screws or pocket holes for the visible portion of the couch?
Sun, 08/01/2021 - 18:40
Looks amazing! What method did you use (pocket holes, dowels, deck screws, etc) to join the visible portions like the arms?

Made the outdoor sectional. The coffee table was made out of left over pieces!

Wed, 10/02/2019 - 09:54
So smart to make the coffee table out of the spare pieces.
Looks amazing!