Community Brag Posts
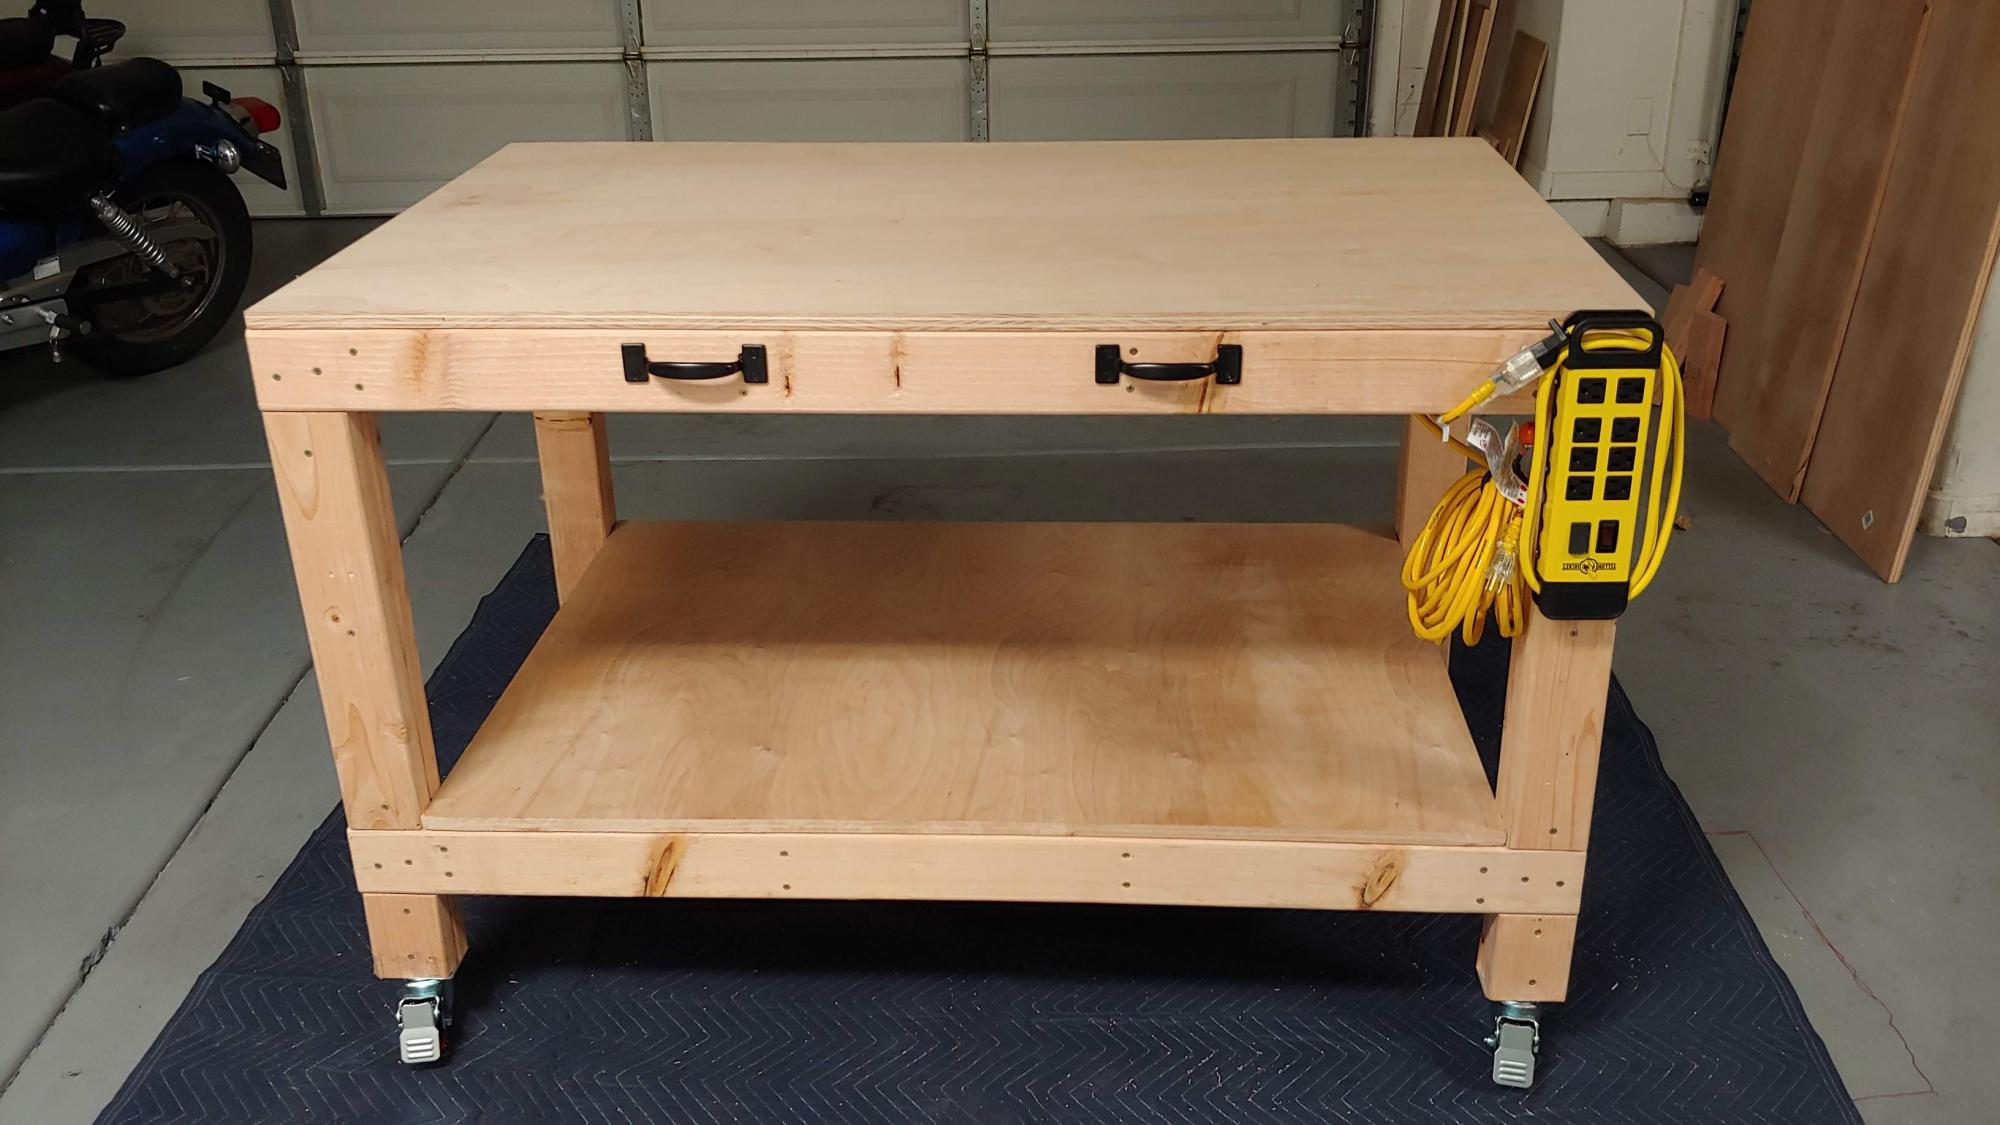
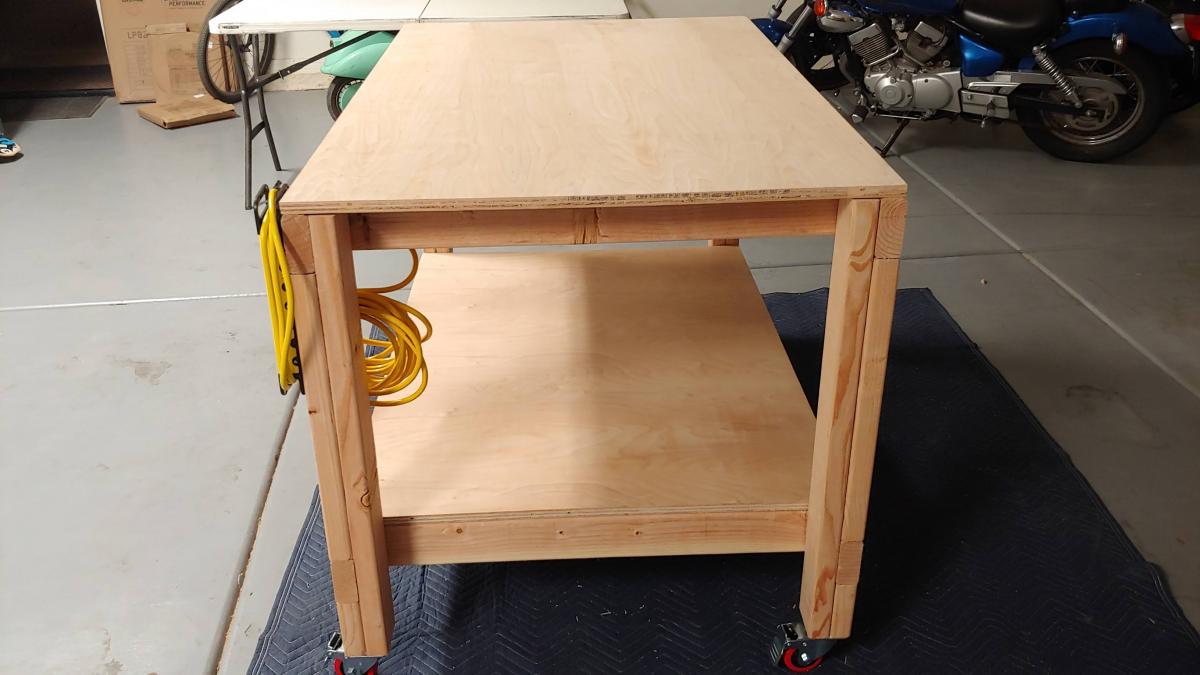
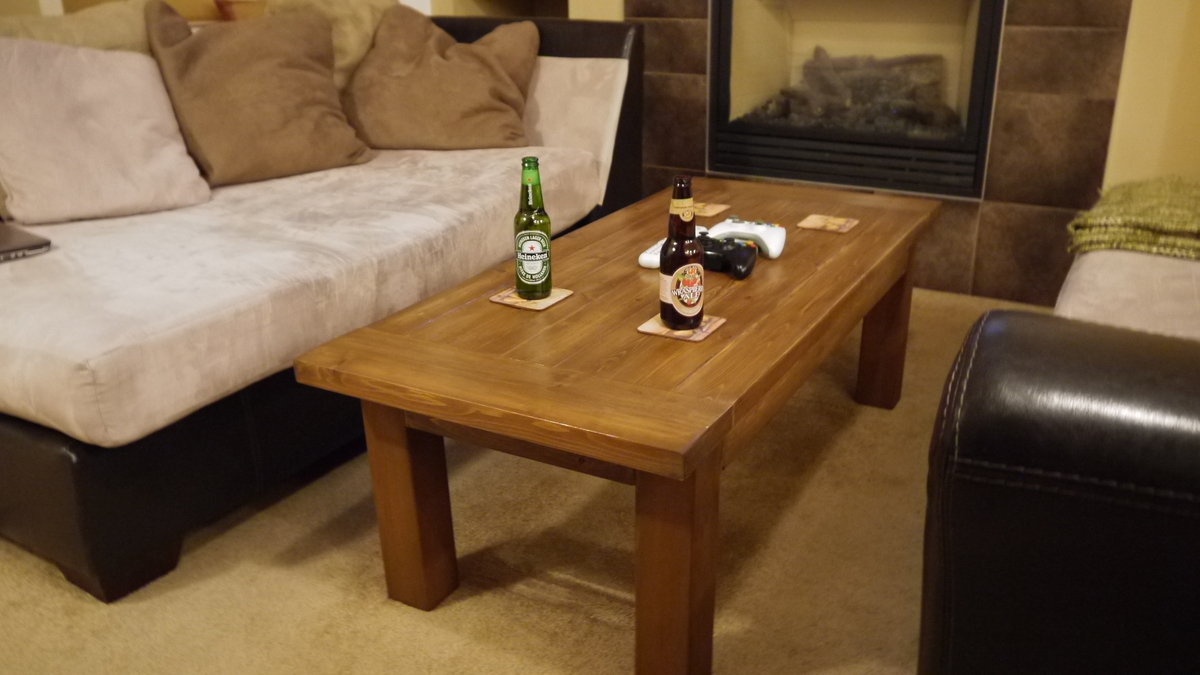
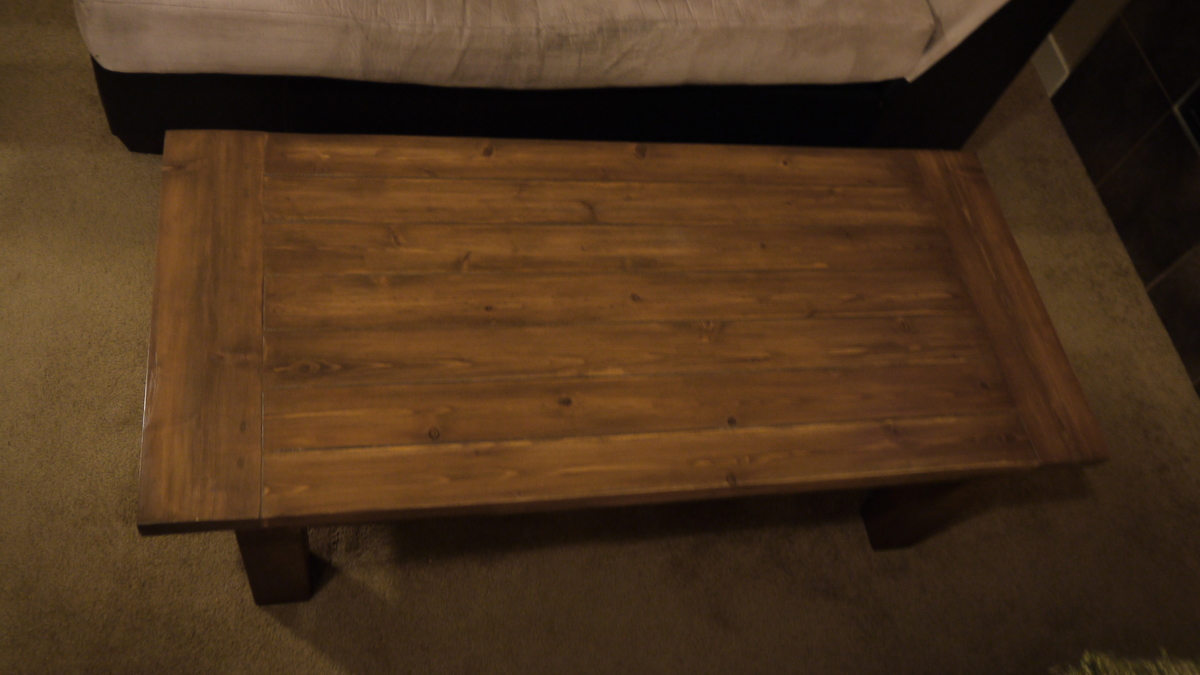
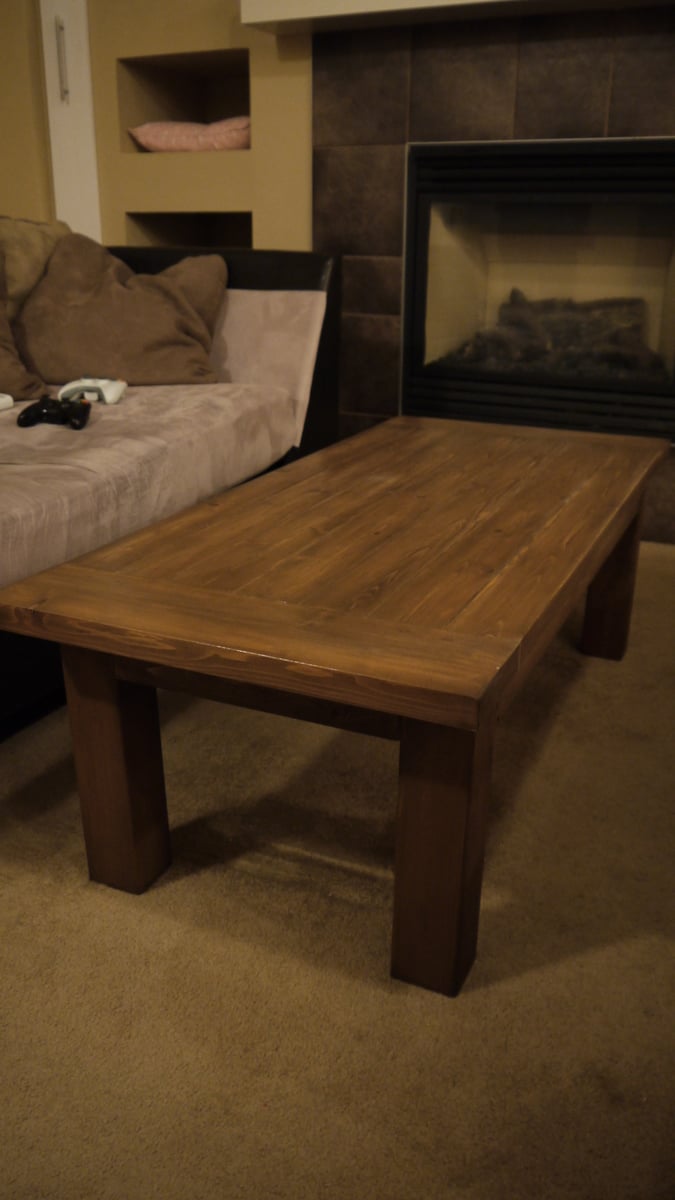
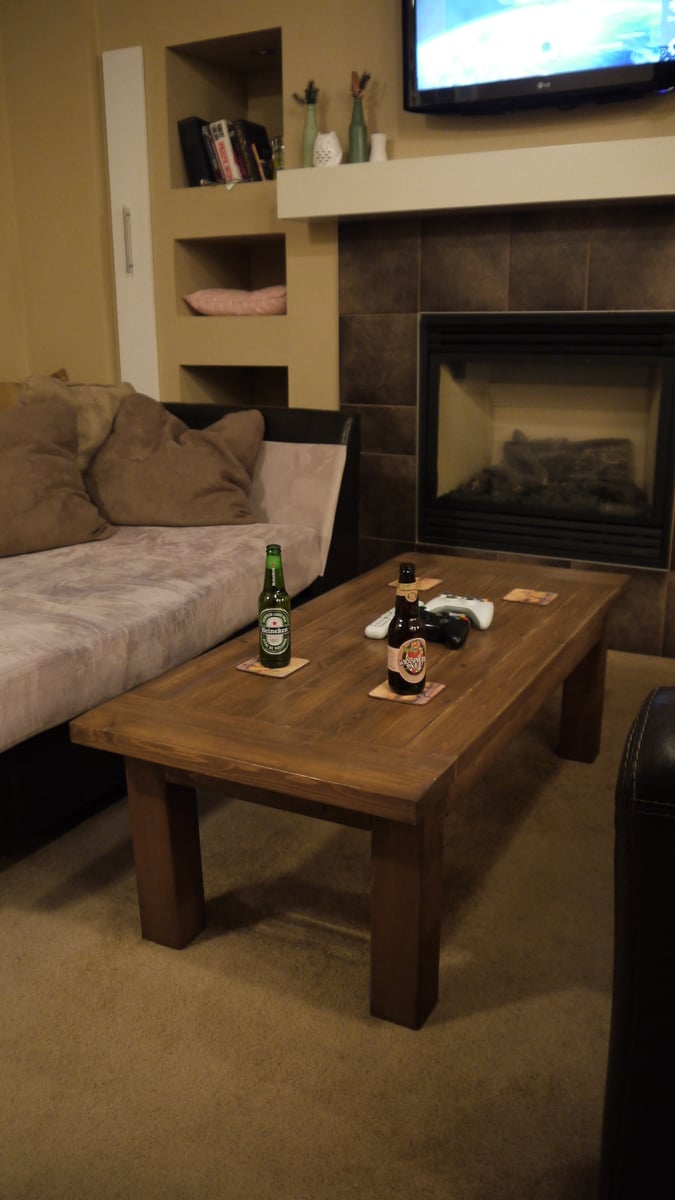
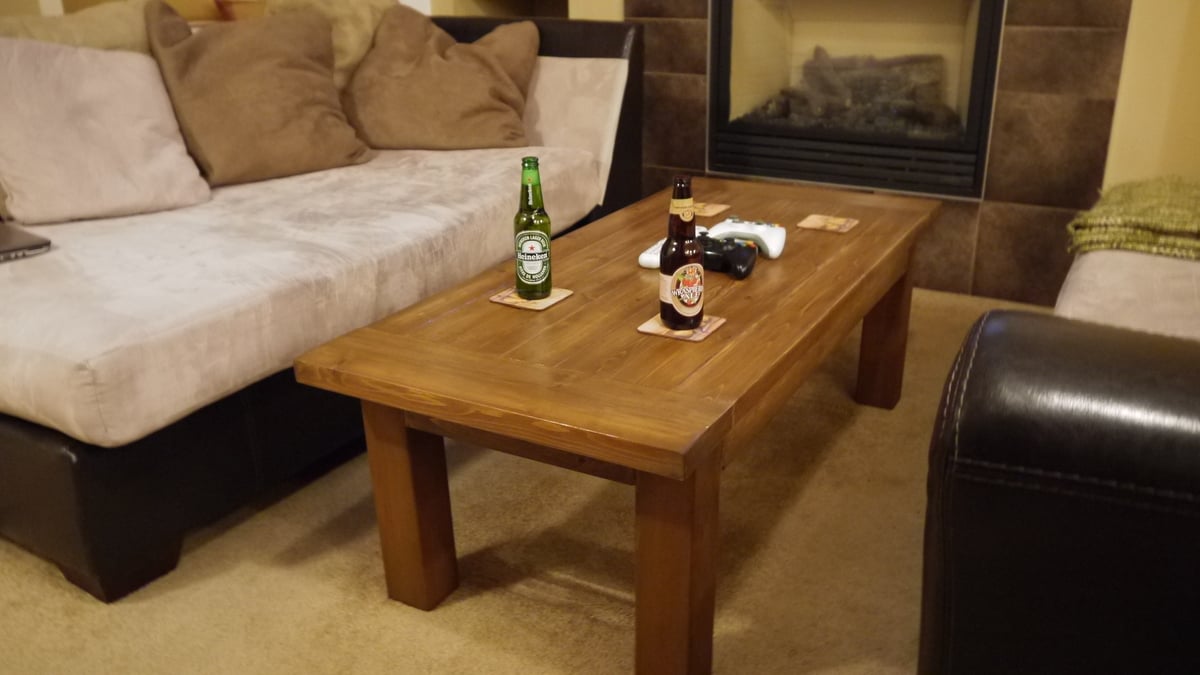
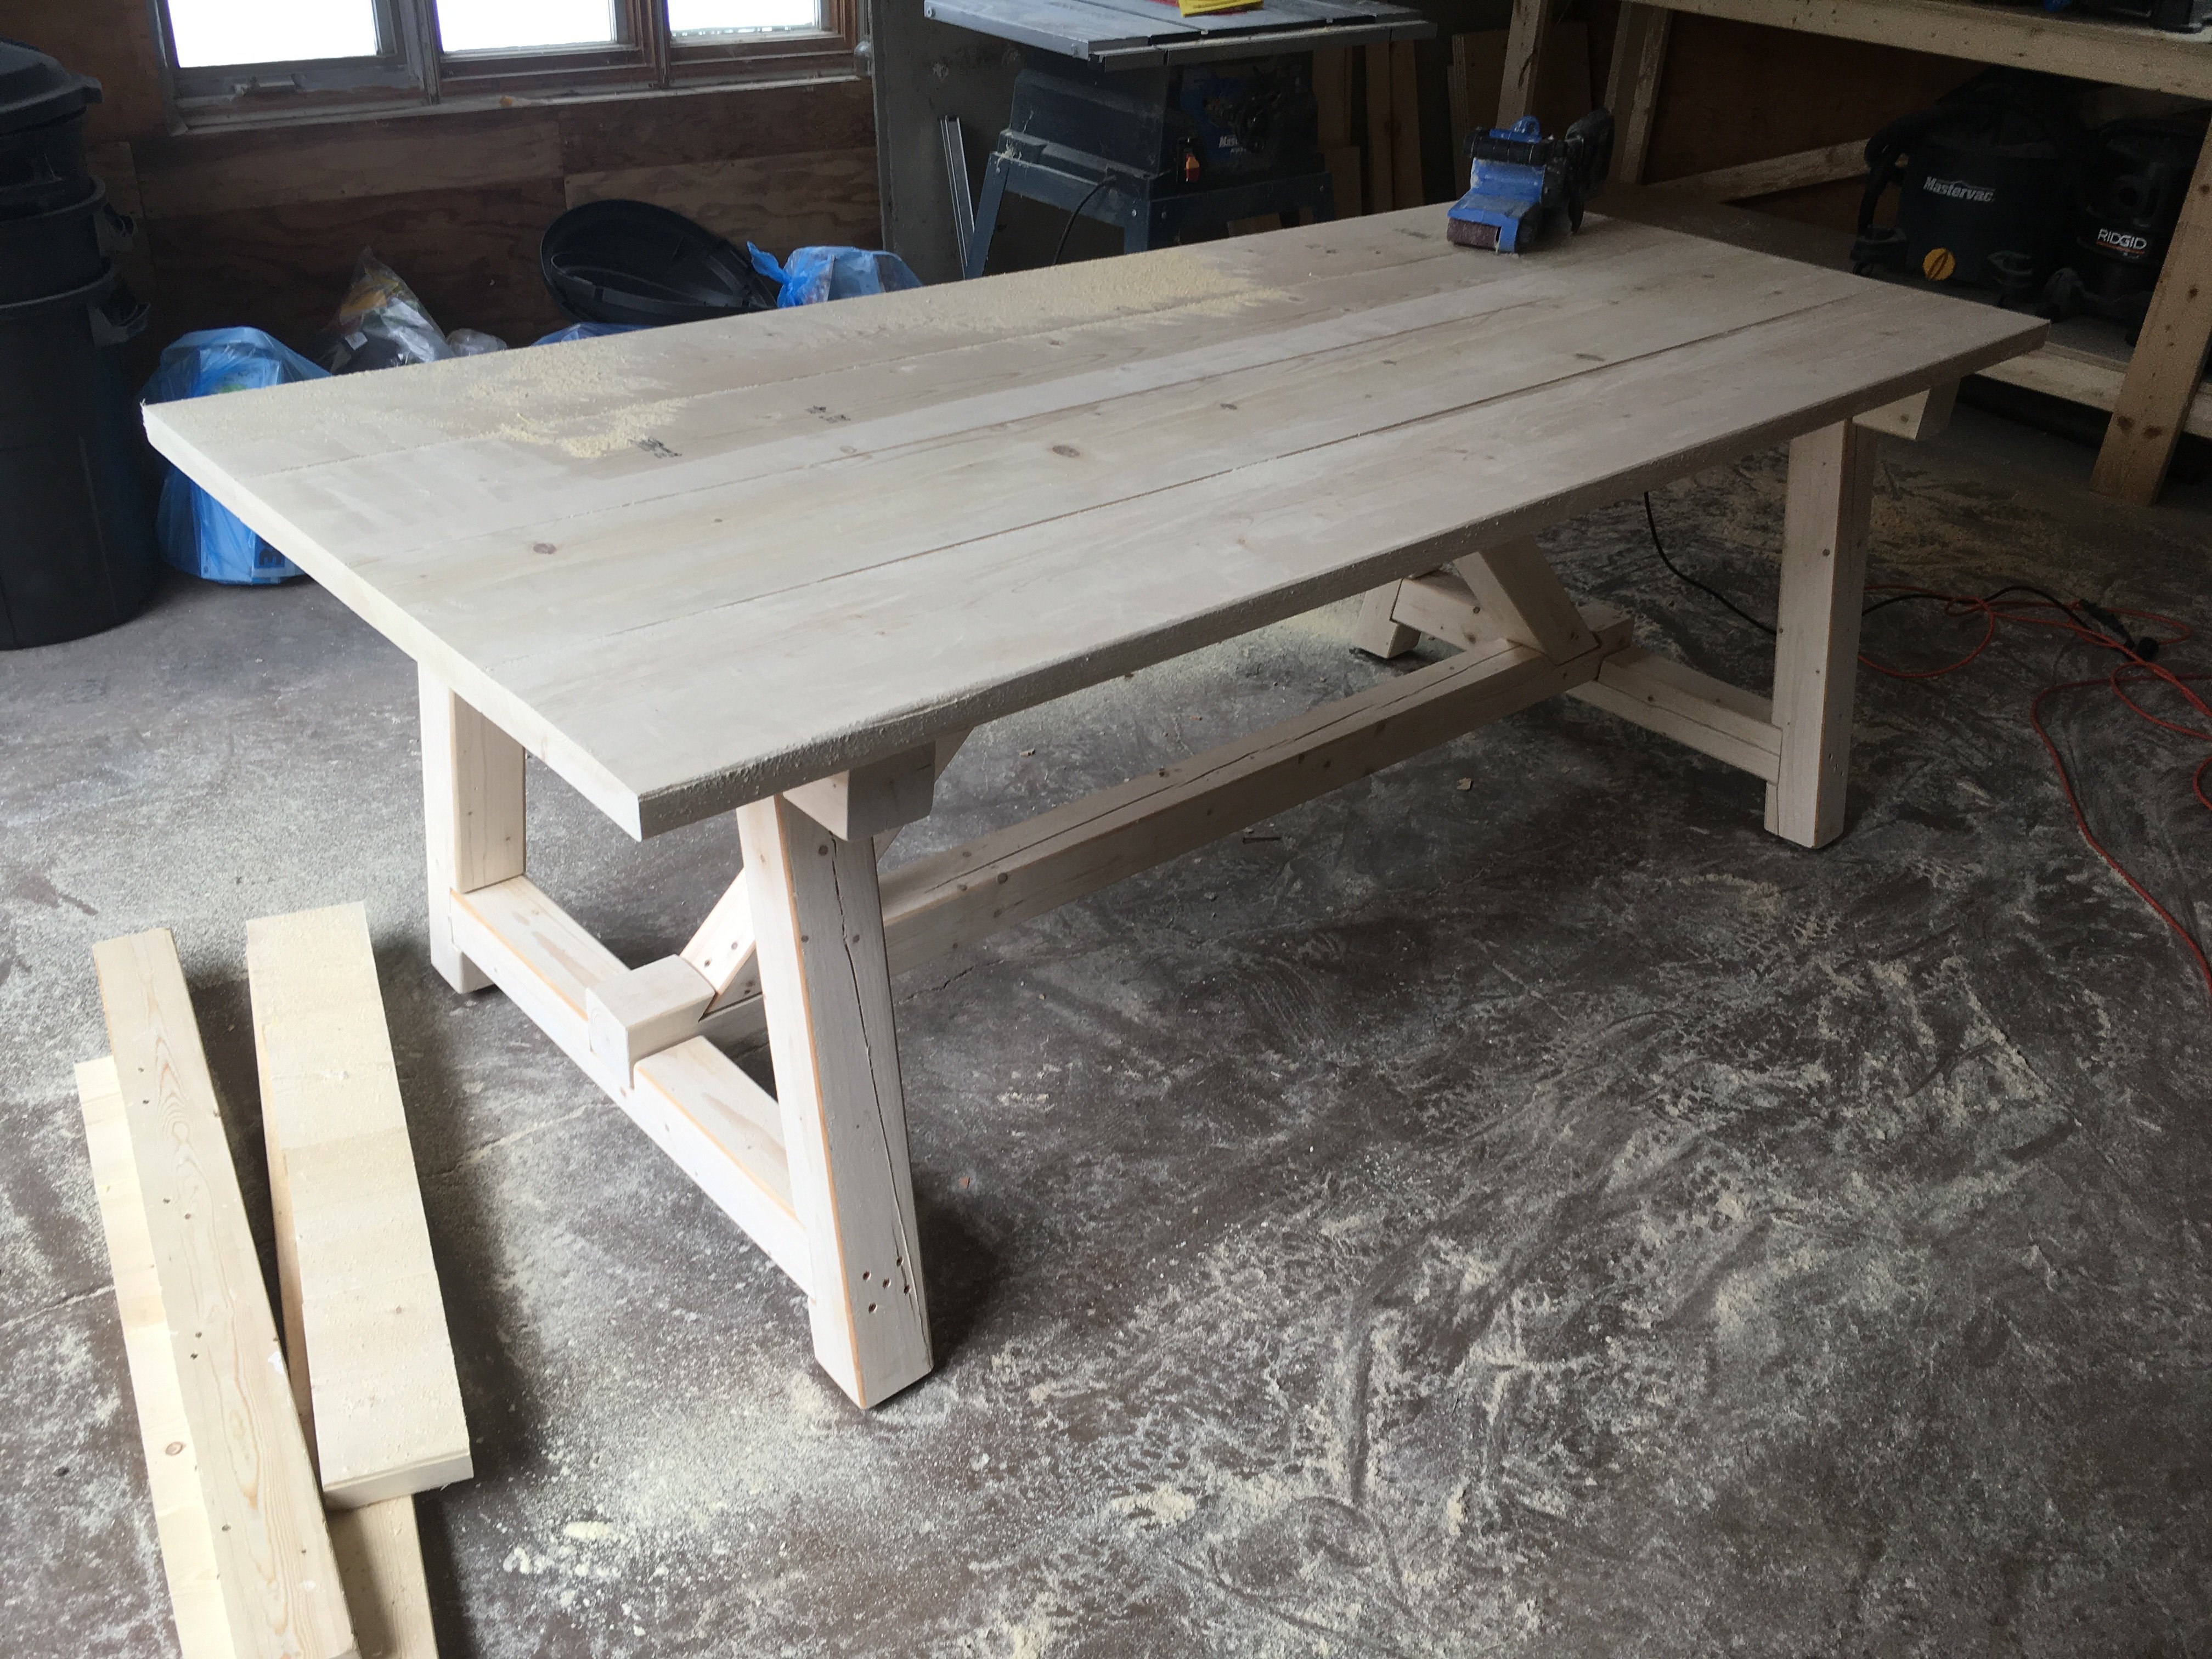
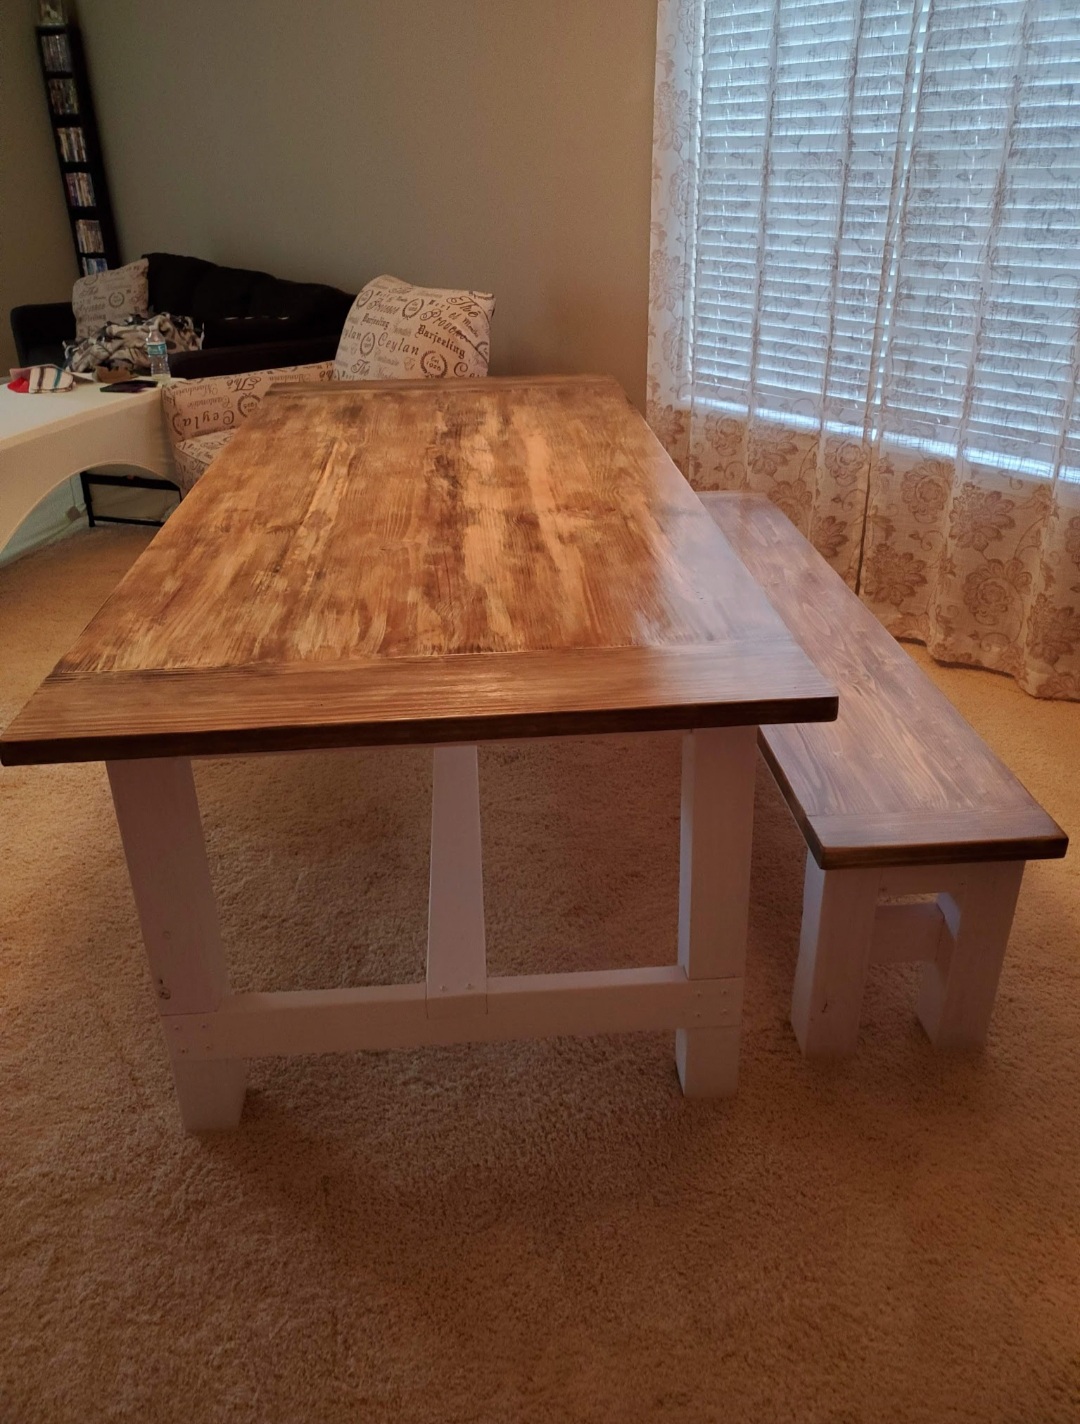
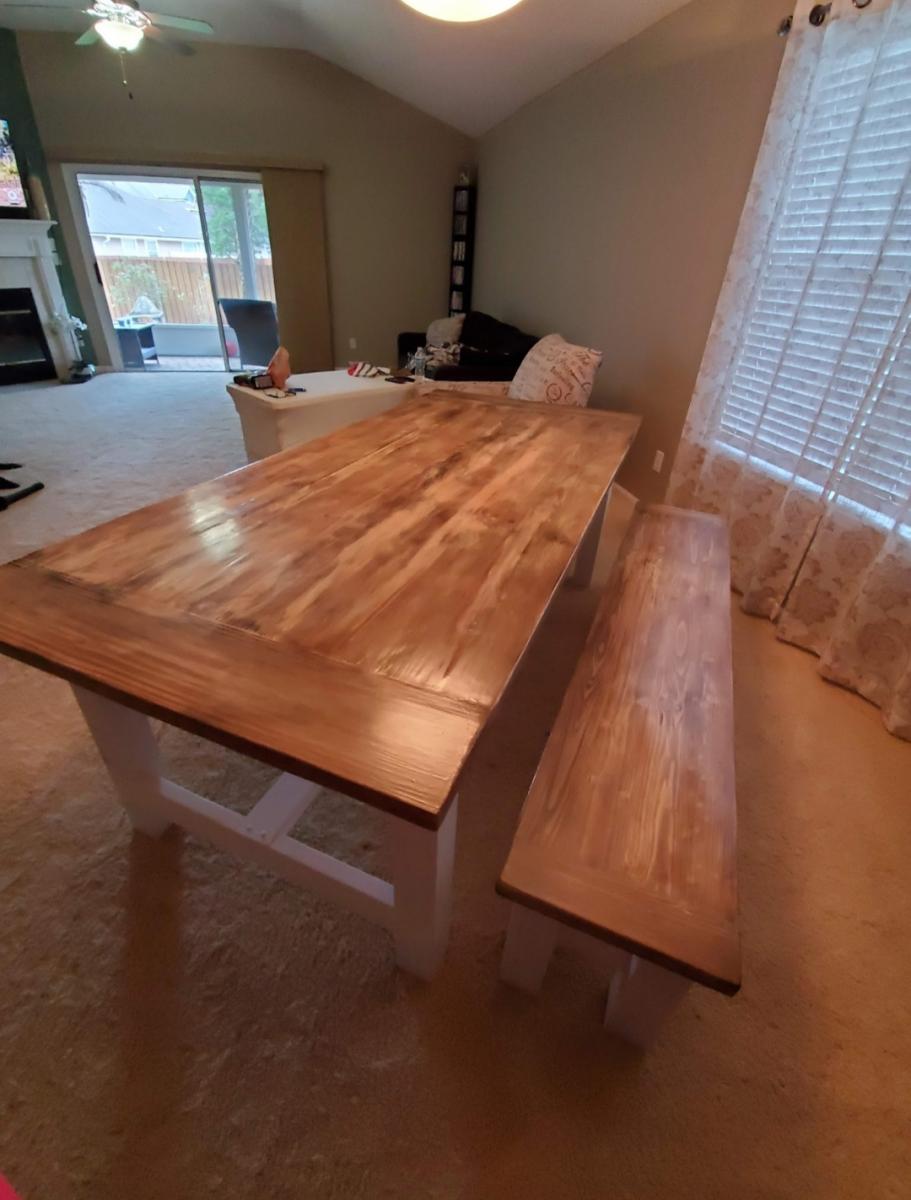
Providence Table & Bench

We needed a new table for our growing family but didn't want to spend a fortune.
Found this website, explored some plans & fell in love with the Providence table & bench.
It is great!!
We used the Rustoleum stain in Kona as well & did 3 coats of polyurethane. Unfortunately, the table is VERY rough to the touch. And I can see it becoming a problem. We can't wipe it with a damp paper towel as the roughness shreds the paper towel. Any help here would be greatly appreciated!!!
We think sawdust & debris settled on the table when we stained & sealed with the polyurethane. We did not sand in between polyurethane coats either.
If there's an easy fix (or do over) here, please let us know!
Otherwise, it is such a great piece & has already received many compliments!
We'll be sure to refer to Ana White's site!
Thanks so much!!
Built from Plan(s)
Estimated Cost
$160
Estimated Time Investment
Day Project (6-9 Hours)
Finish Used
Rustoleum in Kona
Recommended Skill Level
Intermediate
Comments
Sat, 02/16/2013 - 15:02
from what I understand, the
from what I understand, the water in the polyurethane raises the wood, so it needs to be sanded after the first coat (at minimum). I'd sand it down, if I were you. Maybe with a high-grit paper, so you don't damage the stain. Then coat, sand again, and coat.
Sun, 02/17/2013 - 16:18
I have had problems with
I have had problems with polyurethane all my own fault mind ya. I do not know how smooth of a surface you had after the stain, but if the surface is now so rough that it rips up paper towels. I would venture to say it started there. Also the coats of polyurethane are so thin it would be very hard to just sand down to the stain without scaring the stain finish. I would try either 0000 steel wool or 220 grit sand paper and do it by hand not sander. The picture I see shows it to be a dark stain so if you do scare it you might be able to touch it up, but my experience with that is just bite the bullet and sand down to bare wood and start over. If you do have to do it over I use 0000 steel wool lightly after I stain and wipe it down good and do your thin coats of poly ( with steel wool between coats ) until you reach the look you are wanting

Mon, 02/18/2013 - 11:22
I learned my lesson about
I learned my lesson about sanding between coats of poly the hard way too! I was able to smooth out the surface of my desk by sanding it lightly with the finest grit sandpaper. If that doesn't smooth it out enough then you are going to have to sand it down further and re-do the poly.
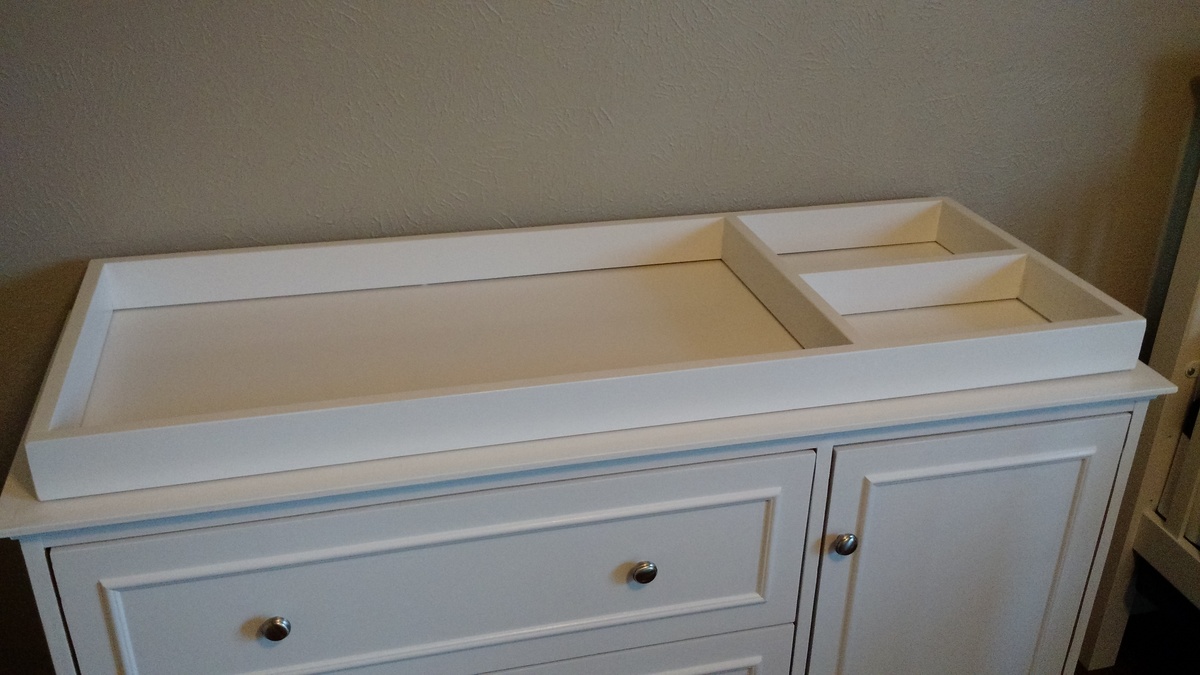
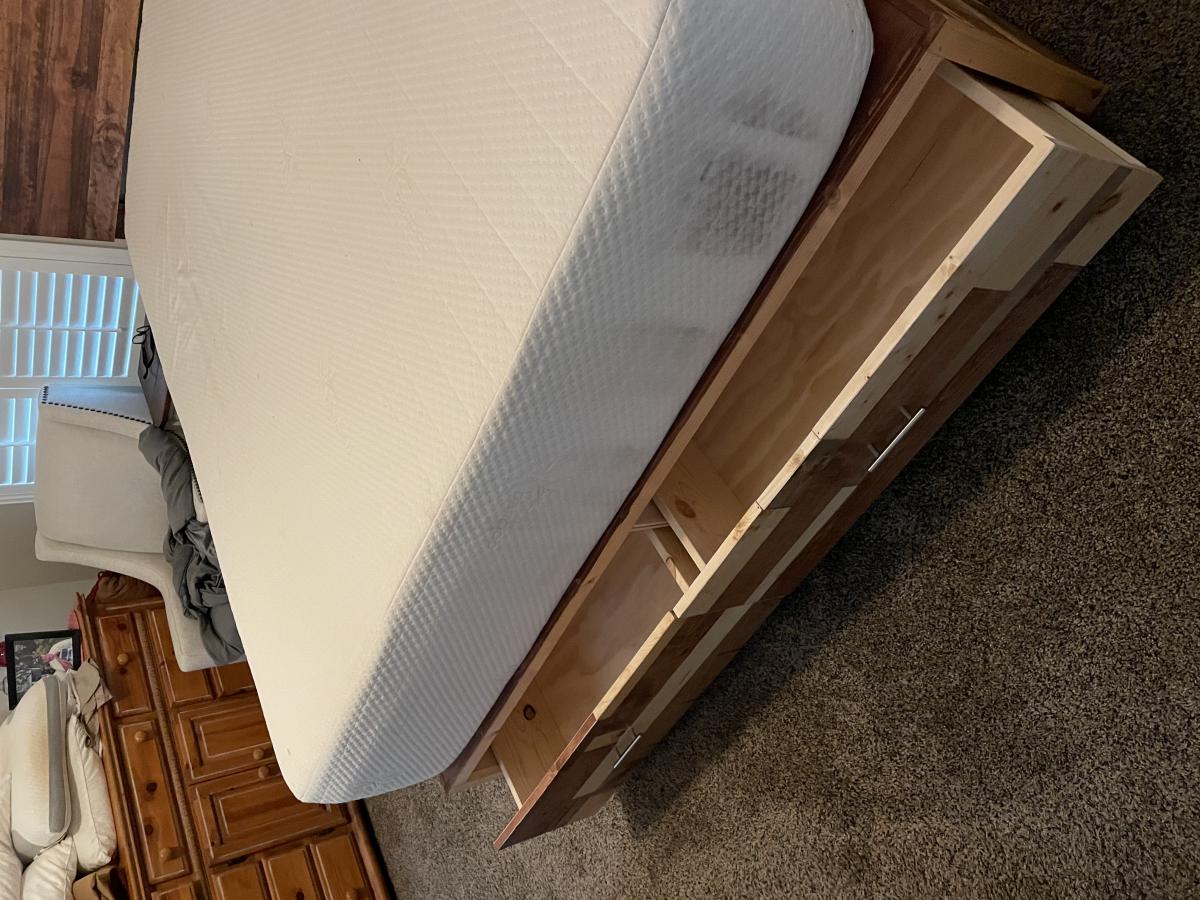
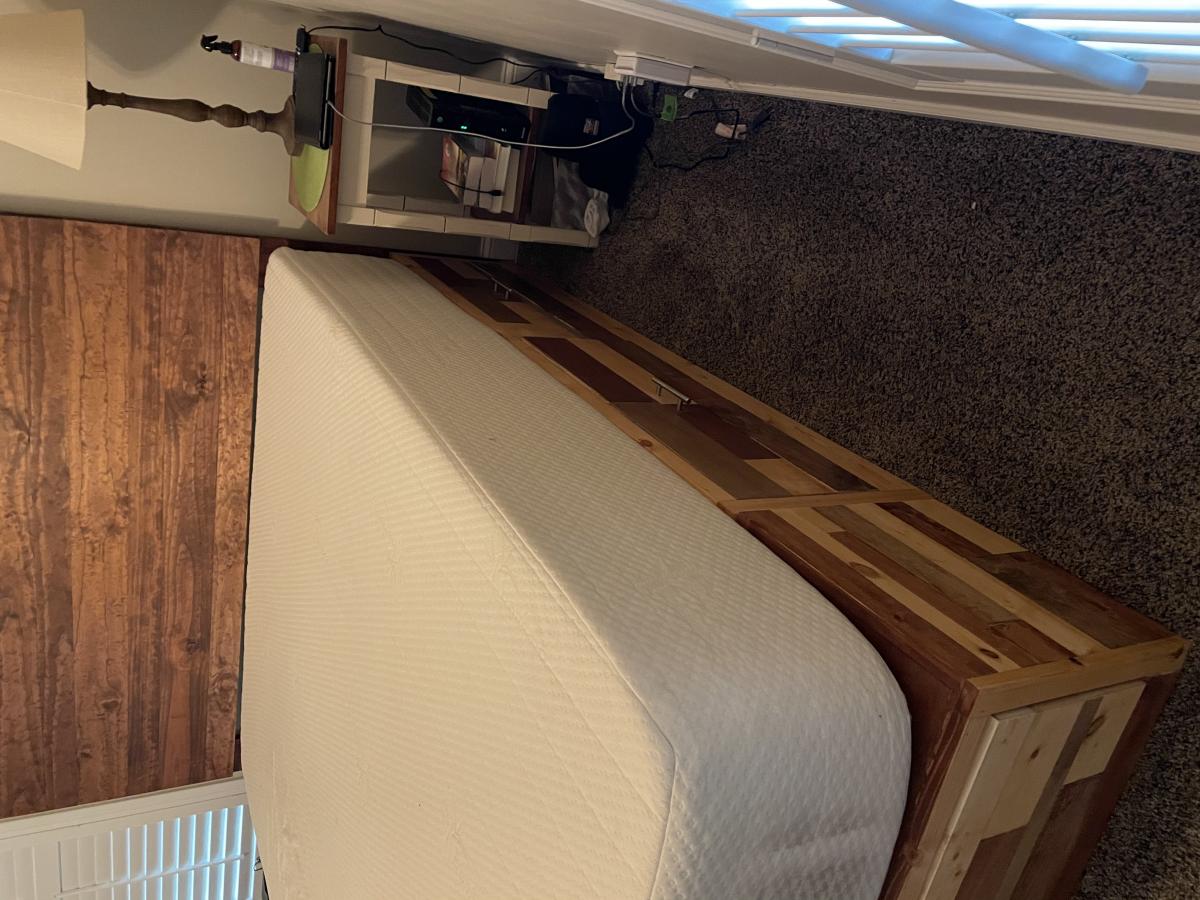
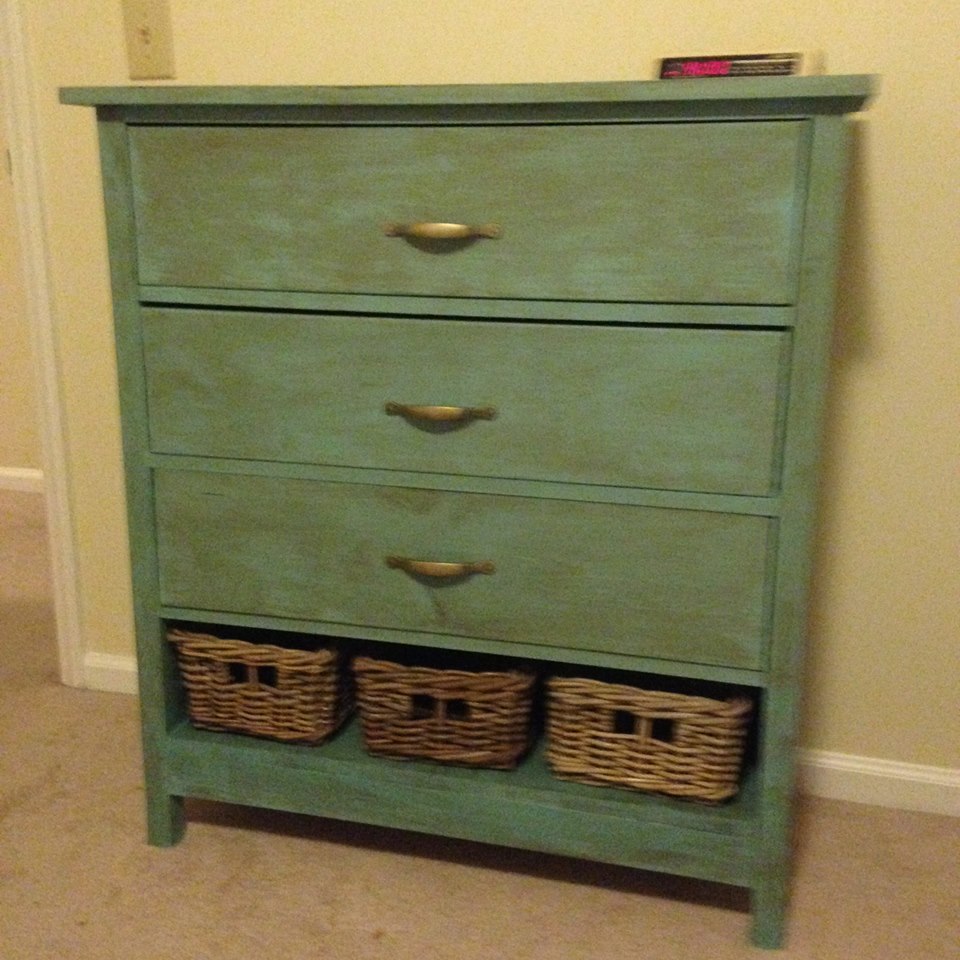
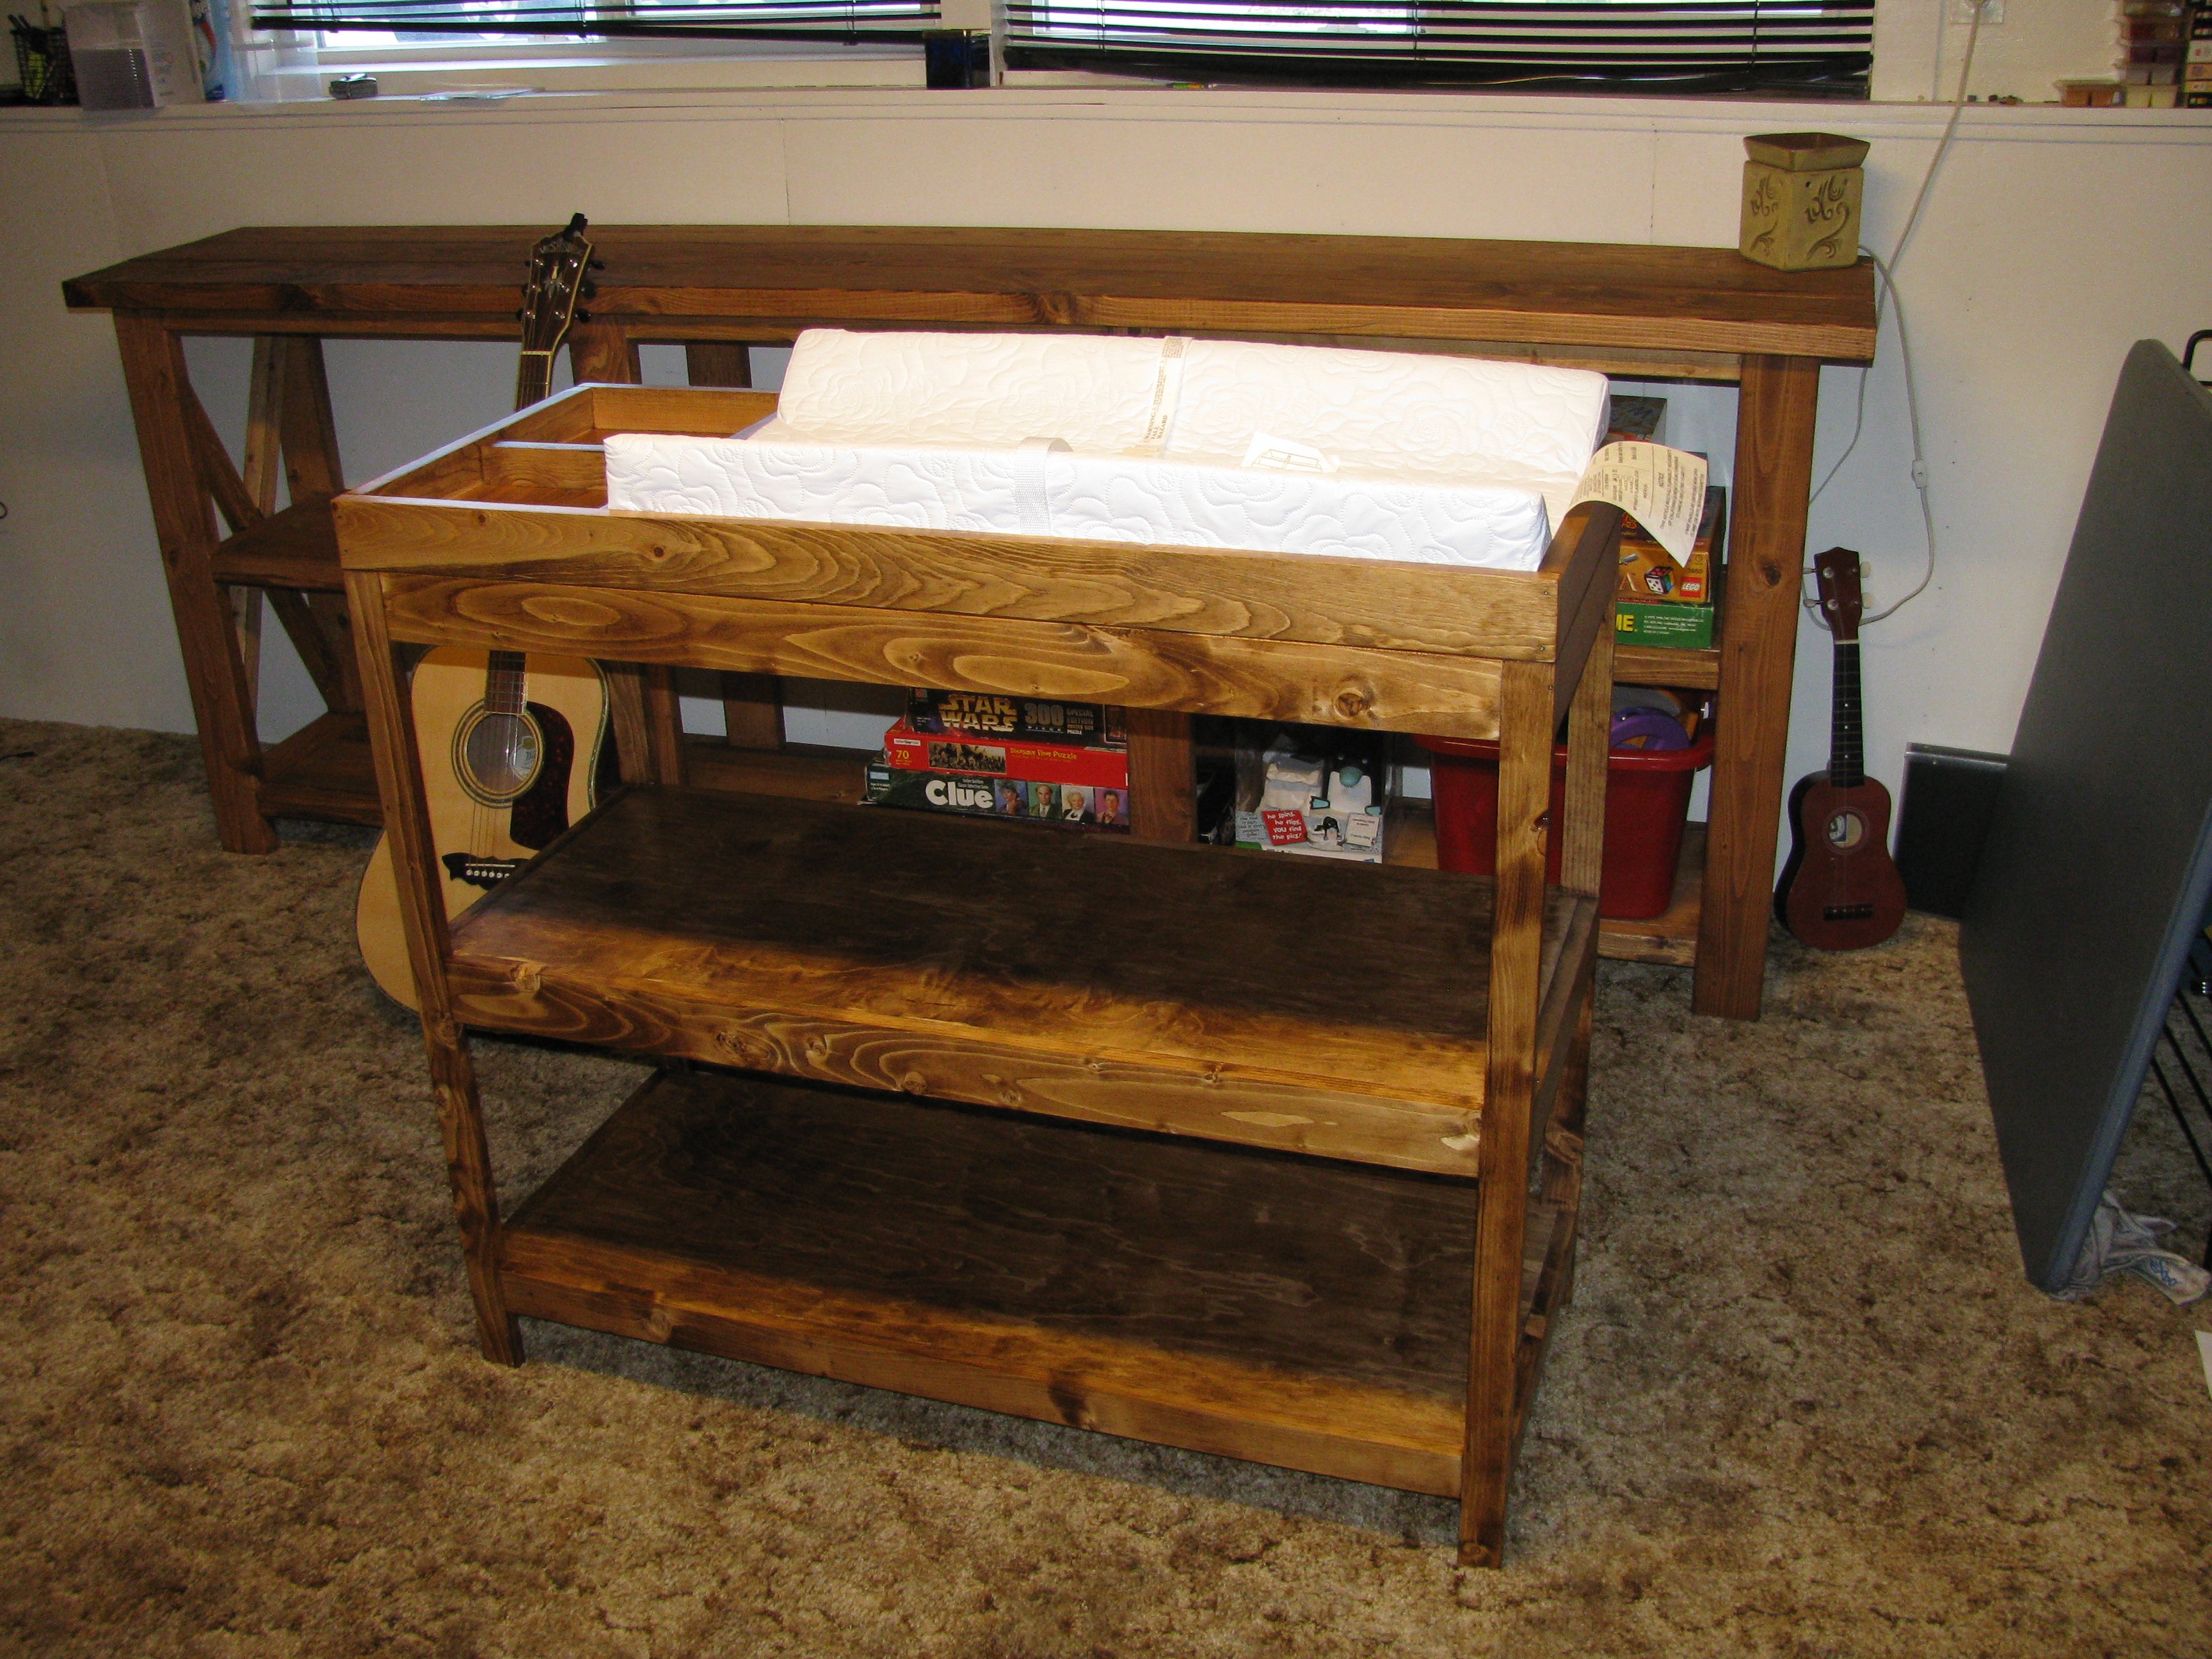
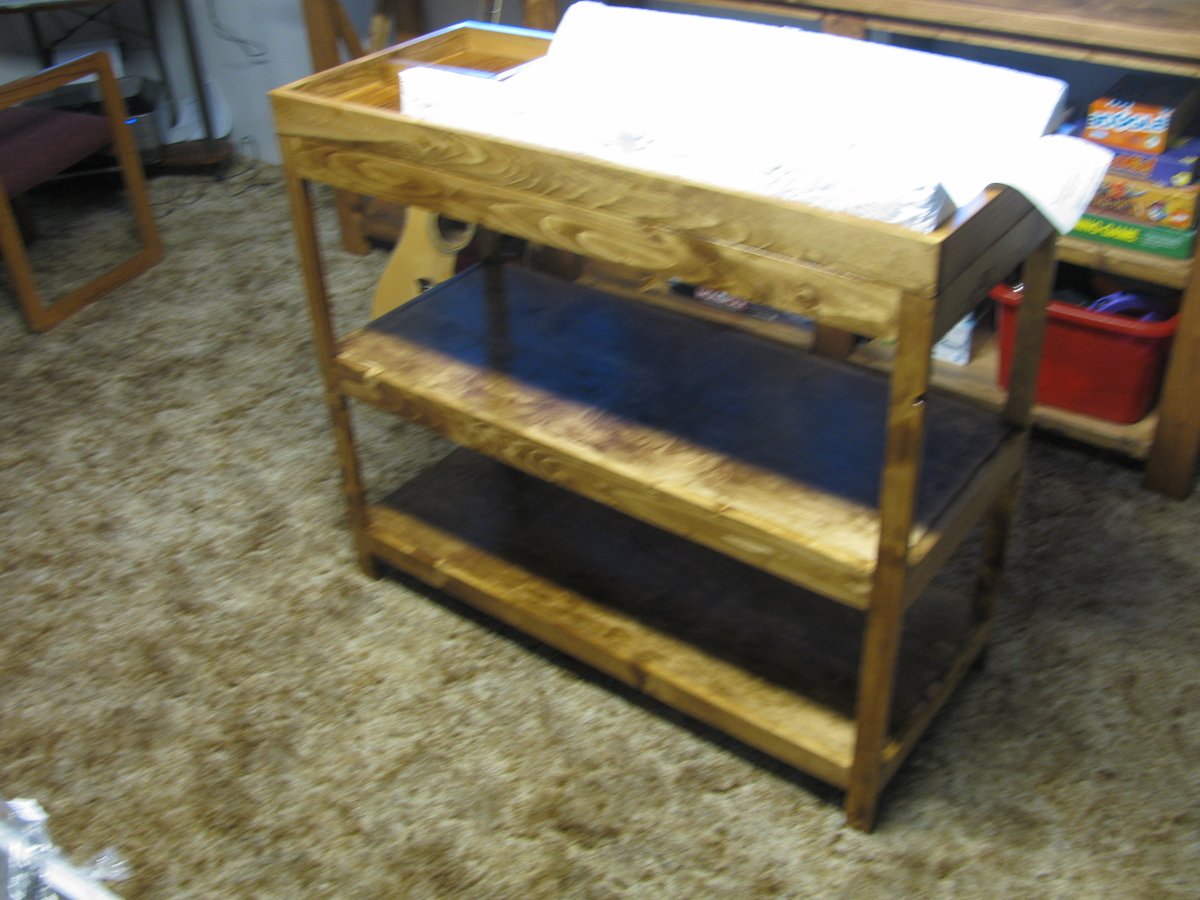
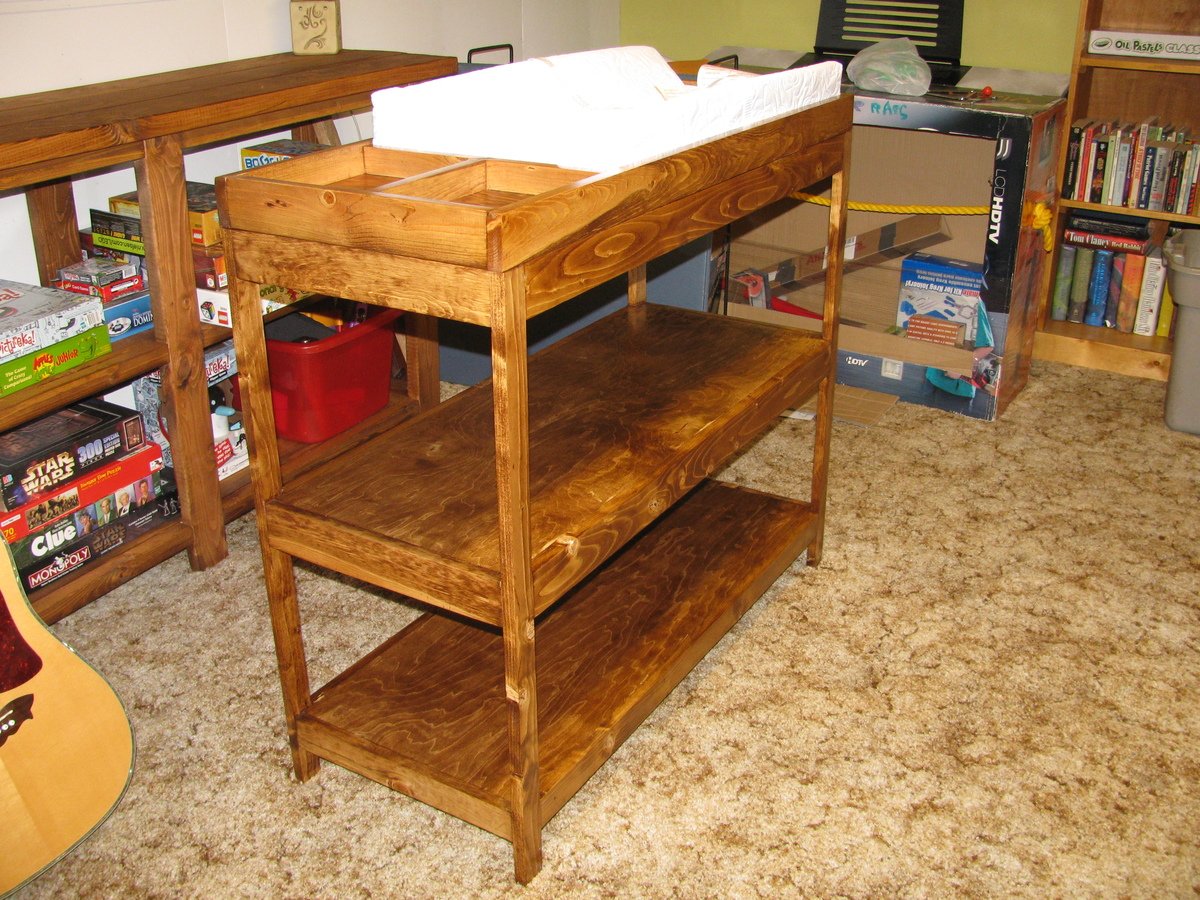
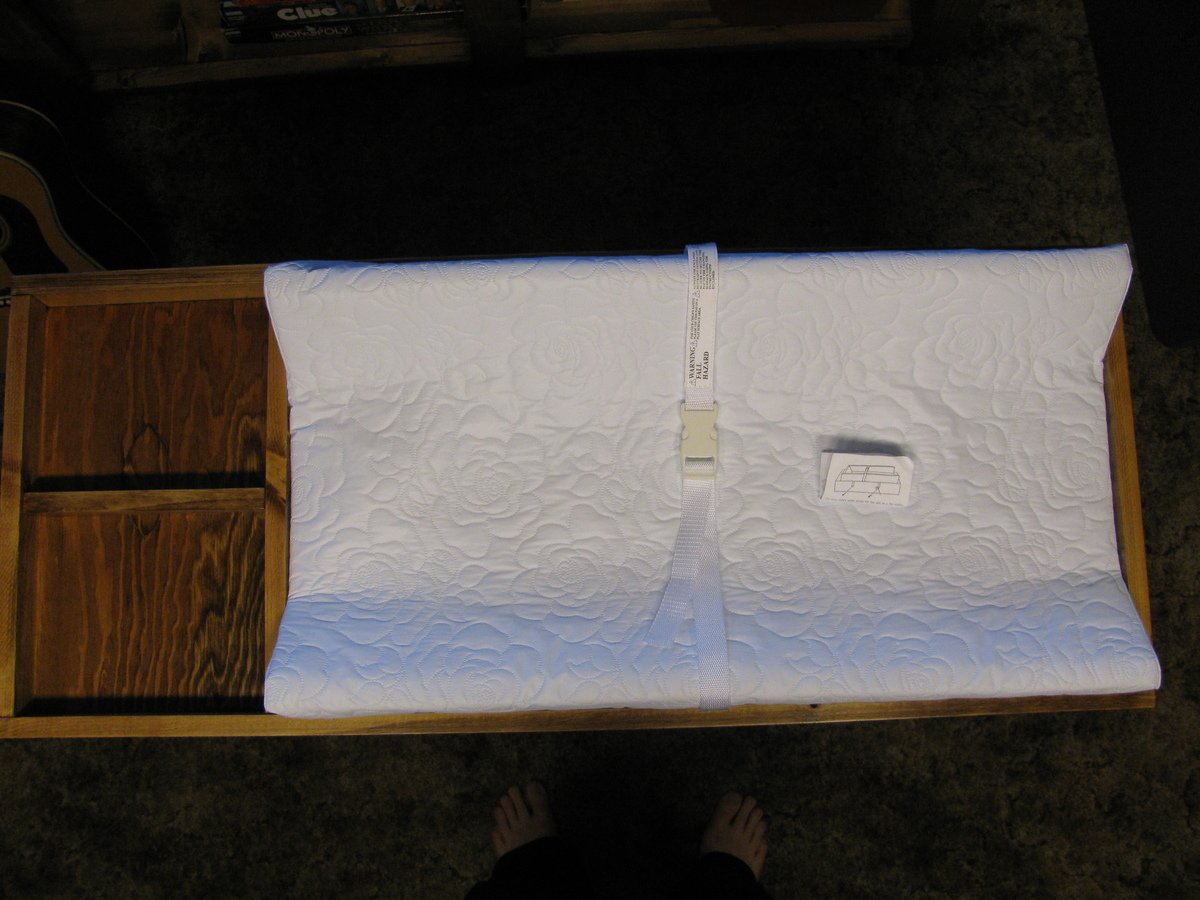
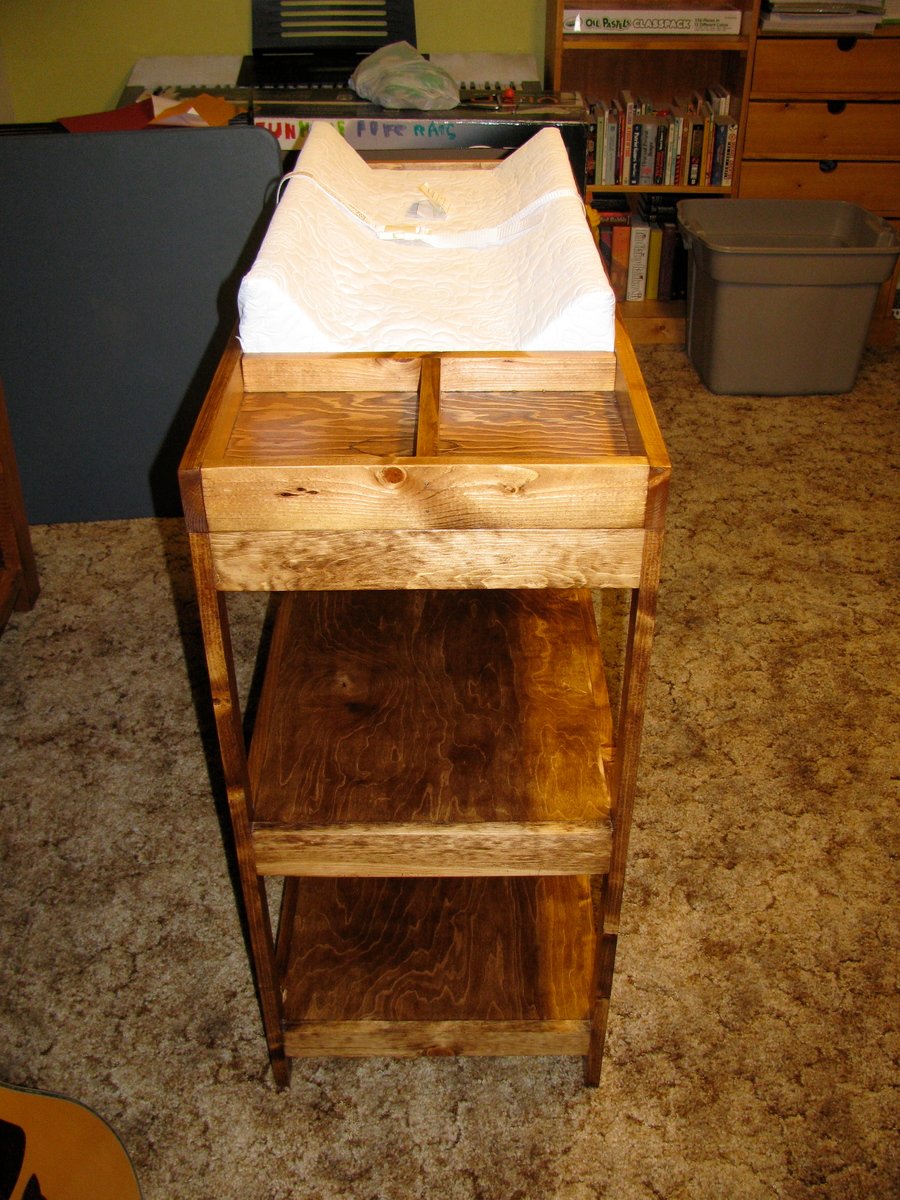
Changing Table / Dresser
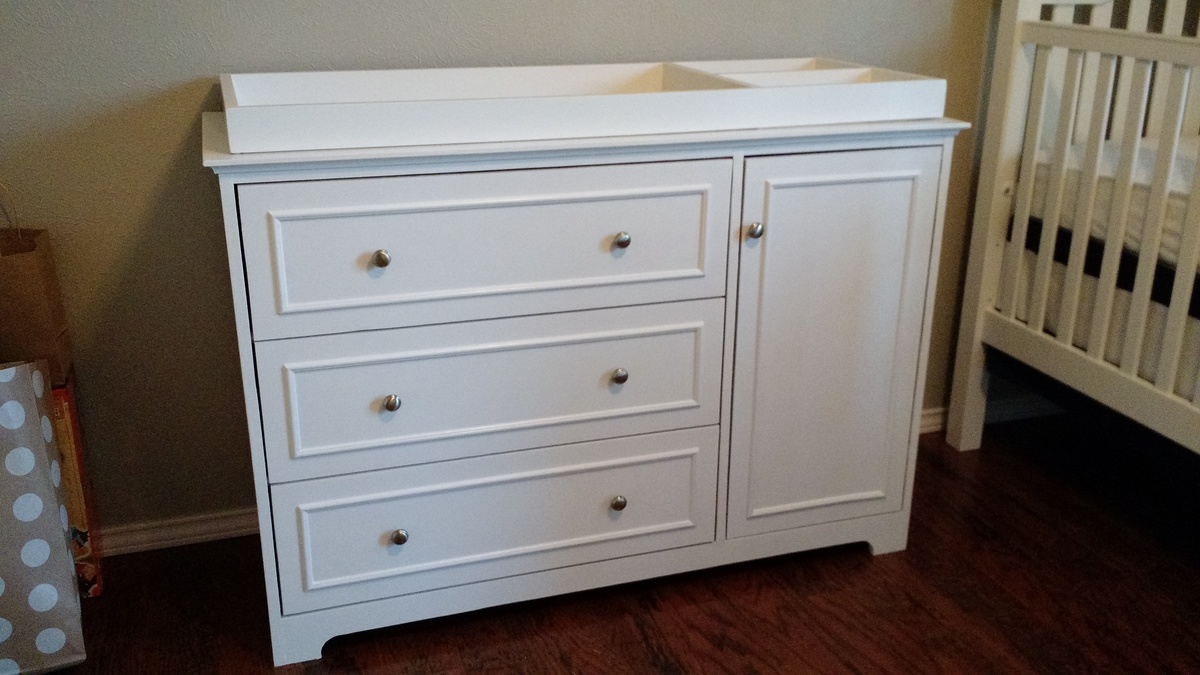
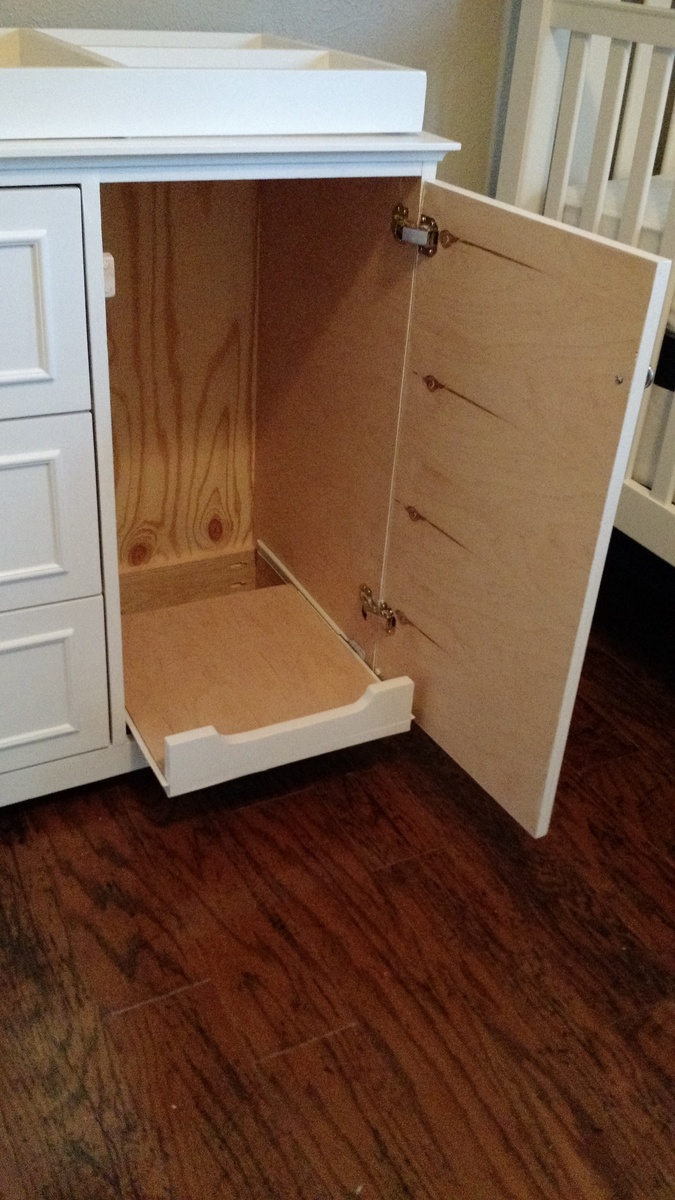
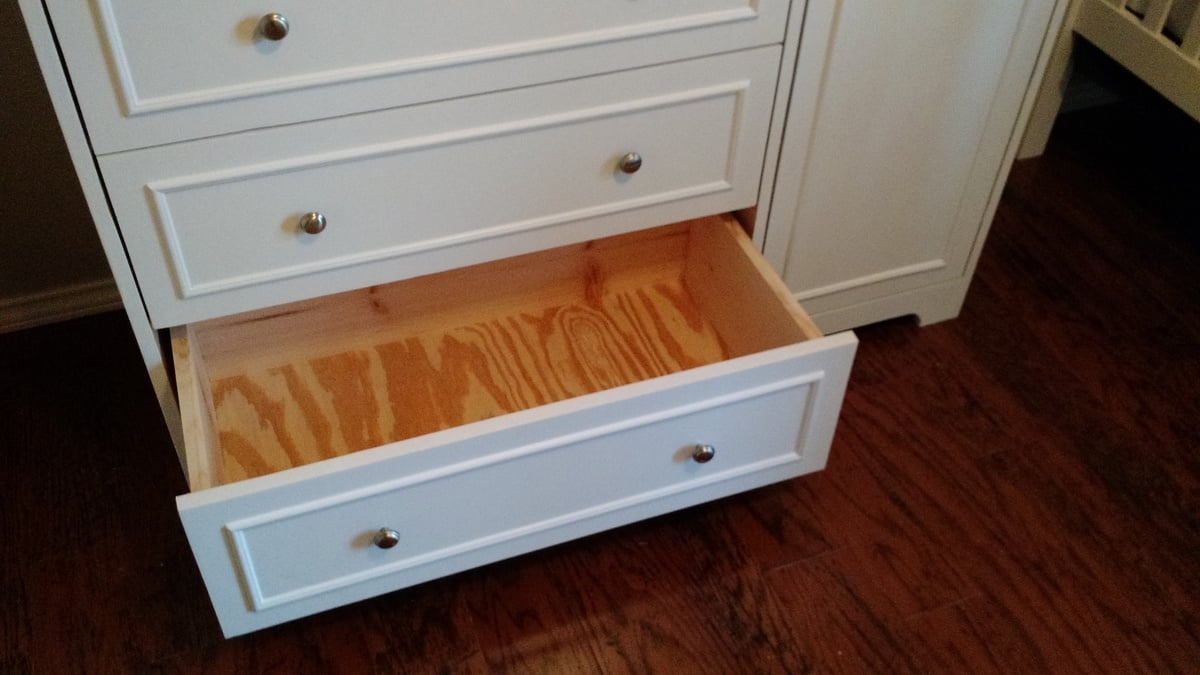
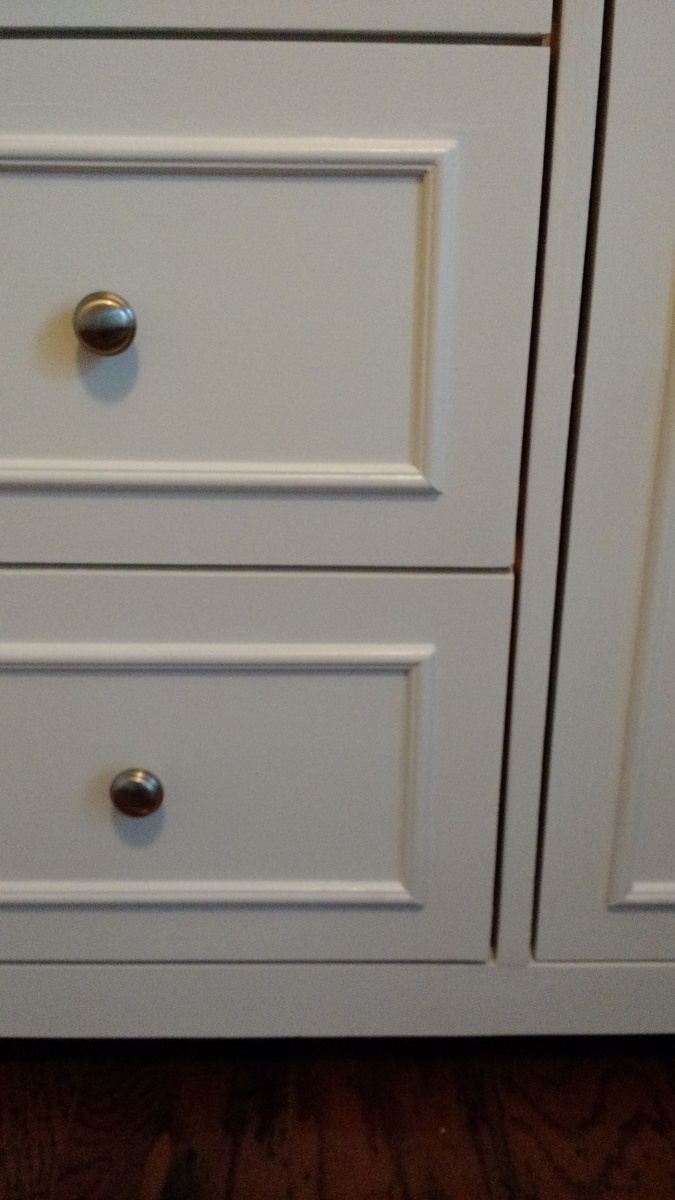
I wanted to build a dresser & changing table combination for our son, who is due in January. I liked the Fillman (Pottery Barn's Fillmore) dresser plan, but also wanted to incorporate some ideas from Pottery Barn's Larkin Hi-Lo Changing table ($1100 - yikes!), namely the side cabinet, so I made a few modifications.
The side cabinet has a pullout shelf to accomodate a diaper pail or hamper. The changing table topper is removable so that this can continue to be used as a dresser when we no longer need the changing table.
I have built a few pieces from or inspired by Ana's site before, but none have been as rewarding as this!
Built from Plan(s)
Estimated Cost
$150
Estimated Time Investment
Weekend Project (10-20 Hours)
Finish Used
Sherwin Williams ProClassic Enamel (semi-gloss) in Snowbound.
Recommended Skill Level
Intermediate
Comments
Mon, 12/22/2014 - 10:26
Changing Table
Beautiful build. Your modifications make this table very versatile, and I noticed that your spacing all around the drawers and door is so even. This should become a family heirloom.

Mon, 02/17/2020 - 07:11
I love the modifications you…
I love the modifications you made. What are the dimensions for the cabinet you added?
Easy, cheap garage shelving
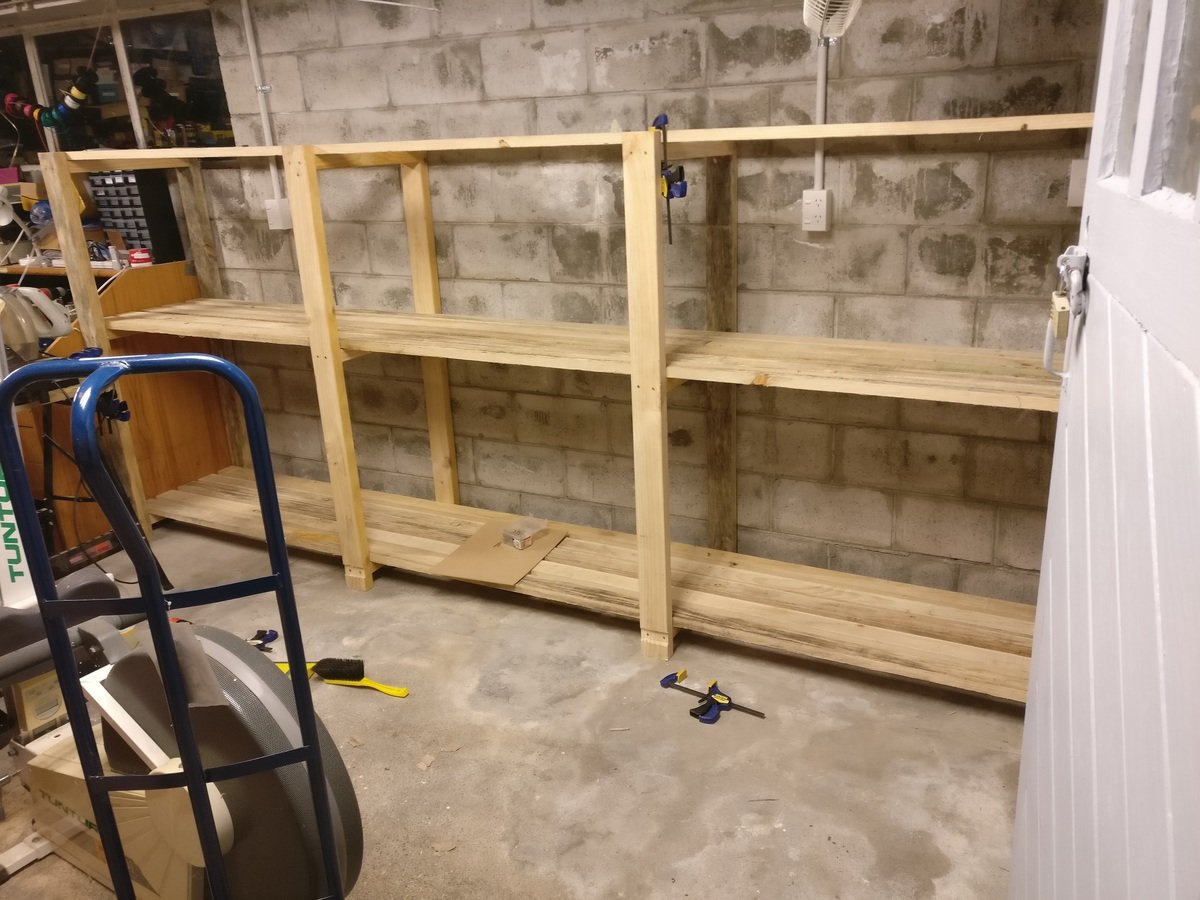
I used 1x3 box pine instead of 2x4's for the bits that things sit on, and everything fits perfectly.
Originally I was planning on a 3.6m long x 0.6m deep X 1.8m high shelf. At the lumberyard I found out that 2x4's came in 6m lengths as standard, so I adjusted this to 1.5m high instead, which worked out fine as I think 1.8m would have been a bit tall to get heavy things on top of. Luckily for me my power points and light switches were just under this, which I didn't think about at the time!
Originally I was going to try and cut grooves for the 'rungs' of the ladder frames to slot into, hence the insets at the bottoms of the legs. I think that the glue-and-screw construction will be plenty strong enough, though.
This took me about 4 hours to put together, and cost about NZD$170 all up, which is about USD$120.
I've got the bug. Making things is awesome.
Built from Plan(s)
Estimated Cost
USD$120
Estimated Time Investment
Afternoon Project (3-6 Hours)
Recommended Skill Level
Beginner
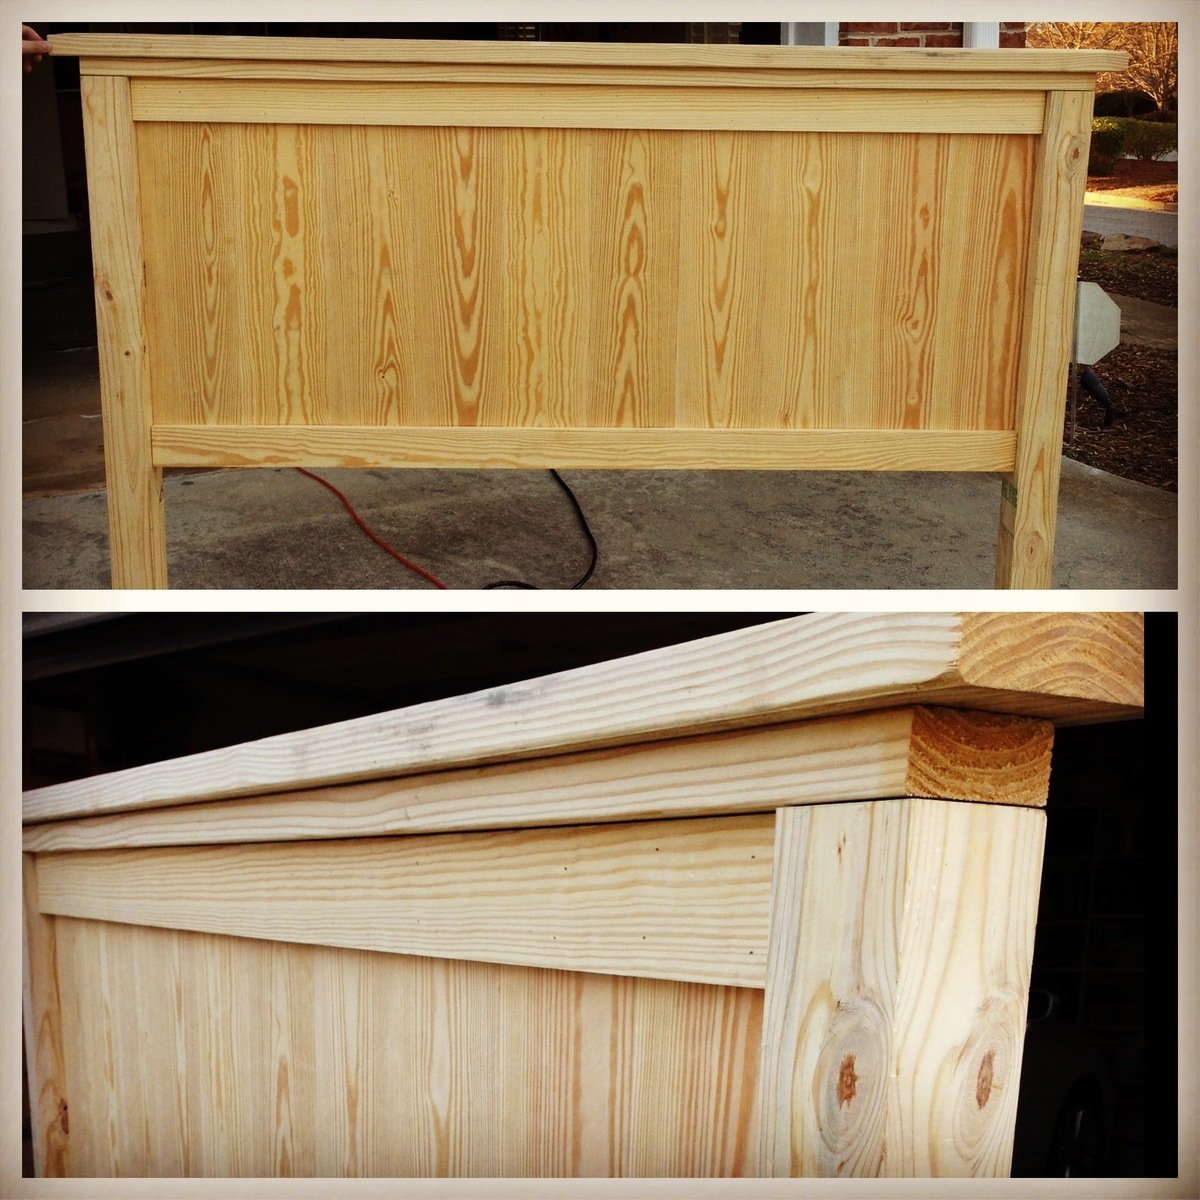
Cal King Scrap Wood Bed Frame

My first project from Ana’s plans. Loved having the material and cut list available!! I adjusted my measurements to fit a Cal King just as Ana suggested.

Built from Plan(s)
Estimated Cost
$400
Estimated Time Investment
Week Long Project (20 Hours or More)
Recommended Skill Level
Intermediate
Comments
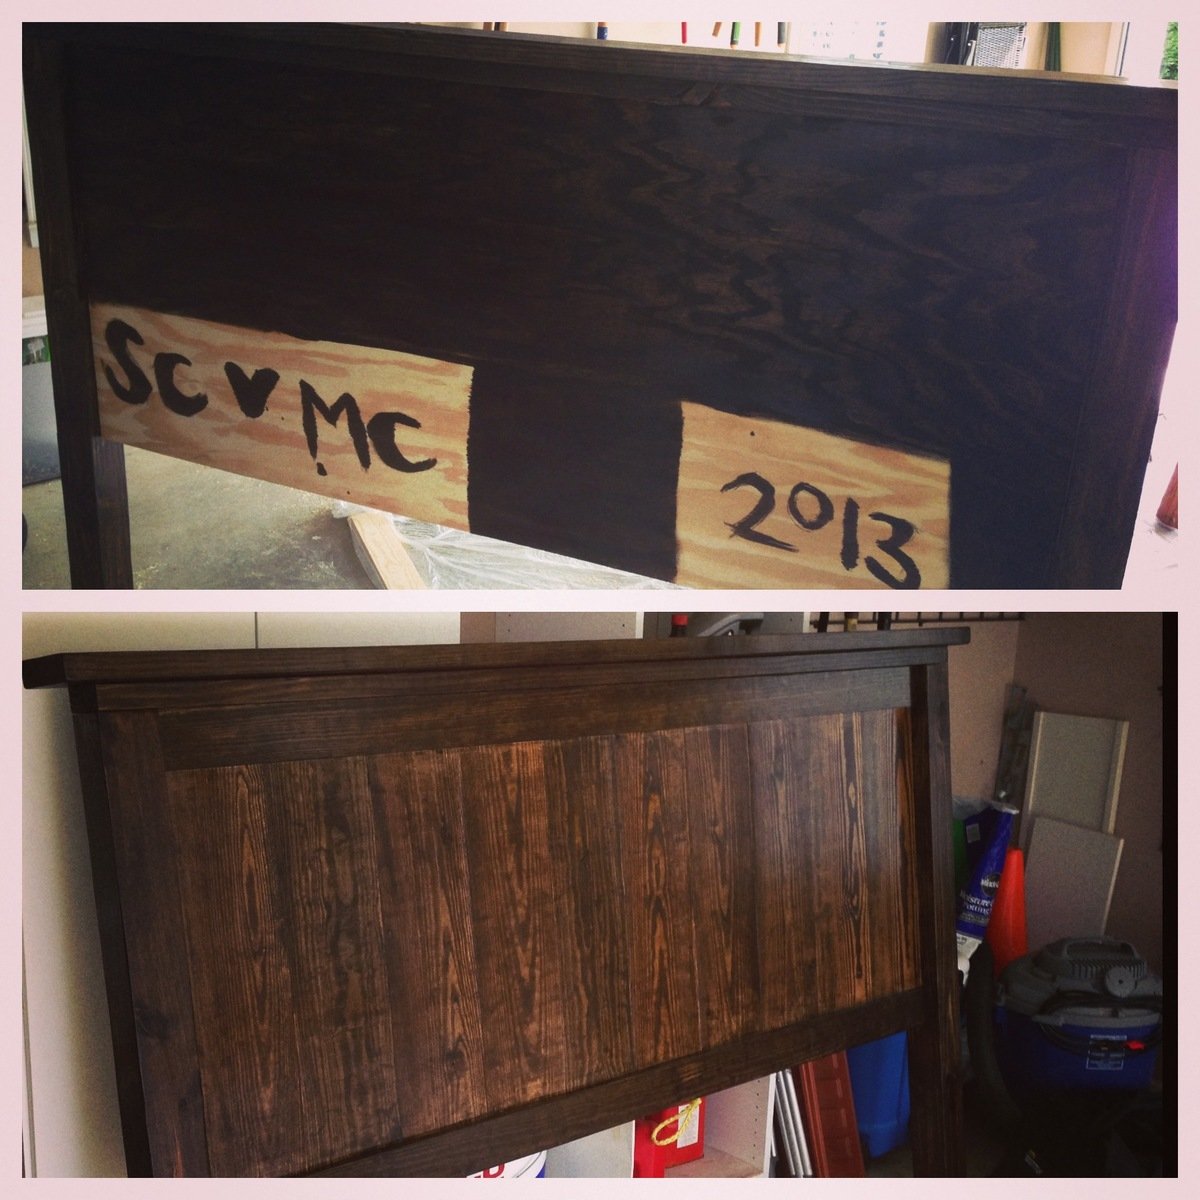
King Size Farm House Bed

We made this bed after making the farmhouse bedside tables. So now we have a whole new bedroom set for probably less than $600. We love how it all turned out, and the plans were so easy to follow. We built both projects from Ana's book and plan to build a lot more from it too!
**In the book the plans are for a queen size bed, we modified it to fit our King size**
We added a piece of plywood to the back of the headboard and footboard and stained them so that it would cover all the pocket holes. Also, we extended the very top piece of wood that is on both the head and foot boards so there was a two inch overhang instead of just one.
This bed is so sturdy! I think if a tornado ever blows through we could just hang onto the bed and we wouldn't go anywhere! The side rails also give it a nice finished look even though they just essentially cover the box spring and bed rails. The bed still sits on the metal frame that is bolted into the headboard.
Check out the bedside tables we made to go along with it!
http://ana-white.com/2013/02/farmhouse-bedside-tables-2-toned


Built from Plan(s)
Estimated Cost
$400
Estimated Time Investment
Weekend Project (10-20 Hours)
Finish Used
Minwax Dark Walnut- one coat that sat for about 20 minutes before being wiped down
Minwax Water Based Polycrylic- Clear gloss- 2 coats on top of the stain
Minwax Water Based Polycrylic- Clear gloss- 2 coats on top of the stain
Recommended Skill Level
Beginner
Comments
Mon, 09/14/2015 - 10:05
no dimensions?
is there a link that gives the dimensions? When I click on the print friendly or PDF version it doesn't have much on there
mega coop
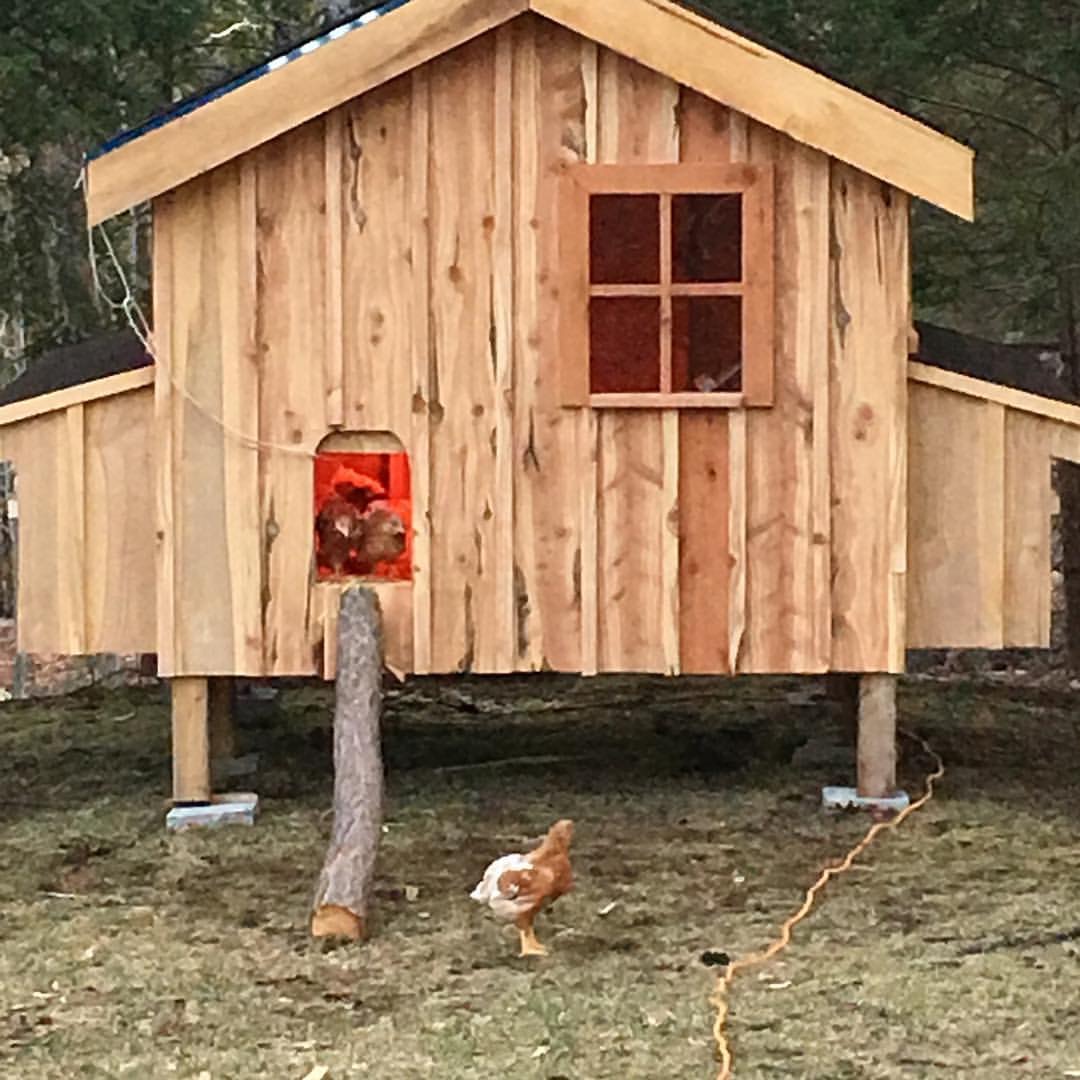
milled a bunch of cedar with the intention of building adirondack chairs, but we got chickens instead :)
Estimated Cost
$50 in hardware milled all the wood
Estimated Time Investment
Day Project (6-9 Hours)
Finish Used
just going to let it weather naturally
Recommended Skill Level
Intermediate
Frosty Garden Greenhouse
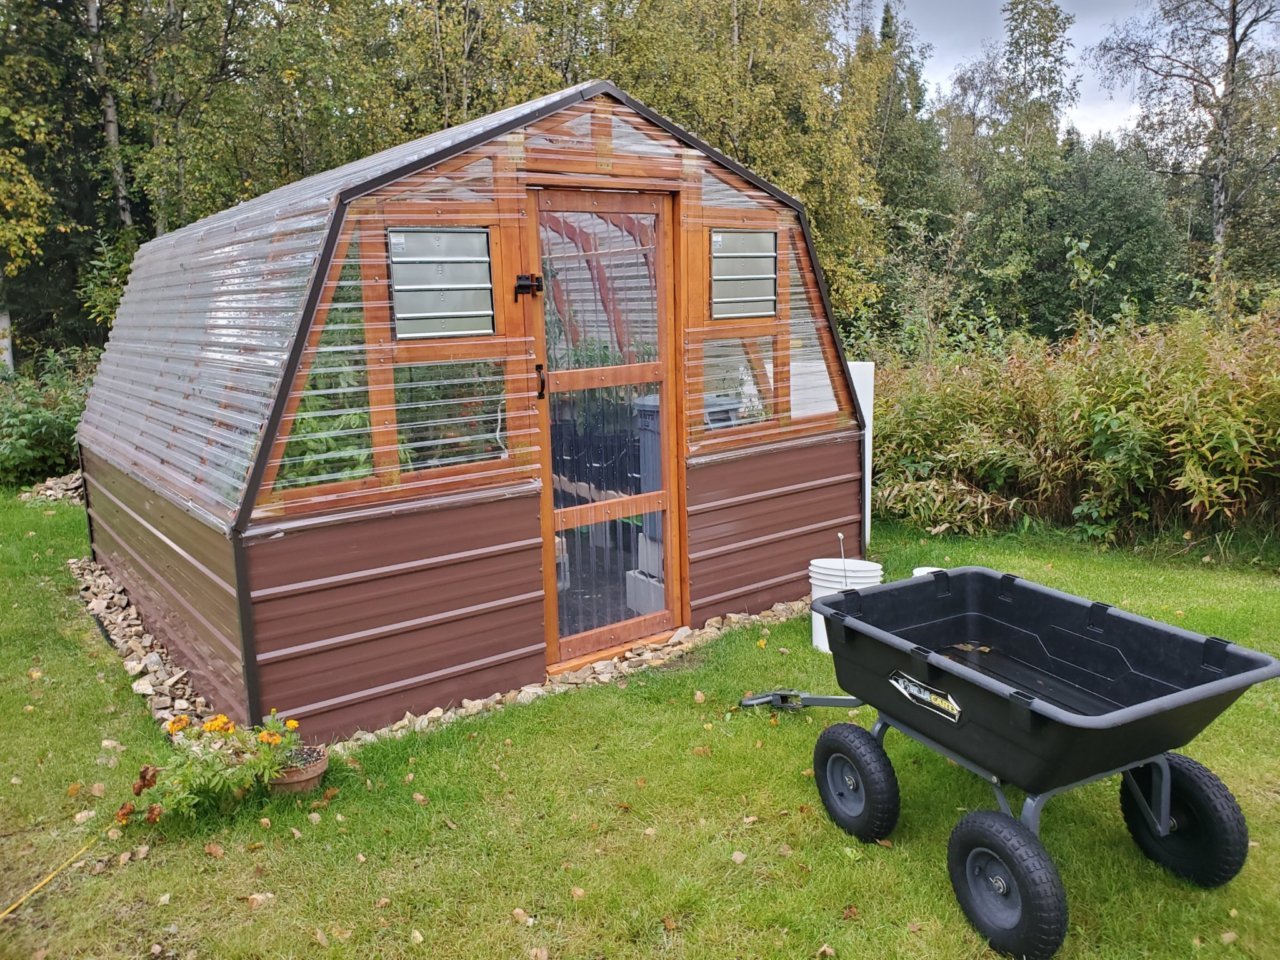
It was truly great for us to find a greenhouse design from a fellow Interior Alaskan blogger. We kept coming back to this design, enough times to where we decided to actually build it.
We would be the first to admit that tackling a gambrel style building was slightly intimidating and not what we had in mind for our very first self-built building! But, we faithfully followed the cut lists and directions. It turned out beautifully! If you're in the same boat, have confidence that you can build this too!
We love the options available for making it your own. We decided to stain the greenhouse lumber of ours to match our cedar sided home. We also built a semi frost-resistant foundation, since we're a little north of Ana at 65 degrees and sometimes experience frost heaving. We also added full climate controls to ours, adding both fans and louvers that keep our greenhouse at perfect temperatures.
The performance has been great! Building this greenhouse has been the single greatest thing we have done in our years of subarctic gardening. We might even consider building a second greenhouse down the road. No matter how big your greenhouse is, it's never quite enough!
Thanks for the great plans, Ana! We appreciate your work!
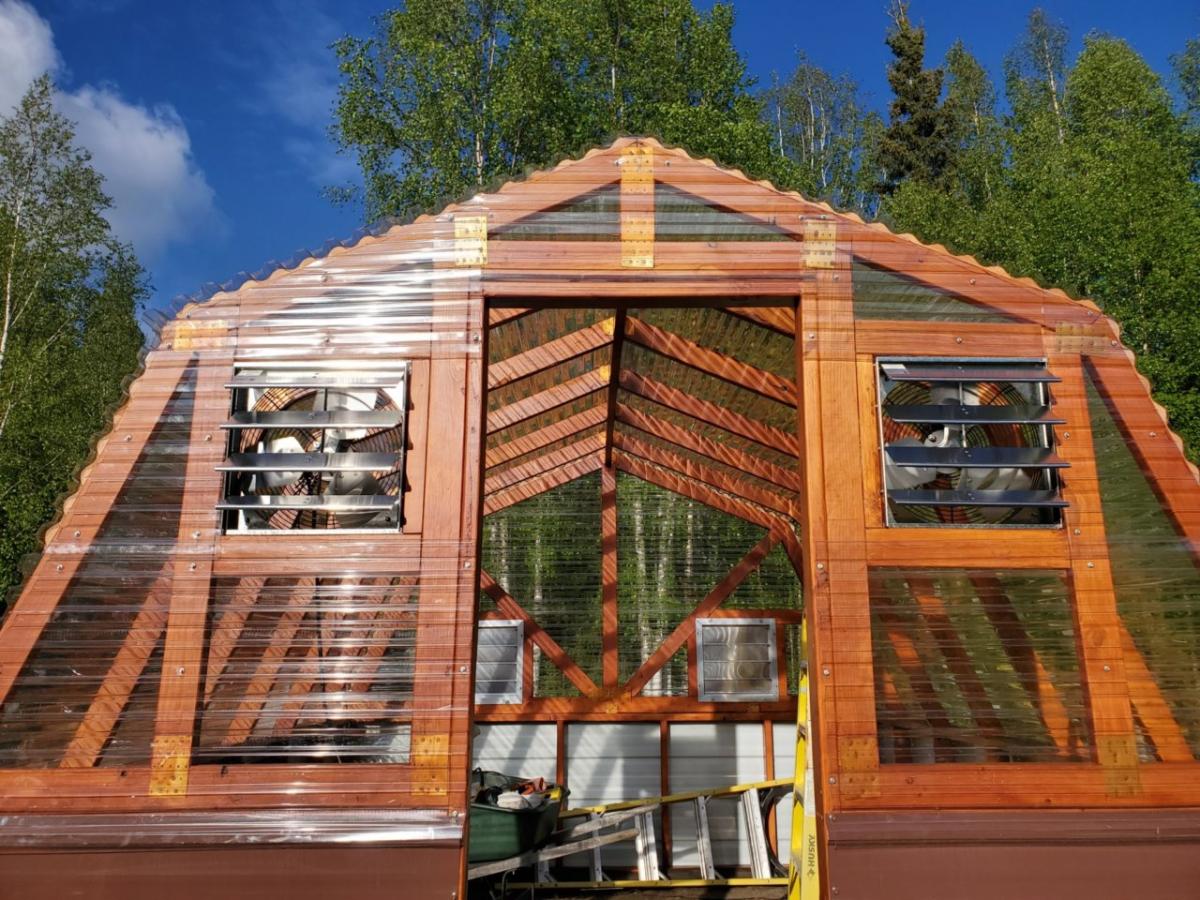

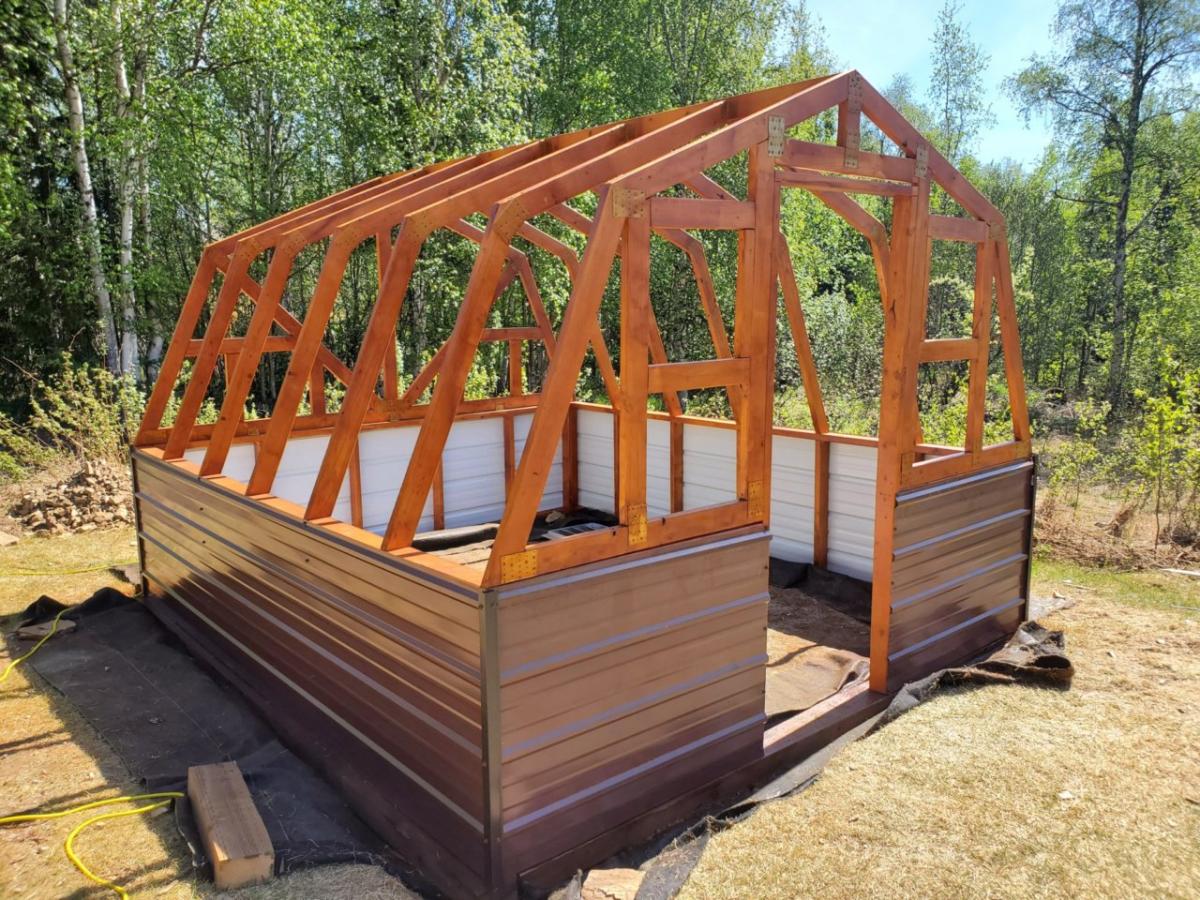
Built from Plan(s)
Estimated Cost
$2400
Estimated Time Investment
Week Long Project (20 Hours or More)
Finish Used
Transparent cedar stain
Recommended Skill Level
Intermediate
Comments
Tryde Coffee Table
This is our very first Ana White project! We are so happy with how it turned out and have definitely been inspired to continue to create. Plans are already in the works for matching end tables, a dining table, and a bookshelf! We used cedar for this table. The stain was MinWax American Walnut, the slight red hue is from the wood only. We finished it with polycrylic because we didn't want any ambering. I think we probably spent about 6 hours doing the actual building A lot of that was spent trying to get the table top boards flush against each other. Any tips for picking straight pieces would be very helpful!! I would suggest cutting and screwing together on the same day do boards don't start to dry out. The rest of the time was really about doing test staining, waiting for coats to dry, etc. We did this in our basement so having water base stains was really key.
Built from Plan(s)
Estimated Time Investment
Weekend Project (10-20 Hours)
Finish Used
MinWax water based conditioner (pre-stain) (applied with cloth)
MinWax water based American Walnut (applied with cloth)
MinWax polyryclic finish (applied with brush)
MinWax water based American Walnut (applied with cloth)
MinWax polyryclic finish (applied with brush)
Recommended Skill Level
Beginner
Modified Beach Cottage Dresser
This is a modified version of Patrick's beach cottage dresser with a shelf at the bottom instead of a fourth drawer. The dresser was painted with Americana Decor chalky paint and distressed with Americana Decor wax. Thanks for this excellent plan, Ana and Patrick!
Built from Plan(s)
Estimated Cost
Under $100.
Estimated Time Investment
Week Long Project (20 Hours or More)
Finish Used
Americana Decor Chalky Paint, 2 containers of 'Primitive' and 1 container of 'Treasure'
Americana Decor Creme Wax, Deep Brown
Americana Decor Soft Touch Varnish
Americana Decor Creme Wax, Deep Brown
Americana Decor Soft Touch Varnish
Recommended Skill Level
Intermediate
Patio sectional
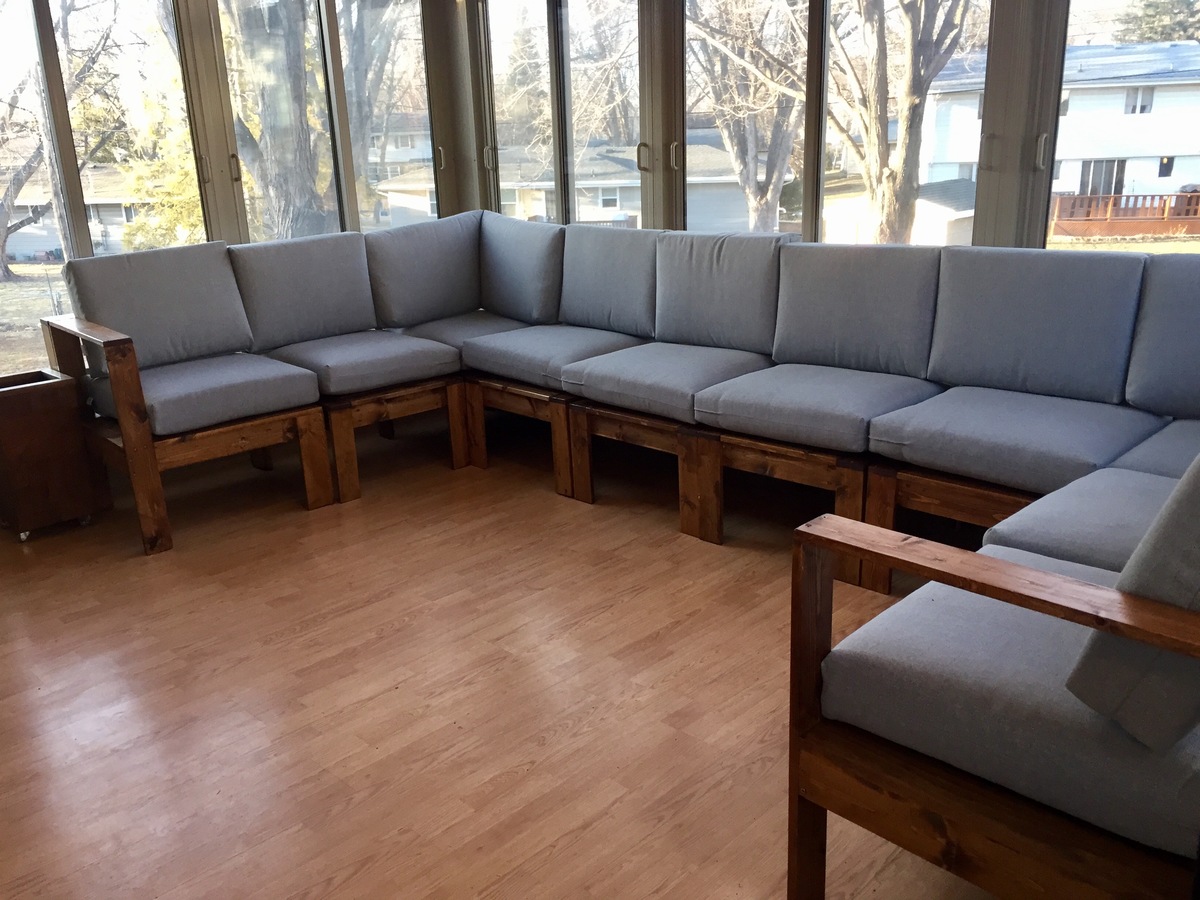
This was exactly what I was looking for! I was able to make a sectional that fit our 4-season patio perfectly, and saved thousands of $$ in the process.
Cushion details
Fullerton Outdoor Deep Seating Cushion Set - Threshold - http://www.target.com/p/fullerton-outdoor-deep-seating-cushion-set-threshold/-/A-52019240
Watch for sales on patio furniture, we were able to save 35% on the cushions (30% off sale + 5% Target REDCard discount)
Estimated Cost(s):
- Lumber = $200
- Cushions = $500
- Screws, stain, miscellaneous supplies = $100
- Total = $800
Finish Used:
- Minwax Pre-Stain Wood Conditioner
- Minwax English Chestnut Oil-Based Stain
- Minway Fast Drying Polyurethane
Built from Plan(s)
Estimated Time Investment
Week Long Project (20 Hours or More)
Recommended Skill Level
Beginner
Lighted hall tree
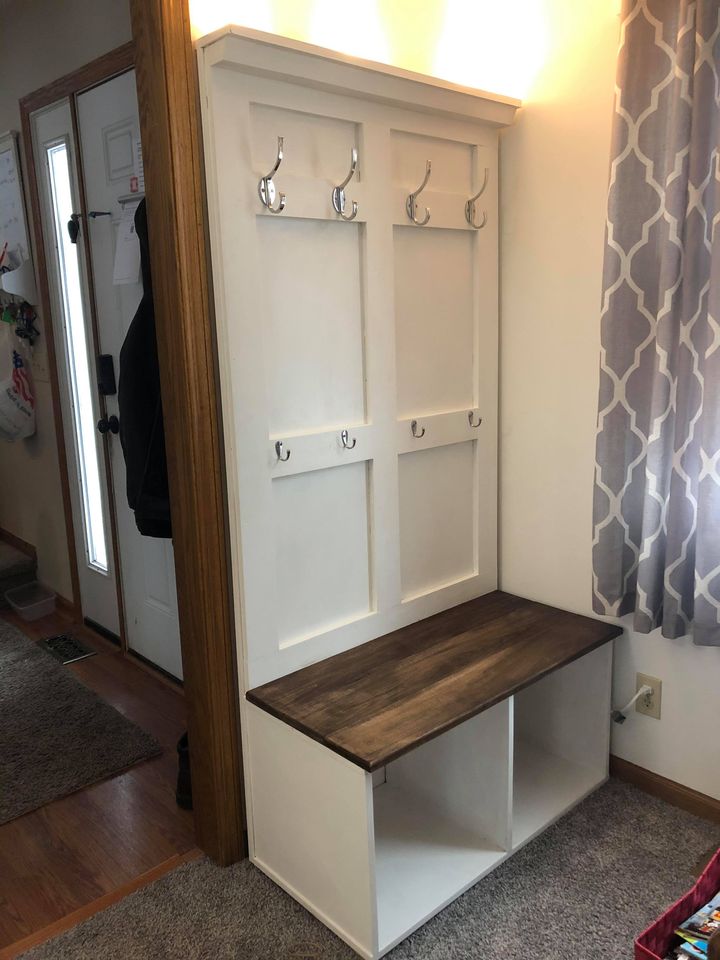
A lighted hall tree.

Estimated Cost
200
Estimated Time Investment
Afternoon Project (3-6 Hours)
Recommended Skill Level
Beginner
Comments
Simple Changing Table
Wanted to make our friends who were expecting a nice gift that would serve them for many years to come. Used a Kreg Jig (greatest tool ever for amateur carpenter or wood worker!!) for most of the joinery. Wanted it to have a bit of an older look to it.
Built from Plan(s)
Estimated Cost
$75
Estimated Time Investment
Weekend Project (10-20 Hours)
Finish Used
Minwax Early American 230 stain and Fast Drying Polyurethane Clear Satin (2 coats)
Recommended Skill Level
Beginner
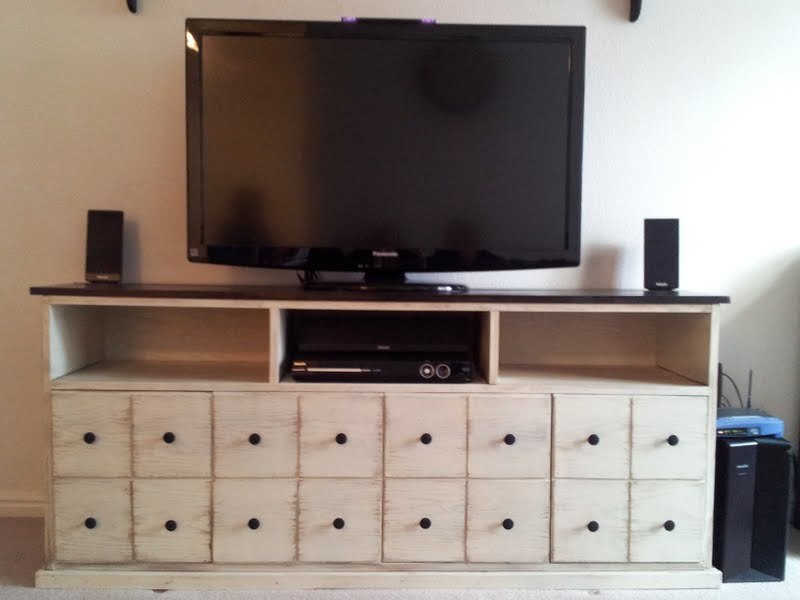
Workbench console
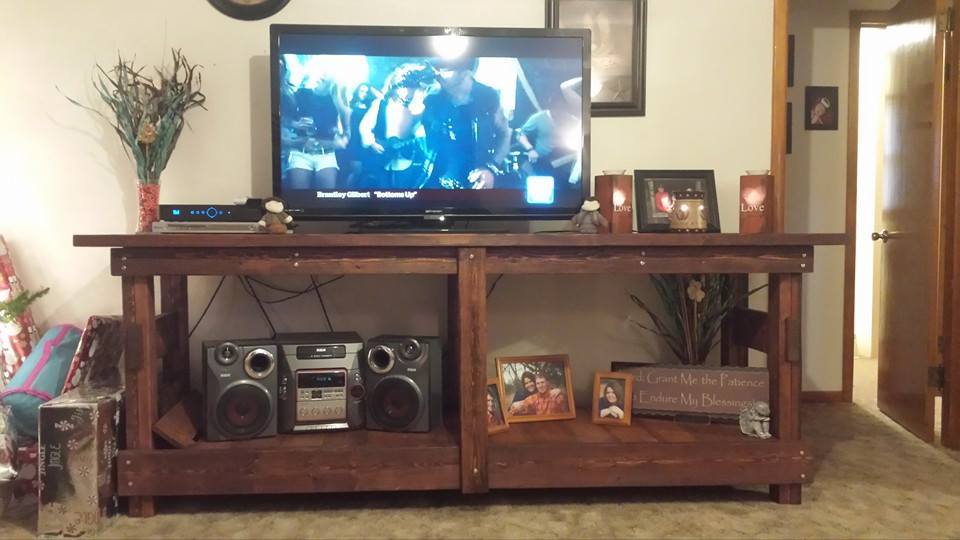
We built this after getting a new tv. We love it.
Built from Plan(s)
Estimated Cost
we used standard pine so it probably cost with stain around $90 to build. Took longer to stain and sand than anything.
Estimated Time Investment
Weekend Project (10-20 Hours)
Finish Used
oak stain
Recommended Skill Level
Intermediate
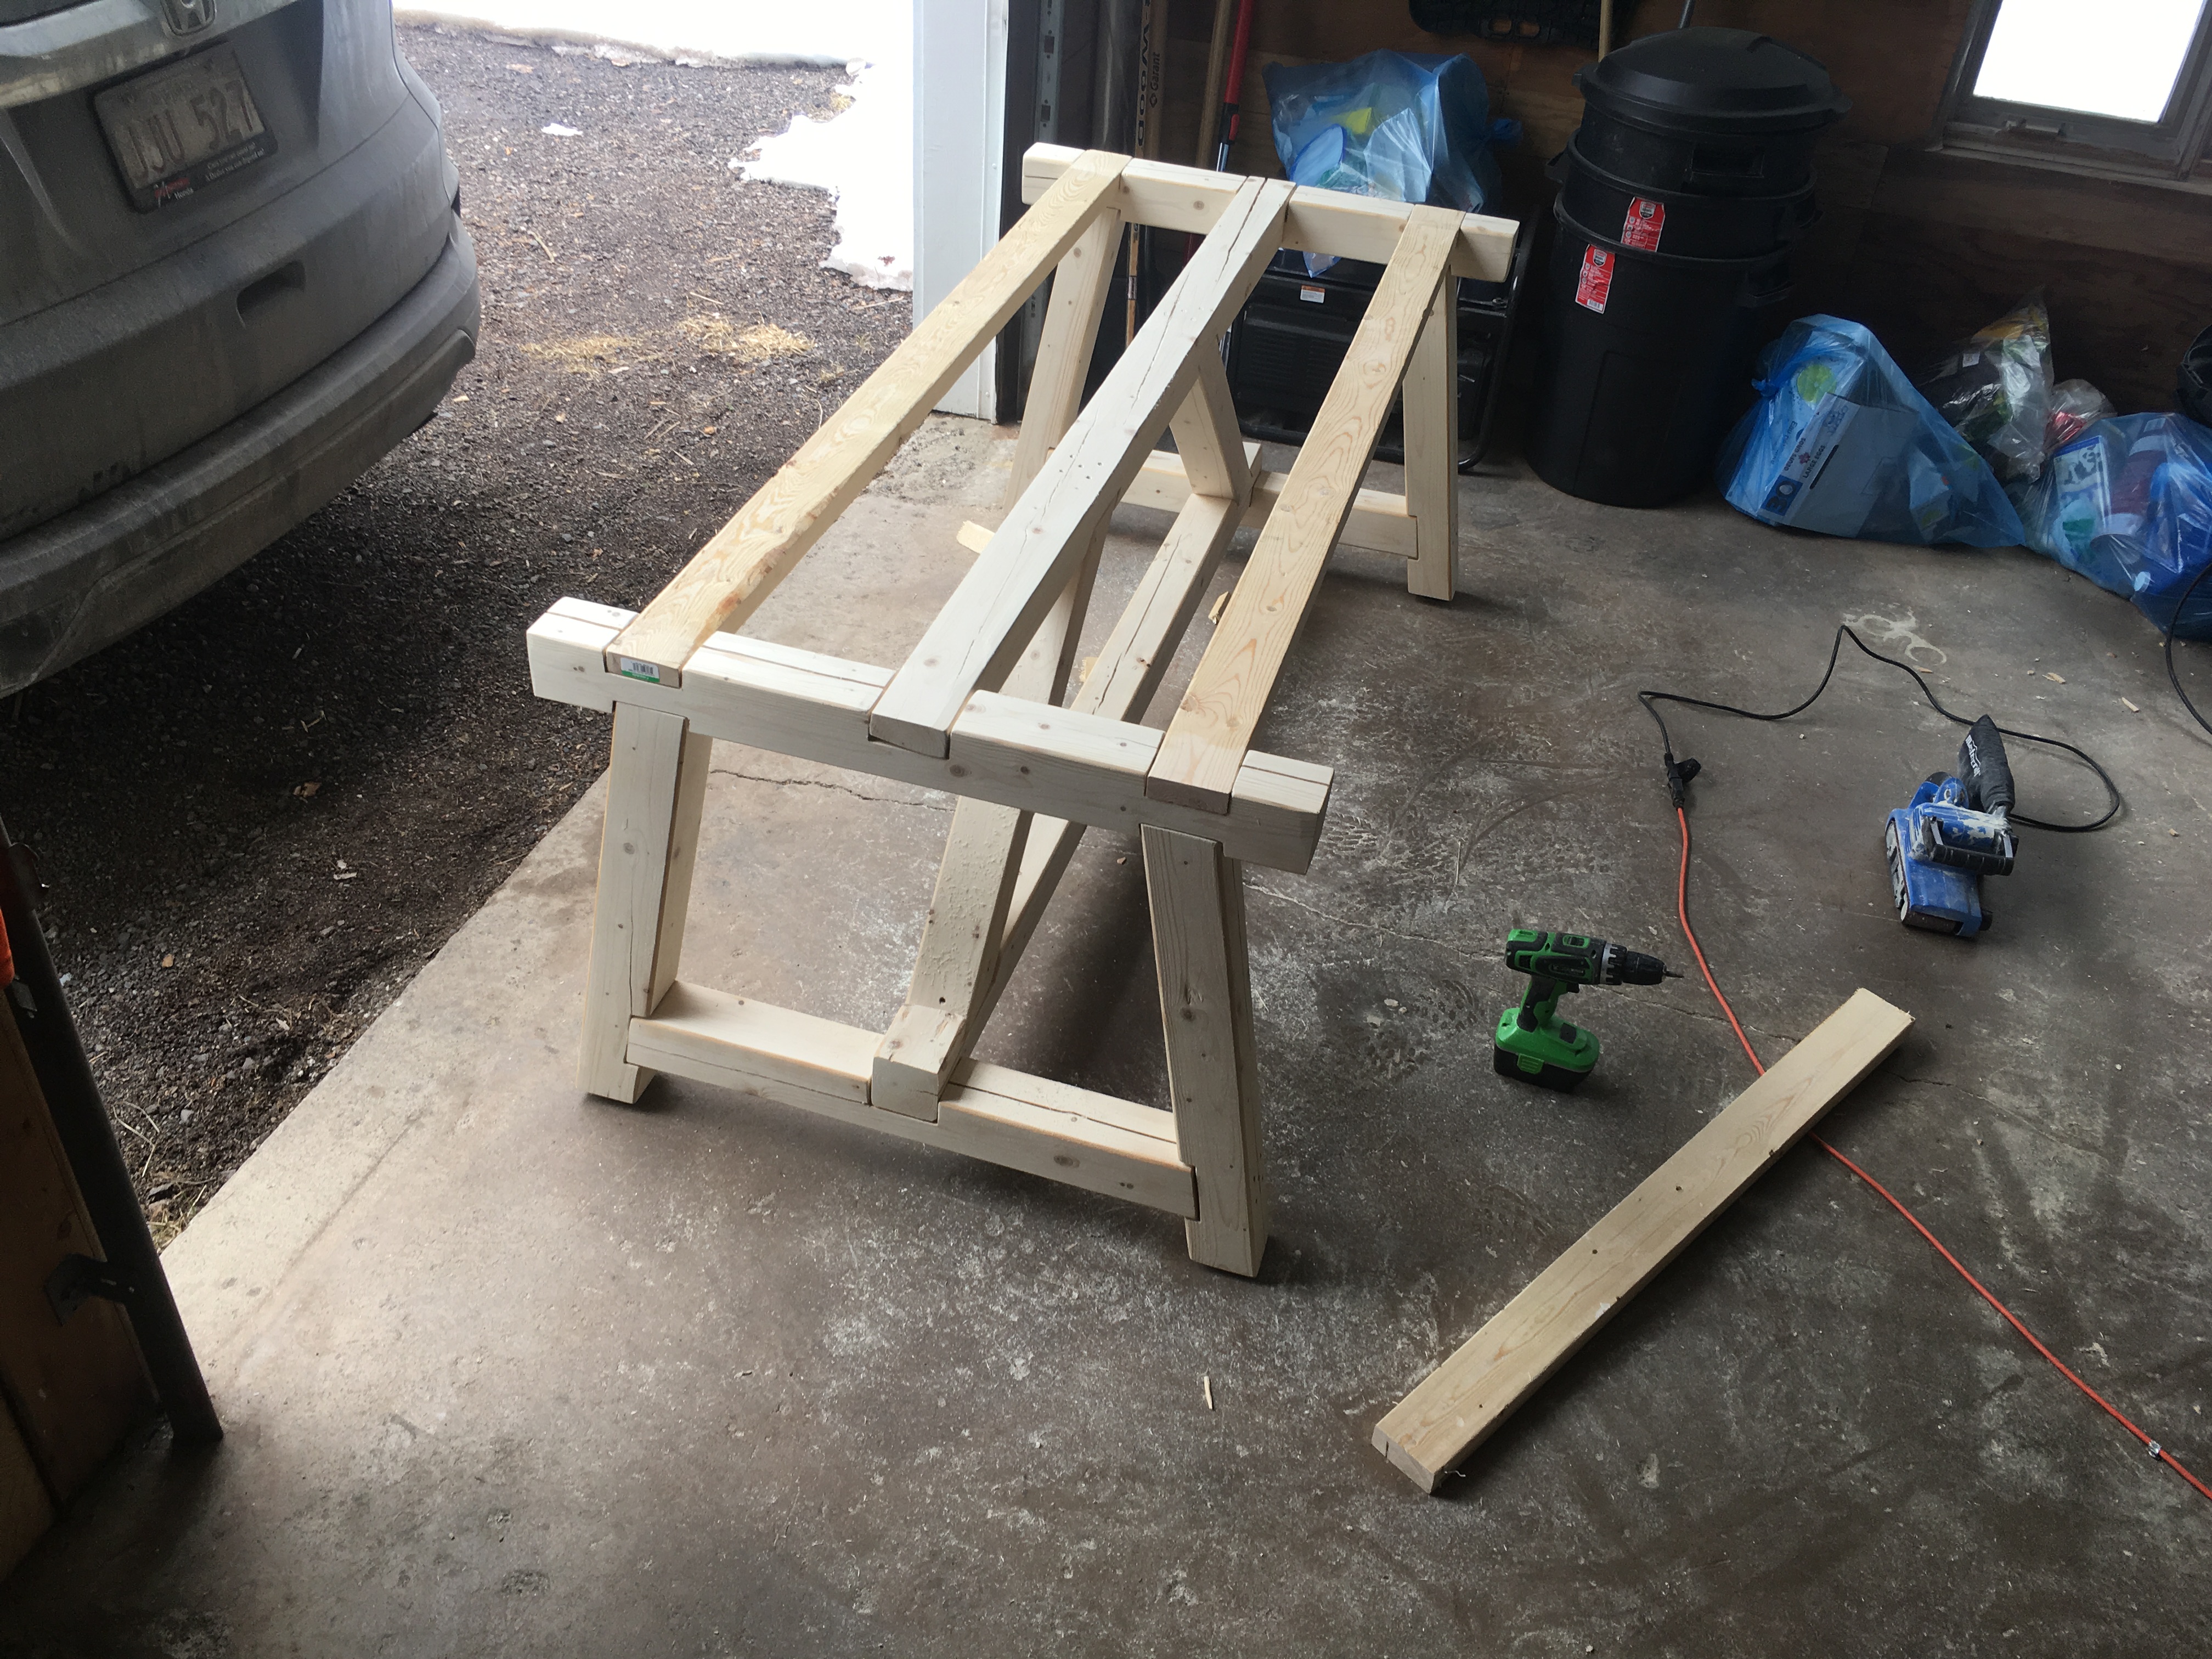
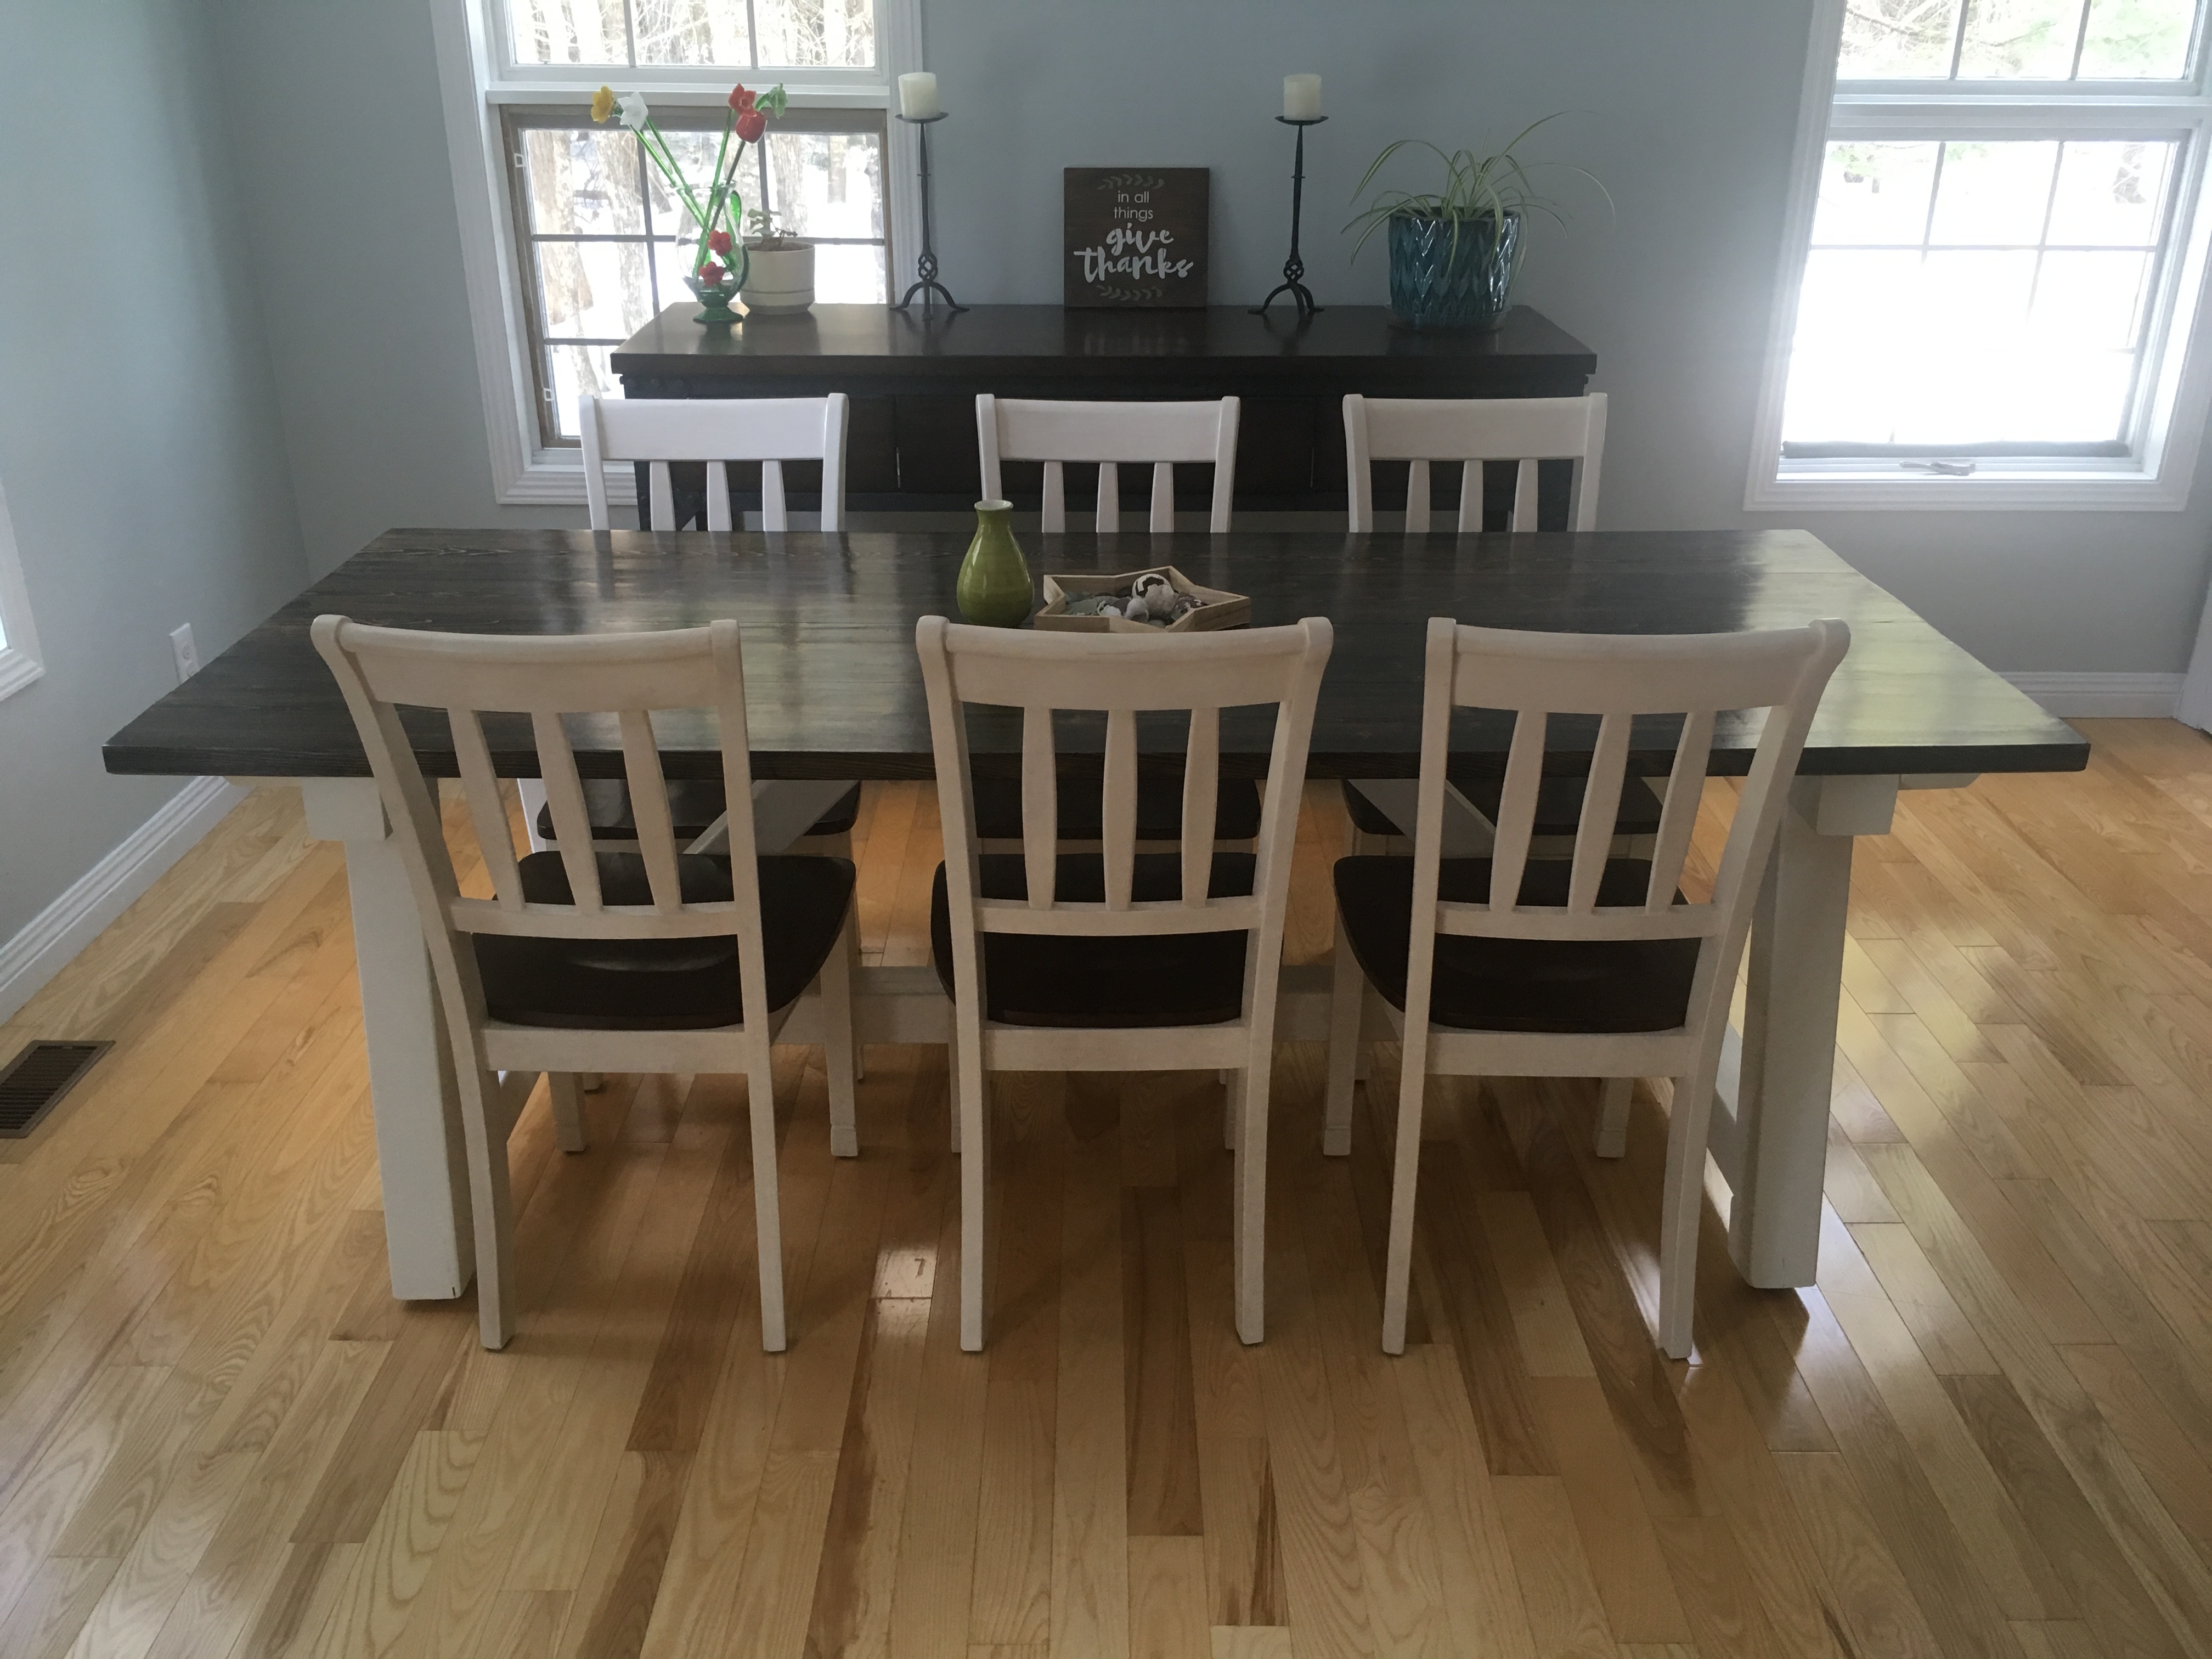
4x4 Truss Harvest Table
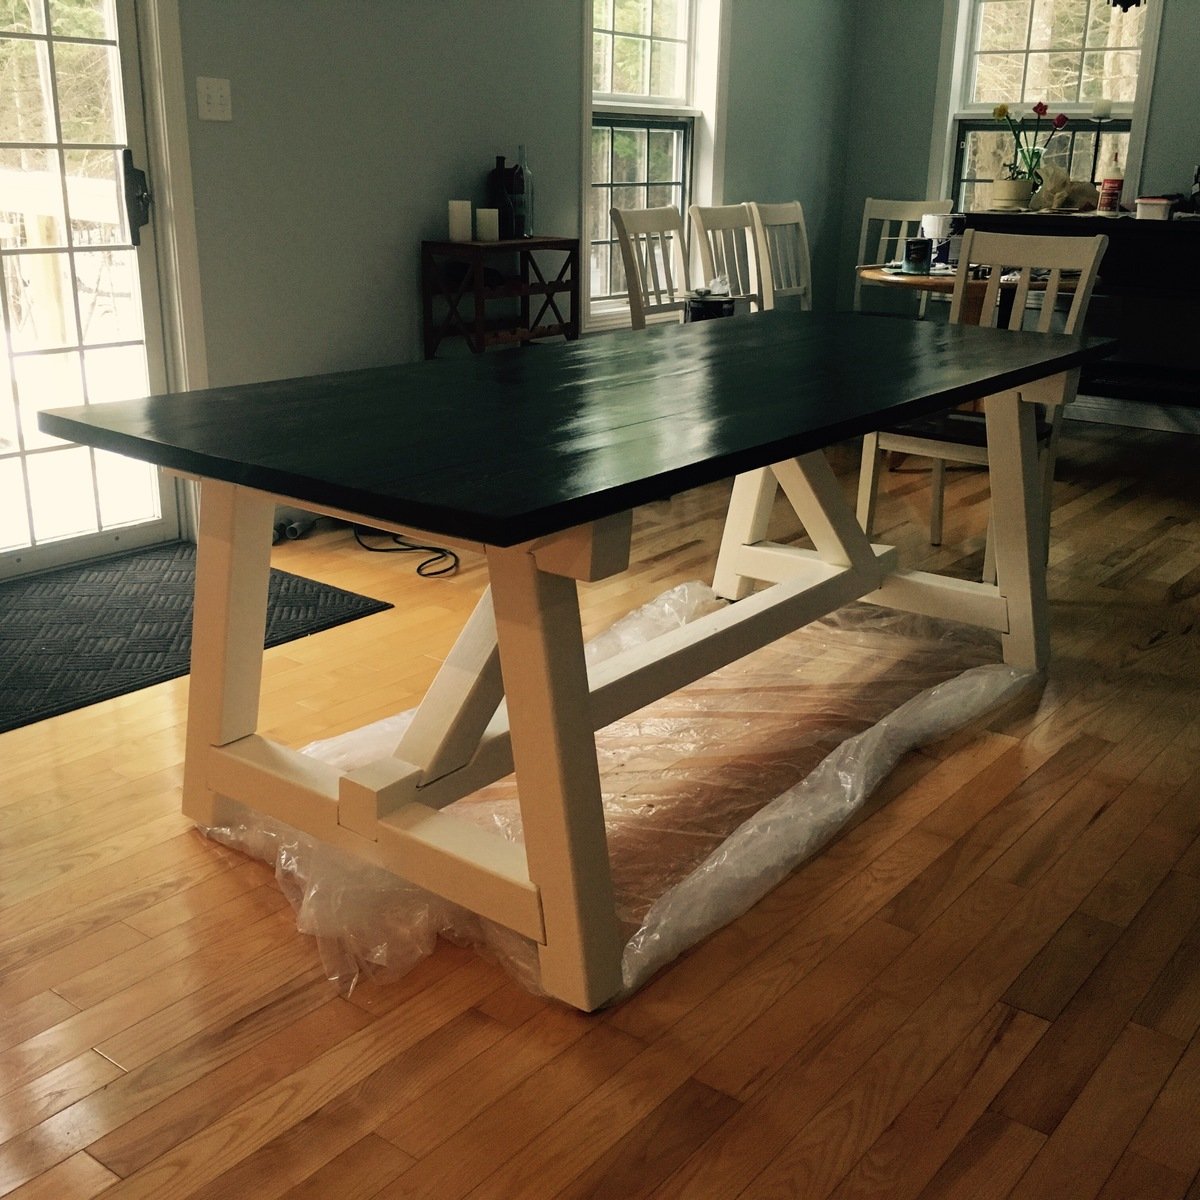
I began with the plans for the 4x4 truss table and modified the plans to include notched joints to make the table stronger. Finished the 4x4 pine base with paint to match our dining chairs and finished the 2x10 top with 1 coat of dark walnut stain and 5 coats of verathane. Added hardware under the legs to level the table. This was my very first woodworking project and everyone says how well it turned out! Next is a headboard and then maybe a dresser. Thanks for these awesome resources!
Built from Plan(s)
Estimated Cost
$250
Estimated Time Investment
Week Long Project (20 Hours or More)
Finish Used
Dark Walnut
Recommended Skill Level
Intermediate
Adirondack Chairs
I wanted to buy Adirondack for comfortable lounge chairs but they are so expensive! Came across these plans and it took a little bit of trial and error but they turned out great! Completed 6 chairs total and they are super comfortable and look great!

Built from Plan(s)
Estimated Cost
$70 per chair
Estimated Time Investment
An Hour or Two (0-2 Hours)
Finish Used
Stain
Recommended Skill Level
Starter Project
Comments
Apothecary Console
Apothecary Console
Estimated Cost
$200
Estimated Time Investment
Week Long Project (20 Hours or More)
Finish Used
Krylon white primer, Krylon gloss Ivory, walnut stain and polyurethane spray in semi gloss, Behr faux glaze mixed with a Behr brown (roasted nut)
Recommended Skill Level
Intermediate
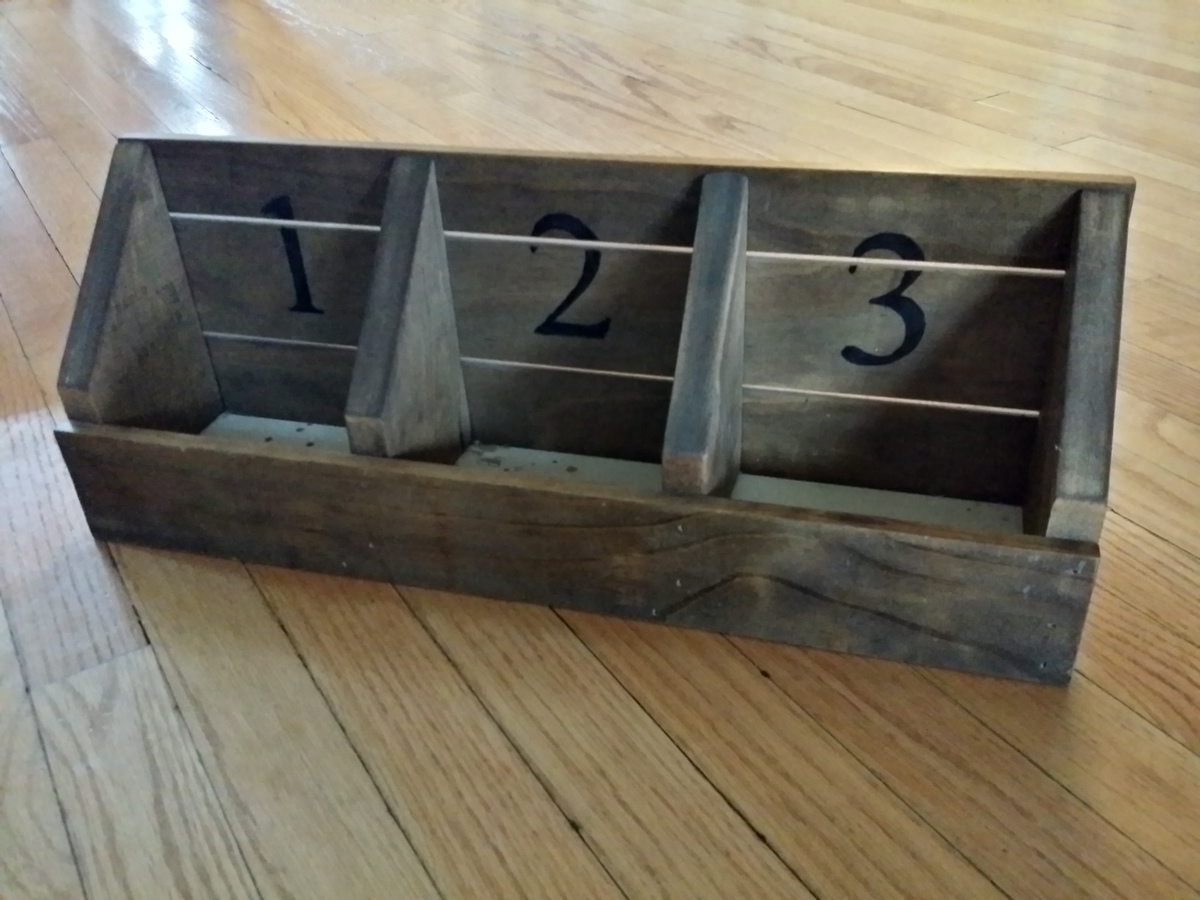
Numbered Cubby Desk Organizer
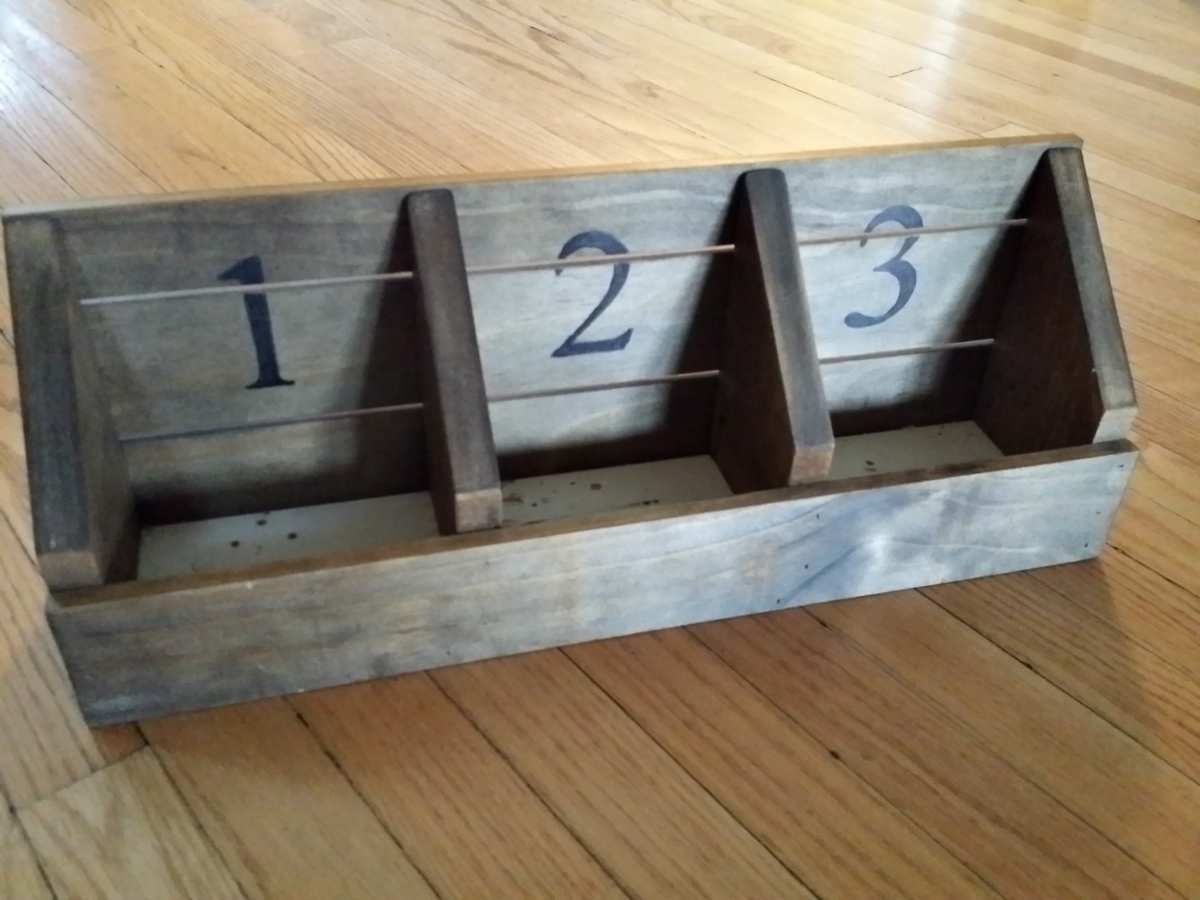
Here's my version of Ana's 'Numbered Cubbies on the Wall'. Mine is made from a 6' long 1/2" x 3" craft board and a 6' long 1" x 4". I followed Ana's plan, adjusting mine for a smaller size and proportion. I used a finish nailer with 1" nails. The numbers were drawn on with black Sharpie following Ana's method. First print out a 3" number in your choice of font, cut it out and tape to the cubby, press HARD to outline the number with a ball-point pen, then remove the stencil and fill in with paint or marker.
This is an easy and fun project. It's very versatile and cute and looks store bought and expensive.
Built from Plan(s)
Estimated Cost
$15
Estimated Time Investment
An Hour or Two (0-2 Hours)
Finish Used
Minwax Woodfinish in Provincial 211, with numbers written in black Sharpie
Recommended Skill Level
Starter Project
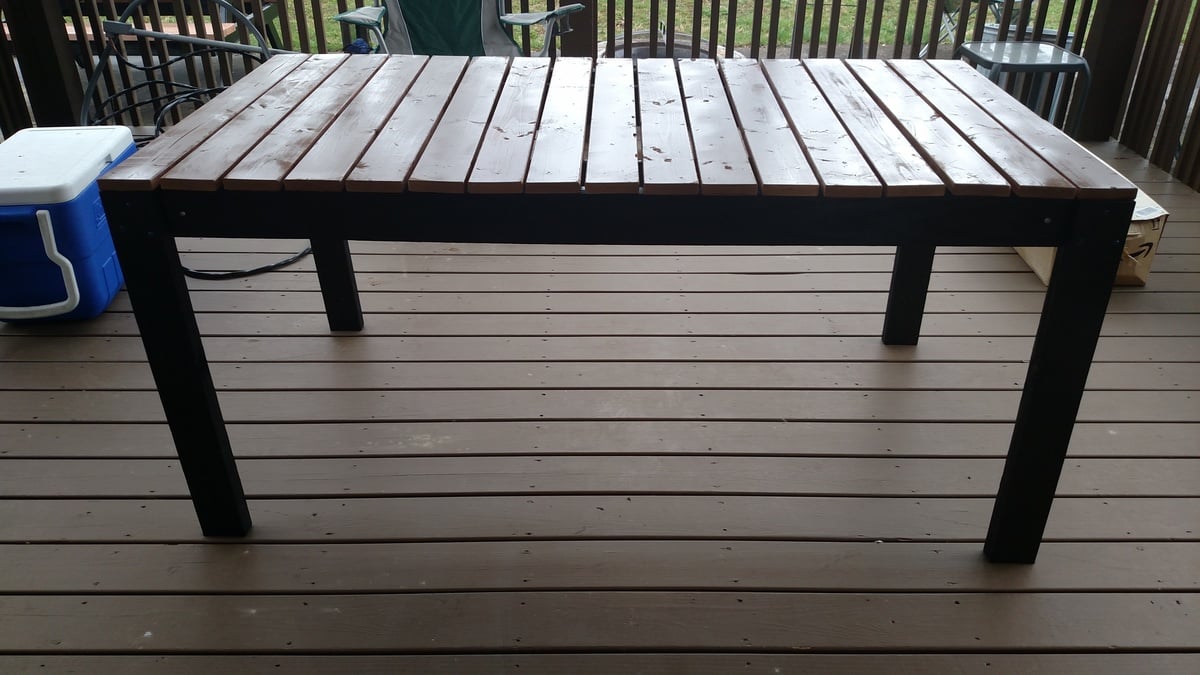
Black and Brown Simple Outdoor Table
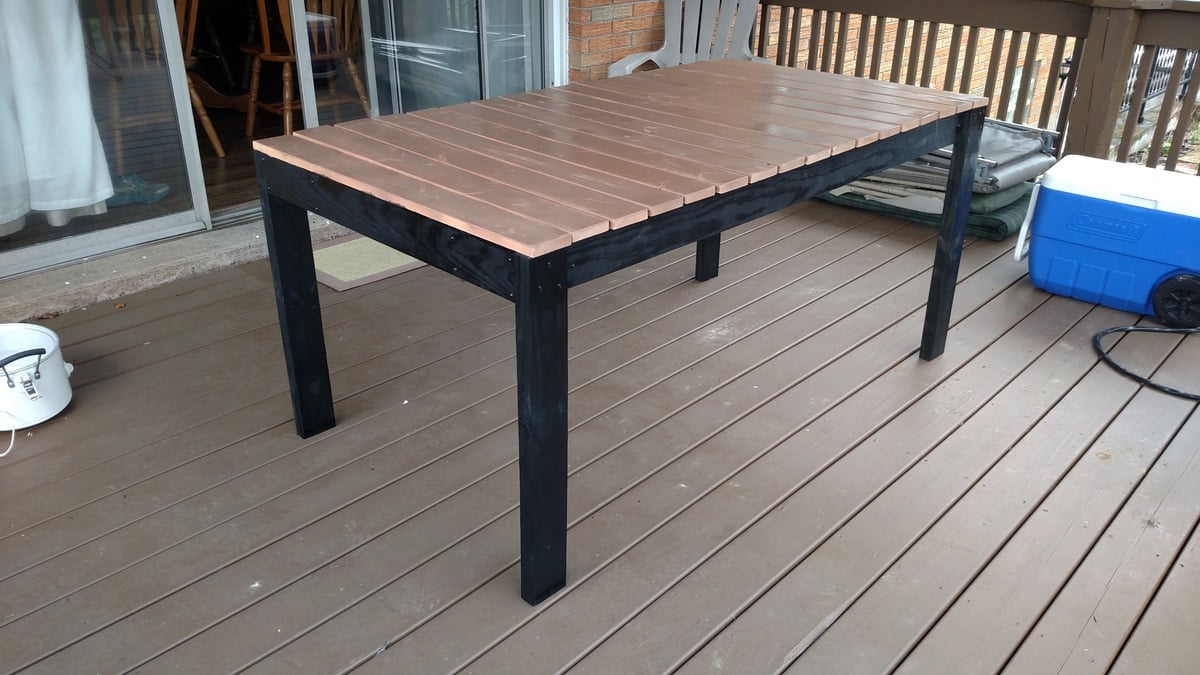
I built the simple outdoor table using a black frame and Brown boards on top.
Built from Plan(s)
Estimated Cost
$100 with paint
Estimated Time Investment
Afternoon Project (3-6 Hours)
Finish Used
Black outdoor paint and valspar color radiance dark brown
Recommended Skill Level
Beginner
We Did It! We Made The Farmhouse Table and Bench!
My sister and I made The Farmhouse Table and Bench (with pocket holes) for my daughter and son-in-love. She was so surprised, she cried! I think she loved it!! It was my first project and now I'm getting requests from my oldest daughter to make one for her after her closing the end of next month.
Thank you Ana White for sharing your plans and making it so easy to follow!
Family File System
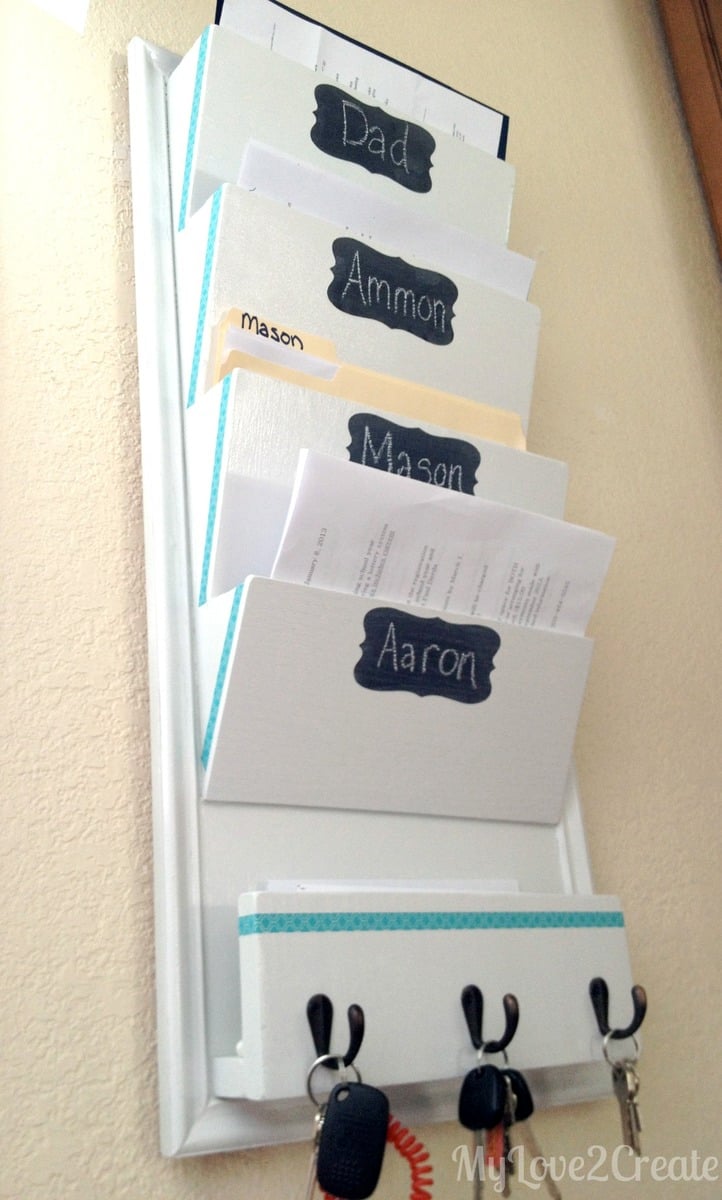
I fell in love with this project when it was first posted...which was quite a while ago. I am so happy to have it hanging in my home making my life SO much easier! I modified it to fit the needs of my family and I LOVE it! Check out my blog for more details!
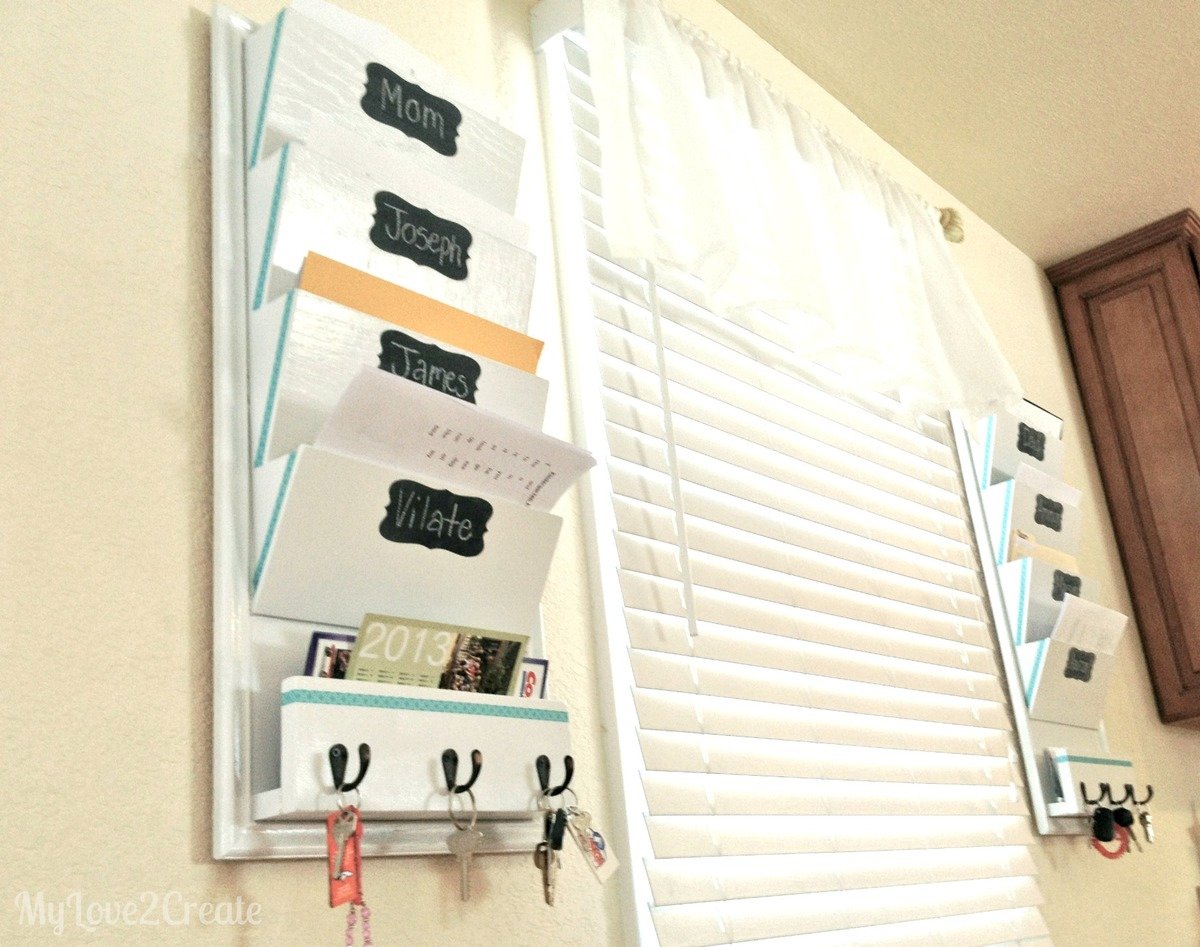
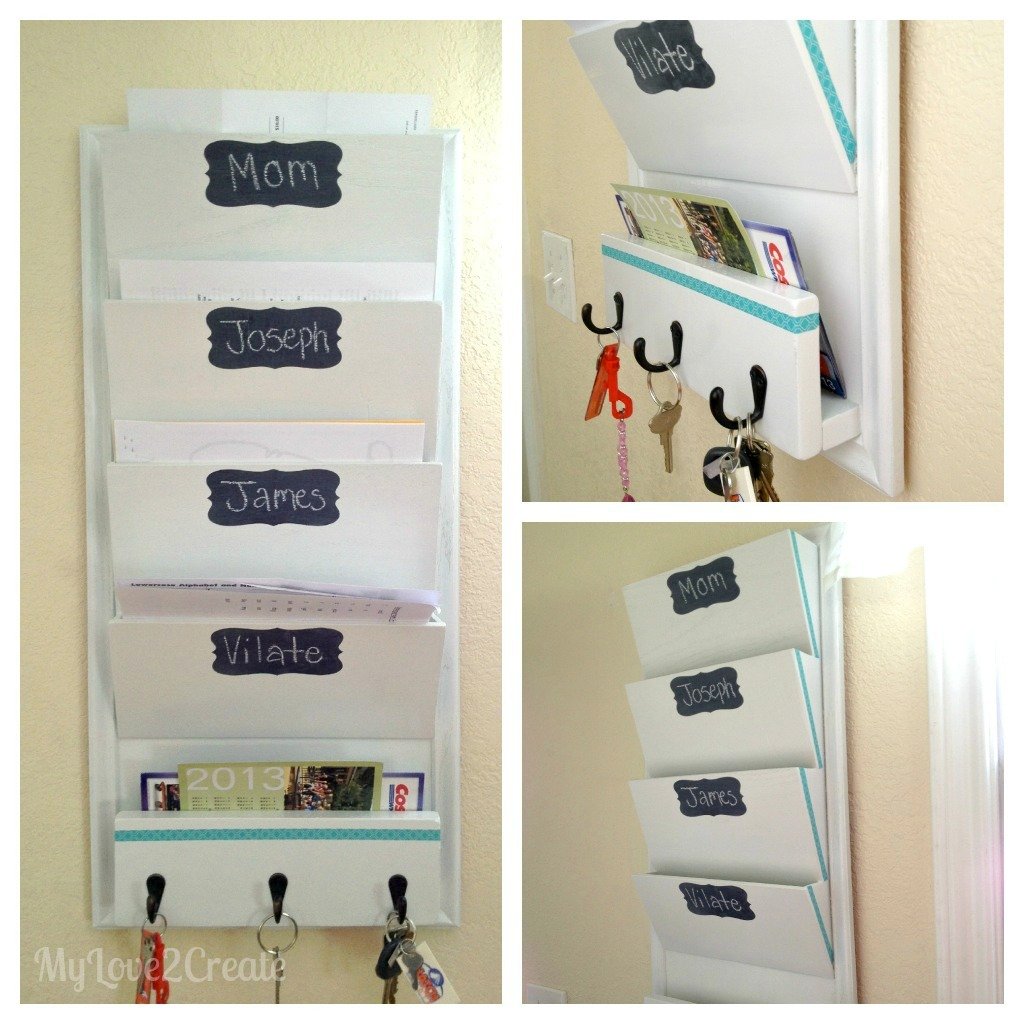
Built from Plan(s)
Estimated Cost
I used scrap wood, I just purchased the hooks!
Estimated Time Investment
Day Project (6-9 Hours)
Finish Used
Spray paint White
Recommended Skill Level
Beginner
Comments
Ana White Admin
Wed, 01/20/2021 - 10:52
Looks great!
Thanks for sharing, time to get building!