
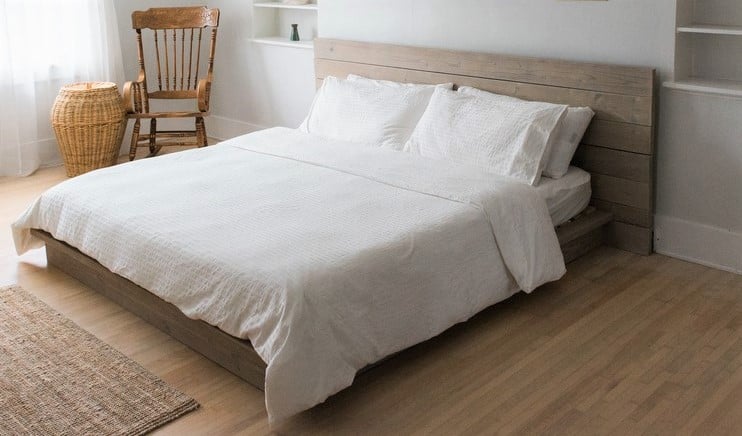

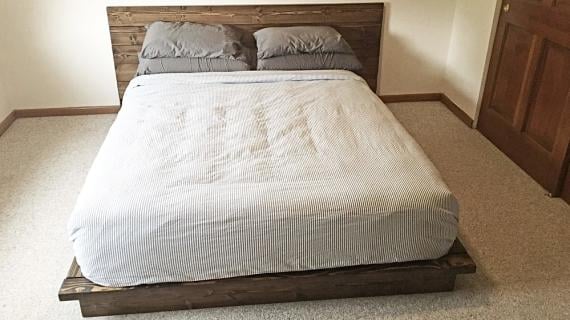
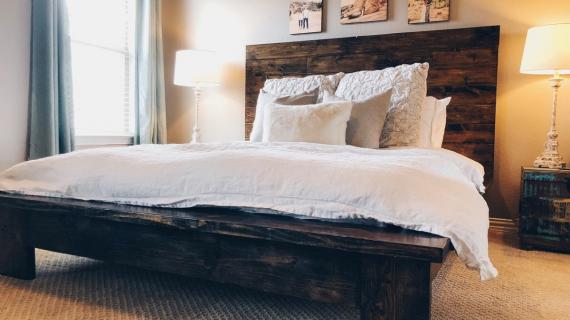
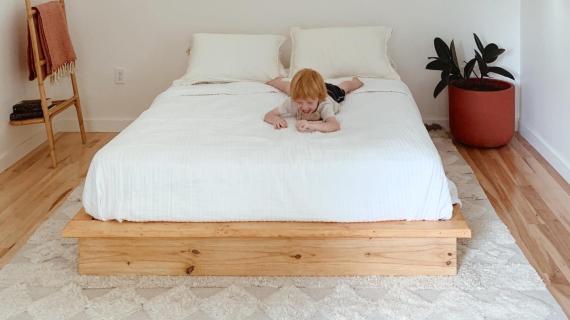
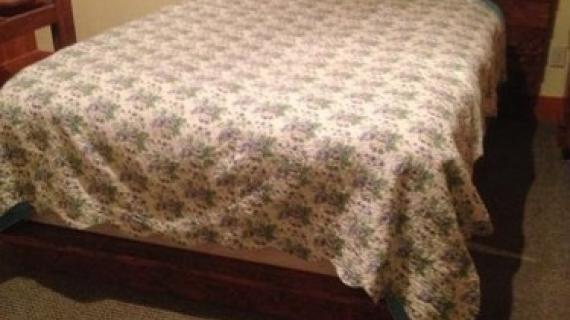
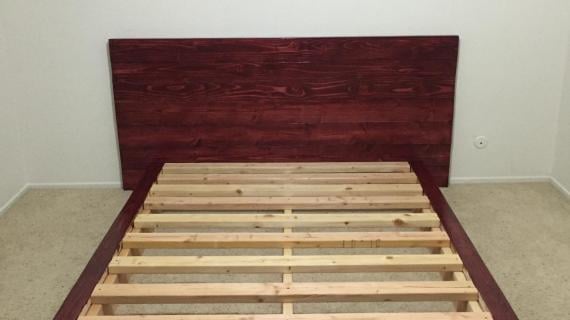
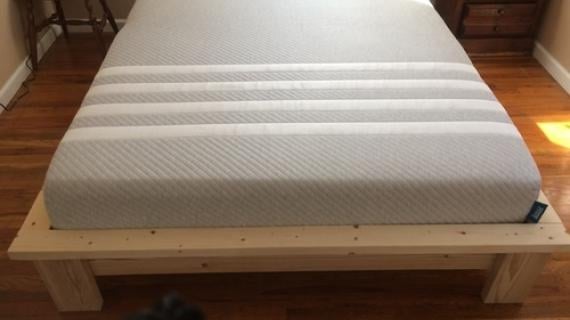
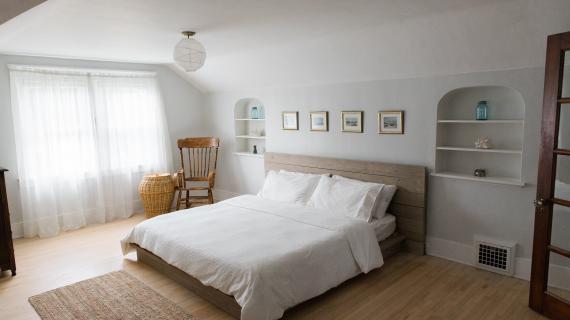
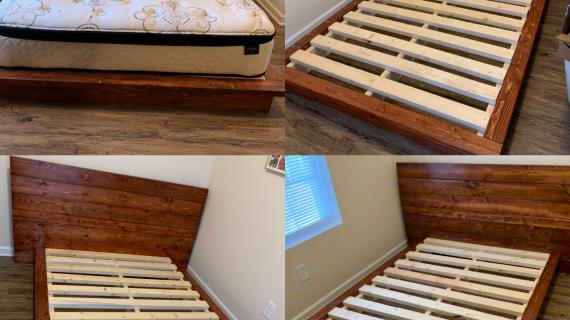
The classic modern platform bed goes rustic when you build it yourself using lumber. This beautiful, solid wood bed, has a modern form combined with rustic wood.
Free step by step plans include shopping list, cut list, diagrams and lots of reader submitted photos. By Ana-White.com
We took a modern silhouette and built it using 2x lumber... and this is how it turned out!
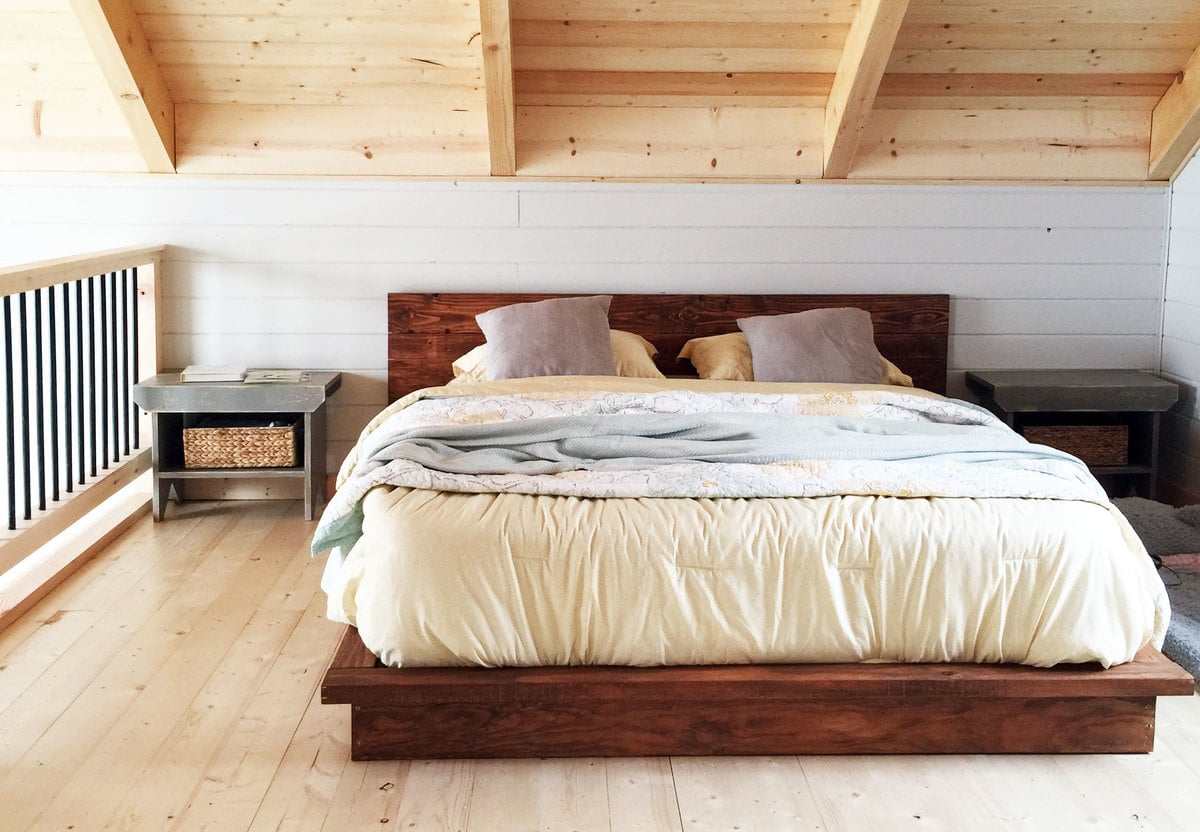
I love the combination of rustic materials in a modern shape.
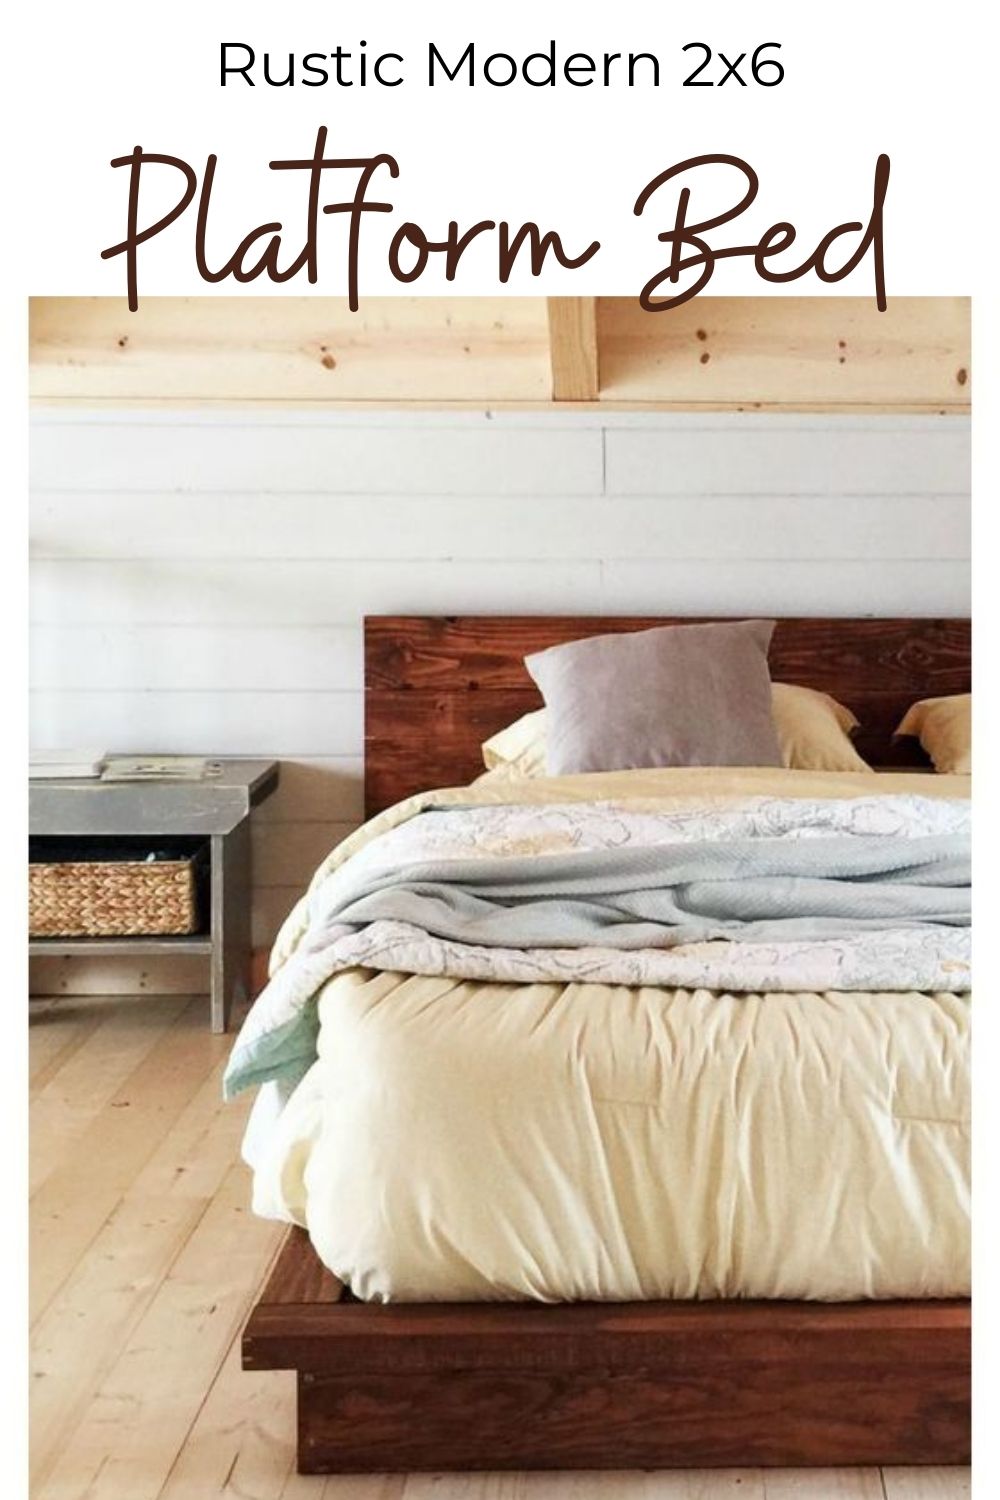
Free Plans to Build Your Own Rustic Modern Platform Bed
This bed turned out so well, we had to share the plans in all mattress sizes for free! You'll love this beginner friendly design that creates amazing results!
Pin for Later

Preparation
Twin Shopping List - 38x75
- 7 - 1x6 @ 5 feet long or desired length of headboard
- 4 - 2x2 furring strips @ 8 feet long
- 3 - 2x6 @ stud length or 8'
- 3 - 2x4 @ stud length or 8'
- 5 - 1x4 @ 8 feet long
- 1-1/4" brad nails
- 50 - 2-1/2" long self tapping star bit screws
- wood glue
- 120 grit sandpaper
Full Shopping List - 54x75
- 7 - 1x6 @ 6 feet long or desired length of headboard
- 4 - 2x2 furring strips @ 8 feet long
- 3 - 2x6 @ stud length or 8'
- 4 - 2x4 @ stud length or 8'
- 5 - 1x4 @ 10 feet long (slats)
- 1-1/4" brad nails
- 60 - 2-1/2" long self tapping star bit screws
- wood glue
- 120 grit sandpaper
Queen Shopping List - 60x80
- 7 - 1x6 @ 8 feet long or desired length of headboard
- 5 - 2x2 furring strips @ 8 feet long
- 3 - 2x6 @ stud length or 8'
- 4 - 2x4 @ stud length or 8'
- 5 - 1x4 @ 10 feet long (slats)
- 1-1/4" brad nails
- 60 - 2-1/2" long self tapping star bit screws
- wood glue
- 120 grit sandpaper
King (Standard) Shopping List - 76x80
- 7 - 1x6 @ 8 feet long or desired length of headboard
- 5 - 2x2 furring strips @ 8 feet long
- 3 - 2x6 @ stud length or 8'
- 4 - 2x4 @ stud length or 8'
- 10 - 1x4 @ 8 feet long (slats)
- 1-1/4" brad nails
- 60 - 2-1/2" long self tapping star bit screws
- wood glue
- 120 grit sandpaper
King (California) Shopping List - 72x84
- 7 - 1x6 @ 8 feet long or desired length of headboard
- 5 - 2x2 furring strips @ 8 feet long
- 3 - 2x6 @ stud length or 8'
- 4 - 2x4 @ stud length or 8'
- 11 - 1x4 @ 6 feet long (slats)
- 1-1/4" brad nails
- 60 - 2-1/2" long self tapping star bit screws
- wood glue
- 120 grit sandpaper
Twin Cut List - 38x75
HEADBOARD
- 7 - 1x6 @ 60" or desired length of headboard
- 1 - 2x2 @ 60"
- 3 - 2x2 @ 31-1/2"
SIDERAILS/FOOTBOARD
- 2 - 2x6 @ 75"
- 2 - 2x4 @ 75"
- 1 - 2x6 @ 41"
- 1 - 2x4 @ 45"
SLAT SYSTEM
- 2- 2x2 @ 75"
- 10 - 1x4 @ 38" (for 4" gaps in between slats - check with your mattress to make sure this is sufficient)
- 2 - 2x4 or 2x6 @ 20" (both ends cut at 45 degrees, long point to long point measurement)
- no center 2x4 needed for twin size
Full Cut List - 54x75
HEADBOARD
- 7 - 1x6 @ 72" or desired length of headboard
- 1 - 2x2 @ 72"
- 3 - 2x2 @ 31-1/2"
SIDERAILS/FOOTBOARD
- 2 - 2x6 @ 75"
- 2 - 2x4 @ 75"
- 1 - 2x6 @ 57"
- 1 - 2x4 @ 61"
SLAT SYSTEM
- 2- 2x2 @ 75"
- 1 - 2x4 @ 75"
- 10 - 1x4 @ 54" (for 4" gaps in between slats - check with your mattress to make sure this is sufficient)
- 2 - 2x4 or 2x6 @ 20" (both ends cut at 45 degrees, long point to long point measurement)
Queen Cut List - 60x80
HEADBOARD
- 7 - 1x6 @ 79" or desired length of headboard
- 1 - 2x2 @ 79"
- 5 - 2x2 @ 31-1/2"
SIDERAILS/FOOTBOARD
- 2 - 2x6 @ 80"
- 2 - 2x4 @ 80"
- 1 - 2x6 @ 63"
- 1 - 2x4 @ 67"
SLAT SYSTEM
- 2- 2x2 @ 80"
- 1 - 2x4 @ 80"
- 11 - 1x4 @ 60" (for 4" gaps in between slats - check with your mattress to make sure this is sufficient)
- 2 - 2x4 or 2x6 @ 20" (both ends cut at 45 degrees, long point to long point measurement)
King (Standard) Cut List - 76x80
HEADBOARD
- 7 - 1x6 @ 96" or desired length of headboard
- 1 - 2x2 @ 96"
- 6 - 2x2 @ 31-1/2"
SIDERAILS/FOOTBOARD
- 2 - 2x6 @ 80"
- 2 - 2x4 @ 80"
- 1 - 2x6 @ 79"
- 1 - 2x4 @ 83"
SLAT SYSTEM
- 2- 2x2 @ 80"
- 1 - 2x4 @ 80"
- 11 - 1x4 @ 76" (for 4" gaps in between slats - check with your mattress to make sure this is sufficient)
- 2 - 2x4 or 2x6 @ 20" (both ends cut at 45 degrees, long point to long point measurement)
King (California) Cut List - 72x84
HEADBOARD
- 7 - 1x6 @ 96" or desired length of headboard
- 1 - 2x2 @ 96"
- 6 - 2x2 @ 31-1/2"
SIDERAILS/FOOTBOARD
- 2 - 2x6 @ 84"
- 2 - 2x4 @ 84"
- 1 - 2x6 @ 75"
- 1 - 2x4 @ 79"
SLAT SYSTEM
- 2- 2x2 @ 84"
- 1 - 2x4 @ 84"
- 11 - 1x4 @ 72" (for 4" gaps in between slats - check with your mattress to make sure this is sufficient)
- 2 - 2x4 or 2x6 @ 20" (both ends cut at 45 degrees, long point to long point measurement)


Please read through the entire plan and all comments before beginning this project. It is also advisable to review the Getting Started Section. Take all necessary precautions to build safely and smartly. Work on a clean level surface, free of imperfections or debris. Always use straight boards. Check for square after each step. Always predrill holes before attaching with screws. Use glue with finish nails for a stronger hold. Wipe excess glue off bare wood for stained projects, as dried glue will not take stain. Be safe, have fun, and ask for help if you need it. Good luck!
Instructions
Step 1
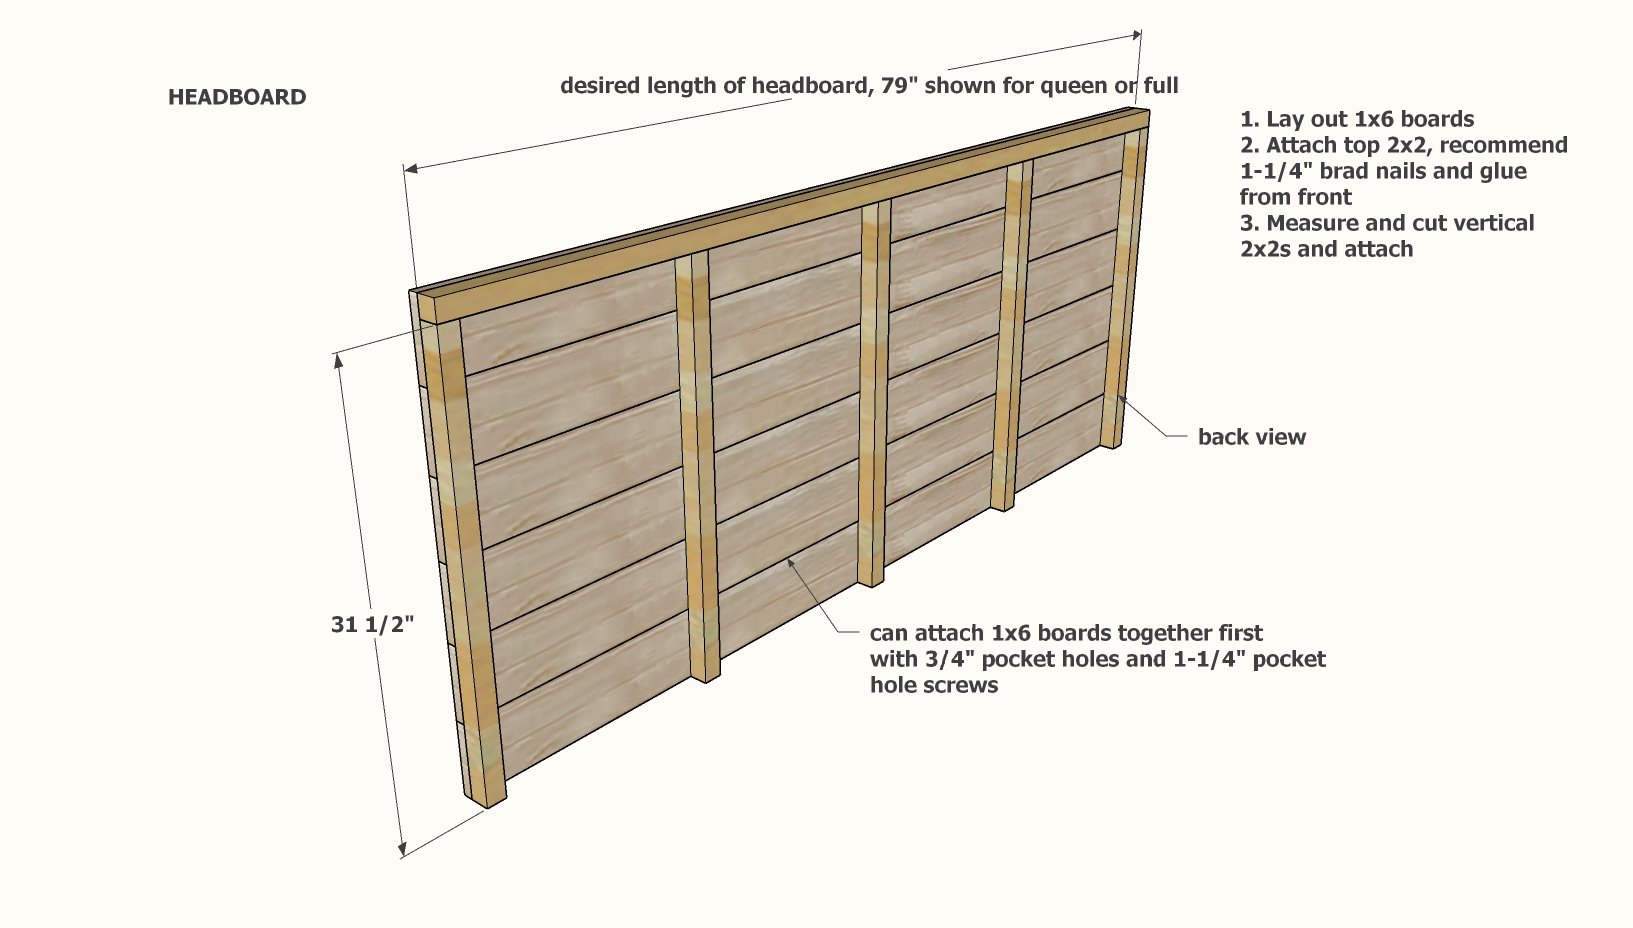
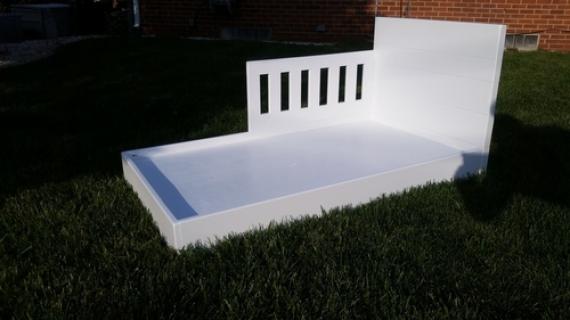
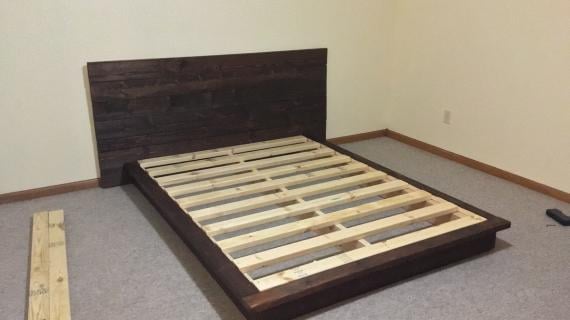
Headboard
Headboard can be easily modified in size by just extending the length of the 1x6s, or by adding more rows of 1x6 boards.
Cut the 1x6s with a compound miter saw or chop saw.
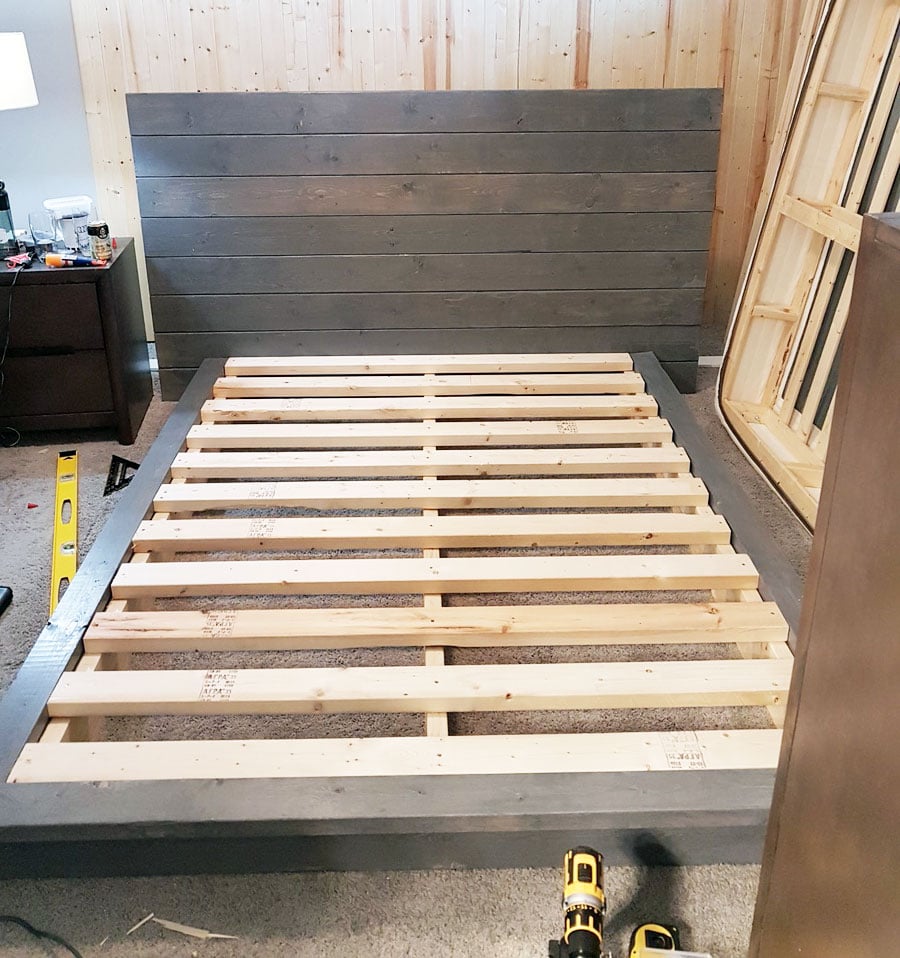
Lay out the 1x6 boards on a flat level surface. Attach the top 2x2 to the top.
Attach the vertical supports on ends, and then spaced out.
Prefinish the headboard.
Step 2
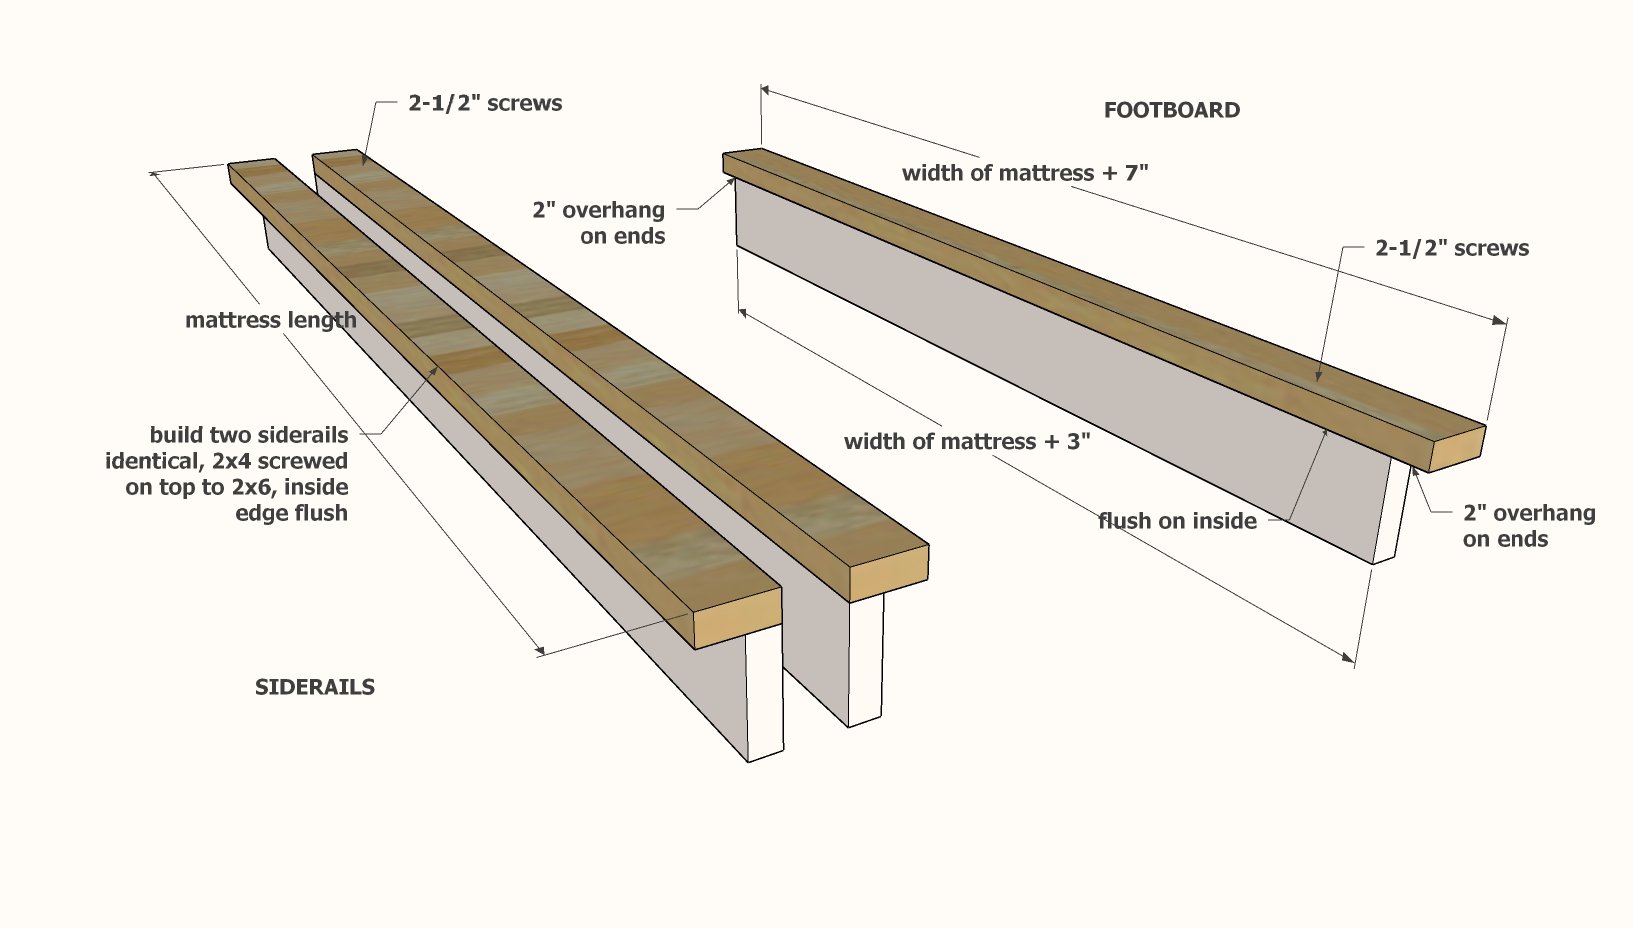
Siderails and Footboard
Attach the 2x4s on top of the 2x6s to create the siderails and footboard.
All edges are flush to the insides.
Footboard 2x4 overextends the 2x6 by 2" on each end.
Prefinish the siderails and footboard.
Step 3
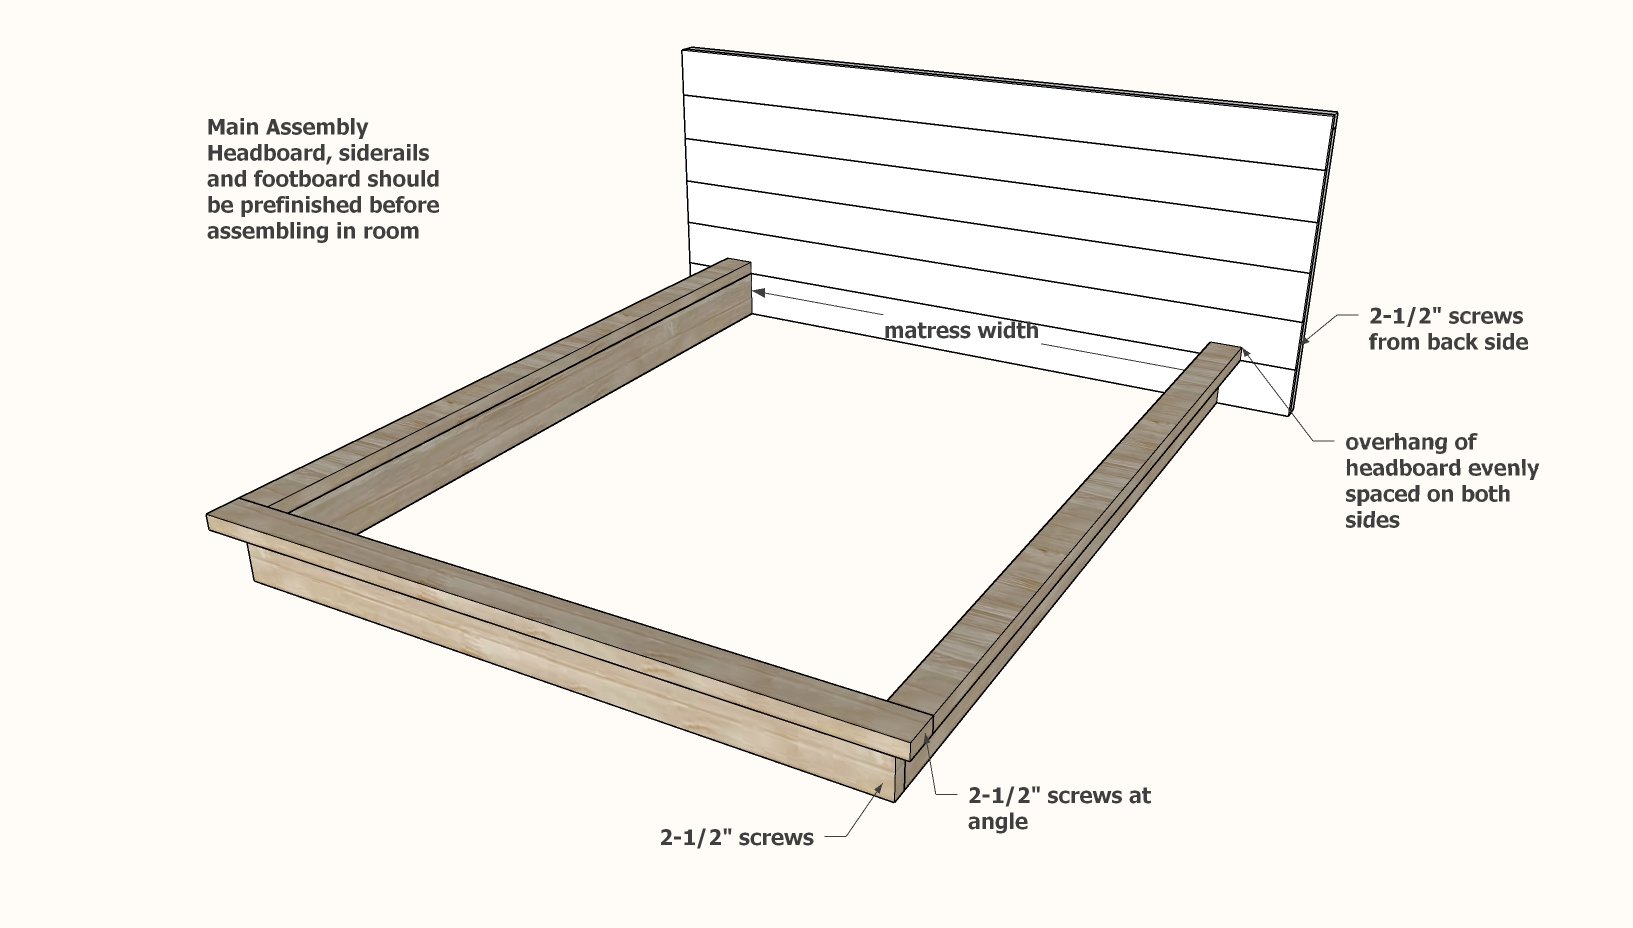
In the room, use the long screws to attach the footboard to the siderails.
Then attach the siderails to the headboard and set in place.
Step 4
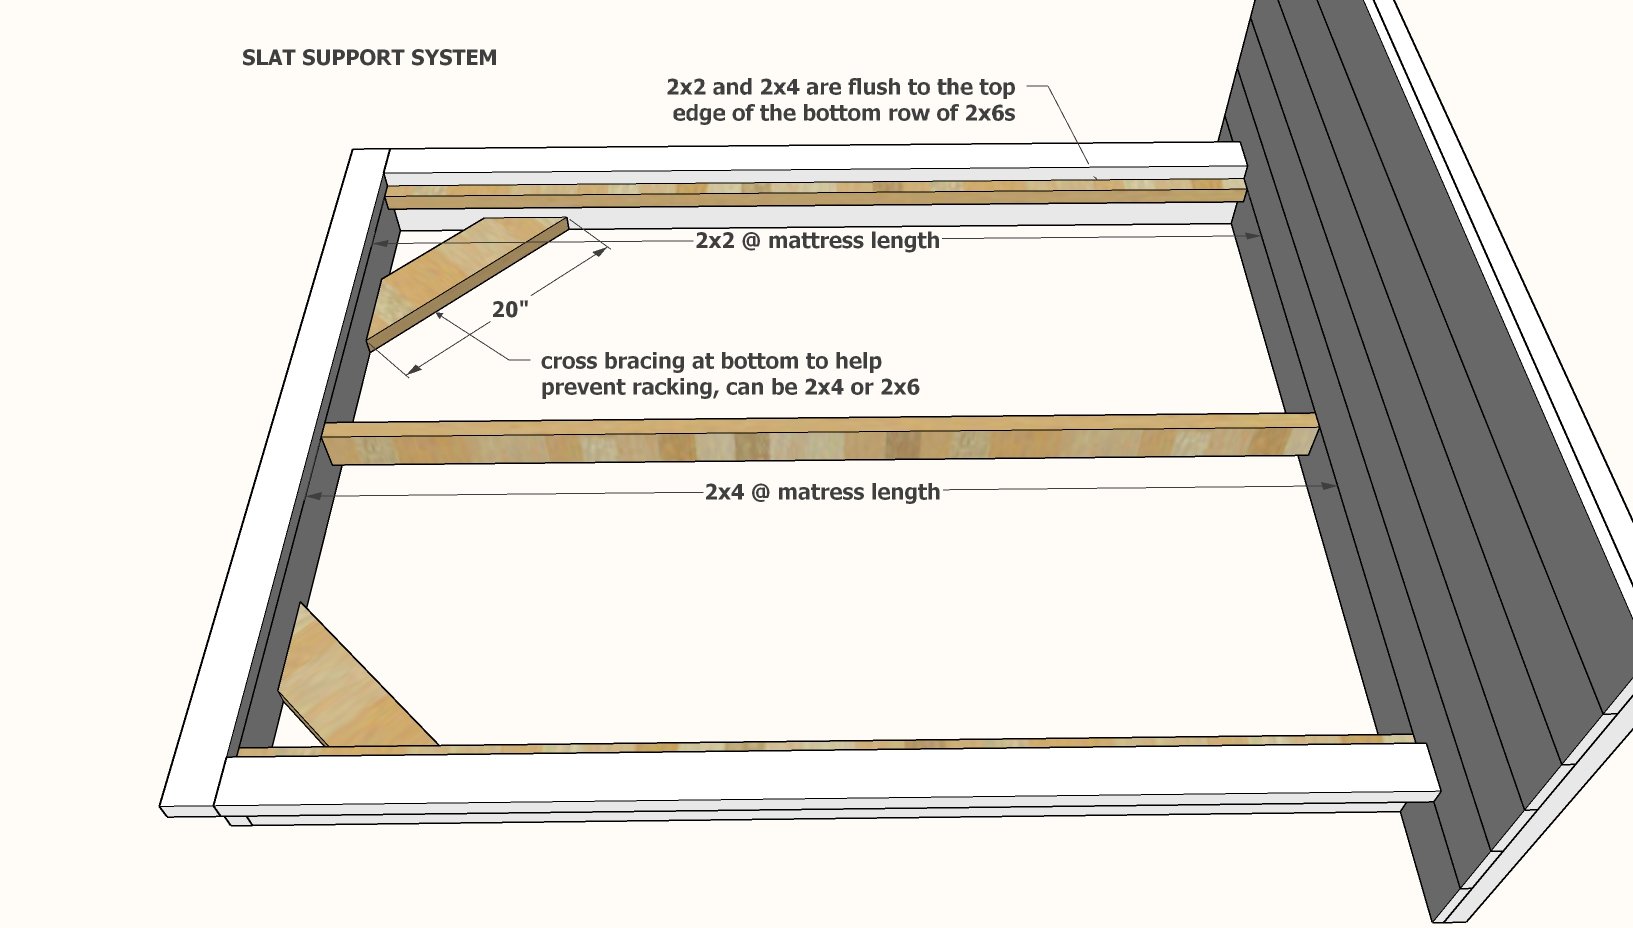
To keep the bed from racking, attach the 45 degree cross bracing at the bottom. You can also attach at the headboard for additional support.
Then add the 2x2 cleats.
For full size or larger, add the center 2x4 support, so the top edge is at the same height as the top edge of the 2x2s.
For additional support, center "legs" can be screwed to the center 2x4 to support the center of the bed.
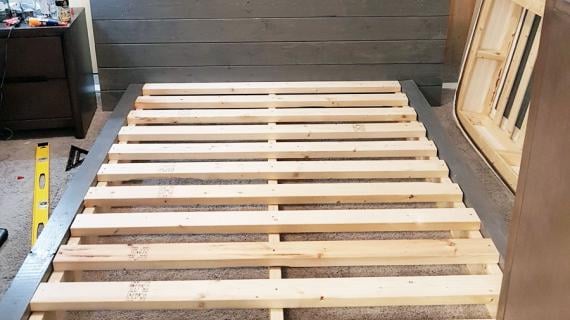
Step 5
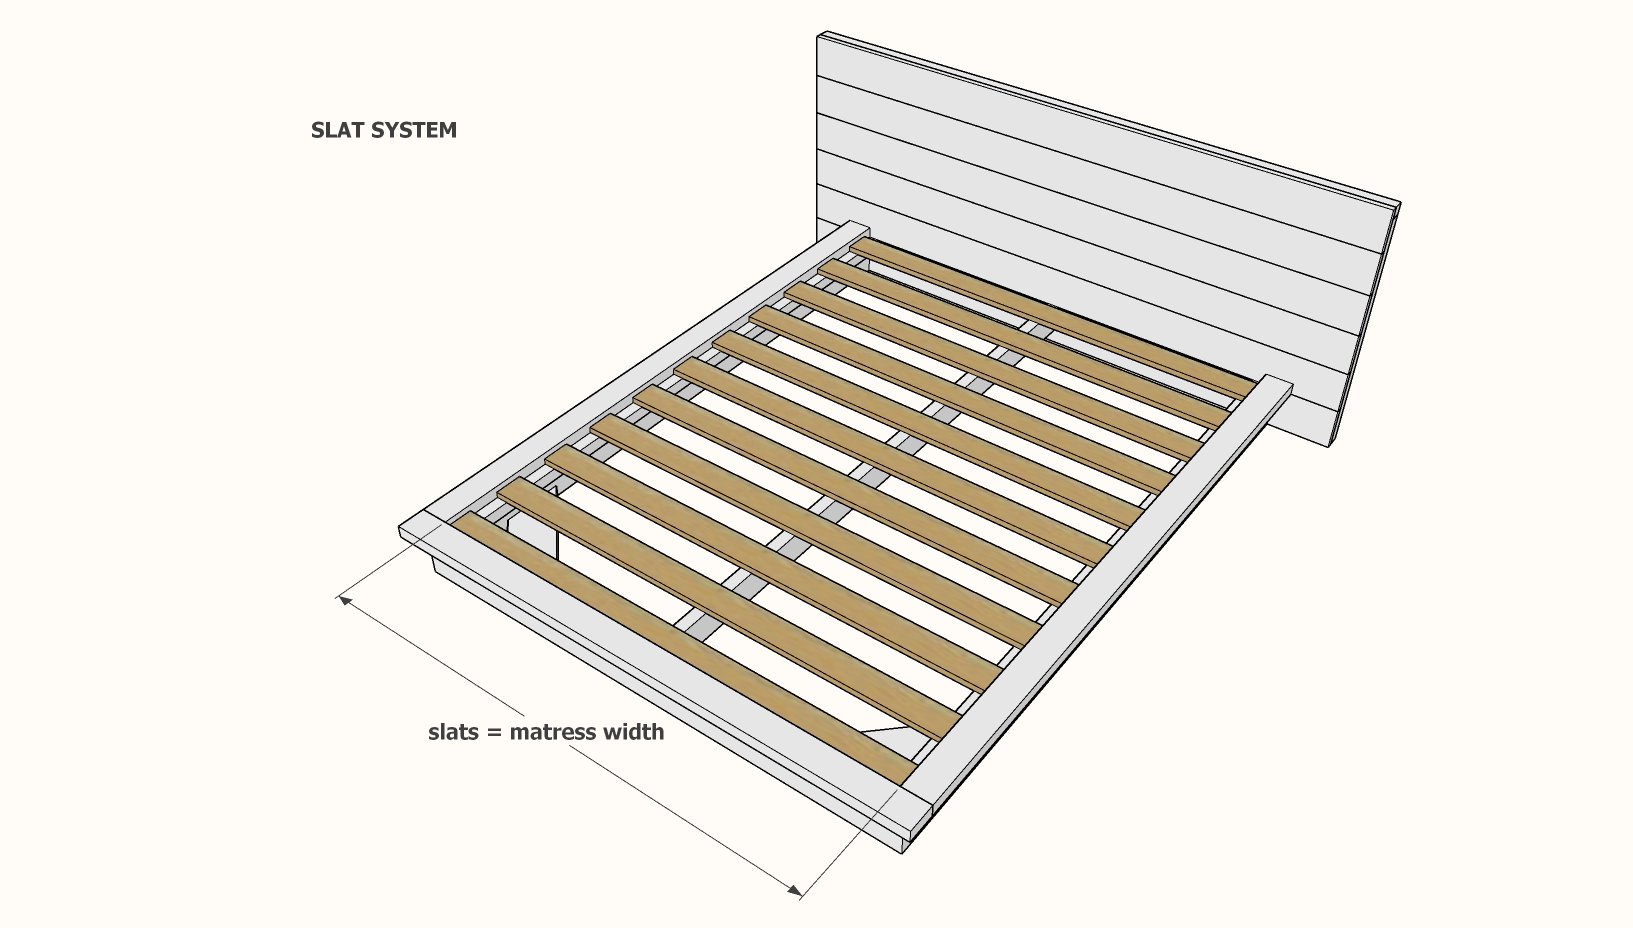
Layout the slats on the cleats, spacing about 4" apart. Use the 1-1/4" nails to tack down.
It is always recommended to apply a test coat on a hidden area or scrap piece to ensure color evenness and adhesion. Use primer or wood conditioner as needed.

Comments
Fantastic Furn…
Thu, 10/22/2015 - 04:53
Beautiful bed! I love your
Beautiful bed! I love your projects. Each and all of the furniture assembly plans I've browsed so for are absolutely amazing! To be honest I find it to be inspiring!
Bommar2
Thu, 10/29/2015 - 14:25
Stain?
What is the color/brand stain you used?
fishmonger
Sat, 01/13/2018 - 05:53
Any idea what stain color was
Any idea what stain color was used?
AzAdventurer
Mon, 09/12/2016 - 11:19
Issues with Brag Post
Hi Anna,
Thanks for the awesome plans, I updated my brag post with more details, but for some reason even after saving it several times, I don't see the changes reflect, I was wondering if you need to do something on your end to push the updates. I'm sure you're super busy, but thanks.
Also, what do you use for creating your plans and the pictures with the cuts, measurements and pocket hole details?
Ditti
In reply to Issues with Brag Post by AzAdventurer
Ana White
Mon, 09/12/2016 - 12:54
Hi, I am so sorry you are
Hi, I am so sorry you are having brag post issues. It has to do with either the site caching or the browser caching. If you reset your browser cache, it should show up pretty quickly.
I use sketchup - it is free for personal use and easy to learn.
Thank you for bragging! great project! Ana
Kimberann
Thu, 12/01/2016 - 11:33
Rustic Modern 2x6 Platform Bed - In a King?
Hi Ana,
Is it possible to get plans for this bed in a standard/eastern King? I would greatly appreciate it.
Thanks
K
mydiyprojects20
Wed, 12/09/2020 - 07:11
Hi!! Did you ever receive…
Hi!! Did you ever receive the plans for the king size bed?? I would really appreciate it if you passed them on! Thanks
autumnbirch
Tue, 03/16/2021 - 12:38
Hi! Could you pass the king…
Hi! Could you pass the king plans to me as well? [email protected]
Thank you!
In reply to Rustic Modern 2x6 Platform Bed - In a King? by Kimberann
Bciaston1
Mon, 03/15/2021 - 10:56
KING bed
Can i also get plans for King bed?
[email protected]
Sat, 03/20/2021 - 18:09
Can I get the king size bed…
Can I get the king size bed plans?
braxtonjay
Thu, 03/01/2018 - 14:08
Question about dimensions
If a standard Queen is 60"x80", based on the dimensions in your plan, does a mattress fit into the bed, or sit slightly on top?
I plan on building this frame this weekend, and just want to make sure I'm not overlooking anything. I want my mattress to fit into the frame.
username.
Fri, 03/02/2018 - 19:22
Hey man I actually just built
Hey man I actually just built the bed, and I myself was wondering how that made sense also. Then after looking at the other people who have made the bed I could tell that the slats are actually flush with the edges. So the top is completely flush, meaning it would sit on and not in. I though, am wanting it to actually sit in the bed frame a little, so I may deviate a little, as I already have with a few things.
Hope this helps
ohanzee6
Sat, 08/24/2019 - 11:39
King Size
Hi Ana,
Is it possible to complete this project for a king size bed? I wasn't sure if there were constraints in the length of 2x6 you could get from local hardware stores. Thank you for the help!
norash23
Mon, 08/26/2019 - 02:42
Is it possible for a king…
Is it possible for a king plan ??
Nora
wknight
Sun, 01/12/2020 - 17:17
Rustic Modern 2x6 Platform Bed
how would to convert this to a standard king....76 x 80 mattress?
tgj2010
Thu, 02/20/2020 - 17:56
Hi! How would I adjust this…
Hi! How would I adjust this to king??
megs502
Tue, 03/23/2021 - 11:17
king
soooooooo, anyone get the king size instructions??
Dana_1027
Mon, 04/19/2021 - 18:52
I am wondering if anyone has…
I am wondering if anyone has converted this to a king size? I am new to building and untrusting to try to do it myself. I'm not sure if there are limited length on this size wood? Any help would be greatly appreciated!!
lachendw
Wed, 08/04/2021 - 12:15
KING PLAN
Can I get the king plan for this bed?
JonBowman
Sat, 11/13/2021 - 00:09
Headboard question
Question..don't know if I missed something in the text of the plans. Why aren't all the boards in the headboard 2x6?
deerfootdreams
Thu, 03/24/2022 - 13:37
King size dimensions!
Would love the dimensions for a King bed. So excited to try and build this!
jlaing3174
Sun, 03/27/2022 - 10:23
Anyone receive king size…
Anyone receive king size plans ?
jlaing3174
Sun, 03/27/2022 - 10:23
Anyone receive king size…
Anyone receive king size plans ?