

UPDATE: I created an updated plan with custom sizing and simplified design here.
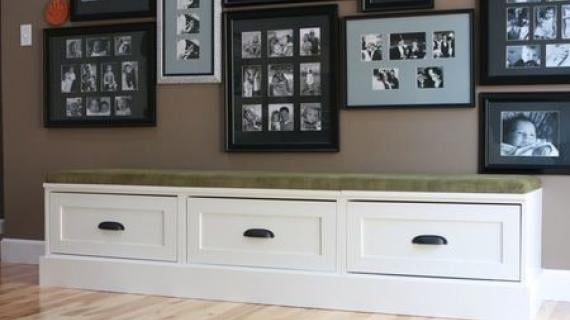
Free plans to build a single open storage base.
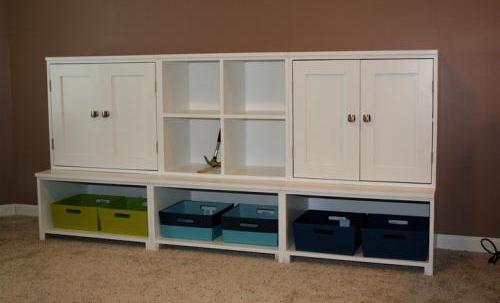
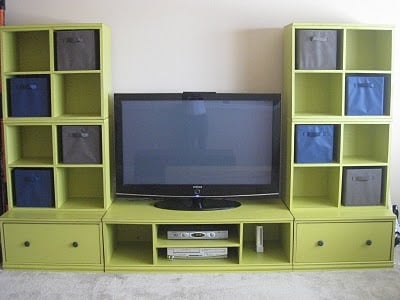
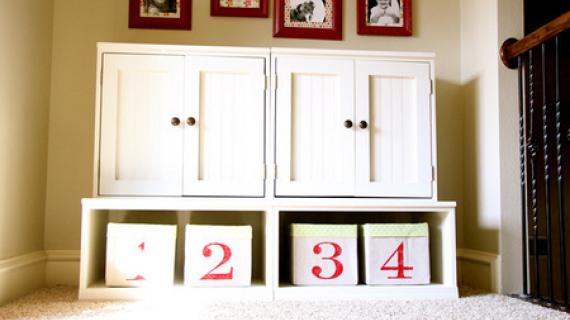
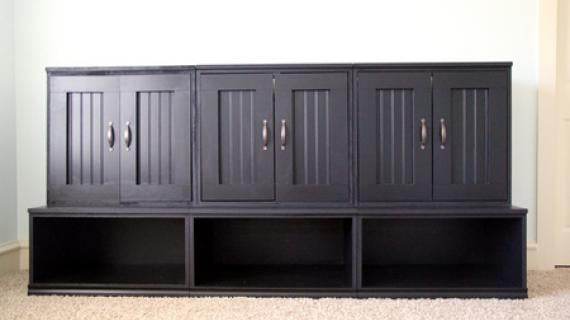
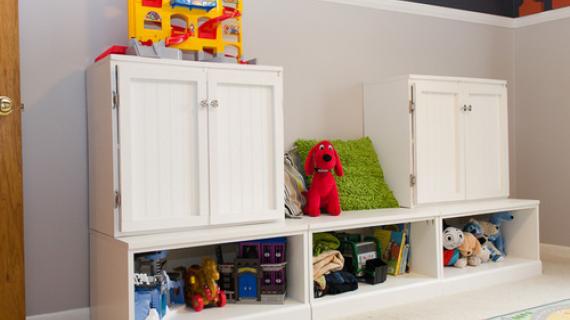
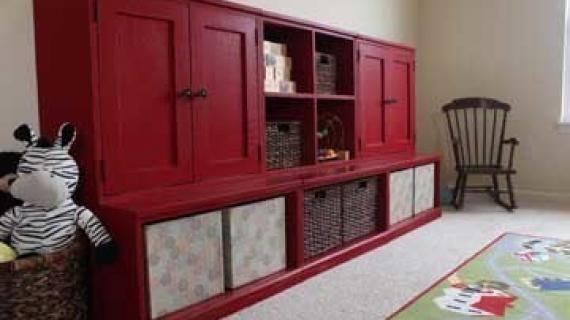
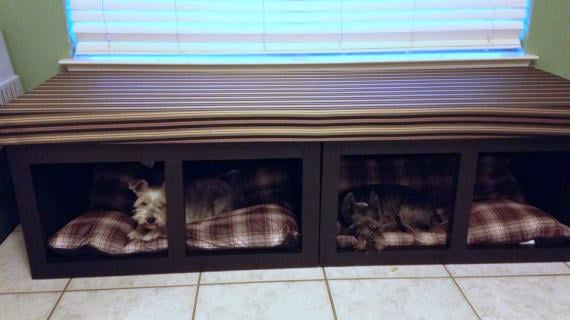
Part of the Cubby Storage Collection, this open base is part storage, part bench, and a whole lot of cuteness! Works with the drawer plan or the cubby hutches. Also available is a media console to create a media storage wall. See all plans in the Cubby Storage Collection.
Preparation
1 sheet of Hardwood Plywood or MDF (see here for a post on choosing your wood types)
 Lowes sells it here. At our local Home Depot, you can actually cut exactly how much you need, instead of having to buy a 8′ stick. This type of moulding is generally inexpensive.
A) 2 – 3/4″ Plywood or MDF @ 15″ x 21″ (Sides)


Cut all your boards. Make sure you cut straight boards, especially your plywood. Be aware of your saw blade clearance when marking out your cuts. Use a square or see the HOW-TO section for a video on checking for square. Always use glue and 2″ nails unless otherwise directed. IF YOU ARE USING MDF, YOU MUST USE SPECIAL CABINET SCREWS. Measure and mark your board before fastening.
Instructions
Step 1
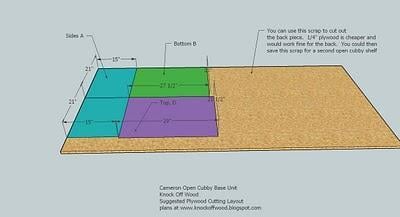
Cut the pieces from plywood. Be aware that your sawblade takes up space when you make your cuts, so you can't just mark and cut. Rather you need to mark each board, cut, mark, cut and so on. It is very important that you make good straight cuts.
Step 2
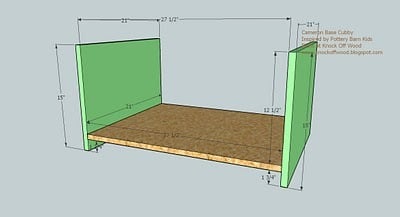
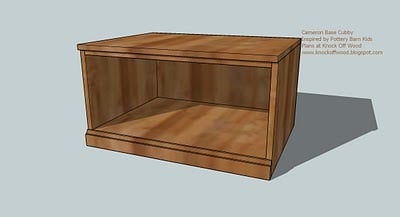
Build the box. Fasten the sides, A (green) to the bottom, as shown above, leaving 1 3/4″ clearance under the bottom shelf, B. Make sure you fasten this piece level and square with the sides.
Step 3

Build the box. Fasten the sides, A (green) to the bottom, as shown above, leaving 1 3/4″ clearance under the bottom shelf, B. Make sure you fasten this piece level and square with the sides.
Step 4
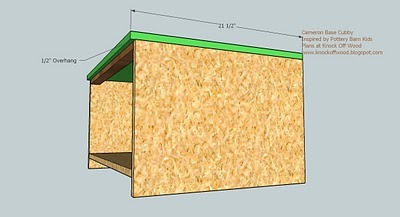
Fasten the top. Keeping the back and side edges flush, fasten the top, D (green) to the sides, A, using 2″ nails. Use the 1 1/4″ nails to nail the top to the top trim piece.
Step 5
Step 6
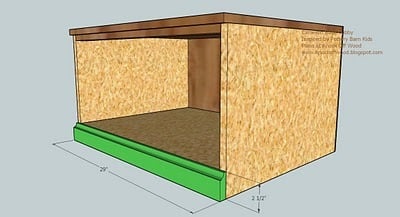
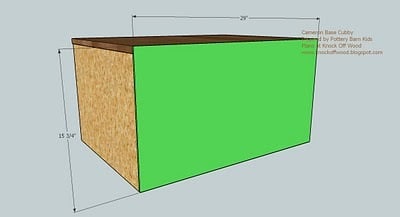
Fasten the Moulding. Nail the base moulding in place as shown above.

Comments
[email protected] (not verified)
Wed, 12/30/2009 - 17:05
a while back in the post
a while back in the post about he land of nod table you mentioned you were doing a post about kids chairs. i have tried to re-read and find it but can't. can you help?
also, i love all your stuff-you are such an inspiration!
Ana White (not verified)
Thu, 12/31/2009 - 08:14
Hi Rachel, yes I did promise
Hi Rachel, yes I did promise chair plans. I even went out in the garage and built the Land of Nod Storage chair. And it turned . . . okay.
The problem was it was too complicated. I have the plans, right here on my computer, already drawn up. But I just could not post these plans. They don't meet my requirements - easy, simple, cheap, doable.
I have been looking at other kids plans, and have decided that I will have to post a plan where the back legs are carved (you can just cut with a jigsaw). Lots of others have asked the same question, so look for plans coming soon!
Candace@crafty… (not verified)
Tue, 01/05/2010 - 05:21
I heard about your site on
I heard about your site on Funky Junk. I love it! I have a question about the nails on MDF? Do you always have to use the special cabinet screws?
Ana White (not verified)
Tue, 01/05/2010 - 07:30
Thank you for reading my
Thank you for reading my blog. I just want to share MY experiences with you on MDF. The experts all say never nail, only use the spendy McFeely's fastners. I did some experiementing. I predrilled and used drywall screws. This worked fine. Just make sure that you predrill the entire depth of the screw. Do not use wood screws, as the shaft is tapered and will cause your MDF to split. Then I tried nailing with 2" finish nails and lots of glue. And it worked PERFECT! I just used less nails and did not place any nails within about 1" of the joints. For example, if you are fastening a bookcase shelf to the sides, I would nail at 1" in on each side of the shelf, and then once in the middle.
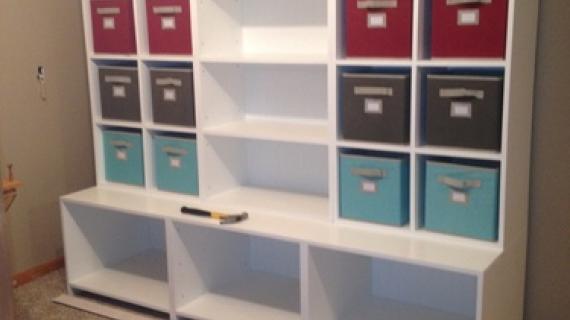
Now this is my experience and I just made 3 bookcases out of MDF. MDF is very easy to work with, is easy to finish, and very straight. No problems on my end. I did frame the entire shelf in wood (I used Pine) and the bookcase now has the look of wood (despite several coats of Antique White).
I would recommend you taking some scrap pieces and testing out your different fastening options. I have heard that there are different grades of MDF.
Make sure you check back later this week. I will be posting photos of my MDF bookcases.
In reply to Thank you for reading my by Ana White (not verified)
CindyLynn
Thu, 04/14/2011 - 06:23
Plans for Doors and issues w/ site...
I cant seem to find the plans for the doors for this project. Can anyone direct me? I seem to be having alot of problems navigating the new webite. Also sometime I click on links and a blank page shows up. Is anyone else expierencing the same issues. Ana, If you could help me to find the plans Im looking for I would appreciate it greaatly!!!! I love this whole set!!
In reply to Plans for Doors and issues w/ site... by CindyLynn
Daisies and Crazies
Thu, 04/14/2011 - 10:27
Door plans are here
Hmm. Including the link is sending my reply to the spam filter. :( The doors are under the plans called Cubby Media Wall Hutch with Doors.
:)
In reply to Door plans are here by Daisies and Crazies
CindyLynn
Thu, 04/14/2011 - 10:39
Thank you! :-) I will check
Thank you! :-) I will check this out.
Lindsay (not verified)
Mon, 01/18/2010 - 09:01
SO glad I found this blog!
SO glad I found this blog! Heard about it from Funky Junk. Do you have any tutorials for building a pottery barn-ish desk? I need one for my craft room :-)
Court (not verified)
Thu, 01/21/2010 - 06:01
I read about you over at
I read about you over at Shanty2Chic and I love your tutorial on the PB shelves. Totally adding it for the toy room I am re-doing this spring.
jacksmom (not verified)
Mon, 02/01/2010 - 09:43
I just finished the bases for
I just finished the bases for this today! Did 2 but think I will make another since it was so easy. Only problem I had was that when I had them cut everything at Lowes the machine was off so all my pieces were off by 1/8" which was a pain but workable. They weren't nice about it and told me it was my problem and I should just be happy they did the cuts in the first place because they don't cut for projects. Will be going to Home Depot for the rest of my project! Thanks again!
ArmySGT.
Thu, 05/26/2011 - 08:24
a cut to size
The fault there is with the machine operator.
Each of the big box stores uses a large 12" or 14" cross cut blade.
Its 1/8" thick.if you need two 4 foot pieces, then buy a 10 foot board. The saw operator should know to cut with the saws thickness on the waste side of the marks.
If your trying to get two pieces out of one board it is better to get a longer board than necessary or cut with a thin blade like a jig saw at home.
The keep the scrap for other uses like a smaller project or to test joints or stains.
In reply to I just finished the bases for by jacksmom (not verified)
claydowling
Thu, 05/26/2011 - 13:53
Cutting material
Don't expect the stores to cut your material to size for you. That's something you need to do for yourself. The only thing you should have the store do for you is to cut the material to a size that you can get into your vehicle. Always have them cut it an inch or two oversize. And really, try to avoid having that done, because these guys aren't finish carpenters, they're retail workers.
If you're not comfortable with a circular saw, that's fine. You can buy a decent hand-powered crosscut saw at Lowes, Home Depot, or nearly any hardware store. I take one to the store with me and cut my own material down on site to get it into my vehicle, so that I know it doesn't get messed up. Get a saw roughly the same length as the height of your knee.
Menards actually has benches in their loading zone that make great supports for cutting. You could also throw a pair of collapsible saw horses into your trunk, since most stores don't have this.
leobrat (not verified)
Thu, 02/18/2010 - 09:46
Just bought the wood for this
Just bought the wood for this project. The project is actually 2 of these, 2 open cubbies and 2 hutch with doors (complete with chalkboard paint). It will end up being a gift for my nephew & wife who are expecting their first child - the first grandbaby of the family.
Anyway, I bought plywood but I plan on painting it to match their color scheme of the room. Would you suggest that I still use the Edge Banding or is that more if the item is stained?
Thanks for all of your effort. I love everything.
In reply to Just bought the wood for this by leobrat (not verified)
imlinenberger
Wed, 03/23/2011 - 11:28
Edge banding
I just bought white edge banding on Sunday and it says that you can either stain or finish it to desired color. The edge banding gives it a more polished look for sure so I would recommend it. Best wishes!
paperkite (not verified)
Sun, 05/23/2010 - 10:39
I am SOOO glad I found you,
I am SOOO glad I found you, too! :)
Doonecachem (not verified)
Mon, 08/30/2010 - 09:01
what I was looking for,
what I was looking for, thanks
ana (not verified)
Mon, 08/30/2010 - 09:21
Awesome. You are welcome!
Awesome. You are welcome!
sarahj77 (not verified)
Tue, 10/05/2010 - 07:39
I've got a question for those
I've got a question for those of you who have built the base. I cannot find 2 1/4" base molding. I found some 2 1/4" casing (which I hate). Lowe's told me they don't carry 2 1/4". I thought of buying 3 1/4" and ripping it myself, but have no table saw. What has anyone else done for the base molding?
Thanks!!
In reply to I've got a question for those by sarahj77 (not verified)
imlinenberger
Wed, 03/23/2011 - 11:24
base moulding
I went on ahead and bought 2 1/2". It barely sticks up over the bottom shelf so I wonder if you went with 2 1/4" if it would even cover the bottom shelf. This was one discrepency I found with the plans. I just built two of these on Monday. HTH and best wishes!
aliciahageman (not verified)
Mon, 01/24/2011 - 17:10
ana-i am making this cubby
ana-i am making this cubby system, but want to be able to stain it to match the rest of the furniture i've built. since MDF isn't stainable...what is my other option?
In reply to ana-i am making this cubby by aliciahageman (not verified)
imlinenberger
Wed, 03/23/2011 - 11:27
Wood to stain
When I was buying my wood on Sunday, they said I could use the Hardwood Plywood and that would work great. It is a little more expensive than basic hardwood/MDF but looked really nice. I didn't go with it because I'm going to paint mine but hindsight, I wish I had because it was better quality wood than what I got. Best wishes!
claydowling
Wed, 03/23/2011 - 12:15
Stainable Materials
A better-quality plywood can be stained. For a nicer look you'd want to trim out the face with 1x3 (or 1x2 if you can lay hands on it). To keep the dimensions the same you'd need to reduce the panel sizes appropriately.
Another option is to build these from solid wood. You'd have to do a panel glue-up to get pieces wide enough, and you'd need to do a little research on that first. Not too difficult, but requires a few larger bar clamps and a jack plane to match-plane the edges. Great video for how to do that here: http://www.logancabinetshoppe.com/1/post/2010/10/episode-28-edge-jointi…
And never mind the antique plane that Rob is using in that video. The modern jack plane that blue or orange sells works just as well once you sharpen them. Rob just likes those older planes.
sgilly
Fri, 06/10/2011 - 15:35
Getting wood cut to size
I've just read the posts about having wood cut to size at the big box stores. My brother is a cabinet maker (but doesn't live close to me) and when I complained about the poor cutting at our local HD an Lowes he suggested that I contact a local,small cabinet shop. He said I could take a cut list to them, tell them the material I wanted, and they would cut it much more precisely than the big box place. He did say it might be a few dollars more to do this, but I'd get a much better end product. Might be something to check on the next project...
Guest (not verified)
Mon, 01/23/2012 - 12:51
Cubby Storage
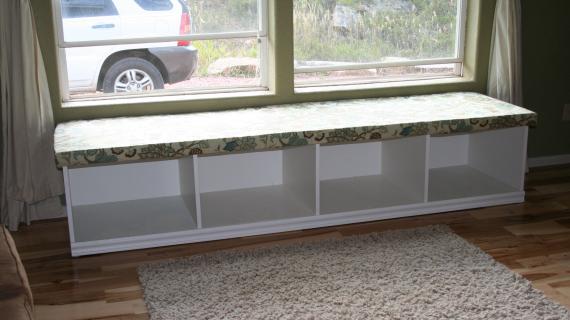
I am wanting to make this into a window seat by putting three cubbies together. Is this strong enough, or would I have people falling through? Thanks! Love the site!
sgilly02 (not verified)
Mon, 01/23/2012 - 14:24
Daybed/window seat
I'm sure this would be sturdy enough, but if you're concerned, take a look at this similar project plan for the storage day bed. http://ana-white.com/2009/12/plan-stratton-daybed-as-request-by-you.html I just modified this somewhat to fit in a nook that wasn't quite big enough for a twin size, so the boxes are custom sized. Still, overall length is about 72". A whole troupe of dancers could dance a jig on this and I don't think you'd have any problems.
brandim96
Tue, 01/24/2012 - 17:46
Thanks!
Thanks for the info! Based on your advice, I decided to build the cubby system, and I'm really glad that I did. This thing is not going anywhere! It is my first project, and I'm almost finished with it. I'll have to post some pics when I'm done.
sgilly02 (not verified)
Wed, 01/25/2012 - 14:26
Looking forward...
to seeing the results of your labor. I'll bet it turns out beautifully.
brigitep72
Mon, 02/27/2012 - 04:14
help with depth of base
Hello. I'm a major rookie here, trying to make some banquette seating using this plan and my own dimensions. Clearly this is my brain getting hung up on numbers since many people have successfully completed projects following these plans.
My question is how do you get a final finished depth of 23"? The top is 21.5" and it looks like the back is contributing to the depth, making it 21.75". I can't tell for sure, but I would imagine the base molding is no thicker than the 0.5" overhang so not contributing to the overall depth. What am I missing? Where is the extra 1.25"?
For some reason, the photos are quite blurry on my browser. So much so that I can't read the text well. I tried control + to zoom in, and that makes it worse. Maybe I need to change the resolution on my screen. Anyway, for now, there for some things that I can't be 100% that I'm reading correctly.
Thanks in advance to anyone who can help me understand this?
pj2rc
Mon, 07/14/2014 - 08:28
is the base space neccessary?
I want to build 3 with cabbies added for a window,seat/storage in the kids room. First question, will this,be strong enough to hold people with cubbies added for vertical support and second question is, can,it just be build as a box straight to the floor instead of lifting the bottom 2" and adding base molding? It would just be wasted space, but I,wasn't sure if it was adding horizontal,support that way?
pj2rc
Mon, 07/14/2014 - 08:30
is the base space neccessary?
I want to build 3 with cubbies added for a window,seat/storage in the kids room. First question, will this be strong enough to hold people with cubbies added for vertical support and second question is, can it just be build as a box straight to the floor instead of lifting the bottom 2" and adding base molding? It would just be wasted space, but I wasn't sure if it was adding horizontal support that way?
pj2rc
Mon, 07/14/2014 - 08:32
is the base space neccessary?
I want to build 3 with cubbies added for a window,seat/storage in the kids room. First question, will this be strong enough to hold people with cubbies added for vertical support and second question is, can it just be build as a box straight to the floor instead of lifting the bottom 2" and adding base molding? It would just be wasted space, but I wasn't sure if it was adding horizontal support that way?
erican007
Thu, 07/31/2014 - 19:53
Ok. I just made my first open
Ok. I just made my first open cubby. Have a few questions. I am having a hard time getting square on one side(this is after I have attached both sides to bottom.). It keeps shifting and I'm slightly off on one side.
Also, in the tools list you said a Kreg jig. When do I use this?
Thanks I would like to start on my next one but want to make sure I'm doing correctly. Boards are straight
balloongal247
Fri, 08/01/2014 - 07:30
Kreg
The Kreg Jig is a fastener tool. This plan doesn't tell you where to do the holes, but you'd put the holes in a non-visible spot, and it is an easy and fairly strong method of fastening. In this one, I'd put the holes in the bottom of the bottom to attach to the sides (and the back) and holes in the bottom of the top piece to do the same.
The Kreg Jig tells you the instructions for spacing and such for strong support. One thing I had an issue with is that when you are setting the drill bit to the right depth, you measure to the part where the drill bit starts getting wide, not the absolute tip. If you measure to the absolute tip, it will barely go into the second piece of wood at all.
natsmom
Wed, 07/20/2016 - 11:05
Step 2 and Step 3 are the same
Pictures are different, and people have obviously figured out what to do, but thought I would mention it just in case.