

UPDATE: Check out this new, updated plan for an easy to build option.
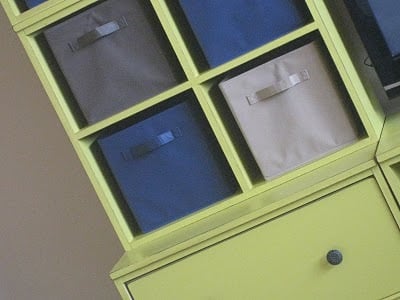
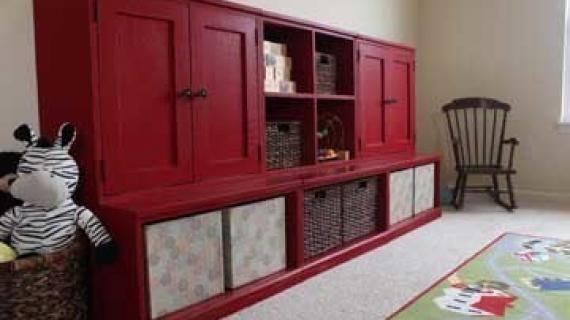
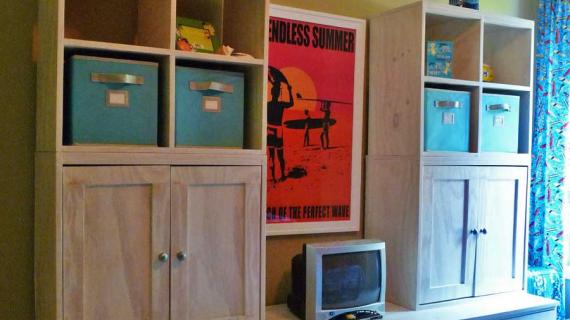
I love cubbies because you can sort things easier, you don't need book ends, and they are just so cute! This cubby hutch is designed to stack and store, build an entire storage wall or surround your media station. These easy plans work with the rest of the Cubby Storage Collection. Special thanks to Nicole and Shanty2Chic for sharing their images.
Pin For Later!
Preparation
If you are building multiple pieces in this collection, it is recommended that you create a cutting template of all the pieces on graph paper to conserve plywood. You will need 3/4" Plywood or MDF 1x2 1/4" Plywood (for the backs)
A) 2 – 3/4″ Plywood or MDF @ 25 1/2″ x 14″ (Sides)
B) 2 – 3/4″ Plywood or MDF @ 27 1/2″ x 14″ (Shelves)
C) 1 – 3/4″ Plywood or MDF @ 29″ x 14 1/2″ (Top)
D) 2 – 3/4″ Plywood or MDF @ 12″ x 14″ (Vertical Dividers)
E) 2 – 1×2 @ 13 3/8″ (Top Trim)
F) 1 – 1/4″ Plywood @ 29″ x 26 1/4″ (Back)


Please review all the information available in the other pieces in the Cubby Storage Collection before begining this project. There is much important information available on types of wood, working with MDF, edge banding, and more here. If you are building this plan, you most likely have scraps leftover from building the open cubby base and the drawer. I recommend using your scraps if possible to maximize savings. Therefore, I will not be posting a plywood cutting layout. I recommend getting some Graph Paper before begining to build any of these pieces and draw up a cutting layout for all the pieces you are building. My trick is to group boards of the same width (for example, 14″ or 21″) and place these boards in progression. Then have Home Depot rip your plywood into that width. This will also help you get your squarest possible cuts. Cut all your boards as instructed above. Depending on your type of wood, use 2″ nails or screws, unless otherwise directed. ALWAYS use glue! Before fastening any boards, mark with a metal square where your board will be placed. This will save you time and you will build better furniture. Make sure your board cuts are square. Use a metal square or check out the HOW-TO section for a video. Work on a clean level surface. If you are using screws, predrill and countersink your screws.
Instructions
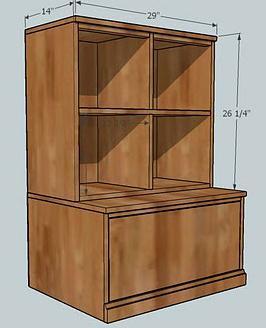
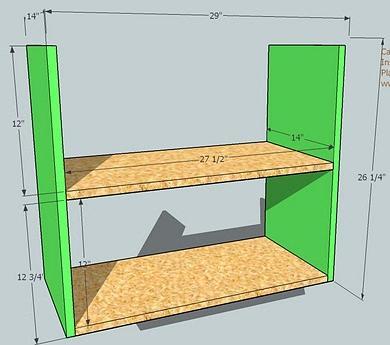
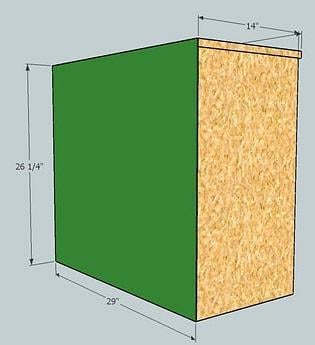
Step 1
Dimensions of the individual hutch.
Step 2
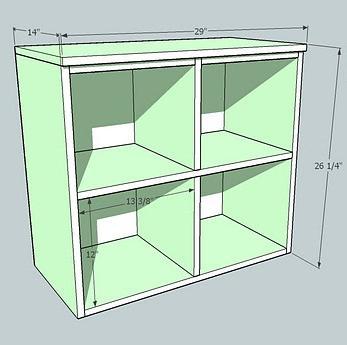
Build the box. Most storage furniture pieces start with a basic box. Fasten through the sides, A (green), into the shelves, B, as shown above. Make sure you mark your sides where the shelves fit prior to fastening the pieces together.
Step 3
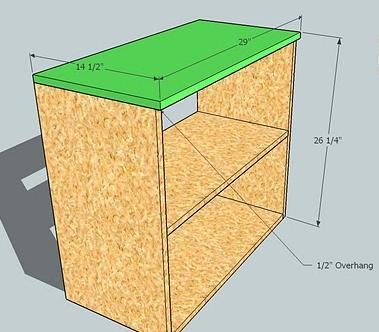
Attach the top. Fasten the top in place (C, Green), as shown above. Keep the back edge and side edges flush. The front will overhang 1/2″.
Step 4
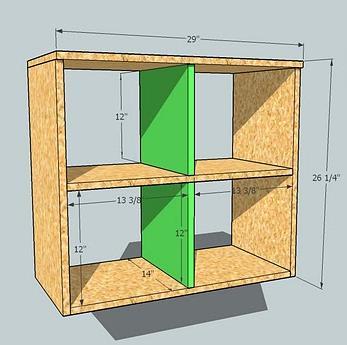
Fastening the Cubby Sides. Start by fastening the top cubby divider (Green, D) in place, as shown above. Fasten through the top and through the middle shelf.
Then position the bottom cubby divider in place. Fasten through the bottom. Then toenail (nail at an angle) through the front and back at an angle into the middle shelf. Make sure you use glue here.
Step 5
Step 6
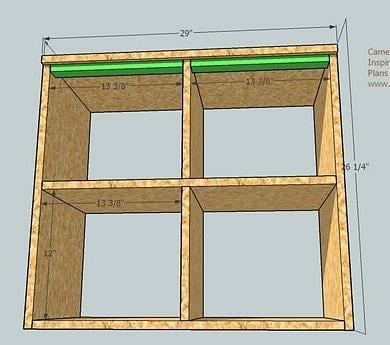
Attach the back. Take a square of the hutch. Using the 1 1/4″ nails or glue, attach the back as shown below. Mark out where the vertical cubby dividers are and MAKE CERTAIN that you fasten the plywood back to all shelves, dividers and sides.

Comments
gail@myrepurpo… (not verified)
Fri, 01/01/2010 - 17:27
Hi Ana!I found your site a
Hi Ana!
I found your site a couple of days ago, and I have loved looking around! You do fabulous work, and I can't wait to try a couple of your projects. I think my first might be the Hyde coffee table! I went to home depot tonight (at closing) to pick up some wire. I walked down to look at the cull bin, and I couldn't believe my eyes! Tons of good lumber, cheap! They never have any good stuff. I only had time to pick up about 6 pieces, I didn't get a cart, so I could only gather what I could carry. I plan to go back tomorrow and load up!
thanks for being so generous with your plans!
Happy New Year!
hope your little one feels better real soon.
gail
Ana White (not verified)
Mon, 01/04/2010 - 05:05
"reclaimed wood" . . .
"reclaimed wood" . . . awesome!
Alexis (not verified)
Fri, 01/15/2010 - 10:16
Hi Ana,Do you have plans for
Hi Ana,
Do you have plans for the doors too? I'm going to build this as soon as the snow melts!
These are the … (not verified)
Sat, 01/16/2010 - 20:22
Yes, would love to see
Yes, would love to see instructions for the doors! I just showed my dad the picture of this in Pottery Barn last week (before I found your blog) to see if he could build it for me. He said he couldn't do it because of the doors. I need the doors to hide kid clutter! ;-)
I love that I found your site! Thank you! Thank you!
Jenessa (not verified)
Mon, 01/18/2010 - 23:35
i was so excited to find you
i was so excited to find you site a few weeks ago, i already shot off your site to a few family members. this is what i've chosen to be my first project, once the weather warms up (it's currently snowing heavily). i'm very excited! ...and a little worried with my nonexistent experience. hopefully i'll figure it out and make the play furniture for my son. i'm eyeballing a few other projects already for when we move (in 2014) and i can get rid of the CRAP, relatively pricey, furniture we have. thank you so much for sharing your knowledge.
Leah (not verified)
Tue, 01/19/2010 - 10:21
Hi Ana,I found your site
Hi Ana,
I found your site yesterday! You are my HERO!
Your work is incredible, you have inspired me to start some of your amazing projects! Thank you for sharing your plans. Keep up the good work!
You rule!
Angie (not verified)
Fri, 01/22/2010 - 13:24
Hi Ana! I just wanted to let
Hi Ana! I just wanted to let you know that you have inspired me to put down the IKEA catalog, and pick up the nail gun...I was about to go buy the Expedit Cubby shelves for my craft studio, but found your plan for the Cameron Cubby Open Hutch and fell in love - with the look and the price! I'll send pics when I finish it!
Mamaperreca (not verified)
Sun, 03/28/2010 - 15:14
I started on the Cubby Hutch
I started on the Cubby Hutch unites this weekend. I am so excited. I posted work in progress pictures on my blog. Will send in pictures when its complete.
I already have a backlog of projects in my head. Bunkbeds, bookshelves..etc..
Love this site Ana! Thanks.
Build a Desk a… (not verified)
Wed, 11/03/2010 - 07:11
[...] if you would like to
[...] if you would like to make the matching hutch, follow along with these directions, but use the measurements and diagram shown [...]
Heather (not verified)
Tue, 11/16/2010 - 10:05
Thanks for these!!! I have
Thanks for these!!! I have been eyeing all of the stuff on this site for months & now am getting up my nerve & have a bit of time & A LOT of need (my 2yr old just had his bday & Christmas is around the corner - too many toys!).
Quick question though - you say to anchor to the base & the wall - how? :)
Thanks! Heather
Lisa (not verified)
Tue, 12/28/2010 - 15:36
Hi Ana, I just happen to run
Hi Ana,
I just happen to run across your blog today and I wanted to let you know that you have really motivated me! I know that life as a mother, wife, daughter, sister, and home maker can be chaotic but, to actually make time to be efficient and creative... that's awesome. Thank you for taking the time to put together this aoutstanding blog. You have absolutely no idea what a blessing it has been to find your this right before I begin my craft room. I figuered it would take me several years to get all the furniture that I wanted for my craft room seeing as its so expensive... no doubt everything happens for a reason. Now I can be creative and efficient as well ;) thank you again and God Bless.
Guest (not verified)
Thu, 04/07/2011 - 14:58
changing wood width
Before you decide to change wood width (say, from 3/4" to 1/2") remember that this will change a lot of other dimensions. This is only my second project and when I went to go purchase the wood at HD, the guys said "Why can't you just use 1/2"? It'll be strong enough." Well, that wasn't the issue. I have had to correct several mistakes because of going this route all the way down to the finish nails since the 2" nails were too wide and splitting my wood. I'm sure a more experienced carpentar wouldn't make that mistake, but I just thought I'd share my story. I'll post pictures when it's all done.
jebwhs87
Wed, 07/13/2011 - 06:11
Toy locker
I am using the hutch on top of the open base cube. Thank you for the designs.
One change I would make is the vertical support a single piece (25 1/2") and daddo both vertical and horizontal pieces 1/2 way then slide them together. This would eliminate the toe nail. If you don't have a daddo kit, you can drill at the 'top' (mid point of the wood)then use your saw to cut up each side of the daddo. Sometime I do this as I am too lazy to swap out the blades.