
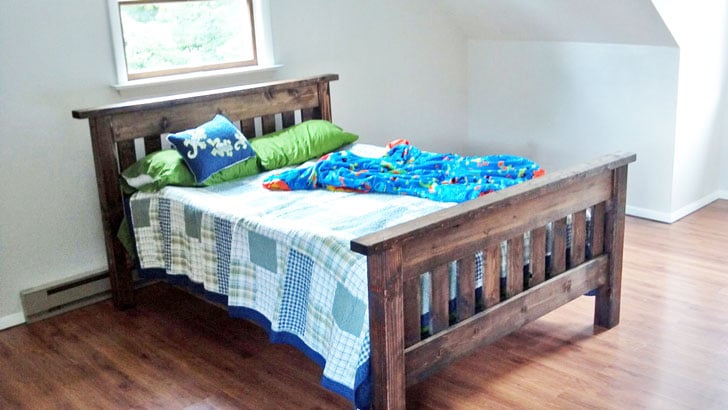

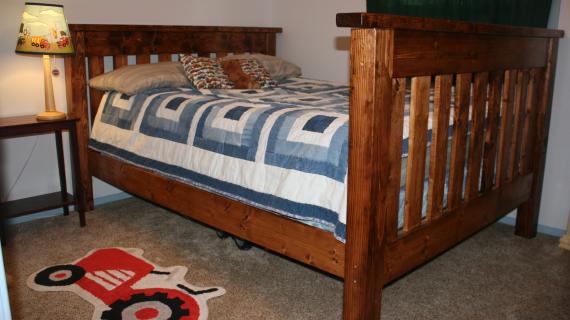
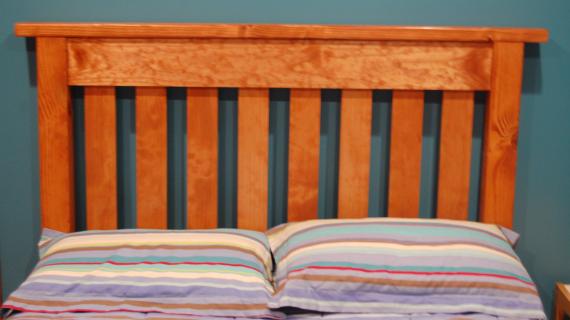
Build your own full size bed and save up to 90%!
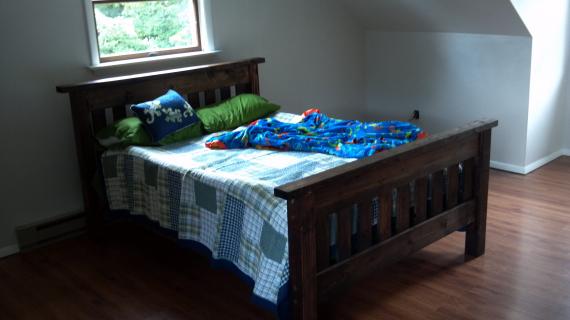
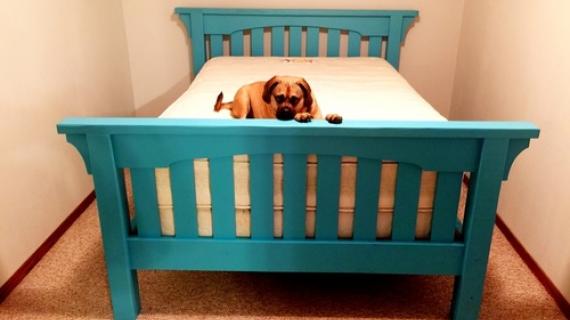
This beautiful full size bed is solid wood, made from standard 2x4s and other dimensional lumber. It is cleverly put together with just basic woodworking tools. This rustic design can work in both a girls or boys room. Step by step plans include diagrams and shopping and cut list. Anyone can build it!
We also have this bed plan available in a twin size version.
Preparation
- 1 - 1x6 @ 6 feet long
- 2 - 1x6 @ 10 feet long
- 4 - 1x4 @ 8 feet long
- 8 - 1x3 furring strips @ 8 feet long
- 1 - 4x4 @ 8 feet long (cut both headboard posts from this board)
- 1 - 4x4 @ 6 feet long (cut both footboard posts from this board)
- 4 - 2x6 @ stud length or 8 feet
- 4 - 2x4 @ stud length or 8 feet
- 1 - 1/4" long brad nails (a couple hundred)
- 16 - 5" long self tapping wood screws OR 2-1/2" pocket hole screws if you have a Kreg Jig
- 50 - 2-1/2" long self tapping wood screws
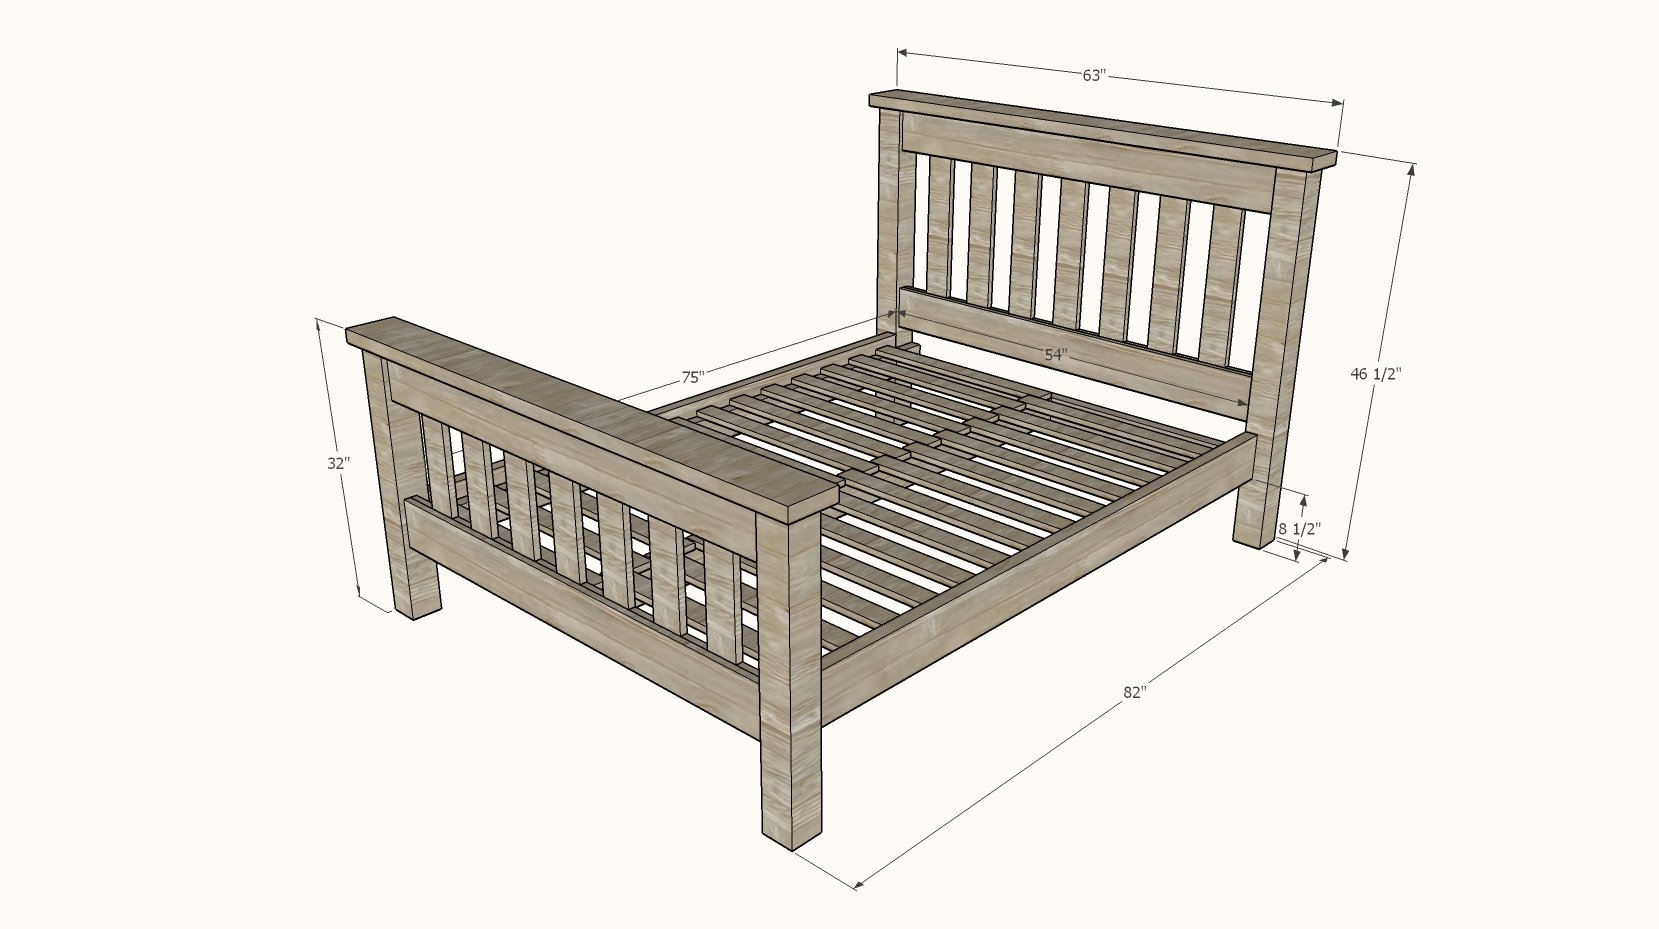
FULL SIZE HEADBOARD CUT LIST
- 2 - 1x6 @ 54"
- 7 - 1x4 @ 30"
- 12 - 1x6 @ 3-1/2"
- 4 - 1x6 @ 4-1/4" (measure and cut to fit)
- 2 - 4x4 @ 45"
- 1 - 2x6 @ 63"
FULL SIZE FOOTBOARD CUT LIST
- 3 - 1x6 @ 54"
- 7 - 1x4 @ 22"
- 12 - 1x6 @ 3-1/2"
- 4 - 1x6 @ 4-1/4" (measure and cut to fit)
- 2 - 4x4 @ 30-1/2"
- 1 - 2x6 @ 63"
FULL SIZE BED FRAME CUT LIST
- 2 - 2x4 @ 80" - cleats
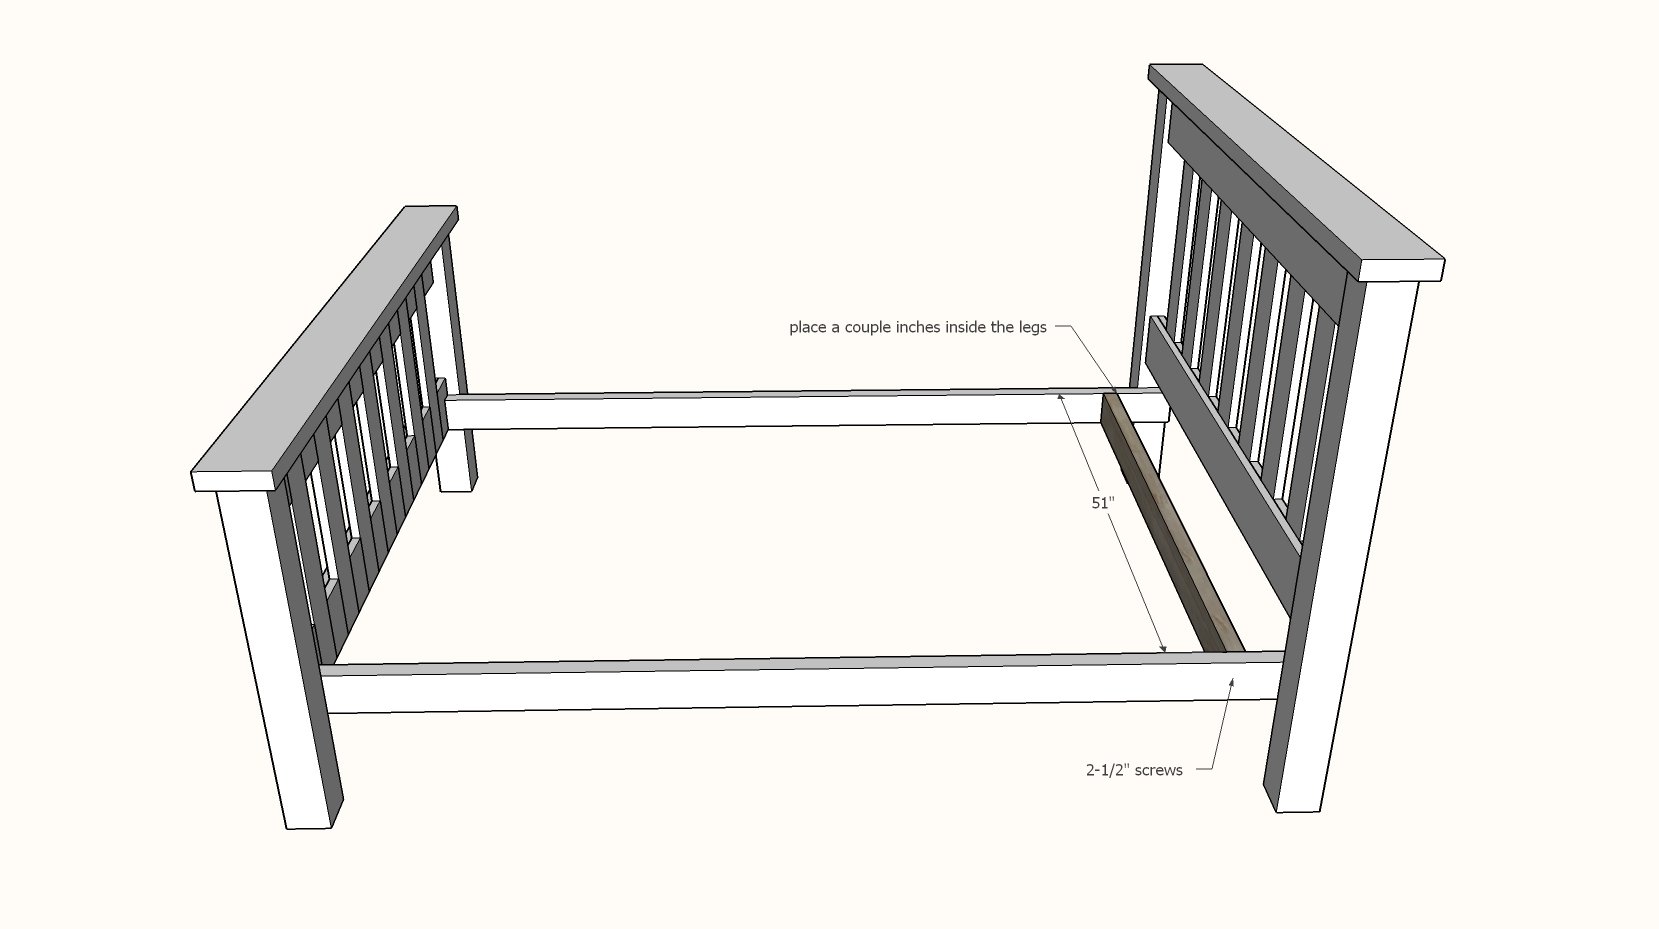
- 1 - 2x4 @ 51" - center support, top
- 1 - 2x4 @ 70-75" - measure and cut to fit - center support, middle
- 2 - 2x6 @ ~75" - measure and cut to fit for best fit
- 13 - 1x3 @ 23 - 3/4" - shorter slats
- 14 - 1x3 @ 31-3/4" - longer slats
Cut longest boards first.
Preferred method of cutting is a miter saw or chop saw or similar.
You can also substitute a circular saw, but use a straight edge or guide to help you cut square cuts.
DO NOT cut tiny pieces - instead, cut tiny pieces from a larger piece, so you can safely clamp the board while cutting.
The 4x4s will require a larger saw to cut. If you do not have a larger saw, flip the 4x4 over and cut from the back side to finish the cut.


With many beds, you may wish to prefinish the headboard, footboard and siderails before assembly. Then you can move into the room for final assembly and not have to paint or stain in the room.
Instructions
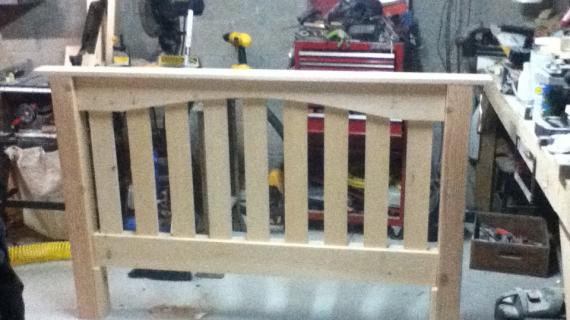
Step 1
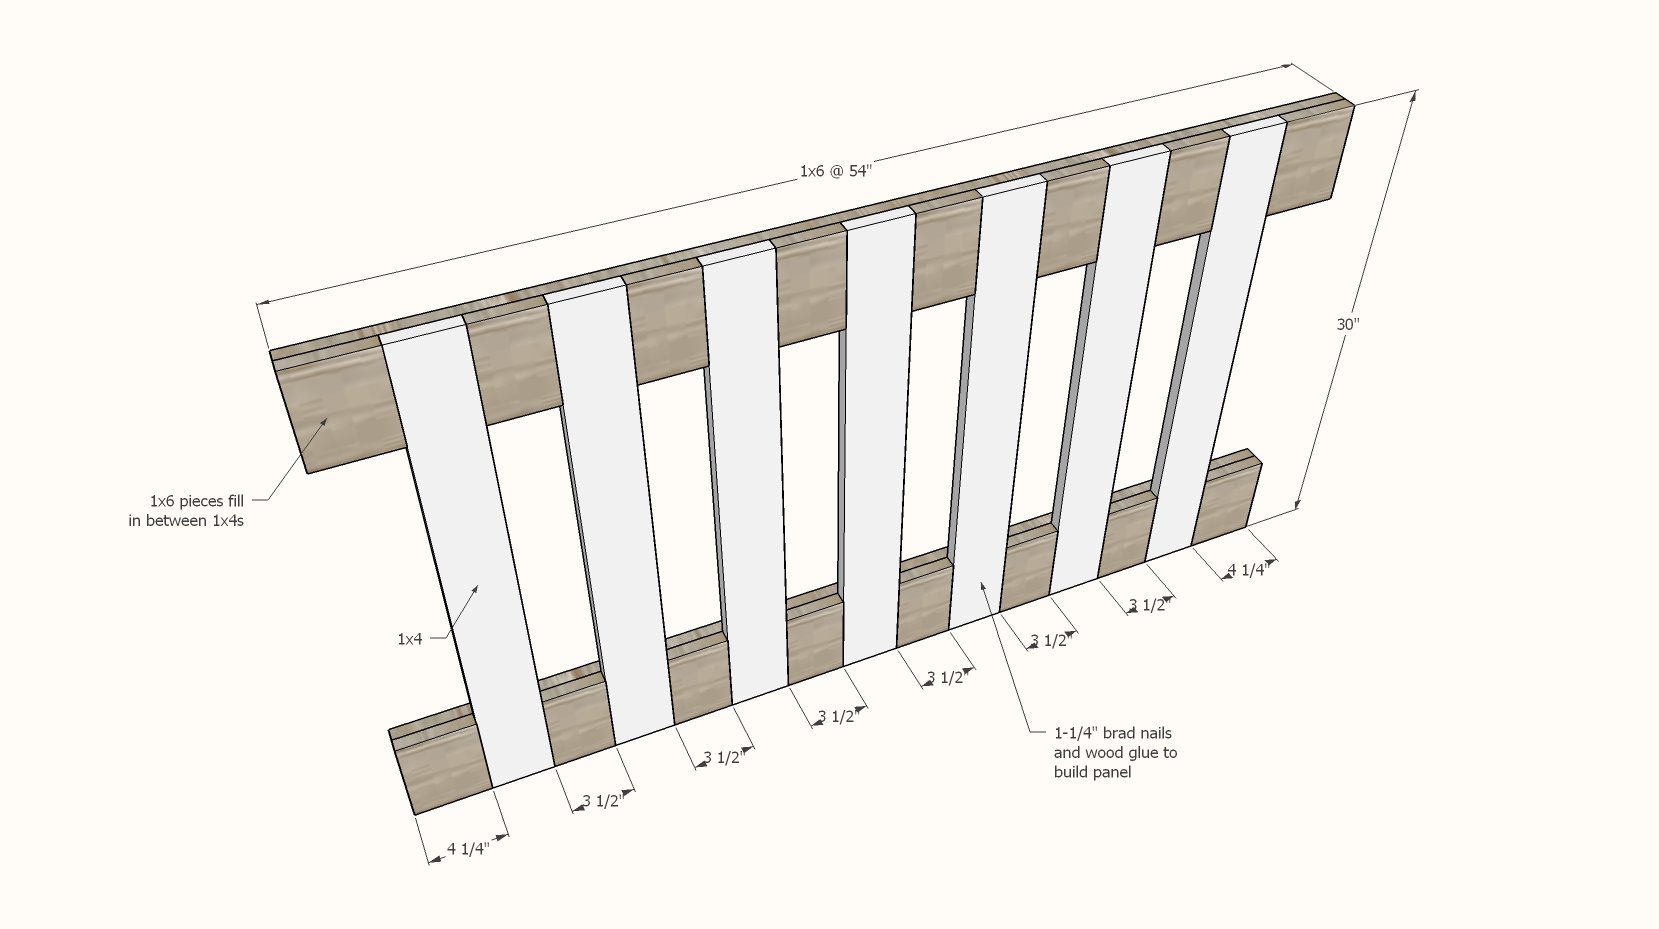
Layout the pieces for the headboard panel. Cut the end pieces to fit.
Glue and nail together with 1-1/4" brad nails.
NOTE: If you are using a Kreg Jig to join the panel to the legs in Step 2, carefully place nails so you can drill pocket holes (see next step) on the end 1x6 boards marked 4-1/4" long.
Step 2
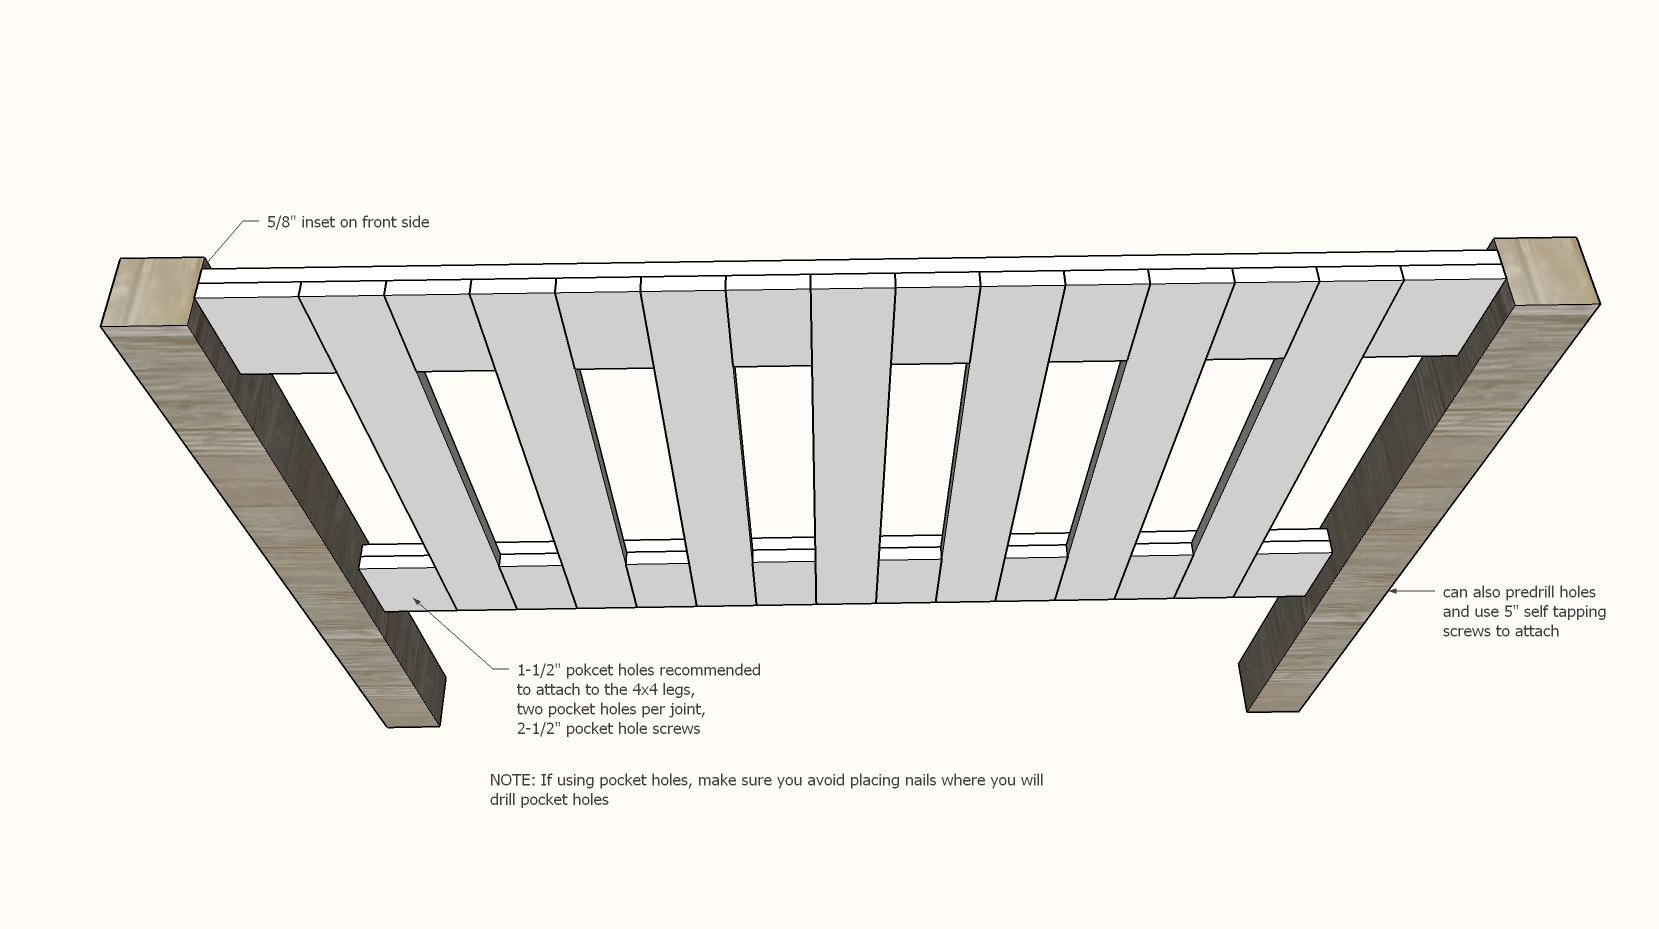
Attach panel to the legs with either pocket holes (preferred) or 5" self tapping wood screws and glue.
Step 3

Attach 2x6 header with 2-1/2" screws and glue to the top of the headboard.
Step 4
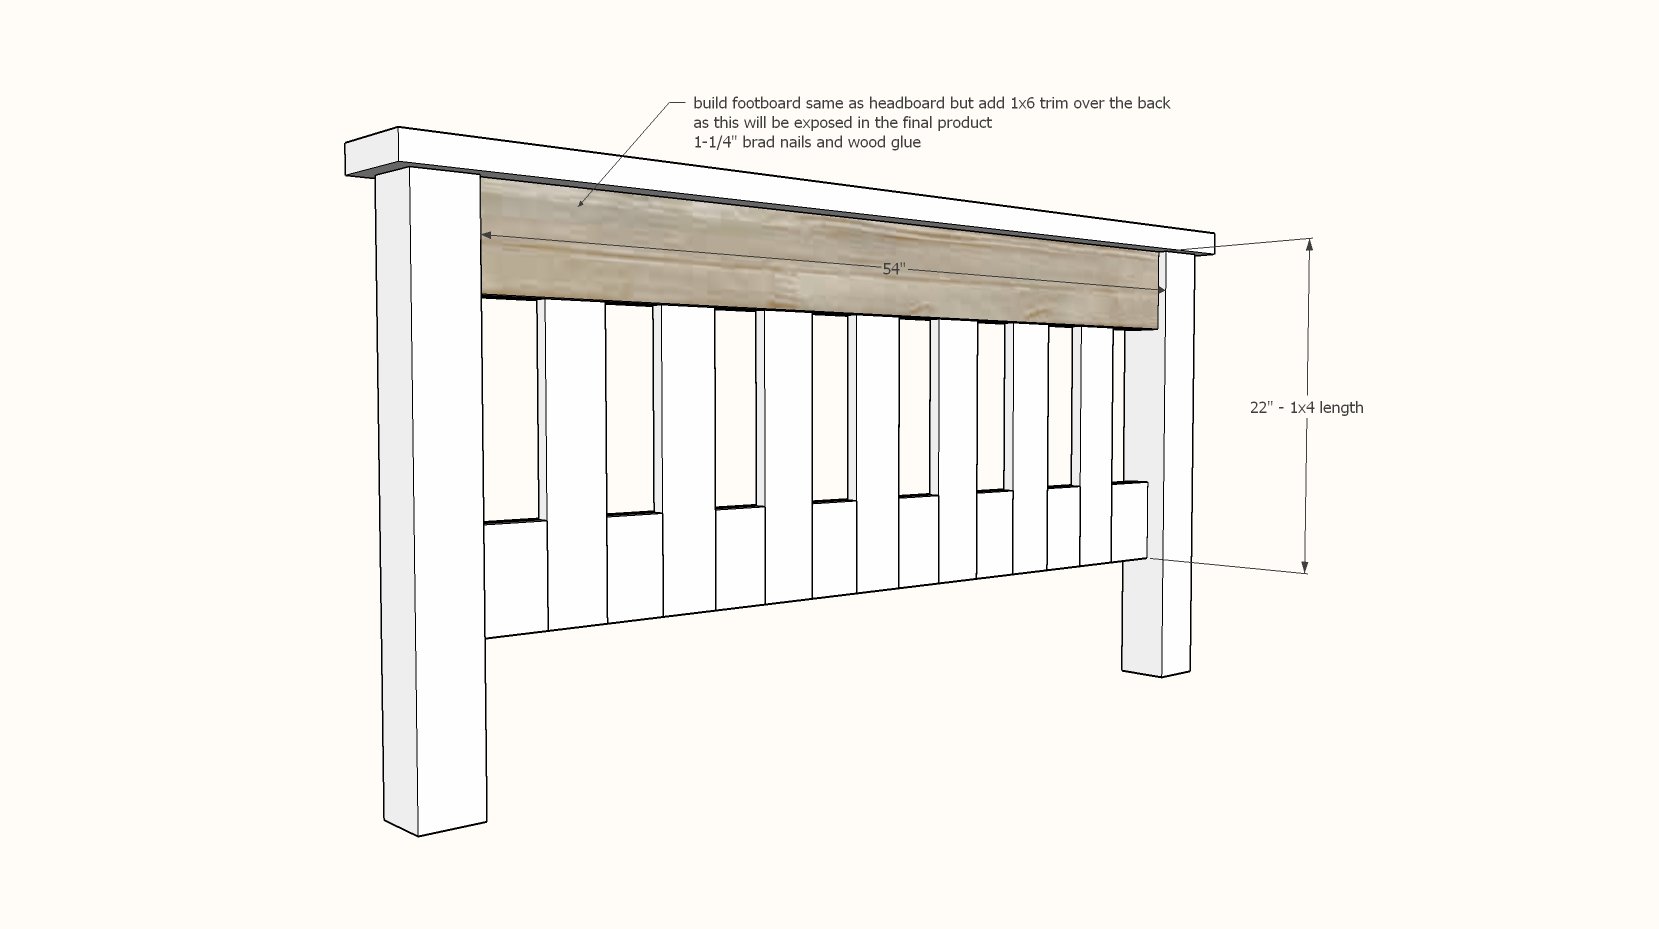
Repeat steps to build footboard.
Add additional 1x6 trim to the inside of the footboard as this will be exposed in the final product. Nail on with 1-1/4" brad nails and glue.
Step 5
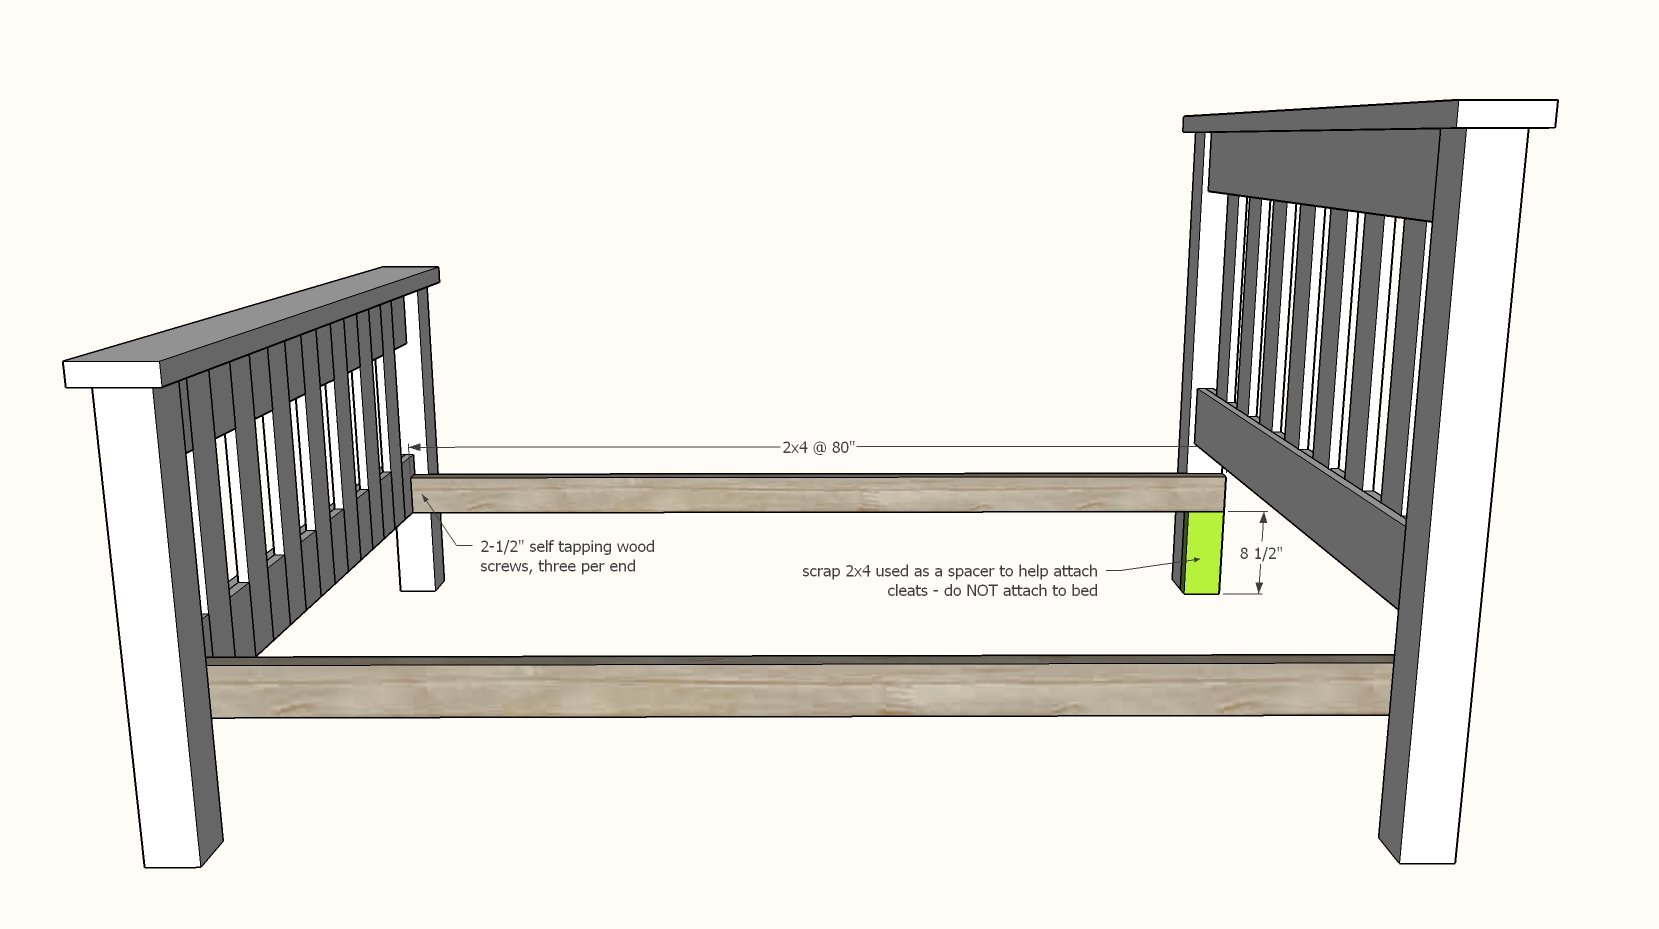
Cut cleats and attach to footboard, flush to bottom of 1x6 panel.
Then attach to headboard legs. Spacer blocks from scrap wood can help elevate the cleats while you work (or use clamps).
Step 6
Since this bed is a full size, center support is recommended.
Attach a 2x4 close to the top with 2-1/2" screws, two per joint.
Step 7

Add siderails to the cleats.
Step 8
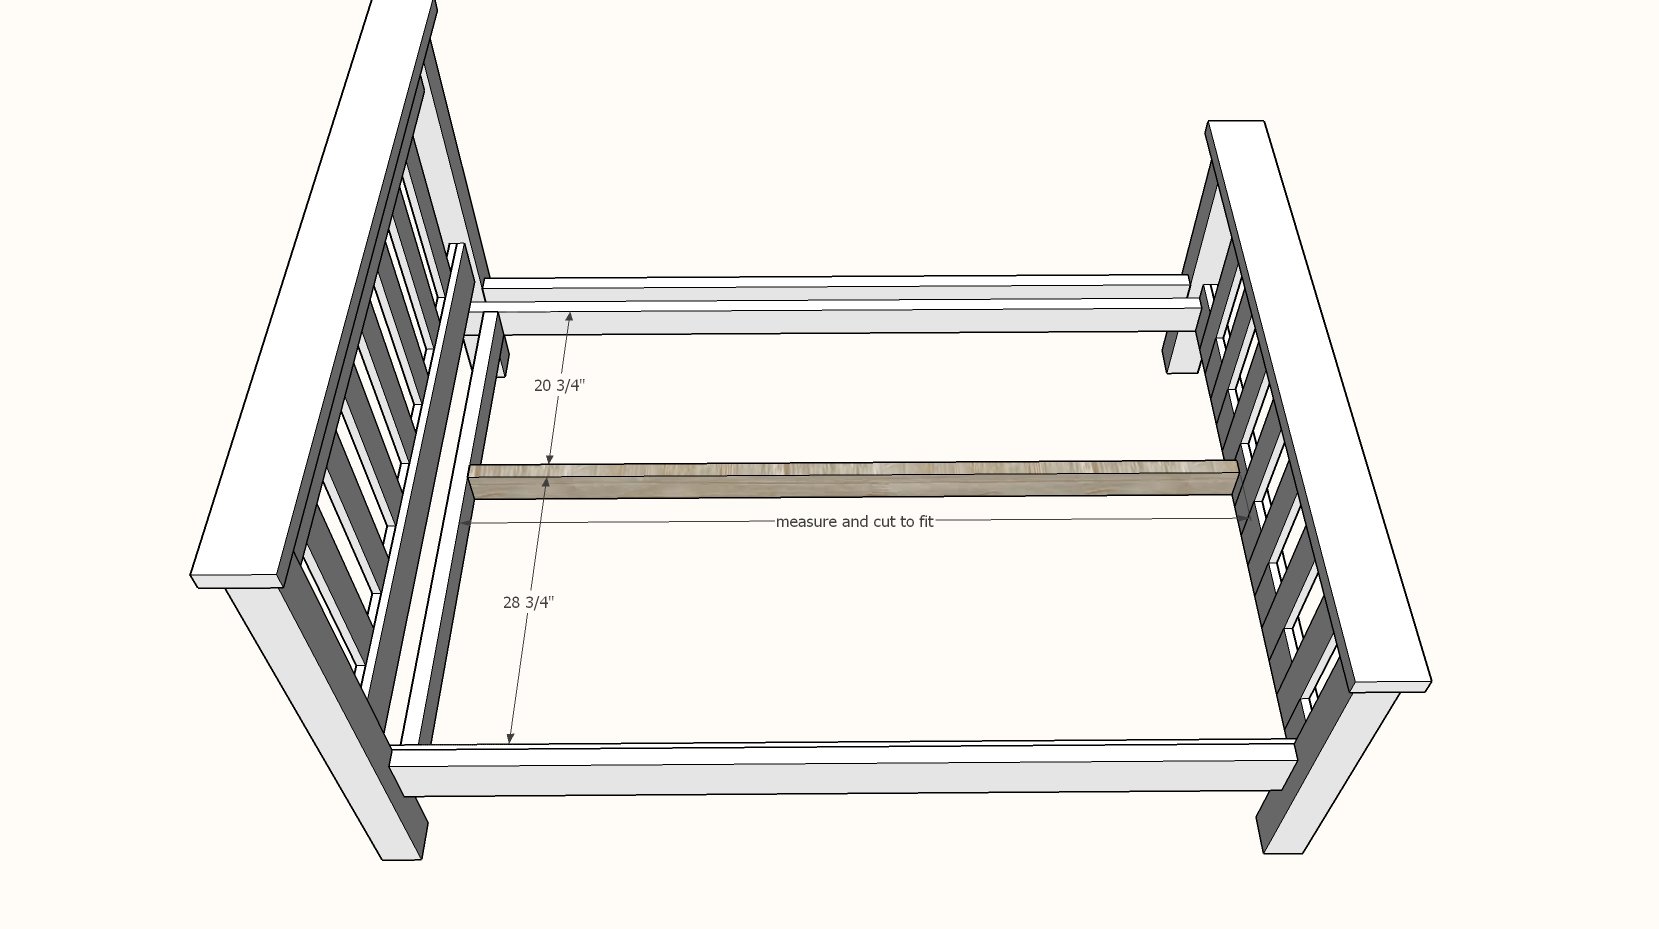
Measure and cut the center support. Place as shown in the bed (this is done offset to conserve wood when cutting the slats)
Step 9
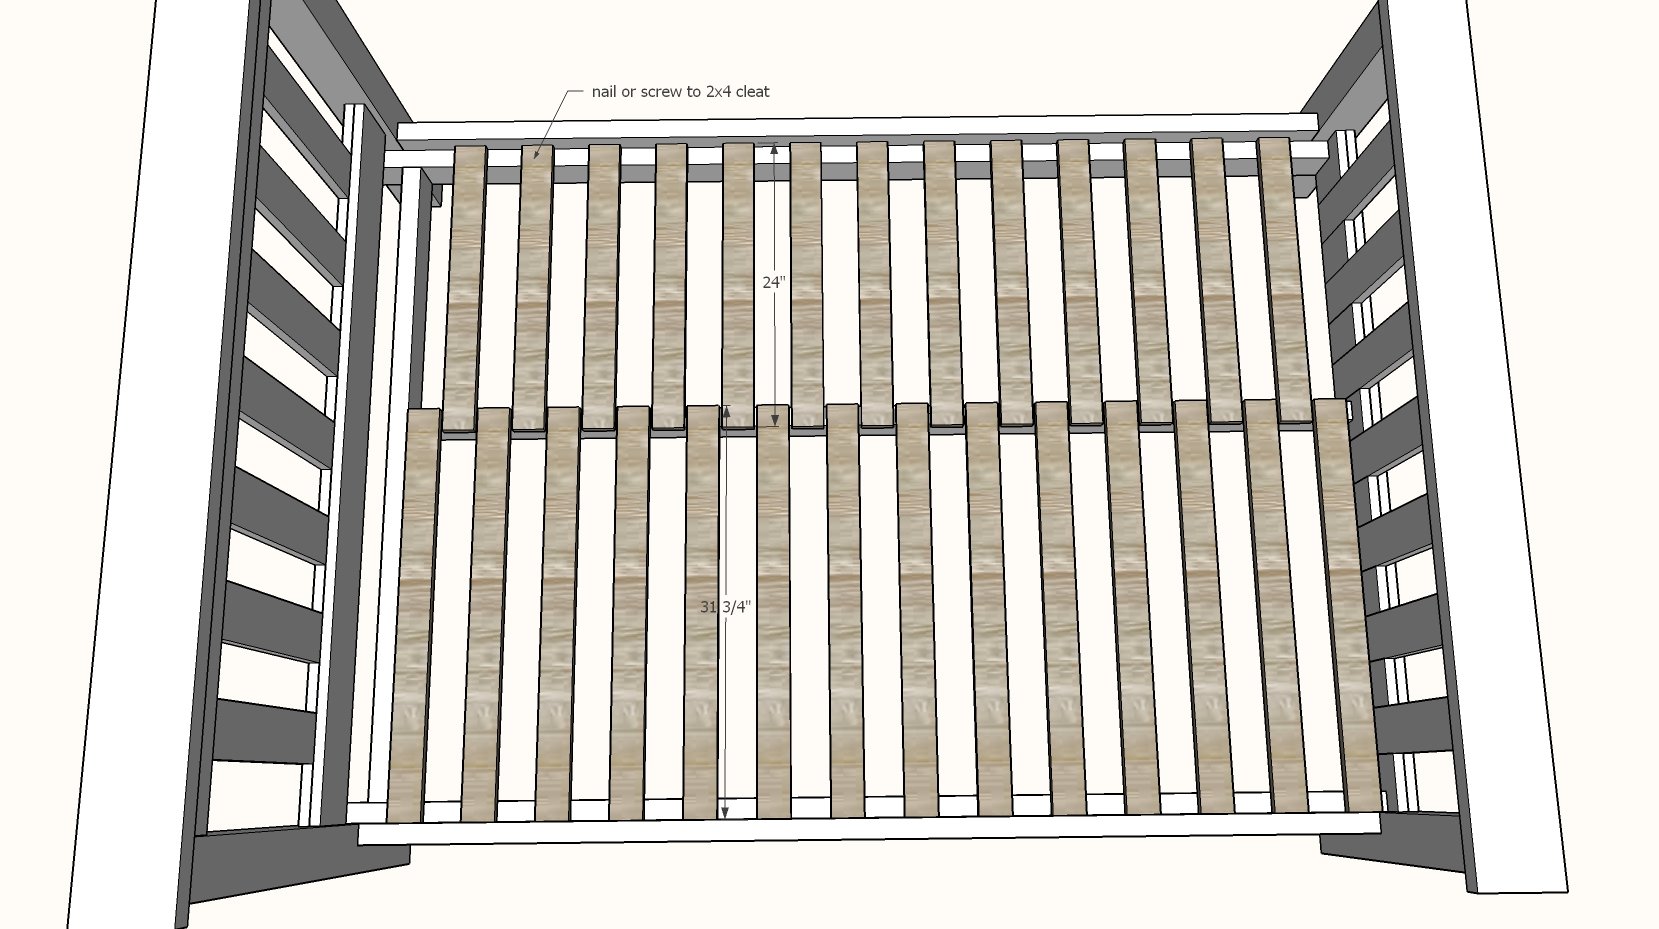
Cut slats and lay in bed. You can nail down (will be harder to remove later) or screw down (screws take longer to install and are more expensive but will be easier to remove). Use a 1-1/4" to 2" long fastener. Do not use glue as it will be impossible to disassemble without damaging the bed.
To conserve fastners and time, I often will just nail the sides down and leave the center floating on the slats.


Comments
Kensey (not verified)
Mon, 02/15/2010 - 13:42
Do you have any suggestions
Do you have any suggestions or pointers for staining it after filling in the screw holes with putty? It just seems like they are way noticeable.
Ana White (not verified)
Tue, 02/16/2010 - 06:59
What you will need to do is
What you will need to do is either buy a good stainable wood filler, or use stain matched wood filler after you stain. Another options is to use wood plugs.
kirstin & jordan (not verified)
Tue, 02/16/2010 - 19:33
This is FABULOUS! We are
This is FABULOUS! We are needing to move our little one from a crib to a big boy bed, and this might be just the ticket.
We have a Friday Fun Find party (on Fridays, of course) and would love it if you'd link to this!
Rachel (not verified)
Sun, 02/21/2010 - 07:13
Wonderful. We have been
Wonderful. We have been waiting for this. Thank you so much. We actually want to do your "Simple Bunk Beds", but with the full on the bottom of the twin. I am wondering if the process is the same for build and attach. Wondering if you can suggest how to modify the ladder to work with the full underneith. Just wanted to check before I get started.
Callie (not verified)
Mon, 02/22/2010 - 10:50
Do you have the materials
Do you have the materials list for this project? I see the cut list--but I would like a list to go into the store with--so I don't forget anything :)! You are awesome, by the way!
Lisa (not verified)
Thu, 02/25/2010 - 18:07
Do you think a full over full
Do you think a full over full bunk could be made safely? Any extra steps?
Michael (not verified)
Fri, 04/23/2010 - 08:43
Has anyone made this in a
Has anyone made this in a queen size?
Becky (not verified)
Tue, 04/27/2010 - 10:22
I am working on making this
I am working on making this in a queen size right now, I will let you know if it works!
Ashley (not verified)
Fri, 05/21/2010 - 05:27
Hi! I'm looking at putting a
Hi! I'm looking at putting a trundle under this bed, and I'm just wondering if I need to adjust the height to fit a trundle made of 1x8s (your plan Ana) under it or not. From the diagram it looks like the header leaves 10" clearance under the bed, but I'm new to building things so I just wanted to double check before I buy the materials to build it. Thanks!
Ana White (not verified)
Fri, 05/21/2010 - 06:21
You could use a 1x10 for the
You could use a 1x10 for the sides of the trundle, but the clearance is going to be very very tight (especially with caster wheels on). I would add just maybe an 1" to the legs on the daybed.
Ashley (not verified)
Tue, 05/25/2010 - 19:20
Thanks so much for your reply
Thanks so much for your reply to my question! You're amazing!
Mariah (not verified)
Wed, 05/26/2010 - 05:19
How difficult would it be to
How difficult would it be to modify this to a queen size bed? I'm looking to do my first ever project and a queen bed is what I need. Thanks so much!
Becky (not verified)
Sat, 06/05/2010 - 18:57
I modified this bed to a
I modified this bed to a queen, if I knew how to share pictures on here I would. I just figured out how much wider my queen bed was than a full, I think it was 6" and added that to every board that went that direction. Then for the side rails and cleats I had to add a couple of inches because my bed was also longer. We had to do 10 boards for the headboard and footboard. We left the measurements of the spacers the same in between and cut the ones on the end after it was assembled. Those were the only modifications necessary and it turned out great. This was my first building project. If you click on my name there is a picture of it on my blog. Good luck!
Paul (not verified)
Wed, 07/21/2010 - 06:25
Ann, Can you post the
Ann, Can you post the adjustments for the bed legs for a bed that is 6 inches higher at the head? So it would be at an angle. Is that even possible?
Becca (not verified)
Thu, 08/26/2010 - 14:54
I would love to do this as a
I would love to do this as a queen but I know I would jumble all the numbers if I did it myself. It's their queen sized of this?
ana (not verified)
Sun, 08/29/2010 - 18:49
I don't have a queen yet in
I don't have a queen yet in this plan - it might not scale right. I think someone did build a queen and posted it on our flickr board www.flickr.com/knockoffwood
Heather (not verified)
Tue, 08/31/2010 - 13:42
Do you think this could be
Do you think this could be adapted for a king size bed?
Ana White (not verified)
Tue, 08/31/2010 - 14:06
Hi Heather, this bed
Hi Heather, this bed certainly could be built in a king. You may find it doesn't scale as perfectly - I would suggest following the dimension of the king Farmhouse bed, but just using the slats instead of the panel. Good luck on your bed!
Merrygold (not verified)
Tue, 09/14/2010 - 16:44
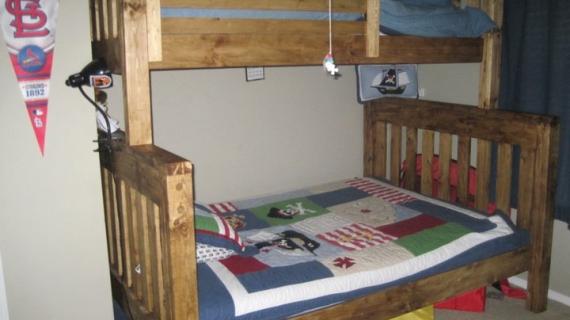
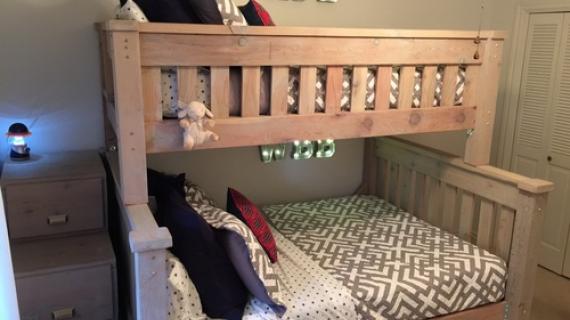
I'm thinking of building this
I'm thinking of building this as a Full size bunk bed. I might add an extra support to the center of the top bunk for extra support and let the slates lay across it.
ashlee (not verified)
Fri, 10/08/2010 - 07:30
ana you are amazing! thanks
ana you are amazing! thanks so much for these plans! now i just need a how to build your own house section:D or maybe a refrence book list:D
im not finding the "what it costs to build it" on most of these plans? am i missing it? or is it just on some?
Mahin (not verified)
Mon, 12/13/2010 - 07:56
Hi Ana, I'm half way through
Hi Ana, I'm half way through building this - I built the doll-sized farmhouse bed first as a test, and that turned out great! I'm worried about joining the cleats to the legs, though. I read all of the comments on the twin sized bed and I think that you mentioned lag bolts there and screwing at an angle through the cleats to the legs (toenailing), but there's only 5/8 ths of an inch to work with on this plan. Will that work? Am I missing something?
Also wanted to thank you for your site and for giving me and so many others the confidence to go out and buy wood and turn it into beautiful and functional things.
Liana (not verified)
Fri, 01/14/2011 - 06:31
I am planning on making this
I am planning on making this for my son's room. I want to pair it with the trundle plans you have on here but I didn't know if the deminsions for the simple bed were compatable to put the trundle under it. Feedback? Thanks! I love all your designs!
krystylmarie
Tue, 04/05/2011 - 15:46
Toy Box
I'm more intrested in the toy box.....please dish...................
Guest (not verified)
Tue, 08/09/2011 - 05:09
Larger Plans
Is there anyway to get a enlarged copy of the pictures for these plans, i cannot read the plans when they are printed out, the writing is too small, if i enlarge it they just get blurry? Thanks!
fk (not verified)
Mon, 10/17/2011 - 10:19
simple full bed
As I read the directions for the simple full bed, it doesn't tell you where to use the 1 1/4" or 2 1/2" pocket screws. Also further into the directions it calls for 4", 2 1/2",3 1/2" screws not on the shopping list, also 1 1/4" & 2" nails. Where do the 2" & 3" nails go? How do you attach the 2"x 4" tops on the head & foot boards I see no instructions for that.
Guest (not verified)
Mon, 10/17/2011 - 20:25
Simple full bed/twin over full bunk beds
I was wondering the same thing. I'm doing a twin over full and I'm modifying the twin to be the same set up as the full as far as cleats and the bedroll slats are concerned (that way we are using all the same materials and plans for both beds) We also decided to modify (like another builder) by using all footboards and adding the difference into the top bunk legs. But, in reading BOTH sets of directions, the twin doesn't have a hardware list in the shopping list and the full has stuff in the shopping list that aren't in the instructions. So, I guess what I'm asking is...what is the right shopping list for hardware for both beds???
My husband and I are building this for our 4yo daughter for Christmas and looking for it to last at least through college. We figure when it's time to trek the top bunk to the dorm, we'll still have a bed at home for her during holidays or for guests. We are SO anxious to make it but want to make sure we have all the right parts instead of 50 million trips to Lowes.
Keep up the good work! It's even got my hubby thinking on making more and selling them. More power to him! Lol Being a full-time mom, working PT, and fixing/modifying/repairing or rebuilding all the stuff I already do is good enough for me. I think I might do the Laundry Shelves though or the Storage Bench though! Anything to make my life easier! :-D
Thanks again for the blog and any info on the hardware!!!
SabySmooth1
Thu, 10/27/2011 - 16:46
How do I make it a King?
Ana, I LOVE this site! Thank you for all that you do! I am dreaming of having this bed as a King size in our bedroom. How do I do that? I'm a newbie! Thanks!!
Jason K (not verified)
Sat, 06/23/2012 - 19:31
Anyone made a queen size yet?
Anyone made a queen size yet? If so I would like the measurements and if possible a picture. Thanks
cakemom
Mon, 03/16/2015 - 13:12
1x6
is there an alternative to the 1x6's? They are $7 a piece here even in pine and would greatly increase the estimated cost. Perhaps plywood cut and then a veneer edging added to hide it.
Noob Builder
Mon, 07/06/2015 - 07:37
Cedar or Pine
Hi Ana,
What material do you recommend for this bed? I have a hard time finding 4x4 pine where I live, however 4x4 cedars are available from Lowes.. do you think it will work? And is it a good idea to mix the material (i.e. Cedar with Pine?) Thanks!!
In reply to Cedar or Pine by Noob Builder
Ana White
Mon, 07/06/2015 - 15:00
Have you tried your local
Have you tried your local lumber yards? I wouldn't recommend mixing
material, it won't finish the same. Pine or
Douglas Fir would be recommended. You could also sandwich 2 x 4's.
Hope this helps!
Noob Builder
Mon, 07/06/2015 - 19:19
thank you!
thanks Ana! you kept me from making a mistake! i'll try out the lumber yards this weekend!
Phil Shremshock
Sun, 08/16/2015 - 06:26
twin over full bunk beds with stairs
There are many ways to hide screw hole , one way is not to use screws at all but glue and use splines, dowels, or mortise and tenons. and for your bed rails use bedrail fasteners or bolts.
I will be adding a bed plan for a twin over full bunk beds with stairs and storage that I'm designing for a clients hunting/ mountain vacation cabin I just found this site when researching ideas for this project, and will share the plans once I finish seeing how no one seems to have done so on any site I've visited including my favorite of finewoodworking.com, of which I've been a member since 1982, yup before the internet and still have every copy of the magazine from then on . I love woodwork and blessed to do it as a living . Phil
pritamda
Sun, 08/23/2015 - 17:34
Beginner at woodwork
Awesome bed!, love it. But, cannot find the plan for twin bed, can you please direct me to the link.
Also which model of kreg jig should I buy ?
Thanks.
In reply to Beginner at woodwork by pritamda
Ana White
Mon, 08/24/2015 - 11:30
Take a look at this, be sure
Take a look at this, be sure to measure your mattress to ensure proper fit.
http://ana-white.com/2009/11/plan-by-request-simple-bed-twin-sized.html
The K4 or 5 are both great options for the Kreg Jig
Hope this helps!
Boomer8960
Sat, 03/12/2016 - 18:45
1x6's and cut list doesn't add up?
Can someone explain to me or maybe its just an error? Project calls for (7) 1x6x8. The cut list calls for a total of (8) 1x6x54.5" and (2) 1x6x75". My math and the offals I would have left does not jive. Should I just get some 1x6x10's to have less offal? Just want to make sure im thinking straight.
kluge9
Sun, 11/20/2016 - 15:49
I'm sure you've figured this
I'm sure you've figured this out already, but I just ran into this problem as well when I made the cuts for the bed today. 1x6x10' would solve it but I was already done with the cuts when I realized. Had to run and grab 2 more boards and luckily I had a 1x8 in the shed I just ripped down to size on the table saw. Those are the only errors I've found. Good luck, everyone!
Lhpspangz
Sun, 01/08/2017 - 18:35
Everything came out right but 1x6 shopping list is wrong
Ana I have been following your builds for a while and almost all of them are DEAD ON.
this time I didn't plan it out right before buying.
Your shopping list suggests buying (7) 1x6x8 when in fact it needs to be (10) 1x6x8
4 at 54 1/2 for the headboard (end up with 4 pieces at 41 1/2" of waste)
4 at 54 1/2 for the footboard (end up with 41 1/2" of waste)
2 at 75 for the side rails
I am sure this was a typo. Let me know that I'm not crazy. It's turning out great otherwise !!!
In reply to Everything came out right but 1x6 shopping list is wrong by Lhpspangz
Ana White
Mon, 01/09/2017 - 14:00
Thanks for catching that!
Thanks for catching that!
jstocks
Tue, 04/21/2020 - 21:51
Queen size bed
Do you have any recommendation for making this same bed for a queen size bed?
xzebra
Mon, 08/17/2020 - 12:40
Kreg Jig Hole Locations?
Looking for help as to where exactly to place the screw holes for Step 2 using a Kreg?
"Attach panel to the legs with either pocket holes (preferred) or 5" self tapping wood screws and glue."
Any assistance, photos would be greatly appreciated.
Randall1955
Mon, 10/18/2021 - 15:52
Replacement Screws
Can I use these Paulin #8 x 2-1/2-inch Star Drive GRK RT Composite(TM) Trim Head Screw Climatek(TM) Coat instead of 2-1/2" long self tapping wood screws?