
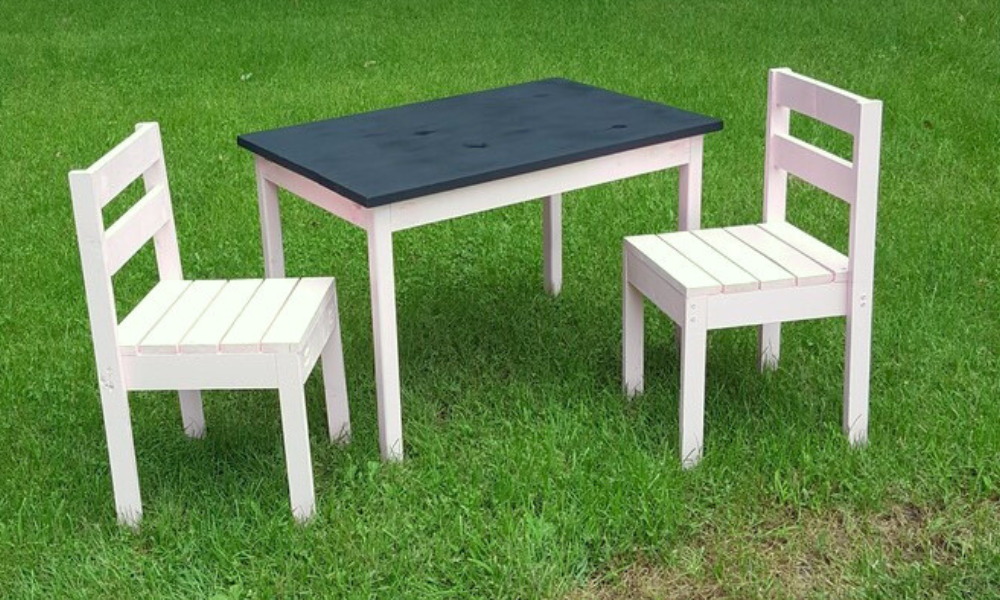

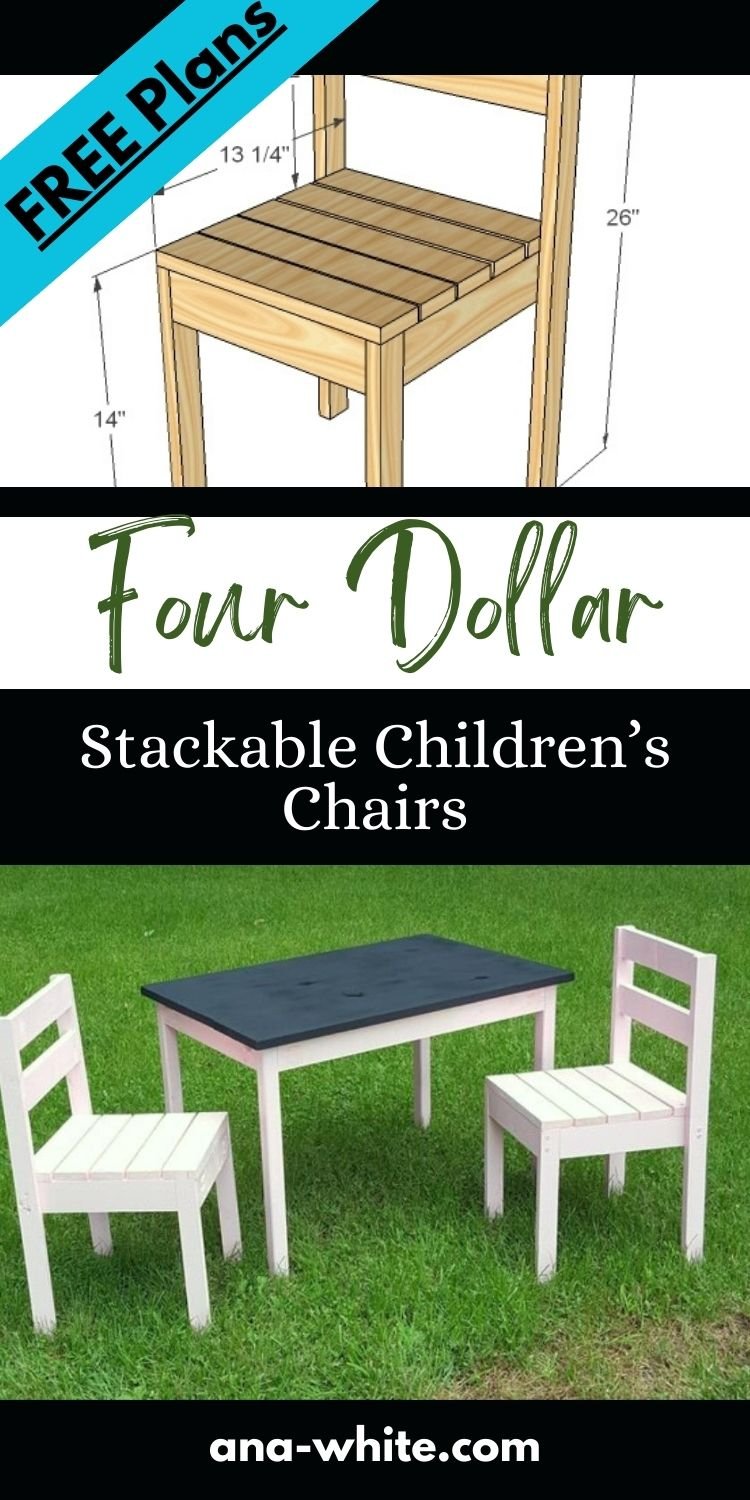
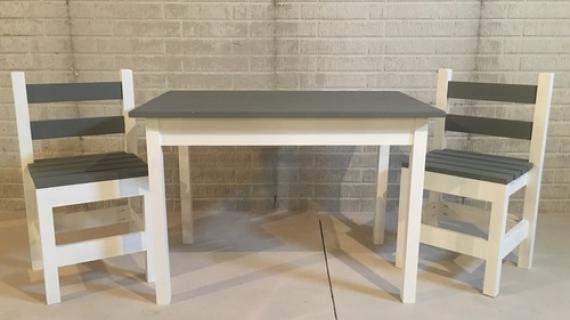
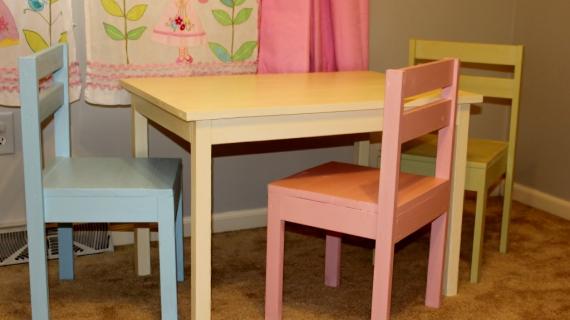
Build your own kids chairs using pine furring strips - Stackable economical lightweight children's chairs. Can be used indoors or outdoors.
This is a free woodworking plan using beginner techniques with step by step diagrams, shopping and cut lists, and lots of reader submitted photos.
Pin For Later!
Preparation
- 2 – 1x3s, 8′ long (Furring strips were used for my chair, about $1.50 each)
- 1 – 1×2, 8′ long (furring strips again, $1 a stick)
- 1 1/4″ screws 2″ screws OR 1 1/4″ pocket hole screws for pocket holes
- wood glue finishing supplies
- 3 – 1×3 @ 11″ (Front and Side Aprons)
- 2 – 1×3 @ 11 3/4″ (Side Supports)
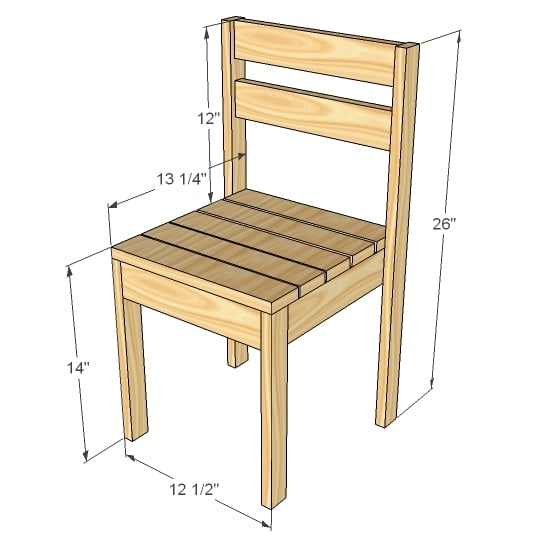
- 2 – 1×2 @ 13 1/4″ (Front Legs)
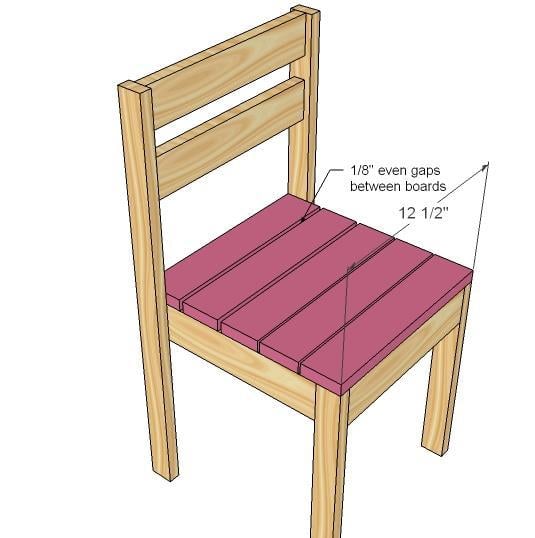
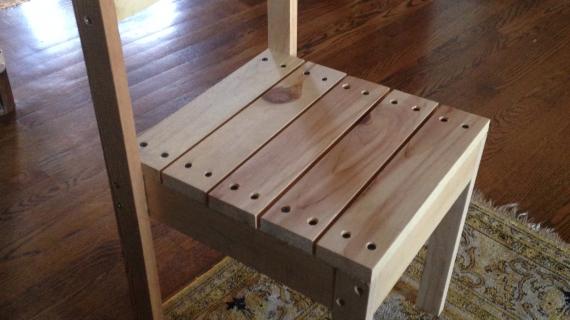
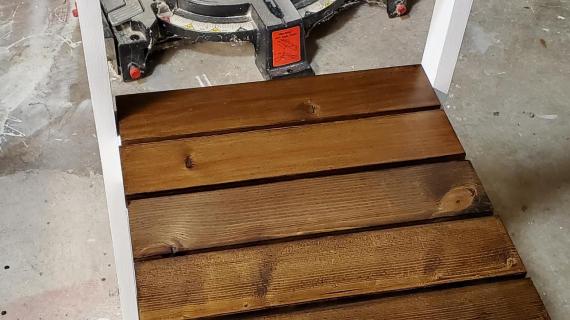
- 8 – 1×3 @ 12 1/2″ (Seat Slats and Back Slats)
- 2 – 1×2 @ 26″ (Back Legs)


Instructions
Step 1

Side Supports
Predrill holes and screw the side supports to the front aprons. I built mine with 1 1/4″ pocket hole screws, but you could also use 2″ screws. Use glue.
Step 2

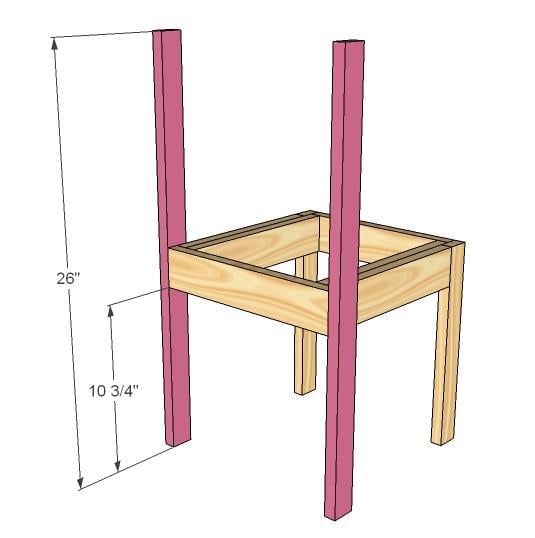
Front Legs
Now just screw the legs to the front apron and supports. Use 1 1/4″ screws to screw into the side supports.
Step 3
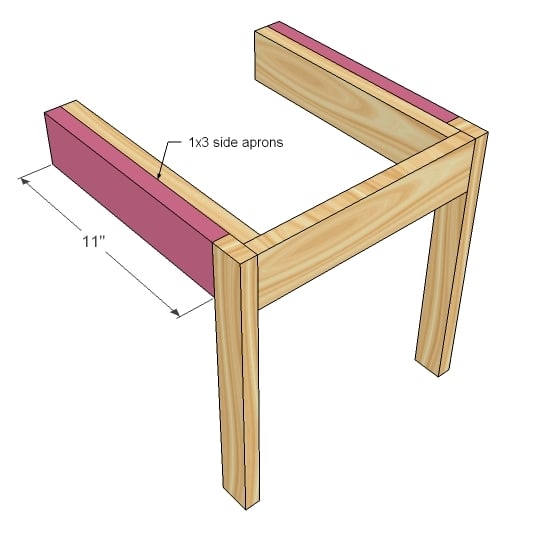
Side Aprons
Now simply add the side aprons with glue and 1 1/4″ screws.
Step 4
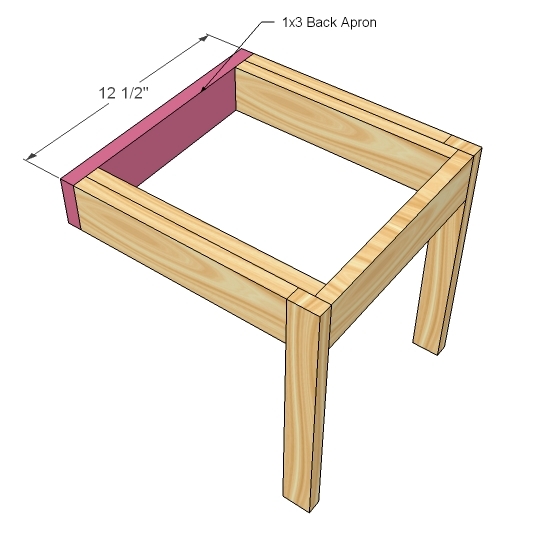
Back Apron
Back apron is the same length as the seat slats. Just attach the back apron with 2″ screws and glue.
Step 5
Step 6
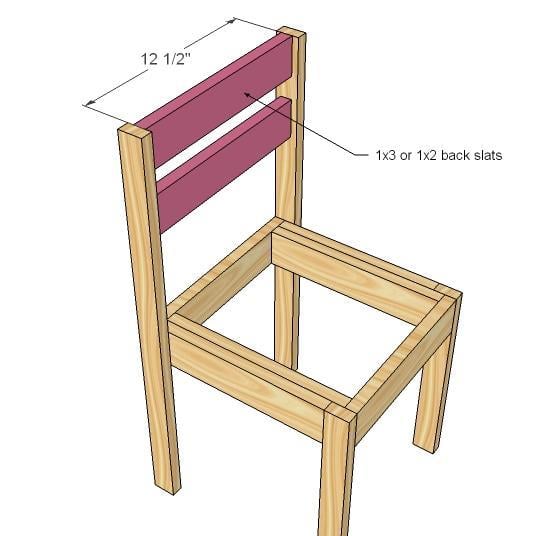
Back Slats
Predrill and attach the back slats to the back legs. I spaced mine 1 1/2″ apart. For a different look, you can cut an arch shape out or use three 1x2s for back slats.
Step 7
Seat Slats
Predrill two holes in both ends of each seat slat. Then screw the seat slats to the chair frame, with 1/8″ gap (evenly spaced between all seat slats) between seat slats. Use glue.


Comments
michelle (not verified)
Sun, 11/07/2010 - 20:10
ABSOLUTELY!!!!!
ABSOLUTELY!!!!! BEAUTIFUL!!!!! I am so making these for my niece......they are amazing.
elizabeth (not verified)
Sun, 11/07/2010 - 20:33
I love these, and you cant
I love these, and you cant beat the price !!! Thankyou for taking the time to create and post these plans it gives us not so handy moms the confidance to make something for our children and homes
Niki (not verified)
Sun, 11/07/2010 - 20:34
LOVE this! I was going to go
LOVE this! I was going to go today to get a newspaper to get a 40% off coupon to go to michaels and buy a chair to go with the table I built for my toddler last week. Now I can build a chair at a fraction of the cost!
Michelle (not verified)
Sun, 11/07/2010 - 20:40
Sweet I have been looking for
Sweet I have been looking for some easy childrens chairs to create for photography props this is awsome...
momma2three (not verified)
Mon, 11/08/2010 - 02:06
Thanks so much! I bought a
Thanks so much! I bought a huge 3 seater lego table for my son at a garage sale and have not been wanting to spend $15 a chair for it. I know ikea had plastic chairs for $8, but it's two hours from my house and I didn't like the colors (and I'm not a fan of plastic furniture). So glad that he can finally have chairs for his table at an affordable price! Thanks!
Christine (not verified)
Mon, 11/08/2010 - 02:10
great plans. I was just
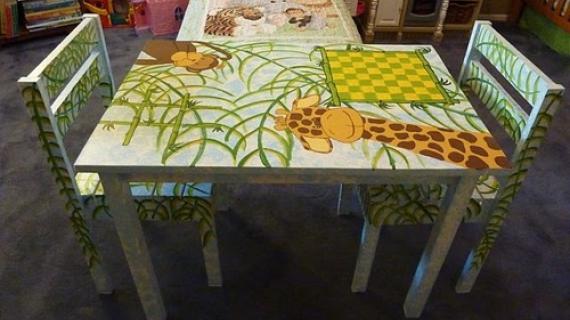
great plans. I was just thinking about a homemade lego table for my son for Christmas and these chairs would be great! Any plans for a table to go with them?
Angel s. (not verified)
Mon, 11/08/2010 - 03:20
Love these! I have several
Love these! I have several friends with little ones, I am thinking Christmas presents!
THANKS ANA!!!!
Tracie (not verified)
Mon, 11/08/2010 - 03:40
I am going to build a
I am going to build a couple!!!

Debbie (not verified)
Mon, 11/08/2010 - 04:27
Could these be stools, if you
Could these be stools, if you didn't extend the backs?
By the way, I LOVE them!!!
Yolanda (not verified)
Mon, 11/08/2010 - 04:35
These are awesome. I love
These are awesome. I love that they stack.
Kristy (not verified)
Mon, 11/08/2010 - 04:52
I LOVE these!!! I'm adding
I LOVE these!!! I'm adding them to my ever-growing list of Ana White design projects! My 2-year old is definitely getting these for Christmas. Thank you! :)
duane bergstrom (not verified)
Mon, 11/08/2010 - 05:23
I'm not sure that only using
I'm not sure that only using screws to hold the back to the seat is good enough. Eventually the seat will give and someone will get hurt.Pretty looking though.
nancy (not verified)
Mon, 11/08/2010 - 06:33
Thank you Ana! :)
Thank you Ana! :)
Michelle (not verified)
Mon, 11/08/2010 - 09:00
Dang, I've still got to get
Dang, I've still got to get my modern bookshelf sanded & painted, and the modern desk built & painted (pieces are all cut out) before I make these for my kids...I better get a move-on!!!
Amanda H. (not verified)
Mon, 11/08/2010 - 13:51
I think these will be my
I think these will be my first build. I have a bunch of other plans that I would like to try, but I think these would be a good jumping off point. Plus I can knock out some Christmas presents while I'm at it! Yay!
lindsey (not verified)
Mon, 11/08/2010 - 15:09
love these, can't wait to
love these, can't wait to sell our house so that we have room for me to build these.
Ashley (not verified)
Mon, 11/08/2010 - 16:24
So cute! Is there a plan for
So cute! Is there a plan for a doll chair like that? Also, I thought I saw a plan for a doll bed for the American Girl dolls. Can you tell me where that is?
Ana White (not verified)
Mon, 11/08/2010 - 18:27
thank you! Try
thank you! Try www.piecesforreese.blogspot.com
Ela (not verified)
Wed, 11/10/2010 - 20:05
Love this! Is it possible for
Love this! Is it possible for you to show where you recommend the screws go on these plans? Thanks!
Stacy (not verified)
Fri, 11/12/2010 - 14:26
Is it safe for me to modify
Is it safe for me to modify these plans for cheap and easy adult chairs?
Ana White (not verified)
Fri, 11/12/2010 - 19:14
Stacy, I wouldn't . . . maybe
Stacy, I wouldn't . . . maybe try a 2x2 leg instead of the 1x2s - just too flimsy for an adult chair.
kate @ www.bro… (not verified)
Sun, 11/28/2010 - 09:37
Ana, I'm going to try to
Ana, I'm going to try to build these for my son's birthday. One question... do you predrill with the countersink bits for every step or just when your instructions say predrill? This will be my first hand at countersinking and my first real project of yours (I did the pallet shelf but that seemed to easy to count;). I want to get it right.
Jonel (not verified)
Thu, 12/02/2010 - 07:45
Anytime you are going to use
Anytime you are going to use a screw you want to countersink the hole first. This allows the screws to go below surface and not stick out above the surface.
Tanya (not verified)
Thu, 12/09/2010 - 10:17
I am DYING to try to make
I am DYING to try to make these!!!
Theresa (not verified)
Thu, 12/09/2010 - 19:17
I started this tonight.
I started this tonight. Cutting went fast. This was the first time using the kreg. I am very disappointed, it was hard to keep clamped and the drill bit kept comming out of the drill. Hoping to make several for Christmas gifts but this is starting to look more like firewood. : ( Anyone else have problems with the kreg? I am using the small one.
Lynne1 (not verified)
Mon, 12/13/2010 - 07:42
This is the project that
This is the project that inspired me. I am using this as my basis for an article on my eco blog. www.greenertoday.blog.ca . You are doing more than you know for women. On top of inspiring them to take on projects themselves, you are also giving them an affordable, healthier alternative to cheap plastic sets that off gas in our homes and are bad for our children and families. Finishing items yourself allows you to select low VOC paint. You are a green inspiration too, and you may not even realize. Saving money, saving the planet. I like what you are doing here Ana.
kimber (not verified)
Wed, 12/15/2010 - 20:11
You rock. Thanks so much for
You rock. Thanks so much for all you do.
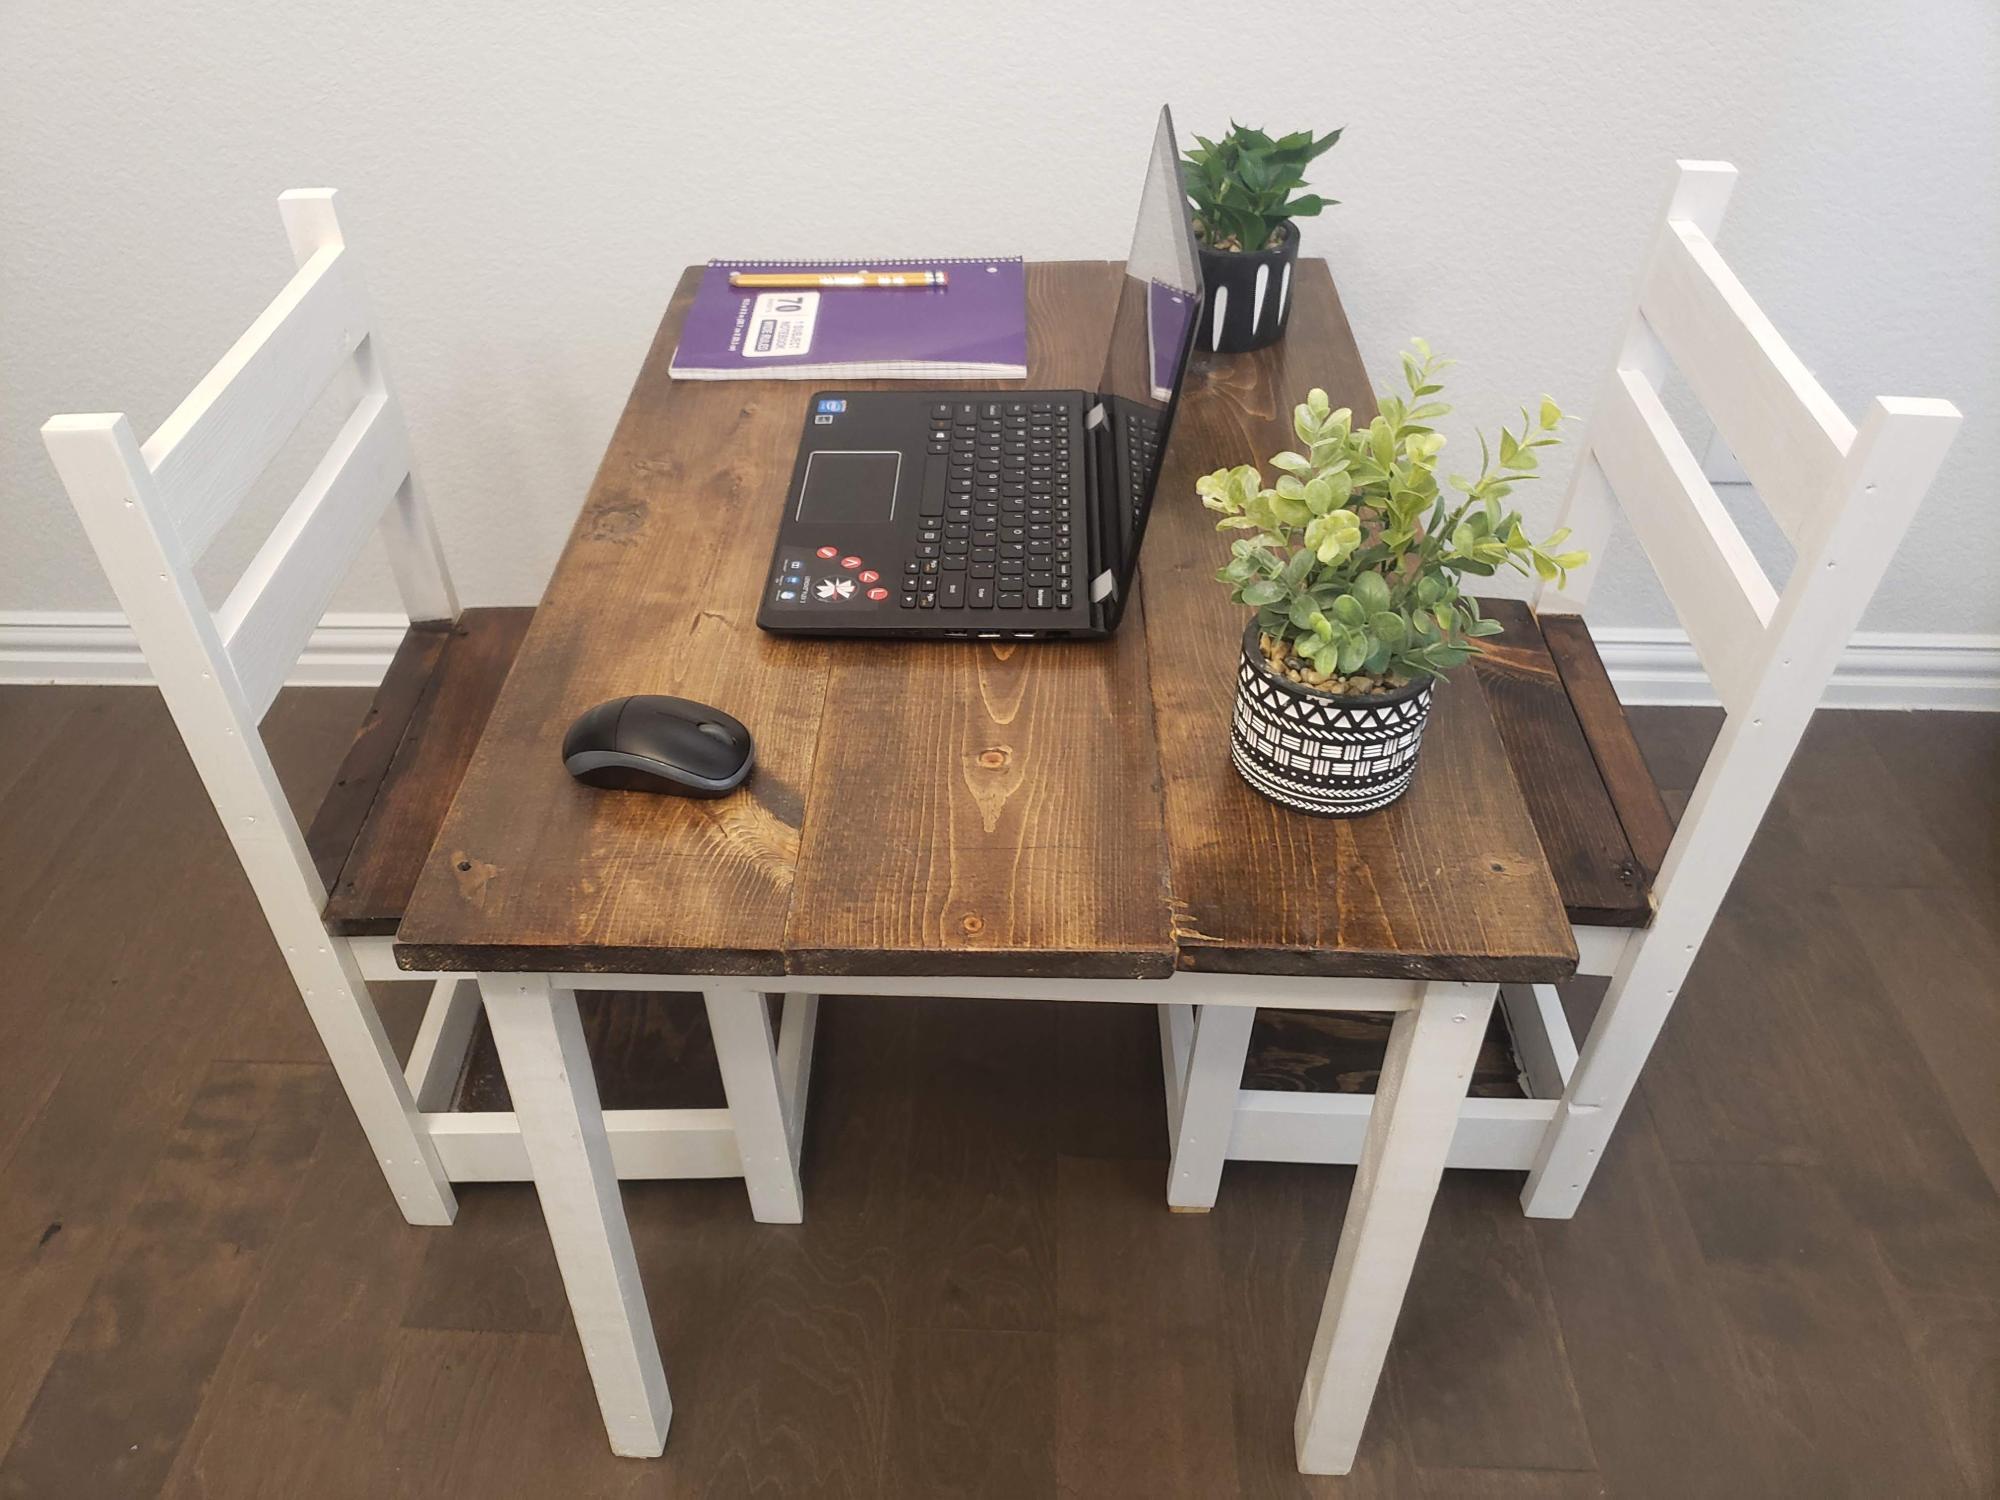
I'm making these for my daughters for Christmas (these and the table).
I LOVE it!!!
Ellen Farrow (not verified)
Wed, 12/15/2010 - 20:47
I just built this chair, and
I just built this chair, and it was not quite as easy as the table! getting things clamped to be square while getting the back legs on wasnt quite as simple as i had hoped ;) but they are sturdy, and they will look pretty nice once i fill all the holes and paint! I was able to get all the pieces while my daughter napped :)- that's how quickly it went.
Nicky (not verified)
Thu, 12/30/2010 - 07:29
I was wondering what sort of
I was wondering what sort of age-range these would be for. I have a 2½ year old and a 7½ year old. I've been looking for the perfect wooden table and chair set for them for what seems like forever now. These looks super cute and easy, but would they be suitable of an older child as well as a toddler?
Ana White (not verified)
Thu, 12/30/2010 - 12:49
Nicky, my seven year old
Nicky, my seven year old niece sits at them (and I do too) but I would say seven is at the upper age limit. Perfect for a toddler though. My 1 1/2 year old niece carries hers around :)
Mindy (not verified)
Wed, 01/19/2011 - 12:30
nvm - i found Clara's table!
nvm - i found Clara's table! totally going to beg my dad to make these for his grandbaby ;)
Becky (not verified)
Mon, 02/14/2011 - 07:40
One of my daughter's broke
One of my daughter's broke her $17 chair similar to this over a year ago. She has been asking for a new one ever since, but we just never found one cheap enough that was the size we needed. I found your plans last night and bought the wood today. Exactly $4 at Home Depot if you don't count the jigsaw I threw in, lol. I was tired of using the circular saw and being intimidated by it.
Robin (not verified)
Sun, 02/20/2011 - 10:25
So, wondering how big these
So, wondering how big these need to be to fit under the LoN Kid's elementary table plans? Thanks so much for any help!
Guest (not verified)
Thu, 03/24/2011 - 14:40
A few tears in my eyes
Just built this chair, my first building project ever! I'm 21 weeks pregnant and have a 3 year old boy. I've been reading your site for a while now and my son peered over my shoulder, then asked me sweetly to make this chair in blue for him. All I have left is to sand and paint the chair, but it already looks wonderful.
Thanks so much for sharing your story and inspiring others to build! I have a few tears in my eyes (although, the pregnancy hormones may have a little to do with that) and am so proud that I made a chair for my son. My grandpa loved woodworking and he would be so proud of me if he were alive today. After this one's painted, I'll be working on a pink one for the little baby girl that will make her appearance around August.
In reply to A few tears in my eyes by Guest (not verified)
tracysmith
Thu, 03/24/2011 - 17:49
Dear Tears
It does feel so great to build something with your own two hands, doesn't it. I've often felt the same way about our building adventures (the tears - and I don't even have the pregnancy to blame it on :-) ) I had grandparents and uncles that were really into woodworking and it does bring a little something extra to the piece when you can think back on the nostalgia - sort of like filling those shoes that you loved so much.
Guest (not verified)
Fri, 05/27/2011 - 17:38
I think for anyone going to
I think for anyone going to build these chairs or anything out of 1x2 and 1x3 material they should buy the higher grade lumber than the cheap stuff. You can see from the photos that the wood is likely to warp or be warped by the time you get them together. Using kiln dried lumber will mitigate this to a significant degree and the chairs will still be both affordable and hand made by you.
BTW, the Kreg jig is great. I can't wait to use it on more of my projects around the home
Paul H. (not verified)
Mon, 11/14/2011 - 13:42
Making this for 18" Dolls
I am making a set of four of these doll sized for some 18" AG dolls.
The over all dimensions are going to be 14 3/4" H (back), 8" H (seat) X 8 1/2" W X 7" D.
The main change for this is using 1 x 4 for the slats on the top of the seat (with no gap). The back slats and apron will still be out of the 1 x 3. The number of "Seat Slats and Back Slats" drops from 8 to 3. The 1 x 4 is new to the cut list for the seat.
Cut List:
3 - 1×3 @ 7" (Front and Side Aprons)
2 - 1×3 @ 7 3/4" (Side Supports)
2 - 1×2 @ 7 1/4" (Front Legs)
3 - 1×3 @ 8 1/2" (Back Slats and Back Apron)
2 - 1×4 @ 8 1/2" (Seat Slats) - NEW
2 - 1×2 @ 14" (Back Legs)
Paul H. (not verified)
Tue, 11/22/2011 - 10:28
Doll sized plan updates...
I finished assembling the four chairs for 18" dolls last night but made them smaller than my original post stated. The over all dimensions are now 12" H (back), 5 1/2" H (seat) X 6" W X 6 1/2" D
Cut List:
2 - 1×2 @ 4 1/4" (Side Aprons)
2 - 1×2 @ 5" (Side Supports)
3 - 1×2 @ 4 1/2" (Front Legs and Front Apron)
7 - 1×2 @ 6" (4 Seat Slats, 2 Back Slats and Back Apron)
2 - 1×2 @ 12" (Back Legs)
I also made a doll sized version of the table. Once Christmas is over, I will post them on the brag boards. I don't want any picture evidence around before the big reveal...
pjhaan
Mon, 12/26/2011 - 09:26
Posted pictures of the Doll sized version...
I have posted pictures to the brag board so you can see the finished product. I think they turned out great.
edgar ulate (not verified)
Tue, 04/03/2012 - 20:35
thankyou ana you are the best
thankyou ana you are the best ever¡¡
Lexi Williams
Fri, 04/13/2012 - 18:18
I am new here and I love it!
I am new here and I love it! I have made a picnic table from this site so far and this will be my next project! I am double teaming these chairs with my grandpa. I will be building and he will be painting. =]
JenWoodhouse (not verified)
Thu, 07/19/2012 - 09:28
Kiddie play table and chair set complete!
Yay! I just built this (with a few modifications): http://jenwoodhouse.com/blog/2012/07/19/pair-kiddie-chairs/
Carrie Stratton (not verified)
Sat, 10/13/2012 - 09:09
Guide for pocket holes??
I was wondering where to do the pocket holes on the aprons in order to avoid hitting the pocket holes on the supports. There is no guide for this and it seems like they would hit one another. I am a beginner so I may be looking at it wrong. Any advice would be great!! Thanks:)
Kassi (not verified)
Mon, 12/17/2012 - 06:55
Please help!!!
I'm confused about where your placement of screws and pre drilled holes go? And also, when you predrill holes are you always using the kreg jig because we are and some of our screws are splitting the wood. I'm confused about what the seat slats are screwed into. Please help! Only 8 days til Christmas!
countrywill
Sun, 04/24/2016 - 03:36
Stackable economical lightweight children's chairs.
How did you manage to hide all the screw heads and holes? As there are none visable in the pictures. Also how can these be stackable if they are all the same size?
shawnnidey
Wed, 07/20/2016 - 19:40
Measure your furring strips
These plans are built around 3/4" furring strips.
The ones I found at home depot were closer to 5/8" which will throw off the back apron. And the width of the 1x2 will throw off the side apron
joseph.davidow
Mon, 07/25/2016 - 10:41
Dimensions don't fit
I planned this on paper first and the dimensions of the frame don't match up. I am left with 1/4" for the side and the back apron is also too short.