

The original tutorial to recycle a discarded pallet into a very useful wall shelf. Featured on HGTV.com. Please be certain that your pallets are clean and do not contain hazardous materials.

Normally I don't let much get in the way of a creative spark. When I get an idea, I go for it. And I've had a great idea since last week, but one big giant thing was in the way.
Who knows how many thousands of pounds of masonry rock for the face of our house was right in the way of my next DIY project. That, and taxes.
Well, taxes, kids, dinner, husbands, housekeeping AND this gigantic pile of concrete.
What to do? Well, I could ask the RAM (Real Alaska Man) to move the concrete. But that's just not right. And even I, the firm believer in natural exercise, thought this might be a little much for me and Grace to handle. I tried - I couldn't even lift one box.
So I waited. I waited until Wednesday, when the delivery truck comes with our organic produce, our groceries for the week.
There's our groceries for the week, delivered right to our doorstep! Oh, the things I can do with a moose in the freezer and this box of produce! And no, I didn't bum the pallet jack off the driver.
And although I was very thankful, it did not have as much character as the one's under the masonry rock
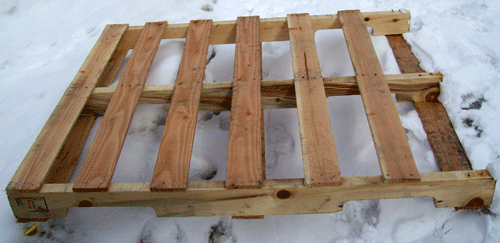
See the blue and green on the bottom pallet? Yes, these pallets will get put to good use after the masonry rock is put to good use. And I wasn't complaining about my absolutely free pallet. After all, when someone gives you something, you shouldn't complain. You shouldn't immediately chop it up either, with a 1 and 3 year old watching. I at least waited for the truck to leave the yard.
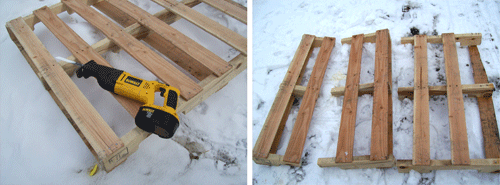
Do they make safety glasses for infants? Sawsall. Yes, the tool is not creatively named, but very effective. A handsaw would have been just as effective, but I didn't have the time. Not with my two helpers standing in the snow holding their ears.
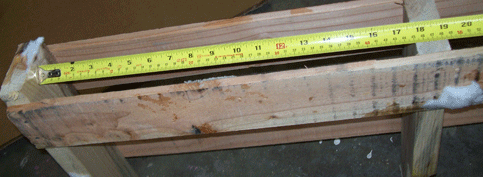
 Then we went in the garage and took a quick measurement of the openings on the bottom of the pieces I had chopped up. Roughly 18". And I knew the sides were 2x4s, so I grabbed some scrap 1x4s and cut four pieces at about 18".
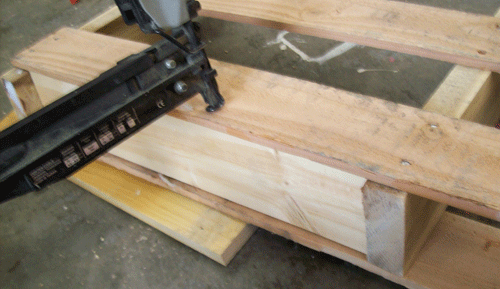
Then I grabbed my nailer and put some 1 1/4" nails into the edges to form a bottom on the pallet pieces. I also nailed down a few loose pieces from the pallet. And then I brought the pieces inside and plopped them down on the floating shelf from yesterday (my husband has asked me not to poke any more holes in the wall just for fun).


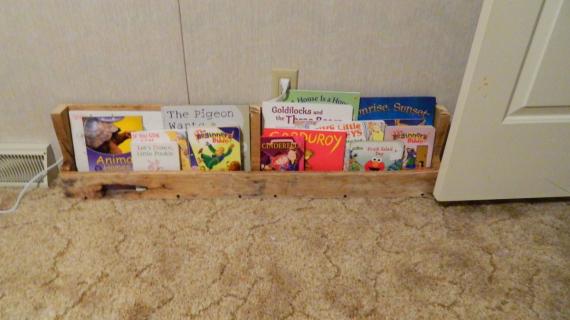
No, I actually made myself TWO free reclaimed wood shelves, in about five minutes (for both shelves) out of reclaimed wood with a 1 year old and a 3 year old watching, in the snow.
And when my husband came home, I got the ultimate compliment . . . "Whoa, where'd you get those?"
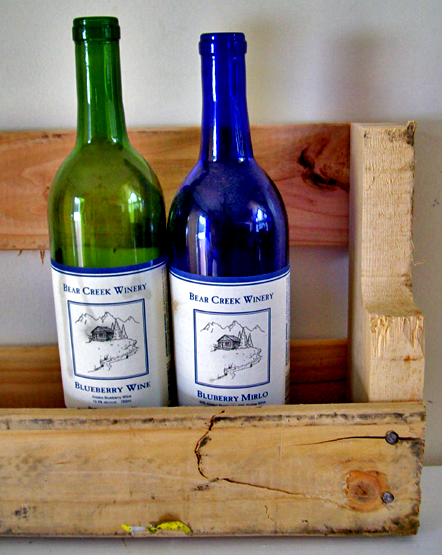
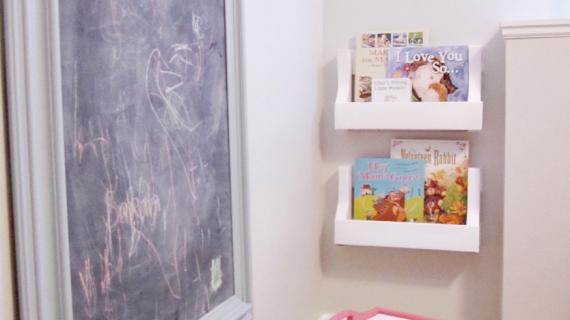
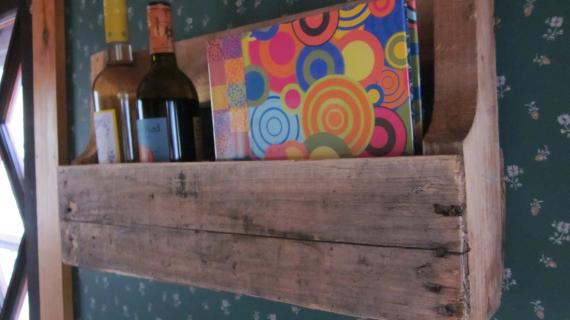
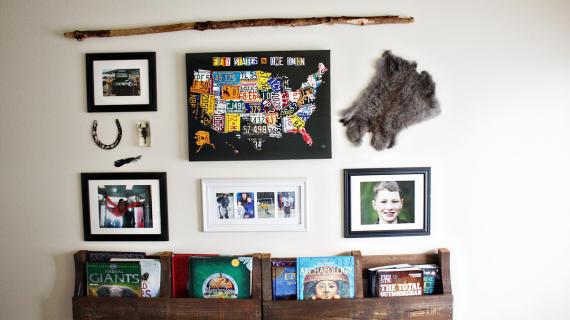
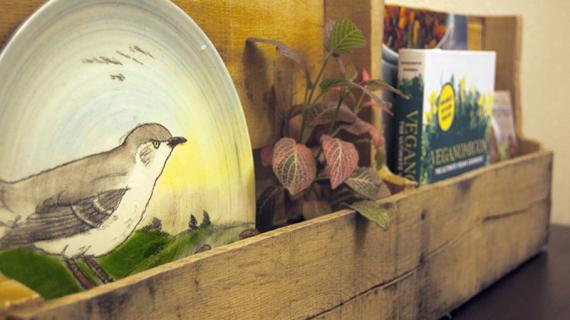
It took longer for me to explain the whole story to him than it did to actually build (can I use the word build here?) these shelves. Of all the projects I have completed over all the years, this one, these simple shelves, was by far the most dramatic results for the time investment and the money investment. And this project is very useful, think about kid's books, bathrooms, spices, even my wine bottles and ballet flats could fit in there! And this project is green - it's made from reclaimed wood and takes someone's trash and turns it into a treasure. Or at least a beautiful place to hold your treasures.

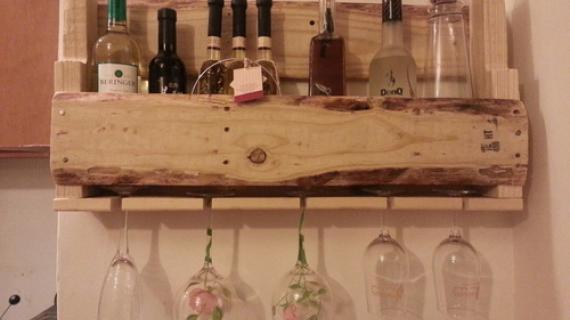
Reclaimed Wood Pallet Shelves. Hand selected and hand cut, each shelf is unique and bears the character of years of use as a shipping pallet. No two shelves are the same, and may have shipping markings, unique discolorations, or non structural cracks, all telling a story of mysterious travels and precious shipments. All shelves have authentic original nails, and are FSC certified.
Skilled artisans hand cut each shelf from a pallet. Sold unfinished, your shelf will continue to develop in character over time. $329. Some Assembly Required.
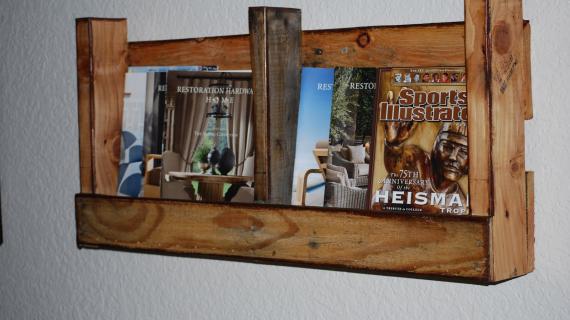
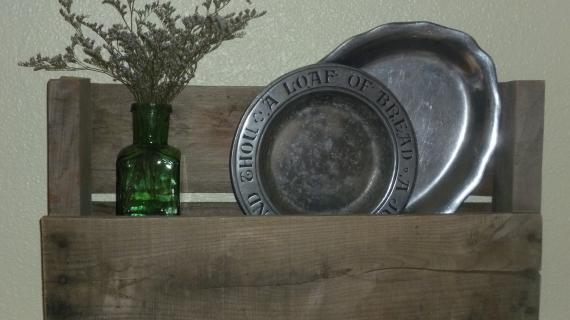
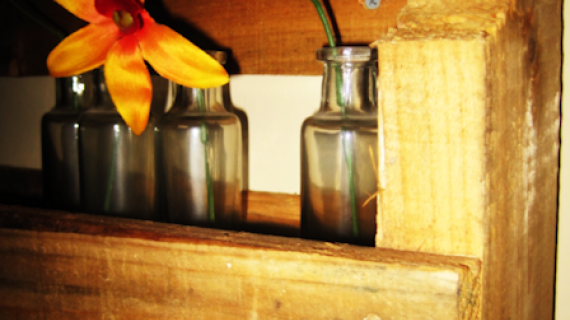
And yes, this shelf has character. Lots of character. I love the stamp on the end, the cracked board on the front, the rough cut notch out, the authentic nails, these are the details that could be very expensive if bought. But you are smarter than that. You are not going to buy what you could build for free.

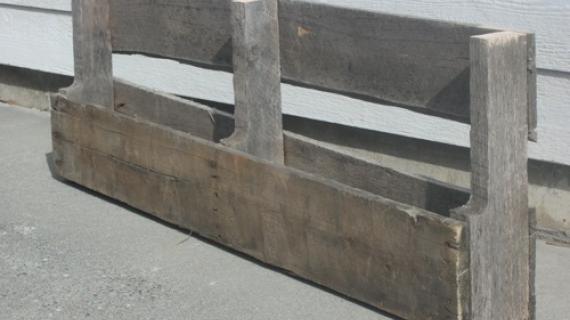
1. Reclaiming Wood. Score a pallet, the more character the better.
2. Cutting the Pallet. Cut the pallet up on the supports, you should be able to get at least two shelves out of one standard pallet. If you have to transport the pallet, you could cut it before hauling, getting it to fit into just about any station wagon.
3. Cutting the Bottom. Measure the length of the opening on the bottom of the pallet and cut a 1x4 board to fit in the opening. For a standard pallet, this measurement should be about 18". You will need 2.
4. Bottom. Fasten the 1x4 boards to the bottoms of the shelves, I used nails, but you could use screws.
5. Hanging. Either attach a picture frame hanging kit to the back and hang as you would a picture frame, or screw through one of the back boards directly into a stud in your wall to hang.
And of course, you could paint or stain as desired. And I want your photos, how you used your free Reclaimed Wood Pallet Shelves.


Comments
Treva (not verified)
Wed, 04/14/2010 - 20:50
Two days too late! I almost
Two days too late! I almost grabbed a nicely patinaed pallet on trash day from my neighbors. I decided I was maybe going a little too far with my "upcycling". I finally decided to let it go as I had no immediate use for it. Now I am kicking myself. Next time.
elei (not verified)
Wed, 04/14/2010 - 21:13
my sister used pallets to
my sister used pallets to line the reception area for her wedding. my dad cut points at the top and painted them white to look like picket fences. these shelves are cool
aklatina (not verified)
Wed, 04/14/2010 - 21:13
00000hh I used to work in a
00000hh I used to work in a warehouse and saw these come and go and tried so hard to think of what i could do with one, best i thought of was some planter boxes that didnt look half as nice as those cute shelves! nice job!
Shell (not verified)
Wed, 04/14/2010 - 21:18
Haha I just googled yesterday
Haha I just googled yesterday stuff to make from pallets since we always have them laying around. I was too ashamed to ask you if you could actually use that wood for stuff.
Landry (not verified)
Wed, 04/14/2010 - 21:26
Does anyone know definitively
Does anyone know definitively about how pallets are treated? I've come close to starting quite a few pallet projects, but have shied away because of reports that many (most?) are chemically treated with toxins.
I would love to find out otherwise so I can build these amazing shelves tomorrow!!
Frugal Mamma (not verified)
Thu, 06/14/2012 - 07:48
Treatment of Pallets
Pallets are treated in one of 2 ways - heat or chemical. Laws in US require 2 stamps on the wood to identify how they are treated. Heat Treated pallets contain HT (meaning no chemicals are used to protect the wood from bugs and rot). Chemically treated pallets have MB on them indicating the use of methyl bromide. If possible, you want to stay away from using these in your home, especially if you have kids. There are additional concerns using pallets for ANYTHING that will come in contact with your children or food. Pallets used in shipping foods may contain listeria, e.coli and salmonella as the wood is porous. Methyl bromide is used to kill bugs (as when shipped from one country to another) but does little for bacteria that causes food bourne illness.
Bottom line - I love pallet projects and use them where appropriate, but never for things my children or my food will touch. A sign? Fine. Wall art? Great! A cutting board or toddler bead? ABSOLUTELY not. Not ever.
Lizzy @ Lizzy … (not verified)
Wed, 04/14/2010 - 23:20
That's a great idea! Thanks!
That's a great idea! Thanks! :)
Katie (not verified)
Thu, 04/15/2010 - 01:06
That is such a great project!
That is such a great project! I have several (like 100, literally) pallets in a burn pile right now. Running out to rescue them!
Rachel (not verified)
Thu, 04/15/2010 - 01:38
THIS IS AWESOME! I think I
THIS IS AWESOME! I think I could even do this! Now...how to score a pallet for myself...:)
Peggy (not verified)
Thu, 04/15/2010 - 01:44
Wow what a great idea!
Wow what a great idea! Another reason to find some pallets... Once I find a local source we will be in like Flin (we just moved from Nenana to Indiana. So do you know many in Delta? Friends of ours moved back after being gone a few years. The Helkinn's. small world, huh? I started reading your blog before the move but never got around to reading old posts to realize we were so close! I must admit I could now kick myself! Keep up the good work!!)
Back to the pallets... I see these book/magazine racks, garden signs and a compost bin in our near future.
Who do you get your organic produce from? Sorry just curious. We have friends who are trying to eliminate the once a week trip up to town for produce from Fred's so I thought I could pass it on to them.
Once again thanks for all the great ideas, plans, and work you put into this blog!!
Keren (not verified)
Thu, 04/15/2010 - 01:56
I love this idea! Adding
I love this idea! Adding this to the list of things to build from your site!!
Kay (not verified)
Thu, 04/15/2010 - 02:33
Brilliant!
Brilliant!
Remodelaholic (not verified)
Thu, 04/15/2010 - 02:37
I LOVE this! I really love
I LOVE this! I really love the look with a few dishes etc in it, it is rustic but then the dishes offset that! Perfect! I love the commentary too! A woman on a mission- don't mess!
Kathy (not verified)
Thu, 04/15/2010 - 03:09
You have the most AMAZING
You have the most AMAZING creative mind! This is a great idea and I have a huge stack of rescued pallets in my back yard that I scored from the warehouse next to where I work.
My Handyman (DH) is always asking me, when I come up with ideas, "does your brain ever hurt?"
Christina (not verified)
Thu, 04/15/2010 - 03:19
I love looking at all you do
I love looking at all you do and come up with! So I gave you an award. Come check it out at Mamafabulous.blogspot.com
Organizing Mommy (not verified)
Thu, 04/15/2010 - 03:39
fabulous!! What pure
fabulous!! What pure awesomeness!
CountryBelle (not verified)
Thu, 04/15/2010 - 04:07
Ha ha! I'm laughing because
Ha ha! I'm laughing because I think my husband would have a hissy fit if I used our pallets from the wood shed. I guess this one will have to wait until I we get some concrete!
marsha (not verified)
Thu, 04/15/2010 - 04:16
Ever since I found your
Ever since I found your website I have had my eye on pallets at work wondering what I could build with them. Thanks for the great idea!
HUMBER (not verified)
Thu, 04/15/2010 - 04:27
Are you kidding me?! I HAVE
Are you kidding me?! I HAVE (!!!) a pile of those behind the shed at the far end of my yard!... I think... Well, guess where I will be this afternoon? All I can say: SUPER IDEA! Thank you.
Judi B (not verified)
Thu, 04/15/2010 - 05:02
I LOVE this idea. I was just
I LOVE this idea. I was just telling my hubby about trying to get some broken up pallets to use in making garden boxes. Maybe you little project will help to get the creative juices flowing. pallets could really have some possibilities!!!
the mama monster (not verified)
Thu, 04/15/2010 - 05:05
oh my goodness those are
oh my goodness those are amazingly cool! i was going to make some of your other shelves for my boys books but how cool would these be in a little boys room! thank you so much for all you do. you are rad!
Jeannine (not verified)
Thu, 04/15/2010 - 05:06
Love it! I will have to go
Love it! I will have to go to the place I saw the other day that had a sign - FREE PALLETTS, and make some for our lake cottage - not much storage there and some of these hung on the wall in the eating area to hold paper plates, plastic silverware, napkins, etc would be great! Thanks again for another great idea!
Catherine peac… (not verified)
Thu, 04/15/2010 - 05:08
They are adorable! I'm on
They are adorable! I'm on the hunt for a pallet or two now.
TYP - Jay (not verified)
Thu, 04/15/2010 - 05:18
I really like this idea! I am
I really like this idea! I am currently trying to find ways to spruce up my small townhouse backyard! I think this is an exellent idea in which I can plant hanging flowers in on the cheap. Excellent drainage and I'm sure it would look great!
Adriana (not verified)
Thu, 04/15/2010 - 05:22
Oooooohhh, looks great! Like
Oooooohhh, looks great! Like Landry, I also wonder if they are treated though.
Scrapity Anne (not verified)
Thu, 04/15/2010 - 05:30
Just went outside and grabbed
Just went outside and grabbed back the pallet that I had in the trash pile. This is an AWESOME idea!! Thanks so much for all you do!
Ana White (not verified)
Thu, 04/15/2010 - 05:33
Thank you all, I am so happy
Thank you all, I am so happy with my shelves! And Landry, I am not sure if the pallets are treated or not. Mine came from an organic farm, so I sure hope not! But I imagine in some places, pallets could be treated to keep rot/bugs out. I would inspect the end grain of the wood and any cracks, seeing if there is any discoloration. You could also seal with a sealer, sealing in any possible chemicals, or paint.
Ana White (not verified)
Thu, 04/15/2010 - 05:35
I really love this hack all,
I really love this hack all, and I hope as you took a second to comment, you also take a second to share/stumble/digg etc because I think this is something just about anyone can do and find a use for! You would be doing our planet a favor - here's to reclaiming trashed pallets!
Familyoffoxes (not verified)
Thu, 04/15/2010 - 05:38
great idea! And yes some
great idea! And yes some pallets are treated but some are not. I would hope the pallets transporting organic produce would be UNtreated!! ;)
But you should be able to ask the supplier and they could tell you! Katie over at bower power paneled her baby's room with pallet wood and it looks amazing!
http://allbowerpower.wordpress.com/2010/02/02/nursery-news-accent-wall/
Lacking Productivity (not verified)
Thu, 04/15/2010 - 05:38
I love pallet furniture. I
I love pallet furniture. I have seen so way cute table/toy chests made of pallet wood, so as soon as I have some of my own little kiddies, I'm making one.,,but this idea gives the toy storage unit some matching shelves.
Rock on!
MaryJanes and … (not verified)
Thu, 04/15/2010 - 05:41
As the wife of a commercial
As the wife of a commercial carpenter I have unlimted access to palletts, I'm about to text him to bring one home so we can make these this weekend! LOVE it, thank you!!!!
Esther (not verified)
Thu, 04/15/2010 - 06:15
Sweet! my kids are SO helping
Sweet! my kids are SO helping me on this one! Thanks!
SaraReno (not verified)
Thu, 04/15/2010 - 07:18
Oh, fabulous! I have been
Oh, fabulous! I have been needing to make a magazine rack for two of the bathrooms and I think this will work perfectly! And luckily, I know a guy who can probably hook me up with a pallet or two.
Michelle Spark… (not verified)
Thu, 04/15/2010 - 07:30
Love this! My husband told
Love this! My husband told me he could get me as many pallets as I can use from his work, for free.....can't wait to make this.
Amanda (not verified)
Thu, 04/15/2010 - 07:49
That's great! I won't be
That's great! I won't be surprised if Pottery Barn decides to hack this idea for their next catalog!
Charlene (not verified)
Thu, 04/15/2010 - 08:07
Love it! I've used pallets
Love it! I've used pallets to build a compost pile container, but never thought about the designer aspect. I, too, will have to keep my eyes open for a lonesome pallet just looking for a makeover and a new home...
Vanilla Comfort (not verified)
Thu, 04/15/2010 - 09:00
These are awesome! I was
These are awesome! I was actually JUST going to ask you if I could reclaim the lumber from wood pallets and use it to build anything? (read my post on your facebook page to find out why :-( I'm Lisa Rene on there) We have 2.5 acres of woods and wetlands behind the house and I took the dogs for a hike to burn off some steam and vent my anger from my unsuccessful, VERY disappointing trip to lowes to buy lumber, and I came across a TON of lumber. And I don't mean tree. There are scraps all over back there. We just moved here in December, and the former owners left a bunch of wood in the garage, but I never noticed the stuff in the yard: lots of random scraps left over from some long ago boys building a fort (which still stands) and more scattered amongst the compost and grass clippings. Most on it looks to be in bad shape, cracked and rotting from weather damage and sitting in the snow all winter. But the real jackpot was my next door neighbors fire pit: wood pallets stacked higher than me! His aren't as pretty as yours are though. They look grey and weathered. What do you think? Can I use them? Should I sand them down and stain them? Or can I just stain them without staining to keep the reclaimed wood look?
Ana White (not verified)
Thu, 04/15/2010 - 09:06
Vanilla comfort, actually, I
Vanilla comfort, actually, I think the rougher shape the pallets are in, the more character! Of course, if you want a smooth finish, you could either build flat wall book holders or sand and finish / paint.
I'm excited for your jackpot find!
And I'm sorry about the big box store. In these rough economic times, they should be happy to help. It's giving someone a job. I would try calling around first.
shares (not verified)
Thu, 04/15/2010 - 09:22
amazing! i've been
amazing! i've been intimidated & amazed by almost everything on the website, but this i think i could do! now to find a pallet...hrm...
3Janes (not verified)
Thu, 04/15/2010 - 09:57
Dang! You're soooooo SMART
Dang! You're soooooo SMART for thinking of this! I stand in awe of your awesome creativeness!! :-))
Chels (not verified)
Thu, 04/15/2010 - 13:04
Uh, LOVE IT> So easy! Well, I
Uh, LOVE IT>
So easy! Well, I dont have the tools, but it would be SO EASY. Im thinking that for christmas I am going to ask for a plethera of power tools!
Maybe you can help me? What ones are the most useful & best to have?
Cottage Dreamers (not verified)
Thu, 04/15/2010 - 13:47
Oh my goodness! I love this
Oh my goodness! I love this so much and want to do it so badly, I think I'm dying! It's the perfect solution to something I was working on this very afternoon, a silverware caddy, but permantly mounted on the wall. Thank you, thank you, thank you!!! If hubs can get a pallet for me from work and I get this done, I'll be sure to let you know.
☺ Celeste
Ana White (not verified)
Thu, 04/15/2010 - 13:55
Hi Chels, you could actually
Hi Chels, you could actually "build" this using a handsaw and a hammer and nails. To make life easier, have Blue or Orange cut your 1x4 boards at the store. Then all you have to do is cut the pallets (handsaw is going to take some sweat, but so does yoga class) with straight cuts (no fancy cutting required - you don't even have to be straight. And then just use the hammer and nails to fasten the bottom in place.
As far as buying tools, I would start with a good drill. Then some saws and an nailgun. I have a section of "tools" in a label on the right sidebar that talks about all the tools we use here.
Midnight Rambler (not verified)
Thu, 04/15/2010 - 17:54
Wood pallets are everywhere
Wood pallets are everywhere and plentiful, but now I'm on the hunt for a sawsall!! A girl could really have a pallet of fun with a sawsall!
Christy (not verified)
Thu, 04/15/2010 - 18:28
I saw this post today and
I saw this post today and knew I had to have these shelves for my breakfast area. I was prepared to drive around tonight looking for pallets, but I actually saw one (on my way home) left out for the trash by my neighbors. I guess it was meant to be. Thanks so much for this idea!
Pacific NW Blogfan (not verified)
Thu, 04/15/2010 - 22:59
Great idea. Free is my
Great idea. Free is my favorite price. :-)
Wonky Girl (not verified)
Sat, 04/17/2010 - 07:05
Great idea for pallet use
Great idea for pallet use but... Those pallets get transferred and used all over. They sit in dirty alley ways and loading docs. Who knows what some of the lovely marks and staining are from? (Dog urine, feral cats spraying, squished mouse droppings)? All kinds of nasty organisms can live in wood. I think you should steam pressure wash any pallets and then at least put a clear sealer on that wood.
Over here in AZ some people use pallets to create stucco walls. Stand them up and secure with rebar so they wont tip over. Then cover with wire mesh and spread your cement and then stucco texture mix all over to cover. Very rustic but blends well with the local architecture.
Kelly (not verified)
Sat, 04/17/2010 - 16:23
I was so inspired by this
I was so inspired by this project that I set out to find some pallets and today I picked up three for free!!! Can't wait to start the project!!!
JackieSue (not verified)
Sat, 04/17/2010 - 19:13
Most of all I loved the way
Most of all I loved the way you told the story of building these shelves. And yes, I fully agree with the rest, they are AWESOME!!!
Our Deli-Sub (not verified)
Sat, 04/17/2010 - 21:37
You amaze me! Great idea!!
You amaze me! Great idea!!