

3D Model to Download
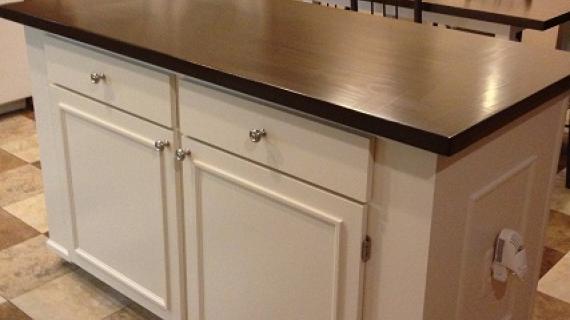
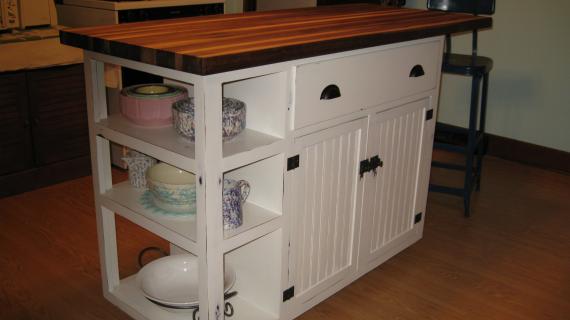
If anything is surprising us about building your own kitchen cabinets, it's just how easy it is!
Special Thanks to PureBond
Preparation
1 sheet 3/4" cabinet grade plywood, MDF or Melamine (shown built with PureBond Formaldehyde Free Plywood in Oak) ripped into strips 22 3/4" wide, 8 feet long (you will only need one strip, but you will have to buy a whole sheet to get the strip)- SAVE THE SCRAP STRIP!!!
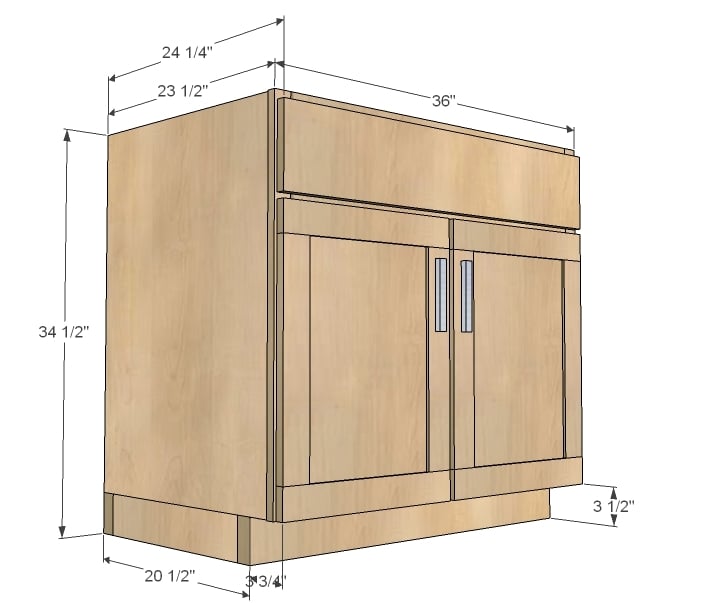
2 - 3/4" plywood @ 22 3/4" wide x 31" long
1 - 3/4" plywood @ 22 3/4" wide x 34" long
3 - 1x2 @ 33"
2 - 1x2 @ 31"
1 - 1x3 @ 21"
2 - supports @ 34"
2 - supports @ 22"
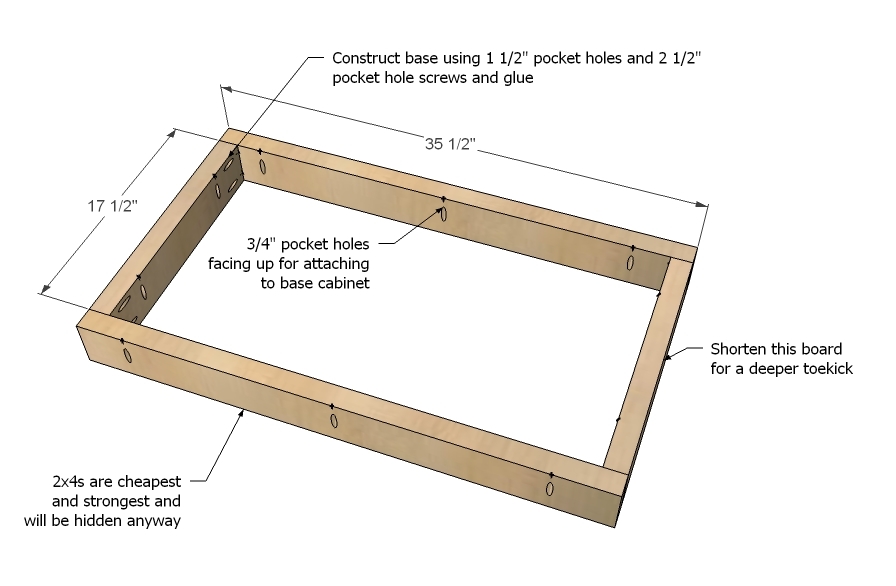
2 - 2x4 @ 17 1/2"
2 - 2x4 @ 35 1/2"
Rip plywood into strips 22 3/4" wide x 8 feet long. Save center scrap. Cross cut strips to create box pieces.


Please read through the entire plan and all comments before beginning this project. It is also advisable to review the Getting Started Section. Take all necessary precautions to build safely and smartly. Work on a clean level surface, free of imperfections or debris. Always use straight boards. Check for square after each step. Always predrill holes before attaching with screws. Use glue with finish nails for a stronger hold. Wipe excess glue off bare wood for stained projects, as dried glue will not take stain. Be safe, have fun, and ask for help if you need it. Good luck!
Instructions
Step 1
Please read this post before beginning any cabinet construction. It talks about general building techniques, how to modify, and other good stuff about cabinet building!
Step 2

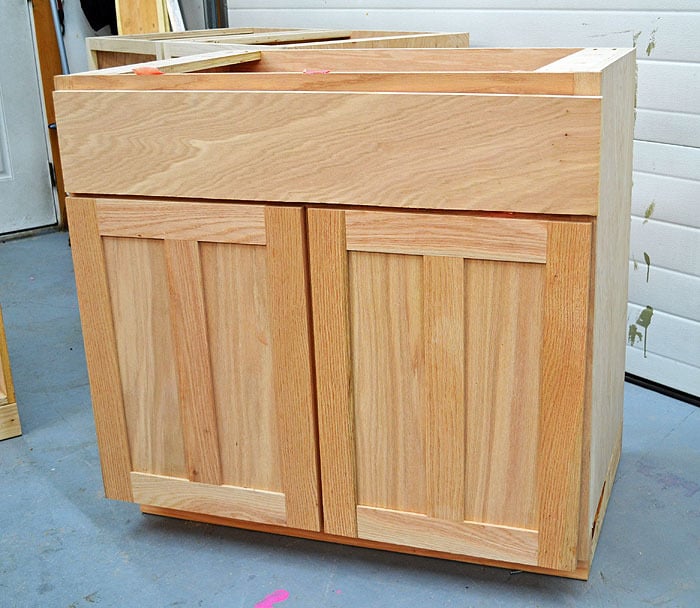
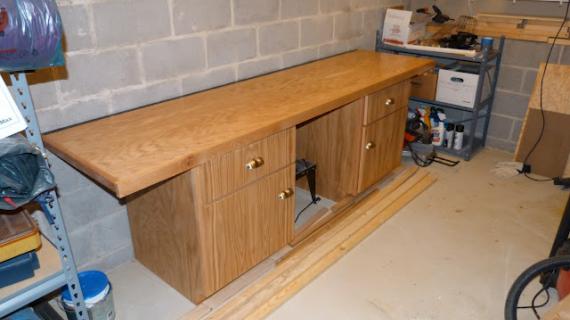
Build the carcase as shown in diagram. Make sure you also drill 3/4" pocket holes along front edges for attaching face frames in later steps.
Step 3
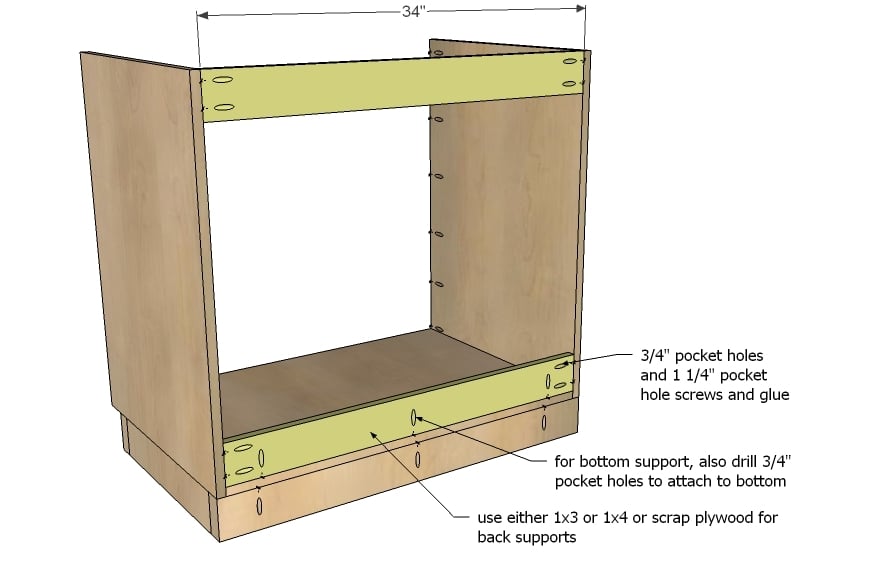
We used scrap plywood strip for the back supports, but 1x3 or 1x4 boards can also be used. These supports add a ton of strength to the cabinet - especially since this is a sink base and is backless.
Step 4

The trick to face frames is clamping each joint, marking each joint, and having a flat level surface. Use glue and build with 3/4" pocket holes and 1 1/4" pocket hole screws. NOTE: If your face frames are hardwood - recommended if you are attaching hinges to the face frame - then use fine threaded pocket hole screws.
Step 5

Step 6

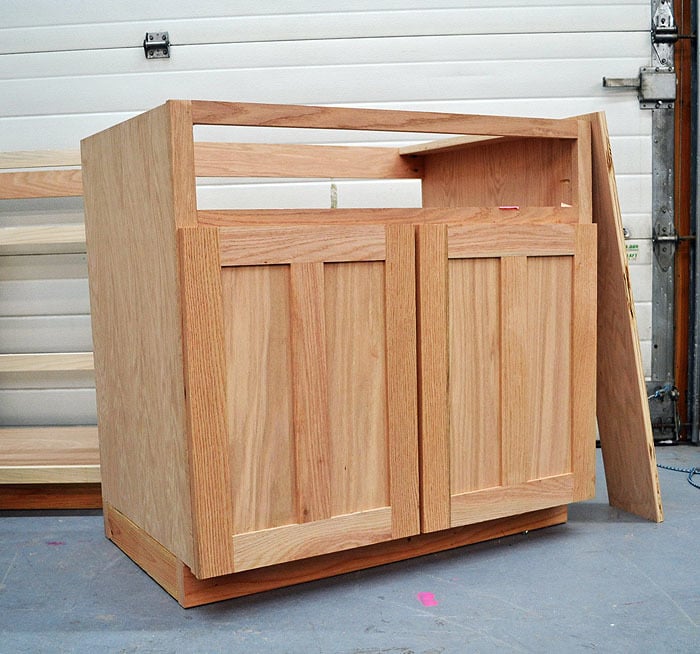
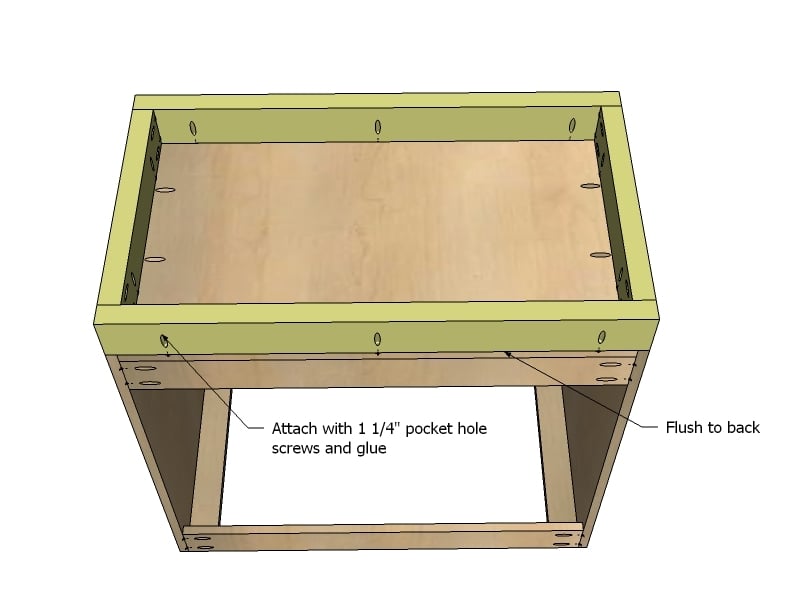
These guys are for attaching the top plywood when all your cabinets are in place to support the countertop. They also provide corner support, keeping your cabinets square. We used scrap plywood pieces, but 1x3 or 1x4 boards would do the trick too.
Step 7
Once the carcase has been built, attach the base, flush to back and sides.
Step 8

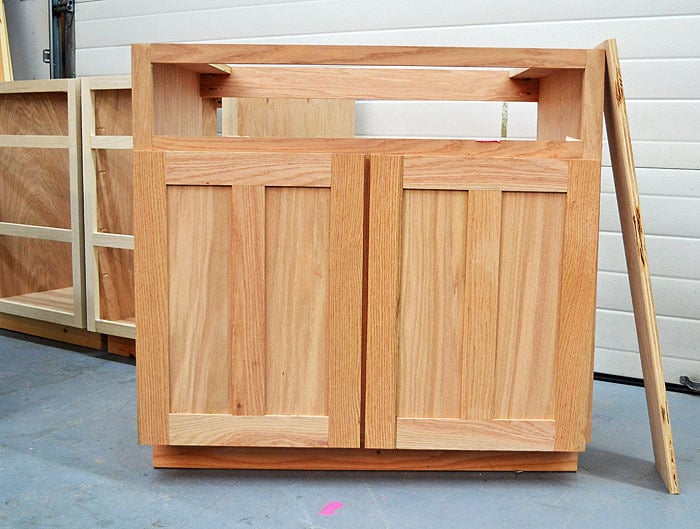
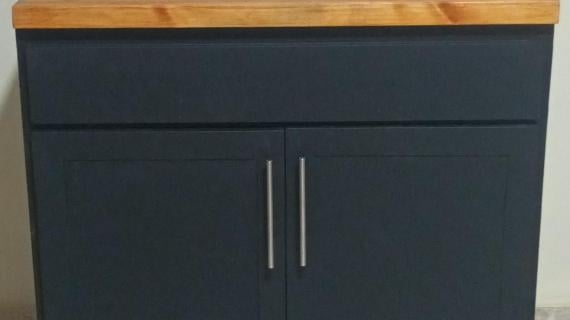
We found the most time consuming part of building the cabinets was the doors. Here's the measurements but I'm going to save door construction for another post - so we can use the same building techniques regardless of the door size.
The drawer face is of course just a 1x8 ripped down to size.
Step 9
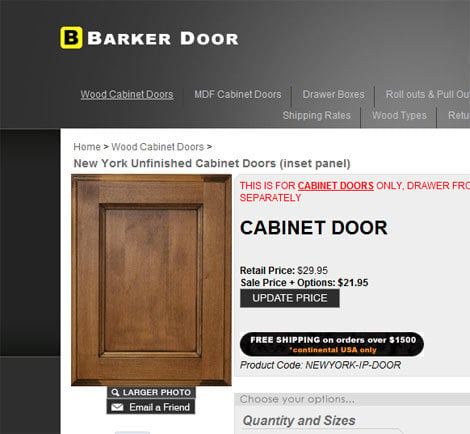
An alternative is to use a door building service. Because doors take such high abuse and are more likely to warp, could be a good idea to look into ordering doors unfinished. Doors also require more tools and know-how, and are the part that you see on your cabinets. They are also cheap to ship.
It is always recommended to apply a test coat on a hidden area or scrap piece to ensure color evenness and adhesion. Use primer or wood conditioner as needed.


Comments
1916home.net (not verified)
Tue, 01/10/2012 - 12:02
NICE!
Holy cow that looks beautiful considering its home made and not some cheap store bought cabinet.
how to paint y… (not verified)
Fri, 06/08/2012 - 15:33
Reply to comment | Ana White
I'm always investigating online for blogs which really explain something to me. Thanks a lot.
Lady Goats
Tue, 01/10/2012 - 12:08
Ohhhh, this is exciting!
I have plans to reno my kitchen in the next 2 years, and I've seen easy plans... but you always amaze me with your ability to simplify things! I'm a lot less scared, now :-p
Ana White
Tue, 01/10/2012 - 13:32
Thanks everyone! We can't
Thanks everyone! We can't wait to paint!
In reply to Thanks everyone! We can't by Ana White
claydowling
Tue, 01/10/2012 - 18:27
Painting Problems
Ana, unless I've mistaken those photos, the surface veneer is red oak, an open-pored wood. It tends not to look very nice painted unless you fill the pores, which is going to be a fair amount of labor.
Have you considered staining instead? If there's a color scheme you're looking for you can still tint the stain. Most paint stores will do that for you, and you can always tint a water based polyurethane on your own.
Karen N (not verified)
Tue, 01/10/2012 - 13:49
Awesome! I SO want to do
Awesome! I SO want to do this now!
Amy @ this DIY life
Tue, 01/10/2012 - 14:08
Apron sink
Awesome plan! I really want to put an apron sink in my kitchen. Any suggestions about how to modify this to fit one?
In reply to Apron sink by Amy @ this DIY life
Ana White
Tue, 01/10/2012 - 15:50
Hi Amy, it depends on what
Hi Amy, it depends on what type of farmhouse sink. I've seen people just cut this cabinet out to add an aprons sink, then I've also seen a squashed version of the cabinet under the sink. Maybe we should do an apron sink in the next kitchen? Either way, I plan to add plans for a base to support an apron sink.
In reply to Hi Amy, it depends on what by Ana White
Amy @ this DIY life
Tue, 01/10/2012 - 17:34
Thank you
You do so much already! I can't wait to build our kitchen cabinets!
lianatempera
Tue, 01/10/2012 - 19:17
I can't wait to see those
I can't wait to see those plans. Apron sinks are so pretty; I might love one in my home.
Guest (not verified)
Tue, 01/10/2012 - 14:09
Doors
Great idea ordering the doors. While I was reading this (long before I reached Step 9) I was thinking that if I ever planned to build kitchen cabinets myself, I would definitely order the doors. I also like doors better than open cabinetry. You can hide all the mess you want behind them, and cleaning the grease and other kitchen dirt from the doors is much easier than separately from all the dishes and stuff on an open cabinet. Transparent doors are also an option for cabinets where the nicer dishes are kept.
Amanda
Tue, 01/10/2012 - 15:23
False Drawer Front
You can hinge that false door front, add a small basket and have a place to store sponges and other small items that live around the sink. Throw on a magnet and you have an easy way to keep it closed as well.
In reply to False Drawer Front by Amanda
Lady Goats
Wed, 01/11/2012 - 08:21
False drawer front
we have these in front of my sink. It's kind of a nice thing to have, so that you can keep sponges/plugs tucked away (we also keep our bottle cleaner in there for long, thin glasses). Good call!
Brian Forbes Colgate (not verified)
Tue, 01/10/2012 - 16:23
Between these and bookcase plans ...
Wonderful execution in these kitchen cabinets!
The PureBond site led me to bookcases, that I am going to do double-sided in my Mum's home, to separate the living and dining spaces in a 59-year-old bungalow. Bookcases on the living room side and china cabinet wall on the dining room side, with an archway by the inside dining room wall.
The kitchen needs to be re-done as well, and your cabinet plans will fit the bill with only a small amount of modification :-)
Thanks so much, as always, for all you share with us, Ana :-))
tnt
Tue, 01/10/2012 - 16:37
Don't Paint it.
Are you really planning on painting the cabinets? It looks awesome the way it is. I would just stain it and put a varnish. Great job. Keep up the inspiration.
Cindy from Indiana (not verified)
Tue, 01/10/2012 - 16:41
So dang awesome!
Thank you so much for sharing this plan with us! I'm tucking it away for future reference. Looks awesome!
Jen B (not verified)
Tue, 01/10/2012 - 17:16
You say Barker Doors don't know you.....
I am betting we should add 'yet' to that... ;-) Barker Doors doesn't know Ana White, YET..
I have my husband on board for building the cabinets, however I don't think I could get him to paint them..
How do you think it will look stained??
Jen B (not verified)
Tue, 01/10/2012 - 17:17
That should be "doesn't" UGH!!!
Doesn't know Ana White.
Brian Forbes Colgate (not verified)
Tue, 01/10/2012 - 18:14
The Doors
FWIW, I like your doors better than any at the Barker site ...
Cher (not verified)
Tue, 01/10/2012 - 19:43
Amazing
Fantastic! Love this idea.
Guest (not verified)
Tue, 01/10/2012 - 21:26
doors etc
thanks for the plans - very encouraging! planning new house & I had already decided to do the doors & drawer fronts myself when I found your site. I was going to buy the carcases - the standard here in australia is a white melamine panel construction (16mm) - the panels are labelled as high moisture resistant & kitchen shops tend to show you a piece of board in a glass of water. unfortunately these are full of formaldehyde.
your plywood cabinets look stunning - and yes, I too would just lacquer or stain+lacquer. your plans make me wonder whether I should try a plywood prototype, I am a bit daunted by the face frames and how dificult they'll make fitting doors & drawers. we do not have formaldehyde free, but E0 standing for for low emissions is available. presumably it needs to be exteriour grade for moisture resistance?
my doors (and front for deep drawers) are going to be made simply from standard size pine (dressed all round 3x1), with an in-fill of v-joint pine lining boards (12mm) for a 'country look' with clear varnish. I've done it for our current kitchen: dowel joints for the frames (but I am sorely tempted to invest in a kreg jig for the new one), 12mm rebates cut with a router (and I cheat and round of the corners of my infills rather than chiseling out the corners of the rebate). drawer fronts for the shallower drawers are going to be plain bits of pine with breadboard ends the same width as the door styles for a bit of interest ....
looking forward to the next installments of your kitchens!!!
Anonymous Coward (not verified)
Wed, 01/11/2012 - 04:00
Build a prototype!
Definitely build a prototype or even two until you figure out what you are doing.
Make a couple of small face frame cabinets with the door you are planning and use them somewhere in the house or garage.
Anonymous Coward (not verified)
Wed, 01/11/2012 - 03:57
Wood species for paint-grade cabinets.
Ana, and anyone else planning to make painted cabinets.
Oak is not the best wood because of the grain. Takes a lot to hide it. Birch, even in the lower cost "spliced" grade, is less prep and sanding and does not cost more.
In some areas you may be able to get ash or alder plywood, probably special order. They both have fine grain and paint or stain very well.
Guest (not verified)
Wed, 01/11/2012 - 06:07
Good work but a word of
Good work but a word of caution to anyone about to tackle the same project with minimal experience. Build a few trial cabinets first. Maybe put them in your garage.
The hinges on the doors can be a little tricky.
LisaT (not verified)
Wed, 01/11/2012 - 06:59
Ana, love your doors and thanks for the inspiration!
Ana, your doors look great! We are building our own house and are making plans to move into our basement soon! So, thank you because I was looking for cheap, used kitchen cabinets for the basement, but reasonable ones are just that-cheaply made, very used, etc. Now, I think we can make our basement kitchen cabinets at a reasonable price and they'll fit perfectly. Plus, that kitchen will always get used later, too, so nice Ana-inspired cabinets will be great! We just needed the encouragement-thanks so much! I think we would just go ahead and make our own doors. You can go as cheap or expensive as you want, and as plain or personalized as you want, too. Beginners, don't forget the retired carpenter, cabinet builder, etc in your community that may be willing to help (teach) you with doors! They're a great resource and usually enjoy small jobs. Thanks, Ana!
Guest (not verified)
Wed, 01/11/2012 - 13:38
Door ordering
We had good luck with a company called "Reface Depot" for cabinet doors. We remodeled a big ugly linen cabinet - it looks fabulous now! The company had very reasonable prices and good service. Maybe there are better options now; our project was a couple years ago.
Guest (not verified)
Sun, 01/15/2012 - 12:26
Pocket Holes
Based on your design, it seems like you could put all your pocket holes for your face fraiming on the outside of the box. This would result in fewer holes inside and/or holes to fill. Holes on the outside will be covered by your next cabinet.
Ana White
Mon, 01/16/2012 - 17:32
Pocket Holes on Outsides
What a brilliant idea! This also puts the pocket hole screw in the centers of the face frames. Thank you for commenting, we definitely will put pocket holes to the outsides here on out! Thank you everyone for taking your time to help us improve the cabinet plans.
Blair (not verified)
Thu, 01/19/2012 - 17:10
Ordering cabinet doors
Having built cabinets and doors in the past, I would order the doors. Having proven to myself that I can do it, I would now save myself the trouble and buy them. Barker door is right down the street from me here in Oregon. My father-in-law ordered a drawer front from Barker with an edge profile to match some existing cabinets and it matched perfectly. Of course, a simple drawer front is different that a paneled door, but I wouldn't hesitate to order from them. I also like the drawer boxes they offer with dovetailed joints that are reasonably priced as well.
Calmly
Mon, 01/30/2012 - 11:38
Door post
Hi Anna, when will you be posting the kitchen cabinet door information? I am putting my plans together now to build my cabinets. I hope to begin in about two weeks. Any new kitchen cabinet post will be a great help. I want to do the ones in the picture above. Thanks in advance for you time and information.
MS Peg (not verified)
Mon, 03/05/2012 - 04:11
Cabinet doors
I looked through all the comments on this post, and didn't see anyone mention MDF doors. I recently remodeled our kitchen, using the existing cabinet boxes. I ordered the MDF doors and drawer fronts from a local shop for about 14.00 each. They also drilled holes on the backs for concealed hinges. The hinges were very easy to install.
trinavera
Mon, 04/23/2012 - 18:47
Wall Cabinets.
We just purchased a new home and wanted to make the wall cabinets, which are about 30 inches tall, can these plans be used for wall cabinets too, because this will save us LOADS if there's a way to make the wall cabinets.
In reply to Wall Cabinets. by trinavera
claydowling
Tue, 04/24/2012 - 02:45
A Useful Book
Trinavera,
There is a useful book called Simply Built Cabinets that will show you how to take this design and extend it to all of your cabinets. Most book stores with a home improvement section seem to have it, and I've found it at some home centers as well.
Respies (not verified)
Tue, 05/29/2012 - 14:23
Google 3D
What program do I use to get the plans to download from Google 3D? Just can't figure it out.
Respies (not verified)
Tue, 05/29/2012 - 14:24
What program is used to get
What program is used to get the Google 3D to download?
Craig Chapma (not verified)
Thu, 06/14/2012 - 08:03
Door Plans
Do you have the door plans yet?
JR Hill (not verified)
Sun, 08/12/2012 - 15:42
Crude Cabinetry
I went looking and looking for basic dimensions - thank you. The project is to build out the cabinetry in our log home. In addition to the challenges building against the uneven, outside walls, all the wood (Doug Fir and Ponderosa Pine) is being harvested, milled to size and dried on site. So far I'm planning to sand the frames smooth but leave the faces rough - like the interior walls. We'll see as that faze comes together.
Sophia Henkel (not verified)
Thu, 09/06/2012 - 14:28
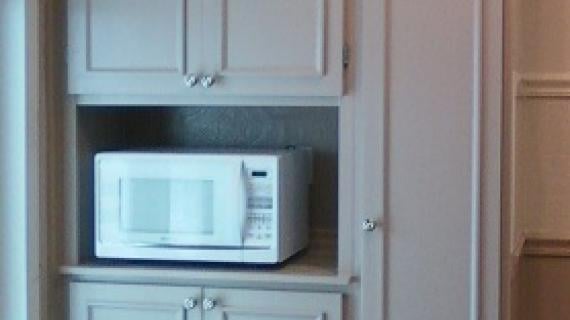
Built in appliances
Do you think you will create plans for build in ovens, microwaves, and other appliances? I would love to see plans for tall cabinets for a hot wall, or even a built in Fridge.
heathertheis
Sat, 01/12/2013 - 09:02
will you make another template for these plans?
I''m thinking of redoing my moms' kitchen and was loving the look of this, but will you be doing the drawers and maybe some open cabinets? Also, I'm pretty much planning on doing custom up top ( diy custom- right?) so would you have any ideas for that? thank you so much for all you do- I come from a family of carpenters/ woodworkers that are stuck in the ice ages when it comes to " girls using power tools" and I'm so glad I can point to someone and say " well Ana can do it!"
robertmccarson
Mon, 02/11/2013 - 01:13
Help with doors!!!!
Ana -
You keep teasing us that you will post a tutorial on cabinet doors. When do you think you will do this. I really need to update the kitchen cabinets in our late mother's home to get it on the rental market.
lisajuanita
Tue, 04/30/2013 - 12:39
1x2 frame
I'm currently in the process of putting together some of these cabinets but have hit a huge snag with the frames. The 1x2s keep splitting! All of my adjustments are correct and I can't possibly clamp any tighter. I have contacted kreg and they recommended beeswax on the screws then screwing in halfway pulling out and screwing in all the way again. Nothing works. Has anyone else had this problem? How did you solve it?
Brittney Durkin
Thu, 07/02/2015 - 17:21
Door plans???
You mentioned making a post about the doors?? I can't find them
Brittney Durkin
Sun, 07/05/2015 - 11:11
cabinet doors?
i cant seem to find any post on making the cabinet doors?
cmanmgm007
Tue, 05/09/2017 - 11:30
i just finished a few
i just finished a few projects using cabinet doors i had to create my own doors, i used 7/16th project panels ripped to the size i needed 1x2 or 1x3 depending on what your are looking for and i placed the 1x2s on the project panels cut to a 45 degree angle run the inside and outside through a router to create a design on the edge and glued and stapled the project panels to the 1x3's
cmanmgm007
Tue, 05/09/2017 - 11:25
Special thank you to Ana White
i would just like to say thank you I have a 16 year old that has been getting into trouble and run away from home, worrried sick i just started woodworking projects to keep me from loosing it with her being missing (she has been found and is home safe). yes i changed ome of the plans to fit my style but if it had not been for your website and plans i would have gone crazy with worry.
Thank you so much
Handyman7124
Mon, 10/14/2019 - 18:37
cabinet door plans?
I am planning to build cabinets like this. My question is where do I find the plans to make doors just like the ones in the picture at the beginning of this post?
Thank you SO much!
Tom
Handyman7124
Sat, 02/01/2020 - 15:38
Base cabinet doors
I am excited to be starting this cabinet. My question is where do I find the plans for these exact doors? They are exactly what we are looking for.
Thank you!